BENUTZERHANDBUCH MODEL: FANTEC AluDOCK2X 2.5"/ 3.5" Dual SATA HDD Docking Station
←
→
Transkription von Seiteninhalten
Wenn Ihr Browser die Seite nicht korrekt rendert, bitte, lesen Sie den Inhalt der Seite unten
BENUTZERHANDBUCH
                                       USER MANUAL   DE | EN

MODEL: FANTEC AluDOCK2X
 2.5”/ 3.5” Dual SATA HDD
      Docking Station

        www.fantec.de • www.fantec-forum.de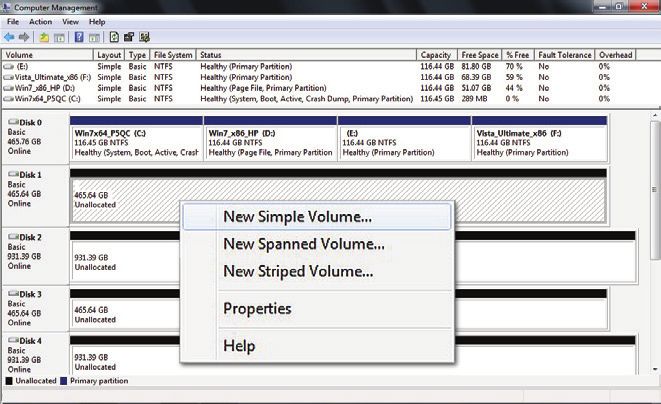
Inhalt:

1)		 EINLEITUNG....................................................................3

2)		 SPEZIFIKATIONEN...........................................................3

3) 		   LIEFERUMFANG...........................................................4

4)		 EIGENSCHAFTEN............................................................4

5)		 HDD DOCKINGSTATION..............................................................4

6)		 FESTPLATTE EINSETZEN UND ENTNEHMEN................................6

7)		 GERÄT ZUM KLONEN VERWENDEN...........................................7

8)		 GERÄT ALS DOCKINGSTATION VERWENDEN..............................9

9)		 FESTPLATTEN INITIALISIEREN UND FORMATIEREN..................10

10)     KONTAKT & TECHNISCHER SUPPORT.......................................15

FANTEC AluDOCK2X Docking Station                                                   2

1) Einleitung

Die Fantec AluDOCK2X USB 3.0 Dockingstation ist ein multifunktionales
Speichergerät zum Erstellen von Kopien von Festplatten, sowie
ein USB 3.0 Speichermedium mit hoher Kapazität. Das funktionale
Dockingdesign ermöglicht schnellen Zugriff und das leichte
Auswechseln Ihrer Festplatten. Mit seiner integrierten One-Touch-Klon-
Funktion können Sie Sektor für Sektor Kopien ohne Anschluss an einen
Computer erstellen. Dieses sogenannte Klonen ermöglicht Ihnen die
Erstellung von 100% identischen Kopien Ihres Laufwerks, unabhängig
von den darauf gespeicherten Inhalten (Betriebssystem, Daten usw.).
Bei Anschluss an einen Computer verwandelt sich das Gerät in ein USB
3.0 Speichermedium und kann bis zu 2 unabhängige Speicherlaufwerke
gleichzeitig bereitstellen. Ob für Datenzugriff oder Klonen, die
AluDOCK2X von FANTEC bietet die perfekte Lösung.

2) Spezifikationen

                                    SATA I/II/III Festplatten bis zu 6TB*
 Unterstützte Geräte:
                                    & SSD
 Gerätegröße:                       2,5” oder 3,5”
 Interne Schnittstelle:             SATA 6 Gbit/s
                                    Superspeed USB 3.0 (abwärts
 Externe Schnittstelle:
                                    kompatibel mit USB 2.0 und 1.1)
 Spannungsversorgung:               Netzteil, 12 V / 3 A
                                    Sandgestrahltes Aluminium
 Material:
                                    und Kunststoff
 Abmessungen (BxTxH):               150mm x 108mm x 61,5mm
                                    Windows® Vista, 7, 8, 8.1,10
 Unterstützte Betriebssysteme
                                    Mac OS X 10.6 und höher, Linux
                                                           *Stand: August 2015
FANTEC AluDOCK2X Docking Station                                            3
3) Lieferumfang
• FANTEC AluDOCK2X
• USB 3.0 Kabel
• Netzteil
• Bedienungsanleitung
4) Eigenschaften
• Computerunabhängige Klon und USB 3.0 Dockingstation
• One-Touch Klon Funktion für 1:1 Kopien
• LEDs für Verbindungsstatus und Klonfortschritt
• Funktionales Dockingdesign für schnellen und einfachen
Festplatten Austausch
• Für USB 3.0 Geschwindigkeit muss Ihr System
USB 3.0 Spezifikationen unterstützen
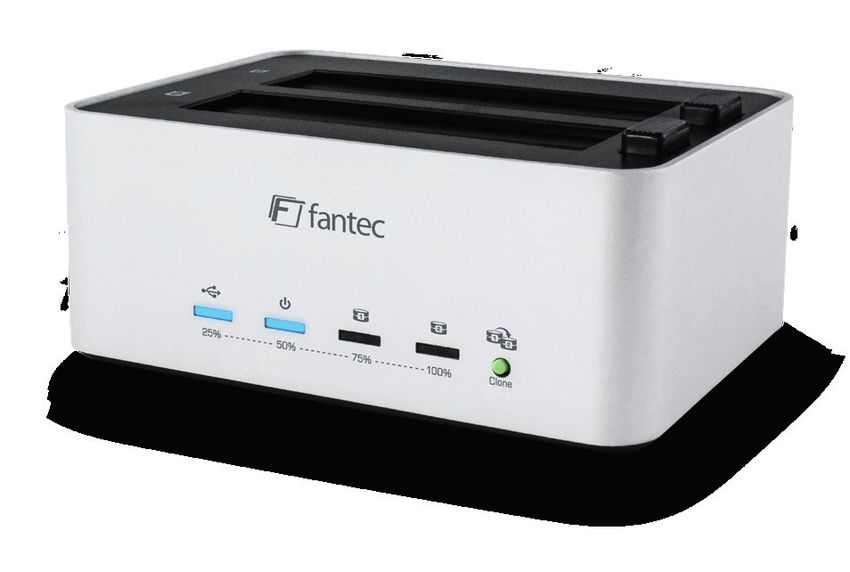
5) Hdd Dockingstation
Frontansicht
1 USB Verbindung
2 Ein/Aus
3 Steckplatz 1 (Quelle)
4 Steckplatz 2 (Ziel)
5 Klon-Taste
FANTEC AluDOCK2X Docking Station 4
Rückansicht

 6 USB 3.0 Port (zum Klonen nicht anschließen!)

 7 Stromversorgung

 8 Hauptschalter

Draufsicht

 9      Steckplatz 1 Schnittstelle

10      Steckplatz 1 Auswurftaste

11      Steckplatz 2 Schnittstelle

12      Steckplatz 2 Auswurftaste

FANTEC AluDOCK2X Docking Station                  5
6) Festplatte einsetzen und entnehmen
1. Suchen Sie die Position des SATA-Anschlusses im Steckplatz.
2. Richten Sie das 2,5” oder 3,5” HDD/SSD Laufwerk auf den
   Anschluss des Steckplatzes aus und drücken Sie das Laufwerk
   vorsichtig in den SATA-Anschluss.
3. Zum Herausnehmen verwenden Sie die Auswurftaste für das
   entsprechende Laufwerk. Drücken Sie langsam auf die Auswurftaste
   und halten Sie das Laufwerk während des Trennens mit der Hand
   fest.

FANTEC AluDOCK2X Docking Station                                  6
7) Gerät zum Klonen verwenden
WICHTIGER HINWEIS:
Vergewissern Sie sich beim Klonen, dass das Quelllaufwerk in
Steckplatz 1 und das Ziellaufwerk in Steckplatz 2 eingesteckt ist. Das
Ziellaufwerk in Steckplatz 2 darf keine geringere Kapazität haben als
das Quelllaufwerk.

1. Schließen Sie das Netzteil an der Dockingstation und an einer
   Steckdose an.
2. Vergewissern Sie sich, dass der USB-Port nicht verbunden ist und
   das Gerät im alleinstehenden Modus arbeitet.
3. Setzen Sie Ihr Quelllaufwerk in Steckplatz 1 und das Ziellaufwerk in
   Steckplatz 2 ein.
4. Schalten Sie das Gerät mit dem Hauptschalter auf der Rückseite ein
   [alle LEDs blinken und die Ein/Aus-LED leuchtet].
5. Warten Sie ca. 15-20 Sekunden ab, bis das Laufwerk von der
   Dockingstation erkannt wird.
6. Halten Sie die Klon-Taste für 5 Sekunden gedrückt, um den Vorgang
   zu starten.
7. Jede LED stellt 25% Fortschritt dar. Erst wenn die gesamten 25%
   von HDD1 auf HDD2 kopiert sind, leuchtet die LED dauerhaft,
   während die andere(n) LED(s) vor- und zurück laufen.
   Nach der Beendigung des Klonvorgangs blinken alle LEDs
   gleichmäßig, bis das Gerät ausgeschaltet wird.

FANTEC AluDOCK2X Docking Station                                         7
LED-Status im Klon-Modus

                                                    LED Status
                                     USB       EIN/AUS     STECK-       STECK-
                                                           PLATZ 1      PLATZ 2

                                     25%         50%         75%         100%
       2 Laufwerke
        installiert,                  LED leuchtet Orange für 25% Fortschritt
     Klonen gestartet

        Klonen läuft               Orange LED bewegt sich von links nach rechts

     Klonen beendet                          Alle LEDs blinken orange

          Klonen                                                        Leuchtet
      fehlgeschlagen                                                      rot

Informationen zum Klonen

1. Alle Daten auf dem Ziellaufwerk gehen verloren, sobald das
   Klonen beginnt.
2. Die Kapazität des Ziellaufwerks muss gleich oder größer als das
   Quellenlaufwerk sein. Ist die Kapazität größer, so kann die nach
   dem Klonen verbleibende Kapazität zu einer neuen Partition angelegt
   werden. Folgen Sie den Formatierungshinweisen in dieser Anleitung.

FANTEC AluDOCK2X Docking Station                                                   8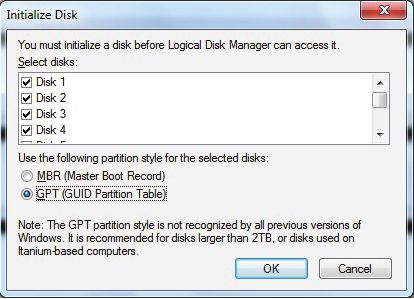
8) Gerät als Dockingstation verwenden
1. Schalten Sie Ihren Computer ein.
2. Schließen Sie das Netzteil an der Dockingstation und an einer
    Steckdose an.
3. Schließen Sie ein USB 3.0 Kabel an der Dockingstation und an einem
    USB 3.0 / 2.0 Port an Ihrem Computer an.
4. Schalten Sie das Gerät mit dem Hauptschalter auf der Rückseite
    ein [HDD-, Ein/Aus- und USB-LEDs blinken und leuchten dann].
5. Ist das eingesetzte Laufwerk brandneu, müssen Sie die Festplatte
    initialisieren und das Laufwerk formatieren. Ist ein älteres Laufwerk
    mit Daten eingesetzt, wird eine Rückmeldung vom Computer
    angezeigt, dass das Laufwerk betriebsbereit ist.
6. Anleitungen zur Initialisierung einer neuen Festplatte finden Sie in
    den Formatierungshinweisen.

LED Status im Docking Modus

                                               LED Status
                                   USB    EIN/AUS     STECK-        STECK-
                                                      PLATZ 1       PLATZ 2
                                   25%     50%          75%          100%
                                          Leuchtet
      STANDBY
                                            rot
     Laufwerk 1                                      Blinkt blau
                                   Blau    Blau
      installiert                                    bei Zugriff
     Laufwerk 2                                                    Blinkt blau
                                   Blau    Blau
      installiert                                                  bei Zugriff
   Laufwerk 1/2                                      Blinkt blau   Blinkt blau
                                   Blau    Blau
     installiert                                     bei Zugriff   bei Zugriff
FANTEC AluDOCK2X Docking Station                                              9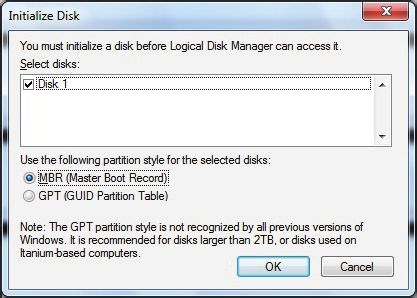
Energiesparmodus

Die Dockingstation schaltet sich automatisch ab, wenn Ihr System dies
unterstützt und sich in den Ruhe- oder Energiesparmodus begibt.
Insofern Ihr System diese Funktion nicht unterstützt, bleibt die
Dockingstation und die eingesteckten Festplatten auch im Ruhe- oder
Energiesparmodus aktiv.

9) Festplatten initialisieren und formatieren
MS Windows (32/64 bit)

Wenn Sie unformatierte Festplatten verwenden, müssen diese zunächst
initialisiert werden. Dazu führen Sie bitte “Start” und “Ausführen” an
Ihrem Windows PC aus und tippen Sie “diskmgmt.msc” ein. Danach
drücken Sie die “ENTER” Taste.

1. Initialisieren Sie die neue Festplatte.

FANTEC AluDOCK2X Docking Station                                    10
2. Legen Sie eine Partition an und führen Sie die Formatierung durch.

3. Festplatte ist fertig formatiert.

MBR oder GPT Modus

WICHTIG: Bitte benutzen Sie GPT (Vista/7/8/8.1/10), wenn die
Festplatte eine Kapazität über 2TB hat. Benutzen Sie MBR, wenn die
Festplattenkapazität max. 2TB beträgt.

FANTEC AluDOCK2X Docking Station                                        11
Ausgewählter MBR Modus für Festplatten unter 2TB
MBR (Master Boot Record)
Ausgewählter GPT Modus für Festplatten über 2TB
GPT (GUID Partition Table)
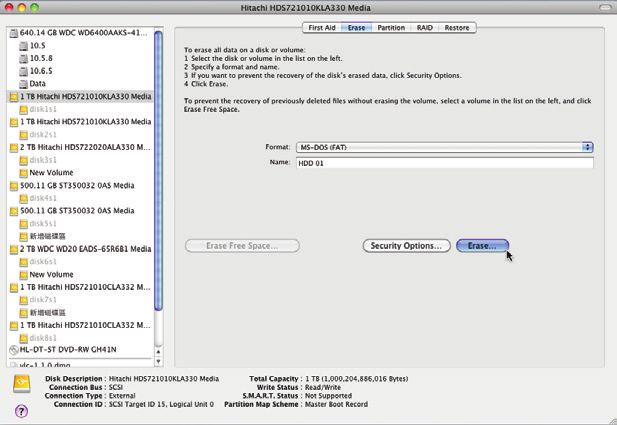
MAC OS X ab 10.6
1. Klicken Sie auf Programme > Dienstprogramme >
Festplatten-Diestprogramm.
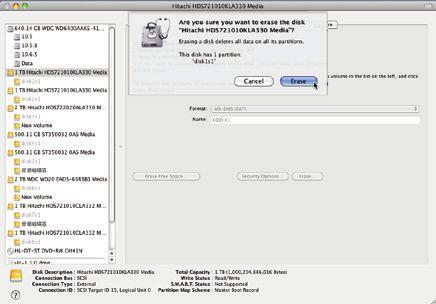
FANTEC AluDOCK2X Docking Station 122. Festplatte initialisieren. 3. Klicken Sie auf den Tab Löschen > wählen Sie ein Dateiformat aus und klicken Sie auf Löschen. 4. Klicken Sie auf Löschen. FANTEC AluDOCK2X Docking Station 13
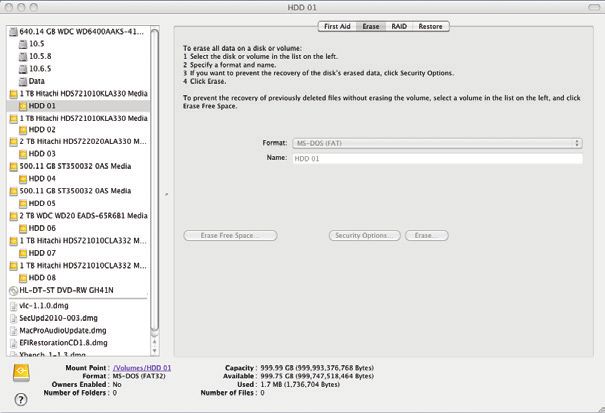
5. Festplatte wird formatiert.

6. Festplatte fertig formatiert.

FANTEC AluDOCK2X Docking Station   14
10) Kontakt & technischer Support

Sehr geehrter Kunde,
vielen Dank, dass Sie sich für unser Produkt entschieden haben. Unsere
Produkte werden mit größter Sorgfalt entwickelt und produziert, um ein
Höchstmaß an Qualität bieten zu können.

1. Bitte lesen Sie das Handbuch und besuchen Sie das
   FANTEC Technic & Support Forum unter
    www.fantec-forum.de
    Dort finden Sie Antworten auf viele Fragen, Hilfestellungen und
    Lösungsansätze.

2. Sollte ein Problem weiterhin bestehen, wenden Sie sich bitte an
   unsere Serviceabteilung.

• per Telefon unter der Servicenummer:
    01805-32 68 32*
    Erreichbar von Montag - Freitag 9.00 - 17.00 Uhr
    *(0,14 EUR/Min. aus dem dt. Festnetz, Mobilfunk max. 0,42 Euro/Min.)

• oder per E-Mail an:
    service@fantec.de

Anschrift für RMA Sendungen:
    FANTEC GmbH
    Abteilung RMA/Service
    Billwerder Billdeich 605B
    21033 Hamburg
                                                                   www.fantec.de • www.fantec-forum.de

Konformitätserklärung:
http://www.fantec.de/unternehmen/bestimmungenrichtlinien/ce/

FANTEC AluDOCK2X Docking Station                                                                   15
Table of Contents: 1) INTRODUCTION..............................................................17 2) SPECIFICATIONS............................................................17 3) PACKAGE CONTENTS...............................................................18 4) FEATURES......................................................................18 5) HDD DOCKINGSTATION............................................................18 6) HARD DRIVE INSTALLATION AND REMOVAL..............................20 7) USING THE DEVICE FOR CLONING............................................21 8) USING THE DEVICE AS A DOCKING STATION...........................23 9) HDD INITIALIZING AND FORMATTING......................................24 10) CONTACT & TECHNICAL SUPPORT...........................................29 FANTEC AluDOCK2X Docking Station 16
1) Introduction

The Fantec AluDOCK2X USB 3.0 docking station a multifunctional
storage device for duplicating hard drives as well as a high capacity
USB 3.0 storage. The funktional docking design allows quick
access and removal of your hard drives and SSDs. With its’ built-in
OneTouch cloning option; you can execute sector-by-sector copies
as a standalone device without even connecting to a computer. This
so called cloning allows you to make 100% identical copies of your
volume, no matter what kind of content (OS, data, etc.) is stored on it.
When connected to a computer, the device turns into a USB 3.0 storage
device and can handle up to 2 independent storage drives at the same
time. Whether your need is data access or cloning, the AluDOCK2X from
FANTEC provides the perfect solution.

2) Specifications

                                     SATA I/II/III Hard Drives up to 6TB*
 Device Support:
                                     & SSD
 Device Size:                        2.5” or 3.5”
 Internal Interface:                 SATA 6 Gbps
                                     Superspeed USB 3.0 (Downwards
 External Interface:
                                     compatible to USB 2.0 & 1.1)
 Power Supply:                       AC Adapter, 12V / 3A
 Material                            Sandblasted aluminum & plastic
 Dimensions (W/D/H):                 150mm x 108mm x 61.5mm
                                     Windows® Vista, 7, 8, 8.1,10
 OS Support
                                     Mac OS X 10.6 & above, Linux
                                                          *Status: August 2015

FANTEC AluDOCK2X Docking Station                                            17
3) package contents
• FANTEC AluDOCK2X
• USB 3.0 Cable
• Power Adapter
• User Manual
4) Features
• Standalone storage Clone & USB 3.0 Docking station
• OneTouch Sector-by-Sector cloning
• LED lights for connection status and cloning progress
• Functional Docking design for quick and easy
exchange and access
• For USB 3.0 speed, the system must support USB 3.0
specifications
5) Hdd Dockingstation
Front View
1 USB Connection
2 Power
3 Slot 1 (Source)
4 Slot 2 (Destination)
5 Clone Button
FANTEC AluDOCK2X Docking Station 18Rear View 6 USB 3.0 interface (do not connect if cloning) 7 Power adapter interface 8 Power switch Top View 9 Slot 1 interface 10 Slot 1 eject button 11 Slot 2 interface 12 Slot 2 ejection button FANTEC AluDOCK2X Docking Station 19
6) Hard drive installation and removal
1. Locate the position of the SATA connector in the slot.
2. Align the 2.5” or 3.5” HDD/SSD SATA drive with the interface of the
   slot and push the drive carefully into the SATA interface.
3. To remove the drive, use the eject button corresponding to the drive
   you want to remove. Press the eject button slowly while holding the
   drive as it disconnect from the SATA interface.

FANTEC AluDOCK2X Docking Station                                      20
7) Using the device for cloning
IMPORTANT NOTE:
For cloning make sure your Main Drive (Source) is in Slot 1 and your
Slave Drive (Destination) in Slot 2. The destination drive in Slot 2 is not
allowed to have less capacity than the source drive.

1. Connect the power adapter to wall outlet and to the docking station
2. Make sure the USB interface is not connected and the device is
   working in standalone mode.
3. Insert your Source drive into Slot 1 and the Destination drive
   into Slot 2.
4. Turn on the power switch on the back
   [All LED will flash and Power LED will stay ON]
5. Wait for about 15-20 seconds to let the drive spin up and being
   recognized by the docking station.
6. Press and hold the Clone button for 5 seconds and then the cloning
   procedure will start.
7. Each LED represents 25% completion. It is only when every 25% of
   HDD1 is duplicated to HDD2 that such LED will remain constantly on,
   leaving the other LED(s) scrolling back and forth. When cloning
   operation is fully completed, all LEDs will flash regularly until the
   device is power off.

FANTEC AluDOCK2X Docking Station                                          21
LED Status in Cloning mode

                                                 LED Status
                                   USB       POWER       SLOT 1       SLOT2

                                   25%        50%         75%         100%
    2 drives installed,
                                   Solid orange LED for every 25% progress
     Cloning started

   Cloning procedure                 Orange LED moving from left to right

     Cloning finished                      All LED blinking orange

      Cloning failure                                                Solid red

About cloning

1. All data on the Destination drive will be lost once the cloning
   procedure starts.
2. The capacity of the Des tination drive must be equal or bigger
   than the capacity of the Source drive. If the capacity is bigger,
   the capacity remaining after cloning, can be formulated to a new
   partition. Follow the formatting guide in this manual for further
   instructions.
3. If the Source drive was initialized using MBR/GPT/APM partition
   scheme, the copied drive will be the same partition scheme, too.
   Even if the Source drive is completely empty, the Destination drive
   will become empty as well.

FANTEC AluDOCK2X Docking Station                                                 22
8) Using the device as a docking station
1. Turn on your computer.
2. Connect the power adapter to wall outlet and to the docking station.
3. Connect the USB 3.0 cable to the docking station and the
other end to a USB 3.0/2.0 port on your computer.
4. Turn on the power switch on the back [HDD(s), Power and
USB LED will flash and stay ON]
5. If the drive inserted is a brand new drive, you will have to initialize
partition and format the drive for the first time. If the drive inserted
is an older drive with data, you should see an acknowledgement
from the computer that the drive is ready for use.
6. For instruction on initializing the new hard drive, please refer to the
formatting guide.
LED Status in Docking mode
LED Status
USB POWER SLOT 1 SLOT2
25% 50% 75% 100%
STANDBY Solid red
Drive 1 Flashing blue
Blue Blue
installed at access
Drive 2 Flashing blue
Blue Blue
installed at access
Drive 1/2 Flashing blue Flashing blue
Blue Blue
installed at access at access
FANTEC AluDOCK2X Docking Station 23Power saving mode The docking station will enter the standby mode when System enters into Sleep or Hibernation mode or will be powered off. The power LED will shine solid red. At some OS, when the system reaches sleep mode, only monitor and peripheral are turned off while motherboard is powered on. In this case, drive(s) are still running and LEDs will remain blue. 9) Hdd Initializing and formatting MS Windows (32/64 bit) If the HDD is uninitialized, you may have to initialize it by doing steps as followed: At first click “Start” at your PC and key in “diskmgmt.msc”. After that please press “OK” key. 1. Start disk initialization. FANTEC AluDOCK2X Docking Station 24
2. Create new partition and format disk.

3. HDD format completed.

Start disk initialization.

NOTE: Please enable GPT (Vista/7/8/8.1/10) if the total capacity is
more than 2TB and enable MBR if the total capacity is less than 2TB.

FANTEC AluDOCK2X Docking Station                                       25
Activate MBR if total volume is less than 2TB

                                   MBR (Master Boot Record)

Activate GPT if total volume is more than 2TB

                                   GPT (GUID Partition Table)

MAC OS X 10.6 or later

1. Click on Programs > Utility > Disk Utility icon.

FANTEC AluDOCK2X Docking Station                                26
2. HDD initialize... 3. Click Erase 4. Click Erase FANTEC AluDOCK2X Docking Station 27
5. HDD format in process

6. Format completed

FANTEC AluDOCK2X Docking Station   28
10) Contact & Technical Support

Dear customer,
thank you for choosing our product. Our products are developed and
produced with the greatest diligence in order to provide the highest
level of quality.

1. Please read the manual or visit or Technic & Support Forum:
    www.fantec-forum.de
There you can find frequently asked questions, support and assistance.

2. If the problem persists, please contact our services department
   via E-Mail:
    service@fantec.de

Address for warranty return shipments:
    FANTEC GmbH
    Abteilung RMA/Service
    Billwerder Billdeich 605B
    21033 Hamburg
    Germany

Declaration of conformity:
http://www.fantec.de/unternehmen/bestimmungenrichtlinien/ce/

                                                    www.fantec.de • www.fantec-forum.de

FANTEC AluDOCK2X Docking Station                                                    29
Sie können auch lesen


