Gegenstromanlage Jet stream Nuoto contreocorrente - Montage- und Betriebsanleitung Pflegetipps - Neptun
←
→
Transkription von Seiteninhalten
Wenn Ihr Browser die Seite nicht korrekt rendert, bitte, lesen Sie den Inhalt der Seite unten
GSA 950-1200 ABS 3sprachig_2021_A4 27.05.21 11:37 Seite 1

                             Montage- und Betriebsanleitung
                                      Pflegetipps
                                                            Compact 950 / 1200 ABS

                                              Gegenstromanlage
                                                  Jet stream
                                             Nuoto contreocorrente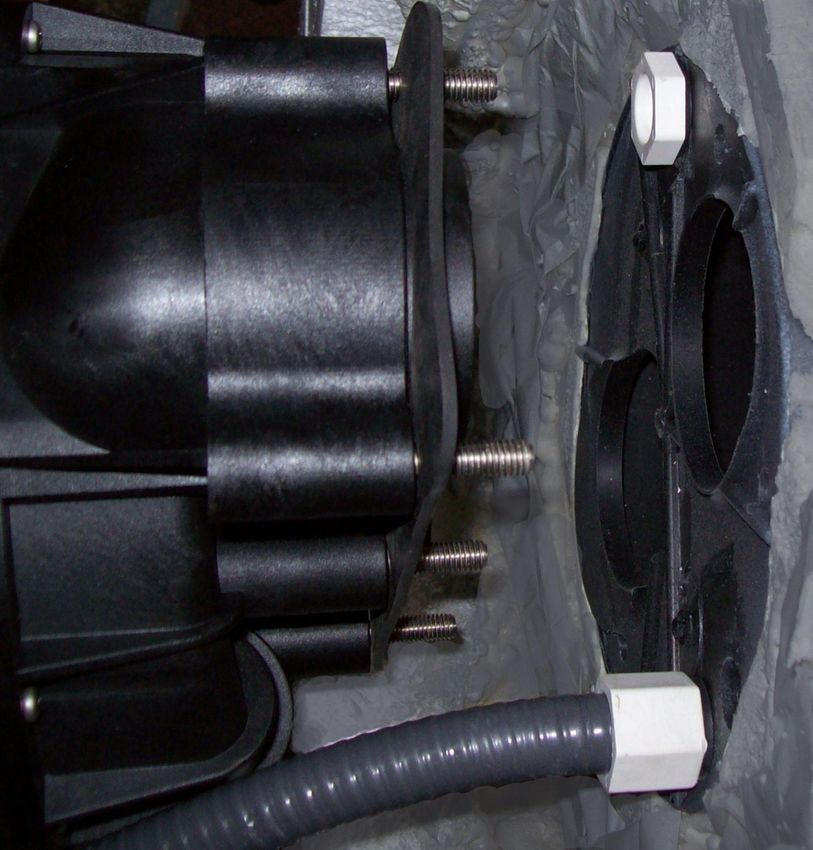
GSA 950-1200 ABS 3sprachig_2021_A4 27.05.21 11:37 Seite 2

        Inhaltsverzeichnis

        Technische Daten der Pumpe ...................................................................................................     3
        Montage Einbausatz .............................................................................................................   4
        Montage der Basiseinheit (Abb. 3,4,5,6,7) .............................................................................            4
        Montage der Einlaufblende (Abb. 7) ......................................................................................          5
        Zur Beachtung für bauausführende Firmen ......................................................................                     5
        Fehler / Ursache / Behebung .......................................................................................                6
        Betriebshinweise für den Endverbraucher / Sicherheitshinweise ........................................                             7
        Stückliste Einbausatz Compact 950 / 1200 ABS ..................................................................                   16
        Stückliste Basiseinheit Compact 950 / 1200 ABS ..............................................................                     17
        Montage Basiseinheit .................................................................................................... 18, 19
        Schaltpläne           .......................................................................................................... 21, 22
        Bedienung ......................................................................................................................   23

        Die Installation darf ausschließlich von einem konz. Elektriker durchgeführt werden.
        In der Netzzuleitung muss eine allpolige Trenneinrichtung mit einer Kontaktöffnung von mind. 3 mm vorhanden sein.
        In der Netzzuleitung ist ein Fehlerstromschutzschalter mit einem Nennfehlerstrom von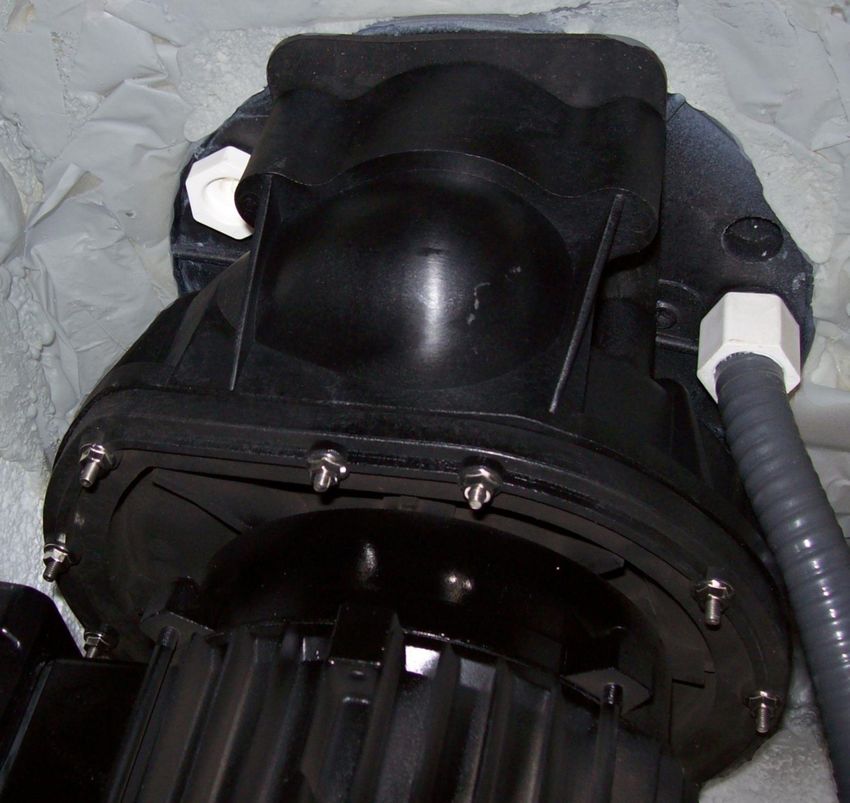
GSA 950-1200 ABS 3sprachig_2021_A4 27.05.21 11:37 Seite 3

        Indice
        Dati tecnici della pompa .......................................................................................................         3
        Kit di montaggio .............................................................................................................. 12
        Montaggio unità base (Figg. 3,4,5,6,7) ..................................................................................... 12
        Montaggio        copertura           ed       aspirazione             (Fig.       7)      ............................................ 13
        All'attenzione per l’impresa costruttrice ..................................................................................... 13
        Difetti / causa / rimedio .......................................................................................................... 14
        Istruzioni per l’utilizzo da parte dell’utente / istruzioni di sicurezza ............................................ 15
        Componenti kit da murare COMPACT 950 / 1200 ABS ............................................................ 16
        Componenti unità base COMPACT 950 / 1200 ABS ................................................................. 17
        Montaggio unità base ................................................................................................................. 18, 19
        Schemi elettrici ................................................................................................................ 21, 22
        Utilizzo ............................................................................................................................. 23

                    L'installazione deve essere eseguita esclusivamente da parte di un elettricista di professione.
          L'alimentazione da rete deve avere un interruttore di tutti i poli con un apertura dei contatti di almeno 3mm. Inollre
                                           deve essere installato un salvavita per
GSA 950-1200 ABS 3sprachig_2021_A4 27.05.21 11:37 Seite 4

        Bitte lesen Sie diese Betriebsanleitung sorgfältig und vollständig, bevor Sie mit
        den Arbeiten beginnen. Etwaige Fehler sind nur mehr unter erheblichem Aufwand oder gar
        nicht mehr behebbar (v.a. Betonarbeiten).
        Montage Einbausatz
        Der Einbausatz zu den Neptun Compact Gegenstromanlagen ist mit dem beiliegenden Bauschutz
        abzudecken damit sämtliche Gewindebuchsen geschützt sind.
        Bitte beachten Sie unbedingt die Einbauanordnung. (Abb. 9)

        Folienbecken / Betonbecken
        Einbautopf ist komplett auszubetonieren; nachträgliches Ausschäumen ist unzulässig.

        Polyesterbecken
        Wenn nötig ist ein zusätzlicher Stützfuß anzubringen.
        Styropordistanzblock ist nicht notwendig.

        Einbau
        Der Einbausatz ist 180 mm unter dem Wasserspiegel zu befestigen (Abb. 9). Die 4 Gewindenippel
        dienen zur späteren Montage der Düsenblende (Abb. 9). Die übrigen Gewinde dienen der
        Flanschbefestigung. Bei Betonbecken werden nur die 4 Gewindemuffennippel montiert.

        Folienmontage
        Anbringung der Flachdichtung an den Einbautopf
        Rundhaltebügel = Folienflansch

        Montage der Basiseinheit (Abb. 3,4,5,6 u. 7)
        Um eine Überflutung des Aufstellungsortes zu verhindern, ist eine Abflussmöglichkeit sowie eine
        ausreichende Be- und Entlüftung vorzusehen. Nur dadurch kann ein störungsfreier Betrieb garan-
        tiert werden.
        Das Luftventil muss senkrecht nach oben angebracht und über dem Wasserpiegel montiert wer-
        den. Sämtliche erforderlichen Verbindungsstücke liegen bei. Sollten dennoch Verlängerungen
        notwendig sein, so ist darauf zu achten, den Pneumatikschlauch möglichst kurz zu halten (max. 4
        m), und keinesfalls zu knicken oder einzuklemmen.

        Compact 950 und 1200
        Der Pneumatikschlauch ist am Steuerkasten sowie am Einbautopf anzubringen und zu fixieren.

         4
                                       Betriebsanleitung GSA Compact 950/1200 ABS V.20210527
GSA 950-1200 ABS 3sprachig_2021_A4 27.05.21 11:37 Seite 5

        Montage der Einlaufblende

        Verbinden Sie den Luftschlauch (5) mit der Düsenblende und stecken Sie das andere Schlau-
        chende auf den im Topf vorgesehenen Luftleitungsanschluss.

        Schieben Sie nun die Spiralfeder (8) über den kurzen Pneumatikschlauch (7) und befestigen Sie
        diesen mittels Klemmhülsen (14) am Ein- bzw. Ausschalter und der Pneumatikführung.

        Fetten Sie nun den O-Ring der Düsenblende gut ein und stecken Sie unter Rücksichtnahme auf
        die Verbindungsschläuche diesen in die vorgesehene Rohrführung des Pumpenflansches (9).
        Die Düsenblende wird nun mittels der Schrauben (17) an den Gewindemuffennippeln (Abb. 6,7)
        befestigt.

        Zur Beachtung für bauausführende Firmen:

        Zum Abdichten der Kunststoffgewinde ist ausschließlich ein Teflonband zu verwenden.
        Sämtliche Anlagenteile sind so zu montieren, dass diese spannungsfrei bzw. frei von Verschmut-
        zungen sind. Insbesondere der Sitz sämtlicher O-Ringe, Dichtungen, Überwurfmuttern, etc. ist
        dahingehend zu überprüfen. Die Pumpe darf niemals trocken laufen (d.h. ohne Wasser), da an-
        sonsten die Gleitringdichtung beschädigt wird (Garantieverlust).
        Die Benutzung in und an Schwimmbecken bzw. Gartenteichen ist nur zulässig, wenn diese nach
        den lokalen gesetzlichen Bestimmungen errichtet sind. Kontaktieren Sie diesbezüglich Ihren NEP-
        TUN-Fachmann bzw. die lokale Baubehörde.

        Belegungsplan für Compact 950 und 1200 siehe Abb. 11,12

        Schaltplan für Compact 950 und 1200 siehe Abb. 11,12

        Es sind die Vorschriften nach ÖVE (VDE), sowie die örtlichen Bestimmungen bei der Installation
        der Anlage unbedingt zu beachten. Die Installation darf ausschließlich von einem konz. Elektriker
        durchgeführt werden. In der Netzzuleitung muss eine allpolige Trenneinrichtung mit einer Kontakt-
        öffnung von mind. 3 mm vorhanden sein. In der Netzzuleitung ist ein Fehlerstromschutzschalter
        mit einem Nennfehlerstrom von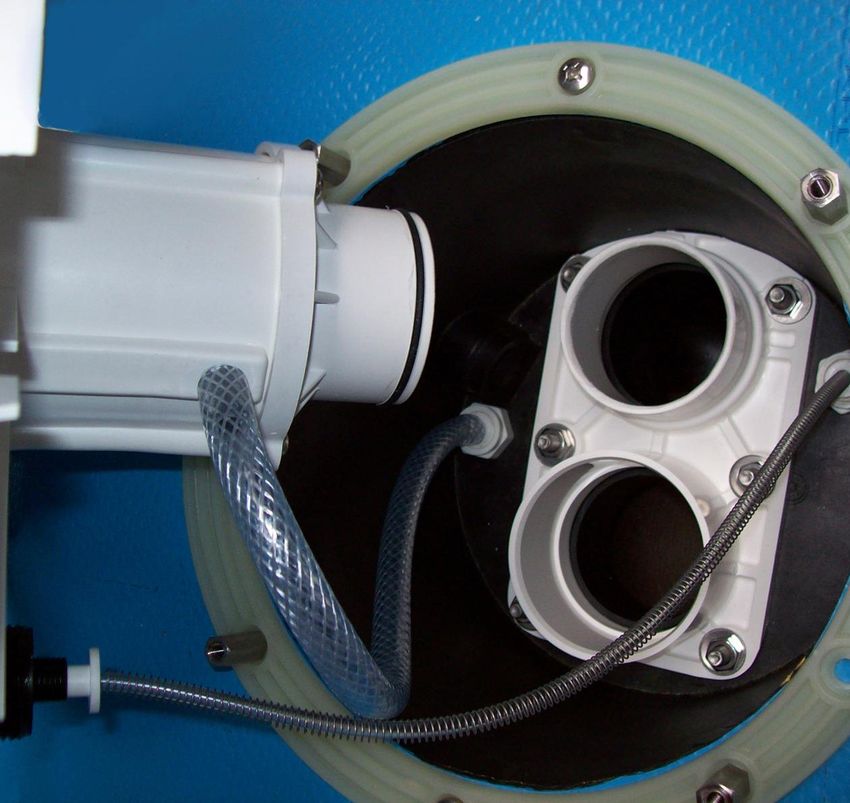
GSA 950-1200 ABS 3sprachig_2021_A4 27.05.21 11:37 Seite 6

        Fehler/Ursache/Behebung

        Pumpe ist sehr laut und bringt nicht die Normalleistung
        Falsche Drehrichtung des Motors       Motor umpolen, durch Vertauschen der Phasen
                                              (400 V)
                                              Nur von konzessioniertem Elektriker!

        Pumpe ist laut und bringt volle Leistung
        Motorhaube streift                     Lüfterhaube locker, ordnungsgemäß befestigen

        Pumpe läuft nicht bzw. schwer und langsam an
        Eine Phase fehlt                    Zuleitung ändern

        Beim Einschalten fallen die Sicherungen
        Falsche Sicherungen                  Sicherung 16 A träge verwenden

        Motorschutz löst sich aus
        Falsche Einstellung                                 Richtigen Stromwert + 10 % einstellen

        Pumpe lässt sich vom Becken aus nicht schalten

         Schaltschlauch geknickt oder                         Prüfen ob Pumpe vom Schaltkasten aus schaltbar ist.
         verklemmt /                                          Schlauch wenn nötig kürzen,
         Schlauch zu lang                                     Sicherungen, Stromzufuhr prüfen.
         Sicherungen / Stromzufuhr                            Motorschutzschalter testen.
         Motorschutzschalter

         6
                                       Betriebsanleitung GSA Compact 950/1200 ABS V.20210527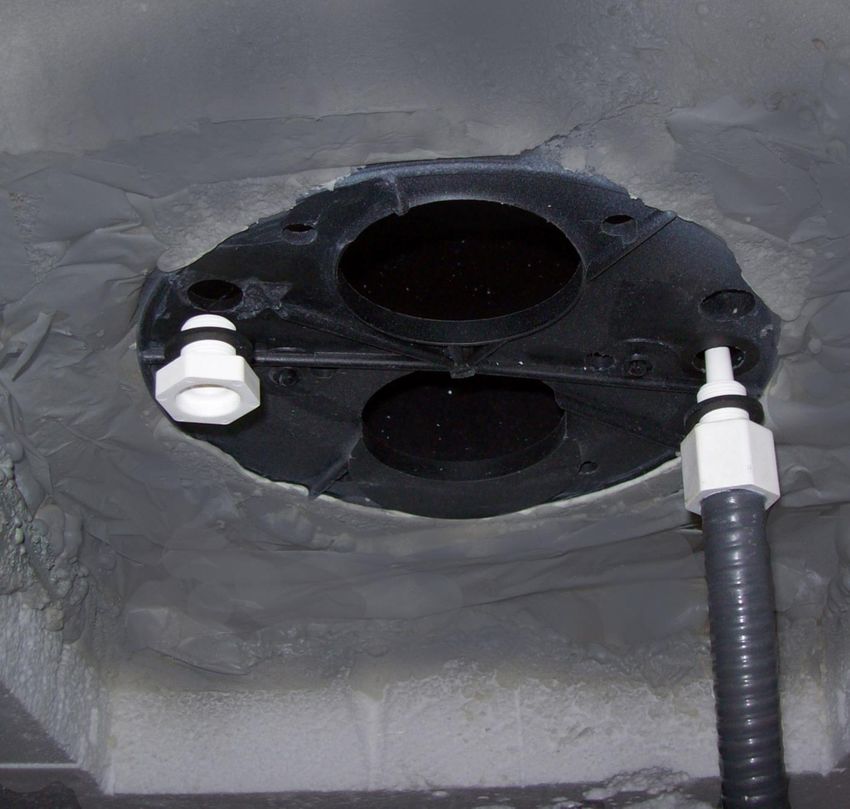
GSA 950-1200 ABS 3sprachig_2021_A4 27.05.21 11:37 Seite 7

        Betriebshinweise für den Endverbraucher:

        Pumpe Ein- / Ausschalten (Abb. 13)
        Durch Drücken des PN-Tasters Pos. 1 wird der Pneumatikschalter betätigt und die Pumpe geht in
        Betrieb. Nochmaliges Drücken schaltet die Pumpe aus.

        Strahlrichtung und Strahlregulierung (Abb. 13)
        Die Strahlrichtung kann durch die allseitig schwenkbare Düse Pos. 2 festgelegt werden. Durch
        Drehen der Düse stellt sie den Wasserstrahl stärker bzw. schwächer.

        Luftregulierung und Massage (Abb. 13)
        Durch Drehen des Ringes Pos. 3 welcher auf der Düse angebracht ist, wird die Luftzufuhr schwä-
        cher oder stärker.

        Gegenstromschwimmen
        Düse so schwenken, dass die Wasserschicht unmittelbar unter der
        Wasseroberfläche in starke Strömung versetzt wird.

        Verwendung des Massagezubehörs (Abb. 14)
        Vor dem Anbringen oder Entfernen ist die Gegenstromanlage abzuschalten. Zum Anbringen der
        Massage-Einheit ziehen Sie die Schiebemuffe Pos. 5 zurück
        und schieben die Schlauchkupplung in die Düse Pos. 2. Drücken Sie nun die Schiebemuffe
        gegen die Düse und ziehen Sie den Schlauch Pos. 6 zurück.
        Die Schlauchkupplung ist verriegelt. Zum Abkuppeln drücken Sie den Schlauch Pos. 6 gegen die
        Schiebemuffe Pos. 5, Schiebemuffe fassen und herausziehen.

        ACHTUNG - Sicherheitshinweise:
        Massagezubehör nicht näher als 30 cm an den Körper halten, optimaler Massageeffekt bei
        voller Durchflussleistung und geeignetem Abstand.
        Bei Inbetriebnahme der Anlage ist eine Badehaube zu verwenden!
        Bei der Anlage Kleinkinder nie allein lassen - nur unter Aufsicht Erwachsener verwenden.

        Überwinterung
        Wasser bis unterhalb des Düsenblockes ablassen. Pumpe mit Hilfe der Entleerungsschraube an
        der Vorderseite entleeren. Erst nach Ende der Frostgefahr Entleerungschraube wieder eindrehen.

                                                                                                       7
                                       Betriebsanleitung GSA Compact 950/1200 ABS V.20210527
GSA 950-1200 ABS 3sprachig_2021_A4 27.05.21 11:37 Seite 8

        Mounting installation kit
        The installation kit for the Neptun compact jet stream must be covered with the enclosed building
        protection so that all threads are protected. Please mind the installation arrangement. (fig.1)

        Film pool/ concrete pool
        The built-in pot must be concreted entirely, subsequent foaming is not allowed.
        polyester pool
        When necessary, an additional supporting foot must be attached.
        Styrofoam distance bloc is not necessary.

        Installation
        The installation kit must be fixed 180 mm below the water surface (fig. 1). The 4 threaded nipples
        are used for the subsequent mounting of the nozzle frame (fig. 7). The other threads are used for
        flange mounting. With concrete pools only the 4 threaded nipple sleeves are mounted.

        Film mounting
        Attaching the flat gasket to the built-in pot (fig. 2)
        round bracket = sheeting

        Mounting the base unit (fig. 3, 4, 5, 6 and 7)
        You have to provide an outflow possibility as well as an adequate ventilation to prevent a flooding
        of the site. That`s the only way how a trouble-free operation can be guaranteed.
        The air valve must be mounted vertically upwards and above the water surface. All the required
        pipe fittings are included. Should, however, extensions may be necessary, keep the pneumatic
        hose as short as possible (max. 4 m), and don`t crincle or clamp it in any way.

        Compact 950 and 1200
        The pneumatic hose must be placed and fixed on the control box as well as on the buit-in pot.

         8
                                       Betriebsanleitung GSA Compact 950/1200 ABS V.20210527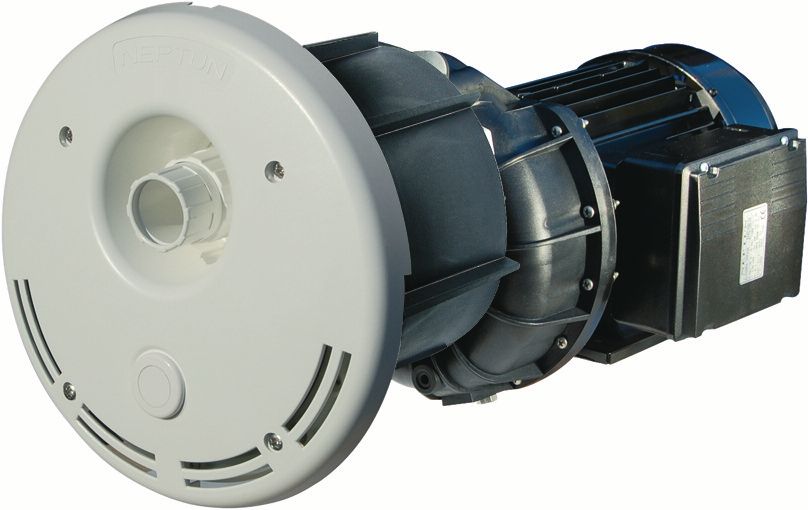
GSA 950-1200 ABS 3sprachig_2021_A4 27.05.21 11:37 Seite 9

        Mounting of the inlet aperture

        Connect the air hose (5) with the nozzle frame and plug the other end of the hose in a pot provi-
        ded airline connection. Then push the coil spring (8) over the short pneumatic hose (7) and fix it
        through the claming sleeve (14) at the on-off switch and the pneumatic implementation.
        Then grease the O-ring of the nozzle frame well to plug it in easily under the consideration of the
        connecting hoses into the provided tube guide of the pump flange (9).The nozzle frame is then
        fixed through screws (17) at the threaded sleeve nipple. (fig 6,7).

        Precautions for building companies

        For sealing the plastic thread exclusively a Teflon tape must be used. All system components
        must be mounted in the way that they are voltage free and free of contamination. In particular, the
        seat of all the o-rings, union nuts, etc. must be checked to that effect. The pump must never run
        dry (which means without water), because otherwise the mechanical seal will be damaged (loss
        of warranty).
        The use in and around swimming pools or garden ponds is only permitted if they are built accor-
        ding to local statutory regulations. In this regard please contact your Neptun expert or the local
        bulding department.

        assignment plan for compact 950 and 1200 see figure 11,12
        wiring diagram for compact 950 and 1200 see figure 11,12

        There are rules necessarily to be observed by ÖVE (VDE), as well as the local EW when installing
        the system. The installation may exclusively be carried out by a licensed electrician. In power line
        an all- pole seperator with a contact gap of at least 3 mm must be provided. In the power line a
        residual current circuit breaker with a rated leakage current of
GSA 950-1200 ABS 3sprachig_2021_A4 27.05.21 11:37 Seite 10

        Error / cause / repairing
        The pump is very loud and does not bring the normal power.
        Wrong motor direction of rotation   Reverse the polarity of motor by swapping the phase
                                            (400 V).
                                            Only by licensed electrician!

        The pump is loud and does not take full power.
        The engine cover swipes.             Fan cover loosely, fix properly.

        The pump is not running or is running difficultly and slowly.
        A phase is missing.                   Change supply line.

        When turning on, the fuses switch.
        incorrect fuses                                      Use fuse 16A inert.

        The motor protection is triggered.
        incorrect setting                                    Set the correct current value + 10%.

        The pump can not be switched from the pool.

         The switching tube is kinked or jammed.               Check whether the pump can be switched from the
         / The hose is too long.                               control box.
         Fuses/ power supply/ motor protective                 Shorten the hose, if necessary.
         button                                                Check the fuses and the power supply. Test the motor
                                                               protective button.

        10
                                       Betriebsanleitung GSA Compact 950/1200 ABS V.20210527
GSA 950-1200 ABS 3sprachig_2021_A4 27.05.21 11:37 Seite 11
Operating instructions for the end user
Turn on/off the pump (fig. 13)
By pressing the PN-button pos.1, the pneumatic switch is actuated and the pump is in opera-
tion. Press again to turn off the pump.
stream direction and beam control (fig. 13)
The stream direction can be set by the all-round swiveling nozzle pos. 2. By rotating the nozzle
you make the water jet stronger or weaker.
air control and massage (fig. 13)
By rotating the ring pos. 3 which is mounted on the nozzle, the air supply gets weaker or stron-
ger.
swimming against the countercurrent
Swivel the nozzle that the water layer directly below the water surface is placed in strong current.
Use of the massage equipment (fig. 14)
Before installing or removing, the countercurrent system must be switched off. To attach the
massage unit, pull back the sliding sleeve pos. 5 and push the hose coupling in the nozzle pos.
2. Then press the sliding sleeve against the nozzle and pull the hose back pos.6. The hose coup-
ling is locked. To uncouple, press the hose pos. 6 against the sliding sleeve pos. 5. Take the sli-
ding sleeve and pull it out.
Attention - safety instructions:
Do not take the massage equipment closer than 30 cm to your body, you get the optimal
massage effect at full flow capacity and suitable distance.
A bathing cap must be used when turning on the jet stream!
Never leave small children alone with the system - use only under adult supervision.
Wintering
Drain the water to below the nozzle block. The pump must be emptied with the help of the drai-
ning screw on the front. Only after the end of the danger of frost the drain plug can be screwed
again.
11
Betriebsanleitung GSA Compact 950/1200 ABS V.20210527GSA 950-1200 ABS 3sprachig_2021_A4 27.05.21 11:37 Seite 12
La preghiamo di leggere attentamente queste istruzioni di montaggio prima
di iniziare i lavori. Eventuali errori si potranno correggere solamente con notevoli spese o
addirittura non saranno correggibili (p.es.: getto di cemento).
Montaggio Kit da murare
Il kit da murare dei gruppi nuoto contro corrente NEPTUN COMPACT devono essere protetti con
la protezione adesiva parte della fornitura, per proteggere gli inserti filettati.
Attenzione seguite la sequenza di montaggio indicata (Figura 1).
Piscine con Liner / piscine in cemento armato
Il corpo da murare deve essere sommerso completamente dal cemento, schiumature successive
non sono ammissibili.
Piscine in resina di polyestere
Se necessario applicare un supporto.
Il blocco distanziale di polystirolo non è necessario.
Posizionamento
Il kit da murare è da posizionare 180 mm sotto il livello dell’acqua (Fig. 9). I 4 nippli filettati servi-
ranno più tardi per il montaggio della copertura ugello (Fig. 9). I restanti filetti servono per il fis-
saggio della flangia . In caso di piscine in cemento armato vengono montati solamente 4 nippli
filettati.
Montaggio liner
Applicare la guarnizione piana sul corpo da murare
Maniglia rotonda = flangia per liner
Montaggio unità base (Figg. 3, 4, 5, 6 e 7)
Per evitare effeffi alluvionali nel vano pompa è da prevedere una possibillità di scarico e per ga-
rentire sufficiente areazione del vano sono da prevedere delle aperture per la stessa. Solamente
questi accorgimenti possono garentire un esercizo privo di problemi.
La valvola d'aria deve essere fissata in verticale verso l'alto sopra il livello dell'acqua in piscina.
Tutti i raccordi necessari fanno parte della consegna. Nel caso dovessero essere necessari dei
prolungamenti, facciamo presente, che il tubo pneumatico non deve superare i 4 m di lunghezza
e che non deve essere piegato ad angolo acuto o incastrato.
COMPACT 950 e COMPACT 1200
Il tubo pneumatico è da fissare sul control box e sul corpo da murare.
12
Betriebsanleitung GSA Compact 950/1200 ABS V.20210527GSA 950-1200 ABS 3sprachig_2021_A4 27.05.21 11:37 Seite 13
Montaggio della copertura ugello
Collegate il tubo aria (5) con la copertura ugello e fissate l'altro capo del tubo sul raccordo pre-
visto all’interno del corpo da murare.
Mettete la molla spiralata (8) sopra il tubo pneumatico corto (7) e fissate questo mediante le boc-
cole da schiacciare (14) sul pulsante On/Off ed al condotto pneumatico.
Adesso ingrassate bene l'O-Ring della copertura ugello e poi inserite il tutto, faccendo attenzione
alle tubature di collegamento, nei condotti dei tubi della flangia della pompa (9).
La copertura ugello deve essere adesso fissata tramite le viti (17) sui nippli filettati (Fig. 6,7).
All'attenzione dell'impresa costruttrice:
Per fare la tenuta di filettature in plastica si deve utilizzare exclusivamente nastro di teflon.
Tutti i componenti del gruppo devono essere assemblati privi di tensioni , liberi da sporcizia, in
particolare le sedi degli O-Ring e delle guarnizioni, ghiere e dadi ecc.
La pompa non deve assolutamente mai lavorare a secco (ossia senza acqua), altrimenti avverrà
danneggiamento della tenuta meccanica e conseguente perdita del diritto di garanzia.
L’istallazione e l'utilizzo dei gruppi Nuoto Controccorrente NEPTUN COMPACT su piscne e lag-
hetti piscina è permesso solamente, se questi sono costruiti in conformità alla disposizioni di
legge locali, contattate l'ufficio tecnico del comune competente.
Schema di collegamento pompa Compact 950 e 1200 vedi Figg. 11,12
Schema elettrico per Compact 950 e 1200 vedi Figg. 11,12
Le prescrizioni delle Norme Europee e del distributore locale di elettricità sono da seguire peren-
toriamente.
L'istallazione deve essere eseguita esclusivamente da un elettricista professionale. L'alimenta-
zione elettrica deve essere provvista di un interruttore di sicurezza su tutti i poli con apertura di al-
meno 3 mm ed un salvavita con taraturaGSA 950-1200 ABS 3sprachig_2021_A4 27.05.21 11:37 Seite 14
Difetto / causa / rimedio
Pompa è molto rumorosa e non porta prestazione normale
Senso rotazione motore errato cambiare posizione poli (400V)
Solo licenza elettricisti!
Pompa è molto rumorosa e porta prestazione piena
Copriventola tocca venlota di raffreddamento Posizionare correttamente copriventola e
fissarlo
Pompa non si avvia o si avvia con fatica e lentamente
manca collegamento una fase correggere collegamento
All'avvio saltano i fusibili
fusibili non adatti utilizzare fusibili da 16 Amp
Protezione motore si insersce
regolazione errata regolare su valore di corrente corretto
+10%
Pompa non si fa comandare dall'interno delta piscina
tubo pneumatico piegato o schiacciato / tubo Verificare se pompa si fa comandare dal con-
troppo trol box /
lungo / fusibili / alimentazione corrente accorciare tubo pneumatico, fusibili, verificare
protezione motore alimentazione.
Collaudare protezione motore
14
Betriebsanleitung GSA Compact 950/1200 ABS V.20210527GSA 950-1200 ABS 3sprachig_2021_A4 27.05.21 11:37 Seite 15
Istruzioni per l'utilizzo da parte del'ulente:
Avviare / Spegnere la pompa (Fig. 13)
Una pressione sul pulsante pneumatico Pos.1 si attiva l'interruttore pneumatico e la pompa si
avvia. Un ulteriore pressione sul pulsante spegne la pompa.
Direzione getto e regolazione getto (Fig.13)
La direzione del getto può essere stabilita tramite posizionamento dell'ugello posizionabile in
tutte le direzioni.
Girando la testa dell'ugello si regola l'intensità del getto.
Regolazione aria e massaggio (Fig. 13)
Girando l'anello Pos. 3 sull'ugello si regola il flusso dell'aria.
Nuotare contro corrente
Posizionare l'ugello in modo che il getto crei corrente immediatamente sotto il livello dell'acqua
Utilizzo degli accessori da massaggio (Fig. 14)
Prima di applicare gli accessori da massagio, spegnere la pompa. Per applicare gli accessori ti-
rare all'indietro la boccola Pos.5 ed inserire il raccordo del tubo nell'ugello Pos.2. Adesso spo-
stare in avanti la boccola e tirare all'indietro il tubo Pos.6.
Il colIegamento del tubo cosi è bloccato. Per staccarlo spingete il tubo Pos.6 contro il raccordo
Pos.5, prendete la boccola ed estraete.
Attenzione - istruzioni di sicurezza:
Non portare l'attrezzatura per il massaggio a una distanza inferiore a 30 cm dal corpo, si
ottiene l'effetto di massaggio ottimale a piena capacità di flusso e distanza adeguata.
Una cuffia da bagno deve essere usata quando si accende il getto d'acqua!
Non lasciare mai i bambini piccoli da soli con il sistema: utilizzare solo sotto la supervisione
di un adulto.
Cosa fare quando inizia l’inverno
Scaricare lacqua fino a sotto il blocco dell'ugello. Scaricare la pompa tramite il bullone apposito
sulla parte frontale.
Riavvitare questo bullone quando in primavera no ci sarà più pericolo di gelo.
15
Betriebsanleitung GSA Compact 950/1200 ABS V.20210527GSA 950-1200 ABS 3sprachig_2021_A4 27.05.21 11:37 Seite 16
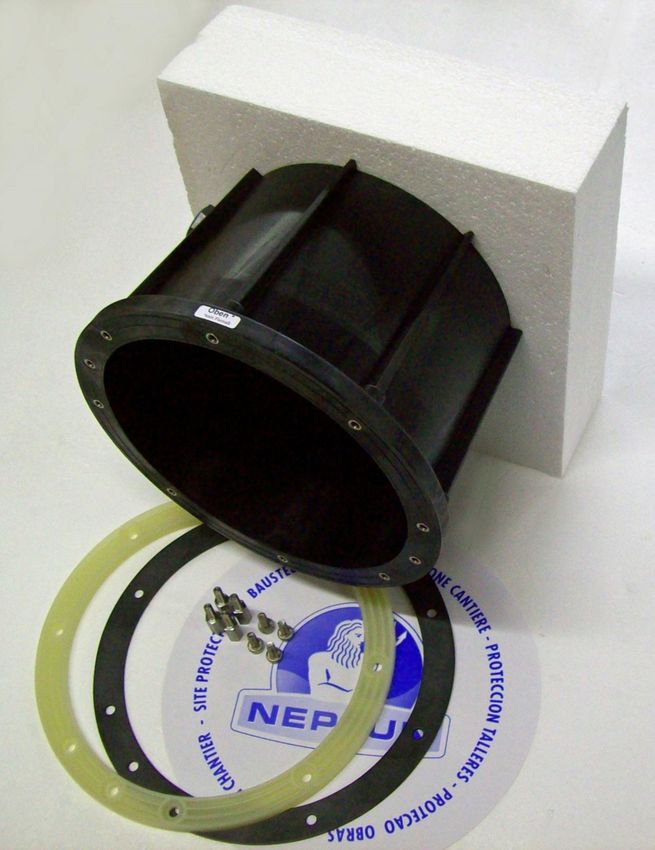
Bild 1 / Figura 1 / Pic. 1
Top !
1
5
4
2
3
6
Stückliste Einbausatz / inventory installation kit / Componeti kit da murare
Nr. Bezeichnung // term // Descrizione Anzahl //
amount //
Quantità
Einbautopf mit Styropordistanz // built-in pot with styrofoam distance // Corpo
1 1
da murare con distanziale in polistirolo
2 Dichtung selbstklebend // seal, self-adhesive // Guarnizione autoadesiva 1
3 Flansch // flange // Flangia 1
4 Linsenkopfschraube // lens-head-screw // Vite 4
5 Gewindenippel // distance screw // Niplo filettato 4
6 Bauschutz // building protection // Protezne da cantiere 1
Kontrollnummer (ohne Abb.) // check number (without illustration) // Numero di
7 1
controllo (non raffigurato)
Betriebsanleitung (ohne Abb.) // operating instruction (without illustration) // Li-
8 1
bretto d'lstruzione (non raffigurato)
16
Betriebsanleitung GSA Compact 950/1200 ABS V.20210527GSA 950-1200 ABS 3sprachig_2021_A4 27.05.21 11:37 Seite 17
Bild 2 / Figura 2 / Pic 2
1
2
1a
3 12
13
14
15
6
4
5
11
18 7
9 8 17 16 10
Stückliste // inventory //Componeti
Basiseinheit // base unit // unitá base Compact 950 / 1200
Nr. Bezeichnung Stk. Nr. Bezeichnung Stk.
Flachdichtung zu Durchführung //
1 Pumpe// pump // Pompa 2,6 kW 400 V 1
11 flat gasket to the implementation // 2
1a Pumpe// pump // Pompa 3,3 kW 400 V 1 Guarnizione piana per passante
Düsenblende komplett // nozzle frame Durchführung zu PN-Taster //
2 1
complete // Copertura ugello completo 12 implementation to the PN-button // 1
Steuerkasten // control box // scatola di Passante per pulsante pneumatico
3 1
comando 13 Mutter // nut // Dado 3/8 “ 2
Luftschlauch m. Ventil u. Durchführung Klemmhülse // clamping collet //
14 3
4 //air hose with valve and implementa- 1 Boccola da schiacciare
tion // Tuba aria con valvola 15 Mutter // nut // Dado M 8 A4 6
Beilagscheiben // washer //
Luftschlauch // air hose // Tuba aria 16 6
5 1 Rondelle M 8 A4
corto
Linsenschrauben // head screw //
PN-Schlauch // PN-hose // 17 4
6 1 Viti M 6x16
Tubo pneumatico (3m)
PN-Schlauch // PN-hose // Rohrhalter // tube holder //
7 1 18 1
Tubo pneumatico (35 cm) Supporto tubo d 20
Ohne Abb. // without illustration //
Spiralfeder // coil spring //
8 1 No raffigurato:
Molla spiralata (33 cm)
Pumpenflansch // pump flange // Kontrollnummer // check number //
9 1 19 1
Flangia pompa Numero di controllo
10 Flachdichtung zu Pumpe // flat gasket 1 Betriebsanleitung // operating
20 1
to the pump // Guarnizione piana per instruction// Libretto istruzioni
pompa
17
Betriebsanleitung GSA Compact 950/1200 ABS V.20210527GSA 950-1200 ABS 3sprachig_2021_A4 27.05.21 11:37 Seite 18
Montage / Montaggio / mounting
3
4
18
Betriebsanleitung GSA Compact 950/1200 ABS V.20181012GSA 950-1200 ABS 3sprachig_2021_A4 27.05.21 11:37 Seite 19
Montage / Montaggio / mounting
5
6
19
Betriebsanleitung GSA Compact 950/1200 ABS V.20181012GSA 950-1200 ABS 3sprachig_2021_A4 27.05.21 11:37 Seite 20
Montage / Montaggio / mounting
7
8
20
Betriebsanleitung GSA Compact 950/1200 ABS V.20210527GSA 950-1200 ABS 3sprachig_2021_A4 27.05.21 11:37 Seite 21
Skizzen / Schemi / sketches
„Oben“ ist durch einen
Aufkleber gekennzeichnet !
Ein- Aus Taster
= PN Anschluss
9
Luftanschluss
= Luftzufuhr
10
21
Betriebsanleitung GSA Compact 950/1200 ABS V.20210527GSA 950-1200 ABS 3sprachig_2021_A4 27.05.21 11:37 Seite 22
Skizzen / Schemi / sketches
Schaltplan / Schema elettrico / electronic schematic
L1
L2
L3
N
PE
-A1
1 3 5
1 -K2 -PN1
-K1
-A2 2
11 -95 -96
-F1 -F1
2 4 6 -96 -95
-A2 -A2
U V W
-K1 -K2
-A1 -A1
M
Pumpenschaltkasten / Schema
collegamento pompa / electronic schematic of the pump
P1 P2
Erdung 12
W2 U2 V2
U1 V1 W1
Anschluß Steuerkasten
P1 und P2 (Kaltleiter) ist je nach Pumpentyp im Schaltkasten ausgeführt, jedoch
kein Anschluß notwendig.
P1 and P2 (PTC thermistor) are designed depending on the type of pump in the
control box, but no connection is necessary.
P1 e P2 (termistore PTC) sono progettati in base al tipo di pompa nella scatola
di controllo, ma non è necessaria alcuna connessione.
22
Betriebsanleitung GSA Compact 950/1200 ABS V.20210527GSA 950-1200 ABS 3sprachig_2021_A4 27.05.21 11:37 Seite 23
Skizzen / Schemi / sketches
13
14
23
Betriebsanleitung GSA Compact 950/1200 ABS V.20210527GSA 950-1200 ABS 3sprachig_2021_A4 27.05.21 11:37 Seite 24
Ihr Neptun Fachhändler:
Your Neptun specialist supplier:
www.neptun-int.com
Die in diesem Dokument gegebenen Hinweise und Richtlinien entsprechen dem Stand der Tech-
nik und sind kein Ersatz für eine Beratung bzw. deren Ausführung durch den Schwimmbadfach-
handel bzw. die entsprechenden Bauorgane und Baufirmen unter Einhaltung der geltenden
Bauvorschriften (Stand 2/2010). Im Falle von Reklamationen bitte die Kontrollnummer und eine
Kopie des Kaufbelegs beilegen.
The instructions and guidelines given in this document correspond to the state of technology and
aren`t any replacement for a consultation or the carrying out by pool specialist shops or the cor-
responding building divisions and construction companies in compliance of current building regu-
lations. In the case of complaint, please enclose the check number and a copy of the invoice.
Druck- und Satzfehler vorbehalten. Kein Anspruch auf Vollständigkeit. Technische Änderungen vorbehalten.
Printing errors and error rate reserved. No demanding on completeness. Technical changes reserved.Sie können auch lesen