Montážní návod koloběžek KOSTKA User manual for KOSTKA footbike Montageanleitung für die Tretroller KOSTKA - MUSHING FUN, MUSHING MAX, MUSHING PRO ...
←
→
Transkription von Seiteninhalten
Wenn Ihr Browser die Seite nicht korrekt rendert, bitte, lesen Sie den Inhalt der Seite unten
Montážní návod koloběžek KOSTKA
    User manual for KOSTKA footbike
Montageanleitung für die Tretroller KOSTKA

   MUSHING FUN, MUSHING MAX, MUSHING PRO
   MUSHING RACER MAX, MUSHING RACER PRO

                                           Návod 1819
NÁVOD
(MONTAGEANLEITUNG/MANUAL)

MUSHING FUN

MUSHING MAX

MUSHING PRO

MUSHING RACER MAX

MUSHING RACER PRO

     OBSAH BALENÍ: Smontovaná část koloběžky,sada montážních klíčů,
CZ   zadní osa náboje a přední osa náboje, vodítko, pružný adaptér, přední a zadní kolo.

     INHALT DES PAKETS: Tretroller, Teile, Zubehöre, Werkzeug, Imbusschlüssel,
DE   Schnellhebel für vorne, Achsstift für hinten, Vorderad und Hinterrad, Dog Antenne,
     Anleitung.
     PACKAGE CONTAINS: An assembled part of the footbike, a tool kit,
EN   a front and a rear wheel with axles, dog leash, dog leash adapter.

        CZ   Výrobek je certifikován Strojírenským zkušebním ústavem, číslo certifikátu: J-32-20061-15

        EN   Product is certificated by Strojírenský zkušební ústav, certificate no.: J-32-20061-15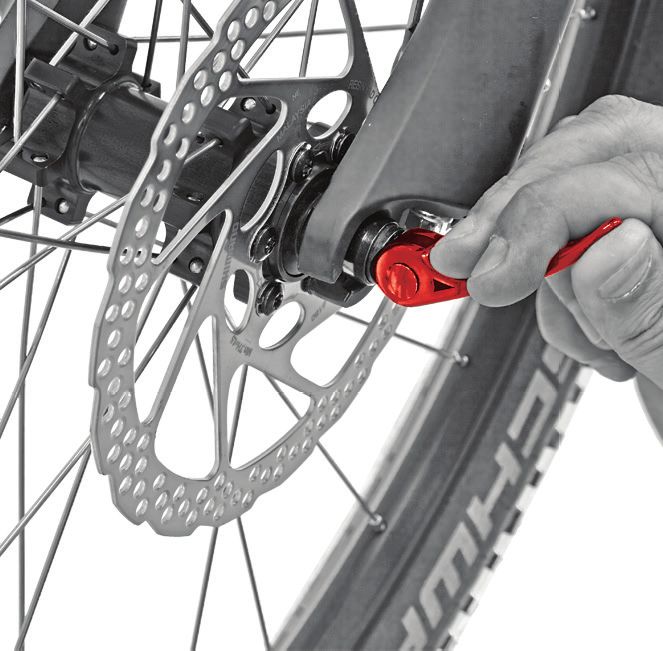
CZ   Vybalená koloběžka.

                                        DE   Ausgepackter Roller.

                                        EN   Unpacked footbike.

                                    1
                                        CZ   Představec 1 je kvůli přepravě otočen vzhůru nohama, pro jeho uvolnění
                                             musíte nejdříve povolit šrouby 2,3 a následně představec 1 vyjměte ve
            2                                směru šipky.
    3
3                                       DE   Inbusschraube 2,3 lockern und Lenkervorbau 1 abnehmen.

                                        EN   Handlebar stem 1 is due to transportation turned upside down. To release
                            1                the stem must first release the screws 2,3 and then remove the stem 1 in
                                             the direction of the arrow.
                                    2
                                        CZ   Otočený představec 1 nasaďte zpět na hlavovou trubku.
                    1

                                        DE   Lenkervorbau 1 einmal drehen und mit der Kröpfung nach oben wieder
                                             aufsetzen.

                                        EN   Turn the stem 1 into right position and set on the fork column back.

                                    3
                                        CZ   Dotáhněte šroub 2.

                                             Ziehen Sie die Schraube 2 so fest, dass die Gabel kein „Spiel“ hat.
        2
                                             Die Gabel muss sich noch gut und frei lenken lassen.
                                        DE
                                             Tighten up the bolt 2.

                                        EN

                                    4
                                        CZ   Řídítka vložte do představce a postupným utahováním šroubů 4 je zafixujte.
                                             POZN.: Šrouby dotahujte postupně do kříže proti sobě (všechny stejným
                            4   4            dotahovacím momentem).

                                        DE   Den Lenker mit den Inbusschrauben 4 anziehen. Bitte darauf achten, daß die
                                             Hydraulikleitungen der Bremse nicht knickt. Die Inbusschrauben 4 über Kreuz
                                             anziehen und auf die Lenkerneigung achten.
                4       4
                                        EN   Insert the handlebars and fix it with bolts 4 (bolts must be tighten to the cross
                                             with same torgue)
                                    5
CZ   Před nasazením předního kola nejprve odstraňte krytku 5.

                                DE   Den Transportschutz 5 unten an der Gabel entfernen. Dieser wird nicht
    5
                                     mehr benötigt.

                                EN   Before fasten the front wheel, first remove the plastic cover 5.

                           6
V-BRAKE
                                CZ   Vodítko lanka 6 vysuňte z pozice 7 přední brzdy, dojde k rozpojení přední brzdy.

                   6            DE   Den Bremszug 6 aus der Halterung 7 aushängen, so dass sich die Bremshebel
                                     weit öffnen lassen um das Rad einhängen zu können.

                                EN   Pull out the metal cable guide 6 from the position 7 and disconnect the front
                                     brake.
              7

                           7
V-BRAKE
                                CZ   Přední osu kola vsuňte do náboje a kolo vložte do přední vidlice. Dávejte pozor,
                                     aby kolo bylo symetricky umístěno mezi rameny vidlice.
                                     Dotáhněte rychloupínák nebo šroub 8.

                                DE   Die Steckachse durch die Nabe des Vorderrades stecken und das Rad in die
                                     Gabel einhängen. Die Mutter der Steckachse etwas anziehen und den
                       8             Spannhebel 8 zum Spannen nach oben drücken.

8                               EN   Insert the axle into the front wheel hub and insert the whole wheel into the front
                                     fork. Make sure to insert the wheel symmetrically into the fork.
                           8         Tighten up the quick release or bolt 8.

V-BRAKE
                                CZ   Spojte přední brzdu. Nasaďte vodítko lanka 6 zpět do pozice 7. Pro kontrolu
                                     roztočte kolo, které se musí volně otáčet a po zmáčknutí přední brzdové páky se
                                     musí zastavit
              6
                                DE   Die Bremshebel vorn zusammen drücken und den Bowdenzug 6 in der
                                     Aufnahme 7 einhängen. Gummikappe zum Schutz über die Bowdenzug-Hülle
          7                          schieben.

                                EN   Connect the front brake. Insert the metal cable guide 6 back into position 7.
                                     Check whether the wheel is spinning freely. The wheel must stop if you use the
                           9         front brake.

V-BRAKE
                                CZ   Vodítko lanka 9 vysuňte z pozice 10 a čelisti zadní brzdy rozpojte.

                                DE   Den Bowdenzug 9 aus dem hinteren Bremshebeln 10 aushängen, so dass die
                                     Bremse weit öffnet.
          9
                                EN   Pull out the metal cable guide 9 from the position 10 and disconnect the rear
                                     brake.

              10

                           10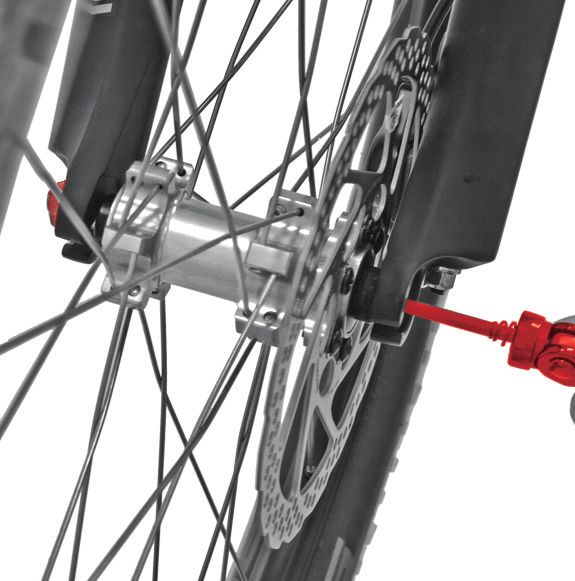
V-BRAKE
                            CZ   Rozpojená zadní brzda.

                            DE   Ausgehängte Bremse.

                            EN   Disconnected rear brake.

                       11
V-BRAKE
                            CZ   Zadní osu kola vsuňte do náboje a kolo vložte do rámu. Dávejte pozor, aby kolo
                                 bylo symetricky umístěno mezi zadními rameny rámu. Dotáhněte šroub 11 max
                                 8-9 Nm.

                            DE   Die Steckachse für hinten durch die Radnabe stecken. Die Mutter der
                                 Steckachse mit 1 bis 2 Umdrehungen aufschrauben, das Rad gerade einhän-
                                 gen und die Schraube 11 mit 8-9 Nm anziehen.

                  11        EN   Insert the rear axle into the the rear hub and fix the whole rear wheel in rear
                                 fork. Make sure to insert the wheel symmetrically into the fork. Tighten up the
                       12        bolt 11 max 8-9 Nm.

V-BRAKE
                            CZ   Zobrazení detailu zajištění zadního kola.

                            DE   Abbildung eingehängtes Rad mit dem Anschlagzapfen im Rahmen.

                            EN   The detail of rear wheel security.

                       13
V-BRAKE
                            CZ   Spojte zadní brzdu. Nasaďte třmen 9 zpět do pozice 10. Kolo se musí volně
                                 otáčet, po zmáčknutí zadní brzdové páky musí zastavit.

             9
                            DE   Hinteren Bremszug 9 wieder im Bremshebel 10 einhängen und Gummikappe
                                 auf 9 schieben.

             10                  Connect the rear brake. Put back the metal cable guide 9 into the position 10.
                                 Check whether the rear wheel is spinning freely. The wheel must stop if you
                            EN   press the brake lever.

                       14
DISC BRAKE
                            CZ   Následně odstraňte přepravní záslepku 12 mezi čelistmi přední
                                 kotoučové brzdy.

                            DE   Den Transportschutz (rot) aus dem Bremssattel entnehmen. Dieser
                  12             wird in Pfeilrichtung aus dem Bremssattel gezogen.
                                 Nach dem Entfernen nicht mehr die Bremshebel ohne eingebauten
                                 Bremsscheiben betätigen.

                            EN   Next, remove the plastic cover between the jaws of front disc brake
                       15        system 12.
DISC BRAKE
CZ Přední kolo 13 vložte ve směru šipky do přední vidlice, současně dávejte pozor,
aby brzdný kotouč byl přesně mezi čelistmi přední brzdy.
DE Das Vorderrad in die Gabel einhängen und auf einen geraden Sitz achten. In
dieser Position, durchläuft die Bremsscheibe den Bremssattel.
Put the front wheel 13 in the direction of the arrow into the front fork, while
paying attention to the brake disc must be precisely between the jaws of the
EN front brakes.
13
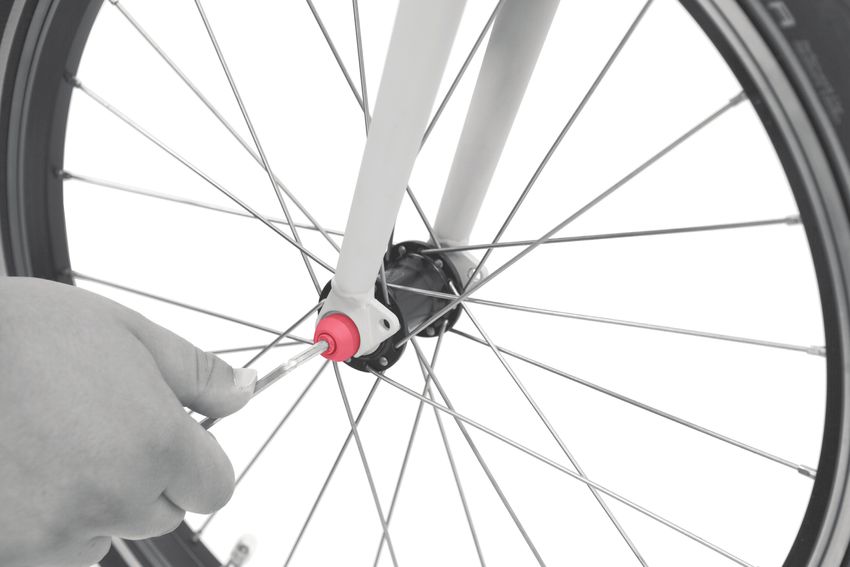
16
DISC BRAKE
CZ Nábojem kola protáhněte osu s rychloupínákem 14 nebo šroubem. Ten zafixujte
oproti matce 15 a dotáhněte tak, aby při následujícím kroku proběhlo úplné a
pevné uchycení kola.
14 DE Rad-Schnellspanner 14 durch die Radnabe stecken und Mutter des
15 Schnellspanners anschrauben.
EN Insert the axis with quickrelease 14 or bolt into the front wheel hub and fix it
with the nut 15.
17
DISC BRAKE
CZ Dotáhněte rychloupínák nebo šroub 16 .
16
Den Hebel des Schnellspanners nach oben drücken um das Rad endgültig zu
befestigen.
DE
Tighten up the quick release or bolt 16 .
16
EN
18
DISC BRAKE
CZ Odstraňte přepravní záslepku 17 mezi čelistmi zadní kotoučové brzdy.
17
DE Den Transportschutz 17, in gleicher Weise wie vorne,
dem Bremssattel hinten entnehmen.
Bitte danach nicht den Bremshebel betätigen.
EN Remove the plastic cover between the jaws of rear disc brake system
17.
19
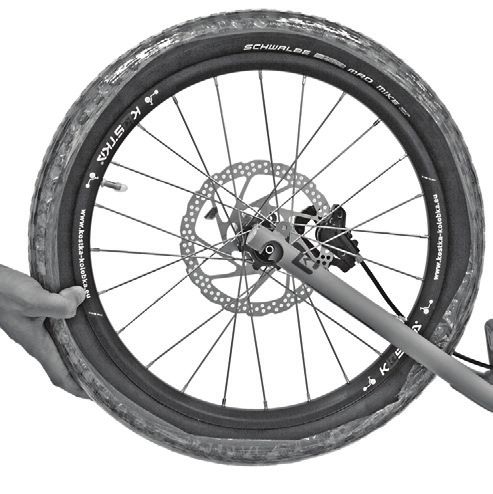
DISC BRAKE 18
CZ Zadní kolo 18 vložíte ve směru šipky do zadní vidlice, současně dávejte
pozor, aby brzdný kotouč byl přesně mezi čelistmi zadní brzdy.
DE DDas Hinterrad 18 in Pfeilrichtung am Roller montieren. Auch hier auf
den richtigen Sitz der Bremsscheibe achten.
EN Put the rear wheel 18 in the direction of the arrow into the rear fork,
while paying attention to the brake disc must be precisely between the
jaws of the rear brake.
20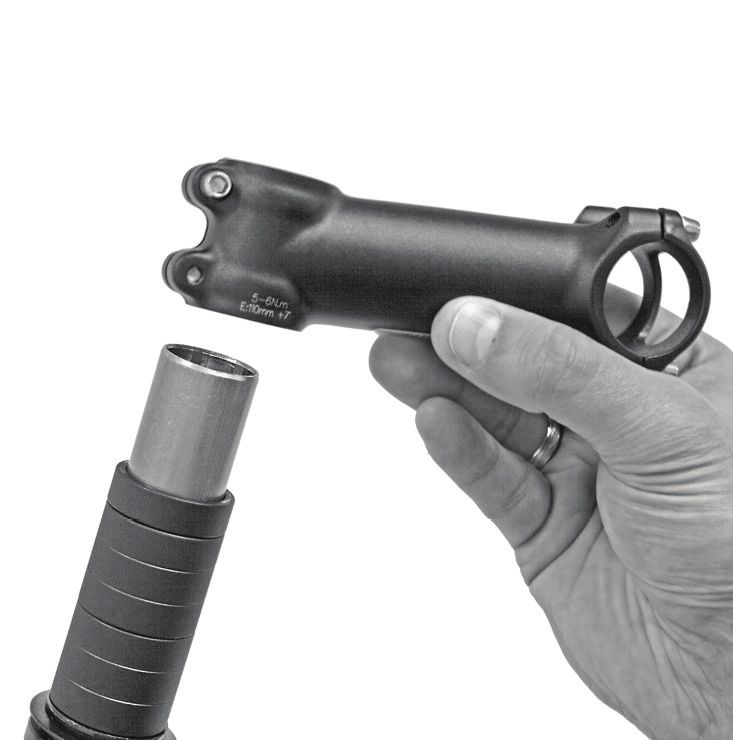
DISC BRAKE
CZ Zadní kolo zafixujte utažením vložené osy 19 pomocí imbusového klíče.
Mit der Steckachse 19 das hintere Rad fest anziehen und auf den
19 DE korrekten Sitz des Rades achten.
Secure the rear wheel with bolt 19 by a hex key.
EN
21
DISC BRAKE
CZ Zobrazení detailu zajištění zadního kola.
DE
Abbildung des gesicherten Hinterrades und Anschlagzapfen im Rollerrohr.
The detail of rear wheel security.
EN
22
CZ Adaptér na psí vodítko zasuňte ve směru šipky do připraveného otvoru
20.
20 DE Den Leinenabstandhalter in die dafür vorgesehene Aufnahme 20
stecken.
EN Insert the dog leash adapter in the direction of arrow to the hole 20.
23
CZ Adaptér na psí vodítko zafixujte utažením červíků 21.
21
21
DE Den Leinenabstandhalter mit den 2 Madenschrauben 21 festziehen.
EN Fix the dog leash adapter with the screws 21.
24
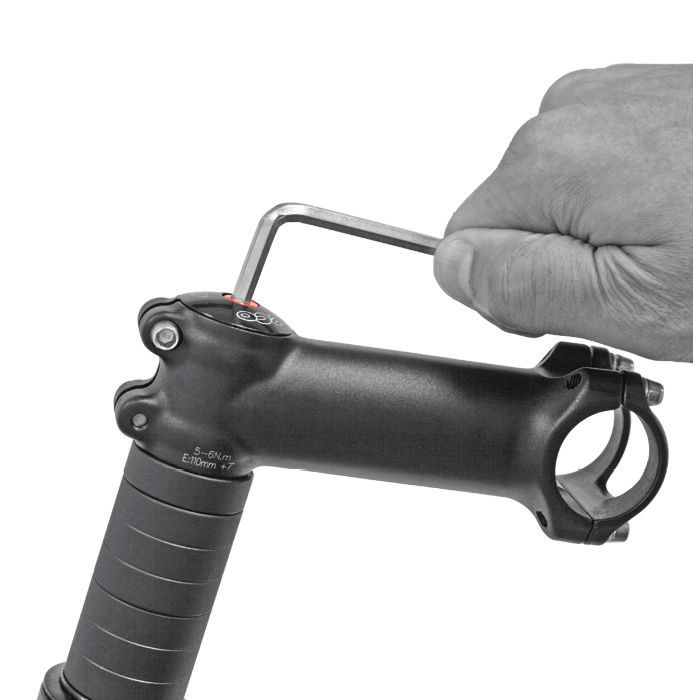
CZ Srovnejte řidítka vůči kolu ve směru jízdy, dotáhněte šrouby 3.
3
DE Lenker korrekt in Geradeausstellung drehen und mit Schrauben 3
fixieren.
3
EN Set the handlebars with the front wheel in the right driving direction,
tighten up the bolts 3.
25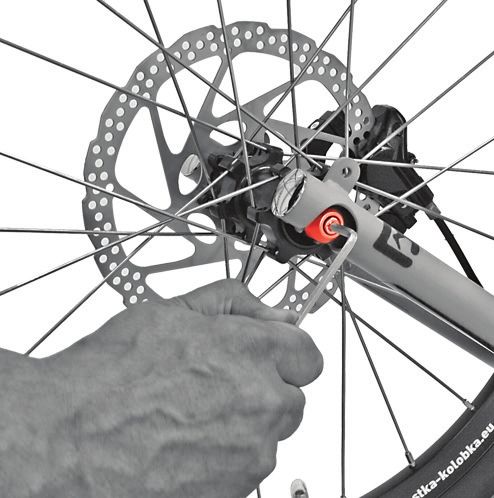
KOSTKA - kolobka, s.r.o.
   Purkyňova 649/127
 612 00 Brno - Medlánky

  Tel.: +420 583 231 025
E-mail: dotazy@kolobka.cz

 www.KOSTKAfootbike.com
Sie können auch lesen