Kurzanleitung Brief Instructions Notice d'utilisation sommaire - Ikarus
←
→
Transkription von Seiteninhalten
Wenn Ihr Browser die Seite nicht korrekt rendert, bitte, lesen Sie den Inhalt der Seite unten

USB
              Kurzanleitung
            Brief Instructions
      Notice d’utilisation sommaire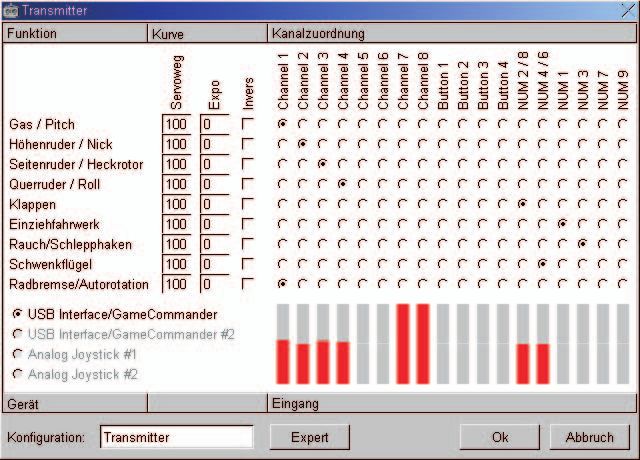
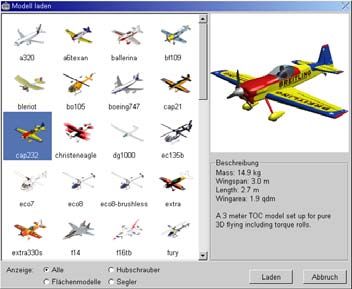
Kurzanleitung AeroFly Professional Deluxe
Die folgende Kurzanleitung gibt Ihnen einen Schnelleinstieg in AeroFly Professional Deluxe (AeroFly). Für ein tieferes
Verständnis von AeroFly empfehlen wir Ihnen die komplette Anleitung zu lesen, denn nur so können Sie auch das volle
Potential von AeroFly ausschöpfen.

1. AeroFly Professional Deluxe installieren
AeroFly verwendet den Autostart-Mechanismus von Windows zum automatischen Starten der
Installationssoftware. Legen Sie also einfach die AeroFly CD in Ihr CDROM Laufwerk.
Daraufhin beginnt die Installation selbsttätig und es erscheint der Startbildschirm des
Setupprogramms. Hier können Sie auswählen, in welcher Sprache AeroFly installiert werden
soll. Bitte beachten Sie, dass es sich hierbei lediglich um die Sprache während der Installation
handelt. AeroFly wird standardmässig mit den Sprachen Englisch, Deutsch und Französisch
ausgeliefert und sie können während des Betriebes von AeroFly jederzeit die Sprache wechseln.
Während der Installation werden Sie gefragt, ob Sie DirectX 9.0 installieren möchten.
Installieren Sie DirectX 9.0 unbedingt, wenn Sie sich nicht 100% sicher sind, dass es sich bereits auf Ihrem System
befindet, da AeroFly sonst nicht korrekt ausgeführt werden kann. Nach der Installation kann ein von Neustart von
Windows erforderlich sein.

2. USB Kabel/USB GameCommander anschliessen
Schliessen Sie nun das USB-Interfacekabel bzw. den
USB-GameCommander an einen freien USB-Anschluss an.
Windows erkennt automatisch das USB Kabel/GameCommander.
Dieser Vorgang dauert ein paar Sekunden. Eine Installation von
Treibern ist nicht notwendig. Unter Windows 98SE kann es
notwendig sein, das Sie nach Ihrer Windows Installations CD gefragt
werden. Wenn Sie das USB-Interfacekabel verwenden, schalten Sie
als nächstes Ihre Fernsteuerung ein.
Wichtig: Das beiliegende USB Interfacekabel muss während des
gesamten Betriebes an der USB Schnittstelle angeschlossen sein,
auch dann, wenn Sie anstatt einer Fernsteuerung einen analogen
Joystick als Steuerung verwenden möchten.

3. AeroFly Starten
Um AeroFly zu starten, wählen Sie im Startmenü von
Windows zunächst Programme und dann den Ordner
AeroFly Professional Deluxe. Wählen Sie dort den Eintrag
AeroFly Professional Deluxe. Alternativ können Sie auch
durch Doppelklick auf das Icon „AeroFly Professional
Deluxe“ auf dem Windows Desktop AeroFly starten. Dieses
Icon wird automatisch von der Installationssoftware auf dem
Windows Desktop angelegt.

4. Modell auswählen
Nach dem Programmstart von AeroFly erscheint das Hauptmenü.. Das
aktuelle Modell dreht sich in der Bildschirmmitte. Sie können nun ein
anderes Modell laden, dabei stehen Ihnen standardmässig 55 Flugmodelle
zur Auswahl. Um ein neues Modell zu Laden klicken Sie auf den Button
„Aircraft I“. Wählen Sie ein Modell und klicken Sie mit der linken
Maustaste auf das kleine Bild das daraufhin blau unterlegt wird. Im rechten
Teil des Fensters wird ein Vorschaubild zusammen mit einer kurzen
Beschreibung des Modells erscheinen. Klicken Sie auf den Button Laden.
Nach dem Laden wird sich das gewählte Modell in der Mitte des
Menüscreens drehen.

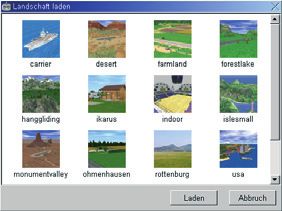
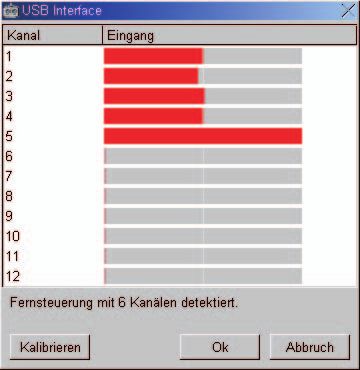
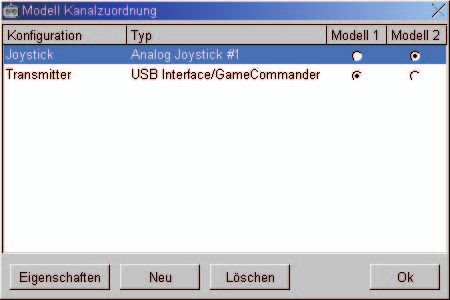
5. Szenerie laden
Nun wählen Sie eine Szenerie aus, in der Sie mit Ihrem Modell fliegen wollen. Ihnen
stehen standardmässig 14 Landschaften zur Auswahl. Klicken Sie auf den Button
„Scenery“ und wählen in dem anschliessenden Fenster Ihre Landschaft aus. Die neue
Landschaft erscheint als Vorschau auf der Postkarte im rechten unteren Teil des
Hauptmenüs.

6. Kalibrieren der Fernsteuerung / GameCommander
Nun müssen Sie Ihre Fernsteuerung bzw. den USB GameCommander kalibrieren.
Dieser Schritt ist notwendig, damit AeroFly die Mittel- und Maximalstellungen all
Ihrer Knüppel und Schalter korrekt erkennt. Klicken Sie als erstes auf den Button
„Calibrate“. Daraufhin öffnet sich ein Fenster mit einer Liste aller angeschlossenen
Geräte. Falls Sie eine Fernsteuerung am USB Kabel angeschlossen haben, wird hier
„USB Interface“ stehen, im Falle eines USB GameCommanders steht auch „USB
GameCommander“ in der Liste.

Doppelklicken Sie nun auf die Zeile mit dem Gerät, dass Sie kalibrieren wollen. Es wird
sich ein weiteres Fenster öffnen, indem Sie eine Liste mit allen Kanälen sehen. Bei einer
Fensteuerung erkennt das USB Kabel automatisch, wieviele Kanäle von der
Fernsteuerung übertragen werden. Klicken Sie auf den Button „Kalibrieren“ und
folgenden den Answeisungen auf dem Bildschirm.

7. Kanäle zuordnen
Zum Abschluss müssen Sie noch alle Knüppel und Schalter den einzelnen
Modellfunktionen zuordnen. Klicken Sie hierzu auf den Button „Controls“ im
Hauptmenü. Wenn Sie eine Fernsteuerung am USB-Interfacekabel oder den
USB-GameCommander verwenden, klicken Sie auf die Zeile mit der
Konfiguration „Transmitter“. Klicken Sie dann auf den Button
„Eigenschaften“, woraufhin sich ein weiteres Fenster öffnen.

Die einzelnen Zeilen entsprechen den unterschiedlichen
Modellfunktionen. In den Spalten wählen Sie jeweils Ihren
Fernsteuerungsknüppel bzw. Schalter aus, mit dem Sie eine
bestimmte Modellfunktionen kontrollieren möchten. Nun
wählen Sie aber zuerst aus, mit welchem Eingabegerät Sie
steuern möchten. Klicken Sie dazu im unteren linken Teil des
Fensters auf USB Interfacekabel / USB GameCommander oder
auf Analog Joystick. Bewegen Sie nun den Knüppel oder
Schalter, mit dem Sie die Funktion Gas/Pitch kontrollieren
möchten. Beobachten Sie, in welcher Spalte sich der rote Balken
bewegt. Wählen Sie dann im Schnittpunkt der Zeile und Spalte
den Knopf aus. Fahren Sie so für die verbleibenden Funktionen
fort. Wenn Sie fertig sind, klicken Sie auf Ok und nochmals auf
Ok.

Sie haben jetzt alle notwendigen Einstellungen vorgenommen um ein Modellflugzeug zu Steuern. Klicken Sie jetzt auf den
Button „Fly“ und Sie wechseln in den Simulationsmodus. Für weitere Details lesen Sie bitte in der ausführlichen
Anleitung nach

Bei weiteren Fragen können Sie unsere Service Hotline anrufen unter 0190- 795020 (1,24€/min) oder info@ikarus.net
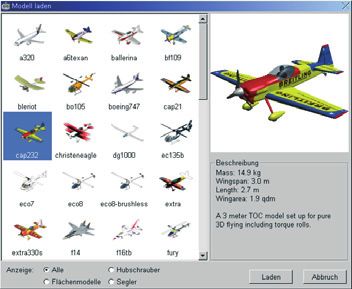
Brief Instructions for AeroFly Professional Deluxe
The following brief instructions will give you a fast introduction to AeroFly Professional Deluxe. For a deeper understand-
ing of AeroFly, we recommend that you read the full instructions, since only in this way you will be able to exploit the full
potential of AeroFly.

1. Installation of AeroFly Professional Deluxe

AeroFly uses the auto-start feature of Windows to automatically start the installation software.
Therefore, simply insert the AeroFly CD in your CD ROM drive. The installation will then begin
automatically and the start window of the set-up program will appear on your screen. Here you
can select the language in which you wish to install AeroFly. Please note that this refers only to
the language used during the installation. AeroFly is supplied with the standard languages
English, German and French and you may switch from one to the other at any time you wish
while operating AeroFly. In the course of the installation you will be asked whether you wish to
install DirectX 9.0. It is essential that you install DirectX 9.0 unless you are 100% certain that it is
already installed in your system, because without DirectX 9.0 it is not possible to properly execute AeroFly. After the
installation it is necessary to re-start Windows.

2. Connect USB Cable/USB GameCommander                                    Picture 1: Graupner /JR / Lexors
Now you may connect the USB interface cable and/or the USB
GameCommander to a free USB socket. Windows automatically
recognises the USB cable/GameCommander. This procedure takes                                     Interface cable          USB-Port PC
only a few seconds. It is not necessary to install any drivers. Under
Windows 98SE your Windows installation CD may be required. If you
wish to use the USB interface cable, first switch on your R/C transmit-   Picture 2: Multiplex / Futaba / Robbe

ter.
If using your own transmitter you must have it connected to the USB
interface cable. As manufacturers of R/C radios use a variety of
different trainer jacks, there may be an optional adapter required.                            Y-Adaptator         Interface cable      USB-Port PC
If the transmitter is not connected, the Aero Fly may shut down. It
may be necessary to switch on the transmitter. Certain transmitters
may power up automatically after it is connected to the interface
cable. We recommend to remove both your TX crystal or RF module
from the transmitter.
Important: The USB interface cable provided must be connected to
the USB interface at all times during the entire operation, even when
you wish to use an analog joystick as control unit instead of your
R/C transmitter.

3. Start AeroFly
To start AeroFly, first select Programs in the start menu and
then the AeroFly Professional Deluxe folder. There, select
AeroFly Professional Deluxe. Alternatively, just double click
the icon for AeroFly Professional Deluxe on your Windows
desktop. This icon is automatically installed on the Windows
desktop by the installation software.

4. Calibrate the Remote Control / GameCommander

It is now necessary to calibrate your remote control and/or USB GameCommander.
This step is required so that AeroFly is able to recognise the mean and maximum
settings of all your joystick and control switches correctly. To begin with, click the
“Calibrate” button. Now, a new window will open with a list of all devices. If you have
connected a remote control to the USB cable, “USB Interface” will appear. In case you
use the USB GameCommander, “USB GameCommander” will also be on the list.

Double-click on the line indicating the device you wish to calibrate. Now, a new window
will appear, showing a list of all channels. In the case of remote control, the USB cable
automatically recognises how many channels are transmitted by the remote control
element. Click the “Calibrate” button and follow the instructions shown on the screen.

5. Allocate Channels

Finally, all joystick and control switches must be allocated to the respective
individual model functions. For this, click the “controls” button in the main
menu. If you wish to use an RC transmitter on the USB interface cable, or the
USB GameCommander, click the line with the configuration “Transmitter”. Then
click the button “Properties”, upon which another new window will appear.

6. Load Scenery

Now, you may load the scenery in which you wish to fly with your model. You have
14 standard sceneries to choose from. Click the “Scenery” button and select the
scenery from the window which then appears. A preview of the new scenery can be
viewed on the postcard on the lower, right-hand side of the main menu.

7. Select Model

After starting the AeroFly program, the main menu appears. The currently
selected model is seen rotating in the centre of the screen. You may now
load a different model, whereby you have 55 aircraft models to choose from.
To load a new model, click the button, “Aircraft 1”. Choose a model and click
with the left-hand mouse key on the small thumbnail picture, which will
then be highlighted in blue. On the right-hand side of the window, a
preview image of the model with a short description will then appear. Now
click on the “Load” button. After loading, the chosen model will be seen
rotating in the centre of the menu window.

The individual lines correspond to the different control
functions. In the columns, you can select your respective
joystick and/or control switch with which you wish to control a
particular model function. Now, however, it is first of all
necessary to select which control input device you wish
to use. To do this, click “Transmitter” (USB Interface cable / USB
Game Commander) or “Joystick” on the lower, left-hand side of
the window. Now move the joystick or the toggle-switch with
which you wish to control the Throttle/Pitch function. Observe
in which column the red bar moves. Then follow that column
up to the intersections with the Throttle/Pitch column on the
left and put a dot in the box at the intersection point. Follow
the same procedure for the remaining channels. When
you have finished, click OK and then again OK.
8. Fly

You have now completed all the necessary settings in order to control your model aircraft. Now, you may click the “Fly”
button which will switch you over to simulation mode. For further details please refer to the full instructions manual.
Notice d’utilisation sommaire AeroFly Professional Deluxe
Cette notice d’utilisation sommaire vous donne un aperçu rapide du fonctionnement de votre AeroFly Professional
Deluxe (AeroFly). Pour plus de détails concernant AeroFly, nous vous recommandons de lire la notice complète : ce n’est
qu’ainsi que vous pourrez exploiter toutes les possibilités d’AeroFly.

1. Installer AeroFly Professional Deluxe

AeroFly utilise le mécanisme d’autodémarrage de Windows pour lancer automatiquement le
logiciel d’installation. Il vous suffit donc de placer le CD AeroFly dans votre lecteur de CD-ROM.
L’installation débute alors d’elle-même et un écran de démarrage du programme d’installation
s’affiche. Vous pouvez à ce moment choisir dans quelle langue le logiciel sera installé. Notez
S.V.P. qu’il ne s’agit que de la langue pour l’installation du programme. AeroFly est livré de
manière standard en Anglais, Allemand et Français et vous pouvez à tout moment changer de
langue pendant le fonctionnement du logiciel. Pendant l’installation, on vous demandera si
vous souhaitez installer DirectX 9.0. Si vous n’êtes pas sûr à 100% que DirectX 9.0 se trouve déjà
dans votre système, vous devez l’installer impérativement, sinon AeroFly ne pourra pas fonctionner correctement.
Après l’installation, un redémarrage de Windows peut être nécessaire.

2. Brancher le câble USB / le GameCommander USB
                                                                         Schéma 1: Graupner /JR / Lexors
Branchez à présent le câble interface USB resp. le GameCommander
USB à un port USB libre. Windows le reconnaîtra automatiquement :
cela prend quelques secondes. L’installation d’un pilote n’est pas                             Câble interface          Port USB du PC
nécessaire. Sous Windows 98SE, il se peut qu’on vous demande de
placer votre CD d’installation Windows. Si vous utilisez un câble USB,
allumez en premier votre télécommande.                                   Schéma 2: Multiplex / Futaba / Robbe

Important : Le câble interface USB ci-joint doit être branché pendant
tout le fonctionnement au port USB, même lorsque vous désirez
utiliser un joystick analogue au lieu d’une télécommande.
                                                                                             Adaptateur Y        Câble interface         Port USB du PC

3. Démarrer AeroFly

Afin de lancer AeroFly, choisissez tout d’abord Programme
dans le menu de démarrage de Windows, puis sélectionnez le
dossier AeroFly Professional Deluxe et cliquez sur l’icône
AeroFly Professional Deluxe. Vous pouvez également démar-
rer le programme en effectuant un double-clic sur l’icône «
AeroFly Professional Deluxe », se trouvant sur le bureau
Windows. Cette icône sera installée automatiquement sur le
bureau Windows par le logiciel d’installation.

4. Calibrer la télécommande / le GameCommander

Vous devez maintenant calibrer votre télécommande resp. votre GameCommander
USB. Cette étape est nécessaire afin qu’AeroFly reconnaisse correctement les
positions moyennes et maximales de votre levier et de votre bouton de commande.
Cliquez en premier sur le bouton « Calibrer ». Une fenêtre s’ouvre alors, présentant
une liste de tous les appareils reliés. Si vous avez branché une télécommande au
câble USB, il s’affichera « Interface USB » ; dans le cas d’un GameCommander USB, ce
sera « GameCommander USB ».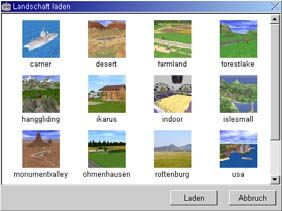
Effectuez un double-clic sur la ligne de l’appareil que vous souhaitez calibrer. Une autre
fenêtre s’ouvrira, dans laquelle vous verrez une liste de tous les canaux. Dans le cas
d’une télécommande, le câble USB reconnaîtra automatiquement combien de canaux
peuvent être gérés par la télécommande. Cliquez sur le bouton « Calibrer » et suivez les
instructions qui apparaissent sur l’écran.

5. Ordonner les canaux

Vous devez enfin ordonner toutes les commandes des fonctions individuelles
de votre modèle. Cliquez sur le bouton bouton « Contrôles » dans le menu
général. Si vous utilisez une télécommande ou un GameCommander USB,
cliquez sur la ligne avec la configuration « Transmetteur ». Cliquez alors sur le
bouton « Particularités », à la suite de quoi une autre fenêtre s’ouvre.

Chaque ligne représente une fonction du modèle. Dans les
colonnes, choisissez le(s) levier(s) resp. bouton(s) de commande
avec le(s)quel(s) vous souhaitez contrôler une fonction détermi-
née du modèle. A présent, sélectionnez en premier lieu avec
quel appareil vous voulez diriger. Cliquez pour cela dans la
partie inférieure de la fenêtre sur : Câble interface USB / Game-
Commander USB ou Joystick analogue. Actionnez alors le levier
ou le bouton avec lequel vous souhaitez contrôler la fonction
Gaz / Pitch. Observez dans quelle colonne la barre rouge se met
en mouvement. Choisissez alors au croisement de la ligne et de
la colonne le bouton correspondant. Procédez de la même
façon pour les fonctions restantes. Lorsque vous avez terminé,
cliquez sur OK, puis à nouveau sur OK.

6. Charger le scénario

Choisissez à présent un scénario selon lequel vous souhaitez voler avec votre
modèle. Vous disposez de 14 paysages. Cliquez sur le bouton « Scénario » et choisis-
sez dans la fenêtre qui suit votre paysage. Le nouveau paysage apparaît en aperçu
sur la carte postale dans la partie inférieure droite du menu général.

7. Choisir le modèle

Après le démarrage du programme AeroFly, le menu général apparaît. Le
modèle actuel est présenté en rotation au centre de l’écran. Vous pouvez
alors choisir un autre modèle parmi les 55 modèles volants standard à votre
disposition. Pour télécharger un nouveau modèle, cliquez sur le bouton «
Aircraft I ». Choisissez un modèle et cliquez avec la touche gauche de la
souris sur la petite photo dont le fond devient alors bleu. Dans la partie
droite de la fenêtre, vous verrez une démonstration et une description
rapide du modèle. Cliquez sur le bouton « Télécharger ». Après le charge-
ment, c’est le modèle sélectionné qui apparaîtra au milieu de l’écran de
menu.

Vous avez alors effectué tous les réglages requis pour gouverner un modèle. Cliquez maintenant sur le bouton « Vol » :
vous passez alors en mode simulation. Pour plus d’informations, merci de lire la notice détaillée.
Im Webertal 22
78713 Schramberg-Waldmössingen   5876 Enterprise Parkway       19, Rue Desaix
Bestelltelefon:                  Billy Creek Commerce Center   Strasbourg Nord
++49 (0) 74 02 - 92 91-90        Fort Myers, FL 33905          67450 Mundolsheim
Hotline: (1,24 €/Min.)           Phone +1-239-690-0003         Tél.: 03 88 18 11 11
++49 (0) 190 - 79 50 20          Fax +1 -239-690-0028          Fax : 03 88 18 11 17
Fax: ++49 (0) 74 02 - 92 91-50   info@ikarus-usa.com           info@ikarus-france.com
info@ikarus.net
Sie können auch lesen


