ECO-N-MPPT PSW-B/H PhocosLink PC for CXup CXNup CXNsolid - Betriebsanleitung User Manual Manual del Usuario
←
→
Transkription von Seiteninhalten
Wenn Ihr Browser die Seite nicht korrekt rendert, bitte, lesen Sie den Inhalt der Seite unten
PhocosLink PC for
      CXup
     CXNup
    CXNsolid
  ECO-N-MPPT
    PSW-B/H

 Betriebsanleitung
   User Manual
 Manual del Usuario

    www.phocos.com
CONTENTS

                 Betriebsanleitung     1-9

                      User Manual      10 - 18

           Manual de Instrucciones     19 - 27

              Guide de l'utilisateur   28 - xx

                Manual do Usuário      xx - xx

                       用户说明书           xx - xx
Inhaltsverzeichnis
1.0 Produkteinführung .................................................................................................................................................................................................................. 1
2.0 Wichtige Sicherheitshinweise ............................................................................................................................................................................................. 1
3.0 Systemvoraussetzungen ....................................................................................................................................................................................................... 1
4.0 Installation .................................................................................................................................................................................................................................. 2
5.0 Funktionen.................................................................................................................................................................................................................................. 3
6.0 Haftungsausschluss ................................................................................................................................................................................................................ 9
7.0 Technischer Support .............................................................................................................................................................................................................. 9
1.0 Produkteinführung
Mit PhocosLink PC können Sie alle unterstützten Produkte konfigurieren, überwachen und warten. PhocosLink PC wird Ihnen dabei helfen,
Ihr System besser zu verstehen und somit einen fehlerfreien Betrieb gewährleisten.
PhocosLink bietet folgende Funktionalitäten:
Anzeige des aktuellen Systemzustands
Darstellung der Datenloggerinformationen
Konfiguration der Einstellungen
Aktualisierung der Firmware
Sichern der Datenloggerinformationen/-Einstellungen
2.0 Wichtige Sicherheitshinweise
Achtung:
Lesen Sie vor der Installation und Verwendung von PhocosLink PC diese folgende Betriebsanleitung sorgfältig durch.
3.0 Systemvoraussetzungen
Folgende Produkte werden durch PhocosLink PC unterstützt:
CXup10/20/40
CXNup10/20/40
CXNup20-2B
CXNsolid50
ECO-N-MPPT 85/15
PSW-B/H
Für die Verbindung eines unterstützten Produktes mit ihrem Computer benötigen Sie zusätzlich einen Phocos MXI-Schnittstellenadapter.
Dieser ist in zwei Versionen verfügbar. Möchten Sie die RS232-Schnittstelle Ihres Computers nutzen, benötigen Sie ein MXI 232. Falls Sie
die USB-Schnittstelle nutzen möchten, benötigen Sie ein MXI USB.
Ihr Computer muss zudem folgende Anforderungen erfüllen:
Betriebssystem: Windows 7/8/10
Bei den Produkten PSW-B und PSW-H wird kein Phocos MXI-Schnittstellenadapter benötigt. Diesen Geräten liegt ein RS232-
Schnittstellenkabel bei.
www.phocos.com 1 | Page
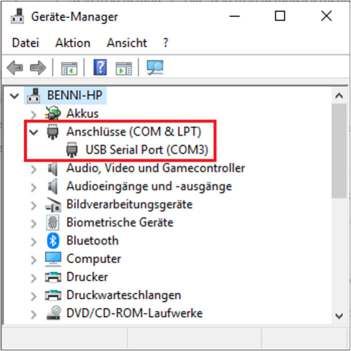
4.0          Installation
4.1      Phocos MXI 232
Das MXI 232 benötigt keine zusätzliche Treiberinstallation. Es kann an jeder ordnungsgemäß installierten RS-232-Schnittstelle (COM)
betrieben werden.

4.2      Phocos MXI USB
Das MXI USB wird als USB Serial Port installiert. Verbinden Sie hierzu das MXI USB mit einem freien USB-Port Ihres Computers. Die
Installation der neusten Version des MXI USB erfolgt automatisch. Es müssen keine Treiber manuell installiert werden. Für die Installation
älterer MXI USB Schnittstellenadapter befolgen Sie bitte die Installationsanleitung MXI-Driver auf unserer Homepage. Bei einer
erfolgreichen Treiberinstallation wird ein MXI USB wie folgt im Geräte-Manager angezeigt.

4.3      PhocosLink PC
Mit einem Doppelklick auf PhocosLinkPC.exe starten Sie die Setup-Routine. Folgen Sie den Anweisungen innerhalb der Setup-Routine,
um PhocosLink PC zu installieren. Nach erfolgreicher Installation können Sie PhocosLink PC starten.

 www.phocos.com                                                                                                                2 | Page
5.0          Funktionen

Nach dem Start von PhocosLink PC wird die Startseite angezeigt. Die Startseite bietet folgende Funktionen.

[1] Produkt-Auswahlmenü
Im Produkt-Auswahlmenü werden alle mit dem Computer verbundenen Phocos Produkte angezeigt. PhocosLink PC erkennt beim Start,
ob und welche Produkte an den verfügbaren Schnittstellen angeschlossen sind. Wählen Sie das gewünschte Produkt aus und betätigen
Sie die Start-Taste [2] um fortzufahren. Sollte kein unterstütztes Produkt angeschlossen sein, wird „…“ angezeigt und die Start-Taste [2]
ist nicht sichtbar.

[2] Start-Taste
Durch betätigen der Start-Taste [2] fahren Sie mit dem gewählten Produkt fort. Es wird die Systemstatus-Seite für dieses Produkt geöffnet.
Die Start-Taste [2] ist nur sichtbar, wenn ein unterstütztes Produkt erkannt wurde.

[3] Öffnen-Taste
Durch betätigen der Öffnen-Taste [3] wird ein Datei-Explorer geöffnet. Innerhalb diesem können Sie in der Vergangenheit gespeicherte
PhocosLink PC Logdateien öffnen.

[4] Wiederherstellungs-Taste
Durch betätigen der Wiederherstellungs-Taste [4] wird der Wiederherstellungsmodus gestartet. Dieser Modus dient dazu, die Firmware
eines Produktes wiederherzustellen, z.B. nach einem fehlgeschlagenen Firmware-Update.

[5] Aktualisierungs-Taste
Durch betätigen der Aktualisierungs-Taste [5] wird erneut geprüft, ob an den verfügbaren Schnittstellen unterstützte Produkte
angeschlossen sind.

[6] Bildschirmmodus-Taste
Durch betätigen der Bildschirmmodus-Taste [6] wird der Vollbildmodus aktiviert bzw. deaktiviert falls bereits aktiv.

[7] Remote-Modus
Dieser Modus ermöglicht den Fernzugriff mit ausgewählten Modems.

[8] Sprach-Auswahlmenü
Im Sprach-Auswahlmenü [8] können Sie die Sprache für die Benutzeroberfläche wählen.

 www.phocos.com                                                                                                                3 | Page
5.1     Systemstatus
Die Systemstatus-Seite zeigt den aktuellen Systemstatus Ihres Produktes an. Es werden sowohl allgemeine Informationen wie Gerätetyp
oder Seriennummer als auch aktuelle Strom-, Spannungs- und Temperaturparameter angezeigt. Der in der linken Spalte angezeigte
aktuelle Systemstatus wird zusätzlich durch die Symbolreihe unterhalb der Produktabbildung visualisiert. In der Tabellenansicht werden
alle abgefragten Systemzustände in chronologischer Reihenfolge dargestellt. Die Systemstatus-Seite bietet folgende Funktionen.

[1] Home-Taste
Durch betätigen der Home-Taste [1] kehren Sie zur Startseite zurück.

[2] Seiten-Auswahlmenü
Im Seiten-Auswahlmenü [2] können Sie auswählen, welche Seite angezeigt werden soll.

[3] Datenblatt-Taste
Durch betätigen der Datenblatt-Taste [3] öffnen Sie den Datenblattbereich unserer Homepage innerhalb Ihres Webbrowsers.

[4] Aktualisierungs-Taste
Durch betätigen der Aktualisierungs-Taste [4] wird der aktuelle Systemzustand abgefragt.

[5] Betriebsanleitungs-Taste
Durch betätigen der Betriebsanleitungs-Taste [5] öffnen Sie den Betriebsanleitungsbereich unserer Homepage innerhalb Ihres
Webbrowsers.

 www.phocos.com                                                                                                            4 | Page
5.2     Datenlogger
Die Datenlogger-Seite zeigt Ihnen den Inhalt des Datenloggers an. Der Inhalt des Datenloggers kann durch PhocosLink PC tabellarisch
und grafisch angezeigt werden. Die Datenlogger-Seite bietet folgende Funktionen.

[1] Home-Taste
Durch betätigen der Home-Taste [1] kehren Sie zur Startseite zurück.

[2] Seiten-Auswahlmenü
Im Seiten-Auswahlmenü [2] können Sie auswählen welche Seite angezeigt werden soll.

[3] Löschen-Taste
Durch betätigen der Löschen-Taste [3] können Sie den Inhalt des Datenloggers löschen. Nach dem betätigen erfolgt die
Sicherheitsabfrage, ob der Löschvorgang durchgeführt werden soll. Sie können das Löschen des Datenloggers bestätigen oder den
Löschvorgang abbrechen.

[4] Tabellen-Auswahlmenü
Im Tabellen-Auswahlmenü [4] können Sie auswählen, welche Daten in tabellarischer Form angezeigt werden sollen.

[5] Diagramm-Auswahlmenü
Im Diagramm-Auswahlmenü [5] können Sie auswählen, welche Daten als Diagramm angezeigt werden sollen.

[6] Speicher-Taste
Durch betätigen der Speichern-Taste [6] wird ein Datei-Explorer geöffnet. Innerhalb diesem können Sie den Inhalt des Datenloggers als
PhocosLink PC Logdatei abspeichern. Diese Logdatei können Sie zukünftig jederzeit erneut mit PhocosLink PC öffnen.

 www.phocos.com                                                                                                            5 | Page
5.3      Einstellungen
Die dargestellte Einstellungen-Seite zeigt die aktuellen Einstellungen Ihres Produktes an und bietet die Möglichkeit, diese zu ändern. In
der linken Spalte werden die aktuellen Einstellungen Ihres Produktes angezeigt. Innerhalb der Einstellungen-Seite selbst können die
Einstellungen geändert werden. Erst nach einer erfolgreichen Übertragung zum Produkt werden die neuen Einstellungen übernommen.
Die Einstellungen-Seite bietet folgende Funktionen.

[1] Home-Taste
Durch betätigen der Home-Taste [1] kehren Sie zur Startseite zurück.

[2] Seiten-Auswahlmenü
Im Seiten-Auswahlmenü [2] können Sie auswählen, welche Seite angezeigt werden soll.

[3] Öffnen-Taste
Durch betätigen der Öffnen-Taste [3] wird ein Datei-Explorer geöffnet. Innerhalb diesem können Sie in der Vergangenheit gespeicherte
PhocosLink PC Logdateien öffnen, um die darin gespeicherten Einstellungen zu laden.

[4] Aktualisierungs-Taste
Durch betätigen der Aktualisierungs-Taste [4] werden die aktuellen Einstellungen abgefragt.

[5] Lade-Taste
Durch betätigen der Lade-Taste [5] werden die Einstellungen zum Produkt übertragen.

[6] Speichern-Taste
Durch betätigen der Speichern-Taste [6] wird ein Datei-Explorer geöffnet. Innerhalb diesem können Sie eine PhocosLink PC Logdatei
abspeichern. Diese Logdatei können Sie zukünftig jederzeit erneut mit PhocosLink PC öffnen, um die darin enthaltenen Einstellungen zu
laden.

[7] Werkseinstellungs-Taste
Durch betätigen der Werkseinstellungs-Taste [7] werden die Einstellungen auf Werkseinstellungen zurückgesetzt.

 www.phocos.com                                                                                                               6 | Page
5.4     Firmware
Die Firmware-Seite zeigt in der linken Spalte die Firmware-Version Ihres Produktes an. Die aktuelle Firmware-Datei Ihres Produktes
erhalten Sie auf Anfrage. Mit dieser Firmware-Datei können Sie die Firmware Ihres Produktes aktualisieren. Die Firmware-Seite bietet
folgende Funktionen.

[1] Home-Taste
Durch betätigen der Home-Taste [1] kehren Sie zur Startseite zurück.

[2] Seiten-Auswahlmenü
Im Seiten-Auswahlmenü [2] können Sie auswählen, welche Seite angezeigt werden soll.

[3] Öffnen-Taste
Durch betätigen der Öffnen-Taste [3] wird ein Datei-Explorer geöffnet. Innerhalb diesem kann die Firmware-Datei zur
Produktaktualisierung ausgewählt werden.

[4] Lade-Taste
Durch betätigen der Lade-Taste [4] wird die ausgewählte Firmware zum Produkt übertragen. Die Lade-Taste kann erst betätigt werden,
wenn erfolgreich eine Firmware-Datei geladen wurde.

 www.phocos.com                                                                                                           7 | Page
5.5      Wiederherstellungsmodus
Die Wiederherstellungsmodus-Seite dient dazu, die Firmware eines Produktes wiederherzustellen, z.B. nach einem fehlgeschlagenen
Firmware-Update. Bei Produkten mit fehlerhafter Firmware ist die automatische Produkterkennung nicht mehr möglich. Die Schnittstelle
für das wiederherzustellende Produkt muss manuell gewählt werden. Die aktuelle Firmware-Datei Ihres Produktes erhalten Sie auf unserer
Homepage. Mit dieser Firmware-Datei können Sie die Firmware Ihres Produktes wiederherstellen. Die Wiederherstellungsmodus-Seite
bietet folgende Funktionen.

[1] Home-Taste
Durch betätigen der Home-Taste [1] kehren Sie zur Startseite zurück.

[2] Schnittstellen-Auswahlmenü
Im Schnittstellen-Auswahlmenü [2] muss die Schnittstelle ausgewählt werden, an die das wiederherzustellende Produkt angeschlossen
ist.

[3] Öffnen-Taste
Durch betätigen der Öffnen-Taste [3] wird ein Datei-Explorer geöffnet. Innerhalb diesem kann die Firmware-Datei zur Wiederherstellung
ausgewählt werden.

[4] Aktualisierungs-Taste
Durch betätigen der Aktualisierungs-Taste [4] wird das Schnittstellen-Auswahlmenü aktualisiert.

[5] Lade-Taste
Durch betätigen der Lade-Taste [5] wird die ausgewählte Firmware zum Produkt übertragen. Die Lade-Taste [5] kann erst betätigt werden,
wenn erfolgreich eine Firmware-Datei geladen wurde.

 www.phocos.com                                                                                                            8 | Page
6.0          Haftungsausschluss

Der Hersteller haftet nicht für Schäden, insbesondere an der Batterie, die durch eine nicht wie vorgesehene oder wie im Handbuch
beschriebene Verwendung entstehen oder wenn die Empfehlungen des Batterieherstellers missachtet werden. Der Hersteller haftet nicht,
wenn Reparaturen oder Kundendienst von nicht autorisierten Personen durchgeführt wurden, bei unsachgemäßem Gebrauch, falscher
Installation oder falscher Systemauslegung.

7.0          Technischer Support

Die Spezifikationen können ohne vorherige Ankündigung geändert werden.
Copyright © 2018 Phocos AG, alle Rechte vorbehalten.
Version: 20210419
Entwickelt in Deutschland

Phocos AG
Magirus-Deutz-Str. 12
89077 Ulm, Germany

Phone +49 731 9380688-0
Fax +49 731 9380688-50

www.phocos.com
info@phocos.com

 www.phocos.com                                                                                                           9 | Page
Content
1.0 Introduction ............................................................................................................................................................................................................................ 10
2.0 Important Safety Information.......................................................................................................................................................................................... 10
3.0 System requirements .......................................................................................................................................................................................................... 10
4.0 Installation ............................................................................................................................................................................................................................... 11
5.0 Features .................................................................................................................................................................................................................................... 12
6.0 Liability Exclusion .................................................................................................................................................................................................................. 18
7.0 Technical Support................................................................................................................................................................................................................. 18
1.0 Introduction
With PhocosLink PC you can configure, monitor and maintain all supported products. PhocosLink PC will help you to better
understand your system and ensure error-free operation.
PhocosLink offers the following features:
Display of the current system status
Display of data logger information
Configuration of settings
Firmware update
Saving Data Logger Information/Settings
2.0 Important Safety Information
Warning
Before installing and using PhocosLink, PC read the following operating manual carefully.
3.0 System requirements
The following products are supported by PhocosLink PC:
CXup10/20/40
CXNup10/20/40
CXNup20-2B
CXNsolid50
ECO-N-MPPT 85/15
PSW-B/H
To connect a supported product to your computer, you also need a Phocos MXI interface adapter. This is available in two versions. If you
want to use the RS232 interface of your computer, you need an MXI 232. If you want to use the USB interface an MXI USB.
Your computer must also meet the following requirements:
Operating system: Windows 7/8/10
No Phocos MXI interface adapter is required for the PSW-B and PSW-H products. An RS232 interface cable is included with these devices.
www.phocos.com 10 | P a g e4.0 Installation 4.1 Phocos MXI 232 The MXI 232 does not require any additional driver installation. It can be operated on any properly installed RS-232 interface (COM). 4.2 Phocos MXI USB The MXI USB is installed as a USB serial port. Connect the MXI USB to a free USB port of your computer. The latest version of the MXI USB will be installed automatically. No drivers must be installed manually. For the installation of older MXI USB interface adapters, please follow the installation instructions MXI-Driver on our homepage. If the driver installation is successful, an MXI USB will be displayed in the Device Manager as follows shown. 4.3 PhocosLink PC Double-click PhocosLinkPC.exe to start the setup routine. Follow the instructions within the setup routine to install PhocosLink PC. After successful installation, you can start PhocosLink PC. www.phocos.com 11 | P a g e
5.0           Features

After starting PhocosLink PC, the home page is displayed. The home page shown offers the following functions.

[1] Product selection menu
The product selection menu [1] displays all Phocos products connected to your computer. PhocosLink recognizes at startup if and which
products are connected to the available interfaces. Select the desired product and press the start button [2] to continue. If no supported
product is connected, "..." is displayed and the start button [2] is not visible.

[2] Start button
By pressing the start button [2] you continue with the selected product. The system state page for this product will open. The start button
[2] is only visible if a supported product has been detected.

[3] Open button
Press the open button [3] to open a file explorer. Within this you can open PhocosLink log files saved in the past.

[4] Restore button
Press the restore button [4] to start the restore mode. This mode is used to restore the firmware of a product, e.g. after a failed firmware
update.

[5] Update button
By pressing the update button [5] it is checked again whether supported products are connected to the available interfaces.

[6] Screen mode button
Pressing the screen mode button [6] activates the full screen mode or deactivates it if it is already active.

[7] Remote-Mode
This mode allows remote access with selected modems.

[8] Language selection menu
In the language selection menu [8] you can select the language for the user interface.

 www.phocos.com                                                                                                                 12 | P a g e
5.1      System State
The system state page shows the current system state of your product. It displays general information such as device type or serial number
as well as current, voltage and temperature parameters. The current system state displayed in the left column is additionally visualized by
the row of symbols below the product image. In the table view, all queried system states are displayed in chronological order. The system
state page offers the following functions.

[1] Home button
Press the home button [1] to return to the start page.

[2] Page selection menu
In the page selection menu [2] you can select which page should be displayed.

[3] Datasheet button
Press the datasheet button [3] to open the data sheet area of our homepage within your web browser.

[4] Update button
By pressing the update button [4], the current system status is queried.

[5] User manual button
By pressing the user manual button [5] you open the user manual area of our homepage within your web browser.

 www.phocos.com                                                                                                                13 | P a g e
5.2      Data Logger
The data logger page shows the contents of the data logger. The contents of the data logger can be displayed by PhocosLink PC in
tabular or graphical form. The data logger page offers the following functions.

[1] Home button
Press the home button [1] to return to the start page

[2] Page selection menu
In the page selection menu [2] you can select which page should be displayed.

[3] Delete button
Press the delete button [3] to delete the contents of the data logger. After pressing the button, you will be asked whether you want to
delete the data. You can confirm the deletion of the data logger or cancel the deletion process.

[4] Table selection menu
In the table selection menu [4] you can select which data should be displayed in tabular form.

[5] Diagram selection menu
In the diagram selection menu [5] you can select which data should be displayed as a diagram.

[6] Save button
Press the save button [6] to open a file explorer. Within this you can save the contents of the data logger as a PhocosLink PC logfile. You
can open this logfile again with PhocosLink PC at any time in the future.

 www.phocos.com                                                                                                                14 | P a g e
5.3      Settings
The settings page shows the current settings of your product and offers the possibility to change them. The left column shows the current
settings of your product. Within the settings page you can change the settings. Only after a successful transfer to the product will the
new settings be accepted. The settings page offers the following functions.

[1] Home button
Press the home button [1] to return to the start page

[2] Page selection menu
In the page selection menu [2] you can select which page should be displayed.

[3] Open button
Press the open button [3] to open a file explorer. Within it, you can open PhocosLink PC logfiles saved in the past to load the settings
saved in them.

[4] Update button
Press the update button [4] to display the current settings.

[5] Load button
Press the load button [5] to transfer the settings to the product.

[6] Save button
Press the save button [6] to open a file explorer. Within this you can save a PhocosLink PC logfile. You can open this logfile again with
PhocosLink PC at any time in the future to load the settings it contains.

[7] Factory settings button
Press the factory settings button [7] to restore the factory settings.

 www.phocos.com                                                                                                              15 | P a g e
5.4      Firmware
The firmware page shows the firmware version of your product in the left column. The current firmware file of your product is available
on request. With this firmware file you can update the firmware of your product. The firmware page offers the following functions.

[1] Home button
Press the home button [1] to return to the start page

[2] Page selection menu
In the page selection menu [2] you can select which page should be displayed.

[3] Open button
Press the open button [3] to open a file explorer. The firmware file for the product update can be selected within this.

[4] Load button
Press the load button [4] to transfer the selected firmware to the product. The load button can only be pressed when a firmware file has
been successfully loaded.

 www.phocos.com                                                                                                             16 | P a g e
5.5      Recovery Mode
The recovery mode page is used to restore the firmware of a product e.g. after a failed firmware update. For products with faulty firmware,
automatic product detection is no longer possible. The interface for the product to be restored must be selected manually. The current
firmware file of your product is available on our homepage. With this firmware file you can restore the firmware of your product. The
recovery mode page offers the following functions.

[1] Home button
Press the home button [1] to return to the start page

[2] Page selection menu
In the page selection menu [2] you can select which page should be displayed.

[3] Open button
Press the open button [3] to open a file explorer. Within this the firmware file can be selected for recovery.

[4] Update button
Press the update button [4] to update the interface selection menu.

[5] Load button
Press the load button [5] to transfer the selected firmware to the product. The load button [5] cannot be pressed until a firmware file has
been successfully loaded

 www.phocos.com                                                                                                                17 | P a g e
6.0          Liability Exclusion

The manufacturer shall not be liable for damages, especially on the battery, caused by use other than as intended or as mentioned in this
manual or if the recommendations of the battery manufacturer are neglected. The manufacturer shall not be liable if there has been
service or repair carried out by any unauthorized person, unusual use, wrong installation, or bad system design.

7.0          Technical Support

Specifications are subject to change without notice.
Copyright © 2018 Phocos AG, All Rights Reserved.
Version: 20210419
Developed in Germany

Phocos AG
Magirus-Deutz-Str. 12
89077 Ulm, Germany

Phone +49 731 9380688-0
Fax +49 731 9380688-50

www.phocos.com
info@phocos.com

 www.phocos.com                                                                                                              18 | P a g e
Contenido
1.0 Introducción............................................................................................................................................................................................................................ 19
2.0 Información importante de seguridad ........................................................................................................................................................................ 19
3.0 Requisitos del sistema ........................................................................................................................................................................................................ 19
4.0 Instalación ................................................................................................................................................................................................................................ 20
5.0 Características ........................................................................................................................................................................................................................ 21
6.0 Exclusión de responsabilidad .......................................................................................................................................................................................... 27
7.0 Soporte Técnico .................................................................................................................................................................................................................... 27
1.0 Introducción
Con PhocosLink PC puede configurar, monitorear y mantener todos los productos que sean compatibles. PhocosLink PC le ayudará a
comprender mejor su sistema y garantizar un funcionamiento sin errores.
PhocosLink PC ofrece las siguientes características:
Visualización del estado actual del sistema.
Visualización de la información del registrador de datos
Configuración
Actualización de firmware
Guardar información / configuración del registrador de datos
2.0 Información importante de seguridad
Warning
Antes de instalar y utilizar PhocosLink PC, lea atentamente la siguiente información de seguridad.
3.0 Requisitos del sistema
PhocosLink PC soporta los siguientes productos:
CXup10/20/40
CXNup10/20/40
CXNup20-2B
CXNsolid50
ECO-N-MPPT 85/15
PSW-B/H
Para conectar un producto compatible a su computadora, también necesita un adaptador de interfaz Phocos MXI. Esto está disponible
en dos versiones. Si desea utilizar la interfaz RS232 de su computadora, necesita un MXI 232. Si desea utilizar la interfaz USB, necesitará
el MXI USB.
Su computadora también debe cumplir con los siguientes requisitos:
Sistema operativo: Windows 7/8/10
Los productos PSW-B y PSW-H no necesitan ningún adaptador de interfaz Phocos MXI. Con estos dispositivos se incluye un cable de
interfaz RS232.
www.phocos.com 19 | P a g e4.0 Instalación 4.1 Phocos MXI 232 El MXI 232 no requiere ninguna instalación de controlador adicional. Puede operarse en cualquier interfaz RS-232 (COM) correctamente instalada. 4.2 Phocos MXI USB El MXI USB se instala como un puerto serie USB. Conecte el MXI USB a un puerto USB libre de su computadora. La última versión del MXI USB se instalará automáticamente. Ningún controlador debe ser instalado manualmente. Para la instalación de adaptadores de interfaz USB MXI más antiguos, siga las instrucciones de instalación del controlador MXI en nuestra página de inicio. Si la instalación del controlador es exitosa, se mostrará un MXI USB en el Administrador de dispositivos como se muestra abajo. 4.3 PhocosLink PC Haga doble clic en PhocosLinkPC.exe para iniciar la configuración. Siga las instrucciones dentro de la rutina de instalación para instalar PhocosLink PC. Después de la instalación, puede iniciar PhocosLink PC. www.phocos.com 20 | P a g e
5.0          Características

Después de iniciar PhocosLink PC, se muestra la página de inicio. La página de inicio ofrece las siguientes funciones.

[1] Menú de selección de productos
El menú de selección de productos [1] muestra todos los productos Phocos conectados a su computadora. PhocosLink PC reconoce en
el inicio qué productos están conectados a las interfaces disponibles. Seleccione el producto deseado y presione el botón de inicio [2]
para continuar. Si no hay ningún producto compatible conectado, se muestra "..." y el botón de inicio [2] no está visible.

[2] Botón de inicio
Al presionar el botón de inicio [2] continúe con el producto seleccionado. Se abrirá la página de estado del sistema para este producto.
El botón de inicio [2] solo está visible si se ha detectado un producto compatible.

[3] Botón de abrir
Presione el botón de abrir [3] para abrir un archivo. Dentro de este puede abrir archivos de registro PhocosLink PC guardados en el
pasado.

[4] Botón de restauración
Presione el botón de restauración [4] para iniciar el modo de restauración. Este modo se utiliza para restaurar el firmware de un producto,
p. Ej. después de una actualización de firmware fallida.

[5] Botón de actualización
Al presionar el botón de actualización [5], se verifica nuevamente si los productos compatibles están conectados a las interfaces
disponibles.

[6] Botón de modo de pantalla
Al presionar el botón de modo de pantalla [6] se activa el modo de pantalla completa o se desactiva si ya está activo.

[7] Modo remoto
Este modo permite el acceso remoto con módems seleccionados.

[8] Menú de selección de idioma
En el menú de selección de idioma [8] puede seleccionar el idioma para la interfaz de usuario.

 www.phocos.com                                                                                                                21 | P a g e
5.1      Estado del sistema
La página que se muestra en la imagen de arriba muestra el estado actual del sistema de su producto. Además, muestra información
general, como el tipo de dispositivo o el número de serie, así como los parámetros de corriente, voltaje y temperatura. El estado actual
del sistema mostrado en la columna izquierda se visualiza adicionalmente por la fila de símbolos debajo de la imagen del producto. En
la tabla, todos los estados del sistema consultados se muestran en orden cronológico. La página de estado del sistema ofrece las
siguientes funciones.

[1] Botón de inicio
Presione el botón de inicio [1] para volver a la página de inicio.

[2] Menú de selección de página
En el menú de selección de página [2] puede seleccionar qué página debe mostrarse.

[3] Botón de la hoja de datos
Presione el botón de la hoja de datos [3] para abrir la ficha técnica de nuestra página de inicio dentro de su navegador web.

[4] Botón de actualización
Al presionar el botón de actualización [4], se consulta el estado actual del sistema.

[5] Botón del manual del usuario
Al presionar el botón del manual del usuario [5] abre el manual del usuario de nuestra página de inicio dentro de su navegador web.

 www.phocos.com                                                                                                                 22 | P a g e
5.2      Registrador de datos
La página del registrador de datos que se muestra arriba muestra el contenido del registrador de datos. PhocosLink PC puede mostrar el
contenido del registrador de datos en forma tabular o gráfica. La página del registrador de datos ofrece las siguientes funciones.

[1] Botón de inicio
Presione el botón de inicio [1] para volver a la página de inicio.

[2] Menú de selección de página
En el menú de selección de página [2] puede seleccionar qué página debe mostrarse.

[3] Botón de eliminar
Presione el botón de eliminar [3] para eliminar el contenido del registrador de datos. Después de presionar el botón, se le preguntará si
desea eliminar los datos. Puede confirmar la eliminación del registrador de datos o cancelar.

[4] Menú de selección de tabla
En el menú de selección de tabla [4] puede seleccionar qué datos deben mostrarse en forma de tabla.

[5] Menú de selección de diagramas
En el menú de selección de diagramas [5] puede seleccionar qué datos deben mostrarse como diagramas.

[6] Botón guardar
Presione el botón guardar [6] para abrir el explorador de archivos. Dentro de esto, puede guardar el contenido del registrador de datos
como un archivo de registro PhocosLink PC. Puede abrir este archivo de registro nuevamente con PhocosLink PC en cualquier momento
en el futuro.

 www.phocos.com                                                                                                              23 | P a g e
5.3      Configuración
La página de configuración que se muestra arriba muestra la configuración actual de su producto y ofrece la posibilidad de cambiarla. La
columna de la izquierda muestra la configuración actual de su producto. Dentro de la página de configuración puede cambiar las
opciones. Solo hasta que los cambios realizados se hayan transferido exitosamente al producto, la nueva configuración estará disponible.
La página de configuración ofrece las siguientes funciones.

[1] Botón de inicio
Presione el botón de inicio [1] para volver a la página de inicio.

[2] Menú de selección de página
En el menú de selección de página [2] puede seleccionar qué página debe mostrarse.

[3] Botón de abrir
Presione el botón de abrir [3] para abrir el explorador de archivos. Dentro de él, puede abrir los archivos de registro PhocosLink PC
guardados en el pasado para cargar la configuración guardada en ellos.

[4] Botón de actualización
Presione el botón de actualización [4] para mostrar la configuración actual.

[5] Botón de carga
Presione el botón de carga [5] para transferir la configuración al producto.

[6] Botón guardar
Presione el botón guardar [6] para abrir el explorador de archivos. Dentro de este puede guardar un archivo de registro PhocosLink PC.
Puede abrir este archivo de registro nuevamente con PhocosLink PC en cualquier momento en el futuro para cargar la configuración que
contiene.

[7] Botón de configuración de fábrica
Presione el botón de configuración de fábrica [7] para restaurar la configuración de fábrica.

 www.phocos.com                                                                                                             24 | P a g e
5.4      Firmware
La página de firmware que se muestra arriba muestra la versión de firmware de su producto en la columna izquierda. El archivo de
firmware actual de su producto está disponible en nuestra página de inicio. Con este archivo de firmware puede actualizar el firmware de
su producto. La página de firmware ofrece las siguientes funciones.

[1] Botón de inicio
Presione el botón de inicio [1] para volver a la página de inicio.

[2] Menú de selección de página
En el menú de selección de página [2] puede seleccionar qué página debe mostrarse.

[3] Botón de abrir
Presione el botón de abrir [3] para abrir el explorador de archivos. El archivo de firmware para la actualización del producto se puede
seleccionar dentro de este.

[4] Botón de carga
Presione el botón de carga [4] para transferir el firmware seleccionado al producto. El botón de carga solo se puede presionar cuando un
archivo de firmware se ha cargado correctamente.

 www.phocos.com                                                                                                             25 | P a g e
5.5      Modo de recuperación
La página del modo de recuperación que se muestra arriba se usa para restaurar el firmware de un producto, por ejemplo después de
una actualización de firmware fallida. Para productos con firmware defectuoso, la detección automática de productos ya no es posible.
La interfaz para el producto a restaurar debe seleccionarse manualmente. El archivo de firmware actual de su producto está disponible
en nuestra página de inicio. Con este archivo de firmware puede restaurar el firmware de su producto. La página de modo de recuperación
ofrece las siguientes funciones.

[1] Botón de inicio
Presione el botón de inicio [1] para volver a la página de inicio.

[2] Menú de selección de página
En el menú de selección de página [2] puede seleccionar qué página debe mostrarse.

[3] Botón de abrir
Presione el botón de abrir [3] para abrir el explorador de archivos. Dentro de este se puede seleccionar el archivo de firmware para la
recuperación.

[4] Botón de actualización
Presione el botón de actualización [4] para actualizar el menú de selección de interfaz.

[5] Botón de carga
Presione el botón de carga [5] para transferir el firmware seleccionado al producto. El botón de carga [5] no se puede presionar hasta
que un archivo de firmware se haya cargado correctamente.

 www.phocos.com                                                                                                            26 | P a g e
6.0          Exclusión de responsabilidad

El fabricante no será responsable de los daños, especialmente en la batería, causados por un uso que no sea el previsto o el
mencionado en este manual o si se descuidan las recomendaciones del fabricante de la batería. El fabricante no será responsable si ha
habido servicio o reparación realizada por una persona no autorizada, uso inusual, instalación o diseño incorrectos del sistema.

7.0          Soporte Técnico

Las especificaciones están sujetas a cambios sin previo aviso.
Copyright © 2018 Phocos AG, Todos los derechos reservados.
Versión: 20210419
Desarrollada en Alemania

Phocos AG
Magirus-Deutz-Str. 12
89077 Ulm, Germany

Phone +49 731 9380688-0
Fax +49 731 9380688-50
www.phocos.com
info@phocos.com

 www.phocos.com                                                                                                            27 | P a g e
Sie können auch lesen