MBN SC-470 Schneekanone snow cannon - Bedienungsanleitung User s manual
←
→
Transkription von Seiteninhalten
Wenn Ihr Browser die Seite nicht korrekt rendert, bitte, lesen Sie den Inhalt der Seite unten
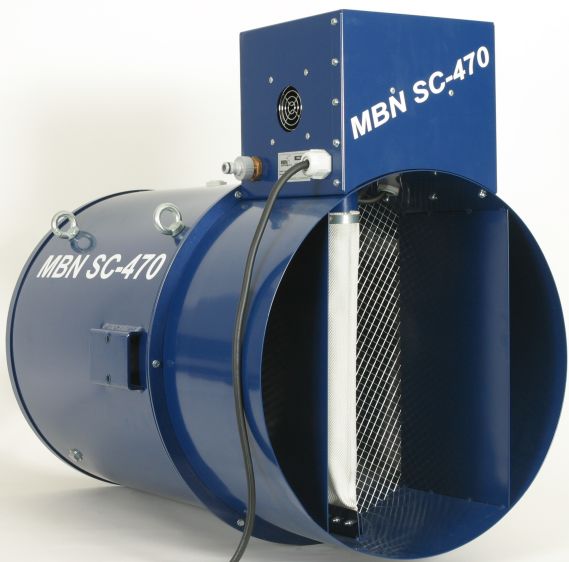
MBN SC-470
  Schneekanone
   snow cannon

 Bedienungsanleitung
    User´s manual
MBN SC-470 Schneekanone Bedienungsanleitung Mit der Schneekanone MBN SC-470 haben Sie ein technisch ausgereiftes Produkt erworben. Wir bitten Sie in Ihrem eigenen Interesse die folgenden Punkte zu beachten. Technische Voraussetzungen Stromanschluß 230V/50 Hz (eine Schukosteckdose 16A Absicherung) Wasseranschluß Vom einfachen Wasserhahn bis zum Hydranten. Hinweise über Raumbeschaffenheit Im zu beschäumenden Raum dürfen keine offenen Stromquellen wie Steckdosen, Schalter und dergleichen vorhanden sein. Auch ist darauf zu achten, dass der Schaum / Schnee nicht durch Kabelschächte oder Kellerabgänge in darunter liegende Räume gelangen kann. Weiterhin sind alle weiteren elektrischen Anlagen wie Licht- und Toneffekte so zu platzieren, dass sie nicht mit dem Schaum / Schnee in Berührung gelangen können. Die Raumwahl ist so zu treffen, dass keine Wasserschäden entstehen können. Hinweis zur Aufstellung der Schneekanone Die Schneekanone kann an den 4 Flugpunkten mit Ketten oder Stahlseilen aufgehängt werden. Sie muss aber zusätzlich nochmals gesichert werden. Alternativ kann die Schaumkanone auch auf dem optional erhältlichen Metallständer montiert werden. In diesem Fall ist bei der Bedienung zu beachten, dass die bedienende Person nicht zu Nahe an dem Lüftergitter steht, da lose Teile (Bänder von Jacken oder Pullover, lange Haare, etc.) angezogen werden und in das Gitter hineingezogen werden können. Hinweise zum Aufstellen des Tanks und der Pumpe Pumpe und Tank sollen an einem für Personen nicht zugänglichen Ort platziert werden. Auch ist darauf zu achten, dass die Pumpe nicht im Schäumungsbereich stehen darf. Beim Tank ist zusätzlich auf das hohe Gewicht nach dem Befüllen zu achten. Auch sämtliche Kabel und Schläuche müssen so verlegt werden, daß ein Stolpern von Personen oder gar ein Abreißen immer vermieden wird. Auch sollten sie nicht im Schaum / Schnee liegen.
Allgemeine Sicherheitshinweise vor Inbetriebnahme

Der Schaum / Schnee stellt immer ein erhöhtes Unfallrisiko dar, wenn nicht folgende
Punkte beachtet werden:
-        Schaum / Schnee außerhalb der beabsichtigten Fläche immer sofort mit Gummiwischer
         beseitigen
-        Getränke und Speisen nach Möglichkeit nicht in Gläser und      Porzellan anbieten (Erhöhte
         Gefahr durch Scherben im Schaum)
-        Ein- und Ausgangsbereich der Schaumfläche rutschsicher und stabil gestalten
-        Schneemaschine, Pumpe und Tank ununterbrochen von einer Person beaufsichtigen lassen

Inbetriebnahme

Vor Publikumsbetrieb muss eine Probeschäumung stattfinden. Währenddessen noch
einmal alle Sicherheitsbestimmungen überprüfen. Kabel und Schläuche müssen auf
Sitz bzw. Dichtheit kontrolliert werden.

Ablauf
1.       Geräte aufstellen.
2.       Mit 2m Schlauch Tank mit Pumpe verbinden (Anschluß an der Seite der Pumpe)
3.       Mit 15m Schlauch Pumpe mit Schneekanone verbinden. (Verbinder mit Regler auf
         der Oberseite der Pumpe anschließen)
4.       Tank wird mit Wasser gefüllt. ( ca. bis 10 cm unter Einfüllöffnung )
5.       Schaumfluid wird zugesetzt ( Verhältnis 4:100 bis 6:100)
         z.B. bei 1000 Liter ca. 30-40 Liter Schaumfluid hinzugeben. Es empfiehlt sich zuerst eher
         eine höhere Konzentration zu wählen und dann im weiteren Verlauf der Veranstaltung die
         Konzentration auf 3:100 einzustellen.
6.       Tankinhalt wird durch Umrühren auf homogene Konzentration gebracht.
7.       Pumpengehäuse mit ca. 1,5l Schaumgemisch füllen. (über Öffnung oben - um ein
         Trockenlaufen zu vermeiden - Schlauch kurzzeitig entfernen und wieder anbringen)
8.       Schneekanonengebläse anstecken bzw. über Schaltleiste einschalten.
9.       Regler am Schlauch öffnen und Pumpe am Geräteschalter einschalten. Je
         nach Stellung kann die Austrittsmenge reguliert werden.
10.      Beide Geräte bis zur gewünschten Schaum- / Schneehöhe laufen lassen.
11.      Wenn die Schaum- / Schneehöhe erreicht wird, muss zunächst die Pumpe
         ausgeschaltet und das Ventil geschlossen werden. Nach ca. 30 Sekunden
         kann auch das Gebläse ausgeschaltet werden.
12.      Die Schneekanone kann jederzeit wieder in Betrieb genommen werden.
         Es ist allerdings immer auf ausreichenden Flüssigkeitsstand im Tank zu
         achten, da ein Trockenlaufen die Pumpe zerstören kann.
Montage der Schneekanone auf optionalen Metallständer
- Schneekanone mit zwei Personen zwischen den Befestigungsplatten halten
und mit den mitgelieferten 4 Schrauben fest montieren.
- Die Schneekanone kann nach oben und unten geschwenkt werden. Sollte die
Position fixiert werden, sind die unteren beiden Schrauben festzuziehen.
- Beim Schwenken horizontal oder vertikal ist darauf zu achten, dass keine
Personen im Schwenkbereich sind.
- Wird die Schneekanone nicht geschwenkt sind die Bremsen an den Rollen
und alle Schrauben fest zu stellen.
Im Falle, dass die Schneekanone auf dem Metallständer montiert wird, ist bei der
Bedienung zu beachten, dass die bedienende Person nicht zu Nahe an dem
Lüftergitter steht, da lose Teile (Bänder von Jacken oder Pullover, lange Haare, etc.)
angezogen werden und in das Gitter hineingezogen werden können.
Hinweis zur Betriebsdauer
Das Schneekanonengebläse sollte maximal 60 Minuten durchgehend in Betrieb sein.
Danach sollte eine Pause von mindestens 15 Minuten folgen.
Hinweise bei Veranstaltungsende
Nach dem letzten Schäumen muß das Gebläse ca. 15 Minuten trocken laufen damit
keine Wasserrückstände im bzw. am Motor verbleiben.
Die Geräte sind vor Abbau vom Stromnetz zu trennen . Gegebenenfalls sind auch
noch geöffnete Wasserhähne und Hydranten zu schließen.
Eine regelmäßige Wartung / Reinigung von Kanone, Pumpe, Tank, Schläuche
gewährleistet Ihnen eine lange Lebensdauer unserer Produkte.
Wir wünschen Ihnen viel Spaß an der MBN SC-470 Schaumkanone.
2000 MBN Eventproducts GmbH, Friedberg bei Augsburg, Deutschland
www.mbngermany.deMBN SC-470 snow cannon
users manual
The snow cannon MBN SC-470 offers you a technically sophisticated product. For
your safety, please read the following instructions carefully.
Technical requirements
Mains supply
230 V / 50 Hz (One EU standard power plugs with separate fuses of 16 A each).
Water supply
From simple water tap to hydrant.
Installation of the cannon
The generator can be rigged with the 4 flying points using chains or steel cables.
Additional securing is however essential. With the optional metal dolly tray the snow
cannon can be placed horizontally or vertically on the floor. In this case it is to be
made sure during the operation, that the serving person is not too close at the
protection grille, because loose parts (tapes of jackets or sweaters, long hair, etc.)
can be pulled into the ventilator.
Installation of tank and pump
Pump and tank should be installed on a location not accessible for the public. Please
note, that the pump may not be placed in the foaming area. Additionally the heavy
weight of the tank after filling should be taken in account. All cables and hoses must
be routed in a way, that persons can not stumble or even rip them off. Also they must
not get in contact with the foam.
General safety information before operation
The foam / snow can cause a higher risk of accidents, if the following instructions are
not observed.
- foam / snow outside the intended area should be removed immediately with a rubber wiper.
- serving food and drinks in glass or china dishes should possibly be avoided to minimize the risk of
broken pieces.
- the entrance of the foamed area should be designed rigid and anti-slippery.
- snow generator, pump and tank should always be attended by an operator.Operating
Before operating the device in public a test foaming must be performed. Check all
safety regulations during this. Correct fitting and tightness must be checked on all
cables and hoses.
Please refer to the following steps for a proper installation:
1. Place the device on the desired location.
2. Connect tank and pump with the 2 meter hose.
3. Connect pump and generator with the 15 meter hose (connector with adjustment on
the top of the pump).
4. Fill the tank with water (approx. 10 cm below opening).
5. Add the foam fluid (relation 4:100 to 6:100).
Add for example 30 - 40 litres of foam fluid to 1000 litres of water. It is recommended to begin
with a higher concentration and reduce it during the show to about 3:100.
6. Stir the tank contents to homogenize the concentration.
7. Fill the pump with 1,5 litres of foam solution (at the top of pump to avoid the
pump running dry - disconnect the hose shortly and plug it in again).
8. Plug in the snow generator or power it on the switching panel.
9. Open adjustment at the connector and plug in the power cord or power it on the
switching panel. The foam output can be controlled by the position of the
adjustment.
10. Run both units, until the desired foam / snow level is reached.
11. When the level is reached, the pump must be switched off and the adjustment
has to be closed. After approx. 30 seconds the fan can be shut down as well.
12. The snow cannon may be restarted at any time, but you will always have to
check the tank for a correct fluid level. Please note that running dry can damage
the pump.
Installing the snow cannon with the optional metal dolly tray
- place the snow cannon with two persons between the mounting plates of the
metal dolly tray and fix it with the 4 screws.
- The snow cannon can be turned up and down. If the position has to be fixed,
tighten the lower screws.
- With turning the machine horizontally or vertically is to be made sure that no
persons are in the swivelling range.
- If the machine is not turned, the brakes at the wheels and the screws are to be
tightened.
In case of mounting the snow cannon at the dolly tray it is to be made sure during the
operation, that the serving person is not too close at the protection grille, because
loose parts (tapes of jackets or sweaters, long hair, etc.) can be pulled into the
ventilator.Notes for the operating period
The snow cannon should work max. 1h continuously. After that the machine should
be stopped for min. 15 min.
Important notes for the end of a show
The fan must remain running for 15 minutes after the last foaming in order to dry the
fan motor.
Disconnect the units from the mains supply before disassembling. Always remember
to close the water taps and hydrants.
Frequent cleaning and service of cannon, pump, tank and hoses will ensure you a
long lasting lifetime of our product.
We wish you lots of enjoyment and fun with the MBN SC-470 foam cannon.
© 2000 MBN Eventproducts GmbH, Friedberg near Augsburg, Germany
www.mbngermany.deSie können auch lesen