Wireless headset "Dima" - monacor.sk
←
→
Transkription von Seiteninhalten
Wenn Ihr Browser die Seite nicht korrekt rendert, bitte, lesen Sie den Inhalt der Seite unten
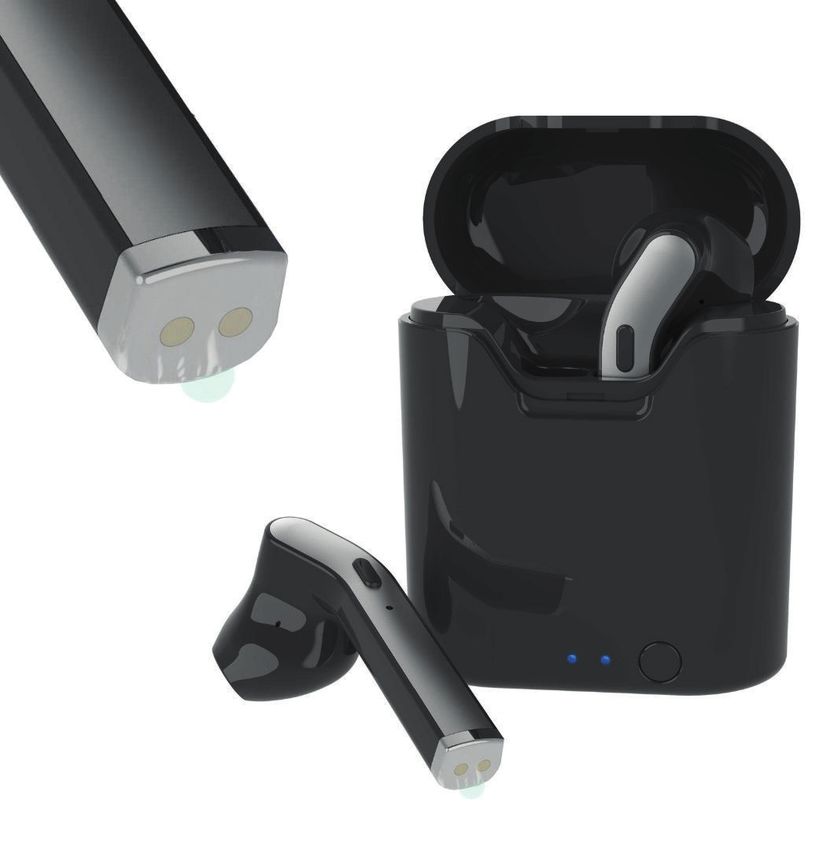
Wireless headset „Dima“

D   Hinweis zur Inbetriebnahme
Entfernen Sie die transparente Schutzfolie von den Ladekontakten an der Unterseite
beider Headsets und stellen Sie sicher, dass diese nicht im Ladeetui stecken.
Platzieren Sie die Headsets in das Ladeetui und drücken Sie die
Power-Taste am Ladeetui, um den Ladeprozess zu beginnen.
Sollte die LED am Ladeetui nicht leuchten bzw. der
Ladeprozess nicht starten, verbinden Sie das Ladeetui
bitte mit dem Micro-USB-Ladekabel und dem USB-A-
Stecker des Kabels mit einer USB-Stromquelle.
Die roten LEDs der Headsets leuchten während
des Ladevorgangs und erlöschen, sobald sie
voll aufgeladen sind.

GB     Note for initial use
Remove the transparent protective film from the
charging contacts on the underside of both head-
sets and make sure that they are not in the charging
case. Place the headsets in the charging case and
press the Power button on the charging case to start
the charging process. If the LED on the charging case
does not light up or the charging process does not start,
please connect the charging case to a USB power source using
the Micro-USB charging cable and the USB A plug of the cable.
The red LEDs on the headsets light up during the charging process and go out as soon
as they are fully charged.
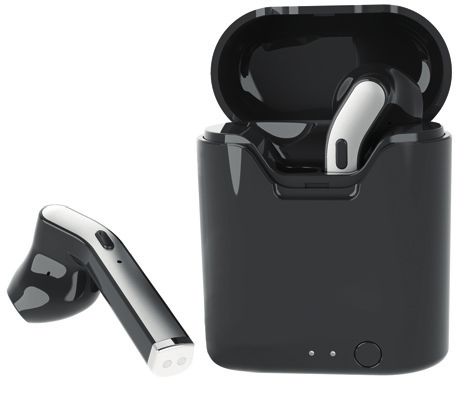
Drahtloses TWS HEadset „Dima“                                                                                                                                         D
Vielen Dank dass Sie sich für dieses Fontastic® Produkt                                                                 Anruf annehmen/beenden/ablehnen/Wahlwiederholung
entschieden haben.                                                                                                      Anruf annehmen: Drücken Sie kurz die Multifunktionstaste (2) auf einem der
                                                                                                                        beiden Headsets.
Bitte lesen Sie die Bedienungsanleitung sorgfältig und                                                                  Gespräch beenden: Drücken Sie kurz die Multifunktionstaste (2) auf einem der
beachten Sie die Sicherheitshinweise.                                                                                   beiden Headsets.
                                                                                                                        Anruf ablehnen: Drücken und halten Sie die Multifunktionstaste (2) für ca. 2
Verpackungsinhalt                                                                                                       Sekunden.
•   2x Drahtloses Fontastic Headset Dima                                                                                Wahlwiederholung: Im Standby-Modus oder bei Musikwidergabe drücken Sie
•   Aufbewahrungs- und Ladeetui                                                                                         zweimal die Multifunktionstaste (2), die zuletzt gewählte Nummer wir erneut an-
•   Micro-USB Ladekabel                                                                                                 gerufen.
•   Bedienungsanleitung
                                                                                                                        Sicherheitshinweise
Übersicht:                                                                                                              • Dies ist kein Kinderspielzeug. Halten Sie das Headset von Kindern
1. Mikrofon                                                5                                                              unter 3 Jahren fern. Es besteht Erstickungsgefahr!
2. Multifunktionstaste                                                                                                  • Betreiben Sie das Headset nicht für längerer Zeit auf der höchsten Lautstärke!
3. Status LED                                              4                                                            • Stellen Sie die Nutzung des Headsets bei gefährlichen Situationen ein!
4. Ladeetui                                                                                                             • Verwenden Sie das Headset nicht bei Nutzung eines Fahrzeugs!
5. Headset-Einschub                        2               3                                              6             • Öffnen Sie niemals das Gerät!
6. Micro-USB Ladeanschluss (Rückseite)                                                                                  • Tauchen Sie das Gerät nicht in Wasser und schützen Sie es vor Feuchtigkeit!
7. Ladestand LED’s                                                                                                      • Entfernen Sie elektronische Geräte vom Netz, wenn sie für langere Zeit
8. Power-Taste                     1                                                                      7               nicht gebraucht werden!
9. Ladekontakt                                                                                                          • Das Gerät nicht benutzen, wenn es sichtbare Schäden aufweist!
                                                  9                                                       8
Inbetriebnahme                                                                                                          Bei falscher Bedienung wird keine Haftung für eventuelle Schäden übernommen.
Aufladen                                                                                                                Falls Sie Technischen Support benötigen, kontaktieren Sie bitte unser
Platzieren Sie die Headsets im Ladeetui. Drücken Sie die Power-Taste (8) um den                                         Support-Team per E-Mail unter der Adresse service@fontastic.eu.
Ladeprozess zu beginnen. Die Headset-Einheiten werden über den internen Akku
des Ladeetuis aufgeladen.                                                                                               Technische Daten:
Die roten LEDs der Headsets leuchten während des Ladevorgangs und erlöschen,                                            • BT Version: 5.0
sobald sie voll aufgeladen sind.                                                                                        • Profile: Headset, hands-free, A2DP, AVRCP
                                                                                                                        • Reichweite: Bis zu 10m
Hinweis: Bei vollständig aufgeladenem Ladeetui können die Headsets bis zu                                               • Audio-Frequenzbereich: 20Hz-20kHz
dreimal aufgeladen werden.                                                                                              • Eingebautes Hochleistungsmikrofon
                                                                                                                        • Batterie: Headset 40mAh, Ladeetui 350mAh
Um das Ladeetui aufzuladen, verbinden Sie das Micro-USB Ladekabel mit dem                                               • Betriebszeit: Bei 70% Lautstärke bis zu 3x 2.5 Stunden
Ladeanschluss (6) des Ladeetuis, und dem USB-A Stecker des Kabels mit einer                                             • Gewicht: Headset 4.3g, Ladeetui 28.4g
USB-Stromquelle.                                                                                                        • Abmessungen: Headset 22x11x46mm, Ladeetui 26x48x57mm
Der interne Akku des Ladeetuis, sowie die Headsets, falls sie sich im Etui befinden,
werden aufgeladen. Der Ladestand der Box wird durch zwei LEDs auf der
Vorderseite angezeigt. Leuchten beide LEDs, ist die Box voll aufgeladen.                                                Hiermit erklären wir, dass dieses Gerät die CE Kennzeichnung gemäß den Bestim-
                                                                                                                        mungen und Vorgaben trägt. Es entspricht somit den grundlegenden Anforderungen
Ein-/Ausschalten:                                                                                                       der Richtlinie (RED) 2014/53/EU.
Das Fontastic® Dima ist mit einer automatischen Ein-/Ausschaltung ausgestattet.
Nach Entnahme der Headsets aus der Ladeschale werden die Headsets
automatisch eingeschaltet.                                                                                              Hinweis zum Umweltschutz:
Nach Einlegen der Headsets in der Schale schalten sich diese automatisch aus.                                                  Gemäß der europäischen Richtlinie 2012/19 EU gilt folgendes: Elektrische
Manuelles Ausschalten erfolgt durch Drücken der Multifunktionstaste (2) für ca. 8                                              und elektronische Geräte dürfen nicht mit dem Hausmüll entsorgt werden.
Sekunden.                                                                                                                      Der Verbraucher ist gesetzlich verpflichtet, elektrische und elektronische
                                                                                                                               Geräte an den dafür eingerichteten, öffentlichen Sammelstellen oder an die
Pairing                                                                                                                 Verkaufsstelle zurückzugeben. Einzelheiten dazu regelt das jeweilige Landesrecht.
Sobald beide Headsets aus der Ladeschale entnommen werden (beide gleichzeitig)                                          Mit der Wiederverwertung von Altgeräten leisten Sie einen wichtigen Beitrag zum
schalten sie sich ein und es erfolgt automatisch eine Verbindung zwischen den                                           Schutz unserer Umwelt.
beiden Headsets (TWS). Eines der Beiden Headsets wird rot und blau blinken, es
ist bereit für das Pairing mit dem Smartphone.

1. Erstes Pairing
Aktivieren Sie Bluetooth® auf Ihrem Smartphone und suchen Sie nach verfügbaren
Bluetooth®-Geräten. Wählen Sie „Dima“ aus der Liste der gefundenen
Bluetooth®-Geräte und bestätigen Sie die Verbindung mit „Dima“. Nach erfolgtem
Pairing, blinken die LEDs beider Headsets blau.

2. Weitere Verbindungen, wenn einmal gepairt
Sobald Sie die Headsets aus der Ladeschale herausnehmen, verbinden sich beide
Headsets miteinander. Danach erfolgt automatisch die Verbindung mit dem
Smartphone.

Hinweis: Für eine Verbindung zwischen Headset und Smartphone muss
Bluetooth® auf dem Smartphone aktiviert sein.

Hinweis: Um ein Headset einzeln zu verwenden, schalten Sie anstatt beider
Headsets nur eines ein und verbinden dies mit Ihrem Smartphone.

Freisprechfunktionen
Mit und dem integrierten Mikrofon und der intelligenten Rauschunterdrückung ist
das Fontastic® Dima Headset perfekt zum Telefonieren geeignet.

Musiksteuerung
Play/Pause: Einmal kurz die Multifunktionstaste (2) drücken, Play oder Pause
wird aktiviert.
Nächster Titel: Drücken Sie während Musik abgespielt wird für ca. 4 Sekunden
die Multifunktionstaste (2) des linken Headsets.
Vorheriger Titel: Drücken Sie während Musik abgespielt wird, für ca. 4 Sekunden
die Multifunktionstaste (2) des rechten Headsets.

                                            Improvement and changes of the technical specifications and other data’s could be made without prior notice. Fontastic, by D-Parts Mobilphon & Zubehör GmbH ● Birkenweiher Str. 16 ● 63505 Langenselbold, Germany 12_2019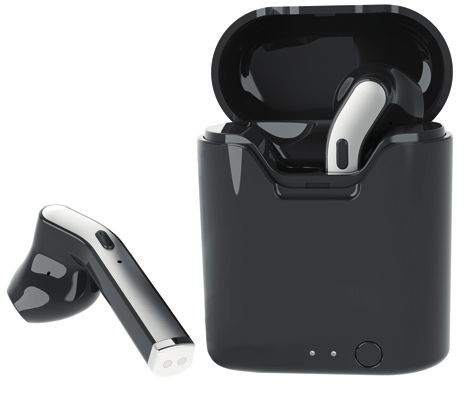
Wireless headset „Dima“                                                                                                                      GB
Thank you for choosing a Fontastic® Product.                                                                            Note: The device must support the A2DP profile for music streaming and AVRCP
                                                                                                                        profile for music remote control.
Please read this user manual carefully and comply with
the safety instructions.                                                                                                Music control
                                                                                                                        To play or stop music playback, briefly press the multifunction (2) button.
Package contents                                                                                                        To skip to the next track, press and hold the multifunction button (2) of
• 2 x Wireless headset Fontastic Dima                                                                                   the left headset for around 4 seconds.
• Storage and charging power case                                                                                       To return to the previous track or the beginning of the track, press and
• Micro-USB cable                                                                                                       hold the multifunction button (2) of the right headset for around 4 seconds.
• User manual
                                                                                                                        Answer/end/reject calls/Re-dial
If any of the above pieces is missing, please pack the product again and                                                To accept an incoming call, briefly press the multifunction (2) button.
return to dealer.                                                                                                       To end a call in progress, briefly press the multifunction button (2).
                                                                                                                        To reject an incoming call, press and hold the multifunction button (2) for
Overview:                                                                                                               about 2 seconds.
1. Microphone                                              5                                                            Re-dial: In standby mode or during music playback, press the multifunction
2. Multifunction button                                                                                                 button (2) twice. The last dialled number will be dialled again.
3. Status LED                                              4
4. Battery case                                                                                                         Safety advice:
5. Headset slot                             2              3                                              6             • This is not a toy for children. Keep the headset away from children under
6. Micro-USB socket                                                                                                       3 years of age. There is danger of suffocation!
7. Power LED                                                                                                            • Adjust the volume to a reasonably low level to use the headset for as long
8. Power button                         1                                                                 7
                                                                                                                          as you like. Be sure to turn down the volume so that others do not have to scream
9. Charging contact                                                                                                       to be heard by you.
                                                  9                                                       8             • Be careful not to use headset in potentially dangerous situations.
Getting started                                                                                                         • Do not use the headset while operating a vehicle.
Charging the battery                                                                                                    • Never open the device.
Place the headsets in the charging case. Make sure that the headsets are inserted                                       • Never immerse the unit in water, always protect it from moisture.
correctly and that the contacts of the headsets and the charging case touch each                                        • Disconnect electronic devices from the power when not using them for longer time.
other. Press the power button (8) and close the cover. The headset units are                                            • Do not use headsets if they show any visible damage.
charged via the internal battery charger. The red LED on the headsets will flash
during charging and goes off when they are fully charged. The current charge level                                       No liability is accepted for any damage caused by incorrect operation.
of the case is indicated by four LEDs on the front.
                                                                                                                        If you need technical support, please contact our support team by e-mail at
Charge the charging case                                                                                                service@fontastic.eu.
Connect the Micro USB charging cable to the socket (6) of the charging case and
the USB-A plug of the cable to a USB power source such as a computer or USB                                             Technical Specifications:
charger.                                                                                                                • BT version: 5.0
The internal battery of the charging case will be charged. The charging status of the                                   • Profile: Headset, hands-free, A2DP, AVRCP
box is indicated by 2 LEDs on the front side of the charging case. If both LEDs are                                     • Range: up to 10 m
on, the box is fully charged.                                                                                           • Audio frequency range: 20Hz-20kHz
                                                                                                                        • Built-in high-performance microphone
Note: The fully charged charging power case can offer 3 times charging of the                                            • Status LED: blue/red
headsets.                                                                                                               • Battery: Headset 40mAh, battery case 350mAh
                                                                                                                        • Operation time: at 70% Volume up to 3x 4.5 hrs.
Switching on/off                                                                                                         • Weight: Headset 4.3g, battery case 28.4g
Switch on: as soon as you take off the headset from its charger, it will switch on.                                      • Dimensions: Headset 22x11x46mm, battery case 26x48x57mm
Switch off: Once the headsets are placed in the charging power case they will
switch off and disconnect with the Smartphone.

Note: You can also switch off the headsets manually by pressing and holding the                                          Registration and Safety
multifunction button (2) for around 8 seconds.                                                                          We hereby declare that this device carries the CE mark in accordance with the
                                                                                                                        regulations and standards.
Pairing                                                                                                                 It complies with the fundamental requirements of the (RED) 2014/53/EU.
The Fontastic Dima Headset must be paired with a Bluetooth® device before use.
Remove the headsets from the charging power case. The two headsets will
automatically switch on and pair together. Activate Bluetooth® of your Smartphone                                       Note on environmental protection:
and search for “Dima” and connect your Smartphone with it. Pairing procedure is                                                 After the implementation of the European Directive 2012/19/EU in the
completed and the headset is ready to use.                                                                                      national legal system, the following applies: Electrical and electronic devices
                                                                                                                                may not be disposed of with domestic waste. Consumers are obliged by
Note: Different mobile phones may require different pairing methods.                                                              law to return electrical and electronic devices at the end of their service lives
                                                                                                                        to the public collecting points set up for this purpose or point of sale. Details of
Note: If the connection is lost or the transmitter is temporarily disconnected,                                         this are defined by the national law of the respective coun-try. This symbol on the
Fontastic® Dima automatically tries to restore the connection.                                                          product, the instruction manual or the package indicates that a product is subject to
If the connection cannot be restored after 3 seconds, try again by pressing the                                         these regulations. By recycling, re-using the materials or other forms of utilising old
multifunction button (2) on one of the headsets or in using your Smartphones                                            devices, you are making an important contribution to protecting our environment.
Bluetooth® settings.

Note: Once the pairing procedure is successfully done and the Dima is shown
in the Smartphones Bluetooth® list, the headset will automatically connected to the
Smartphone without the need to manually reconnect or pair it again.

Hands-free features
With its built-in microhone and intelligent noise reduction, the Fontastic® Dima
headset is perfectly suitable to make phone calls.

Music streaming
Start music streaming on the Smartphone which is paired with Fontastic® Dima.
The music is transferred to the Headsets.

                                            Improvement and changes of the technical specifications and other data’s could be made without prior notice. Fontastic, by D-Parts Mobilphon & Zubehör GmbH ● Birkenweiher Str. 16 ● 63505 Langenselbold, Germany 12_2019
Auriculares inalámbricos „Dima“ E
Gracias por elegir un producto Fontastic®. Nota: el dispositivo debe admitir el perfil A2DP para la transmisión de música y el
perfil AVRCP para el control remoto de música.
Lea el manual detenidamente y tenga en cuenta los
consejos de seguridad. Control de la música
Para reproducir o detener la reproducción de música, pulse brevemente el
Contenido del paquete botón multifunción (2).
• 2 x auriculares inalámbricos Fontastic® Dima Para saltar a la siguiente pista, mantenga presionado el botón multifunción (2) del
• Estuche eléctrico de carga y almacenamiento auricular izquierdo durante aproximadamente 4 segundos.
• Cable Micro-USB Para volver a la pista anterior o al comienzo de la pista, mantenga presionado el
• Manual del usuario botón multifunción (1) del auricular derecho durante aproximadamente 4 segundos.
Si falta alguna de las piezas anteriores, vuelva a embalar el producto y devuélvalo Responder/finalizar/rechazar llamadas/volver a marcar
al distribuidor. Para aceptar una llamada entrante, pulse brevemente el botón multifunción (2).
Para finalizar una llamada en curso, pulse brevemente el botón multifunción (2).
Resumen: Para rechazar una llamada entrante, mantenga pulsado el botón multifunción (2)
1. Micrófono 5 durante aproximadamente 2 segundos.
2. Botón multifunción Volver a marcar: en el modo de espera o durante la reproducción de música, pulse
3. LED de estado 4 el botón multifunción (2) dos veces. El último número marcado se volverá a marcar.
4. Estuche batería
5. Ranura para auriculares 2 3 6 Consejos de seguridad:
6. Toma Micro-USB • Esto no es un juguete para niños. Mantenga los auriculares alejado de
7. LED de estado los niños menores de 3 años. ¡Existe peligro de asfixia!
8. Botón de encendido 1 7
• Ajuste el volumen a un nivel razonablemente bajo para usar los auriculares
9. Contacto de carga durante el tiempo que desee. Asegúrese de bajar el volumen para que otras
9 8 personas no tengan que gritarle.
Primeros pasos • No use los auriculares en situaciones potencialmente peligrosas.
Carga de la batería • No use los auriculares mientras conduce un vehículo.
Coloque los auriculares en el estuche de carga. Asegúrese de que los auriculares • Nunca abra el dispositivo.
estén insertados correctamente y que los contactos de los auriculares y el estuche • Nunca sumerja la unidad en agua y protéjala siempre de la humedad.
de carga se toquen entre sí. • Desconecte los dispositivos electrónicos de la alimentación cuando no los
Pulse el botón de encendido (8) y cierre la cubierta. Las unidades de auriculares use durante mucho tiempo.
se cargarán a través del cargador de batería interno. El LED rojo en los auriculares • No use los auriculares si muestran algún daño visible.
parpadeará durante la carga y se apagará cuando estén completamente cargados.
El nivel de carga actual del estuche se indica mediante cuatro LED en el frente. No se aceptará ninguna responsabilidad por los daños causados por un funciona-
miento incorrecto.
Carga del estuche de carga
Conecte el cable de carga Micro USB a la toma (6) del estuche de carga y el Si necesita asistencia técnica, contacte con nuestro equipo de atención al cliente
enchufe USB-A del cable a una fuente de alimentación USB, como un ordenador o por correo electrónico en service@fontastic.eu.
un cargador USB.
Se cargará la batería interna del estuche de carga. El estado de carga del estuche Especificaciones técnicas:
se indica mediante 2 LED en la parte frontal del estuche. Si ambos LED están • Versión de BT: 5.0
encendidos, el estuche está completamente cargado. • Perfil: auriculares, manos libres, A2DP, AVRCP
• Rango: hasta 10 m
Nota: el estuche de carga completamente cargado puede cargar 3 veces los • Rango de frecuencia de audio: 20 Hz-20 kHz
auriculares. • Micrófono incorporado de alto rendimiento
• LED de estado: azul/rojo
Encendido y apagado • Batería: auriculares de 40 mAh, estuche batería de 350 mAh
Encendido: tan pronto como retire los auriculares de su cargador, se encenderán. • Tiempo de funcionamiento: al 70 % de volumen. hasta 3 x 4,5 horas.
Apagado: una vez que se coloquen los auriculares en el estuche de carga, se • Peso: auriculares: 4,3 g, estuche batería 28,4 g
apagarán y desconectarán con el smartphone. • Dimensiones: auriculares 22x11x46 mm, estuche batería 26x48x57 mm
Nota: también puede apagar los auriculares manualmente pulsando y manteniendo
el botón multifunción (2) durante unos 8 segundos. Por la presente declaramos que este dispositivo lleva la marca CE de acuerdo con
los reglamentos y especificaciones. Por lo tanto, cumple con los requisitos básicos
Emparejamiento de (RED) 2014/53/EU.
Los auriculares Fontastic® Dima deben emparejarse con un dispositivo Bluetooth®
antes de su uso. Retire los auriculares del estuche eléctrico de carga. Los dos
auriculares se encenderán y emparejarán automáticamente. Active Bluetooth® en
su smartphone y busque “Dima” y conecte su smartphone. El procedimiento de Nota sobre protección del medio ambiente:
emparejamiento se habrá completado y los auriculares estarán listos para usarse. A partir de la fecha de transposición de la Directiva Europea 2012/19/EU a la
legislación nacional:
Tenga en cuenta que cada teléfono móvil puede tener diferentes métodos de Los equipos eléctricos y electrónicos no deben desecharse con la basura
emparejamiento. doméstica. El consumidor está legalmente obligado a devolver los equipos
eléctricos y electrónicos, así como las baterías al final de su vida
Nota: si se pierde la conexión o el transmisor se desconecta temporalmente, útil, a los puntos de recogida públicos apropiados o al punto de venta. Los detalles
Fontastic Dima® intentará restablecer la conexión automáticamente. Si la conexión de esto están regulados por la ley estatal respectiva. El símbolo en el producto, las
no se restablece después de 3 segundos, intente nuevamente pulsando el botón instrucciones de uso o el embalaje indican estas
multifunción (1) en uno de los auriculares o usando la configuración Bluetooth® de disposiciones. Con el reciclaje, el reciclaje pesado u otras formas de reciclaje de
su smartphone. equipos viejos, usted hace una contribución importante a la protección de nuestro
medio ambiente.
Nota: una vez que el procedimiento de emparejamiento se haya realizado correcta-
mente y Dima se muestre en la lista de Bluetooth® del smartphone, los auriculares
se conectarán automáticamente sin la necesidad de volver a conectarlos o
emparejarlos manualmente.
Funciones manos libres
Con su micrófono incorporado y la reducción de ruido inteligente, los auriculares
Fontastic Dima son perfectamente adecuados para hacer llamadas telefónicas.
Transmisión de música
Inicie la transmisión de música en el smartphone emparejado con Fontastic® Dima.
La música se transmitirá a los auriculares.
Improvement and changes of the technical specifications and other data’s could be made without prior notice. Fontastic, by D-Parts Mobilphon & Zubehör GmbH ● Birkenweiher Str. 16 ● 63505 Langenselbold, Germany 12_2019Auricolari senza fili „Dima“ I
Grazie per aver scelto un prodotto Fontastic®. Streaming di musica
Leggere attentamente il manuale e osservare le avvertenze Avviare lo streaming di musica sullo Smartphone che è accoppiato con
Fontastic® Dima. La musica viene trasmessa agli auricolari.
di sicurezza.
Nota: il dispositivo deve supportare il profilo A2DP per lo streaming musicale e il
Contenuto della confezione profilo AVRCP per il controllo remoto della musica.
• 2 x auricolari senza fili Fontastic® Dima
• Custodia per la conservazione e la ricarica Controllo della musica
• Cavo Micro-USB Per riprodurre o interrompere la riproduzione musicale, premere brevemente il
• Manuale d‘uso pulsante multifunzione (2).
Per passare al brano successivo, tenere premuto il pulsante multifunzione (2)
Se uno qualsiasi dei pezzi summenzionati dovesse mancare, imballare nuovamente dell‘auricolare sinistro per circa 4 secondi.
il prodotto e restituirlo al rivenditore. Per tornare al brano precedente o all‘inizio del brano, tenere premuto il pulsante
multifunzione (2) dell‘auricolare destro per circa 4 secondi.
Informazioni generali:
1. Microfono 5 Rispondere/terminare/rifiutare le chiamate/richiamare
2. Pulsante multifunzione Per accettare una chiamata in entrata, premere brevemente il tasto
3. LED di stato 4 multifunzione (2).
4. Custodia per la batteria Per terminare una chiamata in corso, premere brevemente il tasto
5. Slot per gli auricolari 2 3 6 multifunzione (2).
6. Connettore Micro-USB Per rifiutare una chiamata in arrivo, tenere premuto il tasto multifunzione (2)
7. LED di stato per circa 2 secondi.
8. Pulsante di accensione 1 7
Richiamare: in modalità standby o durante la riproduzione di musica, premere
9. Contatto di ricarica due volte il tasto multifunzione (2). L‘ultimo numero composto sarà nuovamente
9 8 chiamato.
Come iniziare
Caricare la batteria Consigli di sicurezza:
Posizionare gli auricolari nella custodia di ricarica. Assicurarsi che gli auricolari • Non è un giocattolo per bambini. Tenere l‘auricolare lontano dai bambini
siano inseriti correttamente e che i contatti degli auricolari e della custodia di di età inferiore ai 3 anni. Pericolo di soffocamento!
ricarica si tocchino tra loro. • Regolare il volume a un livello ragionevolmente basso per utilizzare l‘auricolare
Premere il pulsante di accensione (8) e chiudere il coperchio. Le unità vengono per tutto il tempo che si desidera. Assicurarsi di abbassare il volume in modo che
caricate tramite il caricabatterie interno. Il LED rosso sulle cuffie lampeggia durante gli altri non debbano urlare per essere sentiti.
la carica e si spegne quando sono completamente cariche. Il livello di carica attuale • Fare attenzione a non utilizzare gli auricolari in situazioni potenzialmente
della custodia è indicato da quattro LED sulla parte anteriore. pericolose.
• Non utilizzare gli auricolari durante l‘utilizzo di un veicolo.
Carica la custodia di ricarica • Non aprire il dispositivo.
Collegare il cavo di ricarica Micro USB al connettore (6) della custodia di ricarica e • Non immergere mai l‘unità nell‘acqua, proteggerla sempre dall‘umidità.
la spina USB-A del cavo a una fonte di alimentazione USB, ad esempio un • Scollegare i dispositivi elettronici dall‘alimentazione quando non vengono
computer o un caricabatterie USB. utilizzati per un periodo di tempo prolungato.
La batteria interna della custodia di ricarica verrà ricaricata. Lo stato di carica della • Non utilizzare le cuffie se presentano danni visibili.
scatola è indicato da 2 LED sul lato anteriore della custodia di ricarica.
Se entrambi i LED sono accesi, la custodia è completamente carica. Si declina ogni responsabilità per eventuali danni causati da un utilizzo non corretto.
Nota: quando è completamente carica, la custodia di ricarica può caricare gli In caso di necessità di supporto tecnico, si prega di contattare il nostro team di
auricolari fino a 3 volte. assistenza via e-mail all‘indirizzo service@fontastic.eu.
Accensione/spegnimento Specifiche tecniche:
Accensione: gli auricolari si accenderanno non appena verranno tolti dal • Versione del BT: 5.0
caricabatterie. • Profilo: auricolare, hands free, A2DP, AVRCP
Spegnimento: una volta che gli auricolari vengono collocati nella custodia di • Portata: fino a 10 m
ricarica, si spegneranno e si scollegheranno dallo Smartphone. • Gamma di frequenza audio: 20Hz-20kHz
• Microfono integrato ad alte prestazioni
Nota: È anche possibile spegnere gli auricolari manualmente, tenendo premuto il • LED di stato: blu/rosso
pulsante multifunzione (8) per circa 8 secondi. • Batteria: auricolare 40mAh, custodia della batteria 350mAh
• Tempo di funzionamento: al 70% del volume fino a 3x 4,5 ore.
Accoppiamento • Peso: auricolari 4,3g, custodia della batteria 28,4g
I Fontastic® Dima Headset devono essere accoppiati con un dispositivo Bluetooth® • Dimensioni: auricolari 22x11x46mm, custodia della batteria 26x48x57mm
prima dell‘uso. Estrarre gli auricolari dalla custodia di ricarica. Gli auricolari si
accenderanno automaticamente e si accoppieranno tra loro. Attivare il Bluetooth®
del proprio Smartphone e cercare “Dima”, dopodiché collegarlo allo Smartphone. Il presente dispositivo reca il marchio CE conformemente alle disposizioni e ai
La procedura di accoppiamento è completata, gli auricolari sono pronti per l‘uso. requisiti vigenti in materia. Esso si attiene ai requisiti essenziali previsti dalla
direttiva 2014/53/EU.
Si prega di notare che alcuni telefoni cellulari potrebbero necessitare di metodi di
accoppiamento diversi.
Nota: se la connessione viene persa o il trasmettitore viene temporaneamente Indicazioni sulla protezione dell’ambiente:
scollegato, i Fontastic® Dima cercheranno automaticamente di ripristinare la A partire dalla data di recepimento nella legislazione nazionale della direttiva
connessione. Se la connessione non può essere ripristinata entro 3 secondi, europea 2012/19/EU, vale quanto segue: i dispositivi elettrici ed elettronici
riprovare premendo il pulsante multifunzione (2) su uno degli auricolari, oppure non devono essere gettati nella spazzatura. Il consumatore
utilizzando le impostazioni Bluetooth® dello smartphone. è obbligato per legge a conferire i dispositivi elettrici ed elettronici nonché
le batterie esauste nei centri di raccolta predisposti a tale scopo oppure a restituirli
Nota: una volta eseguita con successo la procedura di accoppiamento e dopo aver al punto vendita di riferimento. I dettagli del caso sono disciplinati dalle rispettive
visualizzato il Dima nell‘elenco degli Smartphone Bluetooth®, l‘auricolare si regioni/province. Il simbolo riportato sul prodotto, le istruzioni per l’uso e il confezio-
collegherà automaticamente allo Smartphone senza bisogno di ricollegarlo o di namento richiamano le disposizioni di cui sopra. Il riutilizzo e il riciclo di apparecchi
riaccoppiarlo manualmente. usati rappresentano un importante contributo alla protezione dell’ambiente.
Funzione Hands free
Grazie al microfono integrato e alla riduzione intelligente del rumore, gli auricolari
Fontastic Dima sono perfettamente indicati per effettuare telefonate.
Improvement and changes of the technical specifications and other data’s could be made without prior notice. Fontastic, by D-Parts Mobilphon & Zubehör GmbH ● Birkenweiher Str. 16 ● 63505 Langenselbold, Germany 12_2019Sie können auch lesen