MVD-480 Moniceiver - DVD CD MP3 USB SD BT HD 6,2'' Touchscreen 10009738 10009739 - electronic-Star
←
→
Transkription von Seiteninhalten
Wenn Ihr Browser die Seite nicht korrekt rendert, bitte, lesen Sie den Inhalt der Seite unten
MVD-480
                 Moniceiver - DVD CD MP3 USB SD BT HD 6,2’’ Touchscreen

10009738   10009739                                           http://www.auna-multimedia.com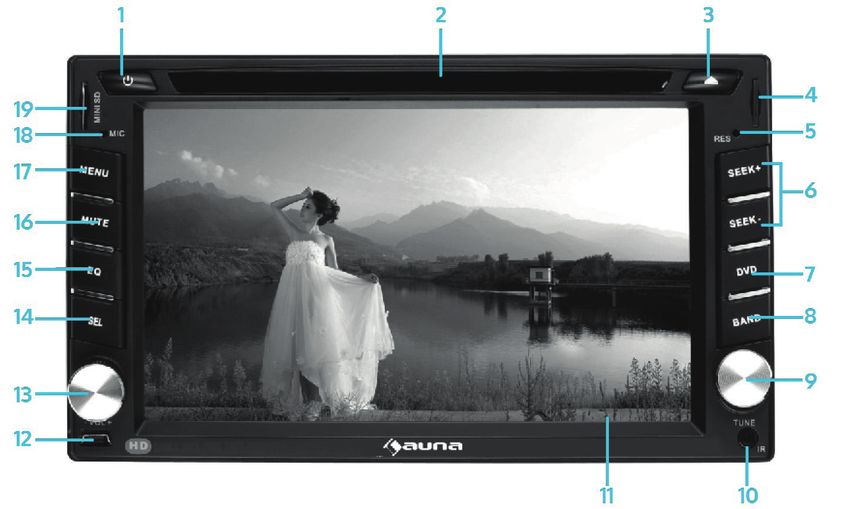
2
Sehr geehrter Kunde,

zunächst möchten wir Ihnen zum Erwerb Ihres Gerätes gratulieren.

Bitte lesen Sie die folgenden Anschluss- und Anwendungshinweise sorgfältig durch und befolgen Sie diese um mögli-
chen technischen Schäden vorzubeugen.

                                         Technische Daten

                                         Artikelnummer 10009737, 10009738

                                                    Allgemein
                                       Stromversorgung DC 12V
                                       Ausgangsleistung 4 x 40W (4 Ω)

                                                    Laufwerk
                                         Abspielformate DVD, VCD, Audio-CD, MP3-CD
                                      Maximale Neigung ±30°

                                                      Video
                                           Video System PAL/SECAM/NTSC
                                  Horizontale Auflösung 500px

                                                      Audio
                                 Max. Ausgangsleistung     2 Vms ( +/- 3dB )
                                          Frequenzgang: 20Hz-20kHz
                                                    S/N 85dB
                                         Kanaltrennung: 80dB
                                               B- Version 2.0
                                              Reichweite 5 Meter

                                                 Warnung
Zur Reduzierung der Gefahr von Brand, elektrischem Schlag und Beschädigung:

•   Setzen Sie dieses Gerät nicht Regen oder Feuchtigkeit aus.
•   Stellen Sie keine mit Flüssigkeiten gefüllten Gefäße auf dieses Gerät.
•   Verwenden Sie ausschließlich das empfohlene Zubehör.
•   Reparieren Sie dieses Gerät nicht selbst. Wenden Sie sich zur Wartung an qualifiziertes Kundendienstpersonal.
•   Reinigen Sie das Gerät nur mit einem trockenen Tuch.

                                                                                                                    3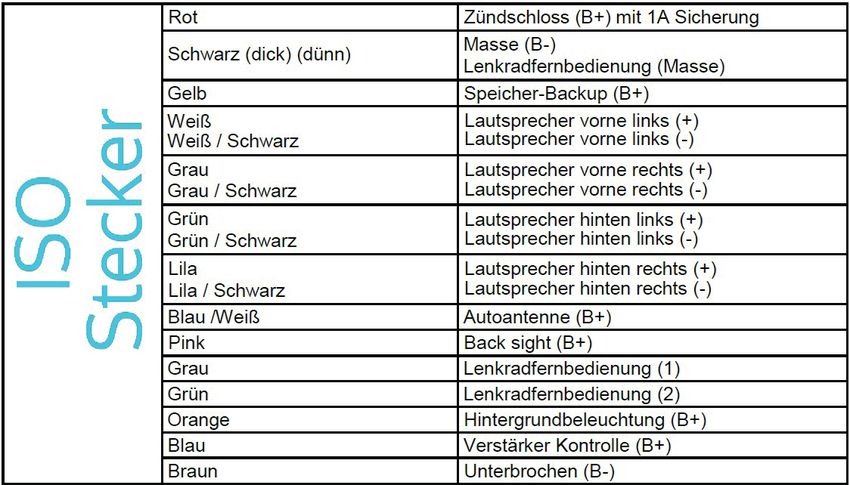
Sicherheits- und Einbauhinweise
•   Halten Sie Ihr Fahrzeug vor jedem Bedienvorgang an, der beim Fahren stören könnte.
•   Versuchen Sie nicht, das Gerät zu modifizieren oder zu ändern – dies kann zu Fehlfunktionen und Beschädigungen
    führen.
•   Um Beschädigungen am Gerät und Kurzschlüsse zu vermeiden, müssen Sie, bevor Sie die Anschlüsse herstellen,
    den Minuspol der Batterie abklemmen.
•   Achten Sie darauf, dass die Farben der Anschlüsse mit dem Schaltplan übereinstimmen. Fehlerhafte Anschlüsse
    können zu Fehlfunktionen im Gerät oder zu Schäden im elektrischen System des Fahrzeugs führen.
•   Achten Sie darauf, dass das Lautsprecherkabel (-) zum Lautsprecheranschluss (-) führt. Verbinden Sie niemals die
    Lautsprecherkabel des linken und rechten Kanals miteinander oder mit der Fahrzeugkarosserie.
•   Achten Sie darauf, dass die Lüftungsöffnungen und Kühlrippen des Geräts frei bleiben. Sind sie blockiert, kommt
    es zu einem Hitzestau im Gerät, wodurch Schäden und Brände verursacht werden können.
•   Wenn Sie mit dem Einbau fertig sind (nach dem erneuten Anschließen der Batterie), drücken Sie mit einem spitzen
    Gegenstand (z.B. Kugelschreiber) die RESET Taste am Hauptgerät, um es in den Ausgangszustand zu setzen.

                                                   Einbau
Der Einbau unterscheidet sich nach Fahrzeugtyp und den mitgelieferten Teilen.

Für den Einbau benötigen Sie unbedingt einen Doppel-Din-Einbauschacht im Armaturenbrett. Falls Sie sich nicht sicher
sind, konsultieren Sie Vertreter des Fachhandels oder eine Kfz-Werkstatt.

Verwenden Sie für den Einbau nur die mitgelieferten Schrauben.

                                                                                                                  4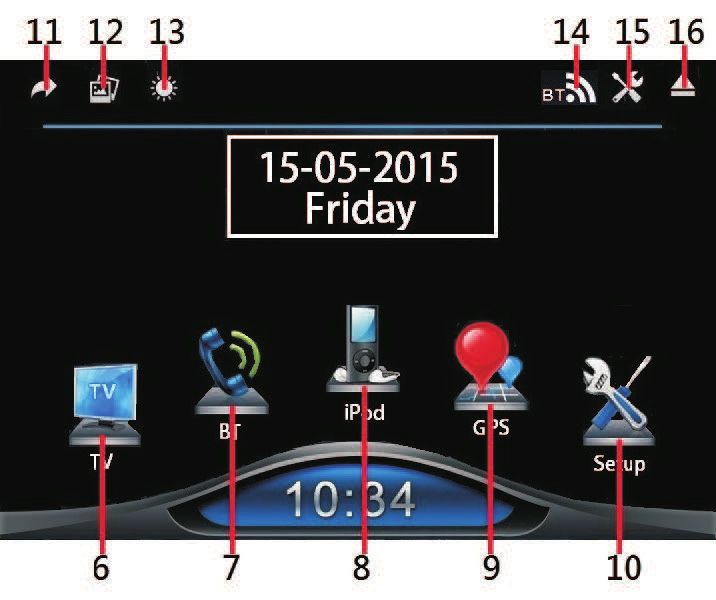
Anschlüsse

                                                        1            2     3

                               4                        5            6     7           8    9

                              Front-Video - Eingang          1   6   Video - Ausgänge
                        Rückfahrkamera - Eingang             2   7   Audio - Eingang
                                      Video - Eingang        3   8   Radio - Antenne
                                         ISO - Buchse        4   9   TV-Antennenanschluss
  Audio - Ausgänge (FL = Front links; FR = Front rechts;     5
                    RL = Hinten links; RR = Hinten rechts)

Hinweis:

Je nach Fahrzeugtyp benötigen Sie eventuell einen passenden Adapter für die ISO-Buchse. Diese sind im Fach-
handel und über KFZ-Werkstätten erhältlich.

                                                                                                         5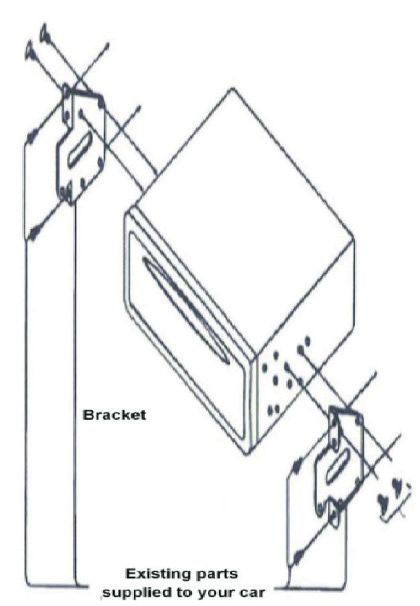
Verkabelung ISO-Stecker:

                            Bedienelemente

(Modell 10009739 ähnlich)
                                             6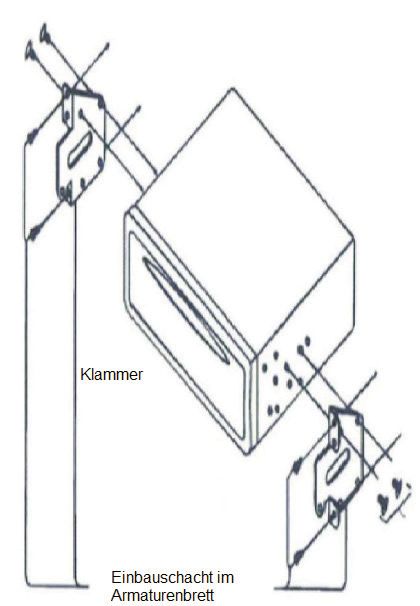
EIN/AUS         1      11    Bildschirm
                                        CD-Fach     2       12    USB-Anschluss
                                  CD Auswerfen      3       13    Lautstärkeregler
                   Micro-SD-Slot für GPS-Betrieb    4       14    SEL (Auswählen)
                                     RES (Reset)    5       15    EQ (Klangregelung)
      SEEK+/- (Frequenz/Titel/Kanal vor/zurück)     6       16    MUTE (Stummschaltung)
                                            DVD     7       17    MENU (Menü)
                                          BAND      8       18    Mikrofon (für Freisprechen)
               Multi-Regler/Frequenzbandregler      9       19    Micro-SD-Slot
              Infrarot-Sensor (für Fernbedienung)   10

                                         Grundfunktionen am Gerät

                    Vor dem erstmaligen Betrieb des Geräts oder nach dem Austausch der Autobatterie, ist es not-
                    wendig, das Gerät zurückzusetzen. Drücken Sie RES (5) mit einem spitzen Gegenstand (z.B. Ku-
GERÄTE-RESET:
                    gelschreiber), um das Gerät in die Werkseinstellung zurückzusetzen. Auch wenn Fehlfunktionen
                    am Gerät auftreten, können Sie RES drücken, um es zurückzusetzen.
                    Drücken Sie EIN/AUS (1) um das Gerät einzuschalten. Drücken und halten Sie zwei Sekunden
EIN/AUS:
                    lang, um das Gerät auszuschalten. Gespeicherte Einstellungen bleiben erhalten.
MUTE                Stellen Sie mit MUTE den Audio-Ausgang stumm.
Infrarot-Sensor     Mit Hilfe der Fernbedienung können Sie verschiedene Funktionen des Geräts bedienen, indem
(für Fernbedie-     Sie die Fernbedienung in Richtung Fernbedienungssensor IR (4) halten und dann auf der Fernbe-
nung):              dienung die entsprechende Taste für die gewünschte Funktion drücken.
Bildschirm:         Zeigt den Betriebszustand des Gerätes. Dies ist ein Touchscreen-Display.
                    Um eine Disc einzugeben, schieben Sie sie in den Disc Slot (2), sie wird vom Gerät automatisch
CD-Fach
                    eingezogen und wiedergegeben. Um die Disc auszuwerfen, drücken Sie auf Auswerfen (3).
USB Anschluss       Stecken Sie den USB Stick ein, um gespeicherte Multi-Media Dateien wiederzugeben.
                    Schieben Sie die Mirko SD Card in den Micro-SD-Slot, um gespeicherte Multi-Media Dateien
Micro-SD-Slot
                    wiederzugeben.
                    Drücken Sie während des Gerätebetriebs DVD (7), um das Gerat von der aktuellen Einstellung
DVD
                    auf Disc-Betriebsmodus umzuschalten (wenn eine Disc eingelegt ist).
Mikrofon            MIC (18) dient dem Sprachempfang im BT-Betrieb (Einzelheiten finden Sie in weiter unten)
Multifunktions-
Knopf/              Im Radio-, TV-, DVD-, Disc- und Musik-Modus: Drehen zum Blättern durch Datei-, Sender-, Wie-
Frequenzband-       dergabe- oder Kapitellisten. Drücken zum Auswählen.
regler
                    Drücken Sie während der Disc/DVD/USB/SD/iPod Wiedergabe kurz um den gewünschten Titel
                    anzuwählen.
                    Drücken und halten Sie zwei Sekunden lang um Vor- oder Rückspulen zu aktivieren. Drücken und
                    halten Sie einmal für x2, drücken und halten Sie zweimal für x4, drücken und halten Sie dreimal
SEEK+/-             für x8, drücken und halten Sie viermal für x20. Drücken und halten Sie fünfmal, um zur normalen
                    Wiedergabe zurückzukehren.
                    Drücken Sie im TV-Modus kurz um den gewünschten TV-Sender aufwärts und abwärts anzuwäh-
                    len. Drücken und halten Sie zwei Sekunden lang um die TV-Sendersuche nach oben und unten zu
                    starten und anzuhalten, wenn ein TV-Sender empfangen wird.
                                                                                                                  7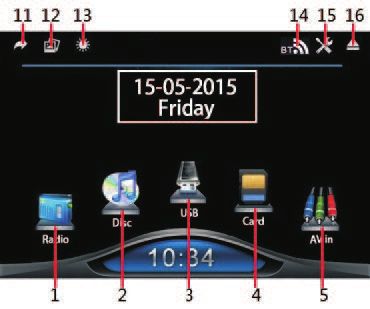
Drücken Sie während des Gerätebetriebs MENU, um das auf dem Bildschirm angezeigte Inter-
MENU
face für die Auswahl unterschiedlicher Betriebsarten zu aktivieren
Drücken Sie in der Radio Betriebsart wiederholt BAND/BND, um das gewünschte Frequenzband
in der folgenden Reihenfolge auszuwählen: FM1 > FM2 > FM3 > AM.
BAND
Drücken Sie in der TV Betriebsart wiederholt BAND/BND, um verschiedene TV-Systeme zu wäh-
len (PAL/SECAM/NTSC).
Fernbedienung
Vor der Benutzung
Lasche entfernen
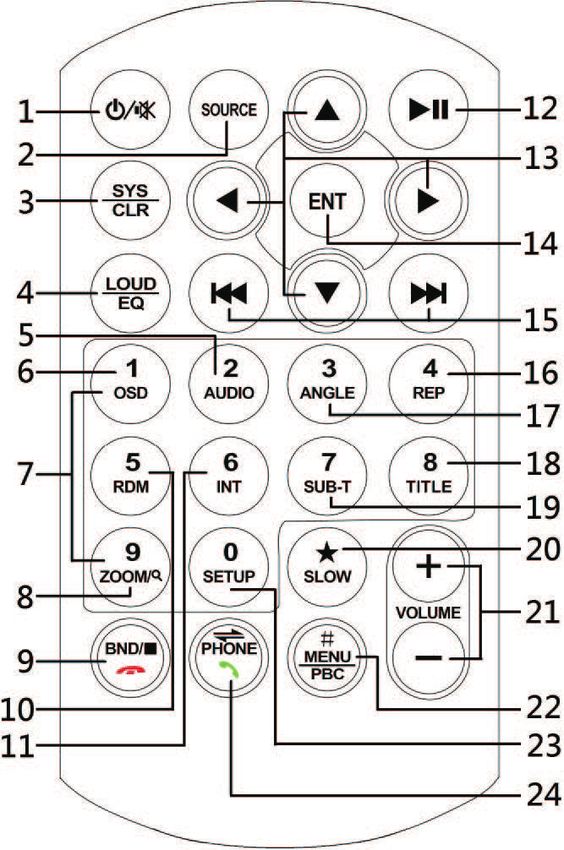
8Nr. Symbol Bedienung und Einstellungen
1 Gerät ein- oder ausschalten.
stummschalten, Stummschaltung wieder aufheben
2 SOURCE Wiederholt drücken, bis die gewünschte Quelle gewählt wurde.
3 SYS/CLR Im BT-Modus letzte Eingabe löschen.
EQ Wiederholt drücken, um den gewünschten Equalizer-Modus zu wählen.
4
LOUD Drücken und kurz halten, um die Lautstärkensteuerung ein- oder auszuschalten..
Im Video- und Musikmodus drücken, um verschiedene Ausgabekanäle anzusteu-
5 AUDIO
ern. (Hinweis: Nicht im BT-Modus verfügbar).
6 OSD Während der Wiedergabe Informationen auf dem Display anzeigen.
Radiobetrieb
1-6
Drücken zur Anwahl eines Programmspeichers. Gedrückt halten, um den aktuel-
len Sender auf der jeweilig gedrückten Nummer zu speichern.
7
CD/USB/SD/MP3-Quelle
0-9
Einen Titel direkt über die Zahlen anwählen.
8 ZOOM CD/USB/SD/MP3-Quelle: In Video hinein- oder herauszoomen.
Radio: Nach gespeicherten Sendern scannen und anhalten
9 BND Radio-Modus: Einstellung des Frequenzbands.
CD/USB/SD/MP3-Quelle: Anhalten der Wiedergabe von Video, Audio und Fo-
toalben.
BT-Betrieb: Anruf ablehnen oder auflegen.
10 RDM Zufallswiedergabe bei einer CD/USB/SD/MP3.
11 INT Intro ein- oder ausschalten (nicht im BT-Betrieb verfügbar)
12 CD/USB/SD/MP3-Quelle: Wiedergabe anhalten und fortfahren
DVD:
Navigation im Menü.
Ordner/Playlist: hoch und runter blättern
13
Fotowiedergabe:
Bilder drehen, Spiegelbild anzeigen
14 ENT DVD: Bestätigen der Auswahl
Radio:
Für Feinabstimmung der Frequenz wiederholt drücken.
Zur Sendersuche kurz gedrückt halten
15
CD/USB/SD/MP3-Quelle:
Drücken: Titel zurück / Titel vor
Gedrückt halten: Im Titel vor- und zurückspulen, mehrfach drücken, um die Ge-
schwindigkeit zu erhöhen.
Im CD/USB/SD-Wiedergabemodus drücken, um die Wiederholfunktion zu akti-
16 REP
vieren.
Während der Videowiedergabe den Winkel ändern
17 ANGLE
( nur bei Medien mit dieser Eigenschaft verfügbar)
9Nr. Symbol Bedienung und Einstellungen
Radio:
Bei UKW Stereo und Mono auswählen.
18 TITLE
DVD:
Drücken und halten, um ins Titelmenü zu gelangen.
Video:
Einblenden von im Medium verfügbaren Untertiteln.
19 SUB-T
Radio: Lokal-Radio-Einstellung zum Empfang starker lokaler oder schwacher
entfernter Sender. Im Display erscheint das Symbol „LOC“.
20 SLOW Video: Einstellung von Wiedergabgeschwindigkeiten.
21 VOL+/VOL- Kurz drücken oder gedrückt halten, um die Lautstärke einzustellen.
DVD:
Kurz gedrückt halten, um das DVD-Menü aufzurufen. Nach einiger Zeit wird die
Wiedergabe fortgesetzt.
22 MENU/PBC
VCD:
Kurz gedrückt halten, um die PBC-Funktion (Steuerungsmenü) ein- oder auszu-
schalten. Im PBC-Betrieb kurz gedrückt halten, um die Wiedergabe von vorne zu
beginnen.
Im Betrieb drücken, um in das Einstellungsmenü zu gelangen. Erneut drücken,
23 SETUP
um zum vorherig aktiven Modus zurückzukehren.
BT-Modus:
• Drücken, um einen eingehenden Anruf entgegenzunehmen.
24 PHONE • Eine eingegebene Nummer wählen.
• Drücken, um ein Gespräch zwischen Mobiltelefon und Autoradio hin- und
her zu schalten.
Hinweis: Je nach Eingabegeräten und Wiedergabemedien kann die Funktion verschieden oder nicht vorhanden sein.
10Menü-Bedienung
Berühren Sie auf dem Bildschirm das Symbol für die gewünschte Betriebsart, um sie zu aktivieren.
Halten und wischen Sie über den unteren Bildschirmbereich, wo sich die Symbole für Eingangsquellen befinden, um
zur zweiten Seite des Hauptmenüs zu gelangen, auf der sich weitere Symbole befinden.
1 Radio einschalten.
2 CD-Player starten.
3 USB-Quelle starten (wenn ein USB-Gerät eingesteckt ist).
4 SD-Karte starten (wenn eine Mikro-SD-Karte eingesteckt ist).
5 AUX-Eingang aktivieren (wenn ein Gerät angeschlossen ist).
6 nicht verfügbar
7 BT-Betrieb
8 nicht verfügbar
9 nicht verfügbar
10 Einstellungen
11 zurück zum letzen Bildschirm
12 Hintergrundbild/Hintergrundfarbe einstellen
13 Bildschirmhelligkeit einstellen: Es sind drei Stufen wählbar. Der letzte Einstellungspunkt ermöglicht eine manuelle
Einstellung. Wenn der Bildschirm ausgeschaltet ist, auf eine beliebige Stelle tippen, um den Bildschirm wieder
zu aktivieren.
14 BT-Modus starten.
15 Einstellungen für Ton und Bild
16 Auswurf der CD
11Geräte Setup
Berühren Sie im MAIN MENU das „SYSTEM“ Symbol auf dem Bildschirm, um in das SETUP MENU zu gelangen, wo Sie
verschiedene weitere Einstellungen vornehmen können.
Problembehandlung
• Kein Strom: Überprüfen Sie die Kabelverbindungen (ist die Verbindung gegeben) Sicherung (ersetzen Sie diese
falls notwendig).
• Kein Ton: Überprüfen Sie die Lautsprecheranschlüsse und die eingestellte Lautstärke
• Kein Bild: Überprüfen Sie die Kabelverbindung des Videoanschlusses.
• Das Gerät ist „eingefroren“ oder reagiert nicht: Drücken Sie die „RESET“-Taste um es neu zu starten.
• Schlechter Radio/TV Empfang: Überprüfen Sie die Kabelverbindungen und die Antenne. Überprüfen Sie ob die
Antenne ordentlich geerdet ist. Versuchen Sie die Antenne neu auszurichten.
• Kein Stereoempfang im Radiobetrieb: Die Frequenz ist möglicherweise nicht genau eingestellt. Der Empfang ist-
nicht optimal.
• Disk eingeführt wird aber nicht gelesen: Überprüfen Sie, ob Sie die Disk richtig eingelegt haben. Die Disk ist ver-
schmutzt oder verkratzt. Die Linse ist verschmutzt, reinigen Sie die Linse mit einer speziellen CD/DVD
• Das Bild ist ohne Farbe oder Ton: Überprüfen Sie das eingestellte Format(PAL/ SECAM/ NTSC).
• Die Disk verhält sich nicht ordnungsgemäß im Laufwerk: Die Disk ist beschädigt oder stark verschmutzt, reinigen
Sie die Disk oder verwenden Sie eine andere.
• Die Fernbedienung funktioniert nicht: Ersetzen Sie die Batterie. Richten Sie die Fernbedienung direkt auf den Sen-
sor. Verringern Sie den Abstand. Säubern Sie den Sensor.
• Keine BT Verbindung: Überprüfen Sie ob die Geräte miteinander verknüpft sind.
Hinweise zur Entsorgung
Befindet sich die diese Abbildung (durchgestrichene Mülltonne auf Rädern) auf dem Produkt, gilt
die Europäische Richtlinie 2012/19/EU. Diese Produkte dürfen nicht mit dem normalen Hausmüll
entsorgt werden. Informieren Sie sich über die örtlichen Regelungen zur getrennten Sammlung
elektrischer und elektronischer Gerätschaften. Richten Sie sich nach den örtlichen Regelungen und
entsorgen Sie Altgeräte nicht über den Hausmüll. Durch die regelkonforme Entsorgung der Altgerä-
te werden Umwelt und die Gesundheit ihrer Mitmenschen vor möglichen negativen Konsequenzen
geschützt. Materialrecycling hilft, den Verbrauch von Rohstoffen zu verringern.
1213
14
Dear Customer,

Congratulations on purchasing this equipment. Please read this manual carefully and take care of the following hints
on installation and use to avoid technical damages. Any failure caused by ignoring the items and cautions mentioned
in the operation and installation instructions are not covered by our warranty and any liability.

                                             Technical Data
                                             Item number 10009737, 10009738

                                                           General
                                       Power requirement DC 12 V
                                       Max. Power Output 4 x 40 W (4 Ω)

                                                     Disc section
                                                  Disc play DVD, VCD, Audio-CD, MP3-CD
                                           Mounting angle ±30°

                                                           Video
                                             Video System PAL/SECAM/NTSC
                                     Horizontal resolution 500px

                                                           Audio
                                         Max. output level     2 Vms ( +/- 3dB )
                                      Frequency response: 20 Hz-20kHz
                                     Signal to Noise Ratio 85 dB
                                     Channel Separation:: 80 dB
                                             BT Version 2.0
                                       Maximum distance

                                                    Warning
To reduce the risk of fire, electrical shock and damage:

•   Never expose this device to rain or humidity.
•   Only use the accessories recommended by the producer.
•   Do not repair the device by yourself. Turn to qualified personnel.

                                                                                                                 15
Safety and Installation Hints
• The unit is designed for DC 12V negative ground operation system only. Before installing the unit, make sure
your vehicle is connected to DC 12V negative ground electrical system.The negative battery terminal must be
disconnected before making connections. By doing so, it can reduce the chance of damaging the unit to short
circuit.
• Be sure to connect the colour coded leads correctly accordingly to the wiring diagram.
• Incorrect connections may cause the unit malfunction or damage the vehicle‘s electrical system.
• Be sure to connect the speaker(-) leads to the speaker(-) terminal. Never connect the left and right channel
speaker wires together or to the vehicle body.
• Do not block vents or radiator panels o f the unit. Blocking them will cause heat to build up inside the unit and
may cause damage or fire.
• After the completion o f installation (or after replacing the battery of vehicle), make sure to press the RESET but-
ton on the main unit with pointed object (such as ball-point pen) to set the unit to its initial status.
Installation
Installation varies on type of cars and supplied parts Store small articles in places not accessible to children Install
only with the supplied screws Installation of unit by professional technician is strongly recommended.
16Connections
1 2 3
4 5 6 7 8 9
Front camera input 1 6 Video output
Video input jack 2 7 Audio input
Video imput 3 8 Radio antenna
ISO plug 4 9 TV antenna (optional feature)
Audio outputs (FL = Front left; FR = Front right; RL = 5
Rear left; RR = Rear right)
Notes::
Depending on the vehicle type, you might need an adapter for the ISO plug. These can be purchased in work-
shops.
17Wiring Connecting Socket
Colour Connection
Red Ignition switch (B+) with 1A fuse
Black (Coarse) Ground (B·)
(Fine) Steering wheel control /Ground
Yellow Memory back up (B+)
White Front left speaker ( +)
ISO CONNECTOR
White / Black Front left speaker /-)
Grey Rear right speaker ( +)
Grey/ Black Rear right speaker (-)
Green Rear left speaker(+)
Green / Black Rear left speaker(-)
Purple Rear right speaker ( +)
Purple / Black Rear right speaker (-)
Blue /White Auto antenna (B+)
Pink Back sight (B+)
Pink/ Black Front camera (B+)
Grey Steering wheel control (1 l
Green Steering wheel control (2)
Orange Illuminate backlioht (B+)
Blue Amplifier control (B+ )
Brown Brake (B-)
Controls
(Modell 10009739)
18Power On/Off 1 11 TFT Screen
Disc Slot 2 12 USB Slot
Disc Eject 3 13 Volume Control (VOL+ / VOL-)
USB Slot 4 14 Sel Control ( SEL)
RES (Reset) 5 15 EQ Control
SEEK+/- 6 16 MUTE
DVD 7 17 MENU
BAND 8 18 Microphone for BT (MIC)
TUNING 9 19 Mini SO Card Port
Remote Comrol Sensor (IR) 10
Basic functions
Press POWER ON/OFF CONTROL (2) to turn on the unit (when the unit is power off).
POWER ON/OFF
Press and hold (!) (2) for two seconds to turn off the unit. All the memorized setting will
CONTROL
retain after the unit turned off.
VOLUME CON- During unit operation, rotate VOLUME CONTROL (2) clockwise or anti-clockwise to adjust
TROL the sound output.
During unit operation, press VOLUME CONTROL shortly to cut down the sound output,
MUTE
press it again to release the mode and recover to the previous volume level.
Using the remote control handset to operate different functions of the unit by pointing the
REMOTE CON-
remote control handset to the remote control sensor IR and press the control key on the
TROL SENSOR
remote control handset for operation.
The TFT SCREEN (10) shows the status of operation on the unit. This display is also a touch screen
TFT DISPLAY: display - soft touch the TFT screen for different operations of unit (for details,
please refer to other parts of this operation manual).
To insert a disc, put it into the DISC SLOT (5), the unit will automatically insert the disc into the
DISC INSERT /
mechanism and start playing. To eject the disc, press A (6) and disc will automatically
EJECT
come out from the DISC SLOT .
Insert USB device to USB SLOT (7) for playback of multi-media files that recorded in the
USB SLOT
device.
MICRO SD CARD Insert micro SD card to MICRO SD CARD SLOT (8) for playback of multi-media files that
PORT recorded in the card.
During unit operation, press DVD to shift the unit from the current mode to disc operation mode
DVD
(when a disc inserted).
The MIC (9) is for voice reception under BT operation (for details of BT
MICROPHONE
operation, please refer to other parts of this operation manual).
During disc/USB/SD/iPod input playback mode, press shortly to choose
track upward or downward for playback. Press and hold for two
SEEK+/- seconds will activate fast forward/rewind of the track. Press and hold one time for x2, press
and hold two times for x4, press and hold three times for x8, press and hold four times for
x20. Press and hold five times to resume to normal playback.
During unit operation, press MENU (17) to activate the main menu interface shown on TFT
MENU SCREEN (17) for different operation modes selection (for details operation, please refer to
other parts of this operation manual).
19At radio mode, press BND (18) repeatedly to select the desired radio band in the following or-
BAND der:> FM1 > FM2 > FM3 > AM, At TV mode, press BND (18) repeatedly to select different TV sys-
tems (PAL/ SECAM / NTSC)..
Remote Control
Remove before first use.
20No. Symbol Operation and control modes
When the unit is turn off, press to turn on the unit.
1
When the unit is turn on, press & hold shortly to turn off the unit.
During unit operation, press to turn on or off of sound mute control.
2 SOURCE Press repeatedly to select the desired mode for operation.
3 SYS/CLR At BT mode, press to erase the digit input by error.
EQ Press repeatedly to select the desired preset equalization mode.
4
LOUD Press & hold shortly to turn on or off of loudness control.
At video and music playback mode, each time press & hold shortly to select
different audio output channels. (Note: Available on input device or media files
5 AUDIO
recorded with different output channels and this selection is not available under
BT mode).
At media playback mode, press to display the contents of the playback
6 OSD
details on screen. (Note: Not available at music playback mode).
Radio Mode
1-6 Press any one of the number key 1-6 to select a station that had been stored in
the preset memory number key 1-6 for broadcasting. Press & hold shortly the
number key 1-6 to store the current broadcasting frequency or station into the
7
respective preset memory key number 1-6..
0-9 Disc / USB / SD Input Mode
Press directly to input the number of track for playback.
8 ZOOM Disc/ USB / SD Input Mode.
Radio Mode
Press to start scanning all the preset stations on memory and stop for a
few seconds for broadcasting.
Press & hold shortly to start searching the frequency and storing the strongest
signal stations into the preset memory stations (total 20 preset stations on each
radio band). Aller storing the stations, the unit starts scanning all the preset sta-
tions on memory and stop for a few seconds for broadcasting.
9 BND Radio Mode: Press repeatedly to select the desired radio band for broadcasting.
Disc/ USB / SD Input Mode: At video playback mode under disc input, press to
stop playback.
At music / photo playback mode under disc input and playback mode under USB
/ SD input, press to stop playback temporary and will resume normal playback
after a few seconds.
BT mode: Press to hang up or refuse an incoming call.
At disc / USB / SD input playback mode, press & hold shortly to turn on
10 RDM
or off of random playback of the input device.
At music playback mode, press & hold shortly to turn on or off of intro
11 INT
playback of the input device. (Note: Not available at BLUETOCTli mode)
At disc / USB / SD / input & BT mode, press to pause, resume or
12
start playback.
21No. Symbol Operation and control modes
DVD Mode:
At DVD menu/title display mode, press to select the desired setting/setup
and press ENT to confirm/enter.
Folder/ Playlist Mode:
13
During folder/playlist display at media playback mode, press to shift page
up or down on playlist
Photo Playback Mode
Press to rotate photo position or show up-down, left-right mirror image.
DVD: At DVD menu/title display mode, press ⁄ to select the desired
14 ENT
setting/setup and press ENT to confirm/enter.
Radio:
Press repeatedly to fine tune radio frequency upward or downward.
Press & hold shortly to tune radio frequency to the upward or downward
station for broadcasting.
15
Disc/ USB / SD Input Mode (Playback Mode)
Press repeatedly to shift track upward or downward for playback.
Press & hold shortly to activate fast forward or fast rewind mode. At this
mode, press repeatedly to select various speeds of fast forward or fast
rewind. (Note: Not available for operate at photo playback mode).
At playback mode under disc/ USB / SD input, each time press & hold
16 REP
shortly to activate various repeat playback setting.
At video playback mode, each time press & hold shortly to view angle changes in
17 ANGLE
sequential order (available on media files recorded with this features).
Radio:
Press to select stereo (ST) or mono mode at FM radio band. (Note: At
stereo mode and when stereo signal received, stereo indicator appeared
on screen whereas this is not indication for mono mode and mode signal
18 TITLE received)
DVD:
Press & hold shortly to display on screen the menu of the entire disc and
resume playback after a while.
Video Playback Mode:
Each time press & hold shortly to select different sub-titles that recoded in the
input device or media files. (Note: Available on input device or media files re-
corded with sub-titles).
19 SUB-T
Radio: At radio band, press to select local setting for reception of strong signal
stations and distant setting for reception of weak signal stations. (Note:
LOG appears on screen on local setting whereas no indication for distant
setting).
22No. Symbol Operation and control modes
At video playback mode, each time press & hold shortly to select different speeds
20 SLOW
on slow motion playback..
21 VOL+/VOL- Press repeatedly or press & hold to adjust sound output level..
DVD:
Press & hold shortly to display on screen the menu of the entire disc &
resume playback after a while.
22 MENU/PBC
VCD:
Press & hold shortly to turn on or off of PBC playback. At PBC on mode,
press & hold shortly will start the sequence playback at the beginningn.
During unit operation, press & hold shortly to activate setup menu on screen
for various system setup. Press & hold shortly again to return to previous opera-
23 SETUP tion mode. (Note: System setup cannot be operated by remote handset. System
setup can only be operated by touch screen - refer to ON SCREEN OPERATION
for details).
BT mode
• Press to pick up an incoming call; dial out after input a phone number;
24 PHONE
• redial last dial out number.
• Press to shift conversation between main unit and mobile phone.
Remarks: Depending on the input devices & playback media files, operation may be varied or not available for opera-
tion.
23Main Menu Operation
Touch the icon on the desired mode on screen and the unit will then enter into the mode that you selected for operati-
on. Hold & slide on the lower portion of screen (input icons) to shift to other MAIN MENU that shows the hidden input
or operation icons.
1 Touch to start radio operation.
2 Touch to start disc input operation (when a disc inserted).
3 Touch to start USB input operation (when an USB device inserted).
4 Touch to start SD card input operation (when a micro SO card inserted).
5 Touch to start auxiliary input operation (when an auxiliary device inserted).
6 Touch to start TV operation (when TV antenna connected).
7 Touch to start BT operation (when connected to a mobile phone).
8 This function is not available in this unit.
9 This function is not available in this unit.
10 Touch to start various setting of the unit.
11 Touch to shift back to previous operation mode.
12 Touch repeatedly for default wallpaper (background colour) setting.
13 Touch repeatedly to select brightness of screen or turn off the screen. When the screen is off, touch any portion of
the screen to turn the screen on again.Three modes can be selected. At the last brightness mode, the brightness
of screen is set by the user (user setting).
14 Touch to start BT operation (icon appeared when connected with mobile phone).
15 Touch to activate audio & visual setting for various audio & visual setup.
16 Touch to eject the disc from the disc slot (when a disc has been inserted).
24Device setup
Touch the system symbol on the screen to access the SETUP MENU where you can adjust many settings.
Troubleshooting
No power
• Check and make sure the connecting wireless are connected correctly
• Check whether the fuse is blown. Replace with the proper value fuse if necessay
No sound
• Check and make sure the speaker wires are connected correct!
No picture
• Check whether the video wire is connected to the video device.
Unit hang-up
• Press the RESET button to reset the unit to its default state.
• No function when pressing the buttons or TFT screen
• Press the RESET button to reset the unit to its default state.
Poor effect or unable to receive radio / TV
• Check whether the radio / TV antenna is inserted or properly connected.
• Antenna may not be the proper length. Make sure the antenna is fully extended.
• Antenna mav be poorly grounded. Check and make sure the antenna is properly mounted.
Stereo cannot be received under radio mode
• Tune the radio frequency accurately.
• The broadcast into sianal is too weak set the mode to MONO.
Disc inserted but cannot play
• Check whether the di sc inserted upsi de down.
• Check whether the di sc is dirty or badly cracked.
• Lens is dirtv. Clean lens bv usina the lens cl ean disc.
• Picture without colour or no sound under disc / TV mode
• Improper setting of colour system. Set again to PAL, SECAM or „NTSC
• The disc is dirty or damaged. Wioe the disc with a drv soft cloth or replace a new disc.
• Abnormal moving, skipping or sound during playback
• The disc is dirt or damaged
• Wipe the disc with a dry soft cloth or re lace a new disc.
•
Remote handset does not work
• Replace new battery of the remote handset.
• Point the remote handset directly at the remote sensor of the main unit.
• Clean the surface of the remote sensor.
25Disposal Considerations
According to the European waste regulation 2012/19/EU this symbol on the product or on its packag-
ing indicates that this product may not be treated as household waste. Instead it should be taken to
the appropriate collection point for the recycling of electrical and electronic equipment. By ensuring
this product is disposed of correctly, you will help prevent potential negative consequences for the
environment and human health, which could otherwise be caused by inappropriate waste handling
of this product. For more detailed information about recycling of this product, please contact your
local council or your household waste disposal service.
26Chal-Tec GmbH | Wallstr.16 | 10179 Berlin | Deutschland
www.chal-tec.com
www.electronic-star.de
EU-Konformitätserklärung
Wir, die
CHAL-TEC GmbH
Wallstraße 16
10179 Berlin
erklären hiermit, dass der nachfolgend bezeichnete Funkanlagentyp:
Auna Autoradio Artikelnr.: 10009736, 10009737, 10009738, 10030923, 10030824,
allen folgenden einschlägigen Bestimmungen entspricht:
RED-Richtlinie 2014/53/EU
LVD-Richtlinie 2014/35/EU
RoHS-Richtlinie 2011/65/EU.
Angewandte harmonisierte Normen:
EN 300 328 V2.1.1 (2016-11)
EN 62479:2010
EN 303 345 V1.1.7 (2017-03)
EN 301 489-1 V2.1.1 (2017-02)
EN 301 489-17 V3.1.1 (2017-02)
EN 60065:2014
Berlin, 30. August 2017 ___________________________
Sebastian Jäger
Produkt Manager
Chal-Tec GmbH ∙ Wallstraße 16 ∙ 10179 Berlin Handelsregister: HRB 98898 Bankverbindung: Hypo Vereinsbank
Fon: +49 (0) 30 3001385-500 Amtsgericht: Berlin - Charlottenburg Konto Nummer: 355 986 675
Fax: +49 (0) 30 3001385-999 USt-ID-Nr.: DE 814529349 BLZ: 100 208 90
E-Mail: frontdesk@chal-tec.com WEEE-Nr.: DE 46906833 IBAN: DE91100208900355986675
Geschäftsführer: Peter Chaljawski BIC|SWIFT-Code: HYVEDEMM488
27Sie können auch lesen