Mini-Speedy 1050 for Atari 1050 drive - Installation instructions - Vintage Computer ...
←
→
Transkription von Seiteninhalten
Wenn Ihr Browser die Seite nicht korrekt rendert, bitte, lesen Sie den Inhalt der Seite unten
Installation instructions
Mini-Speedy 1050 for Atari 1050 drive
Hi Atari fan!
thanks for your purchase of this item. The box contains the prebuilt and ready-to-use PCB
“Mini-Speedy 1050” and this installation instructions.
Attention:
The following instructions don´t require professional skills in soldering or tinkering with
electronic components, but if you´ve never open an Atari 1050 drive before, it´s a good idea
to ask a experienced friend for assistance.
These instructions doesn´t contain any solder guide or “how to” – you have to have the
knowledge ☺
Please follow these steps:
1. Open your Atari 1050 drive case and remove the drive mechanic.
Hint:: Make a photo of the cables coming from the drive mechanic and connected on
the 1050´s PCB. Mark every single plug with a permanent marker to remember it´s
position and direction. Without this remedy it´s very difficult to reassemble the
mechanic again.
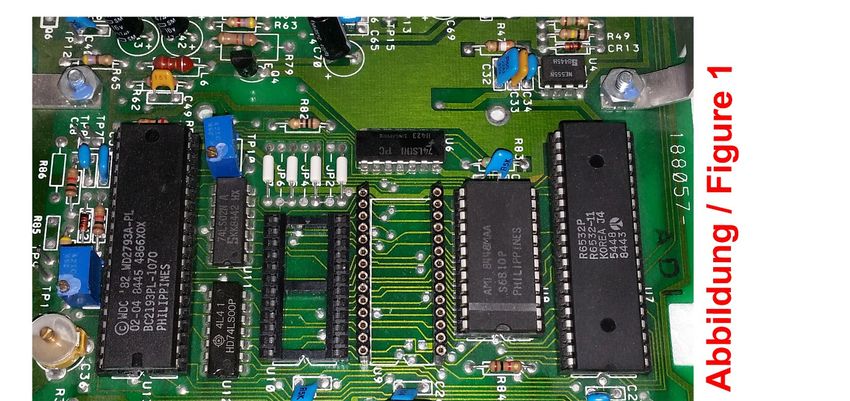
2. Remove the CPU (6507, socket U9) and ROM or EPROM at socket U10. Take a look
at figure 1. Keep both parts for the possibility to make your 1050 original again, if
ever wanted.
3. Insert the Mini-Speedy PCB into the CPU´s Sockel (U9) as shown in figure 2. The
EPROM with white label must be placed on the left side. A small part of the PCB will
rest on the upper side of the blue trim pot – this is intended and used for better fitting
of the whole Mini-Speedy PCB.
4. Remove four capacitors (C56, C57, C58 and C61) as shown in figure 3. The removal
of these caps is needed to make the highspeed-mode of your Speedy work fine.
These caps must never be installed again, even if your want to use the drive without
Speedy or with any other enhancement.
5. Connect the mechanic again using your photos. Only connect the power cord to your
drive. Switch the drive on and observe the mechanic. The motor starts spinning for a
short time and the read-write-head´s carriage will move for- and backward. The time
after the motor stops is much less comparing to an original 1050 without Speedy.
6. Switch the drive off, plug SIO-cable and computer to the drive, power on all devices
and test the drive the usual way. All operations should work normally.
7. Reassemble the case of your 1050. The work is done!
(please turn page)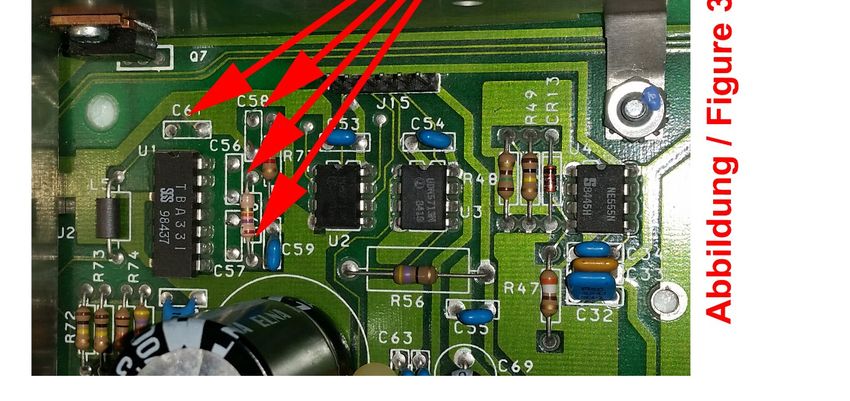
(Continued from other side)

When you start using your Speedy equipped 1050 drive, you should notice that reading from
disk is some times faster than normal. This is the result of having a trackbuffer on the
Speedy PCB. The Speedy always reads the whole track into this RAM and sectors-to-read
could be accessed much faster.
You will get the real highspeed experience using DOS versions or GameDOS loaders with
integrated highspeed-SIO routines. Or install a modified operating system into your computer
with highspeed-SIO routines and nearly everything will be loading with maximum speed.
Some DOS and GameDOS loaders with highspeed support:
    -   SpartaDOS X (SDX) V4.xx
    -   Happy DOS 1050 (Single/Medium/Double Density enabled DOS 2.x clone from HCI)
    -   TOP DOS (some variants)
    -   XDOS 2.xx from Stefan Dorndorf (two versions; one with, one w/o Highspeed-SIO)
    -   PicoDOS from HiasSoft (GameDOS-Loader)
    -   BiboDOS 6.xx (from the developer of the Speedy, Compy-Shop)
    -   F and more
Most of the listed DOS versions (and more) you can get at the download pages on the
ABBUC website (www.abbuc.de) and other Atari-related websites. For the Speedy series
there are two system-discs availible, one tooldisc and one BiboDOS disc. The tooldisc
contains diagnostic and test utilities, copy programs and more.
After closing the business at Compy Shop, the developer of the Speedy series, the rights
about Speedy and Speedy-related material was transferred to the ABBUC e.V. – so the
Speedy systemdiscs are only downloadable at the member area of the ABBUC website. You
must be registered to get these files.
You will find the Speedy systemdics in the member download area of www.abbuc.de and a
lot of different sources on the Internet, just use Google. At ABBUC.DE, search for the
download number 0649 - Speedy System Disk SD/1S. BiboDOS 6.xx you will find at
download 0764 - Bibo-DOS System Diskette 1988 SD/1S
Please keep in mind that “Compy Shop” was a german company and most of the stuff
programmed by them is only availible in german language. But in most cases you can use it
anyway, if some words or sentences aren´t clear, use the Google translator for help - it´s
translation quality is good enough to understand what´s going on.
With exclusion of the four capacitor´s removal there´s no changing on the drive´s hardware,
so that any fine working drive should be also work fine after installing the Mini-Speedy PCB.
Earch „Mini-Speedy 1050“ PCB was built into a 1050 drive for test. Formatting, Writing and
Reading back of a disc were performed. Readout disc compared with the source. You get a
fully tested and working PCB. Any technical issue with the Mini-Speedy 1050 PCB is very
implausible.
In case of any trouble with your Mini-Speedy 1050 equipped 1050 drive please contact an
experienced friend for assistance.

                                                                            V1.2 – tfhh – 04/2018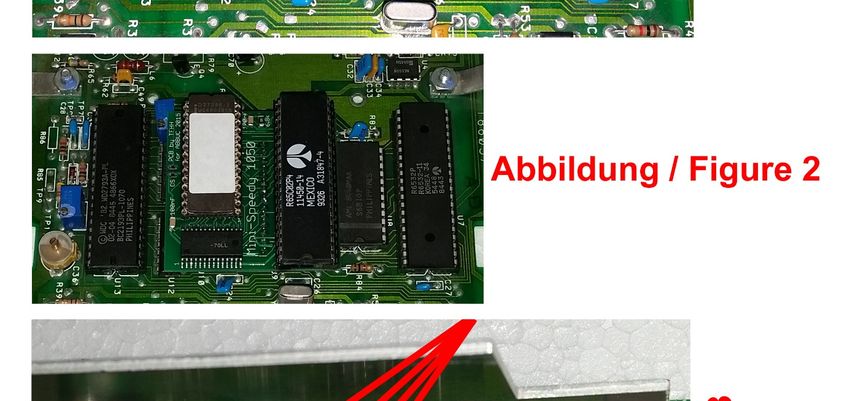
Installationsanleitung

  Mini-Speedy 1050 für Atari 1050 Laufwerk

Hallo Atari-Fan!
Vielen Dank für den Erwerb dieser Hardware. Im Karton findest Du die fertig aufgebaute
Platine „Mini-Speedy 1050“ und diese Installationsanleitung.
Hinweis:
Die folgenden Arbeiten sind eigentlich sehr leicht und einfach durchzuführen. Wenn Du
bisher keine Erfahrungen damit gemacht hast und unsicher bist, empfehle ich Dir jedoch,
einen Freund mit entsprechenden Kenntnissen um Hilfe zu bitten.
Diese Anleitung beinhaltet absichtlich keine Lötanleitungen und/oder Hinweise, welches
Werkzeug benötigt wird. Es wird davon ausgegangen, daß diese Dinge bekannt sind ☺

Folgende Schritte sind durchzuführen:
    1. Öffnen des Atari 1050 Diskettenlaufwerkes und Demontage der Mechanik.

        Tipp: Ein Foto von den Kabeln machen, BEVOR diese abgezogen werden. Oder
        jeden Stecker einzeln ziehen und für Dich sinnvoll beschriften (Edding,
        Folienschreiber etc.). Markiere dabei auch die Steckrichtung!

    2. Entfernung der CPU (6507, Steckplatz U9) und des ROM bzw. EPROM aus
       Steckplatz U10 – siehe dazu Abbildung 1. Bewahre beide Bauteile auf, falls Du den
       Urzustand wieder herstellen möchtest.
    3. Stecke die Mini-Speedy Platine so in den Sockel der CPU (U9) wie in Abbildung 2
       ersichtlich. Das auf der Mini-Speedy befindliche EPROM mit dem weißen Aufkleber
       muß sich auf der linken Seite befinden. Ein kleiner Teil der Mini-Speedy Platine liegt
       auf dem Trimm-Potentiometer (blau) auf – das ist in Ordnung und gewollt, um der
       Platine zusätzlichen Halt zu geben.
    4. Entferne die vier Kondensatoren C56, C57, C58 und C61 wie in Abbildung 3 zu
       sehen. Dieses ist notwendig, damit der Highspeed-Modus der Speedy einwandfrei
       funktioniert. Diese Kondensatoren müssen nicht zurückgebaut werden, wenn die
       Speedy wieder ausgebaut werden sollte.
    5. Schließe die Mechanik wieder korrekt an und versorge das Laufwerk erstmal nur mit
       Strom. Beim Einschalten läuft der Motor kurz an und der Kopfschlitten bewegt sich
       kurz. Der Motor geht viel schneller wieder aus als bei einer Original 1050 ohne
       Speedy, dies ist normal ☺
    6. Schalte das Laufwerk aus, schließe ein SIO-Kabel und einen Rechner an und teste
       das Laufwerk im “normalem Betrieb”. Es sollte einwandfrei funktionieren.
    7. Baue die 1050 wieder zusammen. Der Einbau ist damit beendet.

(Bitte umblättern)
(Fortsetzung von anderer Seite)
Bei deinem Test wird Dir aufgefallen sein, daß das Laden von Diskette schon deutlich
schneller vonstatten geht. Dies liegt am Trackbuffer der Speedy, diese liest nach dem
Spurwechsel den gesamten Track in das auf der Speedy befindliche RAM ein und damit
muß ein Sektor nicht erst gesucht werden bzw. abgewartet werden, bis der gewünschte
Sektor unter dem Schreib-/Lesekopf vorbeirauscht.
So richtig Dampf entwickelt Deine Speedy aber erst, wenn Du ein DOS, ein GameDOS-
Loader oder ein modifiziertes Betriebssystem mit sogenannten Highspeed-SIO Routinen
verwendest. Alle aktuellen, in den letzten 10-15 Jahren entwickelten oder modernisierten
DOS Versionen haben (ggf. optional) Highspeed-SIO-Routinen “ab Werk”. Hier ein paar
Beispiele (ohne Gewähr und Wertung):
- SpartaDOS X (SDX) V4.xx
- Happy DOS 1050 (Single/Medium/Double Density DOS Derivat von HCI)
- TOP DOS (und unzählige Derivate davon)
- XDOS 2.xx von Stefan Dorndorf (zwei Versionen, 1x mit, 1x ohne Highspeed-SIO)
- PicoDOS von HiasSoft (GameDOS-Loader)
- BiboDOS 6.xx (von den Entwicklern der ursprünglichen Speedy, Compy-Shop)
- uvm.
Die meisten dieser DOS-Versionen findest Du in den Download-Seiten von www.abbuc.de
und vielen anderen Atari-Webseiten. Für alle Speedy-Versionen gibt es ehemals vom
Compy-Shop entwickelte Systemdisketten zur Speedy. Auf diesen befindet sich eine
Vollversion des BiboDOS als auch Test- und Diagnose-Software für die Speedy, Highspeed-
Kopierprogramme uvm.
Die Rechte für die Speedy liegen beim ABBUC, demzufolge findest Du auch dort die Speedy
Systemsoftware zum Download. Es ist eine Registrierung auf www.abbuc.de für den
Download erforderlich.
Die Speedy-Systemsoftware findest Du im Mitglieder-Bereich unter Download-Nr. 0649 -
Speedy System Disk SD/1S. Das BiboDOS 6.xx findest Du unter dem Download 0764 -
Bibo-DOS System Diskette 1988 SD/1S
Da außer dem Entfernen der Kondensatoren kein wirklicher Eingriff an der 1050
vorgenommen wird, sind – sofern das Laufwerk vor dem Umbau einwandfrei funktionierte –
keine Probleme zu erwarten.
Jede Platine „Mini-Speedy 1050“ wurde vor dem Einpacken einzeln in ein Atari 1050
Diskettenlaufwerk eingebaut, eine Diskette formatiert, beschrieben und anschließend
eingelesen und mit der Quelle verglichen – im Highspeed-Modus. Ein Fehler an der Platine
ist demzufolge eigentlich auszuschließen.
Wende Dich bitte an einen erfahrenen Freund, wenn der Einbau der Speedy bei Dir zu
Problemen führen sollte.
V1.2 – tfhh – 04/2018Sie können auch lesen