MULTIFUNKCYJNA GOLARKA MĘSKA | MULTIFUNCTIONAL MALE SHAVER
←
→
Transkription von Seiteninhalten
Wenn Ihr Browser die Seite nicht korrekt rendert, bitte, lesen Sie den Inhalt der Seite unten

MULTIFUNKCYJNA GOLARKA MĘSKA |
 MULTIFUNCTIONAL MALE SHAVER
INSTRUKCJA | INSTRUCTION MANUAL

MULTIFUNKCYJNA GOLARKA MĘSKA
                                                   Model: MS-0537
    (Wygląd i kolor urządzenia może nieznacznie różnić się od oryginału)

                                                                                      DLA URZĄDZENIA

                                                               SPIS TREŚCI

1. UŻYCIE ZGODNE Z PRZEZNACZENIEM.............................................................................                                      4
2. DANE TECHNICZNE..................................................................................................................                4
3. ZASADY BEZPIECZNEGO UŻYTKOWANIA.........................................................................                                         4
4. OBJAŚNIENIE SYMBOLI..........................................................................................................                    6
5. BUDOWA.......................................................................................................................................    7
6. ZAWARTOŚĆ ZESTAWU...........................................................................................................                     8
7. UŻYTKOWANIE...........................................................................................................................           9
8. CZYSZCZENIE I KONSERWACJA..........................................................................................                             13
9. NAPRAWA....................................................................................................................................     15
10. PRZECHOWYWANIE I TRANSPORT...................................................................................                                  15
11. UTYLIZACJA.............................................................................................................................        15
12. DEKLARACJA CE.....................................................................................................................             16
13. GWARANCJA I SERWIS.........................................................................................................                    16

3                                                                                                                                                  3
1. UŻYCIE ZGODNE Z PRZEZNACZENIEM
Multifunkcyjna golarka męska została stworzona, aby zaspokoić potrzeby
współczesnego mężczyzny. Ta multifunkcyjna golarka umożliwia niezwykle
dokładne golenie męskiego zarostu, strzyżenie włosów, mycie twarzy
i wycinanie włosów z nosa i uszu. Przestrzeganie instrukcji zapewnia
bezpieczną instalację i użytkowanie urządzenia.
Urządzenie jest przeznaczone tylko do prywatnego użytku wewnętrznego i nie
może być używane do celów profesjonalnych.
                              2. DANE TECHNICZNE

Nr partii                                          POJM200537
Model                                              MS-0537
                                   Urządzenie
Zasilanie/ładowanie                                5.0 V   , 1.0 A
Akumulator:                                        1 x akumulator ICR14500
                                                   3.7 V ; 600mAh
                                 Stacja dokująca
Parametry wejściowe/wyjściowe                      5.0 V   , 1.0 A
Czas pracy                                         Około 1 godziny
Czas ładowania                                     Około 1godzina 15 minut

                      3. ZASADY BEZPIECZNEGO UŻYTKOWANIA

1.          UWAGA! Nie należy używać urządzenia w pobliżu
   wody, nad wanną, basenem, pod prysznicem, nad umywalką
   lub innym zbiornikiem wodnym.
2. Przed utylizacją urządzenia należy zlecić fachowcowi wyjęcie
   z niego akumulatora. Przewód zasilający USB musi być
   odłączony od urządzenia podczas wyjmowania akumulatora.
   Akumulator należy zutylizować w bezpieczny sposób.
3. Urządzenie może być używane przez dzieci starsze niż 8 lat,
   jeżeli są one pod nadzorem osoby dorosłej lub korzystają z
   urządzenia bezpiecznie, zgodnie z instrukcją obsługi i rozumieją
34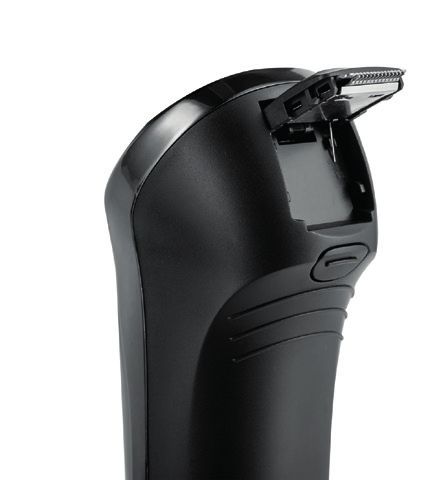
zagrożenia. Urządzenie może być używane przez osoby o
      ograniczonej zdolności fizycznej, czuciowej lub psychicznej lub
      osoby o braku doświadczenia i wiedzy, jeśli pozostają one pod
      nadzorem lub korzystają z urządzenia bezpiecznie, zgodnie z
      instrukcją obsługi oraz rozumieją zagrożenia.
4.    Należy zwracać uwagę na dzieci by nie bawiły się urządzeniem.
5.    Ostrzeżenie! Przed przystąpieniem do czyszczenia w wodzie,
      odłącz golarkę od przewodu zasilającego lub wyjmij ze stacji
      dokującej.
6.    Nigdy nie zanurzaj stacji dokującej ani przewodu USB w wodzie
      lub innych płynach.
7.    Czyszczenie i konserwacja urządzenia nie może być
      wykonywana przez dzieci bez nadzoru osoby dorosłej.
8.    Głowica golarki męskiej służy tylko i wyłacznie do golenia męskiego zarostu na
      twarzy.
9.    Podczas golenia, nie używaj żadnych płynów do golenia, mydła i innych
      podobnych produktów.
10.   Urządzenie może być ładowane bezpiecznym, niskim napięciem zgodnym z
      oznaczeniem na urządzeniu.
11.   Przed użyciem należy przeczytać całą instrukcję.
12.   Urządzenie nie jest zabawką.
13.   Urządzenie tylko do prywatnego użytku wewnątrz pomieszczeń.
14.   Po zakończeniu golenia, strzyżenia, wyłacz urządzenie.
15.   Nie czyścić podczas ładowania w stacji dokującej.
16.   Zachowaj ostrożność podczas użytkowania urządzenia.
17.   Nie używać do celów innych, niezgodnych z jego przeznaczeniem.
18.   Nie wolno zostawiać urządzenia w miejscu dostępnym dla dzieci.
19.   Nie używać urządzenia, jeśli jest uszkodzone lub działa w sposób nieprawidłowy.
20.   Nie należy używać urządzenia, jeśli wcześniej upadło ono z wysokości, wykazuje
      widoczne oznaki uszkodzenia.
21.   Nie wolno podejmować prób otwierania korpusu lub demontażu jakichkolwiek
      części urządzenia. Wewnątrz nie znajdują się żadne części przeznaczone do
      naprawy.
22.   Nie należy używać urządzenia, jeśli Twoja skóra jest podrażniona lub jest zraniona,
      wysypkę, wypryski, pieprzyki (i włosy z nich wyrastające) lub zadrapania.
23.   Urządzenie jest przeznaczone jedynie do przycinania włosów naturalnych.
      Musi być stosowane wyłącznie do włosów ludzkich — nie wolno stosować do
      włosów sztucznych lub sierści zwierząt. Używanie produktu do celów innych
      niż zgodne z przeznaczeniem spowoduje unieważnienie gwarancji.
24.   Za każdym razem po użyciu, oczyść urządzenie.

3                                                                                     5
25. UWAGA! Nie używaj urządzenia w pobliżu wody, wanien, basenów,
    umywalek,pryszniców lub innych źródeł wody.
26. Ostrzeżenie! Podczas czyszczenia lub obsługi nie zanurzać elektrycznych
    części urządzenia w wodzie lub innych cieczach. Nigdy nie trzymaj urządzenia
    pod bieżącą wodą.
27. Podczas golenia nie używać pianki do golenia, żelu, kremu itp.
28. Nie pozostawiać włączonego urządzenia bez nadzoru. Zawsze odłącz od źródła
    zasilania kiedy nie używasz urządzenia lub przed czyszczeniem.
29. Regularnie należy sprawdzać przewód zasilający USB w celu sprawdzenia czy
    nie jest uszkodzony. Jeśli jest uszkodzony należy go zutylizować.
30. Nie dotykaj urządzenia mokrymi rękoma.
31. Zachować ostrożność podczas użytkowania urządzenia.
32. Nie czyścić przy użyciu żrących środków czyszczących.
33. Zachowaj instrukcję oraz jeśli to możliwe, również
    opakowanie.
34. Jeśli urządzenie jest przekazywane innym osobom,
    instrukcja obsługi również musi zostać przekazana.
35. Elektroniczna wersja instrukcji obsługi dostępna jest
    pod adresem instrukcje.vershold.com.
                            4. OBJAŚNIENIE SYMBOLI

                   Produkt zgodny z wymaganiami dyrektyw Unii Europejskiej.

                   Utylizacja urządzeń elektrycznych i elektronicznych – patrz punkt
                   UTYLIZACJA w niniejszej instrukcji.

                   Utylizacja baterii – patrz punkt UTYLIZACJA w niniejszej instrukcji.

                   Oznaczenie materiału, z którego wykonane jest opakowanie –
                   tektura falista.

                   Przeczytaj instrukcję.

                   Znak towarowy, który oznacza, że producent wniósł wkład
                   finansowy w budowę i funkcjonowanie systemu odzysku
                   i recyklingu odpadów opakowaniowych.

                   Urządzenie do prywatnego użytku wewnątrz pomieszczeń.

36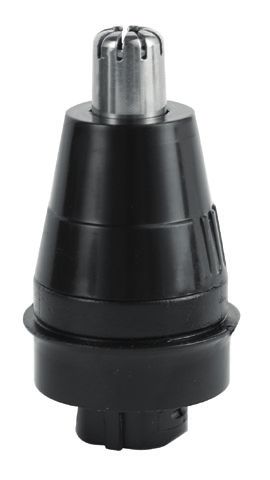
Całkowita ochrona przed strumieniem wody płynącej z różnych
                          kierunków z wydajnością do 12,5 litra na minutę. Wodoodporność
                          przy deszczu i zachlapaniu. Nadaje się dla turystyki pieszej,
    DLA URZĄDZENIA        rowerowej, żeglarstwa. Należy pamiętać, że woda może przedostać
                          się podczas zanurzenia lub skierowania silnego strumienia wody
                          na przedmiot mający opisywaną klasę wodoszczelności.
                JO
             EGU DP
                          Segreguj odpady - oznakowanie wskazujące potrzebę segregacji
      SEGR

                  AD
                    Y

                          odpadów.

                W
             AKO AN
                          Opakowanie papier - oznaczenie pojemnika, do którego powinien
      OP

                  IE

          PA P E R
                          trafić odpad.
              I

                                          5. BUDOWA
                                                                                 10
                      1

                              7

                          4                                         9
                                             8
     2                                                                      11

          3
                              5                                                             12
                                  6
                                                                                  13
                                                        16

     15                                                                               14
                                              17

                                                                                      a

                                                   18        b
                                                                                       c
               19

3                                                                                           7
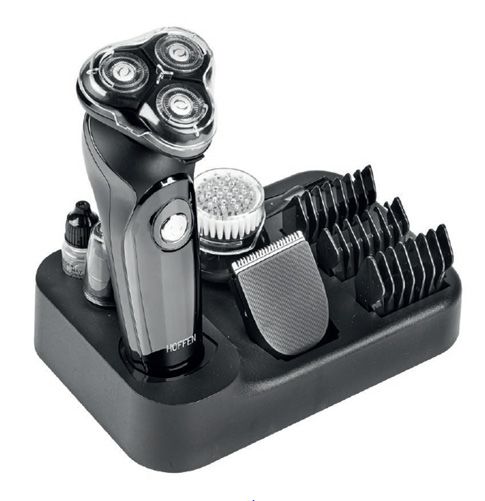
1. Nasadka ochronna dla golarki do twarzy
2. Olejek konserwujący
3. Nasadka ochronna dla trymera do nosa
4. Nasadka ochronna dla szczoteczki
5. Głowica maszynki do włosów
6. Stacja dokująca
7. Gniazdo ładowania stacji dokującej (niewidoczne na zdjęciu, z lewej strony)
8. Nakładki golarki do włosów 3, 6, 9 mm
9. Głowica trymera do nosa
10. Przewód zasilający USB
11. Głowica goląca golarki do twarzy
12. Przycisk otwierania głowicy golarki
13. Włącznik/wyłącznik
14. Wskaźniki świetlne:
a - Sygnalizujący prace urządzenia (zielony)
b - Sygnalizujący naładowanie urządzenia (zielony)
c - Sygnalizujący ładowanie urządzenia (czerwony)
15. Szczoteczka
16. Pędzelek
17. Trymer
18. Przycisk odblokowania trymera
19. Gniazdo ładowania golarki

                             6. ZAWARTOŚĆ ZESTAWU

1x Multifunkcyjna golarka męska
1x Nasadka ochronna dla szczoteczkę
1x Nasadka ochronna dla golarki
1x Nasadka ochronna trymera do nosa
1x Głowica maszynki do włosów
1x Głowica trymera do nosa
3x Nakładki golarki do włosów (3,6,9 mm)
1x Szczoteczka
1x Stacja dokująca
1x Przewód zasilający
1x Pędzelek
1x Głowica goląca golarki do twarzy
1x Olejek konserwujący
1x Instrukcja obsługi

38
Otwórz opakowanie i ostrożnie wyjmij jego zawartość. Sprawdź, czy zestaw jest kompletny
i bez uszkodzeń. Upewnij się, że części z tworzyw sztucznych nie są pęknięte, a przewód
zasilający USB nie jest uszkodzony. Jeśli stwierdzisz, że brakuje części, bądź są uszkodzone,
nie używaj urządzenia, lecz skontaktuj się ze sprzedawcą. Zachowaj opakowanie lub zutylizuj
zgodnie z lokalnymi przepisami

             Uwaga! Dla bezpieczeństwa dzieci proszę nie zostawiać swobodnie
             dostępnych części opakowania (torby plastikowe, kartony, styropian
             itp.). Niebezpieczeństwo uduszenia!

                                    7. UŻYTKOWANIE

7.1     ŁADOWANIE
 Przed pierwszym użyciem, lub gdy urządzenie nie było używane przez kilka mie-
 sięcy, należy je naładować. Nie należy ładować dłużej niż 24 godzin.
 Czas ładowania to około 1 godzina 15 minut.
 Przy pełnym naładowaniu urzadzenie pracuje około 1 godziny.
 Urządzenie powinno być ładowane w warunkach otoczenia: 5oC-35oC
1. Upewnij się, że urzadzenie jest wyłączone.
2. Podłącz końcówkę USB do portu USB a wtyk do gniazda
     ładowania stacji dokującej lub bezpośrednio w gniazdo
     ładowania w urządzeniu. Przewód USB podłącz do zasilacza
     z gniazdem USB 5 V       i wydajności prądowej co najmniej 1 A.
3. Jeśli ładujesz za pomocą stacji dokującej, umieść urządzenie w
     odpowiednim miejscu stacji dokującej.
4. Po podłączeniu do źródła zasilania wskaźnik świetlny
     sygnalizujący ładowanie urządzenia (czerwony) zaświeci się.
5. Po około 1 godzinie i 15 minutach urządzenie będzie
     naładowane.
6. Gdy urządzenie jest naładowane wskaźnik świetlny sygnalizująca naładowanie
     zapali się na zielono.
7. Po zakończeniu procesu ładowania, odłącz przewód USB od źródła zasilania i
     stacji dokującej, bądź urządzenia.
Uwaga!
Nie wolno ładować golarki w pobliżu wody, nad wanną, basenem, pod
prysznicem, nad umywalką lub innym zbiornikiem wodnym. Możliwość
porażenia prądem elektrycznym.
Nie ładuj akumulatora dłużej niż 24 godzin.
Nie korzystaj z urządzenia podczas ładowania.

3                                                                                         9
Wskazówki bezpieczeństwa dotyczące baterii:
  • Nie wyrzucaj zużytych akumulatorów do śmietnika, lecz do specjalnych
    pojemników na zużyte baterie.

     •        Nie ładować baterii nieprzeznaczonych do ładowania (nie będących
         akumulatorami).

     •         Nie zwierać zacisków zasilających.

     •       Nigdy nie należy stosować zużytych akumulatorów w połączeniu z
         nowymi.

     •        Nigdy nie należy narażać akumulatorów na bezpośrednie działanie
         źródeł ciepła takichjak nadmierne nasłonecznienie, grzejnik, ogień.

     •                 Niebezpieczeństwo wybuchu! Akumulatory nie mogą być
       demontowane, wrzucane do ognia lub zwierane.
     • Połknięcie akumulatorów może być śmiertelne! Trzymaj akumulatory z dala
       od dzieci i zwierząt domowych. Natychmiast zwróć się po pomoc medyczną,
       jeśli połkniesz akumulator.

7.2 WŁĄCZANIE/ WYŁĄCZANIE
1.       Aby włączyć należy nacisnąć włącznik/wyłącznik. Zielony wskaźnik świetlny
         (symbol baterii) zacznie się świecić.
2.       Aby wyłączyć należy nacisnąć włącznik/wyłącznik. Zielony wskaźnik świetlny
         (symbol baterii) zgaśnie.

7.3         UŻYCIE
Uwaga! Nie używać urządzenia, gdy jest podłączone do ładowania.
GOLARKA DO TWARZY
1.  Nałóż głowicę golarki do twarzy, jeśli nie jest zamontowana. Patrz punkt 7.4
    Montaż/demontaż głowic.
2. Zdejmij nasadkę ochronną z głowicy golarki do twarzy, jeśli jest.
3. Włącz urządzenie.
4. Zielony wskaźnik świetlny (symbol baterii) zacznie świecić.
Uwaga! Urządzenie najlepiej pracuje na czystej i suchej twarzy.
Uwaga! Nie używać na podrażnionej lub skaleczonej skórze.
5. Przyłóż golarkę do twarzy pod kątem 90° i lekko przyciśnij oraz
    ruchami w linii prostej, lub okrężnymi zacznij golić.
6. Drugą ręką delikatnie naciągnij skórę twarzy w celu łatwiejszego i dokładniejszego
310
golenia.
7. Wraz z upływem czasu, gdy skóra przywyknie do golarki, przyciśnij ją mocniej
do skóry twarzy.
8. Po zakończeniu użytkowania oczyścić golarkę według wskazówek w rozdziale
8. Czyszczenie i konserwacja.
9. Następnie nałóż nasadkę ochronną na głowicę golącą golarki i odłóż w
bezpieczne miejsce.
Uwaga! Urządzenie będzie działaś około 1 godziny przy pełnym naładowaniu.
MASZYNKA DO WŁOSÓW
1. Nałóż głowicę maszynki do włosów, jeśli nie jest zamontowana. Patrz punkt
7.4 Montaż/demontaż głowic.
2. Nałóż jedną z trzech nakładek (3,6,9mm), jeśli jest potrzeba.
3. Włącz urządzenie.
4. Zielony wskaźnik świetlny (symbol baterii) zacznie świecić.
Uwaga! Głowicę golarki do włosów można używać z
nakładkami lub bez.
5. Przyłóż głowicę maszynki do włosów do skóry włosów,
rozpoczynając do karku i przesuwaj ją powoli w kierunku
czubka głowy.
6. Maszynkę do włosów oczyścić według wskazówek w rozdziale 8. Czyszczenie
i konserwacja.
7. Następnie odłóż w bezpieczne miejsce.
PORADY DOTYCZĄCE STRZYŻENIA
1. Zaleca się rozpocząć strzyżenie od większej nakładki 9 mm, żeby uniknąć zbyt
krótkiego ostrzyżenia włosów. Następnie można używać mniejszych.
2. Nigdy nie przesuwaj szybko urządzenia po włosach podczas strzyżenia.
3. Rozpocznij strzyżenie od przeczesania włosów, aby ułożyły się naturalnie.
4. Rozpocznij strzyżenie od dołu ku górze głowy.
5. Strzyżenie i posługiwanie się maszynką do włosów wymaga praktyki, dlatego
podczas pierwszego strzyżenia zaleca się pozostawienie dłuższych włosów niż
żądane.
6. Po zakończeniu strzyżenia, ewentualne odstające pojedyncze włosy można
przyciąć nożyczkami.
TRYMER
1. Aby wysunąć trymer, naciśnij przycisk odblokowania trymera.
2. Włącz urządzenie.
3 113. Przyłóż trymer delikatnie do skóry twarzy. 4. Przesuwaj trymer delikatnie od dołu ku górze twarzy, pod włos. 5. Powtórz czynność jeśli jest taka potrzeba. Uwaga! Za pomocą trymerem można wyrównać, dostrzyć okolice karku, baków, miejść przy uszach. 6. Strzyżenie i posługiwanie się trymerem wymaga praktyki, dlatego podczas pierwszego użycia zaleca się ostrożność. 7. Trymer oczyścić według wskazówek w rozdziale 8. Czyszczenie i konserwacja. 8. Załóż trymer. SZCZOTECZKA Uwaga! Szczoteczka służy do mycia twarzy. 1. Nałóż szczoteczkę, jeśli nie jest zamontowana. 2. Zdejmij nasadke ochronna szczoteczki. 3. Zwilż twarz, nałoż płyn do mycia twarzy bezpośrednio na twarz lub na szczoteczkę i przyłóż szczoteczkę do twarzy. 4. Włącz urządzenie. 5. Umyj całą twarz, omijając okolice oczu, nosa i uszu. 6. Po zakończeniu użytkowania, zmyj płyn z twarzy i osuszyć ręcznikiem. 7. Szczoteczkę oczyścić według wskazówek w rozdziale 8. Czyszczenie i konserwacja. 8. Następnie nałóż nasadkę ochronną na szczoteczkę i odłóż w bezpieczne miejsce. UWAGA! Szczoteczka musi być sucha przed nałożeniem nasadki ochronnej. TRYMER DO NOSA 1. Nałóż głowicę trymera do nosa, jeśli nie jest zamontowana. 2. Zdejmij nasadke ochronna trymera do nosa. 3. Upewnij się, że nos jest czysty. 4. Włóż głowice trymera do dziurki od nosa i włącz. 5. Czynność powtórz z drugą dziurką nosa. 6. Wyłącz urządzenie. 7. Trymer do nosa oczyścić według wskazówek w rozdziale 8. Czyszczenie i konserwacja. 8. Następnie nałóż nasadkę ochronną na trymer do nosa i odłóż w bezpieczne miejsce. Uwaga! Trymera do nosa można użyć do usuwania włosów z uczu. 9. Postepuj analogicznie do sposobu użycia w nosie. Uszy muszą być czyste. 312
7.4 MONTAŻ/DEMONTAŻ GŁOWIC
 UWAGA! Aby poprawnie zamontować głowicę/szczoteczkę należy zwrócić
 uwagę, aby wypustka w głowicy/szczoteczce wpasowała się w wyżłobienie w
 urządzeniu napędowym.
 Głowice tnącą i szczoteczkę montujemy i demontujemy w ten sam sposób. Zdej-
 mij nasadkę ochronną głowicy (jeśli jest).
1. Aby dokonać montażu głowic/szczoteczki należy złapać za korpus urządzenia
     i nałożyć głowicę/szczoteczkę na urządzenie napędowe i docisnąć. Usłyszych
     charakterystyczne kliknięcie.
Uwaga! Nie przekręcać głowicy/szczoteczki.
2. W celu demontażu, szczoteczki/głowicy chwyć za głowicę/szczoteczkę i
     pociągnij.
3. Zaleca się nakładać nasadki ochronne na głowice/szczoteczkę (jeśli posiadają),
     gdy urządzenie jest wyłączone i nieużywane.
Przed przystąpieniem do użytkowania, należy zdjąć nasadkę ochronną.

                       8. CZYSZCZENIE I KONSERWACJA
8.1    GŁÓWNE ZASADY
Urządzenie należy regularnie czyścić by działało poprawnie, dłużej i efektywniej.
Zaleca się czyszczenie szczoteczki i głowic po każdym użyciu.
Uwaga! Nie czyścić żadnej z części urządzenia podczas ładowania.
Właściwe i regularne czyszczenie zapewnia bezpieczeństwo użytkowania oraz
przedłuża żywotność urządzenia.
           Ostrzeżenie! Wyłącz urządzenie, odłącz od zasilania i pozostaw do
           ostygnięcia przed wykonaniem czyszczenia i konserwacji w celu
           uniknięcia porażenia prądem elektrycznym i oparzenia.

Uwaga! Nie stosować do czyszczenia żadnych środków chemicznych, alkalicznych,
ściernych lub dezynfekujących, gdyż mogą szkodliwie wpływać na powierzchnię
urządzenia.
8.2 CZYSZCZENIE GŁOWIC (TRYMERA, GOLARKI DO TWARZY,
MASZYNKI DO WŁOSÓW) PRZY UŻYCIU WODY LUB PĘDZELKA
Ostrzeżenie! Przed przystąpieniem do czyszczenia w wodzie, odłącz
urządzenie od źródła zasilania.
   • Zdemontuj głowicę. Patrz punkt 7.4 Montaż/demontaż głowic.
   • Głowice: trymera do nosa, maszynki do włosów – płucz pod bieżącą wodą lub
     wyczyść za pomocą pędzelka.

3                                                                             13
• Głowicę golarki do twarzy należy otworzyć. W tym celu naciśnij przycisk
otwierania głowicy golarki. Płucz pod bieżącą wodą lub użyj pędzelka.
Uwaga! Pamiętaj aby temperatura wody nie
przekraczała 40 oC.
• Pozostaw do całkowitego wyschnięcia.
• Po osuszeniu nałóż z powrotem na
urządzenie, nałóż osłonkę (jesli głowica
posiada ją) i odłóż urządzenie w bezpieczne
miejsce.
Uwaga! Czyszcząc głowicę golarki za pomoca pędzelka. Do tego należy
użyć krótszej końcówki oraz wykonywać ruchy w przodu i w tył, gdzie włosie
swobodnie wchodzi między ostrza.
CZYSZCZENIE SZCZOTECZKI
• Wyłącz urządzenie.
• Odłącz szczoteczkę. Patrz punkt 7.4 Montaż / demontarz głowic.
• Dokładnie wyczyść pod bieżącą wodą z mydłem.
• Osusz szczoteczkę ręcznikiem i pozostaw do całkowitego wyschnięcia.
• Gdy szczoteczka będzie całkowiecie sucha, załóż nasadkę ochronną.
TRYMER
• Wyłącz urządzenie.
• Odłącz trymer. Patrz punkt 7.4 Montaż / demontarz głowic.
• Dokładnie wyczyść pod bieżącą wodą.
• Osusz trymer ręcznikiem i pozostaw do całkowitego wyschnięcia.
Zaleca sie wymianę głowicy golącej i szczoteczki co dwa lata, aby uzyskać
optymalną wydajność golenia.
Producent nie zapewnia jej dostepności na rynku.
OLIWIENIE
Uwaga! Tylko głowica maszynki do włosów i trymer
wymagają oliwienia.
W zależności od częstotliwości używania zaleca się co
jakiś czas naoliwić urządzenie.
1. Upewnij się, że urządzenie jest wyłączone.
2. Nałóż kilka kropel olejku konserwującego na ostrza maszynki do włosów i
trymera.
3143. Włącz urządzenie na kilka sekund, wyłącz po czym ponownie włącz i wyłącz.
Uwaga! Wskazówki bezpieczeństwa dotyczące oleju konserwującego
1. Unikaj kontaktu ze skórą i oczami. Jeśli olej dostał się do oczu, niezwłocznie
przemyj oczy wodą przez 15-20 minut. W razie potrzeby, skontaktuj się z
lekarzem.
2. Nie spożywaj oleju konserwującego.
3. Trzymaj w miejscu niedostępnym dla dzieci.
4. Podczas używania oleju zapewnij właściwą wentylację w pomieszczeniu.
5. Zapewnij właściwą higienę po użyciu. Umyj dłonie przed posiłkiem.
6. Nie utylizuj do środowiska naturalnego. Zutylizuj zgodnie z lokalnymi przepisami.
9. NAPRAWA
Urządzenie nie zawiera części serwisowanych przez użytkownika. Nie naprawiaj
urządzenia samodzielnie. Zawsze zlecaj naprawę fachowcowi.
Regularnie należy sprawdzać przewód zasilacza w celu sprawdzenia czy nie są
uszkodzone. Jeśli przewód USB i stację dokującą należy zutylizować go.
10. PRZECHOWYWANIE I TRANSPORT
Urządzenie należy czyścić zgodnie z opisem.
Zawsze przechowuj urządzenie w suchym wentylowanym miejscu,
niedostępnym dla dzieci.
Chronić urządzenie przed wibracjami i wstrząsami podczas transportu.
Zalecane jest przechowywanie urządzenia w oryginalnym opakowaniu.
11. UTYLIZACJA
Materiały z opakowania nadają się w 100 % do wykorzystania jako surowiec wtórny
i są oznakowane symbolem recyklingu. Utylizacji opakowania należy dokonać
zgodnie z przepisami lokalnymi.
Materiały z opakowania należy zabezpieczyć przed dziećmi, gdyż stanowią źródło
zagrożenia.
Właściwa utylizacja urządzenia:
1. Zgodnie z dyrektywą WEEE 2012/19/UE symbolem przekreślonego kołowego
kontenera na odpady (jak obok) oznacza się wszelkie urządzenia
elektryczne i elektroniczne podlegające selektywnej zbiórce.
2. Po zakończeniu okresu użytkowania nie wolno usuwać niniejszego
produktu poprzez normalne odpady komunalne, lecz należy go oddać do
3 15punktu zbiórki i recyklingu urządzeń elektrycznych i elektronicznych. Informuje o
tym symbol kołowego kontenera, umieszczony na produkcie, instrukcji obsługi
lub opakowaniu.
3. Zastosowane w urządzeniu tworzywa nadają się do powtórnego użycia zgodnie
z ich oznaczeniem. Dzięki powtórnemu użyciu, wykorzystaniu materiałów lub
innym formom wykorzystania zużytych urządzeń wnoszą Państwo istotny wkład
w ochronę naszego środowiska.
4. Informacji o właściwym punkcie usuwania zużytych urządzeń elektrycznych
i elektronicznych udzieli Państwu administracja gminna lub sprzedawca
urządzenia.
5. Zużyte, całkowicie rozładowane baterie i akumulatory muszą być
wyrzucane do specjalnie oznakowanych pojemników, oddawane do punktów
przyjmowania odpadów specjalnych lub sprzedawcom sprzętu elektrycznego.
12. DEKLARACJA CE
Urządzenie zostało zaprojektowane, wyprodukowane i wprowadzone na rynek zgodnie
z wymaganiami dyrektywy niskonapięciowej oraz kompatybilności elektromagnetycznej
i dlatego wyrób został oznakowany znakiem CE oraz została wystawiona dla niego
deklaracja zgodności udostępniana organom nadzorującym rynek.
13. GWARANCJA I SERWIS
W celu reklamacji produktu należy dostarczyć urządzenie do Punktu Obsługi
Klienta w dowolnym sklepie sieci Biedronka.
Wszystkie pytania i problemy związane z funkcjonowaniem wyrobu, zgłosze-
niem reklamacji można kierować na poniższy adres e-mail:
• infolinia@vershold.com
• lub kontaktować się telefonicznie: +48 667 090 903
Informacje o statusie naprawy można uzyskać kontaktując się z serwisem.
Serwis gwarancyjny i pogwarancyjny urządzeń prowadzi firma QUADRA-NET
Sp. z o.o.
tel. 61/853 44 44
tel. kom. 664 44 88 00
email: infolinia@quadra-net.com
www: www.quadra-net.pl
316Twoja opinia jest dla nas ważna. Oceń nasz produkt pod adresem:
www.vershold.com/opinie
Producent (Gwarant)
VERSHOLD POLAND Sp. z o.o.
ul. Żwirki i Wigury 16A,
02-220 Warszawa, Polska
Wyprodukowano w Chinach
Karta gwarancyjna
1. Stempel .................................................................................
2. Data sprzedaży .......................................................................
3. Podpis ...................................................................................
4. Nazwa sprzętu .......................................................................
5. Model sprzętu ........................................................................
6. Nr seryjny lub nr partii ...........................................................
Ogólne warunki gwarancji
1. Gwarant niniejszego produktu gwarantuje, że w okresie 24 miesięcy od daty
zakupu produktu, potwierdzonej prawidłowo wypełnioną kartą gwarancyjną,
produkt będzie, wedle uznania Gwaranta, podlegał:
a) bezpłatnej naprawie przez Gwaranta, z zastrzeżeniem, że zdemontowane,
uszkodzone lub wadliwe części produktu w celu zapewnienia bezpieczeństwa
Klienta stają się własnością Gwaranta,
b) wymianie produktu na nowy w miejscu zakupu produktu, w związku z czym
uszkodzony lub wadliwy produkt staje się własnością Gwaranta,
c) zwrotowi w zamian za zwrot ceny za zakupiony produkt, w związku z czym
uszkodzony lub wadliwy produkt staje się własnością Gwaranta.
2. Za produkt uszkodzony uważa się taki produkt, który nie spełnia funkcji okre-
ślonych w instrukcji obsługi, a przyczyną tego stanu jest wewnętrzna właści-
wość urządzenia.
3. Uprawniony do gwarancji jest zobowiązany dostarczyć urządzenie do Punktu
Obsługi Klienta w danym sklepie w celu reklamacji sprzętu. Przy realizacji
uprawnień z tytułu gwarancji należy okazać prawidłowo wypełnioną kartę gwa-
rancyjną lub paragon/fakturę zakupu oraz wskazać możliwie dokładny opis
wady urządzenia, w szczególności zewnętrzne objawy wady urządzenia.
4. Karta gwarancyjna bez pieczątki, daty sprzedaży, podpisu sprzedawcy jest
nieważna.
5. Gwarancja nie obejmuje produktów z uszkodzeniami mechanicznymi nie
3 17powstałymi z winy producenta lub dystrybutora, a w szczególności z powodu
wadliwego użytkowania lub wynikłymi w następstwie działania siły wyższej.
6. Gwarancją nie są objęte produkty, w których usunięta została plomba zabez-
pieczająca, chyba, że dokonał tego uprawniony pracownik serwisu.
7. Punkt naprawczy dołoży wszelkich starań, aby dokonać naprawy w terminie 21
dni. Termin ten może ulec przedłużeniu do 1 miesiąca w przypadku zaistnienia
potrzeby zakupu części zapasowych, którymi nie dysponuje aktualnie punkt
naprawczy.
8. Zaleca się reklamowanie sprzętu kompletnego celem usprawnienia działań
serwisowych.
9. Niniejsza gwarancja na sprzedany towar konsumpcyjny nie wyłącza, nie
ogranicza ani nie zawiesza uprawnień kupującego wynikających z przepisów o
rękojmi za wady rzeczy sprzedanej zgodnie z postanowieniami Kodeksu Cywil-
nego z dnia 23 kwietnia 1964 roku (Dz.U.2014.121).
10. Terytorialny zasięg ochrony gwarancyjnej: terytorium Rzeczpospolitej Polskiej.
318MULTIFUNCTIONAL MALE SHAVER
Model: MS-0537
(The appearance and color of the device may slightly differ from the
original)
FOR THE DEVICE
TABLE OF CONTENTS
1. INTENDED USE........................................................................................................................... 20
2. TECHNICAL DATA...................................................................................................................... 20
3. SAFETY INSTRUCTIONS......................................................................................................... 20
4. EXPLANATION OF SYMBOLS................................................................................................. 22
5. DEVICE COMPONENTS............................................................................................................ 23
6. SET CONTENTS.......................................................................................................................... 24
7. USE................................................................................................................................................. 25
8. CLEANING AND CARE.............................................................................................................. 29
9. REPAIR.......................................................................................................................................... 31
10. HANDLING AND STORAGE................................................................................................... 31
11. DISPOSAL.................................................................................................................................. 31
12. CE DECLARATION OF CONFORMITY................................................................................ 32
13. WARRANTY AND SERVICE................................................................................................... 32
3191. INTENDED USE
The multifunctional men’s shaver is designed to meet the requirements of
modern men. This superb shaver provides an exceptionally fine facial shave.
Please follow these instructions to ensure safe use of the device.
The device is intended for private indoor use only, and must not be used for
professional purposes.
2. TECHNICAL DATA
Lot No. POJM200537
Model MS-0537
Device
Power supply / Charging 5.0 V , 1.0 A
Battery: 1 x ICR14500 3.7 V battery;
600mAh
Charging station
Input/output parameters 5.0 V , 1.0 A
Operation time Approx. 1 hour
Charging time Approx. 1 hour and 15 minutes
3. SAFETY INSTRUCTIONS
1. CAUTION! Do not use the device near water, bathtubs,
pools, washbowls, showers or other sources of water.
2. Prior to disposing of the device, have a professional remove the
battery from it. When removing the battery, the USB charging
cable must be disconnected from the device. The battery must
be disposed of in a safe manner
3. This device may be used by children older than 8 years of
age, provided they are supervised by an adult or instructed
in the use of the device in a safe way and understand the
320hazards involved. The device may be used by individuals
with reduced physical, sensory or mental capabilities or by
individuals lacking the necessary experience and knowledge,
provided that they are supervised or use the device safely, in
compliance with the instruction manual, and understand the
hazards involved.
4. Children must not play with the device.
5. Warning! Prior to cleaning in water, disconnect the shaver
from the power cord or remove the device from the charging
station.
6. Never immerse the charging station or the USB cable in water
or other liquids.
7. Cleaning and maintenance may not be performed by children
unless they are supervised by an adult.
8. The head of the shaver is intended solely for shaving men’s facial hair.
9. When shaving, do not use any shaving liquids, soap, or other similar products.
10. The device can be charged with safe low voltage in accordance with the
marking on the device.
11. Please read this manual in whole before using the product.
12. The device is not a toy.
13. The device is intended for private indoor use only.
14. Turn the shaver off when you have finished shaving or hair clipping.
15. Do not clean the device when it is in the charging station.
16. Operate the device carefully.
17. Do not use the product for any purpose other than its intended use.
18. Do not leave the device anywhere accessible to children.
19. Do not use the device if it is damaged or faulty.
20. Do not operate the device if it has fallen from a great height or shows any sign
of damage.
21. Do not attempt to open the housing or disassemble any part of the device. The
product does not contain any user-serviceable parts.
22. Do not apply the product to irritated skin, varicose veins, rash, eczema, moles
(with growing hair) or scratches.
23. The device is intended for trimming natural hair only. It must be applied only
to human hair — you must not use it on artificial hair or animal fur. Using this
product for any other purposes than its intended purpose will void the warranty.
24. Clean the device after every use.
25. CAUTION! Do not use the device near water, bathtubs, pools, washbowls,
showers, or other sources of water.
26. Warning! During cleaning or operation, never immerse any electrical parts
3 21of the device in water or other liquids. Never hold the device under running
water.
27. Do not use any shaving foam, gel, cream, etc.
28. Do not leave the device unattended when it is turned on. When not in use or
prior to cleaning, always disconnect the device from the power source.
29. Regularly inspect the USB power cable for
damage. If it is damaged, dispose of it.
30. Do not touch the device with wet hands.
31. Operate the device carefully.
32. Do not use any caustic agents for cleaning the
device.
33. Keep this manual and, if possible, the package.
34. If the device is passed on to another user, it must
be accompanied by this manual.
35. An electronic copy of this manual is available at:
http://instrukcje.vershold.com.
4. EXPLANATION OF SYMBOLS
This product complies with the relevant EU directives.
Disposal of waste electrical and electronic equipment — see the
DISPOSAL section of this manual.
Instructions for the disposal of batteries — see the DISPOSAL
section.
Designation of the packaging material – corrugated cardboard.
Read the manual.
Symbol indicating that the manufacturer has contributed financially
to the construction and operation of packaging material recovery
and recycling system.
Indoor use only.
322Full protection against a jet of water spraying from any direction
with a capacity of up to 12.5 liters per minute. Watertight in the
rain and when splashed on. Suitable for hiking, biking, and sailing.
FOR DEVICE Keep in mind that water can penetrate the housing if the item of the
described water tightness class is immersed or a strong water jet
is directed at it.
JO
EGU DP
Segregation sign - Labeling indicating the need for waste
SEGR
AD
Y
segregation.
W
AKO AN
Paper waste - Designation of the container to which the waste
OP
IE
PA P E R
should go.
I
5. DEVICE COMPONENTS
10
1
7
4 9
8
2 11
3
5 12
6
13
16
15 14
17
a
18 b
c
19
3 231. Face shaver protective cap
2. Maintenance oil
3. Nose hair trimmer protective cap
4. Face brush protective cap
5. Hair clipping head
6. Charging station
7. Charging station socket (not shown in the picture, on the left side)
8. Hair clipping attachments 3, 6, 9 mm
9. Nose hair trimmer head
10. USB power cable
11. Face shaver shaving head
12. Shaver head opening button
13. On/off switch
14. Indicator lights:
a - Operation indication (green)
b - Device charged indication (green)
c - Device charging indication (red)
15. Face brush
16. Cleaning brush
17. Trimmer
18. Trimmer unlock button
19. Shaver charging socket
6. SET CONTENTS
1x Multifunctional male shaver
1x Face brush protective cap
1x Shaver protective cap
1x Nose hair trimmer protective cap
1x Hair clipping head
1x Nose hair trimmer head
3x Hair clipping attachments (3, 6, 9 mm)
1x Face brush
1x Charging station
1x Power cord
1x Cleaning brush
1x Face shaver shaving head
1x Maintenance oil
1x User's manual
324Open the packaging and carefully take its contents out. Ensure that the package is complete,
and none of its contents are damaged. Check that the plastic parts are not cracked, and
the USB power cable is not damaged. If any part is damaged or missing, contact the dealer,
and do not use the product. Keep the packaging or dispose of it in accordance with local
regulations.
Caution! For the sake of children’s safety, do not leave any packaging
materials accessible and unattended (plastic bags, cardboard boxes,
Styrofoam, etc.). Risk of suffocation!
7. USE
7.1 CHARGING
Charge the device before the first use and after a few months from the last use.
Do not charge for longer than 24 hours. - I confirm
The charging time is approx. 1 h 15 minutes.
When fully charged, the device is able to operate for approx. 1 hour. - I confirm
Charge the device in ambient conditions: 5oC-35oC
1. Make sure the device is turned off.
2. Connect the USB connector to the USB port, and the plug to the
charging station socket or directly to the charging socket in the
device. Connect the USB cable to a power adapter with a USB 5
V socket and current efficiency of at least 1 A.
3. If you charge the device using the charging station, place the
device in the correct place in the charging station.
4. After connecting to the power source, the device charging light
indicator (red) will turn on.
5. After approx. 1 hour and 15 minutes, the device will be charged.
6. When the device is charged, the device charging light indicator will turn green.
7. When the charging is completed, disconnect the USB cable from the power
source and the charging station or the device.
Caution!
Do not charge the shaver near water (bathtubs, pools, showers, washbowls,
etc.). Risk of electric shock.
Do not charge the battery for longer than 24 hours.
Do not use the device while the battery is being charged.
3 25Safety tips for batteries:
• Do not put the used batteries in a rubbish bin, but in special containers for
spent batteries.
• Do not recharge batteries not designed for that purpose (non-
rechargeable batteries).
• Do not short-circuit the battery terminals.
• Never insert used batteries together with new ones.
• Never expose batteries to direct heat sources, such as excessive
sunlight, heaters or fire.
• Explosion hazard! Batteries must not be dismantled, put into fire,
or short-circuited.
• Swallowing a battery may have fatal consequences! Keep batteries away
from children and pets. Seek medical assistance immediately if a battery is
swallowed.
7.2 TURNING THE DEVICE ON AND OFF
1. To switch the device on, press the on/off switch. The green light indicator
(battery symbol) will turn on.
2. To switch the device off, press the on/off switch. The green light indicator
(battery symbol) will turn off.
7.3 USE
Caution! Do not use the device when it is connected to the charger.
FACE SHAVER
1. Install the face shaver head, if it is not installed. See point 7.4 Head installation/
removal.
2. Remove the face shaver head protective cap if it is installed.
3. Turn on the device.
4. The green light indicator (battery symbol) will turn on.
Caution! It is best to use the device on a clean and dry face.
Caution! Do not use the device on damaged or irritated skin.
5. Apply the shaver to the skin at a right angle, press it lightly and
start shaving with linear or circular movements.
6. Gently tighten the skin with your other hand for a more
comfortable and smoother shave.
3267. After some time, when your skin has become used to the shaver, you can press
it more tightly to the skin.
8. When you have finished using the shaver, clean it in accordance with the tips in
chapter 8. Cleaning and care.
9. Then put the protective cap on the shaver shaving head and store it in a safe
place.
Caution! The device can operate for approx. 1 hour when fully charged.
HAIR CLIPPER
1. Install the hair clipper head, if it is not installed. See point 7.4 Head installation/
removal.
2. Install one of the three attachments (3, 6, 9 mm), if necessary.
3. Turn on the device.
4. The green light indicator (battery symbol) turns on.
Caution! The hair clipper head can be used with the
attachments or without them.
5. Position the hair clipper head at the scalp, starting from the
neck, and slide it slowly towards the top of the head.
6. Clean the hair clipper in accordance with the tips in chapter
8. Cleaning and care.
7. Then store it in a safe place.
HAIR CLIPPING TIPS
1. It is recommended to start hair clipping with the larger attachment, 9 mm, to
avoid clipping the hair too short. Then you can use the shorter attachments.
2. Never move the device quickly on the hair during clipping.
3. Before clipping, comb the hair so it is arranged naturally.
4. Start clipping from the bottom of the head up.
5. Using the hair clipper and clipping require practice. Therefore, we recommend
that you leave hair longer than desired during the first clipping.
6. Once you finish clipping, you may cut any remaining single longer hair with
scissors.
TRIMMER
1. To extend the trimmer, press the trimmer unlock button.
2. Turn on the device.
3. Position the trimmer gently on your facial skin.
4. Gently slide the trimmer from the bottom of your face to the top, against the
grain.
5. Repeat if necessary.
3 27Caution! Using the trimmer, you may smooth and fine cut the hair in the
areas of the neck, sideburns, and around the ears.
6. Using the trimmer and trimming require practice. Therefore, we recommend
that you observe caution during the first trimming.
7. Clean the trimmer in accordance with the tips in chapter 8. Cleaning and care.
8. Close trimmer.
FACE BRUSH
Caution! Use the face brush for washing your face.
1. Install the face brush, if it is not installed.
2. Remove the face brush protective cap.
3. Wet your face, apply face washing liquid directly on the face
or on the face brush, and position the face brush at the face.
4. Turn on the device.
5. Wash the whole face. Avoid the areas around the eyes, nose,
and ears.
6. When finished, wash the liquid off the face and dry with a
towel.
7. Clean the face brush in accordance with the tips in chapter
8. Cleaning and care.
8. Then put the protective cap on the face brush and store it in a safe place.
CAUTION! The face brush must be dry before putting the protective cap on it.
NOSE HAIR TRIMMER
1. Install the nose hair trimmer head, if it is not installed.
2. Remove the nose hair trimmer protective cap.
3. Make sure the nose is clean.
4. Put the trimmer head into one of the nostrils and turn on.
5. Repeat with the other nostril.
6. Switch off the device.
7. Clean the nose hair trimmer in accordance with the tips
in chapter 8. Cleaning and care.
8. Put the protective cap on the nose hair trimmer and store it
in a safe place.
Note! The nose hair trimmer may also be used to remove
hair in the ears.
9. Perform the same steps as for application in the nose. The ears must be clean.
7.4 HEAD INSTALLATION/REMOVAL
CAUTION! To install the face brush/head, make sure the tab in the face brush/
head aligns with the notch in the drive unit.
328Remove the cutting head and the face brush in the same way. Remove the head
protective cap (if it is installed).
1. To install the face brush/head, grab the device body, put the face brush/head on
the drive unit, and press down. A characteristic click will be heard.
Caution! Do not twist the face brush/head.
2. To remove the face brush/head, grab the head/face brush and pull it.
3. It is recommended to put the protective caps on the heads/face brush (if such
caps are available for them), when the device is turned off and not in use.
Prior to use, remove the protective cap.
8. CLEANING AND CARE
8.1 GENERAL RULES
Clean the device regularly to ensure its correct, longer, and more effective operation.
It is recommended to clean the face brush and the heads after each use.
Caution! Do not clean any device part during charging.
Correct and regular cleaning will improve the safety of the product and extend its
lifetime.
Warning! Switch off the device, unplug it and let it cool down before
cleaning and maintenance to avoid electric shock and burns.
Caution! Never clean the device with harsh, alkaline, abrasive or disinfecting chemical
compounds, as they may damage the device’s surfaces.
8.2 CLEANING THE HEADS (TRIMMER, FACE SHAVER, HAIR
CLIPPER) USING WATER OR THE CLEANING BRUSH
Warning! Prior to cleaning in water, disconnect the device from the power
source.
• Remove the head. See point 7.4 Head installation/removal.
• For the heads: the nose hair trimmer, the hair clipper — rinse them under running
water or clean them with the cleaning brush.
• The face shaver head must be opened. Press the shaver head opening button
3 29for this. Rinse under running water or use
the cleaning brush.
Caution! Make sure the water temperature
does not exceed 40oC.
• Leave to dry completely.
• When the item is dry, reinstall it on the
device, put the cap on it (if the head has the relevant cap), and store the device
in a safe place.
Caution! Cleaning the shaver head with the cleaning brush. Use the shorter
tip, and move forward and back so the bristles penetrate the spaces between
the blades.
FACE BRUSH CLEANING
• Switch off the device.
• Disconnect the face brush. See point 7.4 Head installation/removal.
• Clean thoroughly using running water with soap.
• Dry the face brush with a towel, leave to dry completely.
When the face brush is thoroughly dry, put the protective cap on it.
TRIMMER
• Switch off the device.
• Disconnect the trimmer. See point 7.4 Head installation/removal.
• Clean thoroughly under running water.
• Dry the trimmer with a towel, leave to dry completely.
For optimum shaving performance, it is recommended to change the shaver
head and the face brush every two years.
The manufacturer does not guarantee its availability on the market.
OILING
Attention! Only the head of hair clippers and trimmer
needs lubrication. Depending on the frequency of use,
it is recommended to lubricate the device from time to
time.
1. Make sure that the device is turned off.
2. Apply a few drops of preservative oil to the blades of the
hair clipper and trimmer.
3. Turn the device on for a few seconds, turn it off and then turn it on and off again.
330Warning! Safety instructions for preservative oil
1. Avoid contact with skin and eyes. If oil gets in your eyes, immediately rinse your
eyes with water for 15-20 minutes. If necessary, contact your doctor.
2. Do not eat preservative oil.
3. Keep out of the reach of children.
4. Ensure proper ventilation in the room when using oil.
5. Ensure proper hygiene after use. Wash your hands before meals.
6. Do not dispose of into the natural environment.
7. Dispose in accordance with local regulations.
9. REPAIR
The device does not contain any user-serviceable parts. Do not attempt to repair the
device on your own. Always have a specialist perform repairs.
Regularly inspect the power adapter cord for damage. If the USB cable and the
charging station become damaged, dispose of them.
10. HANDLING AND STORAGE
Clean the device as described.
Keep the device in a dry and well-ventilated place inaccessible to children.
Protect the device against vibration and shock during transport.
It is recommended that the device be stored in its original packaging.
11. DISPOSAL
All the packaging materials are 100% recyclable, and are labelled as such. Dispose of
the packaging in accordance with local regulations.
Keep the packaging materials out of children’s reach, as these materials can pose a
hazard.
Proper disposal of the device:
1. According to WEEE Directive 2012/19/EU, the crossed-out wheelie bin symbol
(shown on the left) is used to label all electric and electronic devices
requiring segregation.
2. Do not dispose of the spent product with domestic waste: dispose of it
at an electric and electronic devices collection and recycling point. The
crossed-out wheelie bin symbol placed on the product, instruction manual or
3 31package communicates this requirement.
3. The plastics contained in the device can be recycled in accordance with the
specific marking. Thanks to recycling, re-use of materials or other forms of
utilizing used equipment you make a significant contribution to the protection of
our natural environment.
4. Information on electric and electronic devices collection locations is available
from local government agencies or from the dealer.
5. Spent or fully discharged single-use and rechargeable batteries must be discarded
in dedicated labelled bins, turned over to hazardous waste collectors or returned
to electric equipment dealers.
12. CE DECLARATION OF CONFORMITY
The device has been designed, manufactured and marketed in compliance with the Low
Voltage Directive and the EMC Directive. Therefore, the product bears the “CE” mark and
has a declaration of conformity, which is available to market supervision agencies for
inspection.
13. WARRANTY AND SERVICE
In order to submit a complaint about the product, submit the device to the
Customer Service Point at any Biedronka store.
Should you have any questions or issues related to product operation, send them
to the following e-mail address:
• infolinia@vershold.com
• or contact us by phone: +48 667 090 903
Information on the repair status may be obtained by contacting the relevant
service desk.
Warranty and post-warranty service are provided by QUADRA-NET Sp. z o.o.
tel. 61/853 44 44
mobile 664 44 88 00
e-mail: infolinia@quadra-net.com
www: www.quadra-net.pl
332Your opinion is important to us. Evaluate our product at:
www.vershold.com/opinie
Manufacturer (Warrantor):
VERSHOLD POLAND Sp. z o.o.
ul. Żwirki i Wigury 16A,
02-092 Warsaw, Poland
Made in China
Warranty card
1. Stamp .................................................................................
2. Sale date .............................................................................
3. Signature .............................................................................
4. Appliance name ....................................................................
5. Appliance model ...................................................................
6. Serial No. or lot No. ...............................................................
General Terms and Conditions of the Warranty
1. The Warrantor for this product warrants that within 24 months from the
product purchase date, confirmed with a duly completed warranty card, the
product shall be, at the discretion of the Warrantor, subject to:
a) repairing the product free of charge, subject to the condition that any
dismantled, damaged or faulty parts, in order to ensure the Customer's safety,
shall become the Warrantor's property,
b) replacing the product with a new one at the point of purchase, subject to the
condition that the damaged or faulty product shall become the Warrantor's
property,
c) returning the price of the product to the User, subject to the condition that the
damaged or faulty product shall become the Warrantor's property.
2. A defective/damaged product is a product failing to provide the features
described in the User’s Manual due to intrinsic properties of the device.
3. The Beneficiary under the warranty shall deliver the appliance to the Customer
Service Point at a given store in order to submit a complaint about the equ-
ipment. When asserting your rights under warranty, you need to present the
proof of purchase (purchase receipt, invoice) together with a description of the
defect in as much detail as possible, in particular of the external manifestations
of the defect.
4. A warranty card without the vendor’s stamp and signature or sale date is inva-
lid.
3 335. The warranty excludes products with physical damage other than that caused
by the manufacturer or distributor, including specifically any damage resulting
from incorrect usage or force majeure.
6. The warranty excludes products without the tamper-proof seal, unless an
authorized Service employee has removed the seal.
7. The repair centre shall make every effort to complete the repair within 21 days.
The said time limit may be extended to 1 month in the event that spare parts
currently unavailable at the Service must be purchased.
8. It is recommended that the complete product be submitted together with the
complaint so as to facilitate service operations.
9. This warranty for the sold consumer product does not exclude, restrict or
suspend any rights of the Buyer related to laws and regulations concerning
warranty for defects in sold items pursuant to the provisions of the Civil Code
of 23 April 1964 (Journal of Laws Dz.U.2014.121).
10. The warranty shall be applicable within the territ
334Sie können auch lesen