OPENCAR-SYSTEM FEEDCAR HANDBUCH / MANUAL - DAS OPEN SOURCE DCC CAR SYSTEM UNTER GENERAL PUBLIC LICENSE THE OPEN SOURCE DCC CAR SYSTEM UNDER ...
←
→
Transkription von Seiteninhalten
Wenn Ihr Browser die Seite nicht korrekt rendert, bitte, lesen Sie den Inhalt der Seite unten
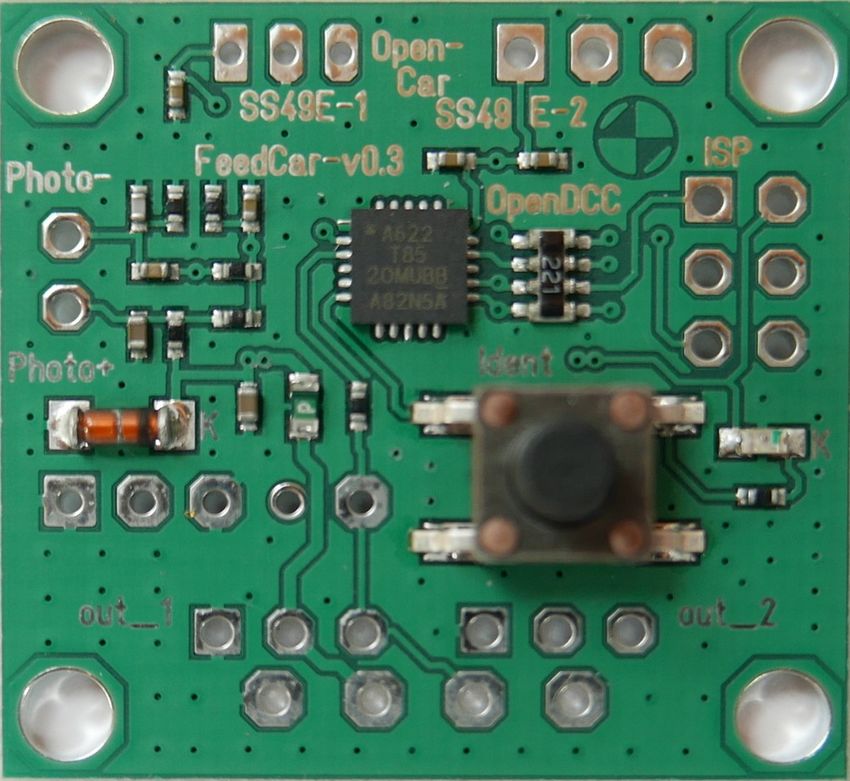
OpenCar-System
                 FeedCar
             Handbuch / Manual

          Das Open Source DCC Car System
             unter General Public License

          The Open Source DCC Car System
            under General Public License

Toralf Wilhelm                              Version 0.8
www.OpenCarSystem.de                        2019-01-06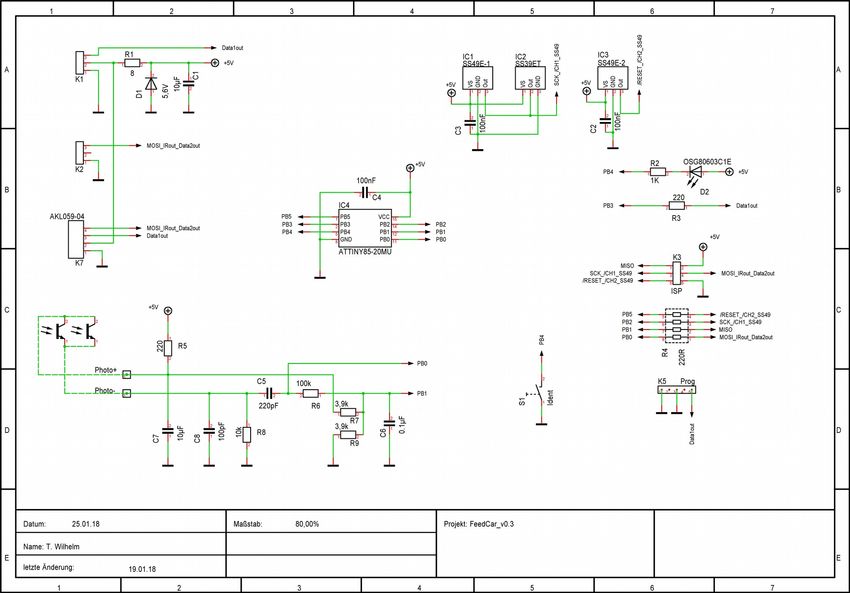
Inhalt / Content

ÄNDERUNGSVERZEICHNIS / REVISION HISTORY...................................................3

EINLEITUNG / PREAMBLE............................................................................. 4

1 | WAS IST „FEEDCAR“ / WHAT IS „FEEDCAR“..............................................6

2 | GRUNDLAGEN / BASICS......................................................................... 7
  2.1 |Stromversorgung / Power supply......................................................7
  2.2 |Betriebsarten / Modes......................................................................8
  2.3 |Externe Bauteile / External components............................................9
  2.4 |Anschlussbelegung / Terminal assignment......................................10
  2.5 |Status-LED / FeedCar Ident............................................................12
  2.6 |Initialisierung / Initialization...........................................................12

3 | KONFIGURATION / CONFIGURATION.........................................................13
  3.1 |Übersicht der CV Variablen / Overview of the CV variables...............13
  3.2 |Programmierung / Programming.....................................................13
  3.3 |CV Variablen..................................................................................16
      3.3.1   |CV   1 Mode................................................................................................16
      3.3.2   |CV   2 Location............................................................................................16
      3.3.3   |CV   3/4 Repeat-ch1/2.................................................................................16
      3.3.4   |CV   5/6 DCC-function-ch1/2........................................................................16
      3.3.5   |CV   7/8 Typ-for-ch1/2.................................................................................16
      3.3.6   |CV   9/10 ch1/2-sw-on?...............................................................................17
      3.3.7   |CV   11 Leseverzögerung / Read delay..........................................................17

4 | KONFIGURATIONSBEISPIELE / CONFIGURATION EXAMPLES.................................18
  4.1 |Kanal Auswahl / Channel selection..................................................18
  4.2 |Infrarot Dioden / Infrared diodes....................................................19
  4.3 |Konfiguration als zweifach Funktionssender / Configuration as a dual
  function transmitter..............................................................................19
  4.4 |Konfiguration als Positionsmelder / Configuration as position detector
  ...........................................................................................................21

5 | FIRMWARE...................................................................................... 22
  5.1 |Erstprogrammierung / Initial programming......................................22
  5.2 |Firmwareupdate............................................................................23

6 | SCHALTBILD / CIRCUIT DIAGRAM............................................................25

7 | TECHNISCHE DATEN / TECHNICAL                    SPECIFICATIONS........................................26

ANHANG / ATTACHMENT............................................................................ 27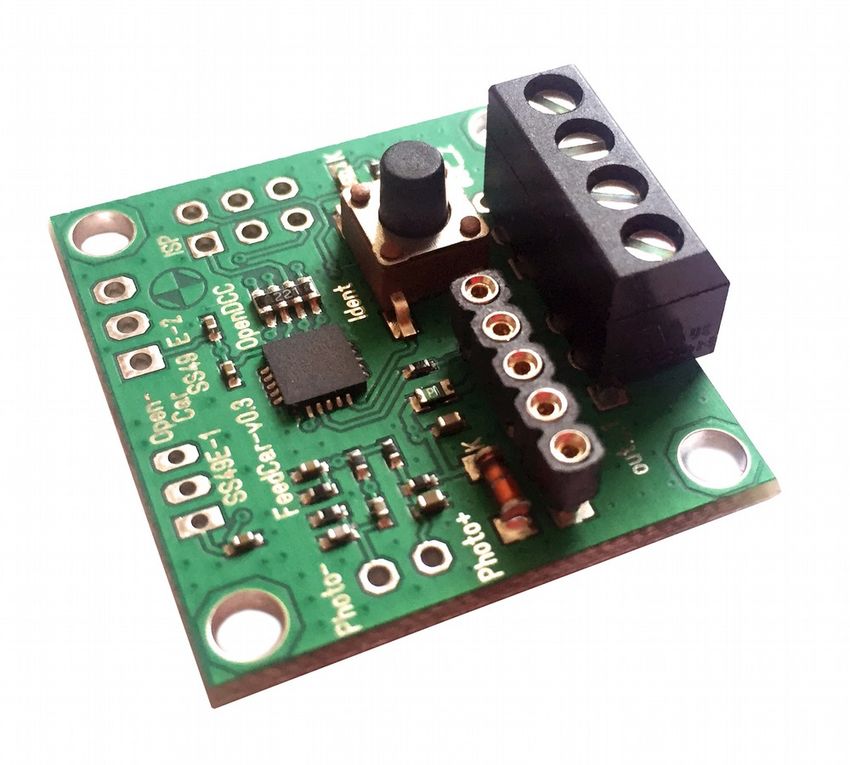
Open Car -
                                                FEEDCAR MANUAL                   System

                                                                                 www.OpenCarSystem.de

Änderungsverzeichnis / Revision History

                                                                 Kapitel geändert von              Datum
Version    Änderungsbeschreibung / change Description
                                                                 chapter changed by                 date
          Handbuch FeedCar erste Version                         komplett
  V0.1                                                                      Toralf Wilhelm        2018-01-18
          Manual FeedCar first version                           complete

  V0.2    Korrekturlesen der DE Version                          komplett   Michael Schäfer       2018-01-27

                                                                 komplett
  V0.3    Korrekturlesen / proofreading                                      Andreas Kuhtz        2018-01-28
                                                                 complete

          Korrekturlesen englische Übersetzung                   complete   Lara Sophie Klit-
  V0.4                                                                                            2018-01-29
          proofreading English translation                         EN             zing

          Initialisierung ergänzt
  V0.5                                                             2.6      Toralf Wilhelm        2018-05-07
          Initialization added

  V0.6    Bug Anschluss Infrarot Diode                             2.4                            2018-07-18
                                                                            Toralf Wilhelm
  V0.7    bug connection infrared diode                            4.2                            2018-07-20

          Status LED weiteren Zustand ergänzt
  V0.8                                                             2.5      Toralf Wilhelm        2019-01-06
          Status LED further status added

Toralf Wilhelm                                   page 3 of 27                 www.OpenCarSystem.de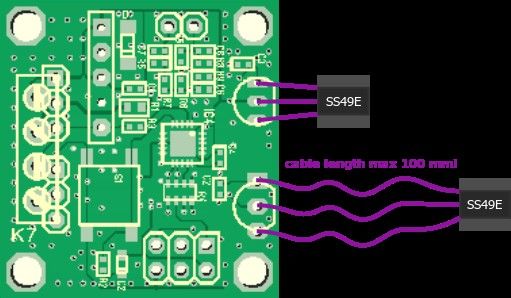
Open Car -
                                        FEEDCAR MANUAL                       System

                                                                             www.OpenCarSystem.de

Einleitung / Preamble

Diese Anleitung beschreibt das „FeedCar“ Modul     This manual describes the "FeedCar" module for
aus der OpenCar-System Selbstbaureihe. Lesen       the OpenCar-System self-assembly series. Read
Sie     diese    Anleitung    vor   Beginn  des    this manual carefully before start assembly and
Zusammenbaus sorgfältig durch und beachten         be aware of the safety instructions.
Sie die Sicherheitshinweise.
Der Zusammenbau und der Umgang mit                 The assembly and handling of the smallest
kleinsten elektronischen Bauelementen setzt ein    electronic components requires a considerable
erhebliches Maß an Erfahrung, vor allem mit        amount of experience, especially with the
dem Umgang von SMD-Bauteilen voraus.               handling of SMD components.
Diese Anleitung erhebt nicht den Anspruch auf      This manual does not claim to be a
ein kommerziell gefertigtes Produkt. Sie dient     commercially manufactured product. It serves
lediglich als Hilfe zum Aufbau des Bausatzes für   only as an aid to the construction of the kit for
versierte und interessierte Modellbahner,          experienced Model railway interested people,
ausschließlich für den Eigenbau. Sie wurde         exclusively for self-construction. It has been
sorgfältig geprüft und nach bestem Wissen          carefully checked and created to the best of our
erstellt.   Es     kann    kein   Anspruch   auf   knowledge.
Vollständigkeit, Aktualität und Richtigkeit        There can be no claim to completeness,
erhoben werden. Sollten Handelsnamen oder          timeliness and accuracy. If trade names or
geschützte Bezeichnungen verwendet werden,         protected terms are used, all rights stay with
so liegen alle Rechte beim Rechteinhaber und       the right holder and marked with "©".
sind mit „©“ gekennzeichnet. Es wird keine
Haftung für jedwede Art übernommen, die aus        There is no liability for any kind that could be
der Nutzung dieser Anleitung, deren Inhalte        deduced from the use and the content of this
oder deren Gebrauch herleitbar wäre. Der           manual or its usage. The user of this manual
Nutzer dieser Anleitung erklärt sich mit           agrees automatically with putting it into use.
Ingebrauchnahme damit einverstanden.

Die hier verwendete und teilweise beschriebene     The software which is used and partially
Software     kann   auf     der    Internetseite   described here may be downloaded, extended
www.OpenCarSystem.de als Download benutzt,         and      improved      on    the      website
erweitert und verbessert werden. Alles Weitere     www.OpenCarSystem.de.
zur Nutzung von Software, Hardware und             Everything else about the use of software,
Applikation, ist auf der Internetseite vom         hardware and application is described on the
OpenCar-System beschrieben. Der Anwender           website of the OpenCar-System. The user
erklärt sich mit den dort beschriebenen            agrees with the described regulation on the
Regelungen vorbehaltlos einverstanden.             website without reservation.
Eine kommerzielle Nutzung der Software oder
Teile daraus ist nicht statthaft! Diese            A commercial use of the software or parts out
Bauanleitung darf keiner anderen Nutzung zu        of it is not permitted! This instruction manual
geführt        werden,         außer        der    should not be used for any other purpose,
bestimmungsgemäßen Anwendung zum Aufbau            except for the intended use for setting up and
und      Betrieb    des      OpenCar-Systems.      operating the OpenCar-System. Any other
Anderweitige Nutzung erfordert die Zustimmung      usage requires the consent of the author or the
des Autors, bzw. des Rechteinhabers der            owner of the website www.OpenCarSystem.de
Internetseite www.OpenCarSystem.de

Toralf Wilhelm                            page 4 of 27                    www.OpenCarSystem.de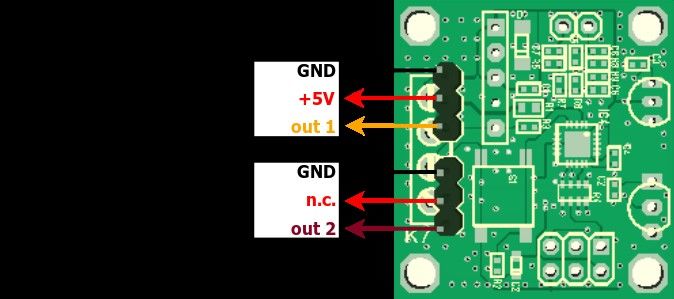
Open Car -
                                          FEEDCAR MANUAL                       System

                                                                               www.OpenCarSystem.de

Sicherheitshinweise:                                 Safety instructions:
Das in dieser Bauanleitung beschriebene Modul        The module described in this manual is an
ist ein elektrisch betriebenes Gerät. Es sind alle   electrically powered device. All necessary
beim Betrieb notwendigen Vorsichtsmaßnahmen          precautionary measures has to be taken when
zu treffen, die mit dem Umgang mit                   you use electronic powered devices. Never
elektrischem Strom anzuwenden sind. Legen Sie        apply mains voltage to the module.
an das Modul keinesfalls Netzspannung an.            Never use switching power supplies from PCs.
Verwenden Sie keinesfalls Schaltnetzteile von        These devices are not ground-free which means
PCs. Diese Geräte sind nicht erdfrei, d.h. es        that high voltages can occur on the tracks and
können hier betriebsbedingt an den Gleisen           connected devices due to operational reasons -
und       angeschlossenen        Geräten     hohe    danger to life!
Spannungen auftreten – Lebensgefahr! Erden           Never ground conductive parts of your model
Sie     keinesfalls    leitfähige    Teile   ihrer   railway layout!
Modellbahnanlage!           Alle     Schirmungen,    All shields, cable shields, etc. are to be brought
Kabelschirme usw. sind, wenn als notwendig           together if necessary to a common, ungrounded
erachtet, auf einen gemeinsamen, erdfreien           point. The finished module has to be operated
Punkt zusammen zu führen. Das fertige Modul          with safety extra-low voltage and protective
ist ausschließlich mit Schutzkleinspannung und       separation only.
Schutztrennung zu betreiben.

Bestimmungsgemäßer Gebrauch:                         Intended Use:
Sämtliche vom OpenCar-System entwickelten            All of the modules developed by OpenCar-
Module sind ausschließlich dafür vorgesehen, in      System are exclusively intended for use in
Modellbahnanlagen/Modellfahrzeugen nach dem          model railway systems/model vehicles according
Prinzip des Faller Car Systems ©, digital            to the principle of the Faller Car Systems ©,
gesteuert zum Fahren und Melden, eingesetzt          digitally controlled for driving and reporting.
zu werden.                                           Any other use is not intended.
Jeder     andere     Gebrauch       ist   nicht
bestimmungsgemäß.

Toralf Wilhelm                              page 5 of 27                     www.OpenCarSystem.de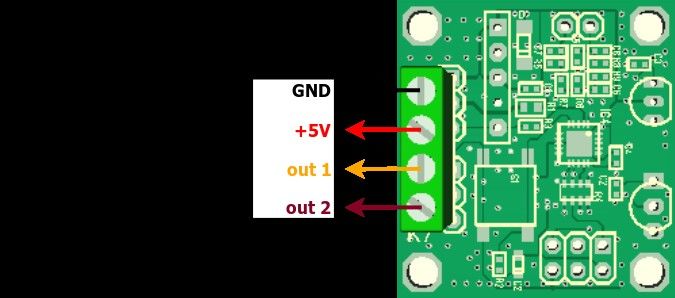
Open Car -
                                        FEEDCAR MANUAL                       System

                                                                             www.OpenCarSystem.de

1|     Was ist „FeedCar“ / What is „FeedCar“
Das OpenCar-System „FeedCar“ ist eine kleine       The OpenCar-System "FeedCar" is a small
Baugruppe zum Rückmelden von Fahrzeug              module for reporting vehicle position data and
Positionsdaten und Senden von DCC IR               sending DCC IR control signals. This allows
Steuersignalen. Hiermit lassen sich Funktionen     functions to be switched locally or to trigger
lokal schalten oder Positionsrückmeldungen in      position feedback in a road vehicle with an
einem Straßenfahrzeug mit einem OpenCar-           OpenCar-System Cardecoder.
System Cardecoder auslösen.
                                                   The vehicle is detected with the help of highly
Die Fahrzeugerfassung erfolgt mit Hilfe von        sensitive SS49E magnetic field sensors that are
hoch     empfindlichen    SS49E      Magnetfeld    mounted below the road. The occupancy
Sensoren, welche unter der Strasse montiert        information prepared by FeedCar can be feed
werden. Die vom FeedCar aufbereitete               into other "input" modules (e.g. TLE-s88-BiDiB
Belegungsinformation lässt sich in andere          Interface) and used to control the driving
„Input“   Baugruppen     (z.B.    TLE-s88-BiDiB    operation.
Interface) einlesen und zur Steuerung des
Fahrbetrieb nutzen.                                FeedCar generates a digital logic signal from a
FeedCar erzeugt aus einem kleinen analogen         small SS49E analog input signal.
SS49E Eingangssignal ein digitales Logik-Signal.
                                                   The FeedCar additionally completely replaces
Das FeedCar ersetzt weiterhin komplett die         the functionality of the "Infrared Module" (IRM).
„Infrarot Modul“ (IRM) Funktionalität.

Toralf Wilhelm                            page 6 of 27                    www.OpenCarSystem.de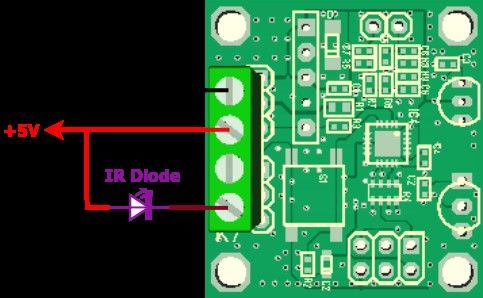
Open Car -
                                       FEEDCAR MANUAL                      System

                                                                           www.OpenCarSystem.de

2|     Grundlagen / Basics

2.1 | Stromversorgung / Power supply

Das FeedCar benötigt für den Betrieb eine         The FeedCar requires a supply voltage of 5V DC
Versorgungsspannung von 5V DC. Es ist zum         for operation. It is designed for direct
direkten Anschluss an das TLE-s88-BiDiB           connection to the TLE-s88-BiDiB interface. The
Interface ausgelegt. Die Verbindung zu diesem     connection can be done with 3-pin "servo
kann mit 3-poligen „Servo–Kabeln“ ausgeführt      cables":
werden:

Die Versorgungsspannung bezieht das FeedCar       The supply voltage is supplied to the FeedCar
ausschließlich am Sensor 1 Ausgang. Wird nur      exclusively at the Sensor 1 output. If only one
ein Sensor Kanal verwendet, muss aus diesem       sensor channel is used, channel 1 has to be
Grund Kanal 1 genutzt werden!                     used for this reason!

An Stelle der zwei 3-poligen Stiftleisten, kann   Instead of the two 3-pin headers, a common 4-
alternativ auch eine gemeinsame 4-polige          pin screw terminal can be used alternatively as
Schraubklemme genutzt werden:                     shown below:

Toralf Wilhelm                            page 7 of 27                  www.OpenCarSystem.de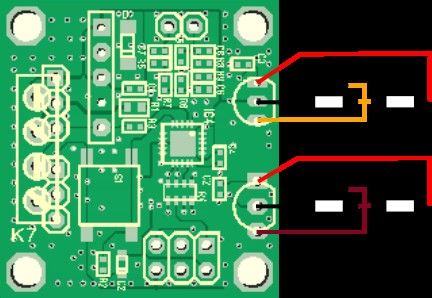
Open Car -
                                        FEEDCAR MANUAL                       System

                                                                             www.OpenCarSystem.de

2.2 | Betriebsarten / Modes

FeedCar kann für mehrere unterschiedliche          FeedCar can be used for several different tasks:
Aufgaben genutzt werden:

 Modus: Beschreibung:                               mode: description:
    1     2-Kanal SS49 Magnetfeld Sensor              1     2-channel SS49 magnetic field sensor
    2     1-Kanal IR Position Rückmelder              2     1-channel IR position feedback
    3     2-Kanal IR Position Rückmelder              3     2-channel IR position feedback
    4     1-Kanal IR Funktionssender                  4     1-channel IR function transmitter
    5     2-Kanal IR Funktionssender                  5     2-channel IR function transmitter

Im    1-Kanal–Modus    führt   FeedCar     die     In 1-channel-mode FeedCar executes the func-
eingestellte Funktion permanent aus, im 2-         tion permanently, in 2-channel-mode the as-
Kanal–Modus wird die jeweilige Funktion durch      signed function is triggered by the associated
den zugehörigen Eingang ausgelöst und für eine     input and executed for a certain number of rep-
festgelegte   Anzahl   von    Wiederholungen       etitions.
ausgeführt.

2-Kanal SS49E Magnetfeld Sensor:                   2-channel SS49E magnetic field sensor:
In dieser Betriebsart liest FeedCar permanent      In this mode FeedCar permanently reads the
die angeschlossenen SS49E Sensoren ein             connected SS49E sensors (sensor 2 may also be
(Sensor 2 darf auch unbestückt sein, wird dann     empty and will then be ignored). A magnetic
aber ignoriert). Eine Magnetfeldänderung           field change activates the associated output.
aktiviert den zugehörigen Ausgang.

1-Kanal IR Position Rückmelder:                    1-channel IR position feedback:
FeedCar        sendet      permanent      seine    FeedCar permanently sends its positional
Positionsadresse als DCC IR Nachricht. Jedes       address as a DCC IR message. Each passing
vorbeifahrende Fahrzeug kann damit seine           vehicle can report its current position on the
aktuelle Position auf der Modellbahn melden.       Model railway like this.

2-Kanal IR Position Rückmelder:                    2-channel IR position feedback:
FeedCar sendet für eine einstellbare Anzahl von    FeedCar sends for one adjustable number of
Wiederholungen        eine       von       zwei    repetitions one of two different position
unterschiedlichen     Positionsadressen       in   addresses depending on the triggering SS49E
Abhängigkeit vom auslösenden SS49E Sensor.         sensor.

1-Kanal IR Funktionssender:                        1-channel IR function transmitter:
Es wird permanent eine von 28 DCC Funktionen       One of 28 DCC functions is permanently sent as
als DCC IR Nachricht gesendet.                     a DCC IR message.

2-Kanal IR Funktionssender:                        2-channel IR function transmitter:
Es können zwei von 28 DCC Funktionen in            Two out of 28 DCC functions can be sent
Abhängigkeit  vom   auslösenden Eingang            depending on the triggering input.

Toralf Wilhelm                             page 8 of 27                   www.OpenCarSystem.de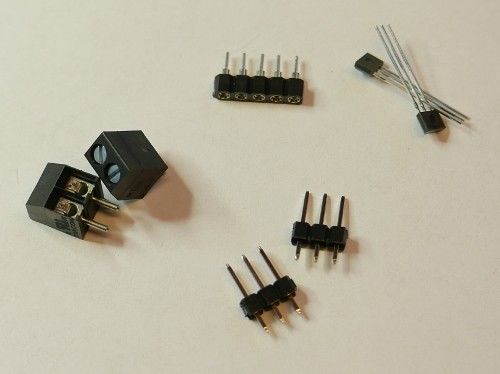
Open Car -
                                       FEEDCAR MANUAL                      System

                                                                           www.OpenCarSystem.de

gesendet werden.
Modus Info:                                       Mode info:
Nach dem Start des FeedCars, zeigt die Status-    After the start of the FeedCar, the status-LED
LED den Betriebsmodus an. Sie blinkt je nach      indicates the operating mode. It flashes
eingestelltem Modus (z.B. im Modus 3 blinkt die   according to the set mode (for example in mode
LED drei mal).                                    3 the led flashes three times).
Im Normalbetrieb blinkt die Status-LED einmal     In normal operation, the status-LED flashes
bei Aktivierung von Kanal 1 und zweimal bei       once when channel 1 is activated and twice
Aktivierung von Kanal 2.                          during activation of channel 2.

2.3 | Externe Bauteile / External components

Das      FeedCar    ist   SMD-bestückt     im     The FeedCar is available as SMD equipped in
„Fichtelbahnshop“        erhältlich.      Zur     the "Fichtelbahnshop". For commissioning the
Inbetriebnahme müssen die Anschlussklemmen        connection terminals (two different versions are
(es sind zwei unterschiedliche Varianten          possible, see 2.1) and, depending on the mode,
möglich, siehe 2.1) und je nach Modus zwei        two Honeywell SS49E magnetic field sensors
Honeywell SS49E Magnetfeld Sensoren sowie         and an IR diode must be connected.
eine IR Diode angeschlossen werden.
Weiterhin wird zur Programmierung des             Furthermore, for programming of the FeedCar a
FeedCars eine 5-polige Buchsenleiste für das      5-pin female connector is required for the well-
bekannte „Cardecoder Update Kabel“ benötigt.      known "Cardecoder Update Cable".

Toralf Wilhelm                            page 9 of 27                   www.OpenCarSystem.de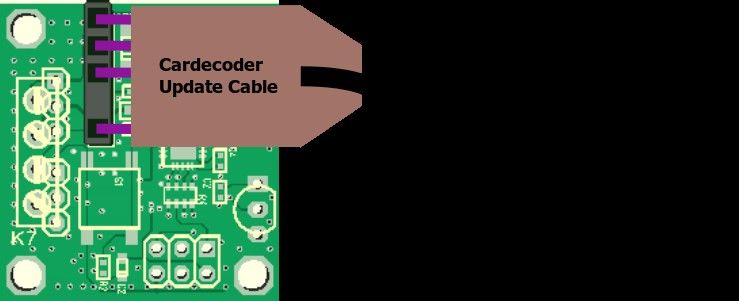
Open Car -
                                         FEEDCAR MANUAL                       System

                                                                              www.OpenCarSystem.de

2.4 | Anschlussbelegung / Terminal assignment

1. Stromversorgung:                                 1. Power supply:

Mit zwei Stiftleisten (Bild links) erfolgt die 5V   With two pin headers (picture left), the 5V
Spannungseinspeisung am Sensor 1 Anschluss!         voltage supply is applied to the sensor 1
Im Bild rechts die alternative Version mit          connection! The picture on the right shows the
Schraubklemme.                                      alternative connection with screw terminal.

2. SS49E Magnetsensor:                              2. SS49E magnetic sensor:

Es können ein oder zwei Sensoren genutzt            The usage of one or two sensors is supported.
werden. Wird nur ein Sensor benötigt, darf der      If only one sensor is needed, the second sensor
zweite (im Bild der untere) fehlen. FeedCar         (the lower one in the picture) can be missing.
erkennt dies und ignoriert dann den zweiten         FeedCar recognizes this situation and then
Sensorkanal. Die maximale Leitungslänge             ignores the second sensor channel. The
zwischen Platine und Sensor beträgt 100 mm!         maximum cable length between PCB and sensor
Der Sensor muss waagerecht unter der                is 100 mm! The sensor must be installed
Fahrbahn verbaut sein!                              horizontally under the road!
Das Magnetband kann durchgängig über dem            The magnetic tape can be routed throughout
Sensor verlegt werden, eine Unterbrechung ist       over the sensor, no interruption is required. The
nicht erforderlich. Der Sensor darf bis zu 3 mm     sensor may be mounted up to 3 mm below the
unter dem Magnetband verbaut sein.                  magnetic tape.

3. Infrarot Diode:                                  3. Infrared diode:

In den Betriebsarten 2 bis 5 kann das FeedCar       In modes 2 to 5, the FeedCar DCC IR can send

Toralf Wilhelm                             page 10 of 27                   www.OpenCarSystem.de
Open Car -
FEEDCAR MANUAL System
www.OpenCarSystem.de
per DCC IR Nachricht Befehle und commands and information to the car decoder
Informationen an den Cardecoder of passing vehicles. Therefor an infrared diode
vorbeifahrender Fahrzeuge senden. Hierfür (IR diode) must be connected to the FeedCar.
muss eine Infrarot Diode (IR Diode) an das The IR diode must be mounted next to the
FeedCar angeschlossen werden. Diese wird carriageway in the direction of the arriving
dann an der Fahrbahn in Richtung der vehicles. The length of the supply line to this IR
ankommenden Fahrzeuge zeigend angebracht. diode is limited to 250 mm. No extra resistor is
Die Zuleitung zu dieser IR Diode darf 250 mm required (it is already on the board). The design
lang sein. Es wird kein extra Vorwiderstand of the IR diode is not relevant, a suitable type
benötigt (dieser befindet sich schon auf der depending on the installation case can be used.
Baugruppe). Die Bauform der IR Diode ist dabei
unerheblich, es kann je nach Montageort ein
passender Typ genutzt werden.
Im Bild der Anschluss mit Schraubklemme. Die The picture above is showing the connection
IR Diode wird an den Sensorausgang 2 vom with screw terminal. The IR diode is connected
FeedCar angeschlossen. to the sensor output 2 of the FeedCar.
4. Programmieranschluss: 4. Programming connection:
Zum Firmware Update und zur Konfiguration For the firmware update and the configuration
des FeedCars, wird das vom Cardecoder of the FeedCar, the well-known update cable
bekannte Update-Kabel und Update-Tool auch and update tool for the Cardecoder can be
für das FeedCar genutzt. Bei der Montage der used. When mounting the female connector K5,
Buchsenleiste K5, sollte zum Verdrehschutz der the fourth pin should be closed to prevent
vierte Anschluss verschlossen werden! twisting!
Toralf Wilhelm page 11 of 27 www.OpenCarSystem.deOpen Car -
FEEDCAR MANUAL System
www.OpenCarSystem.de
2.5 | Status-LED / FeedCar Ident
Das FeedCar besitzt eine Status-LED und einen The FeedCar has a status LED and an Ident-
Ident-Taster. Die LED dient der lokalen button. The LED serves as local function control
Funktionskontrolle des FeedCars und zeigt of the FeedCar and displays the following
folgende Informationen an: information:
LED Beschreibung LED Description
blinkt „Modus“ beim Start vom FeedCar zur flashing at the startup of the FeedCar
x Information des Betriebsmode "mode" x to inform about the operating
mode
blinkt 1x Kanal 1 ausgelöst flashing 1x Channel 1 triggered
blinkt 2x Kanal 2 ausgelöst flashing 2x Channel 2 triggered
blitzt auf Sensor Init wird ausgeführt flashes Sensor Init is executed
blinkt schnell Ident Funktion ausgelöst flashing fast ident function triggered
permanent ein Update Kabel gesteckt permanently on update cable plugged
flackert schnell Erstinbetriebnahme, keine FW flickers quickly First start no firmware
im FeedCar vorhanden (siehe available in FeedCar (see
Kapitel Firmware) chapter Firmware)
Zur Identifikation der FeedCar Ausgänge an To identify the FeedCar outputs on connected
angeschlossenen Baugruppen und Host- modules and host software, press the Ident-
Software kann man den Ident-Taster auf button on FeedCar for 1s. The status LED and
FeedCar für 1s drücken. Die Status-LED und both outputs of the FeedCar will flash. To
beide Ausgänge vom FeedCar blinken dann. switch off the identification mode press the
Zum Abschalten der Identifikation muss man button again for 1s.
den Taster wieder 1s drücken.
2.6 | Initialisierung / Initialization
Nach der Montage der SS49E Sensoren, muss After mounting the SS49E sensors, the FeedCar
das FeedCar die exakte Position der Sensoren needs to learn the exact position of the sensors.
lernen. Es muss einmalig initialisiert werden. It has to be initialized once.
Dazu wird die Ident Taste auf dem FeedCar To do this, the Ident key on the FeedCar is
länger als 3s gedrückt gehalten. Danach blitzt pressed for longer than 3s. Afterwards, the LED
die LED mehrfach kurz auf und das FeedCar flashes several times briefly and the FeedCar
ermittelt automatisch die aktuelle Einbaulage automatically determines the current mounting
der SS49E Sensoren. position of the SS49E sensors.
Dieser Vorgang muss bei jeder Veränderung der This procedure must be repeated whenever the
Einbauposition der Sensoren erneut sensor mounting position is changed.
durchgeführt werden.
Toralf Wilhelm page 12 of 27 www.OpenCarSystem.deOpen Car -
FEEDCAR MANUAL System
www.OpenCarSystem.de
3| Konfiguration / Configuration
3.1 | Übersicht der CV Variablen / Overview of the CV variables
CV default Beschreibung description
1 1 Betriebsmodus operating mode
2 65535 16-Bit Positionsadresse 16-bit positional address
3 10 Anzahl der IR Wiederholungen bei Number of IR repeats when channel 1 is
Aktivierung von Kanal 1 activated
4 10 Anzahl der IR Wiederholungen bei Number of IR repeats when channel 2 is
Aktivierung von Kanal 2 activated
5 0 Kanal 1 DCC-Funktion Channel 1 DCC-function
6 0 Kanal 2 DCC-Funktion Channel 2 DCC-function
7 255 Car-Typ für Kanal 1 Funktion hier 255 Cartype for channel 1 function here 255 all
alle Fahrzeuge vehicles
8 255 Car-Typ für Kanal 2 Funktion hier 255 Cartype for channel 2 function here 255 all
alle Fahrzeuge vehicles
9 1 Kanal 1 Funktion on/off (1/0) Channel 1 function on/off (1/0)
10 0 Kanal 2 Funktion on/off (1/0) Channel 2 function on/off (1/0)
11 10 Leseverzögerung des Hall-Bausteins Read delay of the Hall module
In Kapitel 3.3 werden die CVs im Detail In chapter 3.3 the CVs are described in detail.
beschrieben.
3.2 | Programmierung / Programming
Die Konfiguration und ein Softwareupdate des For configuration and software update of the
FeedCars erfolgt mit dem vom Cardecoder FeedCar, the well-known update cable from the
bekannten Update-Kabel und AVRootloader Cardecoder and AVRootloader Update Tool is
Update-Tool. Bei der Erstinbetriebnahme muss used. During initial commissioning the desired
zuerst die gewünschte Firmware Version firmware version must be programmed first
programmiert werden (siehe FW Update)! (see FW Update)!
Zur Konfiguration wird das FeedCar mit dem
Updatekabel verbunden und dann die For configuration the FeedCar is connected with
Betriebsspannung angelegt. Die LED auf dem the update cable and in a next step the
FeedCar leuchtet jetzt permanent (flackert sie, operating voltage is applied. Now the LED on
siehe FW Update). Nun wird der AVRootloader the FeedCar lights permanently (if the LED
Toralf Wilhelm page 13 of 27 www.OpenCarSystem.deOpen Car -
FEEDCAR MANUAL System
www.OpenCarSystem.de
gestartet, der Port des Update-Kabels flickers, look at FW Update). Now start the
ausgewählt, die Baudrate auf 9600 eingestellt AVRootloader, select the port of the update
und dann im Tool mit „connect“ eine cable, set the baud rate to 9600 and then
Verbindung zum FeedCar hergestellt. Dies sollte connect to the FeedCar in the tool with
dann folgendermaßen aussehen: "connect". It should look like this:
Hinweis: Bei „Port“ muss der korrekte Port Note: You must select the correct "Port" of your
ausgewählt werden, während die Auswahl bei own system here (while the selection behind
„FLASH“ hier nicht wichtig ist. "FLASH" is not important here).
Jetzt in den Reiter „EEPROM Content“ wechseln: Now switch to the tab "EEPROM Content":
Hier mit „Read from device“ den EEPROM (CV Read here the EEPROM (CV list) from the
Liste) vom FeedCar einlesen. FeedCar with "Read from device".
Toralf Wilhelm page 14 of 27 www.OpenCarSystem.deOpen Car -
FEEDCAR MANUAL System
www.OpenCarSystem.de
Das Bild zeigt die „default“ CV Liste vom The picture shows the "default" CV list of the
FeedCar mit Firmware 01.xx.xx. Für den FeedCar with firmware 01.xx.xx. For users the
Anwender ist nur der gelb hinterlegte Teil yellow highlighted part on the right side is only
rechts von Bedeutung. Im oberen Bereich important. The upper section contains
stehen ein paar Informationen zu Hardware- information about the hardware and firmware
und Firmware-Version der Baugruppe. Darunter version of the module. The CV variables are
beginnen ab „Mode“ die CV Variablen. Jede listed after the line “Mode”.
Zeile enthält eine CV. Linksseitig die Each line contains a CV. The name on the left
Bezeichnung und rechtsseitig der aktuelle Wert and the current value of the CV on the right.
dieser CV. Zum Ändern einer CV wird mit dem To change a CV, use the cursor to highlight the
Cursor der Wert rechts markiert: value to the right:
und mit dem neuen Wert überschrieben (hier and overwritten with the new value (here 5),
5), der dann rot erscheint: which then appears in red:
Nun muss diese Änderung mit „Write to device“ Now this change must be saved back to the
zurück in das FeedCar gespeichert werden. FeedCar with "Write to device". The color
Dabei ändert sich die Farbe wieder in schwarz changes back to black and the mode of the
zurück und der Modus des FeedCars ist somit FeedCar is changed to Mode 5. All other CVs are
auf Modus 5 geändert. Alle anderen CVs werden configured according to the same principle.
nach dem gleichen Prinzip konfiguriert.
Toralf Wilhelm page 15 of 27 www.OpenCarSystem.deOpen Car -
FEEDCAR MANUAL System
www.OpenCarSystem.de
3.3 | CV Variablen
3.3.1 | CV 1 Mode
In CV 1 „Mode“ kann der Betriebsmodus vom In CV 1 "Mode" the operating mode of the
FeedCar programmiert werden. Eine Auflistung FeedCar can be programmed. A list of the
der verschiedenen Betriebsarten ist im Kapitel different operating modes can be found in
2.2 zu finden. chapter 2.2.
3.3.2 | CV 2 Location
Die CV 2 „Location“ enthält die 16-Bit (0-65535) The CV 2 "Location" contains position address
Positionsadresse des Kanals 1 vom FeedCar. of Channel 1 as a 16-bit value (0-65535) of the
Diese wird in der Betriebsart 2 und 3 als FeedCar. This value is used in operating modes
Positionsadresse für die Rückmeldung 2 and 3 as a position address for the feedback
vorbeifahrender Fahrzeuge verwendet. Kanal 2 of passing vehicles. Channel 2 of the FeedCar
vom FeedCar hat automatisch die folgende automatically has the subsequent position
Positionsadresse. address.
3.3.3 | CV 3/4 Repeat-ch1/2
In CV 3 (für Kanal 1) und CV 4 (für Kanal 2) In CV 3 (for channel 1) and CV 4 (for channel 2)
wird die Anzahl der DCC IR Telegramme the number of DCC IR telegrams are configured
eingestellt, die beim Auslösen von Kanal 1 bzw. that are sent (repeated) if channel 1 or channel
Kanal 2 gesendet (wiederholt) werden. 2 is triggered.
3.3.4 | CV 5/6 DCC-function-ch1/2
In den Betriebsarten 4 und 5 sendet das In modes 4 and 5, the FeedCar sends function
FeedCar Funktionsbefehle an vorbeifahrende commands to passing vehicles. The function (0-
Fahrzeuge. Dabei wird die Funktion (0-28) für 28) for channel 1 is stored in CV 5 and for
Kanal 1 in CV 5 und die für Kanal 2 in CV 6 channel 2 in CV 6.
hinterlegt.
3.3.5 | CV 7/8 Typ-for-ch1/2
FeedCar sendet im Betriebsmodus 4 oder 5 DCC In operating mode 4 or 5 FeedCar will send DCC
Funktionen an vorbeifahrende Fahrzeuge. Hier functions to passing vehicles. Enter the vehicle
kann für Kanal 1 in CV 7 und für Kanal 2 in CV 8 type that should react on the function in CV 7
ein Fahrzeugtyp gespeichert werden, der auf for channel 1 and in CV 8 for channel 2 (see
diesen Befehl reagiert (siehe 4.3). 4.3).
Toralf Wilhelm page 16 of 27 www.OpenCarSystem.deOpen Car -
FEEDCAR MANUAL System
www.OpenCarSystem.de
3.3.6 | CV 9/10 ch1/2-sw-on?
In CV 9 und 10 (für Kanal 1/2) wird hier CV 9 and 10 (for channel 1/2) save whether the
gespeichert, ob die DCC Funktion aus CV 5/6 DCC function from CV 5/6 is switched on or off
ein- oder ausgeschaltet wird (0=aus oder (0 = off or 1 = on).
1=ein).
3.3.7 | CV 11 Leseverzögerung / Read delay
Hier kann eine „Totzeit“ nach dem Auslösen CV 11 allows to configure a "dead time" after
eines Sensors eingestellt werden, um ein the triggering of a sensor to prevent a second
zweites Auslösen des Sensors durch den (incorrect) triggering of the sensor by the
Fahrzeugmotor oder andere magnetische Teile vehicle engine or other magnetic parts of the
am Fahrzeug zu unterbinden. Der Wert in CV 11 vehicle. The value in CV 11 is a multiplier by
ist ein Multiplikator, mit dem die erste which the first activation time (by the steering
Aktivierungszeit durch den Lenkmagneten magnet) is multiplied with. As a result a speed-
multipliziert wird. Dadurch wird eine dependent "dead time" is realized.
geschwindigkeitsabhängige „Totzeit“ realisiert.
Toralf Wilhelm page 17 of 27 www.OpenCarSystem.deOpen Car -
FEEDCAR MANUAL System
www.OpenCarSystem.de
4| Konfigurationsbeispiele / configuration examples
4.1 | Kanal Auswahl / Channel selection
Das FeedCar sendet in den Betriebsarten 2 – 5 The FeedCar sends in modes 2 - 5 up to two
bis zu zwei verschiedene IR Befehle. Die different IR commands. The selection of which
Auswahl, welcher IR Befehl gesendet wird, IR command is sent is made by activating the
erfolgt mit Aktivierung des Eingangs für diesen input for this channel. For this purpose SS49E
Kanal. Hierzu sind SS49E Sensoren am FeedCar sensors can be connected to the FeedCar.
vorgesehen.
Der obere Sensor aktiviert Kanal 1, der untere The upper sensor activates channel 1, the lower
Sensor Kanal 2. sensor activates channel 2.
Soll die Kanalauswahl durch Taster (T1 und T2), If channel selection is done by means of
Reedkontakte oder andere Baugruppen pushbuttons (T1 and T2), reed contacts or
erfolgen, kann dies am FeedCar durch zwei other modules, it can be realized on the
externe Widerstände (je Eingang) realisiert FeedCar by two external resistors (per input).
werden.
Toralf Wilhelm page 18 of 27 www.OpenCarSystem.deOpen Car -
FEEDCAR MANUAL System
www.OpenCarSystem.de
4.2 | Infrarot Dioden / Infrared diodes
Zum Senden von IR Befehlen an vorbeifahrende To send IR commands to passing vehicles an IR
Fahrzeuge wird eine IR Diode am FeedCar diode is required on the FeedCar. The IR diode
benötigt. Diese wird an den Sensorausgang 2 must be connected to the sensor output 2.
angeschlossen.
4.3 | Konfiguration als zweifach Funktionssender / Configuration as a
dual function transmitter
In dieser Betriebsart (Mode 5) können zwei In this mode (Mode 5) two different function
verschiedene Funktionsbefehle an commands can be sent to passing vehicles.
vorbeifahrende Fahrzeuge gesendet werden. Their selection takes place in operation as
Deren Auswahl erfolgt im Betrieb wie unter 4.1 described under 4.1 via the inputs 1 or 2.
beschrieben über die Eingänge 1 oder 2.
Nehmen wir also an, wir wollen bei allen vorbei Let us suppose we want to turn on the lights on
fahrenden Fahrzeugen das Licht einschalten, all passing vehicles before we drive into a
bevor wir in einen Tunnel fahren. Folgende CV- tunnel. The following CV programming on the
Programmierung am FeedCar ist dafür nötig, FeedCar is necessary for this, whereby the
wobei mit Eingang 1 das Fahrzeuglicht vehicle light should be switched on with input 1
eingeschaltet und mit Eingang 2 ausgeschaltet and switched off with input 2:
werden soll:
CV Beschreibung Description
CV1 = 5 2-fach DCC Funktionssender 2-fold DCC function transmitter
CV3 = 10 IR Befehl an Kanal 1 wird 10x wiederholt IR command on channel 1 is repeated 10x
CV4 = 10 IR Befehl an Kanal 2 wird 10x wiederholt IR command on channel 2 is repeated 10x
CV5 = 0 Funktion Kanal 1 → F0 = Fahrzeuglicht F0 = Fahrzeuglicht Function channel 1 → F0 = Fahrzeuglicht F0 = vehicle light
CV6 = 0 Funktion Kanal 2 → F0 = Fahrzeuglicht F0 = Fahrzeuglicht Function channel 2 → F0 = Fahrzeuglicht F0 = vehicle light
CV7 = 255 Fahrzeugtyp Kanal 1 → F0 = Fahrzeuglicht alle Fahrzeuge Vehicle type channel 1 → F0 = Fahrzeuglicht all vehicles
Toralf Wilhelm page 19 of 27 www.OpenCarSystem.deOpen Car -
FEEDCAR MANUAL System
www.OpenCarSystem.de
CV8 = 255 Fahrzeugtyp Kanal 2 → F0 = Fahrzeuglicht alle Fahrzeuge Vehicle type channel 2 → F0 = Fahrzeuglicht all vehicles
CV9 = 1 Licht wird mit Eingang 1 eingeschaltet Light is switched on with input 1
CV10 = 0 Licht wird mit Eingang 2 ausgeschaltet Light is switched off with input 2
CV11 = 10 Beim Auslösen, wird der Sensor für die When triggered, the sensor is locked for
10-fache Auslösezeit gesperrt. 10-times the trip time.
CV 3 und 4 bestimmen wie oft ein IR Befehl CV 3 and 4 determine how often an IR
beim Auslösen eines Eingangs wiederholt wird. command is repeated when an input is
Dieser Wert sollte nicht zu hoch gewählt triggered. This value should not be too high
werden, weil die Abstandsreglung der because the distance control of the vehicles is
Fahrzeuge auch auf der IR Übertragung basiert also based on the IR transmission and there
und es dort zu Beeinflussungen kommen kann. may be influences. The default setting of 10
Die Default-Einstellung von 10 Wiederholungen repetitions is sufficiently reliable and usually
ist ausreichend zuverlässig und braucht in der does not need to be increased further.
Regel nicht weiter erhöht werden.
Die Werte in CV 7 und 8 beinhalten den The values in CV 7 and 8 include the vehicle
Fahrzeug Typ, der auf diesen Befehl reagiert. type that responds to this command. So you
Darüber kann man z.B. die Blaulichter nur bei can turn on the lights only on emergency
Einsatzfahrzeugen einschalten oder den Blinker vehicles or the turn signal on the right only at a
rechts nur bei einem Müllfahrzeug oder einer garbage truck or a specific bus line. The value
bestimmten Buslinie. Dieser Wert „Fahrzeug "vehicle type" gets logical "and" linked to the
Typ“ wird logisch „und“ verknüpft mit dem Wert value from CV 34 in the cardecoder. If the
aus CV 34 im Cardecoder. Wenn das Ergebnis result of this join is not equal to zero the
dieser Verknüpfung ungleich Null ist, wird der command is executed. This allows that not only
Befehl ausgeführt. Damit lassen sich nicht nur individual vehicle types can be explicitly
explizit einzelne Fahrzeugtypen, sondern auch accessed, but also several types simultaneously,
mehrere Typen gleichzeitig erreichen. too.
Beispiele zu / Examples for CV 7/8:
FeedCar CV7/8 Cardecoder CV34 Logisch Und / Fahrzeug reagiert auf den Befehl
logical and Vehicle reacts to the command
decimal binary decimal binary decimal binary
255 1111 1111 1 0000 0001 1 0000 0001 ja / yes
1 0000 0001 1 0000 0001 1 0000 0001 ja / yes
1 0000 0001 2 0000 0010 0 0000 0000 nein / no
3 0000 0011 2 0000 0010 2 0000 0010 ja / yes
15 0000 1111 1 0000 0001 1 0000 0001 ja / yes
15 0000 1111 16 0001 0000 0 0000 0000 nein / no
In der Tabelle sind rot die Positionen In the table the positions marked red are
gekennzeichnet, die sowohl im FeedCar CV7/8 programmed in the FeedCar CV7 / 8 as well as
Toralf Wilhelm page 20 of 27 www.OpenCarSystem.deOpen Car -
FEEDCAR MANUAL System
www.OpenCarSystem.de
sowie auch im Cardecoder CV34 programmiert in the Cardecoder CV34. Whenever there is a
sind. Immer wenn es dort eine match, a cardecoder will respond to the IR
Übereinstimmung gibt, reagiert ein Cardecoder command from the FeedCar.
auf den IR Befehl vom FeedCar.
4.4 | Konfiguration als Positionsmelder / Configuration as position
detector
Analog zur Betriebsart "Funktionssender" kann Analogously to the operating mode "Function
FeedCar auch als Rückmeldebaustein arbeiten. transmitter" FeedCar can also work as a
Es ist hierfür folgende Programmierung nötig: feedback module. This requires the following
programming:
CV Beschreibung Description
CV1 = 3 2-Kanal Positions- Rückmelder 2-channel position feedback
CV2 = adr 16-Bit Positionsadresse (von Kanal 1) 16-bit positional address (from channel 1)
CV3 = 10 IR Befehl an Kanal 1 wird 10x wiederholt IR command on channel 1 is repeated 10x
CV4 = 10 IR Befehl an Kanal 2 wird 10x wiederholt IR command on channel 2 is repeated 10x
CV11= 10 Beim Auslösen, wird der Sensor für die When triggered, the sensor is locked for 10
10-fache Auslösezeit gesperrt. times the trip time.
Auch hier wird wieder ein IR Befehl in Again, an IR command is sent depending on the
Abhängigkeit vom auslösenden Eingang 1 oder triggering input 1 or 2. This is a request to a
2 versandt. Dies ist eine Aufforderung an ein passing vehicle to report itself at the position
vorbeifahrendes Fahrzeug, sich selbst an der with the address of the feedback block by radio
Position mit der Adresse des Rückmeldebaustein in the vehicle control. If the FeedCar operates
per Funk bei der Fahrzeugsteuerung zu melden. as a 2-channel feedback block, two different
Arbeitet das FeedCar als 2-Kanal- position messages are possible, e.g. to support
Rückmeldebaustein sind zwei verschiedene two different lanes. The address from CV 2 is
Positionsmeldungen z.B. für zwei verschiedene used for channel 1, channel 2 gets the
Fahrspuren möglich. Wobei die Adresse aus CV subsequent address.
2 für Kanal 1 verwendet wird, Kanal 2 bekommt
die nachfolgende Adresse.
Toralf Wilhelm page 21 of 27 www.OpenCarSystem.deOpen Car -
FEEDCAR MANUAL System
www.OpenCarSystem.de
5| Firmware
5.1 | Erstprogrammierung / Initial programming
Ein neues FeedCar enthält nur die Firmware- A new FeedCar contains only the firmware-
Update-Funktionalität! Wird es in Betrieb update-functionality! When it is put into
genommen, blinkt die Status-LED hektisch und operation, the status LED flashes hectically as
informiert genau darüber. optical information.
Als erster Schritt wird die gewünschte As a first step the desired firmware variant is
Firmware-Variante in das FeedCar programmed into the FeedCar! After this step
programmiert! Erst danach kann man es für you can configure and use it for your
seine Anwendung konfigurieren und nutzen. application.
Dazu geht man folgendermaßen vor: To do this, proceed as follows:
1. Update Kabel anschließen und mit PC 1. Connect update cable and connect to PC
verbinden
2. auf dem PC das AVRootloader Tool 2. Start the AVRootloader tool on the PC
starten
3. Baudrate auf 9600 und den Port des 3. Select baud rate to 9600 and the port of
Update Kabels auswählen the update cable
4. auf „connect“ gehen und dann die 4. Go to "connect" and then switch on the
Betriebsspannung am FeedCar operating voltage at the FeedCar
einschalten
Das FeedCar verbindet sich jetzt mit dem The FeedCar connects to the AVRootloader tool
AVRootloader Tool und die Status-LED geht and the status LED goes off now.
aus. In the area "FLASH" the firmware file can be
Im Bereich „FLASH“ kann nun die Firmware- selected. The download can be found at
Datei dafür ausgewählt werden. Der Download www.opencarsystem.de . The zip archive must
dazu ist www.opencarsystem.de zu finden. Das be unzipped!
Toralf Wilhelm page 22 of 27 www.OpenCarSystem.deOpen Car -
FEEDCAR MANUAL System
www.OpenCarSystem.de
zip-Archiv muss entpackt werden! Then you can program the firmware file with
Danach kann man diese Firmware-Datei mit "Program" to the FeedCar.
„Program“ auf das FeedCar programmieren.
Ist keine Anwendungsfirmware im FeedCar If no application firmware is loaded in the
geladen, lässt es sich nicht konfigurieren. Im FeedCar it cannot be configured. In the section
Bereich „EEPROM Content“ gibt es dann keine "EEPROM Content" there are no CVs, only the
CVs, sondern nur einen Hinweis: following hint:
Um nun die Konfiguration durchführen zu In order to be able to carry out the
können, muss am FeedCar kurz die configuration the operating voltage must be
Betriebsspannung unterbrochen werden. briefly interrupted on the FeedCar. Then you
Danach kann man sich wieder mit dem can connect to the AVRootloader again and
AVRootloader verbinden und die Konfiguration perform the configuration as described in
wie Kapitel 3 beschreibt durchführen. chapter 3.
5.2 | Firmwareupdate
Die Vorgehensweise beim Firmwareupdate ist The procedure for the firmware update is the
die gleiche wie bei der „Erstprogrammierung“ same as for the "initial programming" and looks
und sieht folgendermaßen aus: like this:
1. Update Kabel anschließen und mit PC 1. Connect update cable and connect to PC
verbinden
2. auf dem PC das AVRootloader Tool 2. Start the AVRootloader tool on the PC
starten
3. Baudrate auf 9600 und den Port des 3. Select baud rate to 9600 and the port of
Update Kabels auswählen the update cable
4. auf „connect“ gehen und dann die 4. Go to "connect" and then switch on the
Toralf Wilhelm page 23 of 27 www.OpenCarSystem.deOpen Car -
FEEDCAR MANUAL System
www.OpenCarSystem.de
Betriebsspannung am FeedCar operating voltage at the FeedCar
einschalten
5. Im Bereich „FLASH“ die Firmware-Datei 5. Select the firmware file in the "FLASH"
auswählen area
6. mit „Program“ diese auf das FeedCar 6. Program with "Program" to the FeedCar
programmieren
7. FeedCar neu konfigurieren 7. Reconfigure FeedCar
Die aktuelle Firmware für das FeedCar ist im The current firmware for the FeedCar can be
Download-Bereich auf www.OpenCarSystem.de found in the download area at
zu finden. www.OpenCarSystem.de
Toralf Wilhelm page 24 of 27 www.OpenCarSystem.deOpen Car -
FEEDCAR MANUAL System
www.OpenCarSystem.de
6| Schaltbild / Circuit diagram
Toralf Wilhelm page 25 of 27 www.OpenCarSystem.deOpen Car -
FEEDCAR MANUAL System
www.OpenCarSystem.de
7| Technische Daten / Technical specifications
Betriebsspannung: 4,5V – 5,5V DC
Stromaufnahme: < 40mA
Sensorkanäle: 2
Sensortyp: Honeywell Magnetoresistive Sensor SS49E
IR-Dioden Ausgänge: 1
IR-Diode Typ: CQY99, SFH4346, LD271, SFH4356P, ELIR204, TSAL4400, IR1921C
Abmessungen: 30 x 28 mm
Operating voltage: 4,5V – 5,5V DC
Current consumption: < 40mA
Sensor channels: 2
Sensor typ: Honeywell Magnetoresistive Sensor SS49E
IR diode outputs: 1
IR diode typ: CQY99, SFH4346, LD271, SFH4356P, ELIR204, TSAL4400, IR1921C
Dimensions: 30 x 28 mm
Toralf Wilhelm page 26 of 27 www.OpenCarSystem.deOpen Car -
FEEDCAR MANUAL System
www.OpenCarSystem.de
Anhang / Attachment
Für Verbesserungsvorschläge und Hinweise auf Fehler sind wir sehr dankbar.
Auf die Bauanleitung bzw. die Software gibt es keine Haftung für Schäden oder Funktionsgarantie.
Wir haften nicht für Schäden, die der Anwender oder Dritte durch die Verwendung der Software
oder der Hardware verursachen oder erleiden. In keinem Fall haften wir für entgangenen Umsatz
oder Gewinn oder sonstige Vermögensschäden, die bei der Verwendung oder durch die
Verwendung dieser Programme oder der Anleitungen entstehen können.
We are very grateful for suggestions for improvement and information on errors.
On the construction manual or the software, there is no liability for damage or functional
guarantee. We are not liable for damages caused by the user or third parties through the use of
the software or the hardware. In no event shall we be liable for lost sales or profits or other
financial losses that may arise from the usage or use of these programs or the instructions.
Bei Rückfragen steht Ihnen unser Support-Forum gerne zur Verfügung!
If you have any questions, please do not hesitate to contact our support forum!
(https://forum.opendcc.de/)
Kontakt / Contact:
OpenCarSystem.de Open Car - fichtelbahn.de
Toralf Wilhelm System Christoph Schörner
Viktoriaallee 30 Am Dummersberg 26
D-16547 Birkenwerder www.OpenCarSystem.de
D-91220 Schnaittach
support@opencarsystem.de support@fichtelbahn.de
Technische Änderungen vorbehalten.
Reserve technical changes.
Open Car - © 2018 OpenCarSystem.de
All rights reserved in particular the right of duplication and
System distribution as well as translation. Reproduction and
reproduction in any form requires the written approval of
OpenCarSystem.
www.OpenCarSystem.de
Toralf Wilhelm page 27 of 27 www.OpenCarSystem.deSie können auch lesen


