Verarbeitungshandbuch Installation Manual - Ardex
←
→
Transkription von Seiteninhalten
Wenn Ihr Browser die Seite nicht korrekt rendert, bitte, lesen Sie den Inhalt der Seite unten
Verarbeitungshandbuch Installation Manual
!
  PAN [ griech.] pãs; pãn: all, ganz, völlig, gesamt, umfassend

PAN [ greek] pãs; pãn: all, whole, complete, total, encompassing

     DOMO [ lat.] domus, domu: Haus, Gebäude, Haushalt

    DOMO [ latin] domus, domu: house, building, household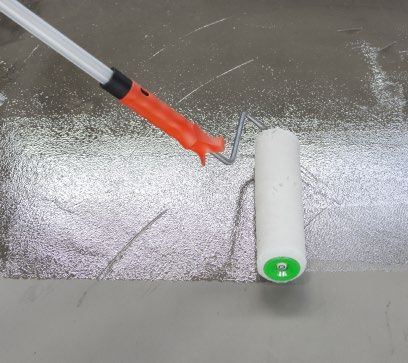
Inhaltsverzeichnis
1.0 Untergrund . . . . . . . . . . . . . . . . . . . . . . . . . . . . . . . . . . . . . . . . . . . . . . . . . . . . . . . . . . . . . . . . . . . . . . . . . . . . . . . . . . . . . . . . . . . 4
2.0 Arbeiten mit PANDOMO Floor / FloorPlus, Loft und Studio. . . . . . . . . . . . . . . . . . . . . . . . . . . . . . . . . . . . . . . . . . . . . . . . . . . . . . . . . . 8
3.0 Polieren der Oberflächen . . . . . . . . . . . . . . . . . . . . . . . . . . . . . . . . . . . . . . . . . . . . . . . . . . . . . . . . . . . . . . . . . . . . . . . . . . . . . . . . 12
4.0 PANDOMO Studio an der Wand. . . . . . . . . . . . . . . . . . . . . . . . . . . . . . . . . . . . . . . . . . . . . . . . . . . . . . . . . . . . . . . . . . . . . . . . . . . . 13
5.0 PANDOMO Studio Concrete Finish. . . . . . . . . . . . . . . . . . . . . . . . . . . . . . . . . . . . . . . . . . . . . . . . . . . . . . . . . . . . . . . . . . . . . . . . . . 14
6.0 Oberflächenbehandlung . . . . . . . . . . . . . . . . . . . . . . . . . . . . . . . . . . . . . . . . . . . . . . . . . . . . . . . . . . . . . . . . . . . . . . . . . . . . . . . . . 15
7.0 Versiegelung der Oberflächen. . . . . . . . . . . . . . . . . . . . . . . . . . . . . . . . . . . . . . . . . . . . . . . . . . . . . . . . . . . . . . . . . . . . . . . . . . . . . 16
9.0 Pflegeempfehlung . . . . . . . . . . . . . . . . . . . . . . . . . . . . . . . . . . . . . . . . . . . . . . . . . . . . . . . . . . . . . . . . . . . . . . . . . . . . . . . . . . . . . 18
10.0 Allgemeine Hinweise. . . . . . . . . . . . . . . . . . . . . . . . . . . . . . . . . . . . . . . . . . . . . . . . . . . . . . . . . . . . . . . . . . . . . . . . . . . . . . . . . . . 19

Table of contents
1.0 Subfloor . . . . . . . . . . . . . . . . . . . . . . . . . . . . . . . . . . . . . . . . . . . . . . . . . . . . . . . . . . . . . . . . . . . . . . . . . . . . . . . . . . . . . . . . . . . . . 4
2.0 Working with PANDOMO Floor / FloorPlus, Loft and Studio . . . . . . . . . . . . . . . . . . . . . . . . . . . . . . . . . . . . . . . . . . . . . . . . . . . . . . . . . 8
3.0 Polishing the surfaces . . . . . . . . . . . . . . . . . . . . . . . . . . . . . . . . . . . . . . . . . . . . . . . . . . . . . . . . . . . . . . . . . . . . . . . . . . . . . . . . . . 12
4.0 PANDOMO Studio on the wall . . . . . . . . . . . . . . . . . . . . . . . . . . . . . . . . . . . . . . . . . . . . . . . . . . . . . . . . . . . . . . . . . . . . . . . . . . . . . 13
5.0 PANDOMO Studio Concrete Finish. . . . . . . . . . . . . . . . . . . . . . . . . . . . . . . . . . . . . . . . . . . . . . . . . . . . . . . . . . . . . . . . . . . . . . . . . . 14
6.0 Surface treatment . . . . . . . . . . . . . . . . . . . . . . . . . . . . . . . . . . . . . . . . . . . . . . . . . . . . . . . . . . . . . . . . . . . . . . . . . . . . . . . . . . . . . 15
7.0 Sealing the surfaces. . . . . . . . . . . . . . . . . . . . . . . . . . . . . . . . . . . . . . . . . . . . . . . . . . . . . . . . . . . . . . . . . . . . . . . . . . . . . . . . . . . . 16
8.0 Maintenance of Surfaces . . . . . . . . . . . . . . . . . . . . . . . . . . . . . . . . . . . . . . . . . . . . . . . . . . . . . . . . . . . . . . . . . . . . . . . . . . . . . . . . 17
9.0 Recommendations for Care . . . . . . . . . . . . . . . . . . . . . . . . . . . . . . . . . . . . . . . . . . . . . . . . . . . . . . . . . . . . . . . . . . . . . . . . . . . . . . 18
10.0 General remarks . . . . . . . . . . . . . . . . . . . . . . . . . . . . . . . . . . . . . . . . . . . . . . . . . . . . . . . . . . . . . . . . . . . . . . . . . . . . . . . . . . . . . 19

                                                                                                                                                                                                    3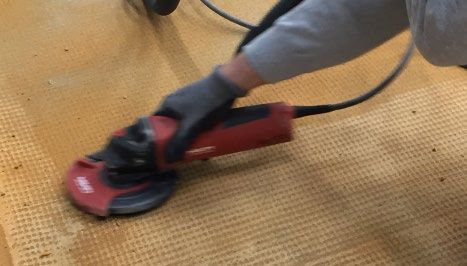
1.0 Untergrund
1.0 Subfloor
1.1 Voraussetzungen am Boden Zementestrich / Cement screed
Haftbrücke / Bonding course
1.1 Preconditions Betondecke / Concrete slab
Die PANDOMO Systeme sollten ausschließlich auf trockenen,
tragfähigen, zementgebundenen oder Calciumsulfatuntergründen im
Innenbereich angewendet werden. Sie müssen staub- und trennmittel-
frei sein. Betonsolen müssen kugel- / sandgestrahlt sein. PANDOMO
Systeme sind nicht geeignet für den Einsatz im Außen- und Dauer-
nassbereich, sowie auf elektrischen Fußbodenheizungen. Warmwas-
sergeführte Heizestrichkonstruktionen sind möglich. Bei schwimmen- Zementestrich / Cement screed
den Konstruktionen sind elastische Randfugen von mind. 8 mm Trennstreifen / Separator strip
einzubauen. Bitumenschweißbahn / Bituminous felt
Betondecke / Concrete slab
PANDOMO systems are intended to be used exclusively on dry,
load-bearing, cement-bonded or calcium sulphate subfloors and are
for indoor use only. They must be free of dust and release agents.
Concrete floors must be shot-peened or sand-blasted. PANDOMO
systems are not suitable for use in outdoor and permanently wet PANDOMO Floor / FloorPlus PANDOMO Loft
areas or on electric floor heating systems. Heating screed systems PANDOMO EP Primer
that use hot water are possible. In the case of floating screeds, elas- Trennstreifen / Separator strip
tic edge joints of at least 8 mm are necessary. Zementestrich / Cement screed
Fußbodenheizung / Underfloor heating
Zementestrich CT-C25-F4 Trittschalldämmung / Impact sound insulation
(Restfeuchte kleiner 2 / 1,8% Heizestrich) Wärmedämmung / Thermal insulation
Anhydritestrich CA-C30-F5
(Restfeuchte kleiner 0,5 / 0,3% Heizestrich) Betondecke / Concrete slab
Temperaturen sollten +15°C nicht unterschreiten
und +35°C nicht überschreiten
Cement screed CT-C25-F4 PANDOMO Floor / FloorPlus PANDOMO Loft
(residual moisture less than 2 / 1.8% heating screed).
Anhydrite screed CA-C30-F5
PANDOMO EP Primer
(residual moisture less than 0.5 / 0.3% heating screed). Trennstreifen / Separator strip
Temperatures should not be less than
+15ºC and not exceed +35ºC Zementestrich / Cement screed
Fußbodenheizung / Underfloor heating
Trittschalldämmung / Impact sound insulation
Betondecke / Concrete slab
1.2 Grundierung für PANDOMO Floor / FloorPlus
1.2 Primer for PANDOMO Floor / FloorPlus
Auf neuen Zementuntergründen wird PANDOMO PR mit einer Bürste,
einem Besen oder einer Rolle 1: 3, und im Anschluss 1:1 verdünnt
mit Wasser aufgetragen. Zwischentrocknungszeit mind. 2 Stunden.
When working on new cement substrates, apply PANDOMO PR with a
brush, broom or roller, first diluted in a ratio of 1:3 and then 1:1 with
water. Allow to dry for at least 2 hours between coats.
Materialbedarf PANDOMO PR
Für beide Aufträge ca. 200g/m2
Coverage PANDOMO PR
For both coats, approx. 200g/m²
4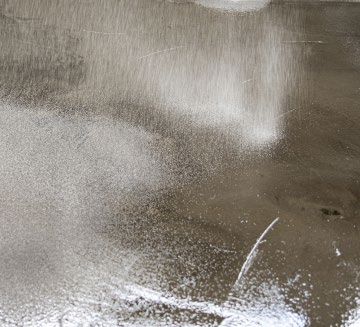
1.3 Grundieren und Verfestigen am Boden
1.3 Priming and reinforcing floors
Auf Altbestandestrichen, Calciumsulfatestrichen und Heizestrich
konstruktionen muss zur Haftverbesserung und Verfestigung der
Estrichoberfläche PANDOMO EP verwendet werden. Die Grundierung
wird im frischen Zustand mit ARDEX QS, PANDOMO HG oder PANDOMO
Broadcast Sand abgesandet. Es dürfen danach keine glänzenden
(feuchten) Stellen sichtbar sein.
To improve adhesion and to reinforce the surfaces of existing
screeds, calcium sulphate and heating screed systems, apply
PANDOMO EP. Sand the primer with ARDEX QS, PANDOMO HG or
PANDOMO Broadcast Sand while still wet. No shiny (moist) areas
should be visible afterwards.
Materialbedarf PANDOMO EP: ca. 200g/m²
ARDEX QS, PANDOMO HG oder
PANDOMO Broadcast Sand: ca. 2kg Sand/m²
Coverage PANDOMO EP: approx. 200 g/m²
ARDEX QS, PANDOMO HG or
PANDOMO Broadcast Sand: approx. 2 kg sand/m²
1.4 Grundierung P
ANDOMO Loft, Studio
1.4 Priming PANDOMO Loft, Studio
Zur Herstellung von PANDOMO Loft oder Studio Böden muss der ebe-
ne und tragfähige Untergrund mit PANDOMO EP grundiert und mit
PANDOMO HG oder PANDOMO Broadcast Sand abgesandet werden.
Im trockenen Zustand nach Entfernung des nicht gebundenen San-
des, kann die Fläche mit 80er Korn leicht geschliffen werden, um
Sandknötchen und Unebenheiten zu egalisieren. Den Sand dabei
nicht abschleifen.
When installing PANDOMO Loft or Studio floors, the level and stable
subfloor must be primed using PANDOMO EP and then sanded using
PANDOMO HG or PANDOMO Broadcast Sand. In dry condition after
removal of the unbound sand, the surface can be lightly sanded with
80 grain to level out sand nodules and unevenness. Do not remove
the sand through sanding.
Unebenheiten im Untergrund wie Estrichlunker
oder Fliesenfugen müssen vorher mit ARDEX FIX
Blitzspachtel geglättet werden.
Uneven areas of the subfloor, such as screed shrinkage cavities
or tile joints, must first be smoothed using ARDEX FIX
super-fast levelling compound.
5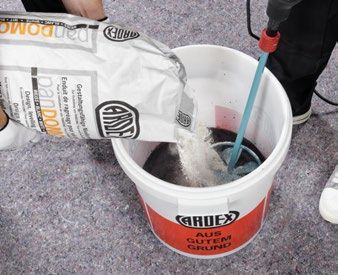
1.5 Untergrundvorbereitung
mit PANDOMO FAM
1.5 Preparing subfloor with PANDOMO FAM
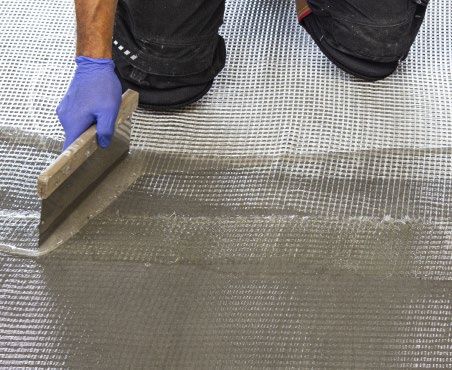
Für Arbeiten auf Hohlraumbodenkonstruktionen der Fa. LINDNER
(FLOOR and more® POWER und HYDRO) und zur allgemeinen Verbes-
serung der Untergrundbeschaffenheit kann der Untergrund mit dem
Glasgittergewebe PANDOMO FAM stabilisiert werden. Das Glasgitter
gewebe wird mit einer Überlappung von 5 cm, beginnend an der Aus-
gangstür, trocken auf dem glatten und ebenen Untergrund ausgelegt.
When working on cavity floor systems by the company LINDNER (FLOOR
and more® POWER and HYDRO) and to improve the quality of the subst-
rate in general, the subfloor can be stabilised using the fibreglass fabric
PANDOMO FAM. Lay the sheets of fibreglass fabric on the clean, level
and dry substrate, starting at the door, such that the sheets overlap by 5 cm
Die Verarbeitung der 50 x 1m großen Gewebebahnen muss sehr
vorsichtig erfolgen, da sie nicht verschiebefest sind. Schnitte
werden mit einem Elektrocutter durchgeführt.
Great care must be taken when placing the 50x1 metre sheets of fa-
bric, since these are liable to move about. The fabric can be cut using
an electric cutter.
1.6 V orbereitung für
PANDOMO Floor / FloorPlus
1.6 Preparing for
PANDOMO Floor / FloorPlus
PANDOMO EP wird in kleinen Mengen auf das lose Glasgittergewebe
gegossen, mit einem Feder- / Rapidspachtel eingespachtelt und
sofort mit Quarzsand (ARDEX QS) abgesandet.
Pour small quantities of PANDOMO EP on the loose fibreglass fabric,
trowel it into place with a spring blade / rapid spreader and immedia-
tely sand with quartz sand (ARDEX QS).
Kleine Unebenheiten im Untergrund müssen vorher mit ARDEX FIX oder
bei Ausgleichschichten über 5 mm mit PANDOMO K3 geglättet
werden. Materialbedarf PANDOMO EP: ca. 800g/m²
Uneven regions of the substrate should be smoothed beforehand
using ARDEX FIX or, if the levelling layer is more than 5 mm thick,
using PANDOMO K3. Coverage PANDOMO EP: approx. 800 g/m²
6
1.7 Vorbereitung für PANDOMO Loft, Studio
1.7 Preparing for PANDOMO Loft, Studio
Das Glasgittergewebe wird wie unter Punkt 1.6 beschrieben vorbereitet,
aber nicht mit Quarzsand abgestreut. Stattdessen wird die trockene
PANDOMO EP-Schicht mit einer Diamantfräse geglättet, anschließend
mit PANDOMO EP PATCH nachgespachtelt und unmittelbar mit PANDOMO
HG oder PANDOMO Broadcast Sand abgestreut.
Prepare the fibreglass fabric as described in Section 1.6 but do not
scatter quartz sand on it. Instead, smooth the dry PANDOMO EP
layer with a diamond grinding wheel before applying PANDOMO EP
PATCH with a trowel and sanding it immediately with PANDOMO HG
or PANDOMO Broadcast Sand.
Schleifkörnung der Diamantfräse: 25/ 30
Materialbedarf PANDOMO EP PATCH: ca. 500 – 600g/m²
Grit size of diamond grinding wheel: 25/30
Coverage PANDOMO EP PATCH: approx. 500– 600 g/m²
7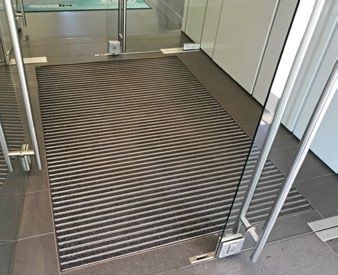
2.0 Arbeiten mit PANDOMO Floor / FloorPlus, Loft und Studio
2.0 Working with PANDOMO Floor / FloorPlus, Loft and Studio
2.1 Verarbeitungsvoraussetzungen
2.1 Conditions for processing
Die Bodentemperatur muss zwischen +15°C und +25°C liegen. Luft-
feuchtigkeitswerte über 65% verzögern die Durchtrocknung. Durch-
zug, besonders unter Türen, ist zu vermeiden. Immer für eine Zirkula-
tionsöffnung (Oberfenster, Kippstellung) der Raumluft sorgen. Wenn
keine Fremdbeheizung des Bauvorhabens möglich ist, sollte die
Warmwasserfußbodenheizung wärend des Einbaus des PANDOMO
Belages mit max. 15°C Oberflächentemperatur betrieben werden.
Raum nicht auskühlen lassen.
The Floor temperature must lie between +15°C and +25°C. Humidity
levels above 65 % will delay the drying process. Avoid draughts,
especially beneath doors. Always ensure there is an opening to allow
the air in the room to circulate (high-level window in tilted position).
If no external heating of the building project is possible, the hot water
underfloor heating should be operated at a maximum surface tempe-
rature of 15°C during the installation of the PANDOMO flooring.
Switch off heating screeds while levelling, but do not allow the room
to cool down.
Löcher und Spalten im Randbereich können mit ARDEX FIX geschlossen
werden. Fleckspachtelungen vor der Überarbeitung immer grundieren.
(PANDOMO PR 1:1 verdünnt mit Wasser)
Holes and cracks around the edges can be filled using ARDEX FIX.
Always prime filled patches before continuing to work on them.
(PANDOMO PR diluted 1:1 with water)
2.2 Einfärben des Anmischwassers
2.2 Dyeing the mixing water
Die PANDOMO-Systeme können uneingefärbt verarbeitet werden
oder sind nach entsprechender Rezeptur mit PANDOMO CC Farb
konzentraten einzufärben. Das in ausreichender Menge vorbereitete
Anrührwasser wird mit der entsprechenden Farbpigmentmenge ein-
gefärbt. Der Farbwasservorrat sollte vor Entnahme immer neu durch-
gemischt werden.
PANDOMO systems can be processed without dyeing, or else they
can be dyed using PANDOMO CC colour concentrates in the appro-
priate formulation. Dye a sufficient quantity of prepared mixing water
with the corresponding quantity of colour pigment. The stock of co-
loured water should be stirred up again each time some is removed.
Die max. Zugabemenge von PANDOMO CC
sollte 2% des Gesamtvolumens nicht überschreiten.
The maximum amount of PANDOMO CC added
should not exceed 2% of the overall volume.
8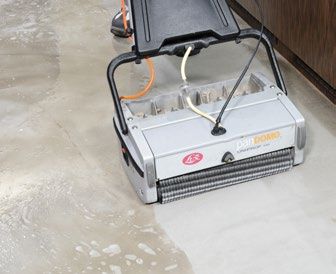
2.3 Anmischen der Spachtelmasse
2.3 Mixing the levelling compound
In ein sauberes, hohes Gefäß (mind. 50l Inhalt) wird kaltes Wasser
gegeben und mit einem leistungsstarken Rührwerk (mind. 650U/min)
mit geeignetem Rührer (z.B. Collomix DLX 152 HF) eingemischt. Wird
PANDOMO Floor/ FloorPlus auf einer Fußbodenheizung und auf gro-
ßen, zusammenhängenden Flächen eingebracht, ist das Material zu-
sätzlich mit A
RDEX E100 Wittener Baudispersion zu vergüten.
Pour cold water into a clean, tall container (holding at least 50 l), add
the powder and mix using a suitable agitator (e.g. Collomix DLX 152
HF) attached to high-performance stirrer (at least 650 rpm). If PAN-
DOMO Floor/FloorPlus is being installed over an underfloor heating
and on a large, continuous surface, the material should be further im-
proved by adding ARDEX E11 Wittener synthetic resin dispersion.
Anmischverhältnis: PANDOMO Floor / FloorPlus
5 – 5,25 l Wasser (0,5– 0,75 Liter Wasser plus 1 Liter ARDEX E100) für 25 kg Pulver.
Verarbeitungszeit: 30 min bei +20°C Lufttemp.
Wir empfehlen ein Rührwerk der Firma Collomix.
Mixing ratio: PANDOMO Floor / FloorPlus
5 to 5.25 l water (or 0,5 to 0,75 litres water, plus 1 litre ARDEX E100) for 25 kg powder.
Working life: 30 min at +20ºC air temperature.
We recommend using a stirrer made by the company Collomix.
2.4 V erarbeitung
PANDOMO Floor / FloorPlus
2.4 Applying
PANDOMO Floor / FloorPlus
Das Material wird sofort nach dem Anmischen in der gesamten Län-
ge der zu spachtelnden Bahn aus dem Anmischgefäß ausgegossen
und im Stehen mit Nagelschuhen und einem Stiftrakel auf die ge-
wünschte Schichtstärke gebracht. Die besten Verlaufseigenschaften
besitzt das Material bei 7mm. Mit einem Stielglätter und „fließenden“
Wellenbewegungen wird die Oberfläche in einer „natürlichen Optik“
geglättet. Spachtelansätze in der Fläche sind zu vermeiden. Immer
frisch in frisch arbeiten. Mit dem Glätter nicht in abgebundende,
matte Oberflächen hineinfahren. Begehbarkeit / Weiterbearbeitung
nach ca. 12 Std. Trocknung. Bei ungünstigen Trocknungsbedingun-
gen (kühle Raumluft, hohe Luftfeuchtigkeit) kann die Trocknungszeit
2 Tage betragen.
Immediately after mixing, pour the material out of the mixing vessel
Materialschichtstärke: min 5 mm, max. 10 mm. Schichtstärken über 10 mm nur im Zweischichtauftrag.
over the entire length of the area to be covered. Standing up, wearing Gesamtschichtstärke Ausgleichspachtel (K1oder K3) zzgl. PANDOMO K1 : 20 mm.
hobnailed boots, and using a long-handled scraper, adjust the thick- Ausgleichspachtelungen bis 15 mm mit Estrichsand (Körnung 1– 4mm) mischen, Mischungsverhältnis 1: 3
ness of the layer as required. The material achieves its best levelling Thickness of layer: min. 5 mm, max. 10 mm. To achieve thicknesses greater than 10 mm, apply two
properties at a thickness of 7 mm. With the aid of a long-handled coats. Total thickness of levelling compound (K1 or K3) plus PANDOMO K1: 20 mm. For thicknesses
up to 15 mm, mix levelling compounds with screed sand (grain size: 1– 4 mm). Mixing ratio: 1:3
smoother and using a “flowing” wavelike motion, smooth the surface
to achieve a “natural look”. Avoid trowelling edges on the flat surface.
Always work wet in wet. Do not use the smoother on cured, matt
surfaces. Can be walked on/finished after drying for approx.
12 hours. When drying conditions are unfavourable (cool air in room,
high atmospheric humidity), drying may take up to 2 days.
9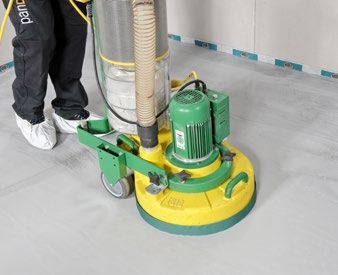
2.5 PANDOMO FloorPlus
2.5 PANDOMO FloorPlus
In die frische, geglättete Oberfläche kann zur Verbesserung der
Härte PANDOMO HG eingestreut werden. Dazu wird eine kleine Men-
ge des Sandes in die flache Hand genommen und mit einer verwir-
belnden Bewegung in die Luft geworfen, sodass sich der Sand
gleichmäßig auf der Spachtelfläche verteilt. Keinen Sandteppich
erzeugen, es sollten nur „feine Pickel“ bei Streiflicht in der Ober
fläche sichtbar sein.
PANDOMO HG can be scattered on the wet, smoothed surface in or-
der to improve its hardness. Take a small quantity of sand into the
flat of the hand and using a swirling motion toss it in the air, so that
the sand is distributed evenly over the levelled surface. Do not crea-
te a sand carpet. When viewed in grazing light, no more than “fine
spots” should be visible on the surface.
Materialbedarf PANDOMO HG: max. 50 – 80 g/m². Nicht zu viel Sand aufbringen. Nicht mehr in be-
reits abgesandete Bereiche mit dem Glätter hineinfahren. Für gute Lichtverhältnisse sorgen.
Coverage PANDOMO HG: max. 50–80 g/m². Do not apply too much sand. Do not use the smoother
on surfaces that have already been sanded. Ensure that lighting conditions are good.
2.6 PANDOMO Loft
2.6 PANDOMO Loft
Das Material wird zweischichtig im Kratzspachtelverfahren aufge-
bracht. Dazu wird die erste Schicht mit der Glättkelle und / oder
einem 40 cm Flächenspachtel scharf auf der PANDOMO HG –
Oberfläche abgezogen. Mit kurzen Spachtelbewegungen sollte ein
natürliches Muster erzeugt werden. Ansätze in der Fläche vermeiden.
Nach ca. 30 – 60 min (je nach Lufttemperatur) erfolgt in der noch
halbfeuchten Oberfläche ein zweiter Spachtelauftrag im gleichen
Farbton. Auch hier auf ein natürliches Spachtelmuster achten.
Weiterbearbeitung der Oberfläche erst nach mind. 12 Std. Trocknung.
Apply the material in two layers as a scratch coat. To do this, apply
the first layer sharply onto the PANDOMO HG surface using a smoot-
hing trowel and/or a 40 cm surfacing trowel. Use short trowelling
movements to create a natural pattern. Avoid edges in the surface.
After approx. 30-60 mins (depending on air temperature) apply a se-
cond coat of the same colour to the still semi-moist surface. Here
too, go for a natural trowelling pattern. The surface must only be fi-
nished after drying for at least 12 hours.
Material gesamt Schichtstärke: 2 – 3 mm Materialbedarf: Für die erste Schicht ca. 2kg, für die Zwei-
te ca. 1,5kg. (Bei Vorbereitung des Farbwassers berücksichtigen) Die Fläche nur mit weichen Schuh-
solen betreten. Spachteleimer nicht direkt auf die frische Erstspachtelung stellen.
Total thickness of layer: 2–3 mm. Coverage: Approx. 2 kg for the first, approx. 1.5 kg for the
second layer. (Remember this when preparing the water for dyeing.) Wear only shoes with soft
soles when walking on the surface. Do not place bucket directly on wet first coat.
102.7 PANDOMO Studio am Boden
2.7 PANDOMO Studio on the floor
Das Material wird dreischichtig aufgetragen.
Erste und zweite Spachtelschicht: Die Schichten werden im
Kratzspachtelverfahren aufgebracht. Dazu wird die erste Schicht mit
dem Federspachtel scharf auf der abgesandeten Oberfläche abgezo-
gen. Mit kurzen Spachtelbewegungen sollte ein natürliches Muster er-
zeugt werden. Ansätze in der Fläche vermeiden. Nach Trocknung der
ersten Schicht (ca. 1Std.) erfolgt ein zweiter Spachtelauftrag im glei-
chen Farbton. Auch hier auf ein natürliches Spachtelmuster achten.
Die ersten beiden Schichten werden mit PANDOMO HG angemischt
(12,5 kg Pulver mit 1.250 g HG Sand : 3,9 Ltr. Wasser).
Dritte Spachtelschicht: Die dritte Schicht wird ohne PANDOMO HG
Sand angemischt, aufgespachtelt, mit einem Pumpzerstäuber ange-
nebelt und mit dem Federspachtel verpresst.
The material is applied in three layers.
First and second levelling layer: The layers are applied using the
scratch filling method. For this purpose, the first layer is applied with
the spring spatula sharply on the sanded surface. A natural pattern
should be created with short spatula movements. Avoid any ridges in
the surface. After the first layer has dried (approx. 1h), a second
coat is applied with the same colour. Also here, ensure a natural tro-
wel pattern. The first two layers are mixed with PANDOMO HG
(12.5 kg powder with 1.250 g HG sand : 3.9 litres water).
Third layer: The third layer is mixed without PANDOMO HG sand, fil-
led, sprayed with a pump sprayer and pressed with a spring spatula.
Material gesamt Schichtstärke: 1,5 – 3 mm. Materialbedarf: bei drei Schichten ca. 1,3 kg – 1,5 kg.
Die ersten beiden Schichten werden mit PANDOMO HG Sand angemischt.
12,5 kg Pulver mit 1.250 g HG Sand : 3,9 Liter Wasser.
Total thickness of layer: 1.5–3 mm. Coverage: approx. 1.3 kg–1.5 kg for three layers.
The first two layers are mixed using PANDOMO HG Sand.
12.5 kg powder with 1.250 g HG Sand : 3.9 litres of water.
113.0 Polieren der Oberflächen
3.0 Polishing the surfaces
3.1 PANDOMO Floor
3.1 PANDOMO Floor
Die trockene Oberfläche wird mit einer Drei- oder Viertellerschleifma-
schine in drei Gängen poliert (z.B. mit TRIO von Lägler oder TRIVARO
von Janser). Der Randbereich wird ebenfalls in drei Gängen poliert.
Hierzu empfehlen wir die Verwendung eines Exzenterschleifers oder
eines Deltaschleifers (ROTEX von Festool) mit Schleifpapier für Holz-
oberflächen (Korund, Siliziumcarbit). Abschließend erfolgt ein
weiterer Poliergang mit weißen Pads um Staubpartikel zu entfernen.
Die Maschine nicht verkanten. Keine Beschädigungen erzeugen.
Achtung: eine Spachteloberfläche, die nicht absolut trocken ist kann
beim Schleifen beschädigt werden.
Polish the dry surface using a three- or four-disk grinding machine in
three passes (e.g. with TRIO by Lägler, or TRIVARO by Janser).
Border areas should also be polished in three passes. We recom-
mend using an orbital sander or a delta sander (ROTEX by Festool)
for this purpose, fitted with sandpaper for wood surfaces (corundum, Schleifpapierkörnung: Erster Schleifgang mit 80/100er Körnung,
zweiter Schleifgang mit 120er Körnung und dritter Schleifgang mit 150er Körnung.
silicon carbide). Follow this with a further polish, using white pads, in Weißes Schleifpad (Scotch Brite) 360er Korn, Schleifzeit alle Schleifgänge: ca. 5min pro m².
order to remove particles of dust. Do not tilt the sanding machine.
Grit size of sandpaper: First sanding pass with 80/100 grit,
Be careful not to cause any damage. Caution: If the levelled surface second sanding pass with 120 grit and third sanding pass with 150 grit.
is not absolutely dry, it may suffer damage when sanded. White sanding pad (Scotch Brite) 360 grit. Total grinding time: approx. 5 min per m².
3.2 P ANDOMO FloorPlus und Loft
3.2 PANDOMO FloorPlus and Loft
Diese Oberflächen werden nur einmal mit den Schleifmaschinen be-
handelt. Die Oberfläche muss sehr sorgfältig und intensiv bearbeitet
werden. Alle erkennbaren Kellenschläge und einzelne, matte Stellen
in der Oberfläche werden mit der ROTEX von Hand nachpoliert.
These surfaces are treated only once with sanding machines.
The surface needs to be finished very carefully and intensively.
Any noticeable trowel marks and individual matt areas on the surface
must be manually repolished using the ROTEX.
Schleifpapierkörnung: 80/100er Korn. Gewicht der
TRIO mit Zusatzgewicht erhöhen (min. 80 kg).
Grit size of sandpaper: 80/100 grit. Increase weight
of TRIO with extra weights (min 80 kg).
3.3 PANDOMO Studio
3.3 PANDOMO Studio
Die Oberfläche wird zweimal mit einer Dreitellermaschine poliert und
muss sehr sorgfältig und intensiv bearbeitet werden.
Der Randbereich wird mit einer Handschleifmaschine poliert.
Polish the surface twice with a three-disk sander, working very carefully
and intensively. Use a hand-held grinder to polish around the edges.
Schleifpapierkörnung: 80/100er Korn. Gewicht der
TRIO mit Zusatzgewicht erhöhen (min. 80 kg).
Grit size of sandpaper: 80/100 grit. Increase weight
12 of TRIO with extra weights (min 80 kg).4.0 PANDOMO Studio an der Wand 4.0 PANDOMO Studio on the wall 4.1 Grundieren mit ARDEX P4 4.1 Priming with ARDEX P4 Damit der Untergrund gleichmäßig saugend ist und gut haftet, wird die Öberfläche an der Wand deckend mit ARDEX P4 grundiert. To ensure that the substrate is uniformly absorbent and bonds well, prime the surface of the wall using ARDEX P4. 4.2 Erste Spachtelschicht 4.2 First layer Für die erste Schicht wird PANDOMO Studio mit 100 g PANDOMO HG Sand pro Kilogramm Pulver angemischt. Die Masse wird mit dem Fe- derspachtel dünnschichtig aufgetragen, es sollten keine Spachtelkan- ten stehenbleiben. For the first layer, mix PANDOMO Studio with 100 grams of PANDOMO HG Sand per kilogram of powder. Apply the material as a thin layer using a spring blade; no trowelling edges should remain. 4.3 Zweite Spachtelschicht 4.3 Applying second layer Die zweite Schicht (ohne HG Sand gemischt) wird wie die erste Schicht aufgetragen, mit dem Pumpzerstäuber angenebelt und mit einem Federspachtel verpresst. Apply the second layer (prepared without HG Sand) like the first, moisten using a pump dispenser and press against the surface with a spring blade. 4.4 Polieren 4.4 Polishing Nach ca. 8 Std. wird die getrocknete Oberfläche mit einem Exzenter- schleifer (z.B. ROTEX) in drei Gängen (80 er / 120 er / 180er Schleif papier) poliert. After approx. 8 h, polish the dry surface with an orbital sander (e.g. ROTEX) in three passes (80 / 120 / 180 grit sandpaper). 4.5 Imprägnieren 4.5 Impregnating Die polierte PANDOMO Studio Fläche kann mit einem Flächenstrei- cher oder Schwamm mit PANDOMO Impregnation einpflegt werden. PANDOMO Studio kann aber auch wie PANDOMO Wall mit PANDOMO SP-SL geölt werden. Die imprägnierten Flächen sollten mit einem fusselfreien Lappen nachgeputzt werden. PANDOMO Impregnation can be applied to the polished PANDOMO Studio surface using a wall brush or sponge. Alternatively, like PANDOMO Wall, PANDOMO Studio can also be oiled using PANDOMO SP-SL. Afterwards, wipe the impregnated surfaces with a lint-free cloth. 13
5.0 PANDOMO Studio Concrete Finish
5.0 PANDOMO Studio Concrete Finish
5.1 Studio Concrete Finish am Boden
5.1 Studio Concrete Finish on the Floor
Das Material wird dreischichtig aufgetragen.
Erste und zweite Spachtelschicht: Die Schichten werden im
Kratzspachtelverfahren aufgebracht. Für die ersten beiden Schichten
wird PANDOMO Studio mit PANDOMO HG Sand angemischt
(12,5 kg Pulver mit 1.250 g HG Sand : 3,9 Ltr. Wasser). Die erste
Schicht wird mit dem Federspachtel scharf auf der abgesandeten
Oberfläche abgezogen, die frische Schicht wird solange mit dem
Flügelglätter bearbeitet, bis keine Spachtelspuren mehr sichtbar
sind. Ansätze in der Fläche sind zu vermeiden. Nach Trocknung der
ersten Schicht (ca. 1 Std.) erfolgt der zweite Schichtauftrag im glei-
Material gesamt Schichtstärke: 1,5 – 3 mm.
chen Farbton wie oben beschrieben. Materialbedarf: bei drei Schichten ca. 1,3 kg – 1,5 kg.
Die ersten beiden Schichten werden mit PANDOMO HG angemischt.
Dritte Spachtelschicht: Die dritte Schicht wird ohne PANDOMO HG 12,5 kg Pulver mit 1.250 g HG Sand : 3,9 Liter Wasser.
Sand angemischt. Die Schicht wird aufgespachtelt und mit einem Total thickness of layer: 1.5–3 mm.
Pumpzerstäuber angenebelt. Danach wird diese mit dem Flügelglätter Coverage: approx. 1.3 kg–1.5 kg for three layers.
The first two layers are mixed using PANDOMO HG.
abgefahren, um eine gleichmäßig, wolkige Oberfläche zu erzeugen. 12.5 kg powder with 1.250 g HG Sand : 3.9 litres of water.
The material is applied in three layers.
First and second levelling layer: The layers are applied using the
scratch filling method. For the first two layers PANDOMO Studio is
mixed with PANDOMO HG sand (12.5 kg powder with 1.250 g HG
sand : 3.9 litres of water). The first layer is removed sharply on the
sanded surface with the spring spatula, the fresh layer is then ap-
plied with the Vane smoother worked until no more filler marks are
visible. Roots in the area are to be avoided. After the first coat has
dried (approx. 1h), the second coat is applied in the same shade as
described above.
Third levelling layer: The third layer is mixed without PANDOMO HG
sand. The layer is applied with a spatula and sprayed with a pump
sprayer. Afterwards it is run over with the trowel to create an even,
cloudy surface.
5.2 Studio Concrete Finish an der Wand
5.2 Studio Concrete Finish on the Wall
Das Material wird zweischichtig aufgetragen.
Erste Spachtelschicht: Für die erste Schicht wird PANDOMO Studio
mit P
ANDOMO HG Sand angemischt (12,5 kg Pulver mit 1.250 g HG
Sand : 3,9 Ltr. Wasser). Die Masse wird mit dem Federspachtel dünn-
schichtig aufgetragen, die frische Oberfläche wird mit dem Handflü-
gelglätter bearbeitet.
Zweite Spachtelschicht: Die zweite Schicht wird ohne PANDOMO
HG Sand aufgetragen und mit dem Pumpzerstäuber angenebelt.
Die angenebelte Fläche wird mit dem Handflügelglätter nachbehandelt,
um eine gleichmäßig, wolkige Oberfläche zu erzeugen.
The material is applied in two layers.
First layer: For the first layer, PANDOMO Studio is mixed with PAN-
DOMO HG sand (12.5 kg powder with 1.250 g HG sand : 3.9 litres of
water). The compound is applied in thin layers with a spring spatula,
the fresh surface is smoothed with a hand trowel.
Second levelling layer: The second layer is applied without PANDOMO
HG sand and sprayed with a pump sprayer. The fogged surface is
then treated with the handheld trowel to create an even, cloudy surface.
146.0 Oberflächenbehandlung
6.0 Surface treatment
6.1 Auftragen der Oberflächenbehandlung
6.1 Applying the surface treatment
Bevor PANDOMO SP-SL oder wahlweise PANDOMO Impregnation
aufgebracht wird, müssen alle Oberflächen durch den Polierprozess
einen gleichmäßig seidenglänzenden Charakter haben. Staubpartikel
auf der Fläche durch absaugen entfernen. PANDOMO SP-SL bzw.
PANDOMO Impregnation sind gebrauchsfertig, sollten aber vor dem
Öffnen gut geschüttelt werden. Der Auftrag erfolgt dünnschichtig mit
einem Lammfellwischer (Wischwiesel) in kreisenden Wischbewegun-
gen bis zur gleichmäßigen Benetzung der Oberfläche. Immer aus einer
Wanne heraus arbeiten. PANDOMO SP-SL bzw. Impregnation nicht
direkt auf die Fläche schütten.
Before applying PANDOMO SP-SL or alternatively PANDOMO
Impregnation, all surfaces must have a uniformly satin sheen from
the polishing process. Remove any dust from the surface by
vacuuming. PANDOMO SP-SL and PANDOMO Impregnation are ready
to use, but must be shaken well before the container is opened.
Apply as a thin coat using a lambskin wiper (squeegee-type) in
circular wiping movements until the surface is uniformly wetted.
Always work from a tray. Do not pour PANDOMO SP-SL or
Impregnation directly onto the surface.
Materialbedarf: ca. 50g bis 75g pro Auftrag. Helle Flächen mind. einmal behandeln, dunkle Flächen
zwei- bis dreimal behandeln. Trocknungszeit: 12Std. bei +20°C Raumtemperatur. Alle Aufträge sind
am selben Tag durchzuführen. Am Folgetag sollte kein weiterer Impregnation Auftrag erfolgen.
Nicht zu behandelnde Oberflächen sind durch abkleben / abdecken zu schützen.
Coverage: approx. 50 to 75 g per coat. Treat light surfaces at least once, dark surfaces two or
three times. Drying time: 12 hours at +20 °C room temperature. Apply all coats on the same day.
No further impregnation should be applied the following day. Mask / cover surfaces that are not
going to be treated so as to protect them.
6.2 Nachpadden
6.2 Padding
Nach ca. 10 min (je nach Raumtemperatur und Trockenheit der
Spachtelfläche) sollte die noch halbfrische PANDOMO SP-SL / Im-
pregnation Oberfläche gepaddet werden. Unter Verwendung einer
Eintellermaschine (Columbus) und einem weißen (beigen) Pad (Rand-
bereiche weißes Handpad) wird die Fläche bis zur seidenmatten Optik
behandelt. Glänzende Rückstände sowie Ölspritzer und Maschinen-
spuren m üssen vermieden werden.
After approx. 10 min (depending on room temperature and how dry
the smoothed surface is) the semi-wet PANDOMO SP-SL/impregna-
ted surface should be treated with a pad. Using a single disc sanding
machine (Columbus) and a white (beige) pad (use white hand pad for Zwei Arbeitsgänge mind. erforderlich: Erster Gang zum Einmassieren des Öls / Impregnation,
borders), treat the surface until it has a satin-matt finish. Avoid shiny ein zweiter Gang mit einem frischen Pad zum trockenpadden der Oberfläche.
Ebenfalls geeignet: Selbstgeschnittene runde Velour-Teppichpads.
residues, splashes of oil and marks made by the machine.
At least two passes are needed: During the first pass, the oil/impregnation is worked
into the surface; during the second, a fresh pad is used to dab the surface dry.
Also suitable: round pads of velour carpet cut to size.
157.0 Versiegelung der Oberflächen
7.0 Sealing the surfaces
7.1 Verarbeitung PANDOMO SP-PS
7.1 Applying PANDOMO SP-PS
Helle, ungefärbte PANDOMO Böden (K1 / K2) können direkt mit
PANDOMO SP-PS versiegelt werden. Hierbei sind mind. zwei Aufträge
erforderlich. Die PANDOMO Oberfläche kann frühestens am Folgetag
(mind. nach 12 Std.) versiegelt werden, muss aber absolut trocken
erscheinen. Auf geölten oder imprägnierten PANDOMO Böden
kann ebenfalls PANDOMO SP-PS eingesetzt werden. Hierzu ist die
Verarbeitungsempfehlung wie unter Punkt 5.1 und 5.2 zu beachten.
Auf geölten / imprägnierten Flächen wird mind. ein zweifacher Auf-
trag PANDOMO SP-PS empfohlen. Als Grundierung für PANDOMO
SP-PS wird PANDOMO PR (1:1 verd. mit Wasser) empfohlen, dass mit
einer Mikrofaserwalze im Kreuzgang aufgetragen wird. Schaumbil-
dungen und Tropfen sind zu vermeiden. Nach 1–2 Std. Trocknungs-
zeit kann dann der Auftrag mit PANDOMO SP- PS erfolgen. Eine Grun- Verarbeitungszeit: ca. 45 min.. Materialbedarf: pro Auftrag ca. 80 g. Trocknungszeit zwischen den
Schichten: min. 2 Std.. Begehbar nach 24 Std.. Voll belastbar nach 7 Tagen.
dierung mit Pandomo PR (1:1 mit Wasser verdünnt) darf nur auf nicht
mit Pandomo SP-SL oder Pandomo Impregnation behandelten Ober- Working life: approx. 45 min. Coverage per coat: approx. 80 g. Drying time between coats:
at least 2 hours. Walkable after 24 hours. Full load-bearing capacity after 7 days.
flächen erfolgen.
Light, untinted PANDOMO floors (K1 / K2) can be sealed immediately
using PANDOMO SP-PS. At least two coats need to be applied.
The PANDOMO surface should not be sealed until the next day
(at least 12 hours), but must appear absolutely dry. PANDOMO SP-PS
can also be applied to oiled or impregnated PANDOMO floors.
In such cases, please take notice of the recommendations in
Sections 5.1 and 5.2. When applying PANDOMO SP-PS to
oiled / impregnated floors, at least two coats are recommended.
As a primer for PANDOMO SP-PS, we recommend PANDOMO PR (1:2
diluted with water), which is applied with a microfibre roller in a cross-
coat. Foaming and dripping should be avoided. After 1–2 hours dry-
ing time the application with PANDOMO SP-PS can be done.
Priming with PANDOMO PR (1:1 with water) may only be applied to
surfaces not treated with PANDOMO SP-SL or PANDOMO Impregnati-
on.
168.0 Einpflege der Oberflächen
8.0 Maintenance of Surfaces
8.1 PANDOMO SP-F Porenfüller
8.1 PANDOMO SP-F Pore Filler
Nur mit PANDOMO SP-SL / Impregnation behandelte PANDOMO-
Böden werden frühestens nach 12 Std. Trocknungszeit (jeweils nach
dem letzten Auftrag) mit PANDOMO SP-F behandelt. Der Auftrag
erfolgt im Wischverfahren, ansatzfrei mit einem Wischmopp / Lamm
fellwischer. Mit PANDOMO SP-PS behandelte Flächen benötigen keinen
Porenfüller.
PANDOMO floors that have only been treated with PANDOMO SP-SL /
Impregnation should be treated with PANDOMO SP-F after drying for
no less than 12 hours (since the last coat). Apply the coat seamless-
ly using a mop / lambskin wiper. Surfaces that have been treated
with PANDOMO SP-PS do not require a pore filler.
Materialbedarf: ca. 50g. Verarbeitungstemperatur mind. +15°C Boden / Luft.
Trocknungszeit:ca. 2 Std.. Oberfläche muss im Anschluss mit PANDOMO SP-GS / SP-MS schluss
behandelt werden.
Coverage: approx. 50 g. Processing temperature, at least +15°C ground / air.
Drying time: approx. 2 hours. Afterwards, surfaces must be finished with PANDOMO SP-GS/ SP-MS.
8.2 P ANDOMO SP-GS / SP-MS
Dispersionseinpflege
8.2 PANDOMO SP-GS / SP-MS
Dispersion treatment
Mindestens 12 Stunden nach dem Auftrag von PANDOMO SP-PS
(oder 2 Std. nach Auftrag von PANDOMO SP-F bei geölten/impreg-
nierten Böden) sollte die Oberfläche mit PANDOMO SP-GS / SP-MS
behandelt werden. Der Auftrag erfolgt unverdünnt im Zweischichtver-
fahren mit einem Lammfellwischer oder Wischmop. Immer nur zu-
sammenhängende Flächen frisch in frisch einpflegen. Das Material
nur auf gut vorbehandelten, nicht mehr saugenden Flächen anwen-
den.
PANDOMO SP-GS / SP-MS should be applied to surfaces treated with
PANDOMO SP-PS at least 12 hours after the last coat (or 2 hours af-
ter applying PANDOMO SP-F in the case of oiled/impregnated floors).
Apply undiluted using the two-coat method with a lambskin wiper or
Materialbedarf: ca. 50g. Verarbeitungstemperatur: mind. +15°C Boden / Luft.
mop. Always treat interconnected surfaces wet-in-wet. Only use the Trocknungszeit: mind. 1Stunde. Begehbarkeit der Fläche: nach ca. 6 Stunden.
material on well-pretreated surfaces that are no longer absorbent.
Coverage: approx. 50 g. Processing temperature, at least +15°C ground / air.
Drying time: at least 1 hour. Surfaces walkable after approx. 6 hours.
179.0 Pflegeempfehlung
9.0 Recommendations for Care
9.1 Unterhaltsreinigung
9.1 Maintenance cleaning
Zur Unterhaltsreinigung wird PANDOMO SP-CR verwendet. Den Boden
immer nur mit einem Lammfell-Wischmop nebelfeucht wischen und
nicht mit zu viel Wasser überschwemmen. Verschmutzungen mit
feuchtem Film anlösen und mit leichten Wischbewegungen entfernen.
Keine aggressiven Reinigungsmittel wie scharfe Laugen, Alkohol oder
Chlorreiniger verwenden. Keine schleifenden Wischbezüge wie Mikro-
faser dauerhaft einsetzen. Für Objektreinigungen wird die Verwen-
dung des LUX Reinigungsautomaten empfohlen.
Use PANDOMO SP-CR for maintenance cleaning. Only ever wipe the
floor with a lambskin wiper mop, which should be slightly damp; do
not “flood” it with too much water. Loosen dirt with a wet film and
remove with a gentle wiping motion. Avoid using aggressive cleaning
agents, such as caustic lye, alcohol or chlorine-based cleaners.
Do not use abrasive wiper covers, such as microfibre. When cleaning
commercial buildings, we recommend using a LUX floor cleaner.
Mischungsverhältnis: ca.50g (zwei Verschlusskappen) auf 8 l Wasser.
Mit Wischlösung Verschmutzungen aufnehmen und mit sauberer Wischlösung nachbehandeln und
trocknen lassen. Den Wischbezug vorher gut auswringen. Den trockenen Boden gegebenfalls mit
einem trockenen Mop nachpolieren.
Mixing ratio: approx. 50 g (two capfuls) to 8 l of water.
Pick up dirt with cleaning solution, re-apply clean solution and leave to dry. Be sure to wring out
wiper cover thoroughly beforehand. If necessary, polish the dry floor using a dry mop.
9.2.Grundreinigung
9.2 Basic cleaning
Wenn der Boden nach einiger Zeit starke Gebrauchsspuren wie matte
Stellen, feine Kratzer oder starke Verschmutzungen aufweist, sollte
eine Grundreinigung durchgeführt werden. Dazu kann die Fläche mit
einer Eintellermaschine unter Verwendung eines roten und / oder
grünen Pads gereinigt werden. Fläche mit PANDOMO BC benetzen,
ca. 5min einwirken lassen und dann mit der Reinigung beginnen.
Schmutzflotte möglichst schnell aufnehmen / absaugen. Mit der
Maschine nicht zu lange auf einer Stelle verbleiben. Nach Reinigung
der Fläche mit klarem Wasser nachwaschen und ausreichend trock-
nen lassen. Abschließend Neueinpflege mit PANDOMO SP-F und
SP -GS. Siehe auch Punkt 8.2
After a while, when the floor begins to show pronounced signs of
use, such as dull areas, fine scratches or heavy soiling, it is time to
carry out a basic clean. For this purpose, the surface can be cleaned
with a single-disc machine, using a red and/or green pad. Moisten Mischungsverhältnis PANDOMO BC: 1:5 bis 1: 10 (je nach Verschmutzungsgrad). Unter Umständen
surface with PANDOMO BC, leave to soak for approx. 5 min. and muss die trockene, raue Oberfläche mit 120er Korn nachpoliert und mit PANDOMO SP-SL behandelt
werden. Am Folgetag erfolgt dann wieder die Ersteinpflege mit PANDOMO SP- MS oder SP-GS.
then begin cleaning. Mop up/hoover up dissolved dirt as soon as
possible. Do not leave machine in the same place for too long. After Mixing ratio for PANDOMO BC: 1:5 to 1:10 (depending on degree of soiling). In some circumstances,
the dry, rough surface will have to be repolished using 120 grit paper and treated with PANDOMO SP-SL.
cleaning the surface, wash it again with clean water and allow to dry. On the following day, the initial maintenance treatment using PANDOMO SP-MS or SP-GS can be car-
Afterwards, treat again with PANDOMO SP-F and SP-GS. See also, ried out again.
Section 8.2
1810.0 Allgemeine Hinweise
10.0 General remarks
10.1 Belastung
10.1 Loads
Der Boden sollte erst nach 5–7 Tagen voll belastet werden. Grund-
sätzlich keine Flüssigkeiten wie Kaffee oder Wasser langfristig einwir-
ken lassen.
Wait 5–7 days before subjecting the floor to full loads. In principle,
do not leave liquids such as coffee or water standing on the surface
for long.
10.2 Sauberlaufzone
10.2 Clean-off zone
Im Eingangsbereich muss die Fläche mit einer ausreichend großen
Sauberlaufzone (Kokos- oder Sisalmatte etc.) ausgestattet werden.
The surface must have a sufficiently large clean-off zone (coconut or
sisal matting, etc.) in the vicinity of the entrance.
10.3 Baustellenschutz
10.3 Site protection
Die frisch eingebauten PANDOMO-Böden müssen mit dampf
diffusionsoffenen Abdeckmaterialien (Malerfilz, Filzpappe) geschützt
werden.
Newly laid PANDOMO floors must be protected with
vapour-permeable covering materials (painter’s felt, felt board).
19ARDEX Baustoff GmbH Hürmer Straße 40 3382 Loosdorf Tel.: +43 (0)2754 7021-0 pandomo@ardex.at www.pandomo.at Die in diesem Katalog wiedergegebenen Abbildungen sind urheberrechtlich geschützt. Jede unbefugte Nutzung ist unzulässig und kann Unterlassungs- und Schadensersatzansprüche nach sich ziehen. Wir übernehmen die Gewähr für die einwandfreie Qualität unserer Erzeugnisse. Unsere Verarbeitungsempfehlungen beruhen auf Versuchen und praktischen Erfahrungen; diese können jedoch nur allgemeine Hinweise ohne Eigenschaftszusicherung sein, da wir keinen Einfluss auf die Baustellenbedingungen und die Ausführung der Arbeiten haben. Länderspezifische Regelungen, die auf regionalen Standards, Bauvorschriften, Verarbeitungs- oder Industrierichtlinien beruhen, können zu spezifischen Verarbeitungsempfehlungen führen.
Sie können auch lesen


