4x4 HDMI 10.2G Matrix Switch - Deutsch Français Italiano - lindy.com - LINDY User Manual
←
→
Transkription von Seiteninhalten
Wenn Ihr Browser die Seite nicht korrekt rendert, bitte, lesen Sie den Inhalt der Seite unten

4x4 HDMI 10.2G Matrix Switch
User Manual                                                  Eng li sh
Benutzerhandbuch                                             Deutsch
Manuel Utilisateur                                           Français
Manuale                                                      Italiano

                           No. 38152

                        lindy.com

             © LINDY Group - SECOND EDITION (January 2021)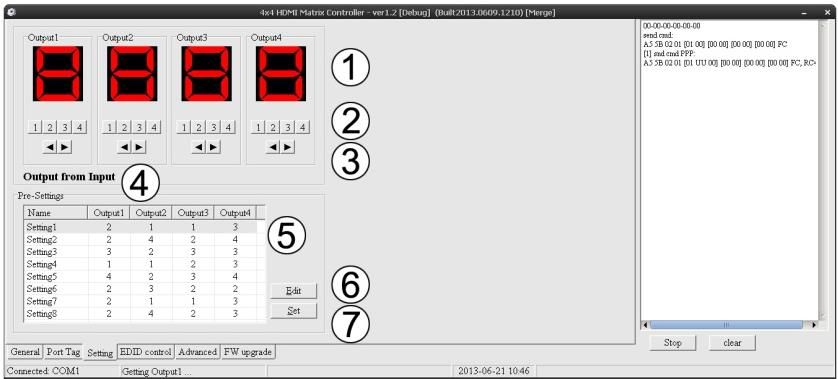
User Manual English
Introduction
Thank you for purchasing the LINDY 4K HDMI 4x4 Matrix with remote control. This high performance
HDMI Matrix allows any of the attached four sources to be show on any of the four displays simultaneously.
An Infra-red remote control is supplied to make switching between sources and displays easier.
Package Contents
▪ HDMI 4x4 4K Matrix
▪ 12V 2.5A DC Multi Country PSU
▪ IR Remote control
▪ 9 Way serial cable
▪ Mounting brackets and screws
▪ This manual
Features
▪ Supports display resolutions up to Ultra HD 4K 3840x2160 30Hz including 1080p 3D
▪ 3D HDMI 1.4a video format support
▪ 3D video support including Frame Packing for all 3D formats up to a 297MHz TMDS clock
▪ Supports deep colour up to 48-bit per pixel
▪ HDCP 1.4 support (INPUT), HDCP v1.4a protocol compliant (OUTPUT)
▪ Supports the reception of any audio data conforming to the HDMI specification 1.4 such as L-PCM at
up to 192kHz,compressed audio (IEC 61937), DSD, DST, DTS and HBR
▪ Full colorimetric including sYCC601, Adobe RGB, Adobe YCC601,xvYCC extended gamut colour
▪ Operates for TMDS clock frequencies up to 300MHz
Specification
▪ Frequency Bandwidth: 2.97Gbps
▪ Input Ports: 4 x HDMI Female input ports
▪ Output Ports: 4 x HDMI Female output ports
▪ Power Supply: DC 12V 2A
▪ ESD Protection Human Body Model: ± 8kV (air-gap discharge) ± 4kV (contact discharge)
▪ Dimensions: 267x120x32mm (WxDxH)
▪ Weight: 839g
▪ Operating Temperature: 0°C ~ 40°C / 32°F ~ 104°F
▪ Storage Temperature: -20°C ~ 60°C / -4°F ~ 140°F
▪ Relative Humidity: 20 ~ 90% RH (Non-condensing)
▪ Power Consumption: 20W Max
Operation
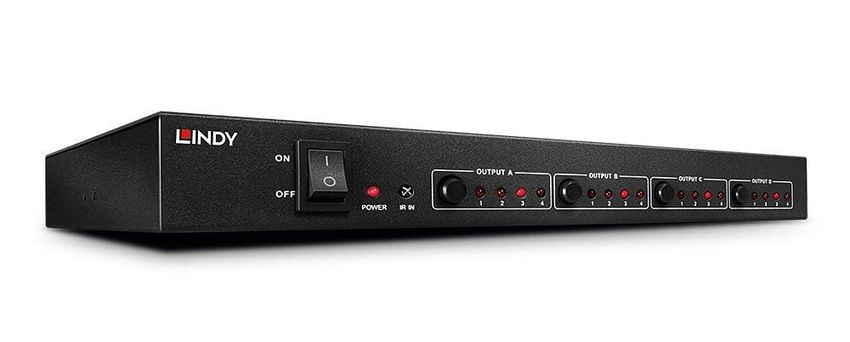
Front Panel:
1. ON/OFF: Power on/off switch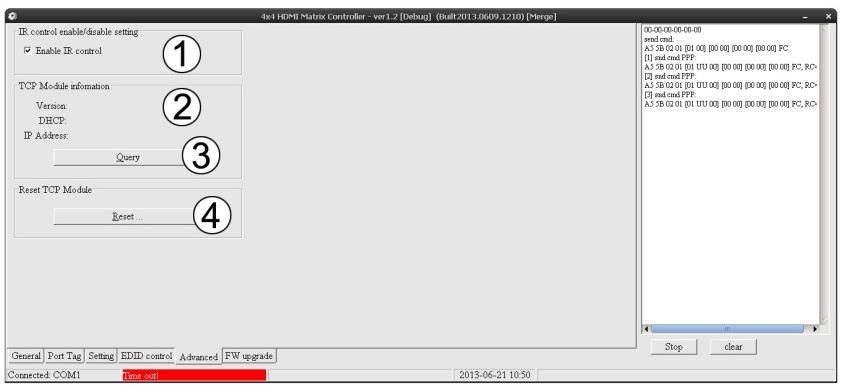
User Manual                                                                                    English
2. POWER: This red LED illuminates when the device is connected with power supply
3. IR IN: Remote control signal receive
4. OUTPUT A: Press this button to select the input source to HDMI OUTPUT A, and the red LED will
   illuminate when selecting corresponding input
5. OUTPUT B: Press this button to select the input source to HDMI OUTPUT B, and the red LED will
   illuminate when selecting corresponding input
6. OUTPUT C: Press this button to select the input source to HDMI OUTPUT C, and the red LED will
   illuminate when selecting corresponding input
7. OUTPUT D: Press this button to select the input source to HDMI OUTPUT D, and the red LED will
   illuminate when selecting corresponding input

Rear Panel:

1.   INPUT PORTS: The LED’s will illuminate when a HDMI signal is detected
2.   OUTPUT PORTS: The LED’s will illuminate when the TV signal is detected
3.   RS232: This port can control the matrix via a PC
4.   DC 12V: Plug the 12V DC power supply into the unit and connect the adapter to AC wall outlet

Remote control:

OUT A: Press any of the four buttons to select a source signal

OUT B: Press any of the four buttons to select a source signal

OUT C: Press any of the four buttons to select a source signal

OUT D: Press any of the four buttons to select a source signal

Software Control:

General page

1.   Control mode select: Only COM control mode is supported with this model
2.   Select RS232 COM port
3.   Click to connect or disconnect PC and Matrix
4.   Click to refresh device status
5.   To enable or disable Input/Output tags displayed when setting buttons on “Setting” page
6.   Click to select tab
7.   Status bar:
          RS232 COM port connection
          Communication status
          Prompt of operation messages
          Time and Date
8.   Device information display area
User Manual                                                                               English

Port Tag Page:

1.   Input port tags
2.   Click to edit Input port tags
3.   Output port tags
4.   Click to edit Output port tags

Edit Input port tags:

To edit the INPUT port tags, click edit and then add your own name in the area provided
User Manual                                                                                      English
Edit Output port tags:

To edit the OUTPUT port tags, click edit and then add your own name in the area provided

Setting page:

1.   Display’s the Input number for respective Output
2.   Click to select Input port for respective Output port
3.   Click to select previous or next Input port for respective Output port
4.   Display Input to Output with tag information when mouse moves over the buttons referred to in 2
5.   Pre-Setting items
6.   Click to edit selected pre-setting item
7.   Set selected pre-setting item to Matrix

EDID Control page:

1.   Set EDID mode for selected Input port or All Input ports, click “Set” button to complete action. “Auto
     EDID mode” can only be set for “All Inputs”
2.   Copy EDID from Output port to selected Input port or All Input ports, click “Copy” button to complete
     action
3.   Read EDID content from Output port and display in grid, click “Read” button to complete action
4.   Save EDID content which displayed in grid to binary file (file extension is “.bin”)
5.   Open EDID binary file and display in grid
6.   Download EDID content which displayed in grid to selected Input port or All Input ports, click
     “Download” button to complete action
7.   EDID content displaying grid
8.   Click to clear EDID content displayed in grid
User Manual English Advanced Page: 1. Enable and disable IR control 2. 3. & 4. TCP Mode is not supported FW upgrade Page: Firmware upgrade is not supported on this model EDID Dipswitch: Adjust the dipswitches on the side of the matrix to force the required setting:
User Manual                           English
(0 is down, 1 is up)

0000        Auto mode (default)
0001        1080i, Stereo Audio 2.0
0010        1080i, Dolby/DTS 5.1
0011        1080i, HD Audio 7.1
0100        1080p, Stereo Audio 2.0
0101        1080p, Dolby/DTS5.1
0110        1080p, HD Audio 7.1
0111        3D, Stereo Audio 2.0
1000        3D, Dolby/DTS5.1
1001        3D, HD Audio 7.1
1010        4Kx2K, Stereo Audio 2.0
1011        4Kx2K, Dolby/DTS5.1
1100        4Kx2K, HD Audio 7.1
1101        1024x768 DVI
1110        1920x1080 DVI
1111        PC Control
Benutzerhandbuch                                                                           Deutsch
Einführung

Vielen Dank für den Kauf der LINDY 4K HDMI 4x4 Matrix mit Fernbedienung. Diese hoch perfomante
HDMI Matrix ermöglicht es Ihnen sich jede der 4 angeschlossenen Quellen gleichzeitig auf jedem der vier
angeschlossenen Bildschirme anzeigen zu lassen.

Lieferumfang

▪   HDMI 4x4 4K Matrix
▪   12V 2A DC Netzteil inklusive Stecker-Adapter für Euro, UK, USA, AUS/CN
▪   Fernbedienung
▪   Montagewinkel und Schrauben
▪   Serielles D9 Kabel
▪   Dieses Handbuch

Eigenschaften

▪   Unterstützt Bildschirmauflösungen bis zu 4Kx2K@30Hz, 1080P@120Hz und 1080 3D@60Hz
▪   Unterstützt das 3D HDMI 1.4a Videoformat
▪   3D Videounterstützung inklusive Frame Packing für alle 3D Formate bis zu 297MHz TMDS clock
▪   Unterstützt Deep Colour bis zu 48-Bit pro Pixel
▪   Unterstützt HDCP 1.4 (Eingang) sowie das HDCP v1.4a Protokoll (Ausgang)
▪   Unterstützt den Empfang aller Audiodaten die HDMI 1.4 konform sind wie z.B. L-PCM bis zu 192kHz,
    komprimierte Audiodaten (IEC 61937), DSD, DST, DTS und HBR
▪   Volles Farbspektrum inklusive sYCC601, Adobe RGB, Adobe YCC601,xvYCC erweiterte Gammut
    Farbe
▪   Arbeitet mit TDMS clock Frequenzen bis zu 300MHz
▪   Unterstützt Fernbedienung über den RS232 COM-Port

Spezifikationen

▪   Frequenzbandbreite: 2.97Gbps
▪   Eingangsports: 4 x HDMI Eingangsbuchsen
▪   Ausgangsports: 4 x HDMI Ausgangsbuchsen
▪   Stromversorgung: DC 12V 2A
▪   Gesichert gegen elektrostatische Entladung: ± 8kV (Funkenentladung) ± 4kV (Kontaktentladung)
▪   Abmessungen: 267x120x32mm
▪   Gewicht: ca. 839g
▪   Betriebstemperatur: 0°C ~ 40°C
▪   Lagertemperatur: -20°C ~ 60°C
▪   Relative Luftfeuchtigkeit: 20 ~ 90% RH (Nicht kondensierend)
▪   Leistungsaufnahme bis max. ca. 20 W
Benutzerhandbuch Deutsch
Betrieb
Vorderansicht:
1. EIN/AUS: Strom EIN/AUS-Schalter
2. EIN/AUS: Strom EIN/AUS-Schalter
3. POWER: Diese rote LED leuchtet wenn das Gerät mit der Stromversorgung verbunden ist
4. IR IN: Diese LED leuchtet wenn von der Fernbedienung Signale empfangen werden
5. OUTPUT A: Betätigen Sie diesen Schalter um die Eingangsquelle für den HDMI OUTPUT A zu
wählen. Die rote LED leuchtet wenn Sie die entsprechende Quelle gewählt haben.
6. OUTPUT B: Betätigen Sie diesen Schalter um die Eingangsquelle für den HDMI OUTPUT B zu
wählen. Die rote LED leuchtet wenn Sie die entsprechende Quelle gewählt haben.
7. OUTPUT C: Betätigen Sie diesen Schalter um die Eingangsquelle für den HDMI OUTPUT C zu
wählen. Die rote LED leuchtet wenn Sie die entsprechende Quelle gewählt haben.
8. OUTPUT D: Betätigen Sie diesen Schalter um die Eingangsquelle für den HDMI OUTPUT D zu
wählen. Die rote LED leuchtet wenn Sie die entsprechende Quelle gewählt haben.
Rückansicht:
1. Eingangsports: Die LED leuchtet wenn ein HDMI Signal erkannt wird
2. Ausgangsports: Die LED leuchtet wenn ein TV Signal erkannt wird
3. RS232: Über diesen Anschluss können Sie die Matrix via PC steuern
4. DC 12V: Schließen Sie das 12V DC Netzteil an das Gerät an und verbinden Sie den Adapter mit
einer AC-Steckdose
Fernbedienung:
OUT A: Drücken Sie eine der vier Tasten um ein Quellsignal zu wählen
OUT B: Drücken Sie eine der vier Tasten um ein Quellsignal zu wählen
OUT C: Drücken Sie eine der vier Tasten um ein Quellsignal zu wählen
OUT D: Drücken Sie eine der vier Tasten um ein Quellsignal zu wählenBenutzerhandbuch Deutsch
Software für die Fernbedienung via COM-Port:
Allgemeine Hauptseite - General
1. Wählen Sie den Kontrollmodus – Dieses Model unterstützt ausschließlich den COM-Port
2. Wählen Sie hier den RS232 COM Anschluss an ihrem Rechner
3. Klicken Sie hier um den PC mit der Matrix zu verbinden oder zu trennen
4. Klicken Sie hier um den Status zu erneuern
5. Hiermit aktivieren oder deaktivieren sie die Eingangs/Ausgangs Tags (Portnamen), welche
angezeigt werden wenn Sie die Schaltflächen auf der Einstellungsseite bearbeiten.
6. Klicken Sie um einen Reiter zu wählen
7. Statusleiste:
RS232 COM Schnittstelle
Kommunikationsstatus
Abfrage der Betriebsnachricht
Zeit und Datum
8. Geräteinformationsanzeige
Port Tag Page / Seite zum Editieren von Portnamen:
1. Input Port Tags (Portnamen Eingangsport)
2. Klicken Sie um die Input Port Tags (Portnamen) zu editieren
3. Output Port Tags (Portnamen Ausgangsports)
4. Klicken Sie um die Output Port Tags (Portnamen) zu editierenBenutzerhandbuch Deutsch Editieren der Input Port Tags (Portbezeichnungen): Um die INPUT Port Tags zu editieren, klicken Sie auf editieren und geben dann den gewünschten Namen in den dafür vorgesehenen Bereich ein. Editieren der Output Port Tags: Um die OUTPUT Port Tags zu editieren, klicken Sie auf editieren und geben dann den gewünschten Namen in den dafür vorgesehenen Bereich ein. Setting Page / Einstellungen-Seite: 1. Zeigt die Eingangsportnummer des jeweiligen Ausgangsports 2. Klicken Sie hier um den gewählten Eingang für den jeweiligen Ausgangsport zu wählen 3. Hier klicken um den vorhergehenden oder nächsten Eingang für den jeweiligen Ausgang zu wählen 4. Anzeigebereich Output from Input, Anzeige der Port Tags wenn der Mauszeiger auf die Ports zeigt
Benutzerhandbuch                                                                           Deutsch
5. Anzeigebereich Voreinstellungen – es können mehrere Voreinstellungen definiert werden
6. Klicken Sie um die gewählten Voreinstellungselemente zu editieren
7. Mit Set legen sie die gewählten Voreinstellungen für die Matrix fest

EDID Control Page:

1.   Legen Sie den EDID Modus für den gewählten Eingang oder alle Ausgänge fest - klicken Sie auf
     “Set” um die Aktion zu bestätigen. Der „Auto EDID mode“ kann nur für alle Eingänge gemeinsam
     gewählt werden
2.   Kopieren Sie den EDID Modus zu den gewählten Eingängen oder allen Ausgängen – klicken Sie auf
     “Copy” um die Aktion zu bestätigen
3.   Lesen Sie den EDID-Inhalt vom Ausgang und zeigen Sie den Inhalt im Raster an – klicken Sie auf
     „Read“ um die Aktion zu bestätigen
4.   Speichern Sie die EDID-Inhalte, welche auf dem Raster als binäre Datei (Dateierweiterung “.bin”)
5.   Öffnen Sie die binäre Datei und lassen Sie diese im Raster anzeigen
6.   Downloaden Sie die EDID-Inhalte welche im Raster angezeigt werden um den Eingang oder alle
     Ausgänge zu wählen – klicken Sie auf „Download“ um die Aktion zu bestätigen
7.   Anzeigeraster für die EDID-Inhalte
8.   Klicken Sie um die im Raster angezeigten EDID-Inhalte zu entfernen

Advanced Page:

1.   Aktivieren oder Deaktivieren der IR Fernbedienungs-Kontrolle
2.   3. & 4. Der TCP Modus wird bei dieser Matrix nicht unterstützt
Benutzerhandbuch Deutsch FW Upgrade Page: Firmware Upgrade wird von diesem Model nicht unterstützt EDID Dipschalter: Stellen Sie die Dipschalter der Matrix auf die gewünschte Einstellung (für Einstellungen siehe weiter unten): (0 is down, 1 is up) 0000 Auto mode (default) 0001 1080i, Stereo Audio 2.0 0010 1080i, Dolby/DTS 5.1 0011 1080i, HD Audio 7.1 0100 1080p, Stereo Audio 2.0 0101 1080p, Dolby/DTS5.1 0110 1080p, HD Audio 7.1 0111 3D, Stereo Audio 2.0 1000 3D, Dolby/DTS5.1 1001 3D, HD Audio 7.1 1010 4Kx2K, Stereo Audio 2.0 1011 4Kx2K, Dolby/DTS5.1 1100 4Kx2K, HD Audio 7.1 1101 1024x768 DVI 1110 1920x1080 DVI 1111 PC Control
Manuel Utilisateur                                                                         Français
Introduction

Merci d’avoir choisi le LINDY 4K HDMI 4x4 Matrix avec télécommande. Cette matrice HDMI hautes
performances permet à chacune des quatre sources raccordées d’être affichées sur l’un des quatre écrans
simultanément. Une télécommande est fournie pour faciliter le contrôle et la commutation des appareils.

Contenu

▪   HDMI 4x4 4K Matrix
▪   Alimentation multi-pays 12V 2A DC
▪   Télécommande
▪   Supports de montage et visserie
▪   Câble série D9
▪   Ce manuel

Caractéristiques

▪   Prise en charge des résolutions d’affichage jusqu’à 4Kx2K@30Hz,1080P@120Hz, et 1080P
    3D@60Hz
▪   Prise en charge du format vidéo 3D HDMI 1.4a
▪   Prise en charge vidéo 3D avec Frame Packing pour tous les formats 3D jusqu’à 297MHz de
    fréquence d’horloge TMDS
▪   Prise en charge deep colour jusqu’à 48 bit par pixel
▪   Prise en charge HDCP 1.4 (INPUT- entrée), conforme au protocole HDCP v1.4a (OUTPUT- sortie)
▪   Prise en charge de la réception de toute donnée audio en conformité avec les spécifications HDMI
    1.4 tel que L-PCM jusqu’à 192kHz, audio compressé (IEC 61937), DSD, DST, DTS et HBR
▪   Colorimétrie complète, y compris sYCC601, Adobe RGB, Adobe YCC601, xvYCC extended gamut
    colour
▪   Fonctionne pour les fréquences d’horloge TMDS jusqu’à 300MHz

Spécification

▪   Largeur de bande passante: 2.97Gbit/s
▪   Ports d’entrée: 4 x HDMI femelle
▪   Ports de sortie: 4 x HDMI femelle
▪   Alimentation: DC 12V 2A
▪   ESD Protection Human Body Model: ± 8kV (air-gap discharge) ± 4kV (contact discharge)
▪   Dimensions: 267x120x32mm (LxlxH)
▪   Poids: 839g
▪   Température de fonctionnement:        0°C ~ 40°C / 32°F ~ 104°F
▪   Température de stockage: -20°C ~ 60°C / -4°F ~ 140°F
▪   Humidité relative: 20 ~ 90% RH (non condensée)
▪   Consommation électrique: 20W Max

Utilisation
Manuel Utilisateur Français
Panneau avant:
1. ON/OFF: Bouton marche/arrêt
2. POWER: Cette LED rouge s’éclaire lorsque l’appareil est connecté à l’alimentation
3. IR IN: capteur de signal de télécommande
4. OUTPUT A: Pressez ce bouton pour sélectionner la source HDMI en entrée vers HDMI OUTPUT A,
la LED rouge s’éclaire lors de la sélection de l’entrée correspondante
5. OUTPUT B: Pressez ce bouton pour sélectionner la source HDMI en entrée vers HDMI OUTPUT B,
la LED rouge s’éclaire lors de la sélection de l’entrée correspondante
6. OUTPUT C: Pressez ce bouton pour sélectionner la source HDMI en entrée vers HDMI OUTPUT
C, la LED rouge s’éclaire lors de la sélection de l’entrée correspondante
7. OUTPUT D: Pressez ce bouton pour sélectionner la source HDMI en entrée vers HDMI OUTPUT
D, la LED rouge s’éclaire lors de la sélection de l’entrée correspondante
Panneau arrière:
1. INPUT PORTS (ports d’entrées): Les LED s’éclairent lorsqu’un signal HDMI est détecté
2. OUTPUT PORTS (ports de sorties): Les LED s’éclairent lorsque le signal TV est détecté
3. RS232: Ce port permet de contrôler le matrix via un PC
4. DC 12V: Branchez le cordon d’alimentation 12V DC à l’appareil et connecter l’adaptateur secteur à
une prise murale.
Télécommande:
OUT A: Press any of the four buttons to select a source signal
OUT B: Press any of the four buttons to select a source signal
OUT C: Press any of the four buttons to select a source signal
OUT D: Press any of the four buttons to select a source signal
Logiciel de contrôle:
Page générale
1. Control mode select: le mode de contrôle COM est seulement disponible pour ce modèle
2. Sélectionnez le port COM RS232
3. Cliquez pour connecter ou déconnecter PC et Matrix
4. Cliquez pour rafraichir les informations d’état de l’appareil
5. Pour active ou désactiver les tags Input/Output affichée lors du paramétrage sur la page “Setting”Manuel Utilisateur Français
6. Cliquez pour sélectionner tab
7. Barre d’état:
Connexion port RS232 COM
Etat de la communication
Affichage rapide des messages de fonctionnement
Heure et date
8. Zone d’affichage des informations de l’appareil
Page Port Tag:
1. Tags port d’entrée
2. Cliquez pour éditer les tags de port d’entrée
3. Tags port de sortie
4. Cliquez pour éditer les tags de port de sortie
Edition des tags de port d’entrée:
Pour éditer les tags de port d’entrée, cliquez sur ‘’edit’’ et entrez ensuite le nom que vous avez choisi
dans la zone correspondanteManuel Utilisateur Français
Edition des tags de port de sortie:
Pour éditer les tags de port de sortie, cliquez sur ‘’edit’’ et entrez ensuite le nom que vous avez choisi
dans la zone correspondante
Page de paramétrage:
1. Affiche le numéro d’entrée pour la sortie correspondante
2. Cliquez pour sélectionner l’entrée pour le port de sortie correspondante
3. Cliquez pour sélectionner l’entrée précédente ou suivante pour le port de sortie correspondant
4. Affiche l’entrée vers la sortie avec les informations de tag lorsque la souris survole les boutons en
référence au point 2
5. Présélections
6. Cliquez pour éditer les présélections
7. Défini les présélections sur le Matrix
Page de contrôle EDID:
1. Fixe le mode EDID pour le port d’entrée sélectionnée ou tous les ports d’entrée, cliquez sur le
bouton “Set” pour compléter l’action. “Auto EDID mode” ne peut être défini que pour “All Inputs”Manuel Utilisateur Français
2. Copie l’EDID du port de sortie pour l’entrée sélectionnée ou pour tous les ports d’entrée, cliquez sur
“Copy” pour compléter l’action
3. Lire le contenu EDID du port de sortie et l’afficher dans la grille, cliquez sur “Read” pour compléter
l’action
4. Enregistre le contenu EDID qui est affiché dans la grille dans un fichier binaire (format de fichier
“.bin”)
5. Ouvre le fichier binaire EDID et l’affiche dans la grille
6. Télécharge le contenu EDID qui est affiché dans la grille vers le port d’entrée sélectionné ou tous
les ports d’entrée, cliquez “Download” pour compléter l’action
7. Grille d’affichage du contenu EDID
8. Cliquez pour vider le contenu EDID affiché dans la grille
Onglet de page ‘’Advanced’’ (paramètres avancés):
1. Active et désactive le contrôle IR
2. 3. & 4. Le mode TCP n’est pas pris en charge par ce modèle
Page de mise à jour du Firmware:Manuel Utilisateur Français La mise à jour du Firmware n’est pas prise en charge par ce modèle Sélecteur Dipswitch EDID: Ajustez les dipswitchs sur le côté du matrix pour forcer les paramétrages requis: (0 est en position basse, 1 en position haute) 0000 Auto mode (par défaut) 0001 1080i, Stéréo Audio 2.0 0010 1080i, Dolby/DTS 5.1 0011 1080i, HD Audio 7.1 0100 1080p, Stéréo Audio 2.0 0101 1080p, Dolby/DTS5.1 0110 1080p, HD Audio 7.1 0111 3D, Stéréo Audio 2.0 1000 3D, Dolby/DTS5.1 1001 3D, HD Audio 7.1 1010 4Kx2K, Stéréo Audio 2.0 1011 4Kx2K, Dolby/DTS5.1 1100 4Kx2K, HD Audio 7.1 1101 1024x768 DVI 1110 1920x1080 DVI 1111 PC Control
Manuale                                                                                           Italiano
Introduzione

Vi ringraziamo per aver acquistato la Matrice LINDY HDMI 4x4 4K con telecomando. Questo prodotto vi
consentirà di visualizzare una qualsiasi delle quattro sorgenti collegate su uno o più schermi collegati alle
porte in uscita. Viene fornito a corredo un telecomando ad infrarossi per rendere più semplice la
commutazione dei vari canali.

Contenuto della confezione

▪   Matrice HDMI 4x4 4K M
▪   Alimentatore 12V 2A DC Multi Country
▪   Telecomando
▪   Staffe di montaggio e viti
▪   Cavo seriale a 9 pin
▪   Questo manuale

Caratteristiche

▪   Supporta risoluzioni fino a 4Kx2K@30Hz,1080P@120Hz e 1080P 3D@60Hz
▪   Supporto formato video HDMI 1.4 3D
▪   Supporto video 3D inclusi i Frame Packing per tutti i formati 3D fino ad una frequenza TMDS di
    297MHz
▪   Supporto Deep Colour fino a 48-bit per pixel
▪   Supporto HDCP 1.4 (IN INGRESSO), Conforme al protocollo HDCP v1.4a (IN USCITA)
▪   Supporta tutti i formati Audio conformi alle specifiche HDMI 1.4 come L-PCM fino a 192kHz, audio
    compresso (IEC 61937), DSD, DST, DTS e HBR
▪   Compatibile con colorimetrie come sYCC601, Adobe RGB, Adobe YCC601,xvYCC a gamut esteso
▪   Opera a frequenze TMDS fino a 300MHz

Specifiche

▪   Larghezza di banda: 2.97Gbps
▪   Porte in ingresso: 4 x HDMI Femmina
▪   Porte in uscita : 4 x HDMI Femmina
▪   Alimentatore: DC 12V 2A
▪   Protezione ESD : ± 8kV (scarica in aria) ± 4kV (scarica a contatto)
▪   Dimensioni: 267x120x32mm (LxPxA)
▪   Peso: 839g
▪   Temperatura di esercizio: 0°C ~ 40°C / 32°F ~ 104°F
▪   Temperatura di immagazzinamento: -20°C ~ 60°C / -4°F ~ 140°F
▪   Umidità Relativa: 20 ~ 90% RH (Non condensata)
▪   Assorbimento: Max 20W
Manuale Italiano
Utilizzo
Pannello Frontale
1. ON/OFF: Pulsante di accensione / spegnimento
2. POWER: Questo LED si illumina quando l’unità è collegata all’alimentazione
3. IR IN: Ingresso segnali IR
4. OUTPUT A: Premete questo pulsante per selezione la sorgente da inviare all’uscita HDMI OUTPUT
A. Uno dei 4 LED Rossi si illuminerà per indicare la selezione corrente
5. OUTPUT B: Premete questo pulsante per selezione la sorgente da inviare all’uscita HDMI OUTPUT
B. Uno dei 4 LED Rossi si illuminerà per indicare la selezione corrente
6. OUTPUT C:Premete questo pulsante per selezione la sorgente da inviare all’uscita HDMI OUTPUT
C. Uno dei 4 LED Rossi si illuminerà per indicare la selezione corrente
7. OUTPUTD: Premete questo pulsante per selezione la sorgente da inviare all’uscita HDMI OUTPUT
D. Uno dei 4 LED Rossi si illuminerà per indicare la selezione corrente
Pannello Posteriore
1. PORTE INPUT : Il LED si illumina quando viene rilevato un segnale HDMI
2. PORTE OUTPUT: Il LED si illumina quando viene rilevato un segnale TV
3. RS232: Questa porta permette di controllare la matrice da un PC
4. DC 12V: Collegato l’alimentatore 12V DC a questa porta
Telecomando
OUT A: Premete uno dei quattro pulsanti per selezionare la sorgente
OUT B: Premete uno dei quattro pulsanti per selezionare la sorgente
OUT C: Premete uno dei quattro pulsanti per selezionare la sorgente
OUT D: Premete uno dei quattro pulsanti per selezionare la sorgente
Controllo via Software
Pagina Generale
1. Selezione modalità di controllo: Questo modello supporta solo la modalità COM (seriale)
2. Selezionate la porta COM RS232 COM
3. Fate click per connettere e disconnettere PC e MatriceManuale Italiano
4. Fate Click per aggiornare lo stato delle porte
5. Abilita o Disabilita la visualizzazione dei nomi delle porte Input/Output quando vengono utilizzati i
pulsanti o la pagina “Setting”
6. Fate Click per selezionare la scheda
7. Barra di stato:
Connessione Porta COM RS232
Stato Comunicazione
Messaggi relativi alle operazioni effettuate
Ora e Data
8. Area di visualizzazione informazioni
Pagina Port Tag
1. Nomi delle porte Input
2. Fate Click per modificare i nomi delle porte Input
3. Nomi delle porte Output
4. Fate Click per modificare i nomi delle porte Output
Modifica dei nome delle porte Input:Manuale Italiano
Per modificare i nomi fate click su Edit e selezionate la denominazione da assegnare alle singole porte
Modifica dei nome delle porte Output:
Per modificare i nomi fate click su Edit e selezionate la denominazione da assegnare alle singole porte
Pagina Setting
1. Visualizza il numero di ingresso (ingresso) selezionato su ciascuna uscita (Output)
2. Fate Click per selezionare l’ingresso da inviare su ciascuna uscita
3. Fate Click per selezionare l’ingresso successivo o precedente a quello impostato su ciascuna uscita
4. Visualizza informazioni si Input e Output con relativi nomi quando il mouse passa sui pulsanti
descritti al punto 2
5. Preselezioni salvate
6. Fate Click per modificare le preselezioni
7. Imposta la preselezione selezionata sulla matrice
Pagina EDID Control
1. Imposta la modalità EDID per la porta Input selezionata o per tutte le porte Input , fate click su “Set”
per completare l’azione. L’“Auto EDID mode” può essere impostato solo per “All Inputs”Manuale Italiano
2. Copia l’EDID da una porta Output alla porta Input selezionata o a tutte le porte Input, fate click su
“Copy” per completare l’azione
3. Legge l’EDID dalla porta Output e lo visualizza in griglia, fate click su “Read” per completare
l’azione
4. Salva l’EDID visualizzato in griglia in un file binario (estensione “.bin”)
5. Apre un file binario EDID e lo visualizza in griglia
6. Invia le informazioni EDID elencate in griglia ad una porta in Input o a tutte le porte in Input. Fate
click su “Download” per completare l’azione
7. Giglia di visualizzazione contenuto EDID
8. Fate Click qui per cancellare le informazioni EDID contenute in griglia
Pagina Advanced
1. Abilita e disabilita il telecomando
2. 3. & 4. La modalità TCP NON è supportata da questo modello
Pagina FW upgrade
L’upgrade del Firmware NON è supportato da questo modelloManuale Italiano Dipswitch EDID Impostate la posizione dei dipswitch posti sul lato della matrice in base alle vostre necessità: (0 è giù, 1 è su) 0000 Auto mode (default) 0001 1080i, Stereo Audio 2.0 0010 1080i, Dolby/DTS 5.1 0011 1080i, HD Audio 7.1 0100 1080p, Stereo Audio 2.0 0101 1080p, Dolby/DTS5.1 0110 1080p, HD Audio 7.1 0111 3D, Stereo Audio 2.0 1000 3D, Dolby/DTS5.1 1001 3D, HD Audio 7.1 1010 4Kx2K, Stereo Audio 2.0 1011 4Kx2K, Dolby/DTS5.1 1100 4Kx2K, HD Audio 7.1 1101 1024x768 DVI 1110 1920x1080 DVI 1111 PC Control
CE/FCC Statement
CE Certification
LINDY declares that this equipment complies with relevant European CE requirements.
CE Konformitätserklärung
LINDY erklärt, dass dieses Equipment den europäischen CE-Anforderungen entspricht
UKCA Certification
LINDY declares that this equipment complies with relevant UKCA requirements.

FCC Certification
This equipment has been tested and found to comply with the limits for a Class B digital device, pursuant
to part 15 of the FCC Rules. These limits are designed to provide reasonable protection against harmful
interference in a residential installation.
You are cautioned that changes or modification not expressly approved by the party responsible for
compliance could void your authority to operate the equipment.
This device complies with part 15 of the FCC Rules.
Operation is subject to the following two conditions:
  1. This device may not cause harmful interference, and
  2. This device must accept any interference received, including interference that may cause undesired
     operation.
The enclosed power supply has passed Safety test requirements, conforming to the US American versions
of the international Standard IEC 60950-1 or 60065 or 62368-1.

LINDY Herstellergarantie – Hinweis für Kunden in Deutschland
LINDY gewährt für dieses Produkt über die gesetzliche Regelung in Deutschland hinaus eine zweijährige
Herstellergarantie ab Kaufdatum. Die detaillierten Bedingungen dieser Garantie finden Sie auf der LINDY
Website aufgelistet bei den AGBs.

Hersteller / Manufacturer (EU):                    Manufacturer (UK):
LINDY-Elektronik GmbH                              LINDY Electronics Ltd
Markircher Str. 20                                 Sadler Forster Way
68229 Mannheim                                     Stockton-on-Tees, TS17 9JY
Germany                                            England
Email: info@lindy.com , T: +49 (0)621 470050       sales@lindy.co.uk, T: +44 (0)1642 754000
Recycling Information
WEEE (Waste of Electrical and Electronic Equipment),
Recycling of Electronic Products
Europe, United Kingdom
In 2006 the European Union introduced regulations (WEEE) for the collection and recycling of all waste electrical
and electronic equipment. It is no longer allowable to simply throw away electrical and electronic equipment. Instead,
these products must enter the recycling process.
Each individual EU member state, as well as the UK, has implemented the WEEE regulations into national law in
slightly different ways. Please follow your national law when you want to dispose of any electrical or electronic
products. More details can be obtained from your national WEEE recycling agency.
Battery Remark:
Do not put empty batteries in your domestic waste bin as they will not be recycled. Empty batteries can be returned
for recycling at our trade counter or at your local household recycling centre.
The raw materials enclosed in batteries such as Zinc, Iron and Nickel can be reused to a very large proportion. The
recycling of batteries and disused/obsolete electronic equipment is one of the most efficient environment protection
actions you can easily take.
Germany / Deutschland Rücknahme Elektroschrott und Batterie-Entsorgung
Die Europäische Union hat mit der WEEE Direktive Regelungen für die Verschrottung und das Recycling von Elektro-
und Elektronikprodukten geschaffen. Diese wurden im Elektro- und Elektronikgerätegesetz – ElektroG in deutsches
Recht umgesetzt. Das Entsorgen von Elektro- und Elektronikgeräten über die Hausmülltonne ist verboten! Diese
Geräte müssen den Sammel- und Rückgabesystemen zugeführt werden! Dort werden sie kostenlos entgegen
genommen. Die Kosten für den weiteren Recyclingprozess übernehmen die Gerätehersteller.
LINDY bietet deutschen Endverbrauchern ein kostenloses Rücknahmesystem an, beachten Sie bitte, dass Batterien
und Akkus den Produkten vor der Rückgabe an das Rücknahmesystem entnommen werden müssen und über die
Sammel- und Rückgabesysteme für Batterien separat entsorgt werden müssen. Ausführliche Informationen zu
diesen Themen finden Sie stets aktuell auf der LINDY Webseite im Fußbereich.
France
En 2006, l'union Européenne a introduit la nouvelle réglementation (DEEE) pour le recyclage de tout équipement
électrique et électronique.
Chaque Etat membre de l’ Union Européenne a mis en application la nouvelle réglementation DEEE de manières
légèrement différentes. Veuillez suivre le décret d’application correspondant à l’élimination des déchets électriques
ou électroniques de votre pays.
Remarque sur les piles et batteries
En tant que consommateur final, vous êtes tenus de restituer toutes les piles et batteries usagées. Il est clairement
interdit de les jeter avec les ordures ménagères ! Les piles et batteries contenant des substances nocives sont
marquées par le symbole ci-dessus. Vous pouvez déposer gratuitement vos piles ou batteries usagées dans les
centres de collecte de votre commune, dans nos succursales ou dans tous les points de vente de piles ou
batteries. Vous respecterez ainsi la loi et contribuerez à la protection de l'environnement !
Italy
Nel 2006 l’unione europea ha introdotto regolamentazioni (WEEE) per la raccolta e il riciclo di apparecchi elettrici ed
elettronici. Non è più consentito semplicemente gettare queste apparecchiature, devono essere riciclate. Ogni stato
membro dell’ EU ha tramutato le direttive WEEE in leggi statali in varie misure. Fare riferimento alle leggi del proprio
Stato quando si dispone di un apparecchio elettrico o elettronico.
Per ulteriori dettagli fare riferimento alla direttiva WEEE sul riciclaggio del proprio Stato.
No. 38152
Tested to comply with
nd
FCC standards. 2 Edition, January 2021
For home and office use. lindy.comSie können auch lesen