Lindy.com - 4 Port HDMI 18G Switch with Audio Deutsch Français Italiano User Manual Benutzerhandbuch Manuel Utilisateur Manuale - LINDY User Manual
←
→
Transkription von Seiteninhalten
Wenn Ihr Browser die Seite nicht korrekt rendert, bitte, lesen Sie den Inhalt der Seite unten
4 Port HDMI 18G Switch with Audio
User Manual                                                Eng li sh
Benutzerhandbuch                                           Deutsch
Manuel Utilisateur                                         Français
Manuale                                                    Italiano

                          No. 38249

                       lindy.com

              © LINDY Group – THIRD EDITION (April 2021)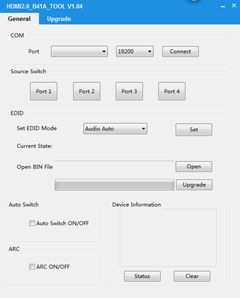
User Manual                                                                                       English
Introduction

Thank you for purchasing the Lindy 4 Port HDMI 2.0 18G Switch with Audio. This product has been
designed to provide trouble free, reliable operation. It benefits from both a LINDY 2 year warranty and free
lifetime technical support. To ensure correct use, please read this manual carefully and retain it for future
reference.

The Lindy 4 Port HDMI 2.0 18G Switch with Audio is a professional solution for providing simple yet reliable
switching control over 4 HDMI source devices connected to a single HDMI display, while also increasing
a display’s available HDMI port connections.

Package Contents

▪   4 Port HDMI Switch with Audio
▪   5VDC 1A Multi-country Power Supply (UK, EU, US & AUS), 5.5/2.1mm
▪   IR Cable, approx. 1.5m (4,92ft)
▪   Mini Optical to Optical Adapter
▪   Remote Control and CR2032L Battery
▪   3.5mm RS-232 Cable, approx. 1m (3.28ft)
▪   This Manual

Features

▪   Supports resolutions up 3840x2160@60Hz, with support for High Dynamic Range
▪   3.5mm Female port with Toslink (Optical) adapter for HDMI audio extraction
▪   IR, Push button, Auto switching and RS-232 control functions
▪   CEC Pass-through support
▪   Audio EDID Management switch
▪   ARC support

Specification

▪   HDCP 2.2/1.4 Pass-through
▪   Input Ports: 4 x HDMI Type A (Female), Output Ports: HDMI Type A (Female), 3.5mm (Female)
▪   Control Ports: RS-232 (3.5mm), IR (3.5mm)
▪   Audio EDID:
    2CH - LPCM 2CH
    5.1CH – LPCM 2CH, Dolby Digital 5.1, DTS 5.1
    7.1CH – LPCM 2CH, LPCM 7.1, Doby Digital 7.1, DTS 7.1, DTS-HD 7.1, Dolby Digital 7.1
▪   Operating Temperature: 0°C - 40°C (32°F - 104°F)
▪   Storage Temperature: -20°C - 60°C (-4°F - 140°F)
▪   Humidity: 20-90% RH (non-condensing)

Installation

Please ensure all devices are switched off before making any connections. Using HDMI cable, connect a
source device such as a games console or set top box to a HDMI switch input port, and connect the
switch output port to a HDMI port of the display. Once all connections are made, please connect the
power supply and turn on in the following order: display, HDMI switch, and source device.
User Manual English
Operation
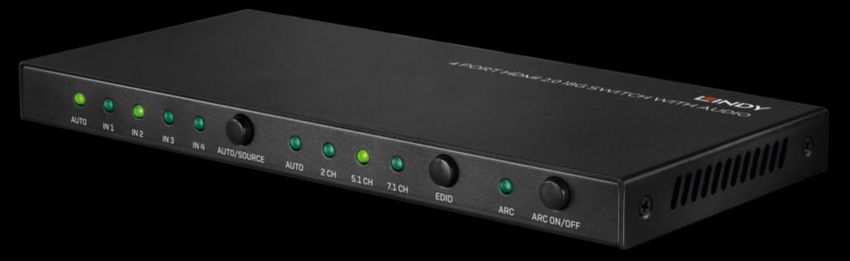
Switch Front Panel
1. Input Indicator LED: When a input port has been selected, the corresponding LED will illuminate
2. Auto/Source: To select auto switching or manual switching, please hold this for more than 2
seconds. When manual switching is activated, a short press will select the required input port.
3. EDID Status LED: The selected EDID option will illuminate. The Auto LED indicates the display’s
EDID is being used.
4. EDID Select button: Pressing this button will switch between each of the 4 Audio EDID options:
Auto/2CH/5.1CH/7.1CH
5. ARC Status LED: If ARC is enabled successfully, this LED will illuminate.
6. ARC On/Off: Press to turn the ARC function on or off
Switch Rear Panel
1. HDMI Output Port: Connect with the display using HDMI cable
2. HDMI Input Ports: Connect with the source devices using HDMI cable
3. Audio Output Port: Connect to analogue speakers or amplifier using a 3.5mm audio cable
(not included). For Toslink (Optical) connections, please use the Mini Optical to Optical
adapter included.
4. RS-232 Port: Control the switch using a PC and RS-232 commands, using the included
3.5mm to RS-232 cable. The RS-232 commands are below.
5. IR Receiver Port: Control the switch using the included 3.5mm IR receiver cable and IR
remote
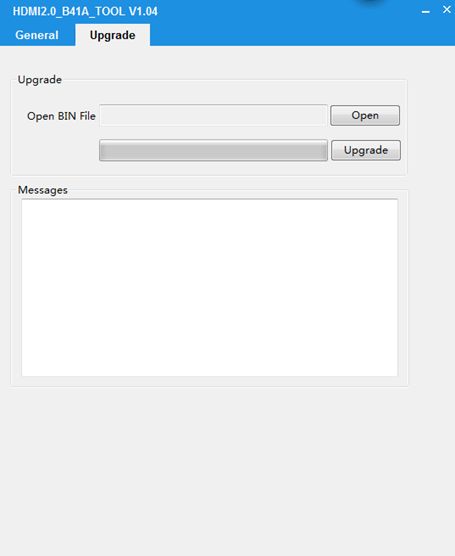
6. 5VDC 1A PSU Port: Connect to the included PSUUser Manual English IR Remote ARC: Press to enable or disable the ARC function. The ARC LED on the switch will illuminate when the function is enabled. Auto/2.1CH/5.1CH/7.1CH: Press to select the different EDID setting. The corresponding LED will illuminate on the switch. Auto/Source: Press to select auto switching or manual switching mode IN1/IN2/IN3/IN4: Press to select the input port. Please note, the switch must be in manual switching mode RS-232 Command List The product can be controlled using the “Upper Computer” software. This is available to download at lindy.com from the 38249 Product web page. Once the switch is connected to a PC using the included 3.5mm to RS-232 cable, open the Upper Computer software. Please select the relevant ‘COM’ port, and set the Baud rate to 19200, then press connect. Once connected, all software will be available to use The commands for controlling the switch are below: Baud rate: 19200 Data Width: 8bit Parity: None Stop: 1 bit
User Manual                                                English
To switch the output to the required input
Input 1: A5 5B 02 03 01 00 01 00 00 00 00 00 F9
Input 2: A5 5B 02 03 02 00 01 00 00 00 00 00 F8
Input 3: A5 5B 02 03 03 00 01 00 00 00 00 00 F7
Input 4: A5 5B 02 03 04 00 01 00 00 00 00 00 F6

Query Input: A5 5B 02 01 01 00 00 00 00 00 00 00 FC
Input 1: A5 5B 02 01 01 00 01 00 00 00 00 00 FB
Input 2: A5 5B 02 01 01 00 02 00 00 00 00 00 FA
Input 3: A5 5B 02 01 01 00 03 00 00 00 00 00 F9
Input 4: A5 5B 02 01 01 00 04 00 00 00 00 00 F8

Audio Switch
Audio Auto: A5 5B 03 02 01 00 01 00 00 00 00 00 F9
Stereo Audio 2.0: A5 5B 03 02 02 00 01 00 00 00 00 00 F8
Dolby/DTS 5.1: A5 5B 03 02 03 00 01 00 00 00 00 00 F7
HD Audio 7.1: A5 5B 03 02 04 00 01 00 00 00 00 00 F6

Query Audio A5 5B 01 0C 01 00 00 00 00 00 00 00 F2
Audio Auto: A5 5B 01 0C 01 00 01 00 00 00 00 00 F1
Audio 2.0: A5 5B 01 0C 01 00 02 00 00 00 00 00 F0
Audio 5.1: A5 5B 01 0C 01 00 03 00 00 00 00 00 EF
Audio 7.1: A5 5B 01 0C 01 00 04 00 00 00 00 00 EE

Auto Switch
ON: A5 5B 02 05 0F 00 00 00 00 00 00 00 EA
OFF: A5 5B 02 05 F0 00 00 00 00 00 00 00 09

Query Auto: A5 5B 01 0D 00 00 00 00 00 00 00 00 F2
Auto ON: A5 5B 01 0D 0F 00 00 00 00 00 00 00 E3
Auto OFF: A5 5B 01 0D F0 00 00 00 00 00 00 00 02

ARC
ON: A5 5B 10 01 0F 00 01 00 00 00 00 00 DF
OFF: A5 5B 10 01 F0 00 01 00 00 00 00 00 FE

Query ARC: A5 5B 10 02 00 00 01 00 00 00 00 00 ED
ARC ON: A5 5B 10 02 0F 00 01 00 00 00 00 00 DE
ARC OFF: A5 5B 10 02 F0 00 01 00 00 00 00 00 FD

Device Information Query ( e.g:No Devices Connected)
HDMI IN1: A5 5B 01 04 01 00 00 00 00 00 00 00 FA
HDMI IN2: A5 5B 01 04 02 00 00 00 00 00 00 00 F9
HDMI IN3: A5 5B 01 04 03 00 00 00 00 00 00 00 F8
HDMI IN4: A5 5B 01 04 04 00 00 00 00 00 00 00 F7
HDMI OUT: A5 5B 01 05 01 00 00 00 00 00 00 00 F9
Benutzerhandbuch                                                                            Deutsch
Einführung

Wir freuen uns, dass Ihre Wahl auf ein LINDY-Produkt gefallen ist und danken Ihnen für Ihr Vertrauen.
Sie können sich jederzeit auf unsere Produkte und einen guten Service verlassen. Dieser Lindy 4 Port
HDMI 2.0 18G Switch inklusive Audio unterliegt einer 2-Jahres LINDY Herstellergarantie und
lebenslangem kostenlosen, technischen Support. Bitte lesen Sie diese Anleitung sorgfältig und
bewahren Sie sie auf.

Dieser Lindy 4 Port HDMI 2.0 18G Switch inklusive Audio ist eine professionelle Lösung, um 4 HDMI-
Quellen mit einem HDMI-Display zu verbinden. Dies ermöglicht nicht nur das Umschalten zwischen 4
verschiedenen Signalquellen, sondern erweitert auch die möglichen HDMI-Port-Verbindungen eines
Displays.

Lieferumfang

▪   4 Port HDMI Switch inklusive Audio
▪   5VDC 1A Multi-Country Netzteil (UK, EU, US & AUS), 5.5/2.1mm
▪   IR-Kabel, ca. 1.5m (4,92ft)
▪   Optischer Audioadapter (3.5mm auf Toslink)
▪   Fernbedienung und CR2032L-Batterie
▪   3.5mm RS232-Kabel, ca. 1m (3.28ft)
▪   Dieses Handbuch

Eigenschaften

▪   Unterstützt Auflösungen bis zu 3840x2160@60Hz, inklusive High Dynamic Range Support
▪   3.5mm (Buchse) Port inklusive Toslink-Adapter (optisch) für HDMI-Extraktion
▪   IR, Schalter am Gerät, Autoumschalten und RS232-Kontrolle
▪   Unterstützt CEC Pass-through
▪   Audio-EDID-Management-Schalter
▪   Unterstützt ARC

Spezifikationen

▪   HDCP 2.2/1.4 Pass-through
▪   Eingänge: 4 x HDMI Typ A (Buchse), Ausgänge: HDMI Typ A (Buchse), 3.5mm (Buchse)
▪   Kontrollports: RS232 (3.5mm), IR (3.5mm)
▪   Audio-EDID-Management:
    2CH - LPCM 2CH
    5.1CH – LPCM 2CH, Dolby Digital 5.1, DTS 5.1
    7.1CH – LPCM 2CH, LPCM 7.1, Doby Digital 7.1, DTS 7.1, DTS-HD 7.1, Dolby Digital 7.1
▪   Betriebstemperatur: 0°C - 40°C (32°F - 104°F)
▪   Lagertemperatur: -20°C - 60°C (-4°F - 140°F)
▪   Feuchtigkeit: 20 – 90% RH (nicht-kondensierend)

Installation

Bitte stellen Sie vor der Installation sicher, dass alle Geräte abgeschaltet sind. Nutzen Sie ein HDMI-
Kabel für die Verbindung der Quellgeräte (Spielekonsole, Set Top Box …) mit den Eingängen des HDMI-
Switches. Verbinden Sie dann den Ausgang des HDMI-Switches mit dem Display. Wenn alle
Benutzerhandbuch Deutsch
Verbindungen abgeschlossen sind, schalten Sie die Geräte in folgender Reihenfolge ein: Display, HDMI-
Switch, Quellgeräte.
Betrieb
Switch (Frontansicht)
1. Eingangsindikator-LEDs: Die LED des aktiven Eingangs leuchtet.
2. Auto/Sources: Halten Sie diesen Schalter ca. 2 Sekunden um automatisches oder manuelles
Umschalten zu aktivieren. Bei aktivem manuellen Umschalten, wird durch eine kurze Betätigung
des Schalters umgeschaltet.
3. EDID-Status-LED: Die gewählte EDID-Option wird aufleuchten. „Auto“ steht für die EDID-Daten
des angeschlossenen Displays.
4. EDID-Wahlschalter: Dieser Schalter dient zum Umschalten der verfügbaren EDID-Optionen
(Auto / 2CH / 5.1CH / 7.1CH).
5. ARC-Status-LED: Wenn ARC eingeschaltet ist, wird diese LED aufleuchten.
6. ARC On/Off: Dient zum Ein- und Ausschalten der ARC-Funktion.
Switch (Rückansicht)
1. HDMI-Ausgangsport: Dient zum Anschluss des Displays.
2. HDMI-Eingangsports: Dient zum Anschluss der Quellgeräte.
3. Audio-Ausgangsport: Dient zum Anschluss eines analogen Lautsprechers oder Verstärkers
via 3.5mm Audiokabel (nicht im Lieferumfang enthalten). Für Toslink (optische) Verbindungen
befindet sich ein passender Adapter im Lieferumfang.
4. RS-232 Port: Der Switch kann mittels PC oder RS-232 Kommandos gesteuert werden
(3.5mm auf RS-232 Kabel im Lieferumfang enthalten). Die RS-232 Kommandos befinden
sich auf den folgenden Seiten dieses Handbuchs.
5. IR-Empfangsport: Der Switch kann mittels IR-Fernbedienung kontrolliert werden (3.5mm IR-
Empfängerkabel im Lieferumfang enthalten)Benutzerhandbuch Deutsch
6. 5VDC 1A Netzteil-Port: Dient zum Anschluss des beiliegenden Netzteils
IR-Fernbedienung
ARC: Betätigen Sie diesen Schalter um die ARC-Funktion ein- und auszuschalten.
Die ARC-LED wird leuchten, wenn die Funktion aktiv ist.
Auto / 2.1CH / 5.1CH / 7.1CH: Betätigen Sie diesen Schalter, um zwischen den
verschiedenen EDID-Optionen umzuschalten. Die dazugehörige LED wird
aufleuchten.
Auto/Source: Betätigen Sie diesen Schalter, um automatisches oder manuelles
Umschalten zu wählen.
IN1 / IN2 / IN3 / IN4: Betätigen Sie diesen Schalter, um den Eingangsport zu wählen.
Der Switch muss sich hierzu im manuellen Umschaltmodus befinden.
RS232-Kommandoliste
Das Produkt kann mittels “Upper Computer” Software gesteuert werden. Diese ist auf lindy.com unter
der entsprechenden Artikelnummer downloadbar.
Wenn der Switch mit einem PC verbunden ist, kann die Software geöffnet werden (3.5mm auf RS232-
Kabel befindet sich im Lieferumfang)
Bitte wählen Sie den relevanten “COM” Port und setzen Sie die Baudrate auf 19200 – bestätigen Sie mit
“Connect”.
Wenn die Verbindung hergestellt ist, kann die Software genutzt werden.
Die Kommandos zum Kontrollieren des Switches lauten wie folgt:
Baud rate: 19200, Data Width: 8Bit, Parity: None, Stop: 1 BitBenutzerhandbuch Deutsch Mit den folgenden Kommandos können die Eingänge auf den Ausgang geschaltet werden: Input 1: A5 5B 02 03 01 00 01 00 00 00 00 00 F9 Input 2: A5 5B 02 03 02 00 01 00 00 00 00 00 F8 Input 3: A5 5B 02 03 03 00 01 00 00 00 00 00 F7 Input 4: A5 5B 02 03 04 00 01 00 00 00 00 00 F6 Eingangsabfrage: A5 5B 02 01 01 00 00 00 00 00 00 00 FC Input 1: A5 5B 02 01 01 00 01 00 00 00 00 00 FB Input 2: A5 5B 02 01 01 00 02 00 00 00 00 00 FA Input 3: A5 5B 02 01 01 00 03 00 00 00 00 00 F9 Input 4: A5 5B 02 01 01 00 04 00 00 00 00 00 F8 Audio-Switch Audio Auto: A5 5B 03 02 01 00 01 00 00 00 00 00 F9 Stereo Audio 2.0: A5 5B 03 02 02 00 01 00 00 00 00 00 F8 Dolby/DTS 5.1: A5 5B 03 02 03 00 01 00 00 00 00 00 F7 HD Audio 7.1: A5 5B 03 02 04 00 01 00 00 00 00 00 F6 Audioabfrage: A5 5B 01 0C 01 00 00 00 00 00 00 00 F2 Audio Auto: A5 5B 01 0C 01 00 01 00 00 00 00 00 F1 Audio 2.0: A5 5B 01 0C 01 00 02 00 00 00 00 00 F0 Audio 5.1: A5 5B 01 0C 01 00 03 00 00 00 00 00 EF Audio 7.1: A5 5B 01 0C 01 00 04 00 00 00 00 00 EE Auto-Switch ON: A5 5B 02 05 0F 00 00 00 00 00 00 00 EA OFF: A5 5B 02 05 F0 00 00 00 00 00 00 00 09 Autoabfrage: A5 5B 01 0D 00 00 00 00 00 00 00 00 F2 Auto ON: A5 5B 01 0D 0F 00 00 00 00 00 00 00 E3 Auto OFF: A5 5B 01 0D F0 00 00 00 00 00 00 00 02 ARC ON: A5 5B 10 01 0F 00 01 00 00 00 00 00 DF OFF: A5 5B 10 01 F0 00 01 00 00 00 00 00 FE ARC-Abfrage: A5 5B 10 02 00 00 01 00 00 00 00 00 ED ARC ON: A5 5B 10 02 0F 00 01 00 00 00 00 00 DE ARC OFF: A5 5B 10 02 F0 00 01 00 00 00 00 00 FD Geräteinformationsabfrage (z.B. keine Geräte angeschlossen) HDMI IN1: A5 5B 01 04 01 00 00 00 00 00 00 00 FA HDMI IN2: A5 5B 01 04 02 00 00 00 00 00 00 00 F9 HDMI IN3: A5 5B 01 04 03 00 00 00 00 00 00 00 F8 HDMI IN4: A5 5B 01 04 04 00 00 00 00 00 00 00 F7 HDMI OUT: A5 5B 01 05 01 00 00 00 00 00 00 00 F9
Benutzerhandbuch Deutsch
Manuel Utilisateur                                                                             Français
Introduction

Nous sommes heureux que votre choix se soit porté sur un produit LINDY et vous remercions de votre
confiance. Vous pouvez compter à tout moment sur la qualité de nos produits et de notre service. Ce
Switch HDMI 2.0 18G 4 Ports avec Audio est soumis à une durée de garantie LINDY de 2 ans et d’une
assistance technique gratuite à vie. Merci de lire attentivement ces instructions et de les conserver pour
future référence.

Le Switch HDMI 2.0 18G 4 Ports avec Audio de LINDY est une solution professionnelle pour disposer d’un
moyen de contrôle et de commutation alliant simplicité et fiabilité pour 4 sources HDMI connectés à un
affichage HDMI.

Contenu de l’emballage

▪   Switch HDMI 4 Ports avec Audio
▪   Alimentation multi-pays 5VDC 1A (UK, EU, US & AUS), prise DC 5.5/2.1mm
▪   Câble IR, 1.5m
▪   Adaptateur mini optique vers optique
▪   Télécommande et pile CR2032L
▪   Câble adaptateur jack 3.5mm vers RS-232, 1m
▪   Ce manuel

Caractéristiques

▪   Prend en charge les résolutions jusqu’à 3840x2160@60Hz, avec prise en charge High Dynamic
    Range
▪   Port jack 3.5mm femelle avec adaptateur Toslink (Optical) pour l’extraction audio HDMI
▪   Fonctions de contrôle IR, bouton poussoir, commutation auto et RS-232
▪   Prise en charge CEC Pass-through
▪   Switch de gestion de l’EDID audio
▪   Prise en charge ARC

Spécifications

▪   HDCP 2.2/1.4 Pass-through
▪   Ports en entrée: 4 x HDMI Type A (femelle), Ports en sortie: HDMI Type A (femelle), 3.5mm (femelle)
▪   Ports de contrôle: RS-232 (3.5mm), IR (3.5mm)
▪   L’EDID audio :
    2CH - LPCM 2CH
    5.1CH – LPCM 2CH, Dolby Digital 5.1, DTS 5.1
    7.1CH – LPCM 2CH, LPCM 7.1, Doby Digital 7.1, DTS 7.1, DTS-HD 7.1, Dolby Digital 7.1
▪   Température de fonctionnement: 0°C - 40°C (32°F - 104°F)
▪   Température de stockage: -20°C - 60°C (-4°F - 140°F)
▪   Humidité: 20-90% RH (sans condensation)

Installation

Veuillez-vous assurer que tous les appareils sont hors tension avant d’effectuer les connexions. En
utilisant des câbles HDMI, connectez les appareils sources (console de jeux, lecteur blu-ray…) aux ports
HDMI en entrée du switch, et connectez le port HDMI en sortie à votre affichage HDMI. Une fois toutes
Manuel Utilisateur Français
les connexions réalisées, veuillez brancher l’alimentation et mettez sous tension dans l’ordre suivant:
affichage, switch HDMI, les appareils sources.
Utilisation
Panneau frontal
1. LED indicatrices d’entrée: lorsqu’un port d’entrée a été sélectionné, la LED correspondante
s’allume
2. Auto/Source: pour la sélection de l’auto switching ou de la commutation manuelle, merci
d’appuyer sur ce bouton pendant plus de 2 secondes. Lorsque la commutation manuelle est
activée, un appui court permet de sélectionner le port en entrée.
3. LEDC d’état EDID: la LED d’option EDID correspondante s’allume. La LED Auto indique que
l’EDID de l’affichage est utilisé.
4. Bouton de sélection EDID: un appui sur ce bouton permet de commuter les 4 options EDID
disponibles: Auto/2CH/5.1CH/7.1CH
5. LED d’état ARC: cette LED s’allume si la function ARC est active.
6. ARC On/Off: appuyez pour activer/désactiver la function ARC
Panneau arrière
1. Port de sortie HDMI: Connecte l’affichage HDMI à l’aide d’un câble HDMI
2. Ports d’entrée HDMI: Connecte les appareils sources en utilisant un câble HDMI
3. Port de sortie audio: Connecte les haut-parleurs analogiques ou un amplificateur en utilisant
un câble audio 3.5mm (non fourni). Pour la connexion Toslink (optique), merci d’utiliser
l’adaptateur Mini Optique vers Optique inclus.
4. Port RS-232 Port: Contrôle le commutateur en utilisant les commandes RS-232, en utilisant
le câble 3.5mm vers RS-232 inclus. Les commandes RS-232 sont indiqués ci-dessous.
5. Capteur IR: Contrôle le switch en utilisant le câble capteur IR 3.5mm inclus et la
télécommandeManuel Utilisateur Français
6. Port 5VDC 1A: Connecte l’alimentation fournie
Télécommande IR
ARC: appuyez pour active ou désactiver la fonction ARC. La LED ARC s’allume sur
le switch lorsque la fonction est activée.
Auto/2.1CH/5.1CH/7.1CH: appuyez pour sélectionner les différents réglages EDID.
La LED correspondante s’allume sur le switch.
Auto/Source: appuyez pour sélectionner l’auto switching ou le mode de commutation
manuel
IN1/IN2/IN3/IN4: appuyez pour sélectionner le port d’entrée. Merci de noter que le
switch doit être en mode manuel
Liste de commandes RS-232
Le produit peut être contrôlé en utilisant le logiciel “Upper Computer”. Il est disponible
au téléchargement sur lindy.com sur la page correspondant au produit 38249.
Une fois le switch connecté à un PC en utilisant le câble 3.5mm vers RS-232 inclus, lancez le
programme Upper Computer.
Veuillez sélectionner ‘COM’ correspondant et régler sa vitesse sur 19200 baud, puis cliquer sur le
bouton connect.
Une fois connecté, toutes les fonctions du logiciel sont disponibles
Les commandes de contrôle du switch sont indiquées ci-dessous:
Bits par seconde: 19200
Bits de données: 8bitManuel Utilisateur Français Parité: aucune Bits d’arrêt: 1 bit Pour commuter la sortie sur l’entrée requise Input 1: A5 5B 02 03 01 00 01 00 00 00 00 00 F9 Input 2: A5 5B 02 03 02 00 01 00 00 00 00 00 F8 Input 3: A5 5B 02 03 03 00 01 00 00 00 00 00 F7 Input 4: A5 5B 02 03 04 00 01 00 00 00 00 00 F6 Requête d’entrée: A5 5B 02 01 01 00 00 00 00 00 00 00 FC Input 1: A5 5B 02 01 01 00 01 00 00 00 00 00 FB Input 2: A5 5B 02 01 01 00 02 00 00 00 00 00 FA Input 3: A5 5B 02 01 01 00 03 00 00 00 00 00 F9 Input 4: A5 5B 02 01 01 00 04 00 00 00 00 00 F8 Switch Audio Audio Auto: A5 5B 03 02 01 00 01 00 00 00 00 00 F9 Stereo Audio 2.0: A5 5B 03 02 02 00 01 00 00 00 00 00 F8 Dolby/DTS 5.1: A5 5B 03 02 03 00 01 00 00 00 00 00 F7 HD Audio 7.1: A5 5B 03 02 04 00 01 00 00 00 00 00 F6 Requête Audio A5 5B 01 0C 01 00 00 00 00 00 00 00 F2 Audio Auto: A5 5B 01 0C 01 00 01 00 00 00 00 00 F1 Audio 2.0: A5 5B 01 0C 01 00 02 00 00 00 00 00 F0 Audio 5.1: A5 5B 01 0C 01 00 03 00 00 00 00 00 EF Audio 7.1: A5 5B 01 0C 01 00 04 00 00 00 00 00 EE Auto Switch ON: A5 5B 02 05 0F 00 00 00 00 00 00 00 EA OFF: A5 5B 02 05 F0 00 00 00 00 00 00 00 09 Requête Auto: A5 5B 01 0D 00 00 00 00 00 00 00 00 F2 Auto ON: A5 5B 01 0D 0F 00 00 00 00 00 00 00 E3 Auto OFF: A5 5B 01 0D F0 00 00 00 00 00 00 00 02 ARC ON: A5 5B 10 01 0F 00 01 00 00 00 00 00 DF OFF: A5 5B 10 01 F0 00 01 00 00 00 00 00 FE Requête ARC: A5 5B 10 02 00 00 01 00 00 00 00 00 ED ARC ON: A5 5B 10 02 0F 00 01 00 00 00 00 00 DE ARC OFF: A5 5B 10 02 F0 00 01 00 00 00 00 00 FD Requête d’information de l’appareil (par ex.:pas d’appareils connectés) HDMI IN1: A5 5B 01 04 01 00 00 00 00 00 00 00 FA HDMI IN2: A5 5B 01 04 02 00 00 00 00 00 00 00 F9 HDMI IN3: A5 5B 01 04 03 00 00 00 00 00 00 00 F8 HDMI IN4: A5 5B 01 04 04 00 00 00 00 00 00 00 F7 HDMI OUT: A5 5B 01 05 01 00 00 00 00 00 00 00 F9
Manuale                                                                                            Italiano
Introduzione

Vi ringraziamo per aver acquistato lo Switch HDMI 2.0 18G con Audio e 4 Porte Lindy. Questo prodotto
è stato progettato per garantirvi la massima affidabilità e semplicità di utilizzo ed è coperto da 2 anni di
garanzia LINDY oltre che da un servizio di supporto tecnico a vita. Per assicurarvi di farne un uso
corretto vi invitiamo a leggere attentamente questo manuale e a conservarlo per future consultazioni.

Questo Switch a 4 Porte HDMI 2.0 18G con Audio è una soluzione professionale che fornisce una
soluzione semplice ma affidabile per la commutazione fra 4 sorgenti HDMI connesse ad un singolo
schermo HDMI e che ne aumenta il numero di ingressi disponibili.

Contenuto della confezione

▪   Switch HDMI con Audio a 4 porte
▪   Alimentatore 5VDC 1A Multi-country (UK, EU, US & AUS) con connettore DC da 5.5/2.1mm
▪   Cavo IR, 1.5m
▪   Adattatore Mini Optical a Optical
▪   Telecomando con batteria CR2032L
▪   Cavo 3.5mm RS-232, 1m
▪   Questo manuale

Caratteristiche

▪   Supporto risoluzioni fino a 3840x2160@60Hz con High Dynamic Range (HDR)
▪   Porta 3.5mm Femmina con adattatore Toslink (Ottico) per estrazione audio HDMI
▪   Controllo tramite IR, pulsanti frontali, Auto Switching e RS-232
▪   Supporto CEC Pass-through
▪   Switch di gestione EDID Audio
▪   Supporto ARC

Specifiche

▪   HDCP 2.2/1.4 Pass-through
▪   Ingressi: 4 x HDMI Tipo A (Femmina), Uscite: HDMI Tipo A (Femmina), 3.5mm (Femmina)
▪   Porte di controllo: RS-232 (3.5mm), IR (3.5mm)
▪   EDID Audio:
    2CH - LPCM 2CH
    5.1CH – LPCM 2CH, Dolby Digital 5.1, DTS 5.1
    7.1CH – LPCM 2CH, LPCM 7.1, Doby Digital 7.1, DTS 7.1, DTS-HD 7.1, Dolby Digital 7.1
▪   Temperatura Operativa: 0°C - 40°C (32°F - 104°F)
▪   Temperatura di immagazzinamento: -20°C - 60°C (-4°F - 140°F)
▪   Umidità: 20-90% RH (senza condensa)

Installazione

Assicuratevi che tutti i dispositivi siano spenti prima di effettuare qualsiasi connessione. Utilizzando un
cavo HDMI colelgate una sorgente come una console di gioco o un ricevitore satellitare a una degli
ingressi HDMI dello switch. Collegato poi uno schermo HDMI alla porta in uscita. Una volta completate
tutte le connessioni collegate anche l’alimentatore e procedete ad accendere i dispositivi nel seguente
ordine: schermo, switch HDMI e infine le sorgenti.
Manuale Italiano
Utilizzo
Pannello Frontale
1. LED Ingressi: Si illumina quello corrispondente alla sorgente selezionata
2. Pulsante Auto/Source: Passa dalla commutazione automatica a quella manuale e viceversa
tenendolo premuto per almeno 2 secondi. Quando si è in modalità automatica permette di
passare da una sorgente alla successiva con una breve pressione.
3. LED stato EDID: Si illumina l’opzione EDID Audio selezionata. Il LED Auto indica che è in uso
l’EDID dello schermo.
4. Pulsante selezione EDID: Premendo questo pulsante si passa ciascuna delle 4 opzioni EDID
disponibili: Auto / 2CH / 5.1CH / 7.1CH
5. LED stato ARC: Se la funzione ARC è abilitata correttamente questo LED si illuminerà
6. ARC On/Off: Premete questo pulsante per attivare e disattivare la funzione ARC
Pannello posteriore
1. Uscita HDMI: da collegare allo schermo con un cavo HDMI
2. Ingressi HDMI: da collegare alle sorgenti con cavi HDMI
3. Uscita Audio: da collegare ad un sistema di altoparlanti analogici utilizzando un cavo audio
da 3,5mm (non incluso). Per connessioni Toslink (Ottiche) utilizzante l’adattatore Mini Optical
a Optical incluso.
4. Porta RS-232: da utilizzare per controllare lo switch utilizzando un PC e comandi RS-232
tramite il cavo da 3.5mm a RS-232 incluso. I comandi RS-232 sono riportati più avanti.
5. Porta ricevitore IR: da utilizzare per controllare lo switch con il cavo da 3.5mm a IR incluso e il
telecomando IR
6. Porta 5VDC 1A: da utilizzare per collegare l’alimentatore fornito in dotazioneManuale Italiano Telecomando IR ARC: Premete questo pulsante per abilitare e disabilitare la funzione ARC. Il LED ARC sullo switch si illuminerà quando attiva. Auto/2.1CH/5.1CH/7.1CH: Premete questo pulsante per selezionare le varie opzioni EDID Audio. Il LED corrispondente si accenderà sullo switch. Auto/Source: Premete questo tasto per passare dalla commutazione manuale a quella automatica e viceversa. IN1/IN2/IN3/IN4: Premete questi tasti per selezionare l’ingresso da visualizzare (funzionano solamente in modalità di commutazione manuale) Lista comandi RS-232 Questo switch può essere controllato utilizzando il software “Upper Computer” disponibile sul sito lindy.com nella pagina dell’articolo 38249. Dopo aver connesso lo switch utilizzando il cavo 3.5mm a RS-232 incluso nella confezione, aprite il software Upper Computer. Selezionate la porta ‘COM’ utilizzata sul computer e impostate una velocità trasmissiva (Baud rate) pari a 19200 e poi premete il pulsante “Connect”. Una volta stabilità la connessione tutto il software sarà utilizzabile per inviare comandi allo switch. I parametri operativi e la lista dei comandi è riportata di seguito: Baud rate: 19200 Data Width: 8bit Parity: None Stop: 1 bit
Manuale                                                                                 Italiano
Per selezionare l’ingresso (input) da visualizzare sulla porta in uscita:
Input 1: A5 5B 02 03 01 00 01 00 00 00 00 00 F9
Input 2: A5 5B 02 03 02 00 01 00 00 00 00 00 F8
Input 3: A5 5B 02 03 03 00 01 00 00 00 00 00 F7
Input 4: A5 5B 02 03 04 00 01 00 00 00 00 00 F6

Interrogare l’ingresso attivo: A5 5B 02 01 01 00 00 00 00 00 00 00 FC
Input 1: A5 5B 02 01 01 00 01 00 00 00 00 00 FB
Input 2: A5 5B 02 01 01 00 02 00 00 00 00 00 FA
Input 3: A5 5B 02 01 01 00 03 00 00 00 00 00 F9
Input 4: A5 5B 02 01 01 00 04 00 00 00 00 00 F8

Selezione modalità Audio
Audio Auto: A5 5B 03 02 01 00 01 00 00 00 00 00 F9
Stereo Audio 2.0: A5 5B 03 02 02 00 01 00 00 00 00 00 F8
Dolby/DTS 5.1: A5 5B 03 02 03 00 01 00 00 00 00 00 F7
HD Audio 7.1: A5 5B 03 02 04 00 01 00 00 00 00 00 F6

Interrogare modalità Audio: A5 5B 01 0C 01 00 00 00 00 00 00 00 F2
Audio Auto: A5 5B 01 0C 01 00 01 00 00 00 00 00 F1
Audio 2.0: A5 5B 01 0C 01 00 02 00 00 00 00 00 F0
Audio 5.1: A5 5B 01 0C 01 00 03 00 00 00 00 00 EF
Audio 7.1: A5 5B 01 0C 01 00 04 00 00 00 00 00 EE

Auto Switch
ON: A5 5B 02 05 0F 00 00 00 00 00 00 00 EA
OFF: A5 5B 02 05 F0 00 00 00 00 00 00 00 09

Interrogare modalità Auto Switch: A5 5B 01 0D 00 00 00 00 00 00 00 00 F2
Auto ON: A5 5B 01 0D 0F 00 00 00 00 00 00 00 E3
Auto OFF: A5 5B 01 0D F0 00 00 00 00 00 00 00 02

ARC
ON: A5 5B 10 01 0F 00 01 00 00 00 00 00 DF
OFF: A5 5B 10 01 F0 00 01 00 00 00 00 00 FE

Interrogare ARC: A5 5B 10 02 00 00 01 00 00 00 00 00 ED
ARC ON: A5 5B 10 02 0F 00 01 00 00 00 00 00 DE
ARC OFF: A5 5B 10 02 F0 00 01 00 00 00 00 00 FD

Interrogare il dispositivo per ricevere informazioni (es.: Num. Dispositivi connessi)
HDMI IN1: A5 5B 01 04 01 00 00 00 00 00 00 00 FA
HDMI IN2: A5 5B 01 04 02 00 00 00 00 00 00 00 F9
HDMI IN3: A5 5B 01 04 03 00 00 00 00 00 00 00 F8
HDMI IN4: A5 5B 01 04 04 00 00 00 00 00 00 00 F7
HDMI OUT: A5 5B 01 05 01 00 00 00 00 00 00 00 F9
CE/FCC Statement

CE Certification
LINDY declares that this equipment complies with relevant European CE requirements.
CE Konformitätserklärung
LINDY erklärt, dass dieses Equipment den europäischen CE-Anforderungen entspricht
UKCA Certification
LINDY declares that this equipment complies with relevant UKCA requirements.

FCC Certification
This equipment has been tested and found to comply with the limits for a Class B digital device, pursuant
to part 15 of the FCC Rules. These limits are designed to provide reasonable protection against harmful
interference in a residential installation.
You are cautioned that changes or modification not expressly approved by the party responsible for
compliance could void your authority to operate the equipment.
This device complies with part 15 of the FCC Rules.
Operation is subject to the following two conditions:
  1. This device may not cause harmful interference, and
  2. This device must accept any interference received, including interference that may cause undesired
     operation.
The enclosed power supply has passed Safety test requirements, conforming to the US American versions
of the international Standard IEC 60950-1 or 60065 or 62368-1.

LINDY Herstellergarantie – Hinweis für Kunden in Deutschland
LINDY gewährt für dieses Produkt über die gesetzliche Regelung in Deutschland hinaus eine zweijährige
Herstellergarantie ab Kaufdatum. Die detaillierten Bedingungen dieser Garantie finden Sie auf der LINDY
Website aufgelistet bei den AGBs.

Hersteller / Manufacturer (EU):                    Manufacturer (UK):
LINDY-Elektronik GmbH                              LINDY Electronics Ltd
Markircher Str. 20                                 Sadler Forster Way
68229 Mannheim                                     Stockton-on-Tees, TS17 9JY
Germany                                            England
Email: info@lindy.com , T: +49 (0)621 470050       sales@lindy.co.uk, T: +44 (0)1642 754000
Recycling Information
WEEE (Waste of Electrical and Electronic Equipment),
Recycling of Electronic Products
Europe, United Kingdom
In 2006 the European Union introduced regulations (WEEE) for the collection and recycling of all waste electrical
and electronic equipment. It is no longer allowable to simply throw away electrical and electronic equipment. Instead,
these products must enter the recycling process.
Each individual EU member state has implemented the WEEE regulations into national law in slightly different ways.
Please follow your national law when you want to dispose of any electrical or electronic products. More details can
be obtained from your national WEEE recycling agency.
Germany / Deutschland Rücknahme Elektroschrott und Batterie-Entsorgung
Die Europäische Union hat mit der WEEE Direktive Regelungen für die Verschrottung und das Recycling von Elektro-
und Elektronikprodukten geschaffen. Diese wurden im Elektro- und Elektronikgerätegesetz – ElektroG in deutsches
Recht umgesetzt. Das Entsorgen von Elektro- und Elektronikgeräten über die Hausmülltonne ist verboten! Diese
Geräte müssen den Sammel- und Rückgabesystemen zugeführt werden! Dort werden sie kostenlos entgegen
genommen. Die Kosten für den weiteren Recyclingprozess übernehmen die Gerätehersteller.
LINDY bietet deutschen Endverbrauchern ein kostenloses Rücknahmesystem an, beachten Sie bitte, dass Batterien
und Akkus den Produkten vor der Rückgabe an das Rücknahmesystem entnommen werden müssen und über die
Sammel- und Rückgabesysteme für Batterien separat entsorgt werden müssen. Ausführliche Informationen zu
diesen Themen finden Sie stets aktuell auf der LINDY Webseite im Fußbereich.
France
En 2006, l'union Européenne a introduit la nouvelle réglementation (DEEE) pour le recyclage de tout équipement
électrique et électronique.
Chaque Etat membre de l’ Union Européenne a mis en application la nouvelle réglementation DEEE de manières
légèrement différentes. Veuillez suivre le décret d’application correspondant à l’élimination des déchets électriques
ou électroniques de votre pays.
Italy
Nel 2006 l’unione europea ha introdotto regolamentazioni (WEEE) per la raccolta e il riciclo di apparecchi elettrici ed
elettronici. Non è più consentito semplicemente gettare queste apparecchiature, devono essere riciclate. Ogni stato
membro dell’ EU ha tramutato le direttive WEEE in leggi statali in varie misure. Fare riferimento alle leggi del proprio
Stato quando si dispone di un apparecchio elettrico o elettronico.
Per ulteriori dettagli fare riferimento alla direttiva WEEE sul riciclaggio del proprio Stato.
No. 38249
3rd Edition, April 2021
Tested to comply with
FCC Standards
For Home and Office Use! lindy.comSie können auch lesen