DCC Programmierer/Tester Bedienungsanleitung DCC programming and testing unit User manual - MD ...
←
→
Transkription von Seiteninhalten
Wenn Ihr Browser die Seite nicht korrekt rendert, bitte, lesen Sie den Inhalt der Seite unten
DCC Programmierer/Tester
Bedienungsanleitung
DCC programming and testing unit
User manual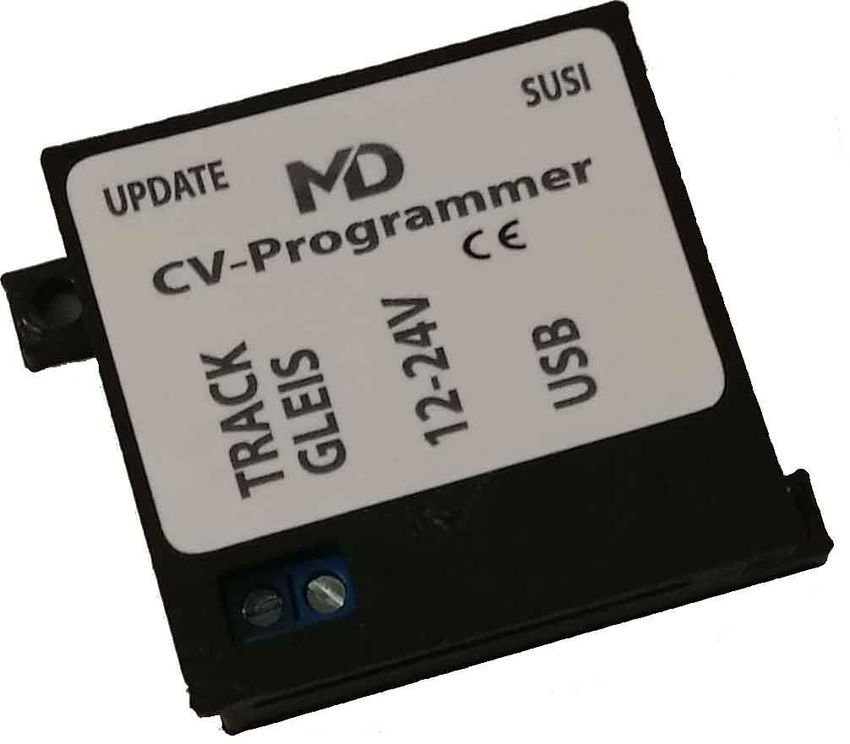
Einleitende Information                            Introduction

Sehr geehrte Kunden, wir empfehlen                 Dear customer, we strongly
die Produktdokumentation und vor                   recommend that you read these
allem auch die Warnhinweise vor der                manuals and the warning notes
Inbetriebnahme gründlich zu lesen und              thouroughly before installing and
diese zu Beachten.                                 operating your device.

HINWEIS: Vergewissern Sie sich, ob die             NOTE: Make sure that the outputs
Ausgangsspannungen zu ihrem Verbrauch-             are set to appropriate value
er passen, da dieser sonst zerstört werden         before hooking up any other
kann! Für Nichtbeachtung übernehmen wir            device. MD can’t be responsible
keine Haftung.                                     For any damage if this is
                                                   disregarded.

Die Passende Software zu diesem Produkt finden     The fitting software for this product you
Sie in unserem Downloadbereich auf                 find in our download are on

http://www.md-electronics.de/de/downloads.html   http://www.md-electronics.de/en/downloads.html

HINWEIS EIS: Funktionsausgang A3

2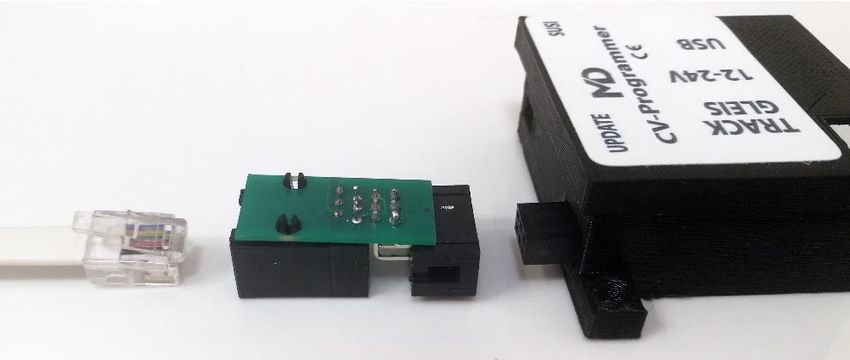
Inhaltsverzeichnis                 Table of Contents

Grundlegende Informationen         General information          4
Funktionsumfang                    Summary of functions         5
Lieferumfang                       Scope of supply              6
Inbetriebnahme                     Hook-Up                      7
Anschlussbuchsen                   Connectors                   8
Produktbeschreibung                Product description          10
Update Funktion                    Update functionality         18
SPEEDY Geschwindigkeitsmessystem   SPEEDY measurement system    19
Treiberinstallation                Drive installation           20
Garantie, Reparatur                Warranty, Service, Support   22
Hotline                            Hotline                      23

3
Grundlegende Informationen                General information

Wir empfehlen die Anleitung gründlich     We recommend studying this manual
zu lesen, bevor Sie Ihr neues Gerät in    thoroughly before installing and
Betrieb nehmen.                           operating your new device.

HINWEIS: Einige Funktionen sind nur mit   NOTE: Some funktions are only
der neusten Firmware nutzbar, führen      available with the latest firmware.
Sie daher bei Bedarf ein Update durch.    Please make sure that your device
                                          is programmed with the latest
                                          firmware.

4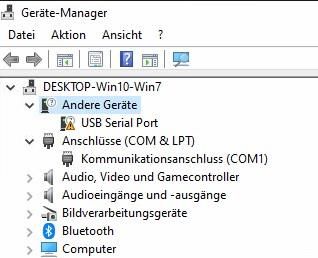
Funktionsumfang Summary of Funktions
▪ CV Programmiermodul CV-Programmer module
▪ Decoder-Tester (Mini-Zentrale) Decoder-Test-Unit (Mini-Control-Unit)
▪ DCC CV/Register Lesen/Schreiben möglich DCC CV/Register read/write possible
▪ DCC Update für mXion DCC Module DCC update for mXion DCC modules
▪ USB Programmieradapter für mXion & MD USB programming module for mXion & MDs
▪ Softwareupdate mXion Module mit Zusatzkabel Software updates for mXion with cable
▪ Softwareupdates über Gleis oder SUSI möglich Software updates over track or SUSI
▪ SUSI Testbereich mit SUSI Anschluss SUSI testing area with SUSI plug
▪ SUSI Soundupdates für alle Dietz®/Uhlenbrock® SUSI sound updates for all Dietz®/Uhlenbrock
und mXion SX6 Soundmodule mit SUSI Anschluss and mXion SX6 sound modules with SUSI.
▪ Unterstützt alle Decoderfabrikate Usable for all Decoder manufactures
▪ Decodervorlagen XML nutzbar Decoder templates XML available
▪ Decodervorlagen für mXion Decoder inbegriffen Decoder templates for mXion included
▪ Updatebar Self updateable
▪ Erweiterungen verfügbar Extensions available
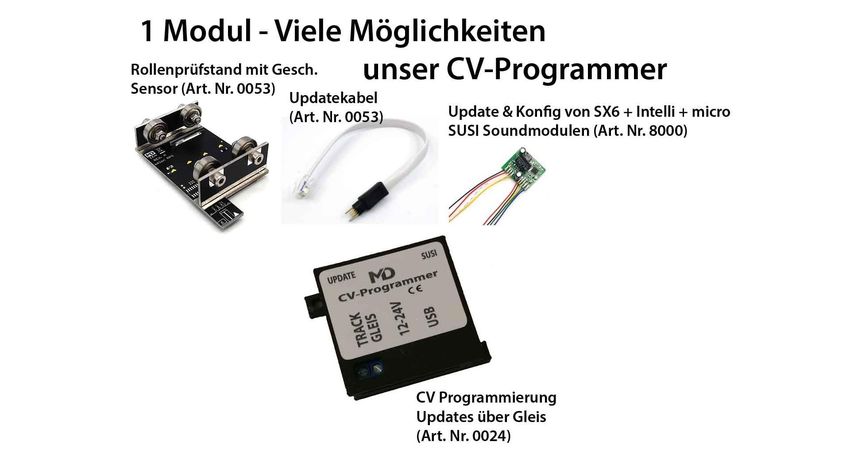
Updatekabel für Decoderupdates ➔ Updatecable for updates
Geschwindigkeitsmessystem SPEEDY ➔ SPEEDY measurement system
5Lieferumfang Scope of supply
▪ Bedienungsanleitung Manual
▪ MD CV-Programmer MD CV-Programmer
▪ USB-Kabel USB cable
▪ 15V/1A Netzteil 15V/1A Supply
6Inbetriebnahme Hook-Up Bauen bzw. platzieren Sie Ihr Install your device in compliance with Gerät sorgfältig nach den Plänen the connecting diagrams in this manual. dieser Bedienungsanleitung. The device is protected against shorts and Die Elektronik ist generell gegen excessive loads. However, in case of a Kurzschlüsse oder Überlastung connection error e.g. a short this safety gesichert, werden jedoch Kabel feature can’t work and the device will be vertauscht oder kurzgeschlossen destroyed subsequently. kann keine Sicherung wirken und Make sure that there is no short circuit das Gerät wird dadurch ggf. zerstört. caused by the mounting screws or metal. Achten Sie ebenfalls beim befestigen darauf, dass kein Kurzschluss mit Metallteilen entsteht. 7
Anschlussbuchsen                                                 Connectors

                                                     SUSI Test und Soundupdates von SUSI
                                                     Soundmodulen SX6, Dietz® micro und
                                                     Uhlenbrock® IntelliSound®
                                                     SUSI test and sound updates with SUSI
                                                     sound modules SX6, Dietz® micro und
                                                     Uhlenbrock® IntelliSound®
Erweiterungsschnittstelle
Extension module

                            Programmier/Testgleis       Trafo       USB®
                            Programming/Test track      Supply      USB®

                                                                                             Auf Gerät Steckplatz
                                                                                             On-Device placement

   8
9
Produktbeschreibung                                       Product description

Der CV-Programmer ist das ideale Gerät für alle           The CV programmer is the ideal device for
Anwendungen rund um die digitale Modellbahnwelt.          everyone applications around the digital
Neben dem klassischen CV und Register programmieren       model railway world. In addition to classic CV
sowie div Funktionen für leichte Programmierung wie       and register programming as well as functions
Bitstellungen, Lange Adressen und Listen/Vorlagen         for easy programming like bit positions, long
besteht die Möglichkeit, dass man                         addresses and templates, the possibility that
programmierte Werte gleich testen kann. Sie haben         one can test programmed values immediately.
mit dem MD-DCC-TOOL die Möglichkeit, Decoder              They have with the MD-DCC-TOOL the pos.
zu testen. Dabei verwandelt sich der Programmer in        to decoder completely to test. This turns the
eine Mini-Zentrale, mit der man alle Funktionen/Decoder   programmer in a mini-control center, with
testen kann. Weichen können auch dauerhaft hin/her        all functions/decoders can test. Turnouts can
geschaltet werden (Toggle-Test). Auch der Roco-Modus      also be permanent back/forth (toggle test).
wird unterstützt. Für Fahrdecoder können 14,28 und        Also the Roco mode is supported. For
128 Fahrstufen gewählt und getestet werden.               driving steps are selected and tested.

Des Weiteren können alle mXion Decoder über das           Furthermore, all mXion decoders can use
Spezialkabel „Tag-Connect“ geupdatet werden.              the module (and with the software MDTerm)
                                                          updated become. There are 2 basic options
Hierzu gibt es 2 grundlegende Möglichkeiten.
   1. Der Decoder ist selbstupdatefähig.                  1. The decoder is self-updatable
       Dann geht das Update über das                      Then the update goes over the
       Programmiergleis.                                  programming track.
   2. Der Decoder ist nicht selbstupdatefähig, dann       2. The decoder is not self-updatable, then
       funktioniert das Update über den „Update“          does the update work via the „Update“
       Anschluss und das optionale Spezialkabel.          connection and the optional special cable
       dieses wird in den Steckplatz mit den 3            this will be in the slot with the 3 holes
       Löchern eingesteckt. Der Vorgang geht              inserted. The process works also via TOOL.
       ebenso über MD-DCC-TOOL.

Außerdem können mit Hilfe des Programmers alle            Besides, with the help of the programmer all
SUSI fähigen Module getestet und programmiert             SUSI enabled modules are tested and
werden, entweder eingesteckt im Decoder                   programmed be either plugged in the decoder
oder direkt an der SUSI Buchse des Programmers.           or directly to the SUSI jack of the
                                                          programmer.

10
Besonders anzumerken ist die Funktion SUSI Of particular note is the function SUSI sound Soundmodule wie unsere mXion SX6 aber auch modules like our mXion SX6 but also the der Firma Dietz® und Uhlenbrock® mit Sounds company Dietz® and Uhlenbrock® with bespielen zu können. Dazu stecken Sie das einfach sounds to be able to play. Just plug it in for that das Soundmodul in die SUSI Buchse des the sound module into the SUSI socket of the Programmers. Über MD-DCC-TOOL unter programmer. About MD-DCC-TOOL under „SUSI“ finden Sie im rechten Teil die Soundbibliothek. SUSI you will find the sound library in the Diese können Sie herunterladen. right part. You can download these. Für unsere SX6 sind alle DS6 Sounds, diese sind 16 Bit und besitzen jeder individuelle 40 einzelne Geräusche in hochwertigster Qualität. DS3 und DSU sind für andere Fabrikate (bspw. IntelliSound). Bei der Erstellung eigener Sounds nehme you want to create your own sounds, take Sie bitte Kontakt mit uns auf. please to contact us. 11
Neben den Updatefunktionen kann                   the programmer will also be used to
der Programmer auch genutzt werden,               use for any decoder and for any
um CVs lesen/schreiben zu können,                 read/write CVs, so as a CV programmer
also als CV Programmer mit einem                  with a programming track. The programmer
Programmiergleis. Die Programmierung              done with our MD-DCC-TOOL and is easy.
erfolgt mit unserem MD-DCC-TOOL und ist           The connection to the terminal is
spielend leicht. Die Verbindung zum               automatic, as also the recognition of the
Terminal erfolgt automatisch, als                 programmer.
auch die Erkennung des Programmers.
Danach können Sie CVs lesen, schreiben            Then you can read CVs, write program
Register programmieren uvm.                       registers and much more. It is also possible
Außerdem ist es möglich, Bits                     to use bits show and long calculate points.
anzeigen zu lassen und lange                      Such as locomotive addresses.
Weichen und Lokadressen zu berechnen.
Das Terminal wird laufend erweitert, auch         The terminal is constantly being expanded,
die Software des Programmers um immer             too the software of the programmer always
mehr Funktionen und erleichterte                  more features and facilitated ensure
Programmierung gewährleisten zu                   programming too can.
können.

MD-Decoder können mit einem                       MD decoders can work with one button
Knopfdruck erkannt und identifiziert              pressure detected and identifed become.
werden. Ebenso ist es möglich, Vorlagen           The XML templates have that peculiarity
zu laden. Die XML Vorlagen haben die              that you graphically all CVs of one decoders,
Besonderheit, dass man graphisch alle CVs eines   also with simple displays like the function
Decoders dargestellt bekomme, ebenso mit          key, drive-key and much more. The
einfachen Anzeigen wie der Funktionstaste,        templates can be simple be activated at the
Fahrkuve uvm. Die Vorlagen können einfach         push of a button.
per Knopfdruck aktiviert werden.
Die nachfolgenden Bilder zeigen                   The following pictures show the procedure
die Vorgehensweise mit unserem                    with ours MD-DCC-TOOL (06/2020).
MD-DCC-TOOL (Stand 06/2020).                      The implementation for templates are still not
Die Implementierung für                           available yet. Here can you load XML
Vorlagen/Templates sind bis dato noch             templates directly in the future.
nicht implementiert gewesen. Hier kann
man künftig XML-Vorlagen direkt laden.

12
13
14
Die nachfolgenden Bilder zeigen die Vorlagenverwaltung. Diese Templates (Vorlagen) gibt
es für jeden unserer Decoder und ist direkt ladbar. In diesem Beispiel für unseren DRIVE-S.

The following pictures show the template management. These templates are available for
each of our decoders and can be loaded directly. In this example, this is for DRIVE-S.

15
16
17
Updatefunktionen (Erweiterung)                             Update functionality (Extension)

Die Selbstupdatefunktion funktioniert ganz generell        The self-update function works in general
direkt über das Gleis. Schließen Sie den Decoder an        directly over the track. Connect the decoder
den Gleisanschluss, wählen Sie „UPDATE“ und                the track connection, select „UPDATE“ and
selektieren Sie das entsprechende Gerät unter              select the corresponding device under
„Decoderupdate Gleis (DCC)“. Die Liste zeigt die           „Decoder update track (DCC)“. The list shows
möglichen unterstützten Decoder an.                        the possible supported decoders.

Alle weiteren Decoder die nicht selbstupdatefähig sind     All other decoders that cannot be updated
werden im Reiter „Decoderupdate Rückseite“ selektiert.     by themselves are selected in the „Decoder
Stecken Sie hierzu das „Tag-Connect“ Kabel in die          update rear side“ tab. To do this, plug the
entsprechende Buchse (je nach Decoder                      „Tag Connect“ cable into the corresponding
unterschiedlich zu finden), halten Sie dies fest in        socket (depending on the decoder different
die Buchse gedrückt während des Vorgangs und starten       to find), hold this firmly in the socket pressed
Sie das Update. Je nach Decoder (bspw. FSD) müssen die     during the process and start the update.
3 silbernen Stäbe etwas gekürzt werden. Der Programm.      Depending on the decoder (e.g. FSD) the 3
selber benötigt mind. V. 1.3.6 sowie das MD-DCC-TOOL       silver rods can be shortened a little. The
mind. 1.0.4.6. Das nachfolgende Beispiel zeigt DRIVE-XL.   programmer itself requires at least V. 1.3.6
                                                           and DCC-TOOL at least 1.0.4.6. Next is XL
Neben der SUSI-Buchse ist die Schnittstelle für das Kabel. Next to the SUSI socket is the interface for
Das Kabel mittels Adapter in den Programmer gesteckt. the cable and is plugged into the programmer.

Das Update für den 30B erfolgt in ähnlicher Weise.         The update for the 30B is done in a similar
Hierbei ist es jedoch wichtig, dass mit einer Zange        way. Here, however, it is important that you
die 2 Pads kurzgeschlossen werden während des              use plierst he 2 pads are short-circuited during
Vorgangs. Die runden Löcher finden Sie unterhalb           the operation. You can find the round holes
der 4 schwarzen Chips hinter dem XpressNet-Master          below of the 4 black chips behind the
Anschluss. Bei Fragen kontaktieren Sie uns hierzu.         XpressNet master connection. If you have
                                                           any questions, please contact us.

18
SPEEDY Messsystem (Erweiterung) SPEEDY measurement system (Extens.) Sie möchten die Geschwindigkeit Ihrer Loks wissen? You need to know your train speed? Als weitere Erweiterungsmöglichkeit gibt es den As a further expansion option there is the SPEEDY extra für unseren CV Programmer. Der SPEEDY especially for our CV programmer SPEEDY wird einfach hinten an die Schnittstelle The SPEEDY is simply attached to the gesteckt und vom Programmer automatisch interface at the back plugged in and autom. erkannt. Das Menü „Update“ wechselt zu SPEEDY. by the programmer recognized. The “Update” Hier kann die aktuelle Geschwindigkeit gesehen menu changes to SPEEDY. The current speed werden als auch für jede Fahrstufe explizit die can be seen here are as well as for each Geschwindigkeit ermittelt oder gesetzt werden. speed step explicitly the speed can be Außerdem ist es möglich die Umrechnungsfaktoren determined or set. It is also possible to use einzustellen – Wahrheit (1:1) welche the conversion factors adjust - truth (1:1) Geschwindigkeit die Lok in natura hat ebenso which the locomotive also has speed in kind wie es umgerechnet im Modell ist (bspw. 1:22,5). as it is converted in model (e.g. 1:22,5). Nach dem Einstecken des SPEEDY blinkt nach ca. After plugging in the SPEEDY, flashes after 2 sek. die rote LED kurz auf. Damit ist der SPEEDY approx. 2 sec. the red LED briefly on. This is einsatzbereit. An dem Rollenlager der Elektronik the SPEEDY ready to use. At the roller bearing sitzt ein Magnet welcher als Sensor dient. Dieser of the electronics there is a magnet which muss sauber mitdrehen. Bei jeder Umdrehung serves as a sensor. This must turn cleanly. wechselt die LED ihren Status (an/aus) als With every revolution the LED changes its Zeichen ob die Umdrehung erkannt wurde. status (on / off) as sign whether the Der SPEEDY ist natürlich genauso beleuchtet wie revolution has been recognized. The SPEEDY unsere normalen Rollenprüfstände auch. is of course just as illuminated as our normal Mind. Version 1.3.8 wird benötigt!! roller dynamometers too. 19
Treiberinstallation Driver installation
Ab Windows® 8 sind idR. die passenden Treiber für From Windows® 8 onwards, the appropriate
unseren Programmer installiert. Hier müssen Sie drivers for our programmer installed. Here you
nichts weiter tun. Falls jedoch keine Verbindung zum have to do nothing more. However, if there
Gerät hergestellt werden kann und auch kein COM-PORT is no connection to the device can be produced
angezeigt wird, kann es möglich sein das die Treiber and also no COM-PORT is displayed, it may be
fehlen. Hierzu folgen Sie bitte den nachfolgenden possible that the drivers absence. To do this,
Anweisungen. Die Treiber finden Sie auf unserer please follow the steps below instructions.
Website im Downloadbereich als .rar. You can find the drivers on our website in the
download area as .rar.
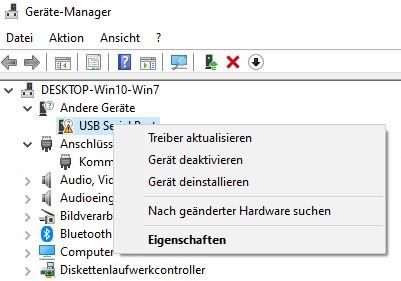
Öffnen Sie zuerst den Geräte-Manager. Falls First, open the device manager. If no driver
keine Treiber installiert sind, finden Sie ein are installed, see one „USB Serial Port“
„USB Serial Port“ Gerät unter „Andere Geräte“. device under „Other Devices“. Recognizable
Erkennbar am gelben Dreieck, hier fehlen Treiber. by the yellow triangle, driver is missing here.
Klicken Sie mit „rechtsklick“ auf das „USB Serial Port“ Right click on the „USB Serial Port“ and a
und es öffnet sich ein Fenster mit Optionen. Klicken Sie windows with options opens. Click then on
dann auf „Treibersoftware aktualisieren“. „Update Driver Software“.
20Nun öffnet sich ein neues Fenster. Sie können A new window will now open. You can try versuchen, „Automatisch nach Treibern suchen“ „Search for drivers automatically“ to choose zu wählen. Wenn dies funktioniert sind Sie fertig und If that works you are done and can now use können das Gerät nun benutzen. Falls dies nicht the device. If not to success, download the zum Erfolg führt, laden Sie sich die Treiber auf drivers our website in the download area. unserer Website im Downloadbereich herunter. These have to be unpacked. Subsequently Diese müssen entpackt werden. Anschließend select „on my computer after search for wählen Sie „Auf meinem Computer nach drivers“ and select the folder. After the Treibern suchen“ aus und wählen den Ordner. installation the device is under “Connections Nach der Installation ist das Gerät unter (COM & LPT) to be found. „Anschlüsse (COM & LPT) zu finden. 21
Garantie, Reparatur                             Warranty, Service, Support

MD Electronics gewährt die                      MD Electronics warrants this product
Fehlerfreiheit dieses Produkts für ein          against defects in materials and
Jahr. Die gesetzlichen Regelungen               workmanship for one year from the
können in einzelnen Ländern abweichen.          original date of purchase. Other countries
Verschleißteile sind von der Garantieleistung   might have different legal warranty
ausgeschlossen. Berechtigte Beanstandungen      situations. Normal wear and tear,
werden kostenlos behoben. Für Reparatur-        consumer modifications as well as improper
oder Serviceleistungen senden Sie das           use or installation are not covered.
Produkt bitte direkt an den Hersteller.         Peripheral component damage is not covered
Unfrei zurückgesendete Sendungen werden         by this warranty. Valid warrants claims will be
nicht angenommen. Für Schäden durch             serviced without charge within the warranty
unsachgemäße Behandlung oder Fremdeingriff      period. For warranty service please return
oder Veränderung des Produkts besteht           the product to the manufacturer. Return
kein Garantieanspruch. Der Anspruch auf         shipping charges are not covered by
Serviceleistungen erlischt unwiderruflich.      MD Electronics. Please include your proof of
Auf unserer Internetseite finden Sie die        purchase with the returned good. Please
jeweils aktuellen Broschüren,                   check our website for up to date brochures,
Produktinformationen, Dokumentationen           product information, documentation and
und Softwareprodukte rund um                    software updates. Software updates you can
MD-Produkte.                                    do with our updater or you can send us
Softwareupdates können Sie mit                  the product, we update for you free.
unserem Updater durchführen,
oder Sie senden uns das Produkt zu;
wir updaten für Sie kostenlos.

Irrtümer und Änderungen vorbehalten.            Errors and changes excepted.

22
Hotline                                    Hotline

Bei Serviceanfragen und Schaltplänen       For technical support and schematics for
für Anwendungsbeispiele richten Sie sich   application examples contact:
bitte an:

MD Electronics                             MD Electronics
info@md-electronics.de                     info@md-electronics.de
service@md-electronics.de                  service@md-electronics.de

www.md-electronics.de                      www.md-electronics.de

MD-TV                                      MD-TV

23
Sie können auch lesen