Nano phono V2 nano phono headphone V2 - User manual Bedienungsanleitung - clearaudio electronic GmbH, 2018/05
←
→
Transkription von Seiteninhalten
Wenn Ihr Browser die Seite nicht korrekt rendert, bitte, lesen Sie den Inhalt der Seite unten
nano phono V2
nano phono headphone V2
User manual
Bedienungsanleitung

© clearaudio electronic GmbH, 2018/05						   Made in Germany
User manual / Bedienungsanleitung
User manual .............................................. 2 - 5
Bedienungsanleitung ................................ 6 - 9
Dear Clearaudio customer,
congratulations on the purchase of your new nano phono V2 / nano phono headphone V2 MC/MM
phonostage.
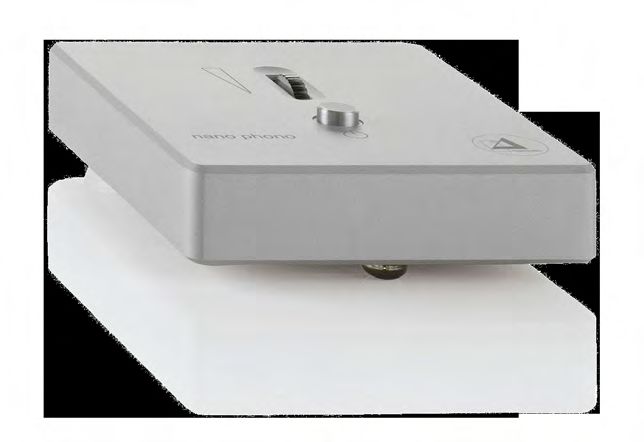
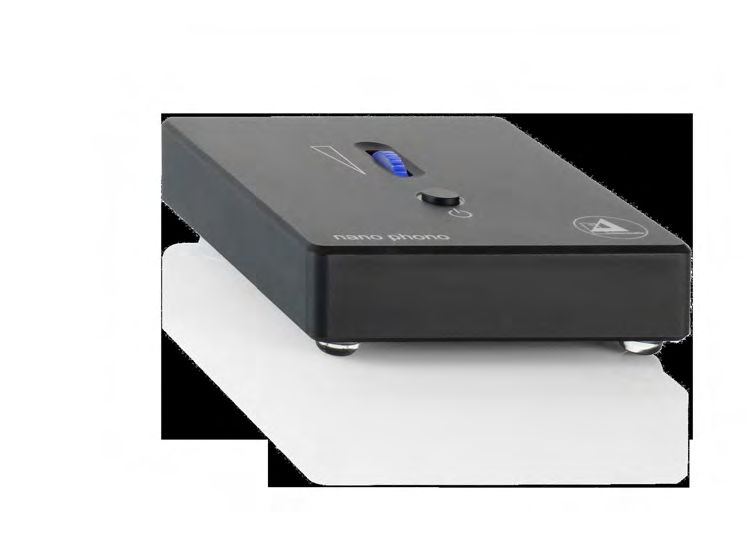
The nano phono V2 / nano phono headphone V2 features a power switch: we recommend that you
keep the unit switched on in order to maintain a constant temperature for the electronic parts inside
(this uses very little power).
The new nano phono V2 / nano phono headphone V2 also has a built-in volume control unit.
Please read this instruction manual carefully, to avoid any damage or loss of warranty.
This manual will help you achieve an easy setup and guarantees the highest pleasure for a long
time.
We wish you a lot of listening pleasure with your new Clearaudio nano phono V2 / nano phono
headphone V2 phonostage.
Clearaudio electronic GmbH
Warning
Do not expose the equipment to rain or moisture.
Do not handle the mains lead with wet hands.
No naked flame sources, such as lighted candles, should be placed on the equipment.
CE-MARKIERUNG
Copyright
Recording and playback of any material may require consent. For further information refer to the
following:
- Copyright Act 1956
- Dramatic and Musical Performers Act 1958
- Performers Protection Acts 1963 and 1972
- Any subsequent statutory enactments and orders
2 © clearaudio electronic GmbH, 2018/05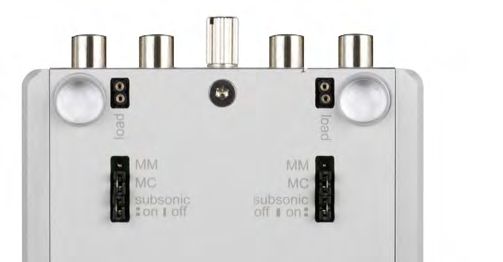
User manual / Bedienungsanleitung

                                             - Setup -

IMPORTANT!

First, select either the MC (moving coil) or MM (moving magnet) mode according to your cartridge
type, by inserting the removable jumpers into the relevant positions on the bottom of the unit (one
each for left and right channels). The subsonic-filter function can also be adjusted by inserting
jumpers into the relevant points on the bottom of the unit: if the jumper is inserted, then the
subsonic filter is OFF. If the jumper is not inserted, then the subsonic filter is ON.

Pic. 1: View from the bottom side

The next step is to connect the ground wire of the turntable/tonearm with the nano phono V2 / nano
phono headphone V2. Make sure that the gain control is set to its lowest volume before connecting
the nano phono V2 / nano phono headphone V2 to your MC/MM cartridge and preamplifier.

Finally, the very last thing to do is to connect the power supply to the mains and press the power
button to the “ON” position.

Pic. 2: Rear view

- Attention -

Never cover or put anything on top of the Nano Phono V2 / nano phono headphone V2 as this
could lead to overheating of electronic parts.

If the unit a longer time not in use, please press the button on top of the device. If the device is
not in use, disconnect it completely from the power supply by removing the main plug from the
socket.

Pic. 3: On/Off button

Made in Germany				                                                                                    3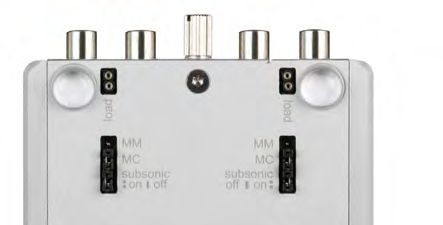
User manual / Bedienungsanleitung

- Notice -

If you are using the nano phono V2 / nano phono headphone V2 with a two-pin mains plug, you
may notice that inserting the plug into the mains socket one way round gives a slightly better sound
than the other way.
Experiment to identify which is the optimum position.

Phonostages provide a very high level of amplification, to address the fact that the electrical signal
generated by a phono cartridge is extremely low.
As a result, phonostages are extremely sensitive, which leads to the potential problem that
high-frequency interference may also be amplified to a point at which it becomes noticeable.
Unfortunately it is not possible to completely protect the sensitive phonostage circuitry from this
interference without degrading its high fidelity performance.

Therefore care must be taken to position the phonostage away from sources of high frequency
interference such as mobile phones, modems and powerline communication systems (PLC) in which
data is sent over the mains power network.

nano phono V2 product information

The nano phono V2 is a fully Dual Mono Design, designed for use with either MM or MC cartridges.
Cartridge type is selected with individual jumpers for the left and right channels which are located
on the underside of the unit.
The standard input impedance is set at 47 kΩ, which ensures an optimal setting for all MM
cartridges.

For the perfect input matching with MC cartridges, Clearaudio now includes the following resistor
pairs:
 - 51
 - 200
 - 402 and
 - 1000 Ω

If there are no resistors connected to the jumpers while in MC mode, the cartridge is automatically
loaded with 47 kΩ.
The 402 Ω resistors are recommended for Clearaudio MC cartridges.
The other resistor values allow 3rd party MC cartridges to be loaded according to the manufacturer’s
guidelines.
It should be noted that sometimes your personal preference for cartridge loading may differ from
that recommended by the cartridge manufacturer.

If so, Clearaudio recommends: Trust your own listening abilities, in your own surroundings!

Clearaudio wish you a lot of pleasure listening to music!

4					                                                        © clearaudio electronic GmbH, 2018/05
User manual / Bedienungsanleitung

Technical Data:

Amplification:			                                         34dB (MM mode)
                                                          54dB (MC mode)
Input load:		                                             47 kOhm/ 220pF / MM mode
                                                                 User MC mode
MM / MC - input:				                                      switchable (at bottom)
Subsonic Filter:			                                       switchable (at bottom)
RIAA:		                                                   Nach RIAA (Zeitkonst.: 75µs / 318µs / 3180µs)
RIAA accuracy:                                            ± 0.4dB @ 20Hz-50kHz
THD:                                                      < 0.04%
Headroom:                                                 18dB / MC
S/N:                                                      81dB (A) (MM mode)
                                                          70dB (A) (MC mode)
Channel seperation:                                       > 80 dB bei 1 kHz,
Max. output voltage:                                      10 V eff (1 kHz)
Power consumption:                                        max. 2.3 watts

in operation:        in operation 2.3 watts
Standby mode:
User manual / Bedienungsanleitung
Sehr verehrte clearaudio – Kundin, sehr verehrter clearaudio – Kunde,
Die RIAA MC- und MM-Vorverstärker nano phono V2 und nano phono headphone V2 erfüllen die
höchsten Ansprüche an die analoge Musikwiedergabe.
Beide nano phonos V2 verfügen über einen Netzschalter. Aus klanglichen Gründen empfehlen wir
Ihnen das Gerät nicht vom Netz zu trennen um eine konstante Betriebstemperatur beizubehalten.
Höchste Ansprüche und Made in Germany, kombiniert mit Technologie und einem zeitlosem
Design lassen bestmöglichen High End Musikgenuss zu einem unschlagbaren Preis wahr werden!
Um alle Vorteile nutzen zu können, lesen Sie bitte diese Bedienungsanleitung aufmerksam durch.
Alle Hinweise dienen dem Ausschöpfen der vollen Klangeigenschaften und bewahren Sie vor
Fehlbedienungen.
Wir wünschen Ihnen viel Freude mit Ihrem neuen clearaudio nano phono V2 /
nano phono headphone V2 Vorverstärker.
clearaudio electronic GmbH
Warnung
Das Gerät nicht Regen oder Feuchtigkeit aussetzen.
Das Netzkabel nicht mit feuchten oder nassen Händen anfassen.
Es dürfen keine Gegenstände mit offener Flamme, wie etwa brennende Kerzen, auf dem Gerät
aufgestellt werden.
CE-MARKIERUNG
URHEBERRECHT
Aufnahme und Wiedergabe jeglichen Tonmaterials kann die Zustimmung des Urhebers erfordern.
Beachten Sie dazu folgende Informationsschriften.
- Copyright Act 1956 (Urheberrechtsgesetz 1956)
- Dramatic and Musical Performers Act 1958 (Gesetz über dramatische und musikalische
Aufführungsrechte, 1958)
- Performers Protection Acts 1963 and 1972 (Künstlerschutzgesetze von 1963 und 1972)
- Jegliche nachfolgende, gesetzliche Verfügungen und Bestimmungen.
6 © clearaudio electronic GmbH, 2018/05User manual / Bedienungsanleitung
-Inbetriebnahme-
WICHTIG!
Stellen Sie sicher, dass die Steckbrücken auf der Geräteunterseite (linker und rechter Kanal
getrennt) in die gewünschte Stellung für den MM- bzw. MC-Betrieb gebracht werden.
Der eingebaute Subsonic-Filter kann über eine Steckbrücke auf der Geräteunterseite auf Wunsch
ein- bzw. ausgeschaltet werden.
- Ist die Steckbrücke gesteckt, dann ist der Subsonic Filter AUS
- Ist die Steckbrücke nicht gesteckt, dann ist der Subsonic Filter AN (EIN)
Abb. 1: Geräteunterseite
Nun erfolgt die Masseverbindung zwischen Plattenspieler/Tonarm und der Masseklemme des nano
phono V2 / nano phono headphone V2. Der Lautstärkeregler auf der Oberseite des Gerätes sollte
auf die niedrigste Lautstärke eingestellt sein. Verbinden Sie anschließend die Cinchstecker des
Tonarmkabels mit den Cinchbuchsen in der nano phono V2 / nano phono headphone V2.
Bitte schließen Sie erst jetzt das Gerät an das Stromnetz an und schalten das Gerät ein!
Abb. 2: Rückansicht
- Unbedingt beachten -
Die Oberseite des Gerätes während des Betriebes nicht abdecken, damit eine ausreichende
Luftzufuhr zur Kühlung gewährleistet ist!
Falls das Gerät eine länge Zeit nicht in Benutzung ist, schalten Sie das Gerät oben am Druckknopf
(siehe Bild) aus. Oder trennen Sie das Gerät komplett vom Stromnetz in dem Sie das Steckernetzteil
aus der Steckdose entfernen.
Abb. 3: Druckknopf
Made in Germany 7User manual / Bedienungsanleitung - Tipp - Ermitteln Sie die richtige Polarität des Stecker-Netzteiles zur Steckdose durch Hörversuche. Drehen Sie den Stecker des Netzteils in der Steckdose um 180° solange, bis Sie die Stellung mit dem klanglich besten Ergebnis gefunden haben und markieren Sie anschließend diese Position (kann auch mittels Polaritätsprüfer bestimmt werden). In nahezu allen Fällen erweist sich eine der beiden Stellungen als die klanglich bessere. Phonovorverstärker sind Geräte mit einer hohen Signalverstärkung, da die Spannung die der Tonabnehmer des Plattenspielers liefert sehr niedrig ist (im Bereich von einigen µV). Aus diesem Grund werden auch hochfrequente Störsignale wahrnehmbar verstärkt. Eine vollständige Abblockung dieser Störsignale im Gerät würde die Audioeigenschaften verschlechtern. Das hat zur Folge, dass hochfrequente Störungen, zum Beispiel aus dem 230 V Netz bzw. 115 V Netz, die Klangqualität beeinträchtigen könnte. Das Gerät sollte daher nicht in der Nähe von Hochfrequenzerzeugenden Geräten wie z.B. Mobiltelefonen oder Modems bzw. an Stromnetzen die für Datenverkehr genutzt werden, betrieben werden. nano phono V2 Produktinformation Die nano phono V2 verfügt über einen Dual Mono MM und MC Eingang der wahlweise auf der Unterseite des Gerätes für jeden Kanal ( Links – Rechts ) eingestellt werden kann. Der Standard - Eingangswiderstand beträgt 47 kΩ, für MM und MC Betrieb. Dies gewährleistet eine optimale Einstellung für alle MM Tonabnehmer. Um eine sofortige MC Inbetriebnahme zu gewährleisten, legen wir die folgenden Widerstands-Pärchen mit folgenden Werten mit bei: - 51 - 200 - 402 und - 1000 Ohm. Ist kein Widerstand im MC Betrieb mit eingesetzt, ist der MC Tonabnehmer mit 47 Kilo Ohm trotzdem abgeschlossen. Für clearaudio MC Tonabnehmer empfehlen wir die Widerstände mit 402 Ohm zu verwenden. Für andere MC Tonabnehmer Typen folgen Sie bitte den Empfehlungen der Hersteller angaben. Des weiteren kann es durchaus vorkommen, das durch eigene Hörempfindungen die verwendeten Widerstände von den Herstellerangaben abweichen. Hier empfehlen wir : Vertrauen Sie ihrem eigenem Gehör ! Wir wünschen Ihnen weiterhin viel Freude beim Musik hören. Ihr clearaudio Team 8 © clearaudio electronic GmbH, 2018/05
User manual / Bedienungsanleitung

Technische Daten:

Verstärkung bei 1 kHz:           34 dB (MM-Betrieb)
                                 54 dB (MC-Betrieb)
Eingangsimpedanz:                47 kOhm/ 220pF / MM-Betrieb
                                 Individual / MC-Betrieb
MM / MC – Eingang:			            schaltbar mit Steckbrücke (auf Unterseite)
Subsonic Filter:				             schaltbar mit Steckbrücke (auf Unterseite)
Schneidekennlinien-Entzerrung:		 Nach RIAA (Zeitkonst.: 75µs / 318µs / 3180µs)
RIAA Genauigkeit:		              ± 0,4 dB @ 20Hz-50kHz
Klirrfaktor:					                < 0,04%
Übersteuerungsfestigkeit:        18dB / MC
Signal/Rauschabstand:				 81 dB (A) (MM Betrieb)
                                 70 dB (A) (MC Betrieb)
Übersprechdämpfung:		            > 80 dB bei 1 kHz,
                                 gegenüberliegender Kanal kurzgeschlossen
Maximale Ausgangsspannung:       10 V eff (1 kHz)
Leistungsaufnahme :              max. 2,3 Watt

in Betrieb:
Standby mode:			                 in operation 2,3 Watt
im ausgeschalteten Zustand:
User manual / Bedienungsanleitung
To achieve the full Clearaudio warranty, it is necessary that you fill out and send the corresponding part of the
warranty registration certificate /card back to Clearaudio, within two weeks after purchase. Only if the product is
returned in it’s original packing Clearaudio can provide the warranty of 3 years for the nano phono V2.
Um die volle clearaudio Garantie (für nano phono V2 3 Jahre) in Anspruch nehmen zu können, senden Sie uns
bitte die beigelegte Garantiekarte innerhalb von zwei Wochen korrekt und vollständig ausgefüllt zu, da sonst nur die
gesetzliche Gewährleistung berücksichtigt werden kann. Nur bei Verwendung der Original-Verpackung während einer
Rücksendung kann clearaudio die vollen 3 Jahre Garantie auf die nano phono V2 geben.
ENGLISH
WARRANTY
For warranty information, contact your local Clearaudio distributor.
RETAIN YOUR PURCHASE RECEIPT
Your purchase receipt is your permanent record of a valuable purchase. It should be kept in a safe place to be referred
to as necessary for insurance purposes or when corresponding with Clearaudio.
IMPORTANT
When seeking warranty service, it is the responsibility of the consumer to establish proof and date of purchase.
Your purchase receipt or invoice is adequate for such proof.
FOR U.K. ONLY
This undertaking is in addition to a consumer‘s statutory rights and does not affect those rights in any way.
FRANÇAIS
GARANTIE
Pour des informations sur la garantie, contacter le distributeur local Clearaudio.
CONSERVER L‘ATTESTATION D‘ACHAT
L‘attestation d‘achat est la preuve permanente d‘un achat de valeur. La conserver en lieu sur pour s‘y reporter aux fins
d‘obtention d‘une couverture d‘assurance ou dansle cadre de correspondances avec Clearaudio.
IMPORTANT
Pour l‘obtention d‘un service couvert par la garantie, il incombe au client d‘établir la preuve de l‘achat et d‘en corroborer
la date. Le reçu ou la facture constituent des preuves suffisantes.
DEUTSCH
GARANTIE
Bei Garantiefragen wenden Sie sich bitte zunächst an Ihren Clearaudio Händler. Heben Sie Ihren Kaufbeleg gut auf.
WICHTIG!
Die Angaben auf Ihrer Quittung erlauben uns die Identifizierung Ihres Gerätes und belegen mit dem Kaufdatum die
Dauer Ihrer Garantie-Ansprüche. Für Serviceleistungen benötigen wir stets die Gerätenummer. Diese finden Sie auf dem
Typenschild auf der Rückseite des Gerätes oder auch in der beigefügten Garantie-Registrierkarte.
NEDERLANDS
GARANTIE
Voor inlichtingen omtrent garantie dient u zich tot uw plaatselijke Clearaudio.
UW KWITANTIE, KASSABON E.D. BEWAREN
Uw kwitantie, kassabon e.d. vormen uw bewijs van aankoop van een waardevol artikel en dienen op een veilige plaats
bewaard te worden voor evt, verwijzing bijv, in verbend met verzekering of bij correspondentie met Clearaudio.
BELANGRIJK
Bij een evt, beroep op de garantie is het de verantwoordelijkheid van de consument een gedateerd bewijs van aankoop
te tonen. Uw kassabon of factuurzijn voldoende bewijs.
10 © clearaudio electronic GmbH, 2018/05User manual / Bedienungsanleitung
ITALIANO
GARANZIA
L’apparecchio è coperto da una garanzia di buon funzionamento della durata di un anno, o del periodo
previsto dalla legge, a partire dalla data di acquisto comprovata da un documento attestante il nominativo del
Rivenditore e la data di vendita. La garanzia sarà prestata con la sostituzione o la riparazione gratuita delle
parti difettose.Non sono coperti da garanzia difetti derivanti da uso improprio, errata installazione, manuten-
zione effettuata da personale non autorizzato o, comunque, da circostanze che non possano riferirsi a difetti
di funzionamento dell’apparecchio. Sono inoltre esclusi dalla garanzia gli interventi inerenti l’installazione e
l’allacciamento agli impianti di alimentazione.
Gli apparecchi verranno riparati presso i nostri Centri di Assistenza Autorizzati. Le spese ed i rischi di trasporto
sono a carico del cliente. La casa costruttrice declina ogni responsabilità per danni diretti o indiretti provocati
dalla inosservanza delle prescrizio-ni di installazione, uso e manutenzione dettagliate nel presente manuale o
per guasti dovuti ad uso continuato a fini professionali.
ESPAÑOL
GARANTIA
Para obtener información acerca de la garantia póngase en contacto con su distribuidor Clearaudio.
GUARDE SU RECIBO DE COMPRA
Su recibo de compra es su prueba permanente de haber adquirido un aparato de valor, Este recibo deberá
guardarlo en un lugar seguro y utilizarlo como referencia cuando tenga que hacer uso del seguro o se ponga
en contacto con Clearaudio.
IMPORTANTE
Cuando solicite el servicio otorgado por la garantia el usuario tiene la responsabilidad de demonstrar cuándo
efectuó la compra. En este caso, su recibo de compra será la prueba apropiada.
Made in Germany 11clearaudio electronic GmbH Spardorfer Straße 150 91054 Erlangen Germany Phone/Tel.: +49 9131 40300 100 Fax: +49 9131 40300 119 www.clearaudio.de www.analogshop.de info@clearaudio.de Handmade in Germany (Änderungen und Irrtümer vorbehalten. Für Druckfehler keine Haftung. Lieferbar solange Vorrat reicht. - Technical specifications are subject to change or improvement without prior notice. Clearaudio accepts no liability for any misprints. Product availability as long as stock lasts.) 2018 © clearaudio electronic GmbH, 2018/05 Made in Germany
Sie können auch lesen