KS500 DE EN ES FR IT NL - SPORTSTECH CARE
←
→
Transkription von Seiteninhalten
Wenn Ihr Browser die Seite nicht korrekt rendert, bitte, lesen Sie den Inhalt der Seite unten
KS500
DE
EN
ES
FR
IT
NL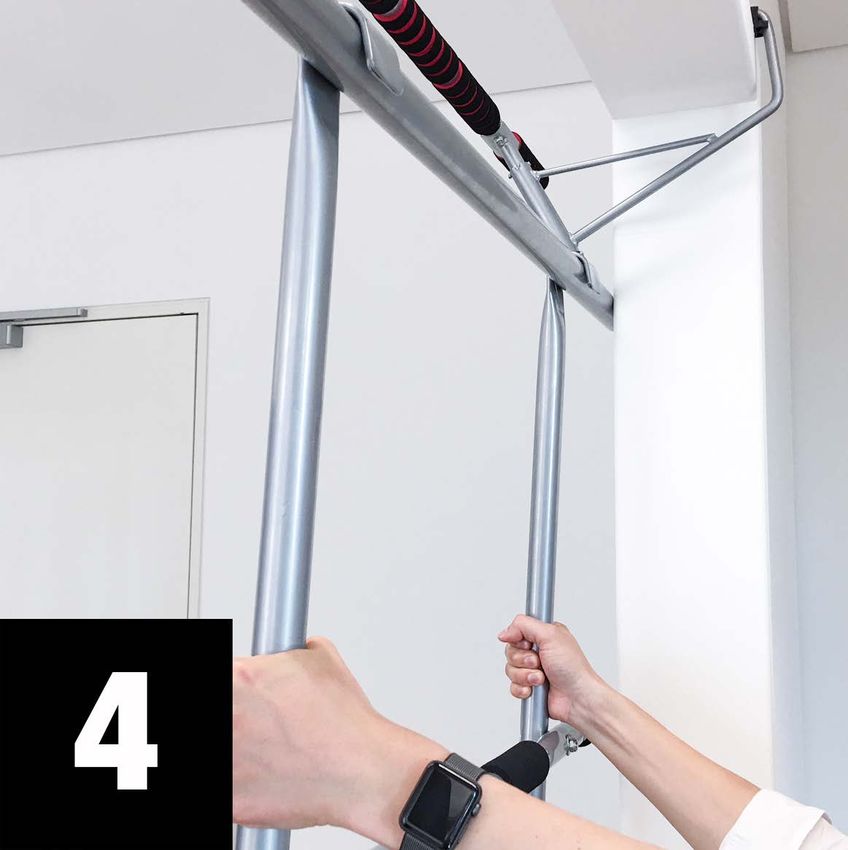
Sehr geehrter Kunde,

wir freuen uns, dass Sie sich für ein Gerät aus der SPORTSTECH Produktpalette entschieden haben.
SPORTSTECH Sportgeräte bieten Ihnen hohe Qualität und neue Technologie.

Um die Leistungsfähigkeit des Gerätes voll nutzen zu können und viele Jahre Freude an Ihrem Gerät zu
haben, lesen Sie bitte vor der Inbetriebnahme und dem Beginn des Trainings dieses Benutzerhandbuch
sorgfältig durch und verwenden Sie das Gerät den Anweisungen entsprechend. Die Betriebssicherheit
und die Funktion des Gerätes können nur dann gewährleistet werden, wenn die Sicherheitshinweise in
diesem Benutzerhandbuch beachtet werden. Wir übernehmen keine Haftung für Schäden, die durch
unsachgemäßen Gebrauch bzw. fehlerhafte Bedienung entstehen.                                             DE

      i
                  Bitte stellen Sie sicher, dass alle Personen, die das Gerät verwenden, das Benutzer-
                  handbuch gelesen und verstanden haben.

Bewahren Sie das Benutzerhandbuch an einem sicheren Ort auf, um im
Bedarfsfall jederzeit darauf zurückgreifen zu können.

                                                                                Stand: 08.06.2021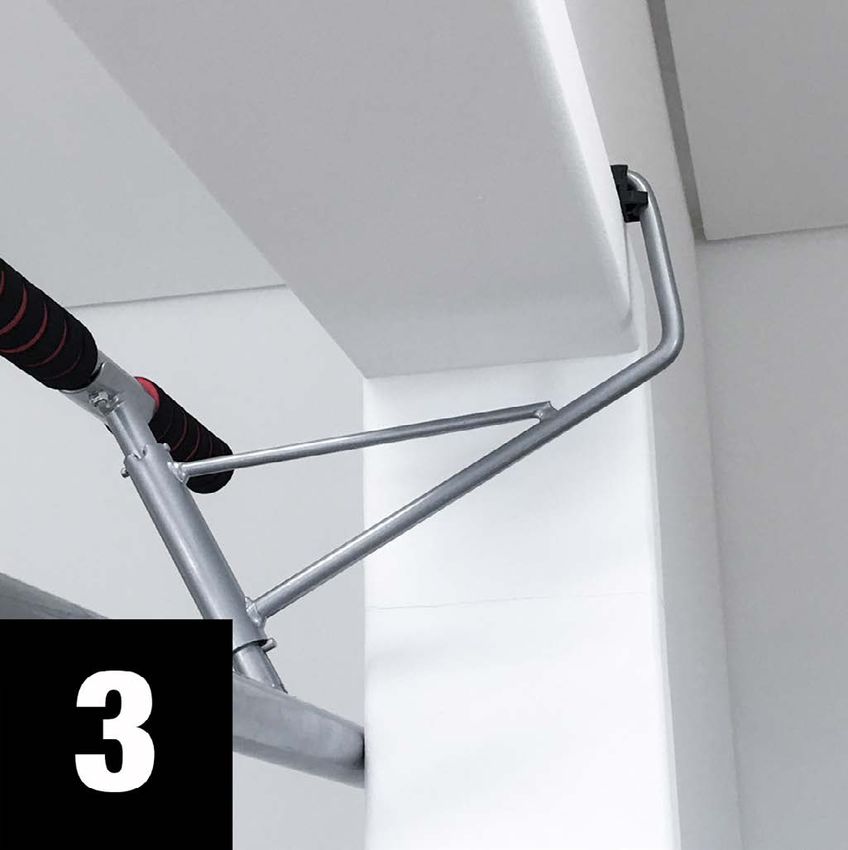
Unsere Video Tutorials für dich!
                   Aufbau, Benutzung, Abbau.
                        1. QR-Code scannen
                        2. Videos anschauen
                        3. Schnell und sicher starten

                                Link zu den Videos:
                   https://service.innovamaxx.de/ks500_video

            Uns gibt es auch auf Social Media!
   Hol dir die neuesten Produktinfos, Trainingsinhalte uvm. auf unserer:
            Instagram-Seite                          Facebook-Seite

https://www.instagram.com/sportstech.de   https://www.facebook.com/sportstech.de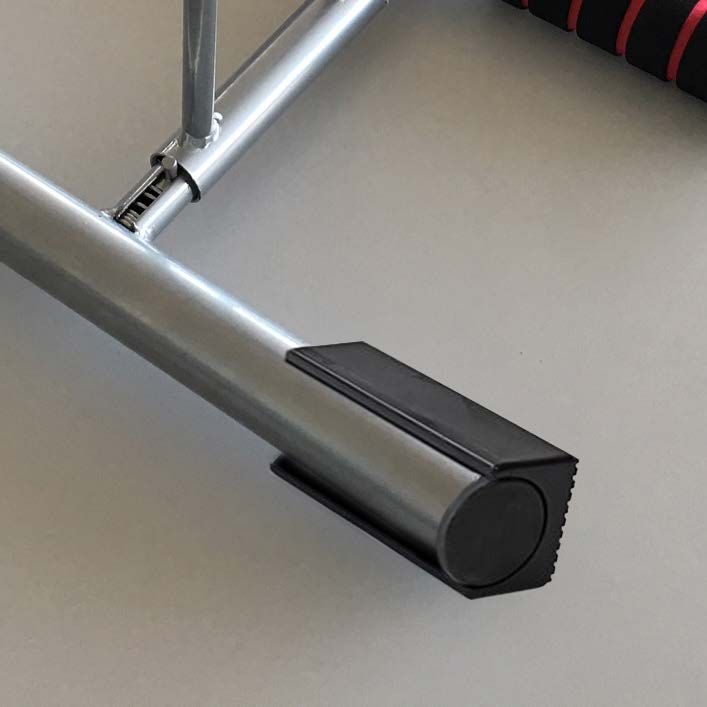
INHALTSVERZEICHNIS

1. WICHTIGE SICHERHEITSHINWEISE............................................................................ 6
2. HINWEISE ZUR NUTZUNG........................................................................................ 7
3. EXPLOSIONSZEICHNUNG/ERSATZTEILLISTE.............................................................. 8
4. LIEFERUMFANG...................................................................................................... 9
5. MONTAGEANLEITUNG ............................................................................................ 10
6. ÜBUNGSVORSCHLÄGE............................................................................................ 13

                                                                                                                          DE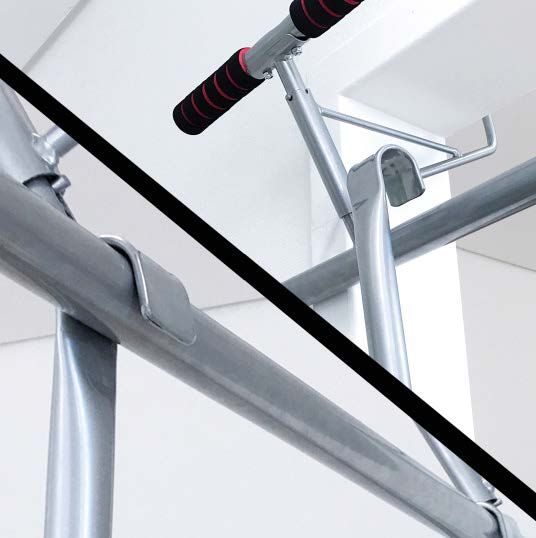
1. WICHTIGE SICHERHEITSHINWEISE

!
         BITTE DIESE BEDIENUNGSANLEITUNG AN EINEM
         SICHEREN PLATZ AUFBEWAHREN.

    1. Es ist wichtig, vor der Montage und Nutzung des KS500 das gesamte Handbuch zu
       lesen. Sichere und effiziente Nutzung kann nur erreicht werden, wenn das KS500
       ordnungsgemäß montiert, gewartet und verwendet wird. Es liegt in Ihrer Verantwor-
       tung zu gewährleisten, dass alle Benutzer des KS500 über alle Vorsichtsmaßnahmen
       und Warnungen informiert sind.
    2. Vor Beginn eines Trainingsprogramms sollten Sie Ihren Arzt konsultieren, um festzu-
       stellen, ob Sie körperliche oder gesundheitliche Einschränkungen haben, welche ein
       Risiko für die Gesundheit und Sicherheit sein könnten oder verhindern, dass Sie das
       Gerät richtig verwenden. Der Rat Ihres Arztes ist wichtig, wenn Sie Medikamente ein-
       nehmen, die Ihre Herzfrequenz, den Blutdruck oder Cholesterinspiegel beeinflussen.
    3. Achten Sie auf die Signale Ihres Körpers. Falsche oder übertriebene Benutzung kann
       gesundheitsschädlich sein. Beenden Sie das Training, wenn eines der folgenden
       Symptome auftritt: Schmerzen, Engegefühl in der Brust, unregelmäßiger Herzschlag,
       extreme Kurzatmigkeit, Benommenheit, Schwindel oder Übelkeit. Wenn einer dieser
       Umstände auftritt, sollten Sie Ihren Arzt konsultieren, bevor Sie mit Ihrem Trainings-
       programm fortfahren.
    4. Halten Sie Kinder und Tiere stets vom Gerät fern. Das Gerät ist nur für Erwachsene
       konzipiert.
    5. Vergewissern Sie sich, dass alle Schrauben, Muttern festgezogen sind, bevor Sie das
       Gerät benutzen.
    6. Stellen Sie sicher, dass Ihr Gerät sicher fixiert ist, bevor Sie es nutzen.
    7. Das Sicherheitsniveau des KS500 kann nur aufrechterhalten werden, wenn es regel-
       mäßig auf Schäden und/oder Verschleiß untersucht wird.
    8. Nur für den Heimgebrauch.
    9. Das Gerät ist nicht darauf ausgelegt um z.B. eine Kinderschaukel o.ä. daran zu be-
       festigen oder als solche zu verwenden. Eine unsachgemäße Verwendung der Klimm-
       zugstange erfolgt auf eigene Gefahr!

                                           6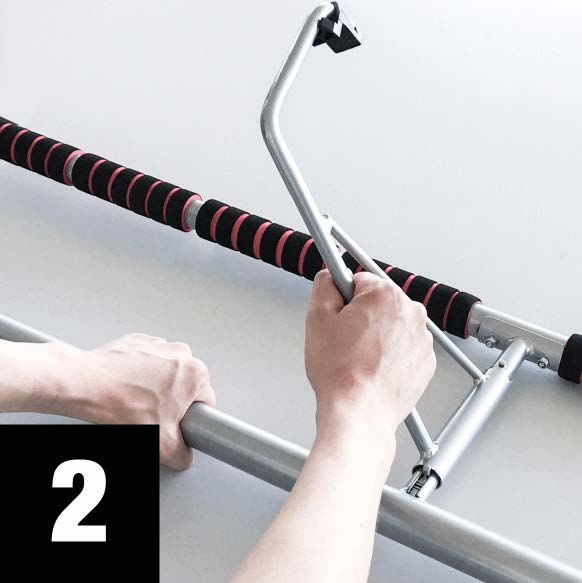
2. HINWEISE ZUR NUTZUNG

1. Stellen Sie sicher, dass der Türrahmen in einem guten Zustand ist. Er muss die Belastungen
   aushalten, die durch die Nutzung der Klimmzugstange entstehen (dies gilt z.B. nicht für Rigips-
   wände).

2. Nutzen Sie bei der Klimmzugstangen-Station NUR die obere Stange zur Ausführung der Übun-
   gen.
3. Vermeiden Sie die Nutzung in der Nähe von Treppenstufen.

4. Springen Sie nicht hoch, um die Stange zu greifen, da sich diese auf diese Weise aus der Ver-
   ankerung lösen könnte.
5. Hängen Sie sich nicht mit den Füßen oder Beinen an die Klimmzugstange.
6. Führen Sie die verschiedenen Klimmzugvariationen nur in gerader Haltung und mit kontrollierter
   (also nicht schwingender oder ruckartiger) Bewegung des Körpers aus.

7. Klemmen Sie die Klimmzugstangenhalterung nur in Türrahmen mit einer Öffnung zwischen 101
                                                                                                     DE
   und 69 cm.
8. Die maximale Belastbarkeit von 130 kg darf unter keinen Umständen überschritten werden.

                                               7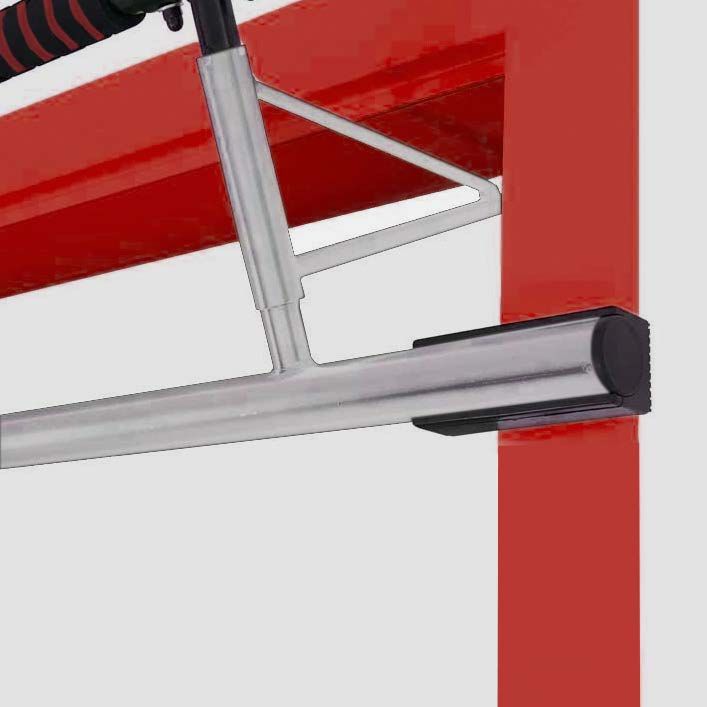
3. EXPLOSIONSZEICHNUNG/ERSATZTEILLISTE

                                      Unter folgendem Link
                               finden Sie die Explosionszeichnung
                                    und die Ersatzteile-Liste:

                            https://service.innovamaxx.de/ks500_spareparts

Recyclingkreislauf
Verpackungsmaterialien können wieder dem Rohstoffkreislauf zugeführt werden.
Entsorgen Sie die Verpackung gemäß den aktuellen Bestimmungen. Informationen erhalten Sie bei den Rückgabe- und Sammelsystemen Ihrer Gemeinde.

                                                                    8
4. LIEFERUMFANG

zusammengebaute
Klimmzugstangen-Station

                                                                          DE
                                                  optionale Dip-Station

                                          Unterlegscheibe

                                            M8 Mutter

       M8 Bolzenschraube        Plastik-Türrahmenschutzblöcke

                                  9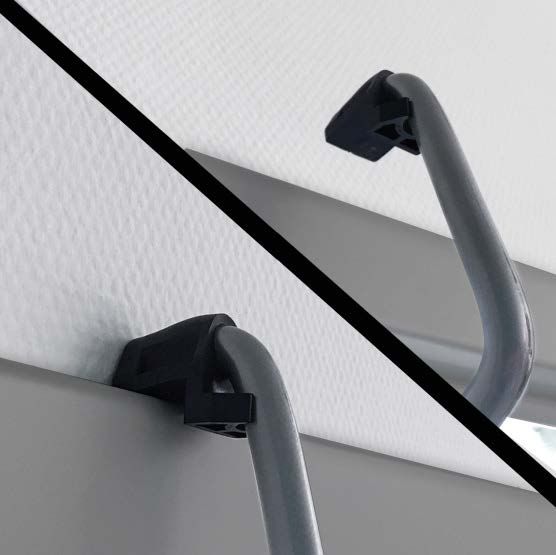
5. MONTAGEANLEITUNG
i Vor der Installation prüfen Sie bitte aus welchem Ma-
terial Ihr gewünschter Montageort besteht und ob er
tragfähig ist.
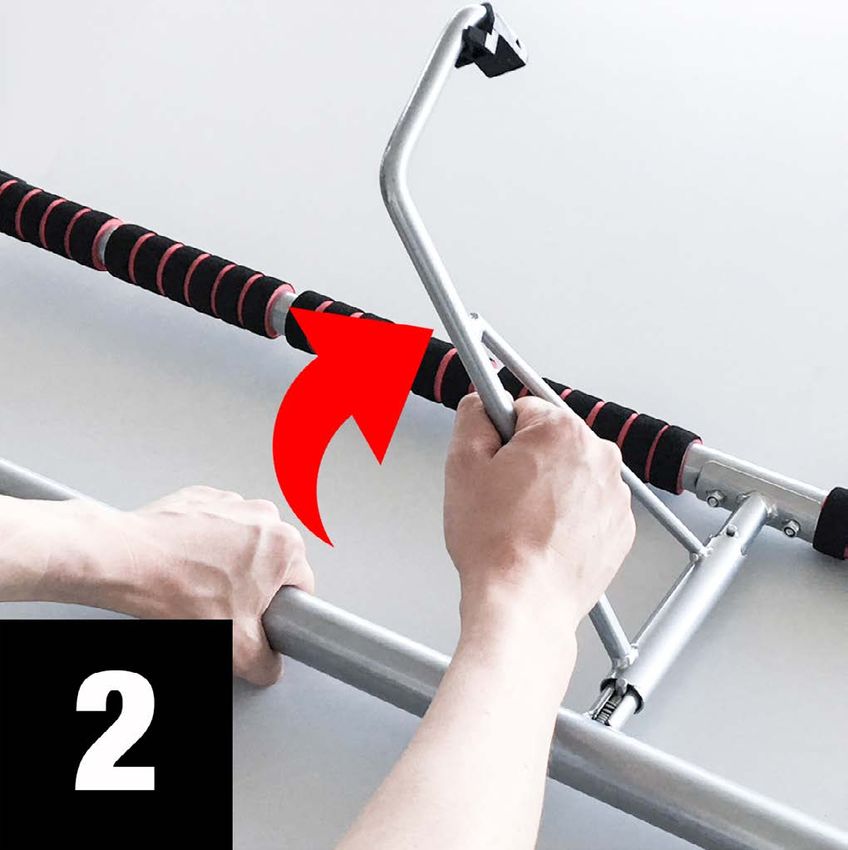
Schritt 1 + 2: Türhaken aufklappen und einrasten
Legen Sie die Stange auf den Boden. Ziehen Sie jetzt die beiden Türhaken in die Richtung der Pfeile
nach unten und dann auseinander, bis beide Haken in senkrechter Position stehen. Dieser Vorgang
wird, insbesondere beim ersten Mal, etwas schwergängig ablaufen. Achten Sie darauf, dass Sie
schon vor dem Ausklappen Druck auf die Feder ausüben, sodass der Aufklappmechanismus wider-
standslos funktioniert. Sobald die Haken die richtige Position erreicht haben, rasten sie sich automa-
tisch ein.
Vor dem Auf- und Zuklappen Druck nach
unten auf den Bügel ausüben, damit die
Feder sich zusammendrückt.
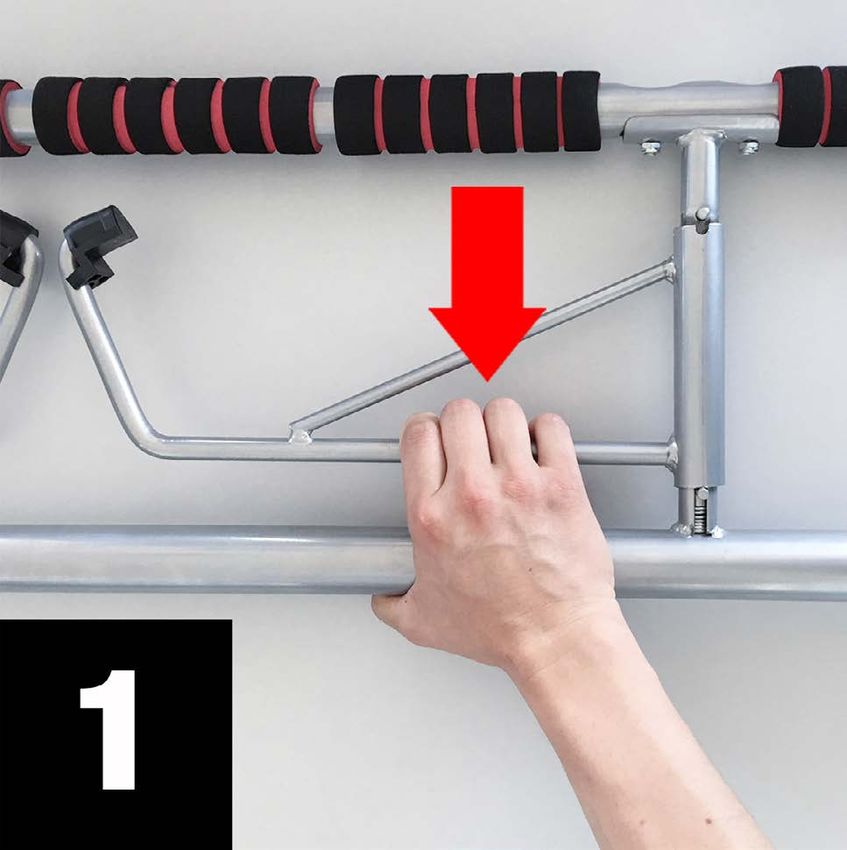
10Schritt 3: Einhängen der Stange
Stellen Sie sich auf die Seite des Türrahmens, auf der sich die Tür in die entgegengesetzte Richtung
öffnet. Führen Sie die Haken durch die Türöffnung, sodass die Enden der Türhaken auf dem Türrah-
men aufliegen.
DE
Hinweis:
Bevor Sie die Stangen einhängen, müssen Sie die beiden beiliegenden Plastik-Türrahmen-
schutzblöcke so auf die Stange schieben, dass die Auflagefläche zum Boden zeigt. Sobald Sie
die Stange an der Tür einklemmen, können Sie die Schutzblöcke so einstellen (hin und her
verschieben), dass diese den Türrahmen mit der größtmöglichen Fläche abdecken. So wird ein
stabiler Halt gewährleistet.
11Hinweis:
Die Spannweite der optionalen Dip-Station ist individuell
anpassbar. Es gibt insgesamt sechs Schraubenlöcher
an der waagerechten Dip-Station Stange, davon sind
drei links und drei rechts. Beim Zusammenschrauben
der Dip-Station empfehlen wir Ihnen die inneren zwei
Schraublöcher zu nutzen.
2x 2x 2x
Unterlegscheibe M8 Mutter
M8 Bolzenschraube
Schritt 4: Einhaken der optionalen Dip-Station
Nachdem Sie die Dip-Station mit den zwei M8 Bolzenschrauben , den zwei Unterlegscheiben und
zwei M8 Muttern zusammengeschraubt haben, verbinden Sie diese mit der Klimmzugstange. Dazu
haken Sie ganz einfach die optionale Dip-Station an die untere Stange der Klimmzugstange ein.
126. ÜBUNGSVORSCHLÄGE
Neben dem typischen Klimmzug sind u.a. folgende Übungen mit der
Klimmzugstange von Sportstech möglich.
Dehnübungen
Dehnen Sie Ihren Körper ausreichend vor und nach den Übungen, um Krämpfe oder Verletzun-
gen vorzubeugen.
1. Knie- und Hüftdehnung
Halten Sie die Klimmzugstange
mit Ihren Händen in entgegen-
gesetzten Richtungen, eine zu
Ihnen, die andere zum Rücken DE
zeigend, fest. Beugen Sie Ihre
Knie und lassen Sie Ihre Arme
ganz ausgestreckt. Heben Sie
langsam die Knie und halten Sie
die Beine zusammen.
2. Wirbelsäulendehnung
Halten Sie sich an der Klimm-
zugstange fest, beugen Sie
langsam die Knie, halten Sie die
Fersen zusammen und übertra-
gen Sie Ihr Körpergewicht auf
die Fußspitzen. Beugen Sie Ihren
Kopf so weit wie möglich nach
hinten und wölben Sie dabei Ih-
ren Rücken.
133. Oberkörperdehnung
Halten Sie sich an der Klimm-
zugstange fest, beugen Sie
langsam die Knie und halten Sie
Ihren Kopf nach vorne geneigt.
Heben Sie Ihre Füße vom Bo-
den und bleiben Sie einige Zeit
in dieser Position.
4. Bauchtraining
Halten Sie sich an der Klimmzugstange
fest, die Arme sind fast komplett ge-
streckt. Jetzt heben Sie Ihre gestreck-
ten Beine vor dem Körper nach oben,
bis Sie einen rechten Winkel mit Ihrem
Oberkörper bilden. Halten Sie diese
Position ein wenig. Bringen Sie danach
Ihre Beine wieder in die Ausgangspo-
sition.
Optional
Dank der optionalen Dip-Station
können Sie Ihr Training um ein
Weiteres gestalten. Stützen Sie
sich rückwärts an den angewin-
kelten Stangen am Schaumstoff
ab und winkeln Sie Ihre Beine
an. In dieser Barrenstützhaltung
stützen Sie sich nun hoch und
runter.
14Dear customer,
We are pleased you chose a device from the SPORTSTECH product range. SPORTSTECH sports equip-
ment offers you high quality and new technology.
In order to fully use the potential of your device and be able to enjoy it for many years, please read this
manual carefully before starting up and beginning of training, and use the device according to the instruc-
tions. The operational safety and function of the device can only be guaranteed if the safety instructions
in this user manual are observed. We shall not assume any liability for damages resulting from improper
use or incorrect operation.
i
Please ensure that all persons using the device have read and understood the user
manual. EN
Keep the user manual in a safe place to be able to access it at any time
if needed.Our video tutorials for you!
Assembly, use, disassembly.
1. Scan the QR code
2. Watch videos
3. Start fast and safely
Link to the videos:
https://service.innovamaxx.de/ks500_video
We are also on social media!
Get the latest product information, training content and much more on our:
Instagram-page Facebook-page
https://www.instagram.com/sportstech.de https://www.facebook.com/sportstech.deTABLE OF CONTENTS
1. IMPORTANT SAFETY INFORMATION.......................................................................... 19
2. INFORMATION ON HOW TO USE............................................................................... 20
3. EXPLODED DRAWING/SPARE PARTS LIST................................................................. 21
4. PACKAGE CONTENTS.............................................................................................. 22
5. ASSEMBLY INSTRUCTIONS....................................................................................... 23
6. EXERCISE SUGGESTIONS......................................................................................... 26
EN1. IMPORTANT SAFETY INFORMATION
!
PLEASE KEEP THIS MANUAL IN A SAFE PLACE FOR
REFERENCE.
1. It is important to read this entire manual before assembling and using the KS500.
Safe and efficient use can only be achieved if the KS500 is assembled, maintained
and used properly. It is your responsibility to ensure that all users of the KS500 are
informed of all warnings and precautions.
2. Before starting any exercise program you should consult your doctor to determine
if you have any physical or health conditions that could create a risk to your health
and safety or prevent you from using the equipment properly. Your doctor‘s advice is
essential if you are taking medication that affects your heart rate, blood pressure or
cholesterol level.
3. Be aware of your body‘s signals. Incorrect or excessive exercise can damage your
health. Stop exercising if you experience any of the following symptoms: Pain, tight-
ness in your chest, irregular heartbeat, extreme shortness of breath, feeling light
headed, dizzy or nauseous. If you do experience any of these conditions you should
consult your doctor before continuing with your exercise program.
4. Keep children and pets away from the equipment. The equipment is designed for
adult use only.
5. Make sure that all screws, nuts, and knobs are tightened before starting to use the
device.
6. Ensure that your equipment is firmly fixed before using.
7. The safety level of the KS500 can only be maintained if it is regularly examined for
damage and/or wear and tear.
8. For home use only.
9. The device is not designed to attach for instance a children‘s swing or something
similar to it, or use it as such. Improper use of the pull-up bar is at your own risk!
182. INFORMATION ON HOW TO USE
1. Make sure that the door frame is in good condition. It must withstand the loads caused by the
use of the pull-up bar (this does not apply, for example, to plasterboard walls).
2. ONLY use the top bar of the pull-up bar station to perform the exercises.
3. Avoid using near stairs.
4. Do not jump up to grab the bar, as this could pull it from the anchorage.
5. Do not hang your feet or legs on the pull-up bar.
6. Perform the different pull-up variations in a straight posture only and with controlled (i.e. no
swinging or jerks) movement of the body.
7. Only fasten the pull-up bar holder in door frames with an opening between 101 and 69cm.
8. The maximum load capacity of 130kg must not be exceeded under any circumstances.
EN
193. EXPLODED DRAWING/SPARE PARTS LIST
At the following link
you will find the exploded drawing
and the spare parts list:
https://service.innovamaxx.de/ks500_spareparts
Recycling loop
Packaging material can be conveyed back to the raw material cycle. Dispose of packaging material in accordance with legal provisions. Information can be
retrieved from the return or collections systems of your community.
204. PACKAGE CONTENTS
Assembled
pull-up bar station
optional dip station
EN
Washer
M8 nut
M8 bolt screw Plastic door frame protection blocks
215. ASSEMBLY INSTRUCTIONS
i
Prior to installation, please check of which material
your desired installation location is made and whether
it is resilient.
Step 1 + 2: Open door hooks and snap into place
Put the bar on the floor. Now pull the two door hooks downwards in the direction of the arrows and
then apart until both hooks are in the vertical position. This process will be somewhat, especially the
first time. Make sure that you apply pressure to the spring before folding it out so that the opening
mechanism works without resistance. As soon as the hooks have reached the correct position, they
lock in place automatically.
Before opening and closing, apply down-
ward pressure to the bar to compress
the spring.
22Step 3: Hooking in the rod
Stand on the side of the door frame where the door opens in the opposite direction. Pass the hooks
through the door opening so that the ends of the door hooks rest on the door frame.
Note: EN
Before suspending the rods, you must slide the two enclosed plastic door frame protection
blocks onto the rod so that the support surface faces the floor. As soon as you clamp the bar
to the door, you can adjust the protection blocks (move them back and forth) so that they cover
the largest possible area of the door frame. This ensures a stable support.
23Note:
The range of the optional dip station can be individually ad-
justed. There are six screw holes in the horizontal dip station
rod, three of which are on the left and three on the right.
When screwing the Dip-Station together, we recommend
using the two inner screw holes.
2x 2x 2x
Washer M8 nut ww
M8 bolt screw
Step 4: Hooking in the optional dip station
After you have screwed the dip station together with the two M8 bolt screws , the two washers and
two M8 nuts , connect it to the pull-up bar. Simply hook the optional dip station to the lower bar of
the pull-up bar.
246. EXERCISE SUGGESTIONS
Apart from the typical pull-up, with this pull-up bar by Sportstech you
can also do the following types of exercises.
Stretching exercises
Stretch your body sufficiently before and after the exercises to prevent cramps or injuries.
1. Knee and Hip Stretching
Hold the pull-up bar with your
hands in opposite directions,
one hand towards your body,
the other hand pointing to your
back. Bend your knees and let
your arms extend completely.
Slowly raise your knees and hold
your legs together.
EN
2. Spinal Stretching
Hold the pull-up bar firmly with
your hands, bend your knees
slowly, hold your heels together
and transfer your body weight to
the toes of your feet. Bend your
head backward as far as you
can, while arching your back.
253. Upper Body Stretching
Hold the pull-up bar firmly with
your hands, bend your knees
slowly, and keep your head til-
ted forward. Lift your feet off the
floor and stay in this position for
some time.
4. Abdominal workout
Hold on to the pull-up bar, the
arms are almost completely
stretched. Now lift up your stret-
ched legs in front of your body
until they form a right angle with
your upper body. Keep this posi-
tion a little. Then bring your legs
back into the starting position.
Optional
Thanks to the optional Dip-Stati-
on you can design your workout
with another one. Support your-
self backwards on the angled
bars on the foam and angle your
legs. Now support yourself up
and down in this bar support po-
sition.
26Estimado cliente,
Nos complace que haya elegido un dispositivo de la línea de productos SPORTSTECH. Las máquinas de
deporte de SPORTSTECH ofrecen una gran calidad y una tecnología innovadora.
Con el fin de usar todo el potencial de su dispositivo y para que pueda disfrutarlo durante muchos años,
por favor lea este manual cuidadosamente antes de comenzar a ejercitarse, y use el dispositivo de acuer-
do a las instrucciones. La seguridad y funcionamiento operativos del dispositivo solo puede garantizarse
si se tienen presentes las instrucciones de seguridad en este manual de usuario. Nosotros no asumimos
ninguna responsabilidad por daños resultantes del uso inadecuado o incorrecto del dispositivo.
i
Por favor asegúrese de que todas las personas que usen el dispositivo hayan leído y
entendido este manual de usuario.
Mantenga el manual de usuario en un lugar seguro para poder acceder
a él cuando sea necesario. ESNuestros tutoriales en video para usted!
Montaje, Utilizar, Desmontaje.
1. Escanear el código QR
2. Ver vídeos
3. Comienza rápido y seguro
Enlace a los videos:
https://service.innovamaxx.de/ks500_video
¡También estamos en redes sociales!
Obtenga la última información sobre nuestros productos, entrenamientos y mucho
más aquí:
Instagram Facebook
https://www.instagram.com/sportstech.de https://www.facebook.com/sportstech.deCONTENIDO
1. INFORMACIÓN IMPORTANTE DE SEGURIDAD............................................................. 30
2. NOTAS SOBRE EL USO............................................................................................ 31
3. DIBUJO DE EXPLOSIÓN/LISTA DE REPUESTOS.......................................................... 32
4. CONTENIDO........................................................................................................... 33
5. INSTRUCCIONES DE MONTAJE................................................................................. 34
6. SUGERENCIAS DE EJERCICIOS................................................................................ 37
ES1. INFORMACIÓN IMPORTANTE DE SEGURIDAD
!
GUARDE ESTE MANUAL EN UN LUGAR SEGURO PARA
REFERENCIA.
1. Es importante leer la totalidad de este manual antes de ensamblar y usar la KS500.
Solo se podrá conseguir un uso efectivo y seguro si la KS500 se ensambla, se man-
tiene y se usa adecuadamente. Es su responsabilidad asegurarse de que todos los
usuarios de la KS500 estén informados sobre todas las advertencias y precauciones.
2. Antes de comenzar cualquier programa de ejercicios debe consultar a su médico
para determinar si tiene alguna condición médica o física que podría poner en riesgo
su seguridad y su salud, o para que le prevenga de usar este equipo de manera ade-
cuada. Las recomendaciones de su médico son esenciales si está tomando medica-
mentos que afecten su frecuencia cardíaca, presión sanguínea o nivel de colesterol.
3. Tenga en cuenta las señales de su cuerpo. El ejercicio incorrecto o en exceso pue-
de perjudicar su salud. tenga el ejercicio si experimenta alguno de los siguientes
síntomas: dolor, opresión en el pecho, latidos irregulares, dificultad para respirar,
aturdimiento, mareo o nauseas. Siexperimenta cualquiera de estos síntomas debe
consultar a su médico antes de continuar con su programa de ejercicios.
4. Mantenga a los niños y a las mascotas lejos de la bicicleta. El equipo está diseñado
únicamente para adultos.
5. Asegúrese de que todos los tornillos, tuercas y perillas estén bien apretados antes
de comenzar a usar el dispositivo.
6. Asegúrese de que su equipo esté asegurado antes de usarlo.
7. El nivel de seguridad del KS500 sólo se puede mantener si se comprueba regu-
larmente los daños y/o el desgaste.
8. Apto únicamente para uso doméstico.
9. El dispositivo no está diseñado para sujetar, por ejemplo, un columpio infantil u otro
objeto similar, ni para usarlo de esa manera. El uso no adecuado de la barra para
hacer dominadas es su responsabilidad!
302. NOTAS SOBRE EL USO
1. Asegúrese de que el marco de la puerta esté en buenas condiciones. Tiene que soportar las
tensiones causadas por el uso de la barra de elevación (esto no se aplica, por ejemplo, a las
paredes de placas de yeso).
2. En la estación de barra de mentón, SOLO use la barra superior para realizar los ejercicios.
3. Evite el uso cerca de escaleras.
4. No salte para agarrar el palo, ya que podría desprenderse del anclaje.
5. No cuelgue sus pies o piernas en la barra de la barbilla.
6. Realice las diversas variaciones de pull-up solo en una postura recta con un movimiento cont-
rolado (sin balanceo o sacudidas) del cuerpo.
7. Sujete el soporte de la barra de mentón solo en los marcos de las puertas con una abertura
entre 101 y 69 cm.
8. Bajo ninguna circunstancia se debe sobrepasar la capacidad de carga máxima de 150 kg.
ES
313. DIBUJO DE EXPLOSIÓN/LISTA DE REPUESTOS
En el siguiente enlace
encontrarás el dibujo de explosión
y la lista de repuestos:
https://service.innovamaxx.de/ks500_spareparts
Reciclaje loop
El material de empaque puede trasladarse de nuevo al ciclo de materias primas. Deshágase del material de empaque de acuerdo a las normativas legales. Puede
encontrar información en los sistemas de recolección de su comunidad.
324. CONTENIDO
Chin-bares montada en la
estación
estación de inmersión
opcional
ES
Arandela
Tuerca M8
Perno M8 Bloques de protección de marco para
la puerta de plástico
335. INSTRUCCIONES DE MONTAJE
i
Antes de la instalación, por favor revise de qué mate-
rial está hecho su lugar deseado de instalación y si es
resistente.
Paso 1 + 2: abra el gancho de la puerta y asegúrelo bien en su posición
Coloque el poste en el suelo. Ahora tire de los dos ganchos de la puerta en la dirección de las
flechas hacia abajo y luego sepárelos hasta que ambos ganchos estén en posición vertical. Este pro-
ceso será un poco complejo, especialmente la primera vez. Asegúrese de aplicar presión al resorte
antes de desplegarlo, para que el mecanismo de plegado funcione sin resistencia. Tan pronto los
ganchos hayan alcanzado la posición correcta, se cerrarán automáticamente.
Antes de abrir y cerrar, presione ha-
cia abajo el soporte para comprimir el
resorte.
34Paso 3: Instalación de la barra
Párese en el lado del marco de la puerta donde la puerta se abre en la dirección opuesta. Pase los
ganchos a través de la abertura de la puerta de modo que los extremos de los ganchos de la puerta
descansen en el marco de la puerta.
Nota:
Antes de colocar las barras, debe deslizar los dos bloques de protección del marco de la puerta
de plástico encerrados en la barra para que la superficie de soporte quede hacia el piso. Tan
pronto sujete el poste a la puerta, puede ajustar los bloques de protección (moverlos hacia
adelante y hacia atrás) para que cubran el marco de la puerta con la mayor área posible. Esto ES
brinda más estabilidad.
35Nota:
El lapso de la estación dip opcional es personalizable. Hay
un total de seis orificios para tornillos en la varilla de la esta-
ción de dip horizontal, tres de los cuales están a la izquierda
y tres están a la derecha. Cuando atornille la estación de
inmersión, le recomendamos que use los dos orificios de
los tornillos internos.
2x 2x 2x
Arandela Tuerca M8
Perno M8
Paso 4: Enganche en la estación de inmersión opcional
Después de atornillar la estación de inmersión con los dos pernos M8, dos arandelas y dos tuercas
M8, conéctelos a la barra de extensión. Simplemente conecte la Dip-Station opcional a la barra
inferior de la barra de dominadas.
366. SUGERENCIAS DE EJERCICIOS
Además de los ejercicios típicos, con esta barra para dominadas de
Sportstech también puede hacer los siguientes tipos de ejercicios.
Ejercicios de estiramiento
Estire su cuerpo suficientemente antes y después de ejercitarse para prevenir calambres o
lesiones.
1. Estiramiento de rodillas y
cadera
Sostenga la barra con sus ma-
nos en direcciones opuestas,
una mano hacia su cuerpo, la
otra apuntando hacia su espal-
da. Doble sus rodillas y deje que
sus brazos se extienda com-
pletamente. Levante sus rodil-
las lentamente y mantenga sus
piernas juntas.
ES
2. Estiramiento de la columna
Sostenga la barra firmemente
con sus manos, doble sus rodillas
lentamente, mantenga sus talo-
nes unidos y transfiera su peso
corporal a los dedos de sus pies.
Doble su cabeza hacia atrás tanto
como pueda mientras arquea su
espalda.
373. Estiramiento de la parte
superior del cuerpo
Sostenga la barra firmemente
con sus manos, doble sus ro-
dillas lentamente y mantenga su
cabeza inclinada hacia adelante.
Levante sus pies desde el suelo
y permanezca en esta posición
durante algún tiempo.
4. Ejercicios abdominales
Se adhieren a la barra de pull-
up determina los brazos están
casi totalmente estirados. Aho-
ra levanta las piernas estiradas
delante del cuerpo hacia arriba
hasta que forman un ángulo rec-
to con el torso. Mantenga esta
posición un poco. a continua-
ción, llevar las piernas de nuevo
a la posición inicial.
Opcional
Gracias a la estación de inmer-
sión opcional, puede planificar
su entrenamiento aún más. Haga
una copia de seguridad contra
las barras en ángulo en la espu-
ma y el ángulo de sus piernas.
En este soporte de publicación
de barra, se puede apoyar hacia
arriba y hacia abajo.
38MANUEL
FRANÇAIS
Cher client,
Nous sommes ravis que vous ayez choisi un appareil de la gamme de produits SPORTSTECH. Les équi-
pements sportifs SPORTSTECH vous offrent une qualité élevée et une technologie innovante.
Afin d'utiliser pleinement le potentiel de votre appareil et de pouvoir l'apprécier pendant de nombreuses
années, lisez attentivement ce manuel avant l'utilisation et le début de votre entraînement et utilisez l'ap-
pareil conformément aux instructions. La sécurité et le fonctionnement opérationnelles de l'appareil ne
peuvent être garanties que si les dispositions légales relatives à la sécurité générale et à la prévention des
accidents ainsi que les consignes de sécurité contenues dans ce manuel d'utilisation sont respectées.
Nous n'assumons aucune responsabilité pour les dommages résultant d'une mauvaise utilisation ou d'un
fonctionnement incorrect.
i
Veuillez vous assurer que toutes les personnes qui utilisent l'appareil ont lu et compris
le manuel d'utilisateur.
Gardez le manuel d'utilisateur dans un endroit sûr pour y avoir accès à
tout moment si nécessaire.
FRNos tutoriels vidéo pour vous!
Montage, utilisation, démontage.
1. Scannez le code QR
2. Regarder les vidéos
3. Démarrez rapidement et en toute sécurité
Lien vers les vidéos:
https://service.innovamaxx.de/ks500_video
Vous pouvez aussi nous trouver sur les réseaux sociaux!
Retrouve les dernières informations sur les produits, le contenu des entraînements et
bien plus encore sur notre:
la page Instagram la page Facebook
https://www.instagram.com/sportstech.de https://www.facebook.com/sportstech.deTABLE DES MATIÈRES
1. INSTRUCTIONS IMPORTANTES DE SÉCURITÉ............................................................. 45
2. NOTES SUR L‘UTILISATION...................................................................................... 46
3. DESSIN ÉCLATÉ/LISTE DES PIÈCES DE RECHANGE.................................................... 47
4. CONTENU DU PAQUET............................................................................................ 48
5. INSTRUCTIONS D‘ASSEMBLAGE............................................................................... 49
6. SUGGESTIONS D‘EXERCICES................................................................................... 52
FR1. INSTRUCTIONS IMPORTANTES DE SÉCURITÉ
!
CONSERVER CE MODE D‘EMPLOI DANS UN ENDROIT
SÛR.
1. Il est important de lire la totalité du manuel avant d‘assembler et d‘utiliser le KS200. Une utilisa-
tion sécurisée et efficace ne peut être obtenue que si le KS200 est installé, entretenu et utilisé
dans le respect des règles. Il est de votre responsabilité de vous assurer que tous les utilisateurs
du KS200 soient informés de toutes les mesures de précaution à prendre et de toutes les mises
en garde à connaître.
2. Avant de commencer un programme d‘entraînement, vous devriez consulter votre médecin
afin de déterminer si vous souffrez de restrictions physiques ou de santé. Celles-ci pourraient
constituer un risque pour votre santé et votre sécurité ou pourraient vous empêcher d‘utiliser
correctement l‘appareil. L‘avis de votre médecin est important si vous prenez des médicaments
qui influencent votre rythme cardiaque, votre tension artérielle ou votre taux de cholestérol.
3. Faites attention aux signaux que vous envoie votre corps. Une utilisation incorrecte ou excessive
peut être préjudiciable à votre santé. Stoppez votre entraînement si l‘un des symptômes suivants
apparaît : douleur, oppression thoracique, rythme cardiaque irrégulier, essoufflement extrême,
somnolence, vertiges ou nausées. Si l‘une de ces manifestations devait se produire, vous devriez
consulter votre médecin avant de poursuivre votre programme d‘entraînement.
4. Tenez toujours les enfants et les animaux loin de l‘appareil qui n‘est conçu que pour des adultes.
5. Assurez-vous que toutes les vis, les écrous et les boutons sont serrés avant de commencer à
utiliser l‘appareil.
6. Assurez-vous que votre équipement est fermement et solidement fixé avant de l‘utiliser.
7. Le niveau de sécurité du KS500 ne peut être maintenu que s’il fait l’objet d’un examen pério-
dique visant à déceler les dommages et/ou l’usure.
8. Pour un usage domestique seulement.
9. L‘appareil n‘est pas conçu pour que l‘on y fixe une balançoire d‘enfant, par exemple, ou pour
être utilisé comme tel. Toute utilisation inappropriée de la barre de traction est à vos risques et
périls !
422. NOTES SUR L‘UTILISATION
1. Assurez-vous que le cadre de la porte est en bon état. Il doit résister aux contraintes causées par
l‘utilisation de la barre de traction (cela ne s‘applique pas, par exemple, aux murs en placoplâtre).
2. Utilisez UNIQUEMENT la barre supérieure pour effectuer les exercices.
3. Évitez l‘utilisation près des escaliers.
4. Ne sautez pas pour saisir la barre, car elle pourrait se détacher.
5. Ne suspendez pas vos pieds ou vos jambes à la barre de traction.
6. N‘effectuez les différentes variations de traction que dans une posture droite avec un mou-
vement contrôlé du corps.
7. Ne fixez le support de barre de traction que dans les cadres de porte avec une ouverture com-
prise entre 69 et 101 cm.
8. La charge maximale de 130 kg ne doit en aucun cas être dépassée.
FR
433. DESSIN ÉCLATÉ/LISTE DES PIÈCES DE RECHANGE
A l‘adresse suivante
vous trouverez le dessin éclaté
et la liste des pièces de rechange :
https://service.innovamaxx.de/ks500_spareparts
Chaîne du recyclage
Les matériaux d‘emballage peuvent être transportés vers le cycle des matières premières. La disposition des matériaux d‘emballage, conformément aux
dispositions légales. Les informations peuvent être récupérées à partir des systèmes de retour ou de collections.
444. CONTENU DU PAQUET
Barre de traction assem-
blée
Station parallèle en
optionopcional
Rondelle
FR
Ecrou M8
Boulon M8 Protection de cadre de porte en plas-
tique
455. INSTRUCTIONS D‘ASSEMBLAGE
i Avant l‘installation, veuillez vérifiez de quel matériel,
l‘installation de votre lieu désirée a été faite et si elle
est résiliente.
Étape 1 + 2: Ouvrez le crochet de la porte et verrouillez-le en place
Posez la barre sur le sol. Maintenant, tirez les deux crochets de porte dans le sens des flèches vers
le bas, puis séparez-les jusqu‘à ce que les deux crochets soient en position verticale. Ce proces-
sus sera quelque peu délicat, surtout la première fois. Assurez-vous d‘appliquer une pression sur le
ressort avant de le déplier, afin que le mécanisme de pliage fonctionne sans résistance. Dès que les
crochets ont atteint la bonne position, ils se bloquent automatiquement.
Avant d‘ouvrir et de fermer, appuyez sur
le support pour comprimer le ressort.
46Étape 3: Fixez la barre
Tenez-vous sur le côté de la porte. Passez les crochets dans l’ouverture de la porte de sorte que les
extrémités des crochets reposent sur le cadre de la porte.
Remarque:
Avant de fixer les barres, vous devez faire glisser les deux blocs de protection du cadre de por-
te en plastique sur la barre de manière à ce que la surface de support soit orientée vers le sol.
Dès que vous fixez la barre à la porte, vous pouvez régler les blocs de protection (déplacez-les
d‘avant en arrière) afin qu‘ils recouvrent le cadre de la porte avec la plus grande surface possib-
le. Cela garantit une tenue stable.
FR
47Remarque:
La portée de la station de parallèle optionnelle est per-
sonnalisable. Il y a un total de six trous de vis sur la station
horizontale (3 de chaque côté). Lors du vissage de la
station, nous vous recommandons d‘utiliser les deux trous
de vis intérieurs.
2x 2x 2x
Rondelle Ecrou M8
Boulon M8
Étape 4 : Mise en place de la station de parallèle
Après avoir vissé la station de parallèle avec deux boulons M8, deux rondelles et deux écrous M8,
connectez-la à la barre de traction. Il suffit de raccorder la station de parallèle optionnelle à la barre
inférieure de la barre de traction.
486. SUGGESTIONS D‘EXERCICES
Mise à part la traction typique, avec cette barre de traction de Sport-
stech, vous pouvez également effectuer les exercices suivants.
Exercices d‘étirement
Étirez votre corps suffisamment avant et après les exercices pour éviter les crampes ou les
blessures.
1. L‘étirement du genou et de
la hanche
Tenez la barre de traction avec
vos mains dans des directions
opposées, une main vers vot-
re corps, l‘autre vers votre dos.
Pliez vos genoux et laissez vos
bras étendus complètement.
Soulevez vos genoux lentement
et tenez vos jambes ensemble.
2. Étirement de la colonne
vertébrale
Tenez fermement la barre de FR
traction avec vos mains, pliez vos
genoux lentement, maintenez vos
talons ensemble et transférez
votre poids corporel sur les orteils
de vos pieds. Penchez votre tête
vers l‘arrière aussi loin que vous
le pouvez, tout en arborant votre
dos.
493. Étirement de la partie
supérieure du corps
Tenez fermement la barre de
traction avec vos mains, pliez
vos genoux lentement et main-
tenez votre tête inclinée vers
l‘avant. Soulevez les pieds du
sol et restez dans cette position
pendant un certain temps.
4. Exercice abdominale
Tenez-vous à la barre de pull-up
détermine les bras sont presque
entièrement tendus. Maintenant,
soulevez vos jambes tendues
devant le corps ascendant jus-
qu‘à ce qu‘ils forment un angle
droit avec votre torse. Maintenez
cette position un peu. puis ap-
portez vos jambes revenir à la
position de départ.
En option
Grâce à la station de parallèle,
vous pouvez ajouter des exer-
cices à votre entraînement. Avec
cette barre, vous vous soutenez
maintenant de haut en bas.
50MANUALE D’USO
ITALIANO
Gentile cliente,
Siamo lieti che abbiate scelto un dispositivo della gamma SPORTSTECH. L‘attrezzatura sportiva SPORT-
STECH ti offre alta qualità e tecnologia innovativa.
Per sfruttare a pieno il potenziale del dispositivo e poterlo utilizzare per molti anni, raccomandiamo di
leggere attentamente questo manuale prima di iniziare l’allenamento e di utilizzare il dispositivo seguen-
do le istruzioni. La sicurezza e la funzionalità del dispositivo possono essere garantite solo se vengono
rispettate le istruzioni di sicurezza contenute nel presente manuale d‘uso. Non ci assumiamo alcuna res-
ponsabilità per i danni derivanti da un uso improprio o da un uso errato del dispositivo.
i
Assicurarsi che tutte le persone che utilizzano il dispositivo abbiano letto e compreso il
manuale dell'utente.
Tenere il manuale dell'utente in un luogo sicuro per potervi accedere in
qualsiasi momento, ove necessario.
ITIl nostro Video Tutorial per te!
Montaggio, Utilizzo, Smontaggio.
1. Scannerizza il QR-Code
2. Guarda il video
3. Inizia ad allenarti veloce e sicuro
Link per il Video:
https://service.innovamaxx.de/ks500_video
Ci siamo anche sui social!
Scopri le ultime novità sui prodotti, contenuti per l'allenamento e molto altro
ancora sul nostro:
pagina Instagram pagina Facebook
https://www.instagram.com/sportstech.de https://www.facebook.com/sportstech.deINDICE
1. INFORMAZIONI IMPORTANTI SULLA SICUREZZA ....................................................... 54
2. INFORMAZIONI D‘USO............................................................................................. 55
3. DISEGNO ESPLOSO/LISTA DEI PEZZI DI RICAMBIO..................................................... 56
4. CONTENUTO DI SPEDIZIONE.................................................................................... 57
5. ISTRUZIONI DI ASSEMBLAGGIO................................................................................ 58
6. SUGGERIMENTI DI ESERCIZI ............................................................................... 61
IT1. INFORMAZIONI IMPORTANTI SULLA SICUREZZA
!
CONSERVARE QUESTO MANUALE IN UN POSTO SICURO
PER ULTERIORE RIFERIMENTO.
1. È importante leggere l‘intero manuale prima di assemblare e utilizzare la KS500. Un
uso sicuro ed efficiente può essere raggiunto solo se la KS500 è assemblata, man-
tenuta e utilizzata correttamente. È responsabilità dell’utente di assicurare che tutti gli
utenti della KS500 siano informati di tutte le avvertenze e le precauzioni.
2. Prima di iniziare qualsiasi programma di esercizio, è necessario consultare un medico
per determinare se disponete di eventuali condizioni fisiche o di salute che potreb-
bero creare un rischio per la salute e la sicurezza o impedire di utilizzare l‘apparecch-
iatura in modo corretto. L’opinione del vostro medico di fiducia è essenziale se state
assumendo farmaci che alterano il livello di frequenza cardiaca, pressione sanguigna
o i livelli di colesterolo.
3. È fondamentale essere consapevoli dei segnali del corpo. Un allenamento sbagliato
o eccessivo può danneggiare la salute. Interrompete l’allenamento se manifestate
uno dei seguenti sintomi: dolore, senso di oppressione al petto, battito cardiaco irre-
golare, estrema mancanza di respiro, sensazione di stordimento, vertigini o nausea.
Se manifestate una delle seguenti condizioni, è consigliabile che consultiate il vostro
medico prima di continuare con il vostro programma di esercizio.
4. Tenere i bambini e gli animali domestici lontano dall‘apparecchiatura. L‘apparecchia-
tura è progettata solo per uso adulto.
5. Assicurarsi che tutte le viti, i dadi e le manopole siano stretti prima di iniziare a utiliz-
zare il dispositivo.
6. Assicurarsi che il dispositivo sia saldamente fissato prima di utilizzarlo.
7. Il livello di sicurezza della KS500 può essere mantenuto solo la macchina viene
regolarmente esaminata per riscontrare eventuali danni e / o usura.
8. Solo per uso domestico.
9. Il dispositivo non è stato progettato per collegare per esempio un‘altalena o qualcosa
di simile o di usarlo come tale. L‘uso improprio della barra per trazioni è a rischio
dell‘utente.
542. INFORMAZIONI D‘USO
1. Assicuratevi che il telaio della porta sul quale volete fissare la barra sia in un buono stato. Questo
deve essere in grado di sopportare il carico derivato dall‘utilizzo della barra per trazioni (va da sè
che ad esempio l‘intercapedine non può essere utilizzata come zona di fissaggio).
2. Nell‘esecuzione degli esercizi con la stazione barra per trazioni si prega di utilizzare SOLO la
barra superiore.
3. Non fissate la barra in prossimità di scale.
4. Non saltate per afferrare la barra, perché in questo caso potrebbe sganciarsi.
5. Non utilizzate la barra appendendovici con i piedi o con le gambe.
6. Tutti gli esercizi con la barra per trazioni vanno effettuati mantenendo una posizione diritta, con-
trollando i movimenti del corpo (senza oscillare e senza effettuare movimenti bruschi).
7. Fissate la barra per trazioni solo su parete con un‘apertura tra i 101 e i 69cm.
8. La capacità di resistenza massima di 130kg non deve essere superata in alcun modo.
IT
55DISEGNO ESPLOSO/LISTA DEI P
a
3. DISEGNO ESPLOSO/LISTA DEI IT
PEZZI DI RICAMBIO
Al seguente link
troverete il disegno esploso
e la lista dei pezzi di ricambio:
https://service.innovamaxx.de/ks500_spareparts
Riciclaggio dei rifiuti
Il materiale di imballaggio può essere trasportato di nuovo al ciclo delle materie prime. Smaltire il materiale di imballaggio in conformità alle disposizioni di legge.
Le informazioni possono essere recuperate dai sistemi di ritorno o di raccolta della vostra comunità.
56PEZZI DI RICAMBIO
4. CONTENUTO DI SPEDIZIONE
Stazione barra per trazioni
assemblata
Dip station opzionale
Rondella
Dado M8 IT
Bullone M8 Blocchi in plastica per protezione telaio
porta
575. ISTRUZIONI DI ASSEMBLAGGIO
i
Prima di iniziare verificate di quale materiale è costitu-
ita la base su cui volete montare la barra, controllando
che sia una zona resistente ai carichi.
Step 1 + 2: aprire i ganci per la parete e chiuderli a scatto
Mettete la barra sul pavimento. Estraete quindi entrambi i ganci per la porta nella direzione indicata
dalla freccia, ovvero verso il basso, e poi dispiegateli fino a che non rimangano in posizione perpen-
dicolare. La prima volta potreste avere qualche difficoltà: prima di aprire i ganci esercitate la dovuta
pressione sulle molle in modo tale che il meccanismo di chiusura - e alzata - non opponga resisten-
za. Quando i ganci si trovano nella posizione corretta si chiuderanno automaticamente a scatto.
Prima di aprire e chiudere esercitare la
dovuta pressione sulla staffa in modo
che la molla sia sufficientemente com-
pressa.
58Step 3: Appendere la barra
Mettetevi a fianco alla parete, lateralmente, vicino alla porta ma in direzione opposta rispetto
all‘apertura della stessa. Fate passare i ganci attraverso l‘apertura della porta in modo che le estre-
mità degli stessi poggino sul suo telaio.
Consiglio:
Prima di appendere la barra è necessario spostare i blocchi di protezione in plastica per il telaio
della porta verso la barra, in modo che la superficie di appoggio sia rivolta verso il pavimen-
to. Una volta fissata la barra alla porta potete posizionare i blocchi di protezione (spostandoli
a vostro piacimento). Questi devono andare a coprire buona parte del telaio. In questo modo
viene garantita la massima tenuta.
IT
59Consiglio:
L‘apertura della dip station è regolabile individualmente. Vi
sono in tutto sei fori per viti sulla barra orizzontale: tre a si-
nistra e tre a destra. Per avvitare la stazione vi consigliamo
di utilizzare i due fori centrali.
2x 2x 2x
Rondella Dado M8
Bullone M8
Step 4: agganciare la stazione per trazioni opzionale
Una volta assemblata la stazione utilizzando bulloni M8, due rondelle e due dadi M8 potete fissare
la barra. Per farlo bisogna agganciare la stazione alla barra per inferiore.
606. SUGGERIMENTI DI ESERCIZI
Oltre alle classiche trazioni, con questa barra per trazioni realizzata
da Sportstech è possibile fare anche i seguenti esercizi.
Esercizi di stretching
Allunga il tuo corpo prima e dopo gli esercizi per prevenire i crampi o le lesioni.
1. Esercizi di stretching per il
ginocchio e l‘anca
Tieni la barra per trazioni con le
tue mani in direzioni opposte,
una mano col palmo verso il tuo
corpo e l‘altra in direzione op-
posta. Piega le ginocchia e es-
tendi le braccia completamente.
Solleva lentamente le ginocchia
e tieni le gambe unite.
2. Esercizi di stretching
per la colonna
vertebrale
Tieni la barra per trazioni con le
mani, piega le ginocchia lenta-
mente, tieni i talloni uniti e trasfe-
risci il peso del tuo corpo alle dita
dei piedi. Piega la testa all‘indietro,
IT
per quanto è possibile, inarcando
la tua schiena.
613. Esercizi di stretching
per la parte superiore
del corpo
Afferra la barra per trazioni con
le mani, piega le ginocchia len-
tamente e tieni la testa inclinata
in avanti. Solleva i piedi da terra
e rimani in questa posizione per
un po‘ di tempo.
4. Esercizi per gli addominali
Stick per la barra di pull-up de-
termina le braccia sono quasi
completamente allungato. Ora
sollevare le gambe distese da-
vanti al corpo verso l‘alto fino
a formare un angolo retto con
il busto. Mantenere questa po-
sizione un po ‚. poi portare le
gambe di nuovo alla posizione di
partenza.
Opzionale
La stazione per trazioni è opzio-
nale, disponibile separatamente
e costituisce vantaggio eccezio-
nale per il vostro training. Affer-
rate le barre, appoggiandovi sul
materiale espanso e flettete le
gambe. Sollevate il vostro cor-
po verso l‘alto e verso il basso
mantenendo sempre questa po-
sizione.
62GEBRUIKSAANWIJZING
NEDERLANDS
Geachte klant,
We zijn blij dat je een apparaat uit het SPORTSTECH-assortiment hebt gekozen. De sportuitrusting van
SPORTSTECH brengt hoogwaardige apparaten met nieuwe technologieën.
Lees vóór gebruik deze gebruikershandleiding aandachtig door en gebruik het apparaat zoals aangege-
ven. Zo zul je ten volle van de prestaties van het apparaat kunnen profiteren en er vele jaren geniet van
hebben. De bedrijfsveiligheid en de werking van het apparaat kunnen alleen worden gegarandeerd als de
veiligheidsinstructies in deze gebruiksaanwijzing in acht worden genomen. We aanvaarden geen aanspra-
kelijkheid voor schade veroorzaakt door oneigenlijk gebruik of verkeerde bediening.
i
Zorg ervoor dat alle personen die het apparaat gebruiken de gebruikershandleiding
hebben gelezen en begrepen.
Bewaar de gebruikershandleiding op een veilige plaats zodat deze kan worden gebruikt
wanneer dat nodig is.
NLOnze Video-tutorials voor jou!
Montage, Gebruik, Demontage.
1. Scan de QR-code
2. Bekijk video‘s
3. Begin snel en veilig
Link naar de video's:
https://service.innovamaxx.de/ks500_video
We zijn ook actief op social media!
Raadpleeg voor de meest recente productinformatie, trainingen en nog veel
meer, onze:
Instagram-pagina Facebook-pagina
https://www.instagram.com/sportstech.de https://www.facebook.com/sportstech.deINHOUD
1. BELANGRIJKE VEILIGHEIDSINSTRUCTIES................................................................... 66
2. AANWIJZINGEN VOOR GEBRUIK............................................................................... 67
3. EXPLOSIETEKENING/ONDERDELENLIJST................................................................... 68
4. LEVERINGSOMVANG............................................................................................... 69
5. MONTAGE-INSTRUCTIES......................................................................................... 70
6. TRAININGSVOORSTELLEN....................................................................................... 73
NL1. BELANGRIJKE VEILIGHEIDSINSTRUCTIES
!
BEWAAR DEZE HANDLEIDING OP EEN VEILIGE PLAATS.
1. Het is belangrijk om de hele handleiding te lezen voordat je de KS500 installeert en gebruikt. Veilig
en efficiënt gebruik kan alleen worden bereikt als de KS500 correct wordt geïnstalleerd, onderhouden
en gebruikt. Het is jouw verantwoordelijkheid om ervoor te zorgen dat alle gebruikers van de KS500
op de hoogte zijn van alle voorzorgsmaatregelen en waarschuwingen.
2. Voordat je met een trainingsprogramma begint, moet je je arts raadplegen om te bepalen of je
fysieke of gezondheidsbeperkingen hebt die een gezondheids- of veiligheidsrisico kunnen inhouden
of je verhinderen het apparaat op de juiste manier te gebruiken. Het advies van je arts is belangrijk als
je medicijnen gebruikt die je hartslag, bloeddruk of cholesterolgehalte beïnvloeden.
3. Besteed aandacht aan de signalen van je lichaam. Onjuist of overmatig gebruik kan schadelijk zijn
voor je gezondheid. Stop met trainen als je een van de volgende symptomen ervaart: pijn, beklem-
mend gevoel op de borst, onregelmatige hartslag, extreme kortademigheid, sufheid, duizeligheid of
misselijkheid. Als een van deze symptomen zich voordoet, moet je een arts raadplegen voordat je
doorgaat met het trainingsprogramma.
4. Houd kinderen en dieren altijd uit de buurt van het toestel. Het apparaat is alleen bedoeld voor
gebruik door volwassenen.
5. Zorg ervoor dat alle schroeven en moeren zijn vastgedraaid voordat je het toestel gebruikt.
6. Zorg ervoor dat je apparaat goed vastzit voordat je het gebruikt.
7. De veiligheid van het toestel kan alleen worden gehandhaafd als het regelmatig wordt gecontro-
leerd op schade en/of slijtage.
8. Alleen voor thuisgebruik.
9. Het apparaat is niet ontworpen om bijv. een schommel of iets dergelijks te bevestigen of als zodanig
te gebruiken. Onjuist gebruik van de optrekstang is op eigen risico!
662. AANWIJZINGEN VOOR GEBRUIK
1. Zorg ervoor dat het deurframe in goede staat is. Het moet bestand zijn tegen de druk die ontstaat
door het gebruik van de optrekstang (dit geldt bijvoorbeeld niet voor wanden uit gipskarton).
2. Gebruik voor het station van de pull-up bar ALLEEN de bovenste stang om de oefeningen uit
te voeren.
3. Vermijd het gebruik in de buurt van trappen.
4. Spring niet omhoog om de stang te pakken - ze kan loskomen uit de verankering.
5. Ga niet met je voeten of benen aan de optrekstang hangen.
6. Voer de verschillende pull-up-variaties alleen uit in een rechte houding en met gecontroleerde
bewegingen van het lichaam (d.w.z. niet zwaaien of schokken).
7. Klem de houder van de optrekstang alleen vast in deurframes met een opening tussen 69 en
101 cm.
8. Het maximale draagvermogen van 130 kg mag in geen geval worden overschreden.
NL
673. EXPLOSIETEKENING/ONDERDELENLIJST
Onder de volgende link
vind je de explosietekening
en de reserveonderdelenlijst:
https://service.innovamaxx.de/ks500_spareparts
Recyclingcyclus
Verpakkingsmaterialen kunnen worden teruggebracht in de grondstoffenkringloop.
Voer de verpakking af volgens de geldende voorschriften. Informatie kan worden verkregen uit de retournerings- en ophaalsystemen van je gemeente.
68Sie können auch lesen