PC ACTINA Instrukcja obsługi komputera - ACTINA PC Operation Manual Bedienungsanleitung für ACTINA Computer - ACTION SA
←
→
Transkription von Seiteninhalten
Wenn Ihr Browser die Seite nicht korrekt rendert, bitte, lesen Sie den Inhalt der Seite unten
Instrukcja obsługi komputera
         PC ACTINA
        ACTINA PC Operation Manual
  Bedienungsanleitung für ACTINA Computer

        20201 ACTION S.A. / v. 1.80 (1903) PL/EN/DE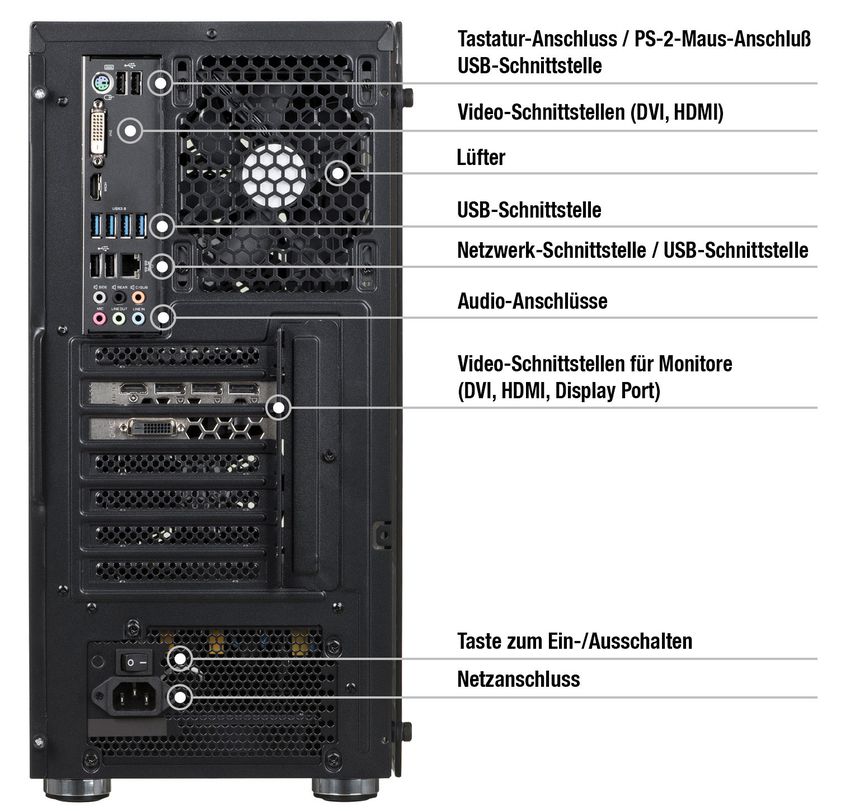
SPIS TREŚCI:

1. Wprowadzenie
1.1 Sprawdzenie kompletności sprzętu
1.2 Wybór miejsca na komputer
1.3 Montaż zestawu
1.4 Uruchomienie komputera
2. System operacyjny - instalacja
3. Bezpieczeństwo użytkowania komputera
3.1 Parametry techniczne
3.2 Bezpieczeństwo pracy
4. Konserwacja komputera
I – Załącznik I – Ponowna instalacja systemów operacyjnych Windows™ 10 i opcje
odzyskiwania systemu.
II – Załącznik II – Zmiana języka wyświetlania systemu operacyjnego Windows™ 10

PRZEDMOWA

Dziękujemy za zakup komputera marki ACTINA wyprodukowanego przez ACTION S.A. Liczymy,
że nowo nabyte urządzenie będzie służyło Państwu przez wiele lat. Sądzimy także, że będziecie
Państwo zadowoleni z użytkowania komputera oraz liczymy na to, iż w pełni zaspokoi on
pokładane oczekiwania. Urządzenie zostało wyprodukowane z zastosowaniem najwyższych
standardów jakości zgodnych z normami ISO9001, ISO1400, ISO27001 i ISO 28000.

Niniejsza instrukcja ma na celu ułatwienie poprawnej instalacji i użytkowania zestawu
komputerowego.

Prosimy przeczytać poniższą instrukcję przed instalacją zestawu komputerowego.

Całość publikacji "Instrukcja obsługi komputera ACTINA” składa się z czterech rozdziałów
oraz 2 załączników.

Rozdział pierwszy
"Wprowadzenie" - zawiera informacje dotyczące przygotowania komputera do pracy, w którym
przygotowujemy Użytkownika do wyboru miejsca i prawidłowego połączenia całego zestawu.

Rozdział drugi
"System operacyjny - instalacja" zawiera uproszczoną instrukcję instalacji systemów z rodziny
Microsoft® Windows®.

Rozdział trzeci
" Bezpieczeństwo użytkowania komputera" - zawiera informacje o parametrach technicznych
oraz o bezpieczeństwie pracy.

Rozdział czwarty
„Konserwacja komputera” - zawiera zalecenia na temat konserwacji i czyszczenia urządzenia.

1.        Wprowadzenie

1.1       Sprawdzenie kompletności sprzętu

Przed przystąpieniem do zmontowania i uruchomienia zestawu komputerowego sprawdź
czy w pudełku znajdują się następujące elementy:

      •   jednostka centralna
      •   kabel zasilający lub zasilacz zewnętrzny wraz z kablem zasilającym
      •   klawiatura oraz mysz (opcjonalnie)
      •   odpowiednie adaptery i przejściówki (opcjonalnie)
      •   nośnik (płyta DVD/pamięć USB) z systemem operacyjnym (opcjonalnie)
      •   nośniki (płyty DVD lub pamięć USB) zawierające niezbędne sterowniki (opcjonalnie)
      •   karta gwarancyjna (zawierająca specyfikację techniczną komputera)

Jeżeli któryś z powyższych elementów nie znajduje się w opakowaniu lub jest uszkodzony należy
skontaktować się ze sprzedawcą lub dostawcą sprzętu.
Zaleca się również zachowanie wszystkich składników opakowania, aby umożliwić
przechowywanie i transport zestawu komputerowego w odpowiednich warunkach i unikając
tym samym potencjalnych uszkodzeń powstałych na skutek transportu.

1.2       Wybór miejsca na ustawienie zestawu komputerowego.

Przy wyborze miejsca, w którym ustawiony będzie zestaw komputerowy należy wziąć pod uwagę
nie tylko względy estetyczne i ergonomię przyszłej pracy, ale także wymagania samego
urządzenia.
Należy bezwzględnie unikać ustawiania komputera w miejscach silnie nasłonecznionych
lub w takich gdzie możliwe są znaczne zmiany temperatury. Niekorzystne dla komputera jest
także miejsca gdzie występuje znaczne zapylenie, wilgotność oraz oddziaływanie wysokich
lub niskich temperatur. Należy dobrać miejsce tak by nie był utrudniony dostęp do źródła
zasilania. Niektóre elementy komputera (np. procesor, karta graficzna) mogą się silnie nagrzewać
podczas pracy a ciepło odprowadzane jest na zewnątrz obudowy. Niewskazane jest więc by
w bliskim sąsiedztwie komputera znajdowały się elementy konstrukcyjne, przedmioty
lub meble ograniczające wentylację.

UWAGA! W szczególności należy zachować odstęp od tylnej ścianki. Wydostający się stamtąd
strumień powietrza uderzając o blisko znajdujące się przedmioty może także zwiększać poziom
dźwięku generowanego przez urządzenie.

W żadnym wypadku nie należy zasłaniać otworów wentylacyjnych na przedniej, tylnej
i bocznych ściankach obudowy komputera!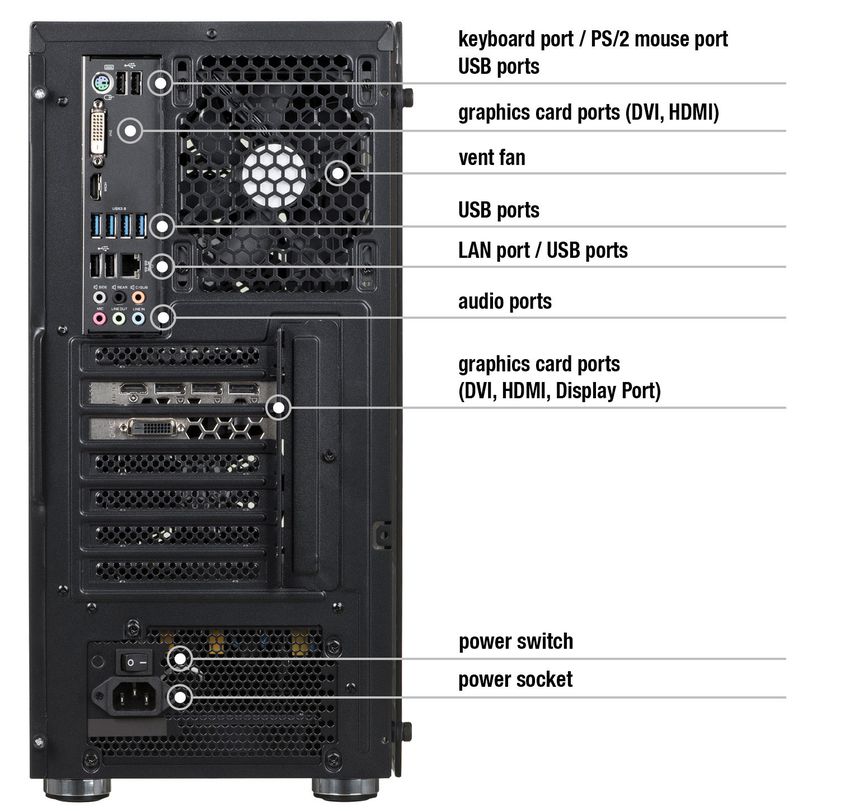
1.3   Montaż zestawu.

Przed instalacją i uruchomieniem zestawu komputerowego należy bezwzględnie zapoznać się
z instrukcjami obsługi jego poszczególnych składników. Na typowy zestaw komputerowy składają
się następujące elementy:

-     jednostka centralna
-     klawiatura
-     myszka
-     monitor
-     głośniki (opcja)
-     drukarka/skaner/urządzenie wielofunkcyjne (opcja)

Poniżej zostanie omówiony sposób podłączenia pierwszych czterech z wymienionych
elementów.

- Jednostka centralna
Przygotowanie jednostki centralnej do pracy sprowadza się do podłączenia zasilania kablem
zasilającym oraz podłączenia urządzeń typu monitor, klawiatura, myszka, drukarka, skaner,
głośniki itp.; do odpowiednich złączy znajdujących się w tylnej części obudowy.
Poniższe rysunki przedstawiają i omawiają złącza znajdujące się z tyłu obudowy typowej
jednostki centralnej.

Na zdjęciu poniżej znajduje się tylna ścianka przykładowego komputera:

- Monitor
Monitor należy podłączyć kablem zasilającym bezpośrednio do źródła zasilania.
Kabel sygnałowy monitora należy podłączyć do "gniazda video" karty grafiki z tyłu jednostki np.
DVI/HDMI/Display Port lub D-Sub/VGA. Niedokładne podłączenie wtyczki video może
powodować zaniki kolorów, utratę obrazu itp.
       Niekiedy wraz z komputerem znajdować się może odpowiedni adapter video
umożliwiający podłączenie monitora ze złączem w innym standardzie.

Ważne: Niektóre modele komputerów posiadają dwa lub więcej gniazda video. W takim
przypadku monitor należy podłączyć do gniazda umiejscowionego niżej.

- Klawiatura
Klawiaturę podłączamy do jednego z portów USB znajdujących się z tyłu obudowy (gniazdo
w kolorze czarnym lub niebieskim).

- Myszka
Myszkę możemy podłączyć pod jeden z portów USB znajdujących się z tyłu obudowy
(gniazdo w kolorze czarnym lub niebieskim) – analogicznie jak dla klawiatury.

- Głośniki (ew. słuchawki)
Głośniki stereo (w systemie 2.0 lub 2.1) podłączamy do okrągłego gniazda typu mini-jack stereo
(bez bolców), zwykle w kolorze zielonym. Jeśli dysponujemy głośnikami wielokanałowymi
(systemy 4.1, 5.1 i więcej) należy je podłączyć do karty muzycznej zgodnie z instrukcją
dołączoną do zestawu głośników.
Głośniki wyposażone w podłączenie typu USB podłączamy do dowolnego niezajętego portu
USB.

UWAGA! Wszystkie dołączane wtyczki należy wtykać ostrożnie zwracając uwagę na to by nie
uległy uszkodzeniu znajdujące się w nich bolce/styki.

1.4   Uruchomienie komputera.

W przedniej lub górnej części każdego komputera znajduje się przycisk włączający/wyłączający
komputer (oznaczony niekiedy symbolem        i opisany: Power lub I/O). W przypadku niektórych
obudów należy przedtem odszukać i włączyć przełącznik zasilania komputera znajdowujący się
z tyłu obudowy.
Dodatkowo na płycie czołowej mogą się znajdować dwie kontrolki diagnostyczno-sygnalizacyjne
(POWER [najczęściej zielona] - sygnalizująca stan pracy komputera; HDD [czerwona]-
sygnalizująca m.in. pracę twardego dysku) oraz przycisk RESET (opcjonalny) służący do
zresetowania komputera. Na płycie czołowej w niektórych typach obudów można znaleźć
dodatkowe gniazda USB lub USB 3.0 (w kolorze niebieskim), oraz gniazda audio dla słuchawek
(w kolorze zielonym) i mikrofonu (w kolorze czerwonym) lub też gniazda czytnika kart typu SD,
microSD, MemoryStick i tym podobnych.

Po poprawnym podłączeniu wszystkich urządzeń do jednostki centralnej możemy ją uruchomić
poprzez naciśnięcie przycisku Power.
Prawidłowo skonfigurowany i zamontowany komputer powinien rozpocząć pracę od
przeprowadzenia szybkiej procedury POST (detekcja procesora, przeliczenie zainstalowanej
pamięci, detekcja napędów i testu wszystkich urządzeń wewnętrznych). Procedura ta może nie
być widoczna dla użytkownika a podczas jej przeprowadzania wyświetlane będzie graficzne logo.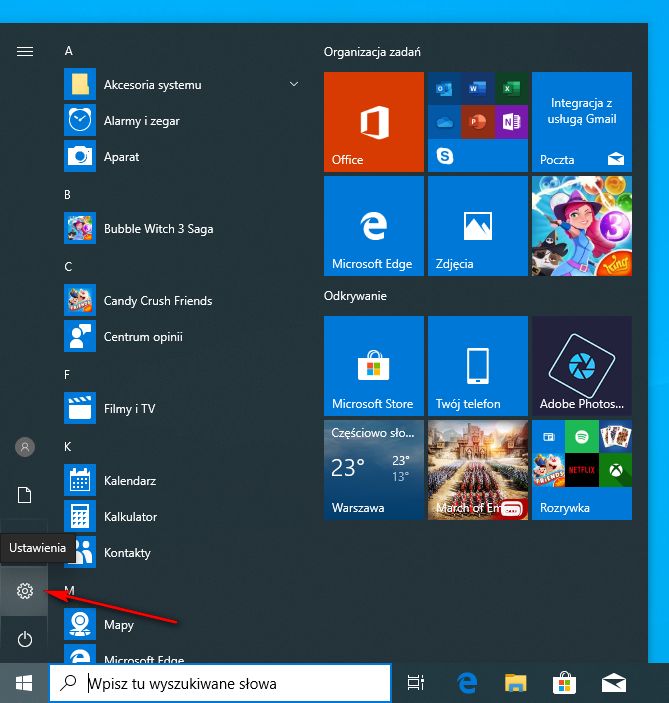
Po tych czynnościach wczytywany jest system operacyjny znajdujący się na dysku komputera.
Kolejne etapy wyświetlane będą na ekranie monitora. Przy pierwszym włączeniu prawidłowo
uruchomiony system operacyjny rozpocznie proces konfiguracji do pierwszego uruchomienia
a następnie wyświetli okno z ustawieniami np. języka i klawiatury.

Ważne: Nie należy przerywać procesu pierwszego uruchomienia komputera – nawet
przy braku informacji na ekranie monitora.

       Jeśli w ciągu ok. 10 minut od pierwszego włączenia system operacyjny nie wyświetli
żadnej informacji wymagającej akcji ze strony użytkownika należy wyłączyć komputer naciskając
przycisk Power przez ponad 5 sekund a następnie sprawdzić poprawność podłączenia monitora
(ew. podłączyć go do drugiego gniazda) i ewentualnie skontaktować się z działem pomocy
technicznej ACTION S.A lub ze sprzedawcą.

2.    Instalacja oprogramowania.

Instalacja systemu operacyjnego z rodziny Microsoft® Windows®:

Aby poprawnie przeprowadzić instalację systemu operacyjnego z rodziny Microsoft® Windows®
z dysku DVD lub pamięci USB (pendrive) na dysk twardy należy:

1. Włożyć dysk instalacyjny DVD Microsoft® Windows® do napędu optycznego lub podłączyć
pamięć USB do odpowiedniego portu;
2. Wyłączyć i ponownie włączyć komputer lub zrestartować go;
       Komputer jest ustawiony tak by pobierał pliki startowe z napędu optycznego; (jeżeli nie
       nastąpi uruchomienie procesu instalacji z napędu DVD lub jeśli nośnikiem instalacyjnym
       jest pamięć USB należy wywołać ręcznie menu startowe (BOOT menu) naciskając
       odpowiedni klawisz np. Esc, F12, F11, F9 lub F8) lub też w odpowiedniej opcji BIOS
       zmienić kolejność urządzeń startowych (ang.: boot sequence).
3. Po wystartowaniu komputera pojawi się program instalacyjny systemu operacyjnego
Microsoft® Windows®.
4. Postępować dalej zgodnie ze wskazówkami programu instalacyjnego pojawiającymi się
na ekranie monitora.

Ważne: Jeśli zakupiony komputer posiadał zainstalowany fabrycznie system Windows® 10
ponowną instalację systemu można przeprowadzić za pomocą opcji odzyskiwania systemu –
patrz Załącznik I w dalszej części instrukcji.

Informacja: W przypadku jakiekolwiek problemów z instalacją systemu operacyjnego można
zwrócić się o pomoc do sprzedawcy, firmy dostarczającej sprzęt lub działu pomocy technicznej
ACTION SA.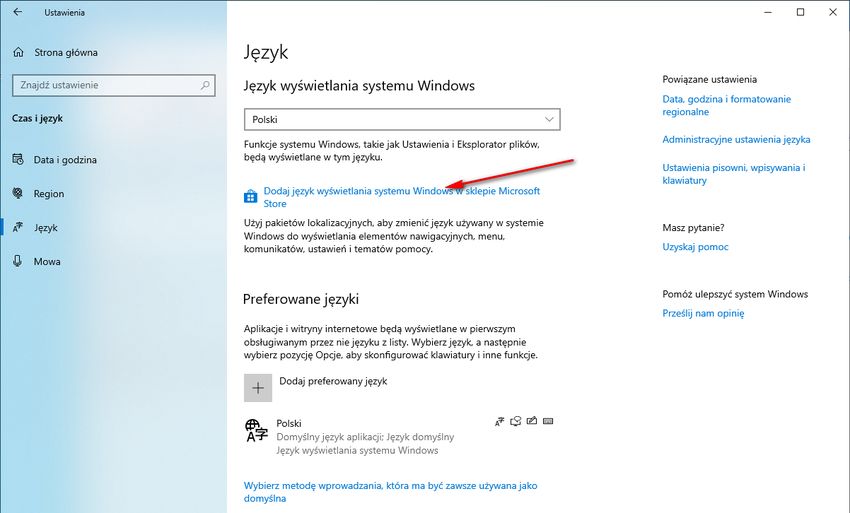
3.    Uwagi dotyczące bezpieczeństwa użytkowania komputera.

3.1 Najważniejsze parametry elektryczne komputera są podane na tabliczce znamionowej
umieszczonej na tylnej lub spodniej ściance komputera.

Pozostałe parametry:

Temperatura pracy: 10 ÷ 50 [°C]
Temperatura przechowywania: -20 ÷ 70 [°C]
Wilgotność powietrza: 10 % ÷ 80% wilgotności względnej (bez kondensacji).

3.2 Komputer musi być zasilany z gniazda z przyłączonym obwodem ochronnym (gniazdo
z bolcem).
Współpracujące ze sobą urządzenia komputerowe (komputer, drukarka, monitor itp.) muszą być
zasilane z tego samego źródła.

Zaleca się wykorzystanie filtru sieciowego, w którym obydwa przewody są wyposażone
w bezpieczniki. Szczególnie polecane jest używanie zamiast filtru sieciowego zasilacza
awaryjnego (UPS).
W przypadku używania przedłużacza sieciowego lub filtru sieciowego należy upewnić się,
czy całkowity pobór prądu wszystkich podłączonych urządzeń nie przekracza dopuszczanego
maksymalnego prądu przewidzianego dla przedłużacza (filtru).
Dodatkowo należy pamiętać, że wartość wkładki bezpiecznikowej w sieci energetycznej powinna
wynosić maksymalnie 16A.

                                          UWAGA!

      Przed otwarciem obudowy wyłączyć zasilanie poprzez wyjęcie wtyczki z gniazda
sieciowego.

4. Konserwacja komputera.

      Komputer jako urządzenie elektroniczne nie wymaga specjalnych zabiegów
konserwacyjnych. Zapoznaj się z poniższymi wskazówkami, aby zapewnić długą i wydajną pracę
Twojego komputera.

       1. Chroń komputer przed upadkiem i umiejsców komputer na stabilnym podłożu. Wskutek
upadku może ulec uszkodzeniu obudowa lub inne podzespoły komputera. Nie wolno narażać
komputera na wstrząsy ani wibracje.
       2. Chroń komputer przed przegrzaniem. Komputer należy trzymać z dala od jakichkolwiek
elementów grzewczych. Urządzenie należy chronić przed długotrwałym bezpośrednim
działaniem światła słonecznego.
       3. Chroń komputer przed zakłóceniami radiowymi. Komputer należy trzymać z dala
od transformatorów dużej mocy, silników elektrycznych i innych źródeł silnych pól
magnetycznych i elektrycznych. Mogą one uniemożliwić poprawną pracę komputera
i spowodować uszkodzenie danych.
       4. Chroń komputer przed wilgocią. Komputer jest urządzeniem elektrycznym i może ulec
uszkodzeniu wskutek kontaktu z wodą lub innymi płynami. Komputera nie należy pozostawiać
w miejscu, w którym może ulec uszkodzeniu wskutek przedostania się do niego wilgoci lub ciała
obcego. Komputera nie wolno przechowywać ani używać w wilgotnym środowisku.
       5. Przestrzegaj procedur obsługi komputera i systemu operacyjnego. Zaleca się zamykać
system operacyjny po zamknięciu wszystkich programów i zapisaniu pracy. Nie zaleca się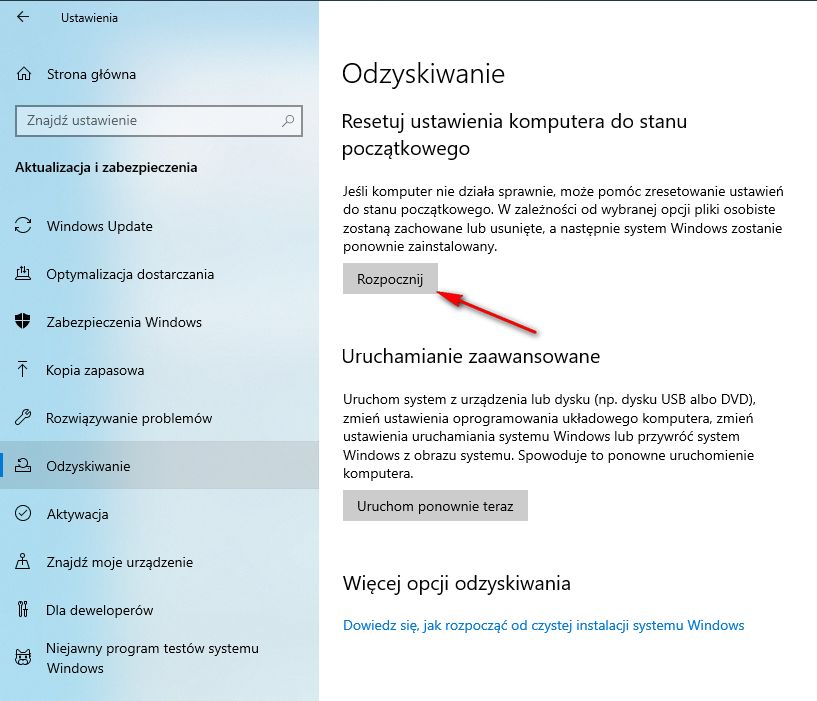
wyłączania komputera poprzez odcięcie napięcia zasilającego (wyłączenie wyłącznikiem z tyłu
komputera lub wyciągnięcie wtyczki zasilającej). Gdy zasilanie komputera jest włączone,
nie należy podłączać żadnych urządzeń peryferyjnych (za wyjątkiem urządzeń USB o ile jest to
wymagane – sprawdź w instrukcji obsługi danego urządzenia).
       6. Nie wolno demontować komputera ani użytkować go bez ścianek bocznych lub innych
elementów obudowy.
       7. Należy stosować się do zaleceń niniejszej instrukcji konserwacji komputera.

                                    Czyszczenie komputera.

          •   Przed czyszczeniem odłącz komputer od sieci zasilającej!
          •   Używaj rekomendowanych dla komputerów PC środków czystości.
          •   Nanieś środek czyszczący bezpośrednio na komputer z odległości 15-20cm.
          •   Użyj miękkiej, czystej ściereczki do wytarcia komputera z zewnątrz.
          •   Nie używaj czyszczących substancji lotnych (rozpuszczalników, benzyn itp.)
              ani ściernych do czyszczenia jakiejkolwiek części komputera.
          •   Czyszczenie wnętrza komputera z kurzu pozostaw serwisowi lub specjaliście.
Na tym produkcie umieszczono symbol CE zgodnie z wymaganiami odpowiednich dyrektyw Unii Europejskiej.
Firmą odpowiedzialną za umieszczenie symbolu CE na tym produkcie jest firma: ACTION S.A. w restrukturyzacji,
Zamienie, ul. Dawidowska 10, 05-500 Piaseczno, Polska.

INFORMACJE DOT. UTYLIZACJI W UE (WEEE)
Symbol przekreślonego pojemnika na odpady na kółkach oznacza, że produkty elektryczne lub elektroniczne
(WEEE) należy zutylizować poza obiegiem odpadów komunalnych.
Stare produkty elektroniczne mogą zawierać niebezpieczne substancje. Właściwa utylizacja starego urządzenia
pozwoli uniknąć potencjalnych negatywnych skutków dla środowiska i zdrowia. Stare urządzenie może zawierać
części wielokrotnego użytku, które mogą zostać wykorzystane do naprawy innych produktów lub inne wartościowe
materiały, które można przetworzyć, aby oszczędzać zasoby naturalne.
Możesz oddać urządzenie do sklepu, w którym zostało kupione lub skontaktować się z lokalnym urzędem
gospodarki odpadami.
Załącznik I
        Ponowna instalacja systemu operacyjnego i opcje odzyskiwania systemu.

   (Dotyczy tylko komputerów sprzedawanych z preinstalowanym fabrycznie systemem
                                    Windows® 10)

Proszę pamiętać, że opisana tutaj opcje mogą spowodować utratę (skasowanie)
wszystkich danych użytkownika. Zalecamy wykonanie kopii zapasowej plików przed
skorzystaniem z tego narzędzia.

Aby samodzielnie przywrócić system do stanu fabrycznego (w przypadku komputera z fabrycznie
zainstalowanym systemem Windows® 10) należy:

   •   Kliknąć lewym przyciskiem myszki klawisz Start       potem kliknąć: „Ustawienia”
       a następnie kliknąć kolejno: „Aktualizacja i zabezpieczenia”, „Odzyskiwanie” i „Rozpocznij”
       w sekcji: „Resetuj ustawienia komputera do stanu początkowego”
   •   W kolejnym oknie należy wybrać właściwą opcję (zalecamy wybranie: „Usuń wszystko”)
       a następnie w kolejnym oknie potwierdzić wybór z bieżącymi ustawieniami klikając:
       „Dalej”. Można też zmienić opcje usuwania plików i czyszczenia dysku poprzez kliknięcie
       w „Zmień ustawienia”.
   •   W ostatnim oknie dialogowym zawierającym podsumowanie wybranych opcji
       i zaplanowanych działań należy kliknąć „Resetuj” aby rozpocząć proces. Kliknięcie
       „Anuluj” przerwie proces resetowania ustawień komputera bez wprowadzania zmian.

Resetowanie ustawień systemu może zająć do kilku godzin i nie należy przerywać tego procesu.
Po zakończeniu procesu pojawi się ekran systemu Windows tak jak to miało miejsce
przy pierwszym uruchomieniu nowego komputera.

Poniższe ilustracje pokazują wcześniej opisane kroki procedury przywracania systemu
wraz z zaznaczeniem czerwonymi strzałkami opcji które należy wybrać:
Załącznik II
Zmiana języka wyświetlania systemu operacyjnego Windows™ 10.
W systemie Windows 10 jest możliwa zmiana języka systemu na inny dowolnie wybrany.
W zależności od wybranej wersji językowej zmiana może dotyczyć wszystkich elementów
systemu lub tylko niektórych (dla rzadziej używanych języków).
Wymagane jest podłączenie komputera do Internetu.
Aby dodać a następnie zmienić język systemu należy:
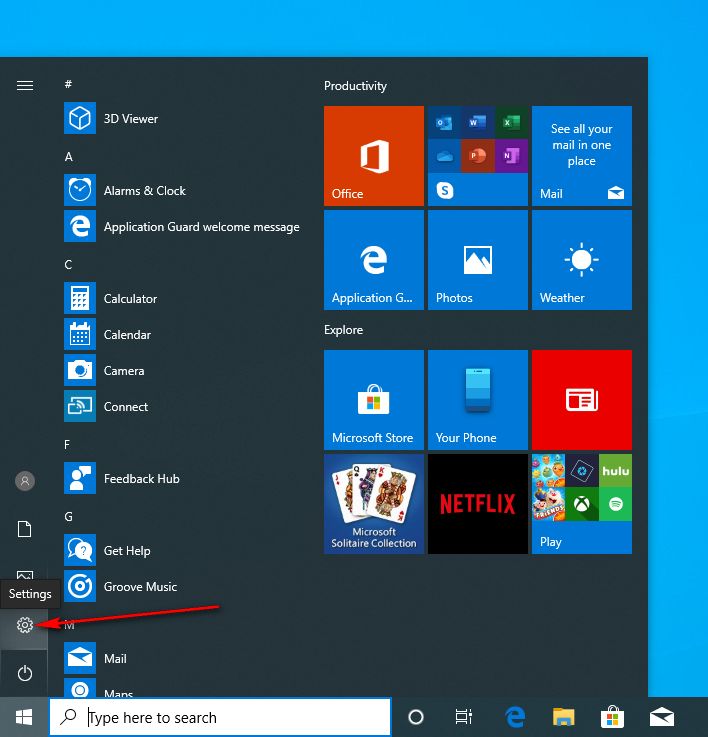
• Kliknąć lewym przyciskiem myszki klawisz Start potem kliknąć: „Ustawienia”
a następnie kliknąć kolejno: „Czas i język”, po lewej stronie wybrać: „Język” i „Dodaj język
wyświetlania systemu Windows w sklepie Microsoft Store” w sekcji: „Język wyświetlania
systemu Windows”
• W kolejnym oknie (Microsoft Store) „Pakiet lokalizacyjny” należy odszukać i wybrać
pożądany język, a następnie po kliknięciu w odpowiedni kafelek, w kolejnym oknie
potwierdzić wybór klikając: „Pobierz”.
• Kolejne okno (Instalowanie funkcji językowych) wyświetli opcji i składniki pakietu
językowego. Aby zainstalować pakiet z wybranymi opcjami należy kliknąć „Zainstaluj”.
• Rozpocznie się proces pobierania i instalowania pakietu językowego. Po zakończeniu
tego etapu pojawi się okno z zapytaniem o wylogowanie z systemu. Należy wybrać
właściwą opcję a po wylogowaniu język wyświetlania systemu Windows zostanie
zmieniony na wcześniej wybrany.
Poniższe ilustracje pokazują wcześniej opisane kroki zmiany języka systemu (na przykładzie dla
języka angielskiego) wraz z zaznaczeniem czerwonymi strzałkami opcji, które należy wybrać:ACTINA DESKTOP PC OPERATION MANUAL CONTENTS: Introduction 1. Getting Started 1.1 Checking that Nothing is Missing 1.2 Finding a Place for your PC 1.3 Assembling your PC system 1.4 Booting your PC 2. Installing the Operating System 3. Using your PC Safely 3.2 Technical Parameters 3.2 Work safety 4. Maintaining your PC Appendix I – Reinstalling the Windows® 10 Operating System and system recovery options Appendix II – Changing language the Windows® 10 Operating System INTRODUCTION Thank you for purchasing this ACTINA personal computer (PC) from the ACTION S.A. sales network. We trust that your newly purchased machine will serve you for many years to come. We further trust that you will be satisfied and we are confident that this computer will meet and exceed your expectations. This PC was manufactured to the highest quality standards and complies with ISO9001, ISO1400, ISO27001 and ISO 28000. These instructions are intended to help you set up and use the PC correctly. Please read the instructions below before setting up the computer. “ACTINA PC Operation Manual” comprises 4 chapters and 2 appendixes. Chapter 1 “Getting Started” explains how to set up and power the computer, including how to find a place for it, and assemble all the components correctly. Chapter 2 “Installing the Operating System” has simple instructions on how to install Microsoft® Windows® operating systems. Chapter 3 “Using the Computer Safely” has information on technical parameters and work safety. Chapter 4 “Maintaining the Computer” has advice on cleaning and maintenance.
1.     Getting Started

1.1    Checking that nothing is missing

Check that the box contains the following components before assembling the computer:

      •   central processing unit;
      •   power cable or power cable with external power supply;
      •   keyboard and mouse (optional);
      •   appropriate cable and connector adapters (optional);
      •   data storage media (disk/USB flash drive) with the operating system and the operation
          manual (optional);
      •   data storage media (disk/USB flash drive) with the necessary drivers;
      •   warranty card (this also contains the technical specifications of the computer).

Please contact the seller or supplier directly if any of these components are damaged or missing.
It is also recommended that you retain all the packaging, as the computer can then be stored in
suitable conditions, transported properly packed, and protected from potential damage while
being transported.

1.2    Finding a place for your PC

When choosing where to set up the computer, it is important to consider not only the aesthetics
and ergonomics of what it is going to be used for, but also the requirements of the machine itself.
It is imperative that the computer not be placed in strong sunlight or anywhere subject to
excessive or sudden temperature changes. Places that experience excessive heat or cold, high
humidity, or excessive dust are also harmful to the computer. The place chosen should have
easy access to a power outlet.
Some components (e.g. processor, graphics card) can heat up considerably while the system
is running and the heat is conducted away from the casing by the PC’s ventilation system.
Restricting the air flow around the PC by placing its components or other objects, such as
furniture near the computer is therefore not advisable.

CAUTION: It is particularly important to leave some space at the rear of the casing, as that is
where the power supply fan is located, which extracts hot air from the inside of the machine.
The noise level of the PC can also be increased when nearby objects are battered by the airflow
of the fan.

The front, side and rear ventilation vents in the casing must not be blocked under any
circumstances.
1.3 Assembling your PC system Before assembling and booting the computer, it is imperative that you familiarise yourself with the service instructions for each of its separate components. A typical computer setup has the following components: - central processing unit; - keyboard; - mouse; - display (monitor); - speakers (optional); - printer/scanner/multi-function printer (optional). How to connect the first four of these components is discussed below. - Central processing unit Getting the central unit ready for work simply involves plugging the power cable into the power supply outlet, and plugging the display, keyboard, mouse, printer, scanner, speakers etc. into the appropriate ports at the rear of the casing. The illustrations below show and describe the ports at the rear of a typical system unit. The photograph below shows the rear panel of a typical PC:
- Display
The display is connected by plugging the power cable directly into the power source.
The display signal cable is connected to the graphics card video port e.g. DVI/HDMI/Display Port
or D-Sub/VGA at the rear of the system unit. It is recommended to tighten the screws (if any) on
the connector of the display signal cable, as a loose video port connection can cause poor colour,
loss of picture, etc.
        The computer sometimes comes with a video interface adapter, which enables
the display to be connected using a connector with a different standard.

Important: Some PC models have two or more video ports. In this case, the display is connected
to the bottom port.

- Keyboard
The keyboard is connected to one of the black/blue USB ports at the back at the casing.

- Mouse
As with the keyboard, the mouse is connected to one of the black/blue USB ports at the back
of the casing.

- Speakers (or headphones)
Stereo speakers (system 2.0 or 2.1) are connected to the round mini-jack stereo port
(without pins), which is usually green. Multi-channel speakers (system 4.1, 5.1 or higher)
 have to be connected to the sound card as per the instructions that come with the speakers.
USB speaker should be connected to any unused USB port.

CAUTION: All these connectors have to be plugged in carefully so that none of their
pins/interfaces are damaged.

1.4 Booting your PC

There is an on/off button at the front of every computer. This is sometimes marked
with the symbol     and labelled “Power” or “I/O”. For some system units, it is first necessary
to find the power switch at the rear of the casing and turn it on.
The front panel additionally has two diagnostic and signal indicators (POWER [most often green]
indicates the operating state of the computer; HDD [red] indicates hard disk activity),
and a RESET button (optional), which is used to restart the computer. The front panel of some
types of system units also have USB or USB 3.0 ports (blue), audio ports for headphones (green)
and a microphone (red), and a port for SD, microSD, MemoryStick and similar card readers.

Once all the components have been properly connected to the system unit, the computer
can be switched on by pressing the “Power” button.

If the computer has been correctly assembled and configured, it should start running the power-
on/self-test (POST) program. This detects the processor, calculates the amount of installed
memory, recognises and identifies all the drives, and tests all the internal devices. Sometimes
this procedure may not visible to the user and the graphic logo will be displayed while it is
running.

Once these functions have been completed, the operating system is loaded into memory from
the hard disk. Subsequent stages are displayed on the display. The very first time the computer is
switched on, the operating system will begin configuring the system for the initial boot and then
display the language and keyboard setup window.
Important: The first computer boot shoot not be aborted, even if there no messages
appear on the screen.
If, after 10 minutes of switching on the computer for the first time, the operating system
does not display any user input requests, shut down PC by pressing Power button for 5 sec then
check that the display has been connected correctly (this might mean connecting it to another
port). If this does not resolve the problem, contact Technical Support at ACTION S.A.
2. Installing the Operating System
Installing Microsoft® Windows® operating systems:
To correctly install Microsoft® Windows® operating systems from a DVD or USB flash drive
(pendrive) onto the hard drive:
1. Insert the Microsoft® Windows® DVD into the DVD disk drive or USB flash drive into USB port;
2. Restart the computer or switch it off and on;
The computer is configured to copy startup files from the media present in the DVD drive.
If the operating system installation program fails to run from the DVD or if the system
needs to be installed from a USB storage device, open the BOOT menu manually by
pressing the appropriate key, e.g. Esc, F8, F9, F11 or F12, which needs to be pressed
immediately after the PC starts and change the boot sequence or change it using the PC’s
BIOS option called Boot Sequence.
3. When the computer has booted, the Microsoft® Windows® installation program will appear.
4. Follow the installation program instructions that appear on the display screen.
Important: If the computer has the Windows® 10 operating system factory installed, it can be
reinstalled if needed using the system recovery options. See Appendix I for further details.
Information: If in any doubt, please contact the vendor, the company that supplied the PC
or Technical Support at ACTION S.A. for assistance.
3. Using your PC safely
3.1 The essential electrical parameters of the computer are given on the nameplate at the rear
of, or under, the machine.
Remaining specifications:
Working temperature: 10 ÷ 50 [°C]
Storage temperature: -20 ÷ 70 [°C]
Air humidity: 10-80% relative humidity (without condensation).
3.2 The computer must be plugged into an earthed mains socket.
All the interactive computer components (system unit, printer, display etc.) must be powered from
the same source.
It is recommended to use a line filter in which each of the two wires is equipped with fuses.
Using an uninterruptable power supply (UPS) is even more recommended.If using a power strip or a line filter, it is important to ensure that the total current consumption
of all the devices plugged into it does not exceed its maximum allowable current rated for
the power strip or a line filter used.
It is also important to remember that the maximum capacity of a safety fuse in domestic/office
mains grids should not exceed 16A.
CAUTION
Always disconnect the power supply by unplugging the power cable from the wall socket
before opening the casing.
4. Maintaining your PC
The personal computer, as an electronic device, does not require special maintenance.
Please familiarise yourself with the guidelines and instructions below, and your computer will
work efficiently and effectively for many years to come.
1. The computer must be placed on a stable surface where it will not fall. A fall can
damage its casing and its internal components. The computer must not be exposed to jolts
or vibrations.
2. The computer must be protected from overheating. The computer must be kept away
from all heat sources and heating appliances, and must not be subjected to prolonged direct
sunlight.
3. The computer must be protected from radio interference. It must be kept away from
strong electromagnetic fields, e.g. high power transformers, electric motors, etc. These can
prevent the computer from working properly and may corrupt data.
4. The computer must be protected from humidity. The computer is an electrical device
and can be damaged by water and other liquids. The computer must not be left anywhere where
it can be damaged by being penetrated by moisture or foreign objects. The computer must not be
used or stored in a humid environment.
5. Follow the service procedures for the computer and the operating system. It is
recommended that the operating system be shut down once all work is saved and all programs
closed. Disconnecting the computer by cutting off the power supply, i.e. turning the computer off
by flicking the switch at the rear of the computer or by pulling out the power plug, is not
recommended. Peripheral devices should not be connected while the computer is powered on
(USB devices, to the extent required, are the exception – check the user instructions for the given
device).
6. The computer must not be disassembled or used without the all the casing components,
including the side panels, in place.
7. It is important that the recommendations in these maintenance instructions be followed.
Cleaning the PC
• Disconnect the computer from the power supply before cleaning it.
• Only use recommended PC cleaning products on the computer.
• Maintain a distance of 15-20 cm when directing applying cleaning products
to the computer.
• Use a soft, clean cloth to wipe the outside of the computer.
• Do not use volatile cleaning products (solvents, petroleum, etc.) or abrasive cloths
to clean any part of the computer.
• Leave cleaning dust out of the inside of the computer to service centres or experts.This product bears CE certification mark that indicates conformity with health, safety, and environmental protection standards for products sold within the European Economic Area (EEA). Company responsible for placing the sign on this product is ACTION S.A. in restructuring, Dawidowska 10 St., 05-500 Piaseczno, Poland. INFORMATION ON UTILIZATION IN EU (WEEE) Symbol of crossed-out wheeled bin indicated that the equipment bearing this sign must not be disposed into the regular household waste stream. Old electronic devices may contain hazardous substances and materials. Proper treatment of such equipment allows to avoid potential negative impact on health and environment. Old devices may contain multiple-use components which can be used for repair of other devices, or other valuable materials that can be processed to save natural resources. You can give back the device to the retail store in which it was purchased or contact your local waste management unit.
Appendix I
              Reinstalling the operating system and system recovery options.

                   (Only applicable to computers sold with the preinstalled
                               Windows®10 operating system)

Please remember that the action described above IT MAY WILL RESULT IN ALL USER
DATA BEING LOST (I.E. DELETED). It is therefore strongly recommended that you back up
all your files beforehand.

Computers running Windows® 10:

To factory reset a computer running Windows® 10:
   •   Left click the Start   button on the toolbar. Click “Settings” and then click the “Update &
       security” and “Recovery” options as the windows appear. Click the “Get Started” option
       under “Reset this PC”;
   •   Choose the appropriate option (we recommend “Remove everything”) when the first dialog
       window appears, and “Next” when the second dialog window appears. You can also click
       “Change settings” to change options of removing files and cleaning drive(s).
   •   A final dialog window now appears. This lists the actions that will be performed as a result
       of the options chosen. Click “Reset” to start the factory reset process or “Cancel” to abort it
       and discard all changes.

Resetting the system settings can take a few hours. This process must not be interrupted. When
it has completed, the Windows operating system screen will be displayed with region selection
options, exactly as it did when the computer was first booted.

The screenshots below illustrate the steps required to reset the system, as described above.
The options that need to be selected are highlighted.
Appendix II
Changing language the Windows® 10 Operating System.
In Windows 10 operating system it is possible to change the system language to any other
language of your choice. Depending on the language version selected, the change may affect all
system elements or only some (for less frequently used languages).
Internet connection is required.
To change a Windows display language:
• Left click the Start button on the toolbar. Click “Settings” and then click the “Time &
Language” and “Language” options as the windows appear. Click the “Add a Windows
display language in Microsoft Store” option under “Windows display language”;
• Find, choose and click on the appropriate language tile when the Microsoft Store dialog
window appears, and “Get” when the second dialog window appears. In “Install language
features” dialog window click “Install” button.
• A sing out dialog window now appears – choose an appropriate option. After sign out
and sign in your Windows language will be change to a selected one.
The screenshots below illustrate the steps required to change a Windows display language
(to a German language) as described above. The options that need to be selected
are highlighted.BEDIENUNGSANLEITUNG FÜR ACTINA COMPUTER INHALTSANGABE VORWORT 1. Einleitung 1.1 Prüfung der Vollständigkeit des Zubehörs 1.2 Wahl des Aufstellungsortes für den Computer 1.3 Installation des Komplettsystems 1.4 Inbetriebnahme des Computers 2. Betriebssystem - Installation 3. Sicherer Betrieb des Computers 3.1 Technische Parameter 3.2 Sicherer Betrieb 4. Wartung des Computers Anhang I – Erneute Installation der Betriebssysteme Microsoft® Windows® 10 und Optionen zur Wiederherstellung des Systems. VORWORT Vielen Dank für den Kauf des ACTINA Computers über das Vertriebsnetz ACTION S.A. Wir gehen davon aus, dass Ihnen das neu erworbene Gerät viele Jahre dienen wird. Wir nehmen auch an, dass Sie mit der Nutzung des Computers zufrieden sein werden und gehen davon aus, dass er die an ihn gestellten Erwartungen vollauf befriedigt. Das Gerät wurde unter Anwendung der höchsten Qualitätsstandards gemäß Normen ISO9001, ISO1400, ISO27001 und ISO 28000 produziert. Diese Anleitung soll die einwandfreie Installation und Verwendung des PC-Komplettsystems erleichtern. Lesen Sie diese Anleitung bitte vor der Installation des PC-Komplettsystems durch. Die vollständige „Bedienungsanleitung für ACTINA Computer“ besteht aus vier Kapiteln und 1 Anhängen. Das erste Kapitel „Einleitung“ enthält Informationen zur Vorbereitung des Computers für den Betrieb, wo wir den Nutzer auf die Wahl des Aufstellungsortes und den richtigen Anschluss des Komplettsystems vorbereiten. Das zweite Kapitel „Betriebssystem – Installation“ enthält eine vereinfachte Anleitung für die Installation des Betriebssystems aus der Familie Microsoft® Windows®. Das dritte Kapitel „Sicherer Betrieb des Computers“ enthält Informationen zu technischen Parametern, sowie zur Sicherheit am Arbeitsplatz. Das vierte Kapitel „Wartung des Computers“ enthält Empfehlungen zum Thema Geräte-Wartung und -Reinigung.
1.        Einleitung

1.1       Prüfung der Vollständigkeit des Zubehörs

Prüfen Sie vor der Installation des Computers, ob in der Box folgende Elemente vorhanden sind:

      •   Zentraleinheit
      •   Netzkabel oder Netzkabel mit externem Netzteil
      •   Tastatur und Maus (Option)
      •   geeignete Adapter und Zwischenstecker (Option)
      •   Datenträger (DVD/USB-Speicher) mit Betriebssystem und oben genannter
          Bedienungsanleitung (Option)
      •   Datenträger (DVD/USB-Speicher) mit unerlässlichen Treibern
      •   Garantieschein (enthält technische Spezifikationen des Computers)

Wenn sich eines der oben genannten Elemente nicht in der Verpackung befindet oder beschädigt
ist, kontaktieren Sie den Verkäufer oder Lieferanten des Geräts.
Es empfiehlt sich ebenso, alle Einzelteile der Verpackung aufzubewahren, um die Aufbewahrung
und den Transport des PC-Komplettsystems unter angemessenen Bedingungen zu ermöglichen
und somit potentielle Schäden zu vermeiden, die aufgrund eines Transports entstehen können.

1.2       Wahl des Aufstellungsortes des PC-Komplettsystems.

Bei der Wahl des Aufstellungsortes für das PC-Komplettsystem müssen nicht nur ästhetische
Gründe und die Ergonomie des zukünftigen Arbeitsplatzes berücksichtigt werden, sondern auch
die Anforderungen des Geräts selbst.
Unter allen Umständen muss vermieden werden, den Computer an Orten mit starker
Sonneneinstrahlung aufzustellen oder dort, wo hohe Temperaturunterschiede möglich sind.
Für den Computer sind auch Orte nachteilig, wo eine hohe Staubbelastung, Feuchtigkeit oder
die Einwirkung hoher oder niedriger Temperaturen auftritt. Der Ort muss so gewählt werden,
dass der Zugang zur Stromversorgung nicht erschwert ist.
Einige Elemente des Computers (z.B. Prozessor, Grafikkarte) werden beim Betrieb sehr heiß
und die Wärme wird aus dem Gehäuse nach außen geleitet. Daher wird davon abgeraten, dass
sich in der näheren Umgebung des Computers Bauteile, Gegenstände oder Möbel befinden,
die die Lüftung einschränken.

ACHTUNG! Insbesondere muss von der hinteren Gehäusewand Abstand gewahrt werden,
wo sich der Lüfter des Netzgeräts befindet Die hier ausströmende Luft kann ebenfalls die
Gerätelautstärke erhöhen, wenn sie auf nahe stehende Gegenstände stößt.

Unter keinen Umständen dürfen die Lüftungsöffnungen auf der Vorderseite, Rückseite
und an den Seitenwänden des Computergehäuses verdeckt werden!
1.3 Installation des Komplettsystems. Vor der Installation und der Inbetriebnahme des PC-Komplettsystems machen Sie sich unbedingt mit den Bedienungsanleitungen seiner einzelnen Bestandteile vertraut. Die folgenden Elemente sind Bestandteile eines typischen PC-Komplettsystems: - Zentraleinheit - Tastatur - Maus - Monitor - Lautsprecher (Option) - Drucker/Scanner/Multifunktionsgerät (Option) Im Folgenden wird beschrieben, wie die ersten vier aufgeführten Elemente angeschlossen werden. - Zentraleinheit Die Vorbereitung der Zentraleinheit zum Betrieb beschränkt sich auf den Anschluss der Stromversorgung über das Stromkabel, sowie den Anschluss weiterer Geräte wie Monitor, Tastatur, Maus, Drucker, Scanner, Lautsprecher usw. an die entsprechenden Schnittstellen auf der Gehäuserückseite. Die unten stehenden Abbildungen stellen die Schnittstellen auf der Gehäuserückseite einer typischen Zentraleinheit dar und beschreiben diese. Auf dem unten stehenden Foto ist eine Computerrückwand als Musterbeispiel zu sehen:
- Monitor
Der Monitor muss mit dem Stromkabel direkt an die Stromquelle angeschlossen werden.
Das Signalkabel des Monitors muss an die Video-Schnittstelle der Grafikkarte auf der Rückseite
der Zentraleinheit angeschlossen werden oder eine andere Anschlussbuchse für den Anschluss des
Monitors, z.B. DVI/HDMI/Display Port, D-Sub/VGA. Es ist ratsam, die Schrauben anzuziehen, die sich
beim Signalkabel-Stecker des Monitors befinden. Bei ungenauem Anschließen des Video-Steckers,
kann es zu einem Schwund von Farben, Bildverlust u. dgl. kommen.
       Gelegentlich ist beim Computer ein geeigneter Video-Adapter zu finden, der das Anschließen
des Monitors an eine andere Standard-Buchse ermöglicht.

Wichtig: Einige Computermodelle besitzen zwei oder mehr Video-Anschlüsse. In einem solchen Fall
muss der Monitor an die untere Buchse angeschlossen werden.

- Tastatur
Die Tastatur wird an einen der USB-Schnittstellen auf der Gehäuserückseite angeschlossen
(schwarze/blaue Buchse).

- Maus
Die Maus kann an eine der USB-Schnittstellen auf der Gehäuserückseite angeschlossen werden
(schwarze/blaue Buchse) - analog zur Tastatur.

- Lautsprecher (evtl. Kopfhörer)
Stereolautsprecher (im System 2.0 oder 2.1) werden an die runde Stereo-Miniklinkenbuchse (ohne
Nadeln) angeschlossen, in der Regel grün. Falls Mehrkanal-Lautsprecher vorhanden sind (System
4.1, 5.1 und mehr) müssen diese gemäß der dem Lautsprechersystem beigefügten Anleitung
an die Soundkarte angeschlossen werden.

ACHTUNG! Sämtliche beigefügten Stecker müssen vorsichtig angeschlossen werden und es muss
dabei darauf geachtet werden, dass vorhandene Nadeln/Kontakte nicht beschädigt werden.

1.4    Inbetriebnahme des Computers.

Im vorderen Teil jedes Computers befindet sich eine Taste zum Ein-/Ausschalten des Computers
(gelegentlich mit dem Symbol       gekennzeichnet und mit Power oder I/O beschrieben). Bei einigen
Gehäusen befindet sich der Netzschalter des Computers auf der Gehäuserückseite und muss dort
ausfindig gemacht und eingeschaltet werden.
Zusätzlich können sich auf der Frontplatte zwei Kontrollleuchten zu Diagnose- und Signal-Zwecken
befinden (POWER [meist grün] - signalisiert den Betriebszustand des Computers; HDD [rot] -
signalisiert u.a. den Betrieb der Festplatte), sowie die Taste RESET (optional), die zum Zurücksetzen
des Computers dient. Auf der Frontplatte können bei einigen Gehäusetypen zusätzliche USB- oder
USB 3.0-Schnittstellen (blau), sowie Audio-Schnittstellen für Kopfhörer (grün) und Mikrofon-
Anschlüsse (rot) oder auch Buchsen zum Lesen von SD-Karten, microSD-Karten, MemoryStick
und ähnlichem mehr gefunden werden.

Nach dem richtigen Anschluss aller Geräte an die Zentraleinheit, kann durch Drücken der Power-
Taste gestartet werden.
Ein richtig konfigurierter und installierter Computer sollte die Arbeit mit einer schnellen POST-
Prozedur beginnen (Prozessor-Detektion, Berechnung des installierten Speichers, Detektion
von Laufwerken und Test aller interner Geräte). Diese Prozedur ist nicht unbedingt für den Nutzer
sichtbar und während ihrer Durchführung wird das Logo angezeigt.
Nach diesen Tätigkeiten wird das Betriebssystem eingelesen, das sich auf der Festplatte des
Computers befindet. Die weiteren Etappen werden auf dem Bildschirm angezeigt. Beim ersten
Einschalten beginnt das richtig gestartete Betriebssystem den Prozess zur Konfigurierung für
die erste Inbetriebnahme und zeigt dann ein Fenster mit Einstellungen zur Sprache und Tastatur an.
Wichtig: Der Prozess der ersten Inbetriebnahme des Computers darf nicht
unterbrochen werden - selbst bei fehlender Information auf dem Bildschirm.
Falls innerhalb von 10 Minuten nach dem ersten Einschalten das Betriebssystem keinerlei
Information anzeigt, die eine Aktion seitens des Nutzers erfordert, überprüfen Sie bitte, ob der
Monitor richtig angeschlossen ist (evtl. an die zweite Buchse anschließen) und kontaktieren Sie
die Abteilung für technische Hilfe (Helpdesk) von ACTION S.A.
2. Betriebssystem - Installation
Installation des Betriebssystems aus der Familie Microsoft® Windows®:
Zur einwandfreien Durchführung der Installation des Betriebssystems aus der Familie Microsoft®
Windows® von DVD oder USB-Speicher (Pendrive) auf die Festplatte, müssen folgende Schritte
ausgeführt werden:
1. Die Microsoft® Windows® Installations-DVD in das DVD-Laufwerk einlegen oder den USB-
Speicherstick in einem USB-Port einschieben;
2. Den Computer Aus- und erneut Einschalten oder neu starten;
Der Computer ist so eingestellt, dass er die Startdateien vom DVD-Laufwerk ausführt;
(falls der Installationsprozess nicht vom DVD-Laufwerk ausgeführt wird oder falls der
Installationsdatenträger ein USB-Speicher ist, muss das Startmenü (BOOT-Menü) manuell
aufgerufen werden, indem die passende Taste gedrückt wird, z.B. Esc, F12, F11, F9 oder
F8) oder es muss in der passenden BIOS-Option die Reihenfolge der Startgeräte
verändert werden (eng.: boot sequence).
3. Nach dem Computerstart erscheint das Installationsprogramm des Betriebssystems Microsoft®
Windows®.
4. Weiter gemäß Hinweisen des Installationsprogramms vorgehen, die auf dem Bildschirm
erscheinen.
Wichtig: Falls bei dem gekauften Computer das Windows Betriebssystem 10 werkseitig installiert
ist, kann eine erneute Installation des Betriebssystems mit Hilfe der Option zur
Systemwiederherstellung durchgeführt werden - siehe Anhang I weiter unten in dieser
Anleitung.
ACHTUNG: Bei jeglichen Zweifeln, können Sie den Verkäufer, die Lieferfirma des Geräts
oder die Abteilung für technische Hilfe (Helpdesk) von ACTION S.A. um Hilfe bitten.
3. Hinweise zum sicheren Betrieb des Computers.
3.1 Die wichtigsten elektrischen Parameter des Computers werden auf dem Typenschild
angegeben, das auf der Rück- oder Unterseite des Computers angebracht ist.
Übrige Parameter:
Betriebstemperatur: 10 ÷ 50 [°C]
Lagertemperatur: -20 ÷ 70 [°C]
Luftfeuchtigkeit: 10 % ÷ 80% relative Feuchtigkeit (ohne Kondensation).
3.2 Der Computer muss über eine Steckdose mit Schutzkreislauf (Erdung) gespeist werden (drei-
Stift-Steckdose).Die miteinander arbeitenden Geräte (Computer, Drucker, Monitor u. dgl.) müssen alle über die
selbe Stromquelle gespeist werden.
Es wird empfohlen, einen Netzfilter zu verwenden, bei dem beide Leitungen mit Sicherungen
versehen sind. Besonders empfohlen wird anstelle eines Netzfilters der Gebrauch einer
Notstromversorgung (UPS).
Falls ein Verlängerungskabel oder ein Netzfilter verwendet wird, muss sichergestellt werden,
dass die gesamte Stromentnahme aller angeschlossenen Geräte nicht den maximal zulässigen
Strom überschreitet, der für das Verlängerungskabel (den Filter) zulässig ist.
Zusätzlich muss daran gedacht werden, dass der Wert des Sicherungseinsatzes im Stromnetz
maximal 16A betragen sollte.
ACHTUNG!
Vor dem Öffnen des Gehäuses die Stromversorgung ausschalten, indem
der Stecker aus der Netzsteckdose gezogen wird.
4. Wartung des Computers.
Für den Computer als Elektrogerät sind keine speziellen Wartungsmaßnahmen
erforderlich. Machen Sie sich mit den unten stehenden Hinweisen vertraut, um einen langen
und effektiven Betrieb Ihres Computers sicherzustellen.
1. Schützen Sie den Computer vor Sturz und platzieren Sie den Computer auf einem
stabilen Untergrund. In Folge eines Sturzes können das Gehäuse oder andere Bauteile
beschädigt werden. Der Computer darf nicht Erschütterungen oder Vibrationen ausgesetzt
werden.
2. Schützen Sie den Computer vor Überhitzung. Der Computer muss von jeglichen
Hitzequellen ferngehalten werden. Das Gerät muss vor langer direkter Einwirkung von
Sonnenstrahlen geschützt werden.
3. Schützen Sie den Computer vor Funkstörungen. Der Computer muss von Trafos mit
hoher Leistung, Elektromotoren und anderen Quellen starker Magnet- und Elektrofelder
ferngehalten werden. Diese können den richtigen Betrieb des Computers unmöglich machen
und die Beschädigung von Daten verursachen.
4. Schützen Sie den Computer vor Feuchtigkeit. Der Computer ist ein Elektrogerät
und kann durch Kontakt mit Wasser oder anderen Flüssigkeiten beschädigt werden.
Der Computer darf nicht an einem Ort belassen werden, an dem er durch eindringende
Feuchtigkeit oder Fremdkörper beschädigt werden kann. Der Computer darf weder in einer
feuchten Umgebung gelagert, noch benutzt werden.
5. Befolgen Sie die Prozeduren zur Bedienung des Computers und des Betriebssystems.
Es wird empfohlen, das Betriebssystem zu schließen, nachdem alle Programme geschlossen
und Arbeiten gespeichert wurden. Es wird nicht empfohlen, den Computer durch Trennen
der Versorgungsspannung auszuschalten (Ausschalten über den Netzschalter auf der Rückseite
des Computers oder durch Ziehen des Netzsteckers). Wenn die Stromversorgung des
Computers eingeschaltet ist, dürfen keine Peripheriegeräte angeschlossen werden (mit
Ausnahme von USB-Geräten, soweit dies erforderlich ist - prüfen Sie dies in der
Bedienungsanleitung des jeweiligen Geräts).
6. Der Computer darf nicht auseinander gebaut oder ohne Seitenwände oder andere
Gehäuseteile verwendet werden.
7. Richten Sie sich nach den Empfehlungen der vorliegenden Anleitung
zur Computerwartung.Reinigung des Computers.
• Trennen Sie den Computer vor der Reinigung vom Stromnetz!
• Verwenden Sie für PCs empfohlene Reinigungsmittel.
• Tragen Sie Reinigungsmittel aus einer Entfernung von 15-20 cm direkt auf den
Computer auf.
• Verwenden Sie ein weiches, sauberes Tuch zum abwischen des Computers
von außen.
• Verwenden Sie zur Reinigung jeglicher Computerteile keine flüchtigen Substanzen
(Lösungsmittel, Benzin u. dgl.) oder Schleifsubstanzen.
• Überlassen Sie die Reinigung des Computerinneren von Staub dem
Wartungsservice oder Fachpersonal.Dieses Produkt trägt ein CE-Zeichen gemäß den Anforderungen der geltenden EU-Richtlinien. Die Firma, die für das Anbringen des CE-Zeichens auf diesem Produkt verantwortlich ist, ist die Firma: ACTION S.A. w restrukturyzacji, Zamienie, Dawidowska 10, 05-500 Piaseczno, Polen. INFORMATIONEN ZU EU-VERWERTUNG (WEEE) Das Symbol der durchgestrichenen Mülltonne weist darauf hin, dass elektrische oder elektronische Produkte (WEEE) außerhalb des Hausmüllkreislaufs entsorgt werden sollten. Alte elektronische Produkte können gefährliche Substanzen enthalten. Richtige Entsorgung Ihres Altgerätes vermeidet mögliche negative Auswirkungen auf Umwelt und Gesundheit. Das alte Gerät kann wiederverwendbare Teile enthalten, mit denen andere Produkte repariert werden können, oder andere wertvolle Materialien, die verarbeitet werden können, um natürliche Ressourcen zu schonen. Sie können das Gerät in dem Geschäft zurückgeben, in dem es gekauft wurde, oder sich an Ihr lokales Abfallwirtschaft-Büro wenden.
Anhang I
       Erneute Installation des Betriebssystems und Optionen zur Wiederherstellung
                                        des Systems.

               (Betrifft nur Computer, die mit vorinstalliertem Betriebssystem
                           Microsoft® Windows® 10 gekauft werden)

Bitte bemerken, dass nach der beschriebene Verrichtung alle Benutzerdaten gelöscht
werden. Wir empfehlen, eine Sicherungskopie der Dateien erstellen, bevor dieses Tool
verwendet wird.

Computer mit Betriebssystem Windows® 10:

Hier erfahren Sie, wie Sie Ihre Windows 10-Installation zurücksetzen:

1. Klicken Sie in Windows 10 auf die Schaltfläche „Start“   .
2. Klicken Sie auf „Einstellungen“ und dann auf „Update und Sicherheit“.
3. Klicken Sie auf „Wiederherstellung“.
4. Klicken Sie unter „Diesen PC zurücksetzen“ auf „Los geht’s“.
5. Klicken Sie auf „Eigene Dateien beibehalten“ oder „Alles entfernen“.

   •   wir empfehlen die Wahl: „Alles entfernen”.
   •   Nächste etappe: muss die Wahl getroffen werden: „Nur meine Dateien entfernen” oder
       „Laufwerk vollständig bereinigen”.

   •   Im letzten Dialogfenster (Zusammenfassung der gewählten Optionen und geplanten
       Tätigkeiten),

    Klicken Sie auf „Zurücksetzen”, um den Prozess zu starten.
Klicken Sie auf „Abbrechen” , um den Prozess zu abbrechen.

Das Zurücksetzen der Systemeinstellungen kann bis zu mehreren Stunden dauern.
Die Prozess darf nicht unterbrochen werden. Wenn die Prozess abgeschlossen ist, erscheint
der Windows Bildschirm mit Wahlmöglichkeit der Sprachversion des Systems, genau wie beim
ersten Start des neuen Rechners.

Die unten stehenden Abbildungen zeigen die zuvor beschriebenen Schritte der Prozedur
zur Systemwiederherstellung mit markierter, zu wählender Option:
NOTATNIK / NOTE / NOTIZBUCH ................................................................................................................................ ................................................................................................................................ ................................................................................................................................ ................................................................................................................................ ................................................................................................................................ ................................................................................................................................ ................................................................................................................................ ................................................................................................................................ ................................................................................................................................ ................................................................................................................................ ................................................................................................................................ ................................................................................................................................ ................................................................................................................................ ................................................................................................................................ ................................................................................................................................ ................................................................................................................................ ................................................................................................................................ ................................................................................................................................ ................................................................................................................................ ................................................................................................................................ ................................................................................................................................
Sie können auch lesen