APP BEDIENUNGSANLEITUNG. APP USER MANUAL EVSE MASTER - we connect solar energy
←
→
Transkription von Seiteninhalten
Wenn Ihr Browser die Seite nicht korrekt rendert, bitte, lesen Sie den Inhalt der Seite unten
APP BEDIENUNGSANLEITUNG.
APP USER MANUAL
EVSE MASTER.

   Deutsch 		   1-26

   English 		   27-52
App zur Fernbedienung von smarten Wallboxen

2

Inhaltsverzeichnis

        							Seite

        1. Allgemeine Information					4
        2. Installation der App					4
              2.1.Kurzanleitung					4
              2.2. Übersicht Startbildschirm				5
              2.3. Anmerkungen zur Installation			              5
              2.4. Verbindungseinstellungen				6
        3. Gebrauchsanweisung EVSE Master App			                6
              3.1.Erste Anwendung				6
              3.2. Ladestation verbinden				7
              3.3. Wartebildschirm				7
              3.4. App-Status aktualisieren				7
              3.5. Ladestation wechseln				8
              3.6. Ladevorgang starten				8-9
              3.7. Ladestatus					10
              3.8. Ladevorgang beenden				11
              3.9. Benutzerdefiniertes, einmaliges Laden		      12-13
              3.10. Benutzerdefiniertes, regelmäßiges Laden		   14-15
              3.11. Laden per Knopfdruck				15
              3.12. Systemdefekt					16
              3.13. Ladehistorie					16-17
              3.14. Benachrichtigungen				17
        4. Systemeinstellungen					18
              4.1. Systeminformationen				18-19
              4.2. Firmware Update				19-20
              4.3. Passwort der Wallbox ändern			               21
              4.4. WiFi-Einstellungen ändern			22
              4.5. Namen der Wallbox ändern			                  23
              4.6. Temperaturanzeige ändern			23
        5. Benutzerprofil						24
              5.1. Benutzername ändern				25
              5.2. Sprache ändern					25
              5.3. FAQ						25
              5.4. Datenschutzbestimmungen			25
              5.5. App-Version anzeigen				25

                                                                        3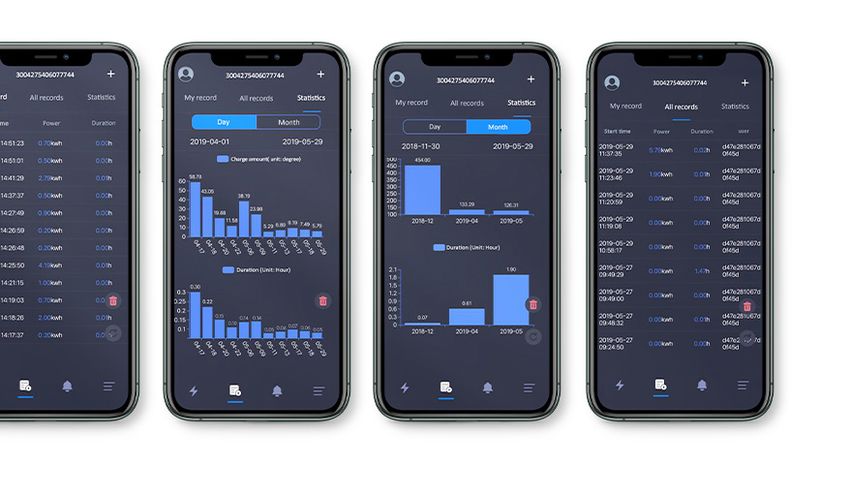
1. General information

    1. Allgemeine Information
    Die EVSE Master App ist eine Smartphone-App für die Benutzung Ihrer EVtap® Wallbox. Zur Ver-
    fügung stehen eine Android- und eine iOS-Version. Für den einfachen Datenaustausch kann ein
    Smartphone per Bluetooth oder WiFi mit der Ladestation verbunden werden. Die Hauptfunktio-
    nen der App bestehen darin, den Status Ihrer Wallbox zu überwachen, das Laden des Fahrzeuges
    zu steuern, den Lademodus einzustellen, die Ladehistorie zu protokollieren und kabellose Firm-
    ware-Updates zu ermöglichen.

    Die Datenübertragung zwischen Smartphone und Wallbox erfolgt via Bluetooth und WiFi. Bei der
    erstmaligen Verbindung muss eine Bluetooth-Verbindung hergestellt werden, um die erforderli-
    chen WiFi Einstellungen vornehmen zu können. Ist die Inbetriebnahme des WiFis erfolgt, schaltet
    die App automatisch auf die WiFi Verbindung um und priorisiert diese.

              Hinweis: Die Bluetooth Reichweite beträgt ohne Störquellen circa zehn Meter. Die
              WiFi-Kommunikation erfolgt über den lokalen WiFi-Router ihres Heimnetzes. So-
              wohl die Wallbox, als auch das Smartphone müssen mit demselben WiFi-Netzwerk
              verbunden werden. Die Signalstärke des Netzwerks ist abhängig vom verwendeten
              Router und den Umgebungs-bedingungen. Eine Steuerung der Ladestation per
              Smartphone ist nur im Signalbereich des WiFi-Routers möglich.

    Auf Werkseinstellungen lautet der Standardname Ihrer Wallbox „ACP#EVSEXXXX“. Dieser
    wird auf dem Startbildschirm der App, sowie in der linken oberen Ecke des LCD-Displays Ihrer
    EVtap® Wallbox angezeigt. Der Standardname des Bluetooth-Moduls Ihrer Wallbox lautet ab
    Werk ebenfalls „ACP#EVSEXXXX“. Bei Änderung des Namens Ihrer Wallbox in den Einstellungen
    ändert sich der Bluetooth Name simultan zum Namen der Wallbox.

    2. Installation der App
    2.1. Kurzanleitung
    Laden Sie die EVSE Master App
    für Ihr Android Smartphone
    im Google Play Store oder als
    iOS-Version für Apple Geräte
    im App Store unter dem Namen
    „EVSE Master“ herunter. Folgen
    Sie dann den Installationsan-
    weisungen auf Ihrem mobilen
    Endgerät.

                  EVSE Master

4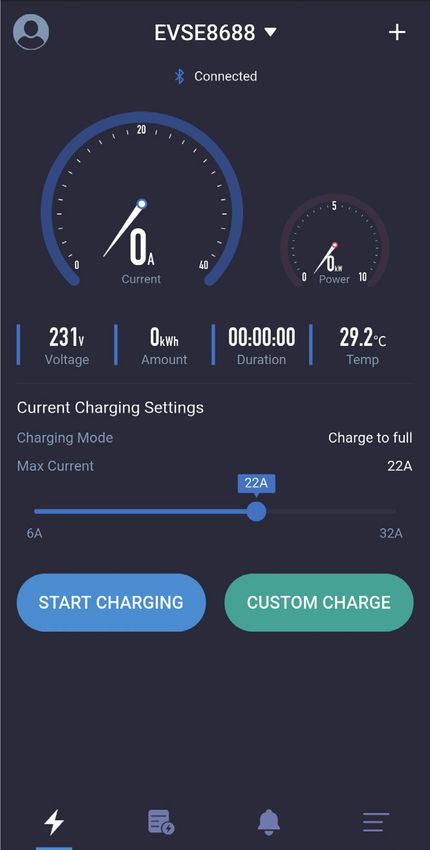
2.2. Übersicht Startbildschirm

                                                    1    Stationsnummer
               1
 13                          3               2      2    Neues Gerät hinzufügen

                                                    3    Verbindungskennung, Bluetooth oder WiFi
                                     5
                        4                           4    Stromanzeige

                                                    5    Leistungsanzeige

                                                    6    Ladeparameter
                                 6
                                                         Maximaler Ladetrom, kann jedes mal
                                                    7    ausgewählt werden
                        7
                                                    8    Ladestart

                                                    9    Einstellungen

           8                                       10    Mitteilungen

                                                   11    Aufzeichnung

      12           11       10           9         12    Zurück

                                                   13    Benutzereinstellungen
Abb. : Hauptbildschirm

2.3 Anmerkungen zur Installation
Der Installationsprozess verschiedener Smartphones kann gegebenenfalls variieren. Folgen Sie den
Anweisungen des Geräts Schritt für Schritt, um eine korrekte Installation zu gewährleisten.
Um alle Funktionen der App nutzen zu können, müssen die erforderlichen Berechtigungen im
Installationsvorgang vom Nutzer genehmigt werden. Bitte achten Sie darauf die Speichergenehmi-
gung, die Standortzugangsberechtigung, sowie die Bluetooth- und WiFi-Funktion zu bestätigen und
einzuschalten. Falls einzelne Berechtigungen im Installationsprozess abgelehnt werden, weißt die
App bei der Benutzung durch Pop-Ups darauf hin, die benötigten Genehmigungen für die Funktio-
nen zu erteilen.

                                                                                                   5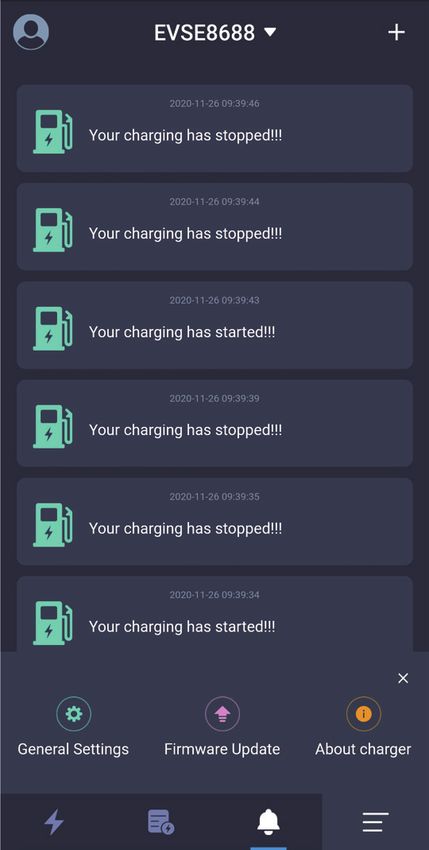
2.4. Verbindungseinstellungen
    Um eine erfolgreiche Verbindung mit Ihrer EVtap® Wallbox mit der EVSE Master App herzustellen,
    müssen folgende Einstellungen Ihres Smartphones aktiviert sein:
      • Aktive Bluetooth-Verbindung
      • Aktive WiFi-Verbindung
      • Aktive Standortfreigabe bei Benutzung der App
    Falls eine oder mehrere Verbindungseinstellungen deaktiviert sind, können Sie die Funktionen der
    EVSE Master App nicht vollumfänglich nutzen. Die App weißt Sie in diesem Falle darauf hin, die Ein-
    stellungen anzupassen.

     3. Gebrauchsanweisung EVSE Master App
     3.1. Erste Anwendung
     Bei erstmaliger Verwendung der App werden die, in Kapitel 2.4 genannte Berechtigungen, ab-
     gefragt. Weiterhin werden Sie aufgefordert das Standard-Passwort der Auslieferung, welches
     „123456“ lautet, zu ändern. Die Aufforderung zur Änderung des Standard Passworts erhalten Sie
     nur bei erstmaliger Installation und Benutzung. Zu einem späteren Zeitpunkt wird es keine Ein-
     gabeaufforderung mehr geben. Gehen Sie in die Einstellungen (siehe Kapitel 4.3), um ein indivi-
     duelles Passwort zu vergeben. Das Passwort muss aus sechs Ziffern bestehen. Vermeiden Sie die
     Verwendung des Standard Passworts „123456“, um anderen App-Benutzern den Zugang zu Ihrer
     Ladestation nicht zu ermöglichen. Nach Änderung des Passworts werden Sie aufgefordert das neue
     Passwort einzugeben. Auch alle anderen Geräte, die bereits mit Ihrer EVtap® Wallbox verwendet
     werden, müssen nun das neue Passwort eingeben. Durch die Vergabe eines individuellen sechsstel-
     ligen Zahlencodes schützen Sie Ihre Wallbox vor unerlaubtem Zugriff durch Dritte.
     Notieren Sie sich ihr persönliches Passwort an einem sicheren Ort. Falls Sie Ihr Passwort verges-
     sen haben sollten, wenden Sie sich an Ihren Lieferanten.

                Hinweis: Das Passwort der Ladestation muss üblicherweise eingegeben werden
                wenn:
                  • das Passwort der Ladestation geändert wird und mehrere Mobilgeräte mit der
                    Wallbox verbunden waren.
                  • das Passwort der Ladestation geändert wurde und die App auf Ihrem Smart-
                    phone neu installiert wurde.

6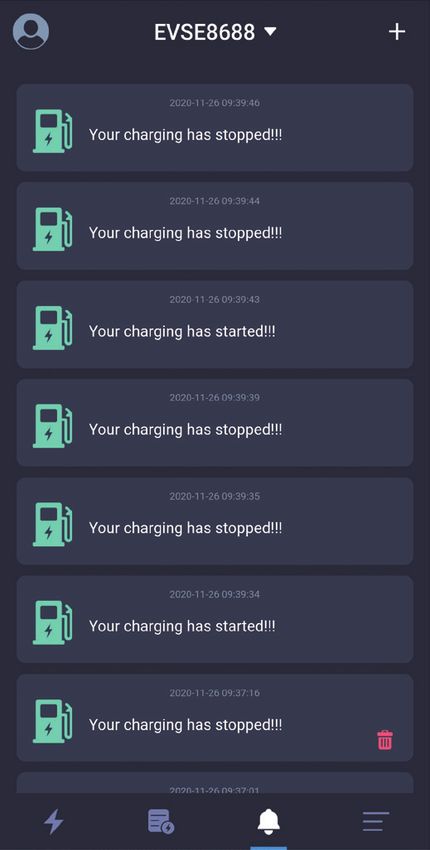
3.2. Ladestation verbinden
Beim Öffnen der App werden Sie darauf hingewiesen, dass noch keine Ladestation verbunden ist.
Drücken Sie auf das Feld „Connect Charger“, um sich mit Ihrer Wallbox zu verbinden.
Falls Sie sich das erste Mal verbinden, drücken Sie auf das Pluszeichen im rechten, oberen Eck
des Startbildschirms, um nach Ihrer EVtap® Wallbox zu suchen. Wählen Sie dann im Anzeigemenü
die gewünschte Wallbox aus und die Verbindung wird hergestellt. Bitte beachten Sie, das die App
nur für Ihre EVtap® Wallbox geeignet ist. Ladestationen anderer Anbieter können nicht verbunden
werden.

Nachdem die erstmalige Verbindung abgeschlossen ist, speichert die App die zuletzt verwendete
Wallbox. Sobald die Ladestation eingeschaltet und in Reichweite ist verbindet sich die App zukünftig
automatisch. Alternativ können Sie mit der Taste „Connect Charger“ die Verbindung herstellen. Ist
die Wallbox ausgeschaltet, kann keine Verbindung aufgebaut werden.

Abb. : Ladestation verbinden      Abb. : Wallbox auswählen           Abb. : Verbindungsaufbau

3.3. Wartebildschirm
Nach dem Öffnen der App erscheint, während des Verbindungsaufbaus mit Ihrer Wallbox, ein War-
tebildschirm. Falls Ihre Wallbox nicht antwortet und der Wartebildschirm länger als fünf Sekunden
bestehen bleibt, tippen Sie auf den Bildschirm und versuchen Sie die App erneut zu verbinden. Falls
die Verbindung fehlschlägt, überprüfen Sie, ob ihre EVtap® Wallbox gegebenenfalls offline ist.

3.4. App Status aktualisieren
Um die angezeigten Daten des Ladevorgangs zu aktualisieren ziehen Sie die Anzeigeseite nach
unten und lassen Sie sie anschließend wieder los. Der Pfeil im oberen Segment zeigt Ihnen die
Aktualisierung an.

                                                                                                       7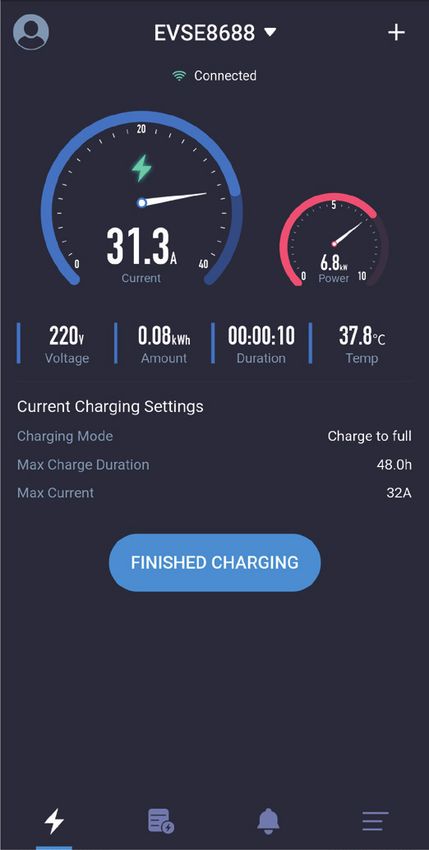
3.5. Ladestation wechseln

    Haben Sie sich bereits mit meh-
    reren EVtap® Wallbox verbunden,
    können Sie einfach zwischen den
    bekannten Geräten wechseln. Die
    App speichert alle bereits verwen-
    deten Geräte. Diese können in der
    Dropdown-Liste aufgeführt und aus-
    gewählt werden. Drücken Sie hierzu
    auf den kleinen Pfeil rechts neben
    dem Wallbox-Namen. Der Wechsel-
    vorgang dauert circa fünf Sekunden
    und kann nur mit eingeschalteten
    Ladestationen erfolgen.

                                                      Abb.: Ladestation wählen

    3.6. Ladevorgang starten

                                         Die fünf nachfolgenden Abbildungen zeigen der
                                         Reihe nach die notwendigen Schritte um einen
                                         Ladevorgang mit Ihrer EVtap® Wallbox schnell
                                         und unkompliziert zu starten:

                                2

                                                  1

                 3                            Verbinden Sie Ihr Fahrzeug mittels passendem
                                         1    Typ-2 Ladekabel mit Ihrer EVtap® Wallbox.

                                              Die Wallbox fordert Sie mit dem Hinweis „Please
             4                           2    connect the car“ hierzu auf.

                                              Stellen Sie nun den gewünschten Ladestrom mit
                                         3    dem Schieberegler ein

                                              Drücken Sie auf die Taste „Start Charging“, um
                                         4
                                              den Ladevorgang zu starten.

8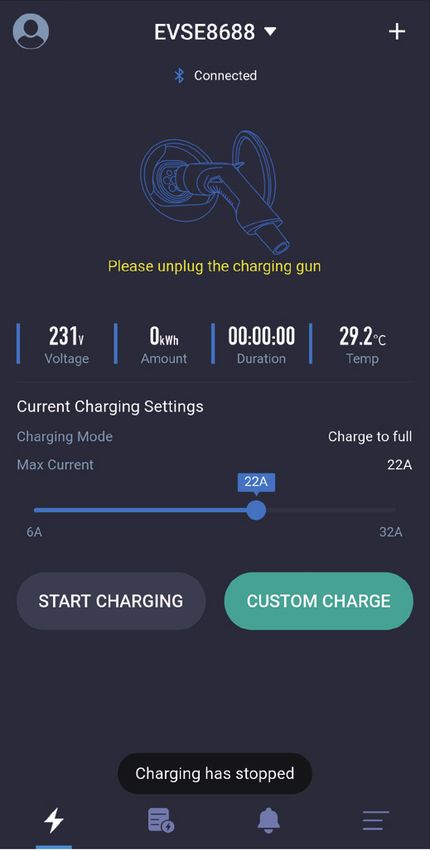
1

         1
        Die Wallbox wartet auf
        die Datenübermittlung
        Ihres Fahrzeuges.
        Sobald die Daten über-
        tragen sind startet der
        Ladevorgang automa-
        tisch

        2
        Diese Abbildung zeigt
2       Ihnen beispielhaft einen
        aktiven Ladevorgang. Der
        Ladestrom, die aktuelle
        Ladeleistung, sowie weite-
        re Ladeparameter werden
    3   angezeigt.

         3
        Falls Sie den Ladevorgang
        vorzeitig beenden möchten,
        drücken Sie auf die Schalt-
        fläche „Finished Charging“.
        Der Ladevorgang wird be-
        endet und die App fordert
        sie auf, den Ladestecker
        aus Wallbox und Fahrzeug
        zu entfernen. Ihre App
        zeigt hierzu die Aufforde-
        rung „Please unplug the
        charging gun“ an

                                     9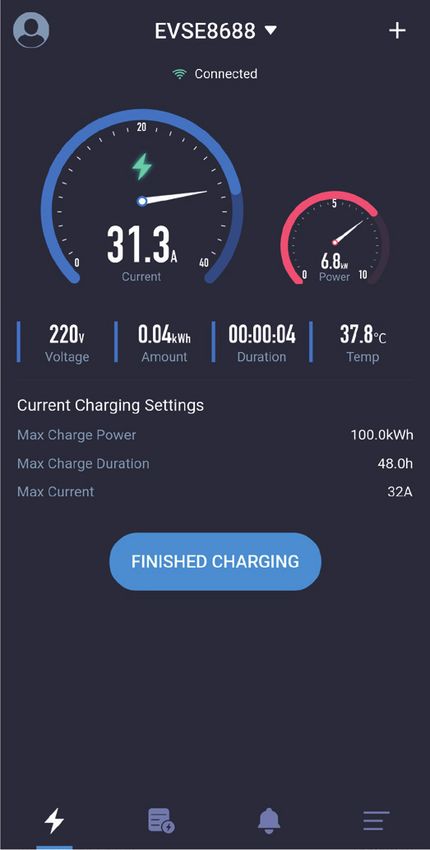
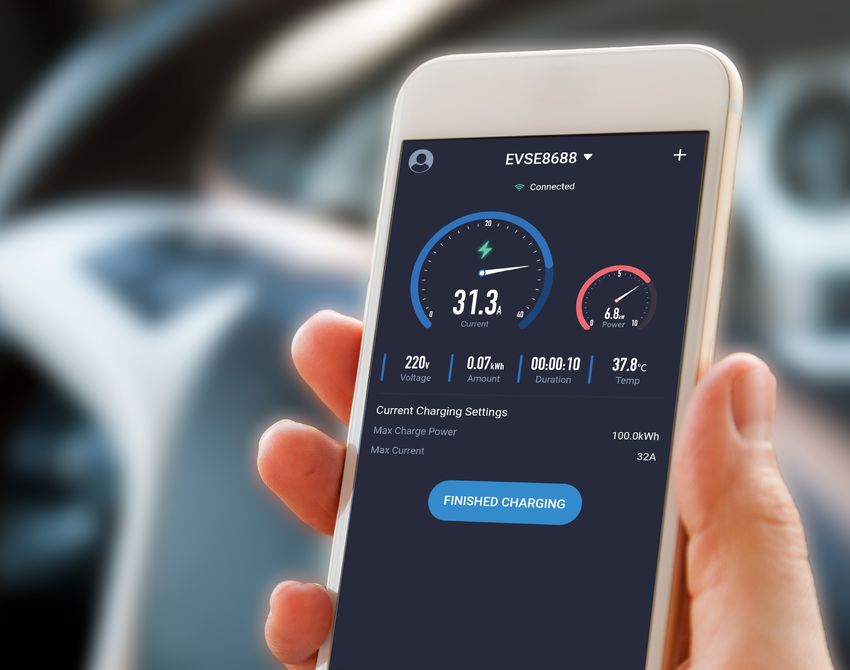
3.7. Ladestatus

     Der Startbildschirm beinhal-
     tet die Ladeübersicht und
     alle relevanten Ladeparame-
     ter. Auf dieser Seite können
     sie alle Informationen und
     Daten zum aktuellen Lade-
     vorgang einsehen.

     Dies sind unter anderem :

     1   Stromfluss

     2   Aktuelle Leistung

     3   Anliegende Spannung                                        2
                                                            1
     4   Gesamtenergieverbrauch

     5   Ladezeit
                                        3              4        5       6
     6   Ladetemperatur

     Mit der Option „Custom
     Charge“ lassen sich be-
     nutzerdefinierte Werte
     nach Wunsch einstellen.
     Beispielsweise kann der ma-
     ximale Ladestrom reduziert
     oder die Ladezeit verlängert
     werden.

                                    Abb.: Wartebildschirm

10
3.8. Ladevorgang beenden
Um den aktuellen Ladevorgang zu beenden, stehen Ihnen drei verschiedene Optionen zur
Verfügung:
1. Wählen Sie auf dem Startbildschirm die Option „Finished charging“, um den Ladevor-
gang per App zu beenden.
2. Der Ladevorgang wird beendet, wenn das Fahrzeug vollgeladen ist, oder die benut-
zerdefinierten Werte erreicht sind.
3. Der Ladevorgang wird beendet, wenn die Ladestation versehentlich vom Stromnetz
getrennt wurde.
Nach Erreichen der eingestellten Ladeparameter wird die Ladung automatisch beendet. Falls
Sie die Ladung vorzeitig manuell beenden möchten, drücken Sie auf den Button „Stop Char-
ging“. In beiden Fällen fordert Sie die App mit dem Hinweis „Please unplug the charging gun“
dazu auf, das Ladekabel abzuziehen. Sie können dann zum Startbildschirm zurückkehren.
Falls das Ladekabel nicht abgezogen wird können Sie zehn Sekunden nach Beendigung des
vorherigen Ladevorgangs einen neuen Ladevorgang per App oder Knopfdruck starten.
Hinweis: Bitte ziehen Sie das Ladekabel nicht während eines aktiven Ladevorgangs
von Ihrer EVtap® Wallbox ab. Beenden Sie immer erst den Ladevorgang und ziehen
Sie dann das Ladekabel von Wallbox und Fahrzeug ab.
Abb.: Ladevorgang beenden Abb.: Ladekabel aus dem Fahrzeug ziehen
113.9. Benuterdefiniertes, einmaliges Laden
Es gibt drei Parameter, die für ein benutzerdefiniertes einmaliges Laden in der App eingestellt
werden können:
1. Startzeit: Stellen Sie einen beliebigen Startzeitpunkt zwischen 0-24h ein. Bei Einstellung auf „0h“
startet der Ladevorgang sofort. Die maximale zukünftige Startzeit beträgt 24h ab dem Zeitpunkt der
Einstellung.
1
Startzeit
Abb.: Startzeitpunkt für einmaliges Laden einstellen
2. Ladezeit: Stellen Sie eine maximale Ladezeit ein. Wenn die maximale Ladezeit erreicht ist, be-
endet die Wallbox den Ladevorgang automatisch. Eine Einstellung auf „0h“ bedeutet, dass keine
maximale Ladezeit vorgegeben ist. Die maximal auswählbare Ladezeit beträgt 48h. Die Parameter
Ladedauer und Lademenge können gleichzeitig eingestellt werden. Mindestens einer der Parame-
ter muss ausgewählt werden.
3. Lademenge: Stellen Sie die maximal zu Ladende Lademenge ein. Eine Einstellung auf „0kWh“
bedeutet, dass die Lademenge nicht begrenzt ist. Der Maximalwert beträgt 100kWh. Die Parameter
Ladedauer und Lademenge können gleichzeitig eingestellt werden. Mindestens einer der Parame-
ter muss ausgewählt werden.
122
Ladezeit
Abb.: Ladezeit für einmaliges Laden einstellen
3
Lademenge
Abb.: Lademenge für einmaliges Laden einstellen
133.10 Benutzerdefiniertes, regelmäßiges Laden
Es gibt vier Parameter, die für die Aufladung mit einem benutzerdefinierten Ladezyklus in der App
eingestellt werden können:
- Startzeit für den Ladezyklus: Geben Sie die Uhrzeit an, zu der die Ladung starten soll.
- Zykluswiederholung: Wählen Sie die Wochentage aus, an denen die Ladung erfolgen soll.
- Ladezeit: Stellen Sie eine maximale Ladezeit ein. Wenn die maximale Ladezeit erreicht ist,
beendet Ihre Wallbox den Ladevorgang automatisch. Eine Einstellung auf „0h“ bedeutet, dass
keine maximale Ladezeit vorgegeben ist. Die maximal auswählbare Ladezeit beträgt 48h. Die
Parameter Ladedauer und Lademenge können gleichzeitig eingestellt werden. Mindestens
einer der Parameter muss ausgewählt werden.
- Lademenge: Stellen Sie die maximale Lademenge ein. Eine Einstellung auf „0kWh“ bedeutet,
dass die Lademenge nicht begrenzt ist. Der Maximalwert beträgt 100kWh. Die Parameter Lade-
dauer und Lademenge können gleichzeitig eingestellt werden. Mindestens einer der Parameter
muss ausgewählt werden.
Das benutzerdefinierte, regelmäßige Laden bezieht sich auf die Einstellungen der oben genannten,
zyklischen Ladeparameter. Sofern Ihre Wallbox online ist und nicht anderweitig in Benutzung ist,
startet der zyklische Ladevorgang entsprechend der vorgenommenen Einstellungen. Diese Funktion
ist vergleichbar mit einer Zeitschaltuhr. Die folgenden Abbildungen zeigen die einzelnen Einstellun-
gen der Reihe nach:
1 2 3
Wählen Sie die Ladezeit Wählen Sie die gewünschte Wählen Sie die gewünschte
und die gewünschte Lade- Startzeit aus (Stunde). Startzeit aus (Minuten).
menge aus.
144 5 6
Wählen Sie die gewünsch- Bestätigen und aktivieren Möchten Sie die Einstellun-
ten Wochentage aus, an Sie Ihre Einstellungen mit gen und den aktiven Lade-
denen geladen werden soll. dem „Enable“ Button. zyklus widerrufen, drücken
Sie den „Disable“ Button
und der aktuelle Zyklus
wird deaktiviert.
3.11. Laden per Knopfdruck
Wie bereits in den vorangegangenen Kapiteln
beschrieben unterstützt Ihre EVtap® Wallbox
verschiedene Modi, um einen Ladevorgang zu
starten:
1. Start des Ladevorgangs per App
2. Benutzerdefinierter Start (zyklisches Laden)
3. Start des Ladevorgangs per Knopfdruck an
der Wallbox
Im Reiter „Start charging by button“ in den all-
gemeinen Einstellungen können Sie die Funktion
des einfachen Ladens per Knopfdruck aktivieren
oder deaktivieren. Bewegen Sie dazu den Schie-
beregler nach links oder rechts. Bitte beachten
Sie, dass die Aktivierung oder Deaktivierung des
Startknopfes Ihrer EVtap® Wallbox nur vor oder
nach einem Ladevorgang, nicht aber während-
dessen erfolgen kann.
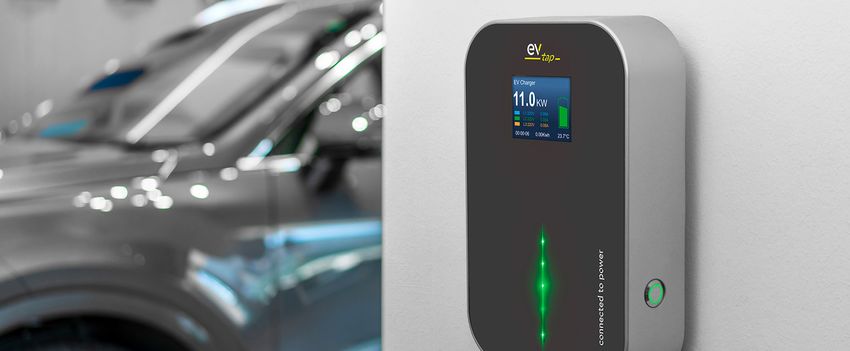
153.12. Systemdefekt
Sollte ein Systemfehler oder –defekt Ihrer EVtap® Wallbox vorliegen, erscheint eine Warnmeldung
in Form eines gelben Dreiecks mit einem Ausrufezeichen auf dem Startbildschirm.
Warnung: Sollte ein Systemfehler auftreten kontaktieren Sie bitte Ihren Lieferanten
oder einen Elektrofachmann zur Behebung des Problems. Öffnen Sie in keinem Fall
selbstständig das Gehäuse der Wallbox. Es besteht Lebensgefahr!
Unterspannung Überspannung
Low Voltage Over Voltage
Überlast Kurzschluss
Over Current Short Circuit
Prozessorfehler Übertemperatur
CP Error Over Temperature
Abb.: Bildschirmanzeige bei einer Fehlermeldung und die möglichen Fehler
3.13. Ladehistorie
Die integrierte Ladehistorie der EVSE Master App hat diverse Funktionen: Anzeige der vergangenen
Ladungen, Statistiken, Datenexport und Löschung von Datensätzen. Erläuterungen zu den
Funktionen:
1. Meine Ladehistorie: Im Reiter „My records“ werden nur die Ladungen der eigenen App und des
eigenen Benutzerprofils angezeigt. Die Sortierung erfolgt nach Datum, wobei die letzte Ladung ganz
oben steht.
2. Gesamte Ladehistorie: Im Reiter „All records“ werden alle Datensätze der Wallbox, auch die von
anderen Nutzern, angezeigt. Die Sortierung erfolgt nach Datum, wobei die letzte Ladung ganz oben
steht.
163. Statistiken zum Laden: Die tägliche beziehungsweise monatliche Lade-
leistung, sowie die Ladezeit, können protokolliert und in einem Balkendiagramm angezeigt werden.
Die tägliche Statistik ist unter dem Reiter „Statistics“ und weiter unter „Day“ zu finden und zeigt den
Datensatz einer Woche. Die monatliche Statistik ist unter dem Reiter „Statistics“ und weiter unter
„Month“ zu finden und zeigt eine Monatsübersicht.
4. Datensätze löschen: Mit der Löschtaste (roten Papierkorb markieren) können Sie vorhandene
Datensätze einfach löschen und die Statistiken zurücksetzen.
5. Datensätze exportieren: Mit dem Ordnersymbol (markieren) können Sie Ihre gespeicherten
Datensätze in einem Dokument exportieren, speichern und versenden.
6. Datensätze synchronisieren: Mit der Pfeiltaste können Sie die Daten der Wallbox mit Ihrem
Smartphone synchronisieren. Somit können auch Ladedaten anderer Nutzer in Ihrer App angezeigt
werden. Die Synchronisierung kann etwas Zeit in Anspruch nehmen.
Abb.: gesamte Ladehistorie
2
1
3
4
5
6
Abb.: meine Ladehistorie Abb.: Statistiken zum Laden
173.14. Benachrichtigungen
Benachrichtigungen Ihrer EVtap® Wallbox finden Sie im Reiter mit dem Glockensymbol am unteren
Bildschirmrand. Benachrichtigungen erhalten Sie beispielsweise wenn ein Ladevorgang gestartet
oder beendet wurde. Mit dem roten Papierkorbsymbol können Sie die Benachrichtigungen löschen.
2
1
Abb.: Liste der Benachrichtigungen
4. Systemeinstellungen
Die Systemeinstellungen befinden sich im Einstellungsmenü, welches Sie über das
Menü-Symbol am rechten unteren Bildschirmrand erreichen können. Die Systemein-
stellungen sind unterteilt in allgemeine Einstellungen („General Settings“), Firmware-
Updates und Systeminformationen („About Charger“).
4.1. Systeminformationen
Wenn Sie die aktuellen Systeminformationen abrufen wollen gehen Sie in den rechten
Reiter am unteren Bildschirmrand und wählen Sie im Menü „About charger“. Sie er-
halten nun Informationen über Marke, Modell, Firmware-Version, Firmware-Nummer,
maximale Nennleistung, maximaler Nennstrom, sowie die Ladestationsnummer.
184.1 Systeminf
Abb.: Systeminformationen Abb.: Informationen über die Wallbox
4.2. Firmware update
Wenn Sie den aktuellen Firmware-Stand abrufen wollen gehen Sie in den rechten Reiter am
unteren Bildschirmrand und wählen Sie im Menü „Firmware upgrade“. Sie bekommen nun
die aktuell installierte Version angezeigt. Falls eine neuere Firmware-Version vorhanden sein
sollte wird Ihnen der Button „upgrade“ blau angezeigt. Um die neue Firmware zu installieren
tippen Sie auf den Button „upgrade“.
Hinweis: Bitte stellen Sie sicher, dass das Smartphone und Ihre EVtap® Wallbox eine
ausreichende WiFi-Verbindung (Internet) haben, das Smartphone über mindestens
50% Akku verfügt und der Abstand zwischen Ladesäule und Smartphone nicht mehr
als zehn Meter beträgt. Die Übertragung des Updates kann per WiFi (ca. 5 min) oder
Bluetooth (ca. 30 min) erfolgen. Die Übertragung des Updates per WiFi wird aus-
drücklich empfohlen.
194.2. Firmware update
Abb.: Firmware update anzeigen
Abb.: Download Firmware
204.3. Passwort der Wallbox ändern
Um das Standard-Passwort oder ein bereits vorhandenes persönliches Passwort zu ändern
müssen Sie in den allgemeinen Einstellungen unter „Modify Charger Passwort“ zuerst das
bestehende Passwort im Feld „Original Password“ eingeben. Danach legen sie im Feld „New
Password“ ihr persönliches, neues Passwort fest. Wiederholen Sie die Eingabe im Feld „Confirm
New Password“, um das neue Passwort zu bestätigen.
Das Passwort muss aus sechs Ziffern bestehen und sollte sich aus Sicherheitsgründen und zum
Schutz vor unerlaubtem Zugriff auf Ihre Wallbox vom Standard-Passwort bei Auslieferung unter-
scheiden. Falls Sie Ihr Passwort vergessen haben, wenden Sie sich an Ihren Lieferanten, um das
das Passwort zurücksetzen zu lassen. Zum Zurücksetzen des Passworts benötigt der Support
die 16-stellige Wallboxnummer, welche im Einstellungsmenü bei „About charger“ zu finden ist.
Nach der Verifizierung Ihrer Wallbox wird das Passwort der Wallbox auf das standard Passwort
„123456“ zurückgesetzt.
Abb.: Passwort ändern
214.4. WiFi-Einstellungen ändern
Bei erstmaliger Verwendung muss das WiFi-Modul Ihrer EVtap® Wallbox mit dem Router Ihres
Heimnetzwerkes verbunden werden. Im Reiter „Charger Wi-Fi Settings“ im allgemeinen Ein-
stellungsmenü können sie den WiFi Name Ihres Netzwerks und das Passwort eingeben. Sollte
Ihr Smartphone bereits mit dem gleichen WiFi-Heimnetz verbunden sein, wird der WiFi-Name
automatisch eingefügt und Sie müssen lediglich das Passwort Ihres WiFi-Zugangs im Feld „Wi-
Fi Password“ eintragen.
Bitte beachten Sie, dass die maximale Passwortlänge 16 Stellen beträgt. Sobald das korrekte
Passwort eingetragen ist, verbindet sich Ihre Wallbox mit dem WiFi.
Abb.: WiFi Einstellungen ändern
224.5. Name der Wallbox ändern
Auf Werkseinstellungen lautet der Stan-
dardname Ihrer EVtap® Wallbox „ACP#EV-
SEXXXX“. Dieser wird auf dem Startbild-
schirm der verbundenen App, sowie in der
linken oberen Ecke des LCD-Displays der
Ladestation angezeigt. Sie können den
Namen Ihrer Wallbox im Reiter „Modify
Charger Name“ in den allgemeinen Ein-
stellungen beliebig ändern. Die maximale
Länge des Namens beträgt 11 Stellen
einschließlich Leerzeichen und Sonder-
zeichen. Haben Sie einen neuen Namen
vergeben, muss die App neu gestartet
werden, damit der neue Name bei Ver-
bindungsaufbau übertragen wird.
Abb.: Wallboxname ändern
4.6. Temperaturanzeige ändern
Die Temperaturanzeige Ihrer EVtap® Wallbox kann bei Bedarf von Grad Celsius (°C) auf Grad
Fahrenheit (°F) umgestellt werden. Bewegen Sie hierzu den Schieberegler im Reiter „Temperatu-
re Type“ in den allgemeinen Einstellungen nach links oder rechts. Die Temperaturanzeige ändert
sich sowohl in der App, als auch am Anzeigedisplay der Ladestation.
Um die Temperaturanzeige schnell umzustellen, kann auf dem Startbildschirm der App die Tem-
peratur angetippt werden. Die Anzeige ändert sich von Grad Celsius auf Grad Fahrenheit, jedoch
nur in der App.
Abb.: Temperaturanzeige ändern
235. Benutzerprofil
Auf die Seite des Benutzerprofils gelangen Sie per Tipp auf das Benutzersymbol in der linken obe-
ren Ecke des Bildschirmrandes. Das Benutzerprofil beinhaltet Einstellmöglichkeiten der Sprache,
die FAQs, die Datenschutzbestimmungen und Informationen über die App-Version.
1
1
2
2
3
4
5
3
4
5
245.1. Benutzername ändern
Wenn Sie Ihren Benutzernamen ändern möchten, tippen Sie einfach auf den Namen unter dem
Benutzersymbol. Tragen Sie den Namen Ihrer Wahl ein und bestätigen Sie die Änderung mit der
Taste „OK“.
5.2. Sprache ändern
Momentan unterstützt die App die Sprachen Englisch und Chinesisch. Wählen Sie im Reiter „Lan-
guage Set“, die von Ihnen genutzte Sprache aus, indem Sie auf die jeweilige Sprache tippen. Ein
Haken symbolisiert die ausgewählte Sprache.
5.3. FAQ
Der Reiter „FAQ“ liefert Antworten zu den meisten allgemeinen Fragen und Problemen, die bei
der Verwendung Ihrer EVtap® Wallbox und der Steuerung per App auftreten können. Eine deutsche
FAQ-Version und eine digitale Version der App-Bedienungsanleitung finden Sie online unter www.
hik-solutions.de / www.his-solar.de/ zum Download.
5.4. Datenschutzbestimmungen
Die Datenschutzbestimmungen können Sie im Reiter „Privacy“ nachlesen.
5.5. App-Version anzeigen
Den Stand Ihrer App-Version können Sie im Reiter „About“ abfragen. Falls eine aktuellere
Version zur Verfügung stehen sollte, bekommen Sie einen Hinweis.
25Herausgeber HIS Renewables GmbH HIK GmbH Siemensstraße 4 D-64760 Oberzent Telefon +49 6068 9314 501 E-Mai: sales@evtap.de Copyright © 2021 HIK GmbH Stand: 04-2021 Änderungen vorbehalten. Für Druckfehler keine Haftung
APP USER MANUAL.
EVSE MASTER.
App for remote control of smart wall boxes

28
Table of contents

        							Page

        1. General information					29
        2. App installation						30
        2.1. Quick start guide					30
               2.2. Start screen overview				31
               2.3. Installation notes				31
               2.4. Connection settings				32
        3. Instructions for use of EVSE Master App			   32
               3.1. First use					32
               3.2. Connect charging station				33
               3.3. Waiting screen					33
               3.4. Update app status				33
               3.5. Change charing station				34
               3.6. Start Charging					34-35
               3.7. Charging status					36
               3.8. Stop charging					38
               3.9. Custom, one time charging			        38-39
        3.10. Custom, repeated charging				             40-41
               3.11. Charge by button				41
               3.12. System defect					42
               3.13. Charging history				42-43
               3.14. Notifications					43
        4. System settings						44
               4.1. System information				44-45
               4.2. Firmware update				45-46
               4.3. Change wallbox password				47
               4.4. Change WiFi settings				48
               4.5. Change wallbox name				49
               4.6. Change temperature display			       49
        5. User profile						50
               5.1. Change username				51
               5.2. Change language				51
               5.3. FAQ						51
               5.4. Privacy policy					51
               5.5. Show app version				51

                                                                29
1. General information
The EVSE Master App is a smartphone app for using your EVtap® Wallbox. An Android and an iOS
version are available. Smartphones can be connected to the charging station via Bluetooth or WiFi
for easy data exchange. The main functions of the app are to monitor the status of the wallbox,
control the charging of the vehicle, set the charging mode, log the charging history and enable
wireless firmware updates.
The data transfer between smartphone and wallbox takes place via Bluetooth and WiFi. When
connecting for the first time, a Bluetooth connection must be established in order to be able to set
the required WiFi settings. Once the WiFi connetcion has been established for the first time, the
app automatically switches to the WiFi connection and prioritizes it.
Note: The Bluetooth range is around ten meters without sources of interference.
WiFi communication takes place via the local WiFi router in your home network.
Both the wallbox and the smartphone must be connected to the same WiFi network.
The signal strength of the network depends on the router used and the environmen-
tal conditions. The charging station can only be controlled using a smartphone in the
signal range of the WiFi router.
In the factory settings, the standard name of your wallbox is „ACP#EVSEXXXX“. This is shown on
the start screen of the app and in the top left corner of the LCD display of your EVtap® Wallbox.
The factory default name of the Bluetooth module in your wallbox is also “ACP#EVSEXXXX”. If you
change the name of your wallbox in the settings, the Bluetooth name changes simultaneously with
the name of the wallbox.
2. App installation
2.1. Quick start guide
Download the EVSE Master App
for your Android smartphone from
the Google Play Store or as an iOS
version for Apple devices from the
App Store (App Name: „EVSE Mas-
ter“). Then follow the installation
instructions on your mobile device.
EVSE Master
302.2. Start screen overview
1 Device no.
1
13 3 2 2 Add new wallbox
3 Connection sign, bluetooth or WiFi
5
4 4 Charge current indicator
5 Performance indicator
6 Charging parameters
6
7 Maximum available charging current
7
8 Start charging / Custom charging
9 System settings
8 10 Notifications
11 Charging history
12 11 10 9 12 Back
13 User settings
Fig.: Main display
2.3. Installation notes
The installation process of different smartphones may vary. Follow the instructions of the device
step by step to ensure correct installation. In order to be able to use all functions of the app, the
required authorizations must be approved by the user during the installation process. Please make
sure to confirm the storage authorization, the location access authorization as well as the Bluetooth
and WiFi functions and switch them on. If individual authorizations are denied during the installation
process, the app uses pop-ups to indicate that the required authorizations for the functions have to
be granted.
312.4. Connection settings
In order to establish a successful connection with your EVtap® Wallbox with the EVSE Master App,
the following settings on your smartphone must be activated:
• active bluetooth connection
• active WiFi connection
• active location sharing when using the app
If one or more connection settings are deactivated, you will not be able to fully use the functions of
the EVSE Master App. In this case, the app will tell you to adjust the settings.
3. Instructions for use of EVSE Master App
3.1. First use
When using the app for the first time, the authorizations mentioned in Chapter 2.4. are requested.
You will also be asked to change the default password of the delivery, which is „123456“. You will
only receive the request to change the standard password when installing and using it for the first
time. There won’t we any prompt at a later point in time. Go to the settings (see chapter 4.3.) to
assign an individual password. The password must consist of six digits. Avoid using the standard
password „123456“ to prevent other app users from accessing your charging station. After changing
the password, you will be asked to enter the new password. All other devices that are already being
used with your EVtap® Wallbox must now enter the new password. By assigning an individual six-di-
git number code, you protect your wallbox from unauthorized access by third parties.
Make a note of your personal password in a safe place. If you have forgotten your password, please
contact your supplier.
Note: The password of the charging station usually has to be entered if:
• the password of the charging station is changed and several mobile devices
were connected to the wallbox.
• the password of the charging station has been changed and the app has been
reinstalled on your smartphone.
323.2. Connect charging station
When you open the app, you will be informed that no charging station is connected yet. Press the
„Connect Charger“ button to connect to your wallbox.
If you are connecting for the first time, press the plus sign in the top right corner of the start screen
to search for your EVtap® Wallbox. Then select the required wallbox in the display menu and the
connection will be established. Please note that the app is only suitable for your EVtap® Wallbox.
Charging stations from other providers cannot be connected.
After the initial connection has been completed, the app saves the last used wallbox. As soon as the
charging station is switched on and within range, the app will connect automatically in the future.
Alternatively, you can establish the connection with the „Connect Charger“ button. If the wallbox is
switched off, no connection can be established.
Fig. : Connect wallbox Fig. : Choose wallbox Fig. : Establishing connection
3.3. Wainting screen
After opening the app, a waiting screen appears while the connection is being established with
your wallbox. If your wallbox does not answer and the waiting screen persists for longer than five
seconds, tap the screen and try to connect the app again. If the connection fails, check whether your
EVtap® Wallbox is offline.
3.4. Update app status
To update the displayed data of the cherging process, pull the homescreen down and then release it
again. The arrow in the upper segment shows you the update.
333.5. Change charging station
If you have already connected to
several EVtap® Wallboxes, you can
easily switch between the known
devices. The app saves all devices
that have already been used. These
can be listed and selected in the
drop-down list. To show the drop-
down list, press the small arrow to
the right of the wallbox name. The
change process takes about five se-
conds and can only be done with the
charging stations switched on.
Abb.: Select Wallbox
3.6. Start charging
The five following pictures are showing the steps
necessary to start a charging process with your
EVtap® Wallbox quickly and easily:
2
1
3 Connect your vehicle to your EVtap® Wallbox
1 using a suitable type 2 charging cable.
A message is displayed in the app screen
4 2
Now set the desired charging current with the
3 slider
press the start button to initiate the charging
4
process.
34Fig. 3: The wallbox is
waiting for the data
to be transmitted
from your vehicle. As
soon as the data has
been transferred, the
charging process starts
automatically.
Fig. 4: This picture shows
you an example of an
active charging process.
The charging current, the
current charging power
and other charging para-
meters are displayed.
Fig. 5: If you want to stop
the charging process early,
press the „Finished Char-
ging“ button. The charging
process is ended and the
app prompts you to remove
the charging plug from the
wallbox and vehicle.
353.7. Charging status
The start screen contains the
charging overview and all re-
levant charging parameters.
On this page you can see all
information and data on the
current charging process.
The data includes:
1 Current flow
2 Current power
3 Applied voltage 2
1
4 Total energy consumption
5 Charging time
3 4 5 6
6 Temperature
With the „Custom Charge“
option, user-defined values
can be set as required. For
example, the maximum
charging current can be
reduced or the charging time
can be extended.
Fig.: Charging status
363.8. Stop charging
There are three different options available to end the current charging process:
1. Press the „Stop charging“ button on the start screen to end the charging process via
app.
2. The charging process is ended when the vehicle is fully charged or the user-defined
values are reached.
3. The charging process is ended if the charging station is accidentally disconnected
from the mains.
After reaching the individually defined charging parameters, charging will end automatically.
If you want to end charging manually, press the “Stop Charging” button. In both cases, the
app prompts you to unplug the charging plug with the message. You can then return to the
home screen. If the charging cable is not removed, you can start a new charging process ten
seconds after the end of the previous charging process via app or by pressing the button on
the side of your wallbox.
Hinweis: Please do not disconnect the charging cable from your EVtap® Wallbox
during an active charging process. Always end the charging process first and then
disconnect the charging cable from the wallbox and vehicle.
Fig.: Stop charging Fig.: Manually stop charging
373.9. Custom, one time charging
There are three parameters that can be set in the app for a custom one-time charging process:
1. Start time: Set any start time between 0-24h. If the setting is „0h“, the charging process starts
immediately. The maximum future start time is 24 hours from the time of setting.
1
Start time
Fig.: Set start time for one time charging
2. Charging time: Set a maximum charging time. When the maximum charging time is reached, the
wallbox ends the charging process automatically. A setting to „0h“ means that no maximum char-
ging time is specified. The maximum selectable charging time is 48 hours. The parameters charging
duration and charging amount can be set at the same time. At least one of the parameters must be
selected.
3. Charge amount: Set the maximum charge amount to be charged. A setting to „0kWh“ means that
the charge amount is not limited. The maximum value is 100kWh. The parameters charging duration
and charging amount can be set at the same time. At least one of the parameters must be selected.
382
Charging time
Fig.: Charging time for one time charging
3
Charging amount
Fig.: Set charging amount for one time charging
393.10 Custom, repeated charging
There are four parameters that can be set in the app for charging with a custom charging cycle:
- Start time for the charging cycle: Enter the time at which the charging should start.
- Cycle repetition: Select the days of the week on which the charging should take place.
- Charging time: Set a maximum charging time. When the maximum charging time is rea-
ched, your wallbox will automatically stop charging. A setting to „0h“ means that no maximum
charging time is specified. The maximum selectable charging time is 48 hours. The parameters
charging duration and charging amount can be set at the same time. At least one of the para-
meters must be selected.
- Load amount: Set the maximum load amount. A setting to „0kWh“ means that the charge
amount is not limited. The maximum value is 100kWh. The parameters charging duration and
charging amount can be set at the same time. At least one of the parameters must be selected.
The user-defined, regular charging refers to the settings of the cyclic charging parameters men-
tioned above. If your wallbox is online and not otherwise in use, the cyclical charging process starts
according to the settings made. This function is comparable to a timer.
The following pictures show the individual settings in sequence:
1 2 3
Select the charging time Select the desired start Select the desired start
and the desired charging time (hour). time (minutes).
amount.
404 5 6
Select the desired days of Confirm and activate your If you would like to cancel
the week on which charging settings with the „Enable“ the settings and the active
should take place. button. charging cycle, press the
„Disable“ button and the
current cycle will be deac-
tivated.
3.11. Charge by button
As already described in the previous chapters,
your wallbox supports various modes for start-
ing a charging process:
1. Start the charging process via app
2. User-defined start (cyclic loading)
3. Start the charging process by pressing the
button on the wallbox
In the “Start charging by button” tab in the ge-
neral settings, you can activate or deactivate the
simple charging function by pressing a button.
To do this, drag the slider to the left or right.
Please note that the activation or deactivation of
the start button of your EVtap® Wallbox can only
take place before or after a charging process,
but not during the charging process.
413.12. System defect
If there is a system error or defect in your wallbox, a warning message appears in the form of a yel-
low triangle with an exclamation mark on the start screen. There are six different error messages:
Warning: If a system error occurs, please contact your supplier or a qualified electrici-
an to rectify the problem. Under no circumstances should you open the housing of the
wallbox yourself. There is danger to life!
Low Voltage Over Voltage
Over Current Short Circuit
CP Error Over Temperature
Fig.: Display with system defect and possible warning messages
3.13. Charging history
The integrated charging history of the EVSE Master App has various functions: display of previous
charges, statistics, data export and deletion of data records.
Explanations of the functions:
1. My charging history: only the loads from your own app and your own user profile are displayed.
Sorting takes place by date, with the last charge at the top.
2. Entire charging history: all data records of the wallbox, including those of other users, are di-
splayed. Sorting takes place by date, with the last charge at the top.
423. Statistics on charging: The daily or monthly charging capacity and the
charging time can be logged and displayed in a bar chart. The daily statistics can be found in “Statis-
tics” and further in “Day” and shows the data set for a week. The monthly statistics can be found in
the tab „Statistics“ and further in „Month“ and shows a monthly overview.
4. Delete data records: With the delete button you can easily delete existing data records and reset
the statistics.
5. Export data records: With the delete button you can easily delete existing data records and reset
the statistics.
6. Synchronise data sets: With the arrow key you can synchronize the data of the wallbox with your
smartphone. This means that the charging data of other users can also be displayed in your app.
Synchronization may take a little while.
Fig.: All records
2
1
3
4
5
6
Fig.: My records Fig.: Charging statistics
433.14. Notifications
You will find notifications of your EVtap® Wallbox in the tab with the bell symbol at the bottom of the
screen. You will receive notifications, for example, when a charging process has started or ended. You
can delete the notifications with the red trash can symbol.
2
1
Fig.: List of notifications
4. System settings
The system settings are located in the settings menu, which you can access via the
menu symbol at the bottom right of the screen. The system settings are divided into
general settings, firmware updates and about charger.
4.1. System information
If you want retrieve the current system information, go to “About charger” in the menu.
You will now receive information about the brand, model, firmware version, firmware
number, maximum rated power, maximum rated current and the charging station num-
ber.
444.1 Systeminf
Fig.: System information Fig.: Information about the wallbox
4.2. Firmware update
If you want to retrieve the current firmware version, go to the right tab at the bottom of the
screen and select “Firmware upgrade” in the menu. You will now see the currently installed
version. If a newer firmware version is available, the upgrade button will be displayed in blue.
To install the new firmware, tap the upgrade button.
Hinweis: Please ensure that the smartphone and your wallbox have a sufficient WiFi
connection, the smartphone has at least 50% battery and the distance between the
charging station and the smartphone is no more than ten meters. The update can be
transmitted via WiFi (approx. 5 min) or Bluetooth (approx. 30 min). The transfer of
the update via WiFi is highly recommended.
454.2. Firmware update
Abb.: Firmware upgrade anzeigen
Fig.: Download firmware
464.3. Change wallbox password
To change the standard password or an existing personal password, you must first enter the
existing password in the corresponding field in the general settings at „Modify Charger Pass-
word“. Then set your personal, new password in the field below. Repeat the entry in the corre-
sponding field to confirm the new password.
The password must consist of six digits and should differ from the standard password on deli-
very for security reasons and to protect against unauthorized access to your wallbox. If you have
forgotten your password, contact your supplier to have the password reset. To reset the pass-
word, the support team needs the 16-digit wallbox number, which can be found in the settings
menu (see „About charger“). After the verification of your wallbox, the password of the wallbox is
reset to the standard password „123456“.
Fig.: Change password
474.4. Change WiFi settings
When using it for the first time, the WiFi module of your EVtap® Wallbox must be connected to
the router of your home network. The Charger Wi-Fi Settings can be found in the general set-
tings menu, you can enter the WiFi name of your network and the password. If your smartphone
is already connected to the same WiFi home network, the WiFi name is automatically inserted
and you only have to enter the password of your WiFi access in the Password field.
Please note that the maximum password length is 16 characters. As soon as the correct pass-
word has been entered, your wallbox connects to the WiFi.
Fig.: Change WiFi settings
484.5. Change wallbox name
In the factory settings, the standard name
of your EVtap® Wallbox is „ACP#EV-
SEXXXX“. The Name is displayed on the
start screen of the connected app and in
the top left corner of the charging station‘s
LCD display. You can change the name of
your wallbox in the corresponding tab in
the general settings. The maximum length
of the name is 11 characters including
spaces and special characters. If you have
assigned a new name, the app must be
restarted so that the new name is trans-
ferred when the connection is established.
Fig.: Change wallbox name
4.6. Change temperature display
If necessary, the temperature display on your wallbox can be switched from degrees Celsius (° C)
to degrees Fahrenheit (° F). To change the settings, move the slider in the „Temperature Type“ tab
in the general settings to the left or right. The temperature display changes both in the app and
on the display of the charging station.
To change the temperature display quickly, the present temperature can be touched on the app‘s
start screen. The display changes from degrees Celsius to degrees Fahrenheit, but only in the
app.
Fig.: Change temperature display
495. User profile
You can access the user profile page by tapping on the user symbol in the top left corner of the
screen. The user profile includes setting options for the language, the FAQs, the privacy policy and
information about the app version.
1
1
2
2
3
4
5
3
4
5
505.1. Change username
If you‘d like to change your username, just tap the name underneath the user icon. Enter the name
of your choice and confirm the change with the „OK“ button.
5.2. Change language
The app currently supports English and Chinese. Select the language you are using by tapping on
the respective language in the user settings. A tick symbolizes the selected language.
5.3. FAQ
The „FAQ“ tab lists most of the general problems and questions and helps you to find a solution. A
German FAQ version can be found at:
5.4. Privacy policy
You can read the privacy policy in the tab „privacy“.
5.5. Show app version
You can check the status of your app version in the „About“ tab. If a more recent version is
available, you will be notified.
51Publisher HIS Renewables GmbH HIK GmbH Siemensstraße 4 D-64760 Oberzent Phone: +49 6068 9314 501 Email: sales@evtap.de Copyright © 2021 HIK GmbH State: 04-2021 Subject to changes. No liability for misprints
Sie können auch lesen