TRAGE HILFEN Bindeanleitung - BABY CARRIERS
←
→
Transkription von Seiteninhalten
Wenn Ihr Browser die Seite nicht korrekt rendert, bitte, lesen Sie den Inhalt der Seite unten
Bindeanleitung

                            TRAGE
                            HILFEN
                          Wrapping instructions

                             BABY
kokadi® Babytragetücher
Ludwigstraße 6
85551 Kirchheim
                          CARRIERS
mail@kokadi.de
www.kokadi.de
GLOSSAR:                                                                                    INHALT
Steg/Stegbreite – Rückenteil am Hüftgurt befestigt. Einstellung der Stegbreite über den     Tragehilfe FLIP.......................... 3
Klettverschluß.                                                                             Rückentrageweise FLIP................. 9
Anhock-Spreiz-Haltung: Hierbei ist der Rücken des Babys leicht gerundet, seine              Herausheben aus der
Beinchen sind angehockt und seine Knie befinden sich ungefähr auf Höhe seines               Tragehilfe FLIP........................ 10
Bauchnabels. Der Spreizwinkel der Oberschenkel zueinander beträgt dabei ca. 90 Grad
                                                                                            Tragehilfe TAITAI...................... 11
(also auch nicht „froschschenkelartig“ auseinandergespreizt). Dies ist eine Haltung, die
kleine Babys häufig auch von sich aus einnehmen, wenn man sie sich z.B. auf den Bauch       Rückentrageweise TAITAI............ 17
legt oder sie hochnimmt.                                                                    Herausheben aus der
Schulterträger Befestigung: Der Schulterträger kann wahlweise am Hüftgurt oder              Tragehilfe TAITAI...................... 18
am Rückenteil befestigt werden. Wir empfehlen bei kleinen Babys die Befestigung
am Hüftgurt, um durch das Festziehen keinen Druck auf den kindlichen Rundrücken
auszuüben. Ab ca. Sitzalter kann der Schulterträger auch am Rückenteil befestigt
werden, um ggf. eine bessere Gewichtsentlastung zu erreichen.

GLOSSARY:                                                                                   CONTENTS
Web/web width – back panel fixed at the hip belt. Placement of the web width by the         Baby Carrier FLIP....................... 3
hook-and-loop-fastener                                                                      Back Carry FLIP.......................... 9
Spread-Squat-Position: baby’s back is little rounded (humpback/kyphosis), its legs are      Lifting your baby out of
tucked up and the knees are approximately on its belly button’s high. The spread angle      Baby Carrier FLIP..................... 10
of the thighs to each other should be around 90 degrees (not spread out like “frog’s
                                                                                            Baby Carrier TAITAI................... 11
legs”). Little babies take this position often on her own when took up on arm or belly.
                                                                                            Back Carry TAITAI..................... 17
Shoulder strap fixation: the shoulder strap can be fixed at the hip belt or at the back
                                                                                            Lifting your baby out of
panel by using the buckles. In the case of little babies we recommend fixing the shoulder
                                                                                            Baby Carrier TAITAI................... 18
strap at the hip belt to avoid pressure on baby’s hunched back. Once the baby can sit
on their own, the shoulder strap can be fixed at the back panel to assist with weight
unloading .
 2
FLIP
Vorbereitung:
Bereite Deine kokadi Flip Tragehilfe für die Größe Deines Babys vor. Das geht leichter, wenn das Baby sich noch nicht darin befindet,
da das Gewicht Deines Babys nach unten zieht und Dir die grobe Einstellung erschwert.
Zunächst stellst Du die Stegbreite für Dein Baby ein. Sie soll (bei Anhock-Spreiz-Haltung) von Kniekehle zu Kniekehle reichen. Als
Faustregel kann man sagen, dass dies ungefähr bei einer Stegbreite entsprechend der halben Körperlänge des Babys der Fall ist – im
Einzelfall freilich anzupassen an die Statur Deines Babys.
Anschließend passt Du den Hüftgurt für Dich auf die richtige Breite an. In welcher Höhe Du tragen möchtest, ist ein wenig von
Deiner Oberkörperlänge und der Deines Babys abhängig: der Hüftgurt sitzt im Regelfall für die optimale Gewichtsentlastung für Dich
auf der Hüfte auf. Im Einzelfall kann es jedoch sein, wenn Dein Baby z.B. noch sehr klein ist oder Du einen sehr langen Oberkörper
hast, dass Du ein wenig höher tragen möchtest und den Hüftgurt eher auf der Taille trägst. Auch den Brustgurt solltest Du Dir bereits
grob passend einstellen.

Preparation of the baby carrier:
Prepare your kokadi Flip baby carrier for your baby’s size. This is easier without baby sitting inside, because the weight of your child
is pulling downwards which complicates the coarse adjustment.
First, you adjust the web width for the approximate size of your baby. Considering the spread-squat-position, this should reach from
one hollow of the knee to the other. As a rough rule of thumb, one can say that this is reached by a web width at half body length of
the baby – to adjust to your baby’s body individually.
After that, the hip belt is adapted to the correct width for you. The height you would like to carry your baby depends upon the
length of your body and baby’s body. For optimal weight unloading, the hip belt sits on your hip, usually. In the individual case, it
is possible that you would like to carry a little higher and then you put the hip belt more to your waist – for example if your baby is
very small.
The breast belt should be roughly adjusted as well at this time.

                                                                                                                                     3
Schließe sie mit der Schnalle
    1                                   2   hinter deinem Rücken, bis ein
                                            deutliches Einrasten der Schnalle
                                            in ihrem Gegenstück zu hören ist.
                                            Vergiss dabei nicht die Schnalle
        Nimm deine so voreingestellte
                                            durch den Sicherheitsgummi zu
        Tragehilfe nun am Hüftgurt
                                            führen.
        und lege sie dir um.
                                            Close the hip belt with the
        Now, please take your well-         buckle behind your back. Please
        prepared baby carrier at the        note that you should hear the
        hip belt and move it around         fixing click of the buckle to make
        your body                           sure that it is safely closed. Do
                                            not forget to move the buckle
                                            through the safety rubber band.

    3

        Nun kannst du den Hüftgurt
        nochmal nachziehen und
        festigen.
        Now you can finally adjust
        and fix the hip belt.

4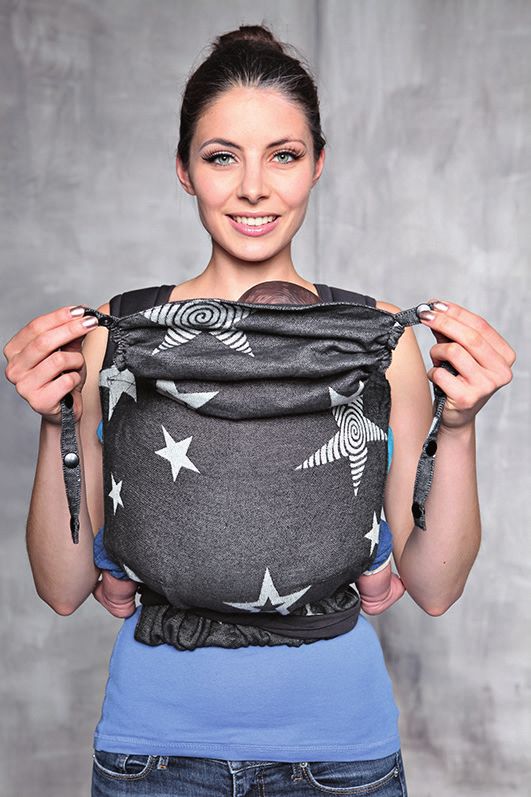
Jetzt ist unsere Tragehilfe              The baby carrier is now prepared for
4   vorbereitet, nimm dein Kind auf          your baby. Please place your baby in
    und „setze“ es vor deinen Bauch.         front of your belly. Ensure your baby is
    Achte darauf, dass du dein Baby          in the correct spread-squat-position.
    bereits jetzt in eine Anhock-Spreiz-     The back is a little rounded (kyphotic),
    Haltung bringst. Hierbei ist der         with legs tucked up and knees
    Rücken des Babys leicht gerundet,        approximately belly button height.
    seine Beinchen sind angehockt und        With their knees tucked up, their thighs
    seine Knie befinden sich ungefähr        should form a 90 degree angle (not
    auf Höhe seines Bauchnabels. Der         spread out like “frog’s legs”).
    Spreizwinkel der Oberschenkel
    zueinander beträgt dabei ca. 90 Grad
    (also auch nicht „froschschenkelartig“
    auseinandergespreizt).

5
    Führe die Beine deines Babys durch       Please guide baby’s legs through the loop
    die Öffnungen der Schulterträger         holes of the shoulder straps (when your
    (ab Sitzalter kann der Schulterträger    baby can sit on their own, the shoulder
    bei der Toddler-Trage am Rückenteil      straps of the toddler carrier can be fixed
    montiert werden)                         at the back panel, too). It is important
    ACHTE darauf, die Beine zwischen         that their legs pass through the loop holes
    dem Schulterträger durchzuführen!        of the shoulder straps. Always take care to
    Bitte achte darauf, dass du immer        support you baby with one hand.
    eine Hand am Kind behältst.

                                                                                           5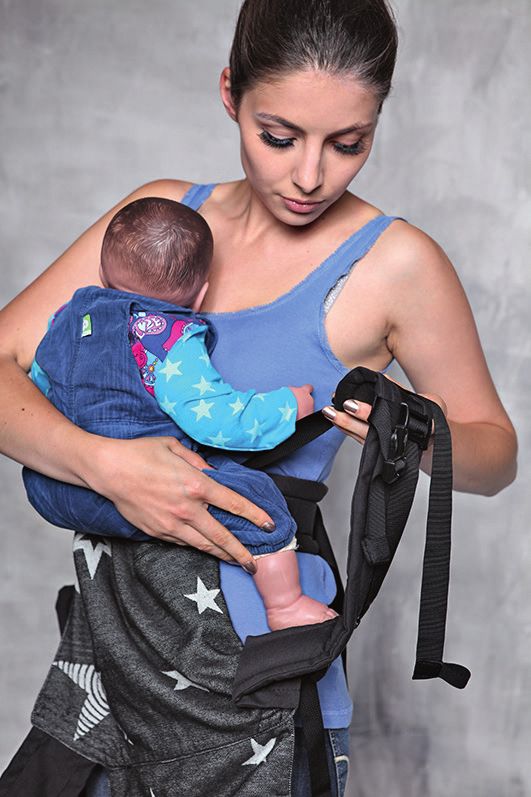
Nun zieh das Rückenteil hoch, lege dir           Next, pull up the back panel, lay both shoulder
    6   nacheinander beide Träger auf die Schultern      straps one after another over your shoulders
        und schlüpfe mit Deinen Armen hindurch. Das      and slip into it with your arms. The back panel
        Rückenteil sollte glatt, straff und faltenfrei   should be placed over the back of your baby in a
        über dem Rücken Deines Kindes liegen. Du         unruffled, supportive and wrinkle-free manner.
        kannst jetzt den Sitz deines Babys noch etwas    You can adjust baby’s correct fit in the carrier
        korrigieren. Achte darauf, dass dein Kind        now. Take care, that your baby is placed in the
        mittig in der Trage sitzt und sich der äußere    middle of the carrier and the outer edge of the
        Rand des Rückenteils in den Kniekehlen des       back panel is placed in the hollows behind baby’s
        Babys befindet. Auch kannst du jetzt die         knee. Also the legs can be tucked up now.
        Oberschenkel in eine angehockte Position
        bringen.

    7   Zieh noch einmal ein wenig an der                Your baby should now be in the proper spread-
        Nackenkante. Dein Baby sollte nun schön          squat-position in the wrap pouch. When baby
        im Tuchbeutel hocken und sich mit                is at the proper height you can comfortably put
        seinem Köpfchen für Ddich ungefähr auf           a kiss on the crown of their head. In the case
        „Kopf-Kuss-Höhe“ befinden. Idealerweise          where baby cannot stabilize their own head yet,
        befindet sich bei einem Baby, das sein           the neck’s edge of the head cushion is placed
        Köpfchen noch nicht selbst halten kann,          approximately level with the middle of the ear;
        die Kopfkante ungefähr auf Höhe der              this is where the upper cervical spine ends on
        Ohrmitte                                         the back of the cranium.
        (= Ende der Halswirbelsäule auf der
        Schädelrückseite).

6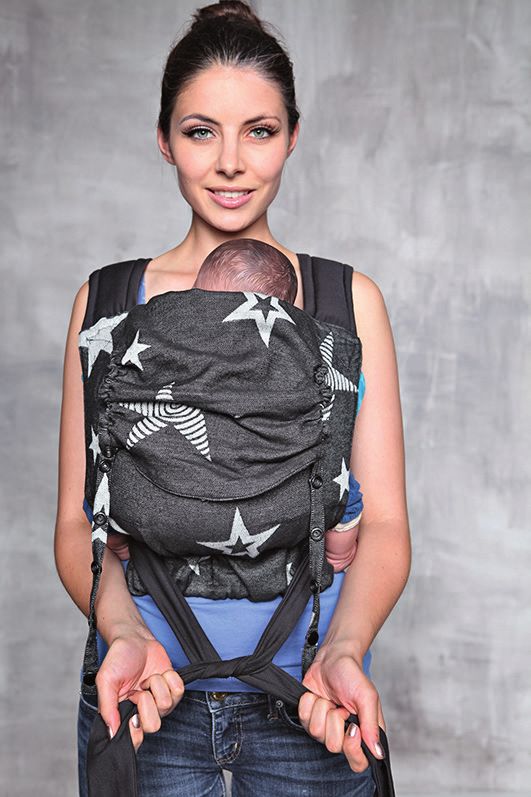
8

    Nun schließt du den Brustgurt
    hinter deinem Rücken.
    Next, please close the breast
    belt behind your back.

    Wenn du den Sitz deiner Trage noch etwas          If you want to adjust your carrier a little more,
9   festigen möchtest, ziehst du an den               pull the belt webbings of the shoulder straps.
    Gurtbändern der Schultergurte. Am besten          This can be accomplished by a rotary motion of
    unterstützt du dies mit einer kreisenden          your shoulders.
    Bewegung deiner Schultern nach hinten.            The correct fit of your baby in the carrier can
    Du kannst nun den korrekten Sitz deines Babys     be assessed by the following: when bending
    kontrollieren: wenn du dich ein wenig nach        forward at the waist, your baby should sit
    vorn beugst, sollte dein Kind fest in der Trage   tightly attached in the carrier and their body
    sitzen und sich sein Körper nicht spürbar von     should not move perceptible from yours. If you
    deinem lösen. Du merkst dies instinktiv daran,    feel the need to put your hand behind your
    ob du das Bedürfnis hast, mit einer Hand          baby for support, the carrier is still to loose-
    stützend vor dein Kind zu greifen. Ist das der    fitting.
    Fall, ist die Trage noch zu locker eingestellt.

                                                                                                      7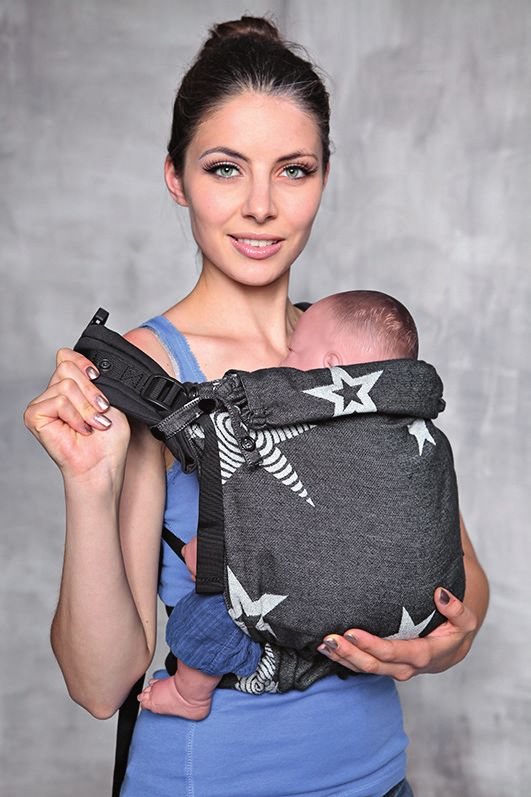
10   Dein Baby sitzt nun perfekt in        Your baby is sitting perfectly in
     Deiner Tragehilfe; nun kannst         your kokadi baby carrier now,
     du die Kopfstütze entweder            so you can use the head cushion
     als Sonnen- oder Windschutz           as a sunscreen or windbreak by
     verwenden und mit Hilfe der           buttoning it around the straps.
     Druckknöpfe um die Träger
     knöpfen.

                                                           Alternativ kannst du die
11     12                             13                   Kopfstütze einklappen, zu einer
                                                           Nackenrolle formen und sie mit
                                                           Hilfe der Druckknöpfe wieder
                                                           befestigen.
                                                           Fertig sitzt deine kokadi Flip
                                                           Tragehilfe!
                                                           Alternatively, you can retract
                                                           the head cushion, form it to a
                                                           bolster and fix it by the patent
                                                           fasteners.
                                                           Now your kokadi Flip baby
                                                           carrier fits perfectly!

8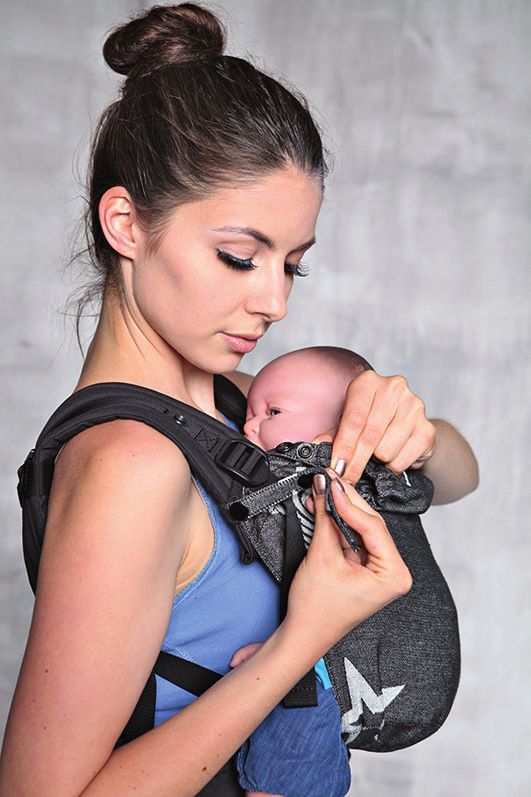
RÜCKENTRAGEWEISE
Ungefähr ab Sitzalter kannst du dein Baby in der kokadi
Flip Tragehilfe auch auf dem Rücken tragen. Du setzt
dazu dein Baby wie bei der Fronttrageweise beschrieben
in die Tragehilfe, hältst diese an den Schulterträgern
fest, sodass dein Baby von der Trage sicher umschlossen
wird, und schiebst sie über deine Hüfte nach hinten.
Ggf. beuge dich nun ein klein bisschen nach vorn. Dann
schlüpfst du auch hier in die Träger und verschließt den
Brustgurt.

BACK CARRY
If your baby is able to bring themselves to sit on their
own, it is possible to wrap them on your back in your
kokadi Flip baby carrier, too. Prepare the carrier with
your baby inside as described for the front carry. Hold
the carrier strongly at the shoulder straps, ensuring your
baby is securely enclosed by the carrier, and then move
it behind to your back over your hip. It can be useful to
bend yourself forward a little at the waist. Then slip into
the straps and close the breast belt as described when
using the front carry.

                                                              9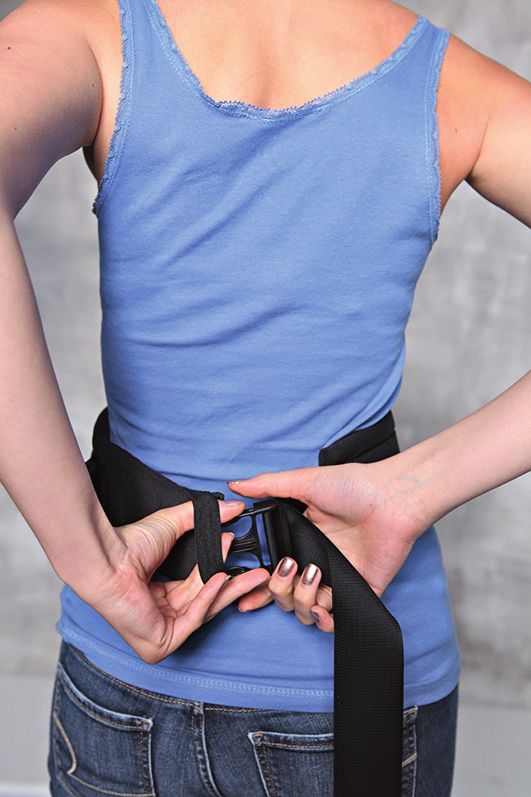
HERAUSHEBEN                  1
                                          Wenn du dein Baby
                                          wieder aus der Tragehilfe
         DEINES BABYS                     herausnehmen möchtest,
         AUS DER TRAGE-                   öffne den Brustgurt hinter
                                          deinem Rücken.
         HILFE
                                          When you want to lift your
         LIFTING YOUR                     baby out of the carrier,
                                          please open the breast belt
         BABY OUT OF                      behind your back.
         THE CARRIER

         Eine Hand stützt dein            Jetzt hebst du dein Baby
     2   Baby. du schlüpfst nun       3   wieder aus der Tragehilfe
         aus den Schultergurten,          heraus.
         indem du einen Träger nach
         dem Anderen von deiner
                                          Now you can lift your baby
         Schulter gleiten lässt.
                                          out of the carrier.

         With one hand supporting
         your baby, slip out of the
         shoulder straps one after
         the other.

10
TAITAI
Vorbereitung:
Bereite deine kokadi TaiTai Tragehilfe für die Größe deines Babys vor. Das geht leichter, wenn das Baby sich noch nicht darin
befindet, da das Gewicht deines Babys nach unten zieht und dir die grobe Einstellung erschwert.
Zunächst stellst du die Stegbreite für dein Baby ein. Sie soll (bei Anhock-Spreiz-Haltung) von Kniekehle zu Kniekehle reichen. Als
Faustregel kann man sagen, dass dies ungefähr bei einer Stegbreite entsprechend der halben Körperlänge des Babys der Fall ist – im
Einzelfall freilich anzupassen an die Statur deines Babys.
Anschließend passt du den Hüftgurt für dich auf die richtige Breite an. In welcher Höhe du tragen möchtest, ist ein wenig von deiner
Oberkörperlänge und der deines Babys abhängig: der Hüftgurt sitzt im Regelfall für die optimale Gewichtsentlastung für dich auf
der Hüfte auf. Im Einzelfall kann es jedoch sein, wenn dein Baby z.B. noch sehr klein ist oder du einen sehr langen Oberkörper hast,
dass du ein wenig höher tragen möchtest und den Hüftgurt eher auf der Taille trägst.
Preparation of the baby carrier:
Prepare your kokadi TaiTai baby carrier for your baby’s size. his is easier without baby sitting inside, because the weight of your
child is pulling downwards which complicates the coarse adjustment.
First, you adjust the web width for the approximate size of your baby. Considering the spread-squat-position, this should reach from
one hollow of the knee to the other. As a rough rule of thumb, one can say that this is reached by a web width at half body length of
the baby – to adjust to your baby’s body individually.
After that, the hip belt is adapted to the correct width for you. The height you would like to carry your baby depends upon the
length of your body and baby’s body. For optimal weight unloading, the hip belt sits on your hip, usually. In the individual case, it
is possible that you would like to carry a little higher and then you put the hip belt more to your waist –for example if your baby is
very small.
11Schließe sie mit der Schnalle
1 2 hinter deinem Rücken, bis ein
deutliches Einrasten der Schnalle
in ihrem Gegenstück zu hören ist.
Vergiss dabei nicht die Schnalle
Nimm deine so voreingestellte
durch den Sicherheitsgummi zu
Tragehilfe nun am Hüftgurt
führen.
und lege sie dir um.
Close the hip belt with the
buckle behind your back. Please
Now, please take your well-
note that you should hear the
prepared baby carrier at the
fixing click of the buckle to make
hip belt and move it around
sure that it is safely closed. Do
your body
not forget to move the buckle
through the safety rubber band.
3
Jetzt ist unsere Tragehilfe vorbereitet, The baby carrier is well prepared yet. Please
nimm dein Kind auf und „setze“ es vor take your baby and put it in front of your
deinen Bauch. Achte darauf, dass du dein belly. By doing this, please already consider to
Baby bereits jetzt in eine Anhock-Spreiz- bring your baby into a spread-squat-position.
Haltung bringst. Hierbei ist der Rücken des Hereby, the back of the baby is a little rounded
Babys leicht gerundet, seine Beinchen sind (kyphotic), its legs are tucked up and baby’s
angehockt und seine Knie befinden sich knees are almost on high of its belly button. The
ungefähr auf Höhe seines Bauchnabels. Der spread angle should be around 90 degree (not
Spreizwinkel der Oberschenkel zueinander like “frog’s legs” spread).
beträgt dabei ca. 90 Grad (also auch nicht
„froschschenkelartig“ auseinandergespreizt).
12Mit einer Hand holst du den Nun gibst du beide Träger über
4 Rückenteil der Tragehilfe bis 5 deine Schultern; lass eine Hand
Hoch zu Babys Nacken, mit immer an deinem Baby, um
der anderen Hand stützt du dieses zu stützen.
dein Baby. Achte darauf, dass Next, please lay the straps over
der Stoff glatt und straff über your shoulders. Make sure that
Babys Rücken verteilt ist und one hand is always at your baby’s
keine Falten wirft. body to support and secure them.
Using one hand for drawing
the back panel of the carrier
up to baby’s neck, the other
hand supports the baby. Take
care that the back panel
is placed over the back of
your baby in a unruffled,
supportive and wrinkle-free
6 manner.
Halte dein Baby mit einer
Hand und greife mit der
freien Hand nach hinten, um
die Träger zu erfassen.
With one hand always
supporting the baby, reach
behind and grab the shoulder
straps with your other hand.
13Ziehe die Träger nach hinten, nun Draw the shoulder straps to your
7 kannst du mit der zweiten Hand nach back, you can reach backwards
hinten greifen und einen Träger fassen. with the second hand and grasp
Unterstütze den Zug nach hinten mit one strap. Support the backward
einer kreisenden Bewegung deiner draw with a rotary motion of
Schultern. Kreuze die Träger und halte your shoulders. Cross the straps
sie unter Spannung. Achte darauf, and hold them under tension.
dass die Träger in gleichmäßiger Länge Take care that the straps are
festgezogen sind (andernfalls hängt tightened equally (otherwise your
dein Baby schief – ggf. auch nicht baby will sit lopsided – this may
sichtbar, aber mit Auswirkung auf Sitz not be visible, but will effect fit
und Komfort). and comfort).
8
Führe nun die Träger unter
den Beinen deines Babys nach
vorne. Ziehe sie nochmal
straff nach.
Please lead the straps under
your baby’s legs to front and
retighten them firmly.
14Mache nun einen doppelten Knoten unter Please make a double knot under baby’s
9 dem Po deines Babys. Falls du noch bottom to secure them. If there are long
viel Trägerlänge übrig hast, kannst du strap lengths left over, these can be lead
anschließend die Träger nochmals unter behind your back and knotted. (Caution,
den Beinen nach hinten führen und hinter do not lead behind without fixing the first
dem Rücken einen Knoten machen. (Bitte knot; you would lose too much stability and
nicht ohne den ersten Knoten nach hinten firmness)
führen; du würdest viel Stabilität dabei Your baby should now be in the proper
verlieren) spread-squat-position in the wrap pouch.
Dein Baby sollte nun schön im Tuchbeutel When baby is at the proper height you
hocken und sich mit seinem Köpfchen can comfortably put a kiss on the crown
für dich ungefähr auf „Kopf-Kuss-Höhe“ of their head. In the case where baby
befinden. Idealerweise befindet sich bei cannot stabilize their own head yet, the
einem Baby, das sein Köpfchen noch nicht neck’s edge of the head cushion is placed
selbst halten kann, die Kopfkante ungefähr approximately level with the middle of the
auf Höhe der Ohrmitte (= Ende der ear; this is where the upper cervical spine
Halswirbelsäule auf der Schädelrückseite). ends on the back of the cranium.
Du kannst nun den korrekten Sitz deines The correct fit of your baby in the carrier
Babys kontrollieren: wenn du dich ein can be assessed by the following: when
wenig nach vorn beugst, sollte dein Kind bending forward at the waist, your baby
fest in der Trage sitzen und sich sein Körper should sit tightly attached in the carrier
nicht spürbar von deinem lösen. Du merkst and their body should not move perceptible
dies instinktiv daran, ob du das Bedürfnis from yours. If you feel the need to put your
hast, mit einer Hand stützend vor dein Kind hand behind your baby for support, the
zu greifen. Ist das der Fall, ist die Trage carrier is still to loose-fitting.
noch zu locker eingestellt.
15Nun kannst du die Kopfstütze Alternativ kannst Du die
10 entweder als Sonnen- oder 11 Kopfstütze einklappen und zu
Windschutz verwenden und einer Nackenrolle formen ...
mit Hilfe der Druckknöpfe um
die Träger knöpfen.
Alternatively, you can retract
the head cushion, form it to a
You can use the head cushion bolster …
as a sunscreen or windbreak
by buttoning it around the
straps.
... und sie einfach mit Hilfe
12 der Druckknöpfe wieder
befestigen.
Dein Baby sitzt nun perfekt
in deiner kokadi TaiTai
Tragehilfe!
... and easily fix it by the
patent fasteners.
Your baby is sitting perfectly
in your kokadi TaiTai-carrier
now!
16RÜCKENTRAGEWEISE
Ungefähr ab Sitzalter kannst du dein Baby in der kokadi
TaiTai Tragehilfe auch auf dem Rücken tragen. Du setzt
dazu dein Baby wie bei der Fronttrageweise beschrieben
in die Tragehilfe, hältst diese an den Schulterträgern fest
und schiebst sie über deine Hüfte nach hinten. Ggf. beuge
dich nun ein klein bisschen nach vorn. Dann ziehst du die
Träger straff nach unten, führst sie über den Hüftgurt zu
deinem Rücken, hinten unter den Beinchen deines Babys
herum, über Kreuz wieder nach vorne und knotest mit einem
Doppelknoten.
BACK CARRY
If your baby is able to bring themselves to sit on their own,
it is possible to wrap them on your back in your kokadi TaiTai
baby carrier, too. Prepare the carrier with your baby inside as
described for the front carry. Hold the carrier strongly at the
shoulder straps, ensuring your baby is securely enclosed by
the carrier, and then move it behind to your back over your
hip. It can be useful to bend yourself forward a little at the
waist. Then tighten the straps strongly downwards, lead them
over the hip belt to your back, backwards under your baby’s
legs. There cross them and lead the straps back forward to
your belly and make a double knot.
17HERAUSHEBEN 1
Wenn du dein Baby
wieder aus der Tragehilfe
DEINES BABYS herausheben möchtest,
AUS DER TRAGE- öffne den Knoten der
Träger unter dem Po deines
HILFE Babys.
LIFTING YOUR If you want to lift your
baby out of the carrier
BABY OUT OF again, please open the knot
THE CARRIER of the straps under your
baby’s bum.
Mit einer Hand stützt du Nun kannst du dein Baby
2 dein Baby, mit der zweiten 3 mit beiden Händen nehmen
Hand lässt du einfach und aus der Tragehilfe
die Träger von deinen herausheben.
Schultern gleiten.
You can take your baby
One hand supports and with both hands yet and
secures the baby, with the lift it out of the carrier.
other hand you help the
straps to slip from your
shoulders.
19NOTIZEN NOTES
19kokadi® Babytragetücher Ludwigstraße 6 · 85551 Kirchheim mail@kokadi.de · www.kokadi.de
Sie können auch lesen


