HDMI Switch 41 automatic 4K60 Inbetriebnahme- und Bedienungsanleitung Commissioning and operating instructions - D GB
←
→
Transkription von Seiteninhalten
Wenn Ihr Browser die Seite nicht korrekt rendert, bitte, lesen Sie den Inhalt der Seite unten

HDMI Switch 41 automatic 4K60
 HDMI2.0 4 auf 1 Umschalter
 HDMI2.0 4 to 1 switch
 Art.-Nr. 5778000154
 Ref.-No. 5778000154

 Inbetriebnahme- und Bedienungsanleitung
 Commissioning and operating instructions

  D
 GB
02.2021
D
Inhaltsverzeichnis
1.       Vorwort .............................................................................................................................................. 4

2.       Sicherheitshinweise und Vorsichtsmaßnahmen ................................................................................ 4

3.       Gerätebeschreibung / Bestimmungsgemäße Verwendung ............................................................. 5
         3.1. Eigenschaften ............................................................................................................................ 5
         3.2. Lieferumfang ............................................................................................................................. 5

4.       Anschlussschema .............................................................................................................................. 6

5.       Bedien- und Anzeigekomponenten ............................................................................................. 6 - 7
         5.1. Vorderseite ................................................................................................................................ 6
         5.2. Rückseite ................................................................................................................................... 7

6.       Bedienung .................................................................................................................................. 7 - 11
         6.1. Manuelle Auswahl ..................................................................................................................... 7
         6.2. Automatische Auswahl ............................................................................................................. 7
         6.3. IR-Fernbedienung ..................................................................................................................... 8
         6.4. RS232 Steuerung ...................................................................................................................... 9
           6.4.1. RS232 Befehle .................................................................................................................... 9
           6.4.2. Signalumschaltung ............................................................................................................. 9
         6.5. Steuerung von Wiedergabegeräten ................................................................................... 9 - 10
           6.5.1. Steuerung eines Anzeigegeräts (z. B. Display) ................................................................ 10
           6.5.2. Audio Auswahl .................................................................................................................. 10
         6.6. Systemsteuerung ....................................................................................................................  11
           6.6.1. Baud Rate Einstellung ...................................................................................................... 11

7.       EDID Management ................................................................................................................... 11 - 12
         7.1. Vordefinierte EDID-Einstellung ........................................................................................ 11 - 12
         7.2. Benutzerdefinierte EDID-Einstellung ...................................................................................... 12

8.       ARC Mode ....................................................................................................................................... 13

9.       Zeichnung ....................................................................................................................................... 13

10. Technische Daten ............................................................................................................................ 14

11. Fehlerbehebung .............................................................................................................................. 15

12. CE-Konformitätserklärung .............................................................................................................. 15

13. Verfügbares Zubehör ...................................................................................................................... 15

2
GB
Table of contents
1.     Foreword ........................................................................................................................................... 17

2.     Safety Instructions and precautions ................................................................................................. 17

3.     Device description / Intended use ................................................................................................... 18
       3.1. Features ..................................................................................................................................... 18
       3.2. Scope of delivery ...................................................................................................................... 18

4.     Connection diagram .......................................................................................................................... 19

5.     Operating and display components .......................................................................................... 19 - 20
       5.1. Front side .................................................................................................................................. 19
       5.2. Rear side ................................................................................................................................... 20

6.     Operation ................................................................................................................................... 20 - 24
       6.1. Manual selection ....................................................................................................................... 20
       6.2. Automatic selection .................................................................................................................. 20
       6.3. IR remote control ...................................................................................................................... 21
       6.4. RS232 control .................................................................................................................... 21 - 22
         6.4.1. RS232 commands .............................................................................................................. 22
         6.4.2. Signal switching .................................................................................................................. 22
       6.5. Control of the source devices ............................................................................................ 22 - 23
         6.5.1. Display control .................................................................................................................... 23
         6.5.2. Audio selection ................................................................................................................... 23
       6.6. System control ........................................................................................................................... 24
         6.6.1. Baud Rate setting ............................................................................................................... 24

7.     EDID management .....................................................................................................................  24 - 25
       7.1. Predefined EDID setting ....................................................................................................  24 - 25
       7.2. User-defined EDID setting .............................................. ......................................................... 25

8.     ARC mode ......................................................................................................................................... 26

9.     Panel drawing .................................................................................................................................... 26

10. Technical data ................................................................................................................................... 27

11. Troubleshooting ................................................................................................................................ 28

12. CE declaration of conformity ............................................................................................................ 28

13. Available accessories ........................................................................................................................ 28

3
1. Vorwort
Bevor Sie das Produkt verwenden, lesen Sie diese Bedienungsanleitung sorgfältig durch. Die in diesem
Handbuch gezeigten Bilder dienen nur als Referenz und können sich vom realen Produkt unterscheiden.
Wenden Sie sich an den örtlichen Händler, um Unterstützung bei der Wartung zu erhalten.
Im ständigen Bemühen, das Produkt zu verbessern, behalten wir uns das Recht vor, Funktionen oder
Parameter ohne vorherige Ankündigung oder Verpflichtung zu ändern. Die neuesten Informationen
erhalten Sie von Ihrem Kindermann Fachhändler.

2.       Sicherheitshinweise und Vorsichtsmaßnahmen
•    Lesen Sie die Bedienungsanleitung sorgfältig durch und bewahren Sie diese auf.
•    Packen Sie das Gerät vorsichtig aus und heben Sie die Originalverpackung und das Verpackungs-
     material für einen eventuellen späteren Versand auf.
•    Befolgen Sie die grundlegenden Sicherheitsvorkehrungen, um die Gefahr von Bränden,
     Stromschlägen und Verletzungen von Personen zu verringern.
•    Öffnen oder modifizieren Sie niemals das Gerät. Dies kann zu Stromschlägen oder Verbrennungen
     führen.
•    Das Produkt darf nur mit Sicherheitskleinspannung mit dem mitgelieferten Netzteil betrieben werden.
•    Die Verwendung von Verbrauchsmaterialien oder Teilen, die nicht den Produktspezifikationen
     entsprechen, kann zu Beschädigung oder Fehlfunktion führen.
•    Wenden Sie sich bei allen Wartungsarbeiten an qualifiziertes Servicepersonal.
•    Das System darf nur in trockener Umgebung gelagert und eingesetzt werden.
•    Stellen Sie das Gerät an einem gut belüfteten Ort auf, um Schäden durch Überhitzung zu vermeiden.
•    Verwenden Sie zum Reinigen dieses Geräts keine Flüssigkeits- oder Aerosolreiniger.
     Ziehen Sie vor dem Reinigen immer den Netzstecker aus der Steckdose.
•    Ziehen Sie den Netzstecker, wenn Sie das Gerät längere Zeit nicht benutzen.
•    Hinweise zur Entsorgung von Altgeräten: Das Gerät darf nicht mit dem Hausmüll entsorgt werden,
     sondern ist über den Handelsweg zurück zu geben.

•    Vergewissern Sie sich vor der Installation, dass alle Komponenten und Zubehörteile enthalten sind.
•    Alle Netzschalter, Stecker, Steckdosen und Netzkabel müssen isoliert und sicher sein.
•    Alle Kabel sollten vor dem Einschalten angeschlossen werden.

                                                                                                          4
3. Gerätebeschreibung / Bestimmungsgemäße Verwendung
Der HDMI Switch 41 automatic 4K60 ist ein ultradünner HDMI Umschalter mit Automatikfunktion und
vier Eingängen und einem Ausgang. Er unterstützt Videoauflösungen bis zu 4Kx2K@60Hz 4:4:4 HDR und
Mehrkanal-Audio. Neben der Weitergabe der EDID-Informationen des Wiedergabegeräts an die Quelle
verfügt der Umschalter über mehrere vordefinierte EDID-Profile, die eine Installation vereinfachen können.
Der HDMI Switch 41 bietet lokales Audio De-Embedding und stellt ein analoges Stereo-Audiosignal bereit,
z. B. für ein vorhandens Audiosystem. Der Umschalter unterstützt zusätzlich an einem Eingang auch die
ARC-Funktion (Audio-Return-Channel) und ermöglicht so die Rückübertragung der Audiosignale vom
Wiedergabegerät, z. B. wenn ein im Display integrierter Tuner genutzt wird, der Ton aber von einem
Surroundsoundsystem wiedergegeben werden soll.
Im Automatikmodus schaltet der HDMI Switch 41 automatic 4K60 den HDMI-Eingang um, sobald eine
Quelle angeschlossen wird. Wird der aktive Eingang abgezogen, schaltet das Gerät automatisch auf eine
andere aktive Quelle um. Priorität hat dabei der Eingang mit der niedrigsten Ziffer (1 vor 2, 2 vor 3, usw.).
Der Umschalter kann auch per RS232 oder Infrarot gesteuert werden. Eine Fernbedienung und ein abge-
setzter Empfänger ist im Lieferumfang enthalten.

3.1 Eigenschaften
•   Schaltet einen von vier HDMI-Eingängen auf einen HDMI-Ausgang um
•   Unterstützt eine Videoauflösung von bis zu 4Kx2K@60Hz 4:4:4 HDR
•   Unterstützt eine Bandbreite von bis zu 18 Gbps
•   Kompatibel mit den HDMI 2.0- und HDCP2.3-Spezifikationen
•   Unterstützt den Audio-Rückkanal (ARC)
•   Erweiterte EDID-Steuerung
•   Steuerbar über RS232 und IR
•   Unterstützt CEC
•   Status LEDs zur Anzeige des aktuellen Betriebsstatus

3.2 Lieferumfang
•   1 x HDMI Switch 41 automatic 4K60
•   2 x Montagewinkel mit 4 x Befestigungsschrauben
•   4 x Gerätefuß
•   1 x RS232-Kabel (3-polig zu DB9)
•   1 x IR-Fernbedienung
•   1 x IR-Empfänger
•   1 x Netzteil (24 V DC 1,25 A)
•   1 x Benutzerhandbuch

    Hinweis:
Bitte setzen Sie sich sofort mit Ihrem Händler in Verbindung, wenn bei Erhalt ein Schaden oder Fehlteile
bzgl. der Komponenten festgestellt wird.

5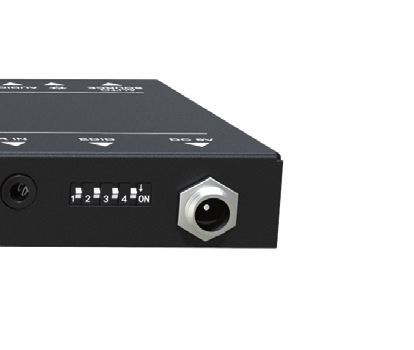
2. Anschluss Schema
4. Anschlussschema
 Die folgenden Systemdarstellungen zeigen typische Eingangs- und Ausgangsverbindungen, die mit diesem
Die folgenden Systemdarstellungen zeigt ein typisches Anwendungsszenario für diesen Umschalter:
 Umschalter verwendet werden können:

                                                                                                               HDMI:
                                                                                                               Audio:
                                                                                                              RS232:
                                                                                                              Control:

                                                                                                                     7
                                                                                                                     6
                                                                                                                     5
       Game Console               Laptop               TV            Speaker     Central Control   Receiver        Remote
                                                                                    System

           STB                Ray-Blu DVD

 Hinweis: Dieses Bild dient nur als Referenz.
      Hinweis: Dieses Bild dient nur als Referenz.

5. Bedien- und Anzeigekomponenten
5.1 Vorderseite
           AUTO
          SOURCE      ☀ AUDIO MODE 1         2   3 4
             ▼        ▼ ▼         ▼ ▼ ▼ ▼▼

                                                                 5
             1        2   3   4             5                                                                  6

 Nr.      Name                             Beschreibung
                                           Drücken, um zum nächsten Eingang zu wechseln.
          Manuelle Quellenwahl
  1                                        Halten Sie die Taste mindestens drei Sekunden lang gedrückt, um
          Automatikmodus
                                           zwischen dem manuellen und dem automatischen Modus zu wechseln.

  2       Betriebs-LED                     Die LED leuchtet rot, wenn Strom anliegt.

                                           Die LED leuchtet grün, wenn Audio-De-embedding aktiv ist.
  3       Audio Mode LED
                                           Die LED leuchtet im ARC-Modus gelb.
                                           Die LED leuchtet grün, wenn die Eingangsquelle manuell geschaltet wird.
  4       Modus LED
                                           Die LED leuchtet gelb, wenn der Automatikmodus aktiviert ist.

  5       LED für Eingang 1-4              Die LED leuchtet grün, wenn ein HDMI-Eingangssignal anliegt.

  6       FIRMWARE                         Micro-USB-Anschluss für Firmware-Aktualisierung.

                                                                                                                            6
5.2 Rückseite
IN 1 IN 2 IN 3 IN 4 (ARC) OUT AUDIO RS232 IR IN EDID DC 5V
▼ ▼ ▼ ▼ ▼ ▼ ▼ ▼ ▼ ▼
7 8 9 10 11 12 13
Nr. Name Beschreibung
HDMI-Eingänge (Buchse, Typ A) zum Anschluss von Quellgeräten.
7 IN 1-4
Der HDMI Anschluss 4 unterstützt ARC.
8 OUT HDMI-Ausgang (Buchse,Typ A) zum Anschluss eines Anzeigegeräts.
9 AUDIO 3,5 mm Stereo-Klinkenbuchse für analoge Audioausgabe.
10 RS232 3,5 mm Klinkenbuchse zum Anschluss z. B. einer Mediensteuerung.
11 IR IN 3,5 mm Klinkenbuchse zum Anschluss des beiliegenden IR Empfängers.
12 EDID 4-poliger DIP-Schalter für die EDID-Einstellung.
13 DC 5V Hohlsteckerbuchse zum Anschließen des beiliegenden 5V DC Steckernetzteils.
6. Bedienung
6.1 Manuelle Auswahl
Im manuellen Schaltmodus, leuchtet die Status-LED grün. Durch Drücken der Taste “Auto/Source“
wechselt man zum nächsten Eingang.
6.2 Automatische Auswahl
Zum Umschalten des Automatik-Modus halten Sie die Taste „Auto/Source“ für mindestens drei Sekunden
gedrückt. Die „Mode“ LED leuchtet jetzt in Gelb.
Im Automatikmodus gelten diese Regeln:
• Neues Eingangssignal: Wird ein neues Gerät mit aktivem Ausgangssignal angeschlossen, wird auto-
matisch auf diesen Eingang umgeschaltet. (Bei Notebooks muss unter Umständen erst die Bildausga-
be aktiv werden.)
• Reboot: Bei einer Versorgungsunterbrechung wird die zuletzt gewählte Quelle wieder aktiviert, falls
diese noch verfügbar ist. Andernfalls schaltet das Gerät auf den ersten aktiven Eingang, beginnend
mit dem HDMI-Eingang 1 (Priorität: 1 vor 2, 2 vor 3, 3 vor 4).
• Quelle entfernen: Wenn eine aktive Quelle entfernt wird, schaltet der Umschalter auf den ersten
verfügbaren aktiven Eingang, beginnend mit dem HDMI-Eingang 1 (Priorität: 1 vor 2, 2 vor 3, 3 vor 4).
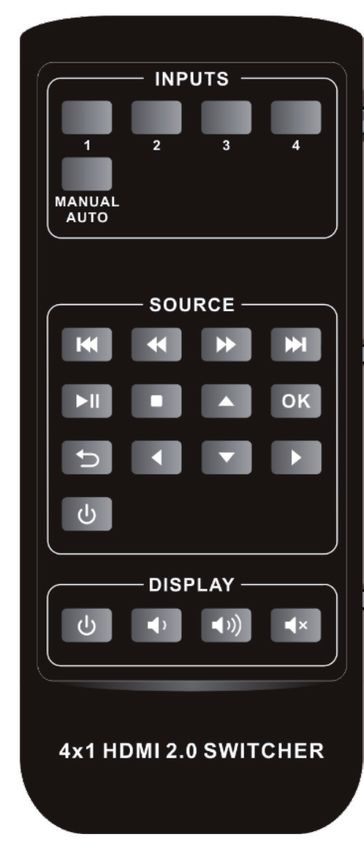
76.3 IR-Fernbedienung
Schließen Sie den IR-Empfänger an der Eingangsbuchse (11) an. Die IR-Fernbedienung kann auch zur Steu-
erung von Quell- und Anzeigegeräten auf Basis von der CEC-Funktion verwendet werden (Kompati-bilität
vorausgesetzt).
Input:
1-4: Wählen Sie die entsprechende Eingangsquelle aus.
MANUAL/AUTO:
Schalten Sie zwischen dem automatischen und manuellen Modus
um.
Source:
Steuern eines Wiedergabegeräts per CEC Protokoll, z. B. DVD
Player.
DISPLAY:
Steuerung eines Anzeigegerät per CEC Protkoll, z. B. Display.
Hinweis:
• Der HDMI-Eingang 4 unterstützt kein CEC. Ein an diesem Eingang angeschlossenes Wiedergabegerät
kann nicht mit der IR-Fernbedienung gesteuert werden.
6.4 RS232 Steuerung
Schließen Sie den Umschalter mit einem RS232-Kabel an eine Mediensteuerung an und programmieren
Sie diese mit den richtigen Parametern. So kann der HDMI Switch 41 per RS232-Befehlen gesteuert werden.
Tx GND Rx
Mediensteuerung
Baud rate: 9600
Data bit: 8
Stop bit: 1
Parity bit: none
5 1
9 6
RS232 Adapterkabel
(Lieferumfang)
86.4.1 RS232 Befehle
Sobald sich der Status des HDMI Switch 41 automatic 4K60 ändert, z. B. durch Tastendruck, wird der
neue Status per RS232 ausgegeben.
Hinweis: Alle Befehle können wahlweise mit "“ beendet werden oder ohne. Beides wird erkannt.
Antworten werden immer mit "“ beendet.
6.4.2 Signalumschaltung
Befehl Funktion Beispiel Antwort
1B1. Schaltet auf HDMI-Eingang 1 um AV: 1 1
2B1. Schaltet auf HDMI-Eingang 2 um AV: 2 1
3B1. Schaltet auf HDMI-Eingang 3 um AV: 3 1
4B1. Schaltet auf HDMI-Eingang 4 um AV: 4 1
?B1. Eingangs Abfrage AV: x 1 (x: 1,2,3 oder 4)
B1 Auto On Aktivieren des automatischen Umschaltmodus B1 Auto: On
B1 Auto Off Aktivieren des manuellen Umschaltmodus B1 Auto: Off
B1 Auto: On
B1 Auto? Zeigt den aktuellen Umschaltmodus
B1 Auto: Off
6.5 Steuerung von Wiedergabegeräten
Hinweis:
• Das angeschlossene Wiedergabegerät muss CEC unterstützen.
• Der HDMI-Eingang 4 unterstützt kein CEC!
Befehl Funktion Beispiel Antwort
Einschalten des Wiedergabegerätes,
SRC PWR On SRC: PWR On
z. B. Blueray-, DVD-Player
Ausschalten des Wiedergabegerätes,
SRC PWR Off SRC: PWR Off
z. B. Blueray-, DVD-Player
SRC: PWR On
SRC PWR? Power Status Abfrage des Wiedergabegerätes
SRC: PWR Off
SRC Play Play SRC: Play
SRC Pause Pause SRC: Pause
SRC Stop Stop SRC: Stop
SRC FForward Fast Forward x1 SRC: FForward
SRC FBackward Fast Rewind x1 SRC: FBackward
9SRC Skip
Nächstes Kapitel SRC: Skip Forward
Forward
SRC Skip
Vorheriges Kapitel SRC: Skip Backward
Backward
SRC Menu Zeige Einstellungsmenü SRC: Menu
SRC Back Zurück SRC: Back
SRC Ok Bestätigen (OK) SRC: Ok
SRC Exit Exit SRC: Exit
SRC Up Nach oben SRC: Up
SRC Down Nach unten SRC: Down
SRC Left Nach links SRC: Left
SRC Right Nach rechts SRC: Right
6.5.1 Steuerung eines Anzeigegeräts (z. B. Display)
Hinweis: Das Display muss CEC unterstützen!
Befehl Funktion Beispiel Antwort
TV PWR On Einschalten des Displays TV: PWR On
TV PWR Off Ausschalten des Displays TV: PWR Off
TV: PWR On
TV PWR? Power Status Abfrage
TV: PWR Off
TV VOL+ Lauter TV: VOL+
TV VOL- Leiser TV: VOL-
Änderung des Mute/Unmute
TV Mute Toggle TV: Mute Toggled
Zustandes
6.5.2 Audio Auswahl
Befehl Funktion Beispiel Antwort
ARC EXT Auswahl vom Audio Kanal (ARC) ARC: EXT
ARC INT Auswahl des HDMI Kanals ARC: INT
ARC: EXT
ARC? Abfrage des ARC Status
ARC: INT
106.6 Systemsteuerung
Befehl Funktion Beispiel Antwort
Reset System reset Reset done
Unit:
Kindermann HDMI Switch 41 automatic
4K60
FW: V1.0.0
Info Systeminformationen anzeigen
AV: 1 1
ARC: EXT
B1 Auto: On
EDID: 0
6.6.1 Baud Rate Einstellung
Befehl Funktion Beispiel Antwort
BAUD 2400 Setzt die Baudrate des RS232 Port auf 2400 Baud: 2400
BAUD 4800 Setzt die Baudrate des RS232 Port auf 4800 Baud: 4800
BAUD 9600 Setzt die Baudrate des RS232 Port auf 9600 Baud: 9600
BAUD 19200 Setzt die Baudrate des RS232 Port auf 19200 Baud: 19200
BAUD 38400 Setzt die Baudrate des RS232 Port auf 38400 Baud: 38400
BAUD 57600 Setzt die Baudrate des RS232 Port auf 57600 Baud: 57600
BAUD 115200 Setzt die Baudrate des RS232 Port auf 115200 Baud: 115200
7. EDID Management
7.1 Vordefinierte EDID-Einstellung
Auf der Rückseite befindet sich ein 4-poliger DIP-Schalter (12) zur Einstellung des EDID-Modes.
In der folgenden Liste sind die möglichen Schalterposition und ihre Funktion aufgeführt.
ID Schalter-Status Video Audio
0 0000 Pass through Pass through
1 0001 1920x1080p@60Hz 4:4:4 RGB 8bit Stereo
Schalterposition 2 0010 1920x1080p@60Hz 4:4:4 RGB 8bit High Definition
unten = "ON",
oben = "OFF" 3 0011 1920x1080p@60Hz 4:4:4 RGB 12bit Stereo
4 0100 1920x1080p@60Hz 4:4:4 RGB 12bit High Definition
11ID Schalter-Status Video Audio
5 0101 3840x2160p@60Hz 4:2:0 RGB 8bit Stereo
6 0110 3840x2160p@60Hz 4:2:0 RGB 8bit High Definition
7 0111 3840x2160p@60Hz 4:4:4 RGB 10bit HDR Stereo
Schalterposition
unten = "ON",
8 1000 3840x2160p@60Hz 4:4:4 RGB 10bit HDR High Definition
oben = "OFF"
9 1001 1280x800@60Hz Stereo
10 1010 1920x1200@60Hz Stereo
7.2 Benutzerdefinierte EDID-Einstellung
Zusätzlich zu den vordefinierten EDID Konfigurationen können Sie bis zu 5 eigene Konfigurationen hin-
terlegen. Lesen Sie die EDID mit einem geeigneten Gerät oder einer Software aus dem Anzeigegerät aus
oder erstellen Sie manuell eine eigene EDID Datei:
1. Benennen Sie diese nach dem folgenden Format um:
� EC_xx_xxxx_xxx.bin
• EC: Entspricht EDID.
• xx: Entspricht EDID ID (11-15)
• xxxx: Entspricht dem Videoparameter.
• xxx: Entspricht dem Audioformat.
• Beispiel: EC_11_720P_LPCM.bin
2. Schalten Sie den Umschalter ein und schließen Sie diesen, mittels USB-Kabel an einen PC an.
Der PC erkennt automatisch eine USB-Festplatte namens "BOOTDISK".
3. Kopieren Sie die umbenannte EDID (z. B. EC_11_720P_LPCM.bin) auf das Laufwerk "BOOTDISK".
4. Öffnen Sie das Laufwerk "BOOTDISK" erneut, und prüfen Sie, ob der Dateiname "READY.TXT" auto-
matisch zu "SUCCESS.TXT" unbenannt wurde. Falls ja, wurde die benutzerdefinierte EDID erfolgreich
übernommen und kann über die untenstehende DIP-Schalterstellung aufgerufen werden.
5. Wiederholen Sie Schritt 3 und 4, um weitere benutzerdefinierte EDIDs zu kopieren.
6. Entfernen Sie das USB-Kabel.
ID Schalter-Status
11 1011
12 1100
13 1101
14 1110
15 1111
126. ARC Mode
Der Audio-Rückkanal (engl. Audio Return Channel (ARC)) ermöglicht, den Ton von einem Display "upstream" über
ein HDMI-Kabel zu einem Audioverarbeitungsgerät, wie z.B. einem AV-Verstärker, zu leiten. Wenn der ARC-Modus
8.aufARC Mode aktiv ist, wird der ARC-Stream an das aktive HDMI-Quellgerät weitergeleitet, sofern dieses das
dem Umschalter
Der Audio-Rückkanal
Signal (Audio Return Channel "ARC") ermöglicht es den Ton von einem Display mit Tuner
verarbeiten kann.
per upstream, also "rückwärts" über ein HDMI-Kabel z. B. zu einem AV-Verstärker zu leiten.
Nur der vierte HDMI-Eingang verfügt über ARC!
Hinweis:
Der Bildschirm und der AV-Verstärker müssen auch ARC unterstützen !!!
Nur HDMI-Eingang 4 unterstützt ARC! Das Display als auch der AV-Verstärker müssen ARC unterstützen!
ARC Anschlussschema ist wie folgt dargestellt:
ARC Anschlussschema ist wie folgt dargestellt:
Speakers
ARC AUDIO:
Speaker
Amplifier
IN 1 IN 2 IN 3 OUT AUDIO RS232 IR IN EDID DC 5V
TV
9. Zeichnung
15.00 mm
194.00 mm
ON 4 3 2 1
DC 5V EDID IR IN RS232 AUDIO OUT IN 4 (ARC) IN 3 IN 2 IN 1
81.00 mm
AUTO
15
SOURCE AUDIO MODE 1 2 3 4
HDMI Switch 41 automatic 4K60
FIRMWARE
1310. Technische Daten
Video Eingänge
Eingang 4 x HDMI
Eingangsanschlüsse HDMI-Buchse Typ A
HDMI-Eingangsauflösung Bis zu 4Kx2K@60Hz 4:4:4
Bandbreite 18Gbps
HDMI Standard 2.0
HDCP Version 2.3
Video Ausgänge
Ausgang 1 x HDMI
Ausgangsanschluss HDMI-Buchse Typ A
HDMI-Ausgangsauflösung Bis zu 4Kx2K@60Hz 4:4:4
HDMI Standard 2.0
HDCP Version 2.3
Audio
Ausgang 1 x AUDIO
Ausgangsanschluss 3,5 mm Stereo Miniklinkenbuchse
Audio Format PCM
Audio-Ausgangsimpedanz 70 Ohms
Frequenzgang 20Hz auf 20kHz, ±3dB
Steuerung
Steuerung 1 x IR IN; 1 x RS232
Steueranschluss 2 x 3,5 mm Miniklinkenbuchse
Allgemein
Betriebstemperatur -10°C ~ +55°C
Lagertemperatur -25°C ~ +70°C
Relative Luftfeuchtigkeit 10%-90% (nicht kondensierend)
Stromversorgung Input: 100V~240V AC; Output: 5V DC 1A
Leistungsaufnahme 5W (Max)
Abmessungen (BxHxT) 194 x 15 x 81 mm
Nettogewicht 324 g
Hinweis:
Bitte verwenden Sie für eine zuverlässige Übertragung und Verbindung hochwertige HighSpeed HDMI-
Kabel.
1411. Fehlerbehebung
Probleme Mögliche Ursache Lösung
Kein Videosignal auf dem Display Die Verbindungskabel sind Überprüfen Sie, ob die Kabel
Kein Ausgangssignal trotz möglicherweise nicht richtig korrekt angeschlossen und in
korrektem Eingangssignal angeschlossen oder beschädigt einwandfreiem Zustand sind
Wechseln Sie die Verbindungs-
kabel gegen hochwertige oder
Minderwertige Qualität der
Display zeigt "kein Signal" setzten Sie zusätzliche aktive
Verbindungskabel
Komponenten zur Signalaufberei-
tung ein
Überprüfen Sie die eingestellten
Umschalter kann nicht über den Falsche RS232 Befehle
Befehle
RS232-Anschluss gesteuert werden
Falsche PIN Belegung Überprüfen Sie die PIN Belegung
Das Gerät lädt sich statisch auf Schlechte Erdung Überprüfen Sie die Erdung
Hinweis:
Wenn das Problem nach den obigen Schritten zur Fehlerbehebung weiterhin besteht, wenden Sie sich
an Ihren Händler oder Händler vor Ort, um weitere Unterstützung zu erhalten.
13. CE-Konformitätserklärung
Hinweis:
Die aktuelle Inbetriebnahme- und Bedienungsanleitung kann von unserer Webseite heruntergeladen
werden: www.kindermann.com
Die aktuell gültige CE-Erklärung kann unter folgender URL eingesehen und heruntergeladen werden:
https://shop.kindermann.de/erp/webshop/navigationPath/5778000154.html
14. Verfügbares Zubehör
• HDMI-Kabel, Typ A, 19-Pin (5809002 0xx)
• Aktive HDMI-Kabel, Typ A, 19-Pin (5809003 0xx)
Bitte wenden Sie sich an Ihren Händler vor Ort, um weitere Unterstützung oder Lösungen zu erhalten.
15HDMI Switch 41 automatic 4K60 HDMI2.0 4 to 1 switch Ref.-No. 5778000154 Commissioning and operating instructions GB 06.2020
1. Foreword
Before using the product, read this manual carefully. The images shown in this manual are for reference
only and may differ from the actual product. This manual is for reference only. Contact your local dealer
for maintenance assistance.
In a constant effort to improve the product, we reserve the right to change functions or parameters
without prior notice or obligation. For the latest information, please contact your local Kindermann
dealer.

2.       Safety Instructions and precautions
•    Read the operating instructions carefully and keep them in a safe place.
•    Carefully unpack the unit and save the original packaging and packing materials for possible
     future shipment.
•    Follow basic safety precautions to reduce the risk of fire, Reduce electric shock and injury to persons.
•    Never open or modify the unit. This may result in electric shock or burns.
•    The product may only be operated with safety extra-low voltage using the supplied power supply.
•    The use of consumables or parts that do not meet the product specifications may result in damage
     or malfunction.
•    Refer all servicing to qualified service personnel.
•    The system should only be stored and used in a dry environment.
•    Place the unit in a well-ventilated location to prevent damage from overheating.
•    Do not use liquid or aerosol cleaners to clean this unit. Always unplug the power cord from the
     wall outlet before cleaning.
•    Unplug the power plug if you are not going to use the product for a long time.
•    Notes on the disposal of old equipment: The device may not be disposed of with the household
     waste, but must be returned via trade channels.

•    Make sure that all components and accessories are included before installation.
•    All power switches, plugs, sockets and power cords must be insulated and secure.
•    All equipment should be connected before switching on.

17
3. Device description / Intended use
The HDMI Switch 41 automatic 4K60 is an ultra-thin automatic switch with four HDMI video inputs and
one HDMI output. It supports HDMI video resolutions up to 4Kx2K@60Hz 4:4:4 HDR and multi-channel
audio. In addition to passing EDID information from the display there are several integrated EDID settings
to simplify installation. The switcher will de-embed digital stereo audio to provide an analog audio source
for an existing audio system. The switcher also supports audio return channel (ARC) for transferring audio
from the connected display back to the HDMI input connector.
In auto switching mode, the HDMI Switch 41 automatic 4K60 switches to an HDMI input when a new sour-
ce is connected. When the active input is removed, the switch selects the first source at the input with the
lowest number. The switch can also be controlled via RS232, IR with the supplied remote control or via
the source button on the front panel.
3.1 Features
• Switches one of four HDMI inputs to one HDMI output
• Supports a video resolution of up to 4Kx2K@60Hz 4:4:4 HDR
• Supports max. 18 Gbps bandwidth
• Compatible with HDMI 2.0 and HDCP2.3 specifications
• Supports the audio return channel (ARC)
• Extended EDID control: pass through, preset and user-defined settings are possible
• Controllable via RS232 and IR
• Supports CEC
• LEDs to indicate the current operating status and to assist in troubleshooting during installation
3.2 Scope of delivery
• 1 x HDMI Switch 41 automatic 4K60
• 2 x Mounting bracket with 4 x fixing screws
• 4 x Support feet
• 1 x RS232 cable (3-pin to DB9)
• 1 x IR remote control
• 1 x IR receiver
• 1 x Power supply unit (24 V DC 1.25 A)
• 1 x User manual
Note:
Please contact your dealer immediately if any damage or missing parts regarding the components
are found upon receipt.
182. Anschluss Schema
4. Connection diagram
Die folgenden Systemdarstellungen zeigen typische Eingangs- und Ausgangsverbindungen, die mit diesem
The following system diagram shows typical input and output connections that can be used with this
switch:
Umschalter verwendet werden können:
HDMI:
Audio:
RS232:
Control:
7
6
5
Game Console Laptop TV Speaker Central Control Receiver Remote
System
STB Ray-Blu DVD
Hinweis: Dieses Bild dient nur als Referenz.
Note: This image is for reference only.
5. Operating and display components
5.1 Front side
AUTO
SOURCE ☀ AUDIO MODE 1 2 3 4
▼ ▼ ▼ ▼ ▼ ▼ ▼▼
5
1 2 3 4 5 6
No. Name Description
Press to switch to the next input source.
Switch
1 Press and hold for at least three seconds to switch between manual
Auto/Manual
and automatic mode.
2 Operation LED Illuminates red when power is applied.
Illuminates green when de-embedding audio.
3 Audio Mode LED
Illuminates yellow in ARC mode.
Illuminates green in manual mode.
4 Switching mode LED
Illuminates yellow in auto switching mode.
The LED illuminates green when there is an active HDMI input on the corre-
5 LED for input 1-4
sponding channel.
6 FIRMWARE Micro USB port for firmware update.
195.2 Rear side
IN 1 IN 2 IN 3 IN 4 (ARC) OUT AUDIO RS232 IR IN EDID DC 5V
▼ ▼ ▼ ▼ ▼ ▼ ▼ ▼ ▼ ▼
7 8 9 10 11 12 13
No. Name Description
Type A HDMI input connector for connecting HDMI sources.
7 IN 1-4
HDMI connector 4 supports ARC.
8 OUT Type A HDMI output connector for connecting a display.
9 AUDIO 3.5 mm jack socket for analogue stero audio output.
10 RS232 3.5 mm mini jack for connecting a control device (e. g. media control system).
11 IR IN 3.5 mm mini jack socket for connecting the IR Sensor (in scope of delivery).
12 EDID 4-pin DIP switch for EDID setting.
13 DC 5V Hollow plug socket; for connecting the enclosed 5V DC plug-in power supply unit.
Note: The HDCP-compliant output status depends on the input signal.
If the input signal is with HDCP, the output signal is with HDCP and vice versa.
6. Operation
6.1 Manual selection
When the switch is in manual switch mode, the switch mode LED is green.
By pressing the "Auto/Source" button, you switch to the next input.
6.2 Automatic selection
To activate the automatic selection, press and hold the "Auto/Source" button for at least three seconds.
The "Switching Mode" LED will now light up in yellow.
If the automatic selection is switched on, it will switch according to these rules:
• New Input: If a new device is connected, the system automatically switches to this input. (When con-
nection notebooks you might activate the signal output on the device manually.)
• Reboot: In case of a power interruption, the unit switches to the last input, if the last selected source
is still available. Otherwise, the unit switches to the first available active input, starting with HDMI
input 1. (Priority: 1 prior to 2, 2 prio to 2 and so on)
• Source removed: When an active source is removed, the switch switches to the first available active
input, starting with HDMI input 1. (Priority: 1 prior to 2, 2 prio to 2 and so on)
206.3 IR remote control
Connect the IR receiver to the IR input connector (10). The IR remote control is used for signal switching
and can also be used to control source and display devices based on the CEC function.
INPUTS:
1-4: Select the appropriate input source.
MANUAL/AUTO:
Switch the automatic or manual mode.
SOURCE:
Controlling the input source (e. g. DVD-Player)
DISPLAY:
Display control (e. g. TV).
Note:
• The HDMI input 4 does not support CEC! Source devices connected to this input cannot be controlled
with the IR remote control.
• The source and display devices must support CEC in order to control them with the IR remote control.
6.4 RS232 control
Connect the switch to the media control system with a RS232 cable and the supplied adapter and set the
parameters correctly. The control system can now control this switch via RS232 commands.
Tx GND Rx
RS232
Baud rate: 9600
Data bit: 8
Stop bit: 1
Parity bit: none
5 1
RS232 socket
9 6 PC
Sub-D9
RS232 cable
216.4.1 RS232 commands
As soon as the status of the HDMI Switch 41 automatic 4K60 changes (e. g. by pressing a button), the
last change is automatically displayed via RS232 command.
Note: All commands can be terminated with "" or without. Both are recognized.
Answers are always terminated with "".
6.4.2 Signal switching
Command Function Example answer
1B1. Switches to HDMI input 1 AV: 1 1
2B1. Switches to HDMI input 2 AV: 2 1
3B1. Switches to HDMI input 3 AV: 3 1
4B1. Switches to HDMI input 4 AV: 4 1
?B1. Input Query AV: x 1 (x: 1,2,3 or 4)
B1 Auto On Activating the automatic switching mode B1 Auto: On
B1 Auto Off Activating the manual switching mode B1 Auto: Off
B1 Auto: On
B1 Auto? Shows the current switching mode
B1 Auto: Off
6.5 Control of the source devices
Note:
• The connected source device must support CEC.
• HDMI input 4 does not support CEC!
Command Function Example answer
Switch on the input source device,
SRC PWR On SRC: PWR On
e. g. Blue-ray/DVD-player
Switch off the input source device,
SRC PWR Off SRC: PWR Off
e. g. Blue-ray/DVD-player
SRC: PWR On
SRC PWR? Source device power status request
SRC: PWR Off
SRC Play Play SRC: Play
SRC Pause Pause SRC: Pause
SRC Stop Stop SRC: Stop
SRC FForward Fast Forward x1 SRC: FForward
SRC FBackward Fast Rewind x1 SRC: FBackward
22SRC Skip
Next section SRC: Skip Forward
Forward
SRC Skip
Previous section SRC: Skip Backward
Backward
SRC Menu Show settings menu SRC: Menu
SRC Back Back SRC: Back
SRC Ok Confirm (OK) SRC: Ok
SRC Exit Exit SRC: Exit
SRC Up To the top SRC: Up
SRC Down Down SRC: Down
SRC Left To the left SRC: Left
SRC Right To the right SRC: Right
6.5.1 Display control
Note: The display must support CEC!
Command Function Example answer
TV PWR On Switching on the display TV: PWR On
TV PWR Off Switching off the display TV: PWR Off
TV: PWR On
TV PWR? Power Status Request
TV: PWR Off
TV VOL+ Louder TV: VOL+
TV VOL- Quieter TV: VOL-
TV Mute Toggle Change of the mute/unmute status TV: Mute Toggled
6.5.2 Audio selection
Command Function Example answer
ARC EXT Audio channel selection (ARC) ARC: EXT
ARC INT HDMI channel selection ARC: INT
ARC: EXT
ARC? Query of the ARC status
ARC: INT
236.6 System control
Command Function Example answer
Reset System reset Reset done
Unit:
Kindermann HDMI Switch 41 automatic
4K60
FW: V1.0.0
Info Show system information
AV: 1 1
ARC: EXT
B1 Auto: On
EDID: 0
6.6.1 Baud Rate setting
Command Function Example answer
BAUD 2400 Sets the baud rate of the RS232 port to 2400 Baud: 2400
BAUD 4800 Sets the baud rate of the RS232 port to 4800 Baud: 4800
BAUD 9600 Sets the baud rate of the RS232 port to 9600 Baud: 9600
BAUD 19200 Sets the baud rate of the RS232 port to 19200 Baud: 19200
BAUD 38400 Sets the baud rate of the RS232 port to 38400 Baud: 38400
BAUD 57600 Sets the baud rate of the RS232 port to 57600 Baud: 57600
BAUD 115200 Sets the baud rate of the RS232 port to 115200 Baud: 115200
7. EDID management
7.1 Predefined EDID setting
On the rear panel there is a 4-pin DIP switch (12) for setting the predefined EDID.
The following list shows the possible switch positions and their function.
ID Switch status Video Audio
0 0000 Pass through Pass through
1 0001 1920x1080p@60Hz 4:4:4 RGB 8bit Stereo
Switch in the lower 2 0010 1920x1080p@60Hz 4:4:4 RGB 8bit High Definition
position = "ON",
Swich in the upper
3 0011 1920x1080p@60Hz 4:4:4 RGB 12bit Stereo
position = "OFF"
4 0100 1920x1080p@60Hz 4:4:4 RGB 12bit High Definition
24ID Switch status Video Audio
5 0101 3840x2160p@60Hz 4:2:0 RGB 8bit Stereo
6 0110 3840x2160p@60Hz 4:2:0 RGB 8bit High Definition
Switch in the lower 7 0111 3840x2160p@60Hz 4:4:4 RGB 10bit HDR Stereo
position = "ON",
Swich in the upper 8 1000 3840x2160p@60Hz 4:4:4 RGB 10bit HDR High Definition
position = "OFF"
9 1001 1280x800@60Hz Stereo
10 1010 1920x1200@60Hz Stereo
7.2 User-defined EDID setting
Additionally to the predifined EDID and the existing (on the device) EDID up to 5 individual configura-
tions can be stored and selcted on the switch. In order to create your individual EDID download it via an
appropriate device or software or create an EDID file by yourself.
1. Rename the custom EDID according to the following format:
� EC_xx_xxxx_xxx.bin
• EC: Corresponds to EDID.
• xx: Corresponds to EDID ID (11-15)
• xxxx: Corresponds to the video parameter.
• xxx: Corresponds to the audio format.
• Example: EC_11_720P_LPCM.bin
2. Turn on the switch and connect it to a PC with a USB cable.
The PC automatically recognizes a USB hard disk called "BOOTDISK".
3. Copy the renamed EDID (e. g. EC_11_720P_LPCM.bin) to "BOOTDISK".
4. Open the USB hard disk again and check that the file name "READY.TXT" is automatically
renamed to "SUCCESS.TXT". If so, the custom EDID was successfully imported into the switcher and
saved as the corresponding EDID ID. To activate the EDID set the DIP switch according to the list
below.
5. Repeat the third to fifth step to copy other custom EDIDs to the "BOOTDISK".
6. Remove the USB cable.
ID Switch status
11 1011
12 1100
13 1101
14 1110
15 1111
25Der Audio-Rückkanal (engl. Audio Return Channel (ARC)) ermöglicht, den Ton von einem Display "upstream" über
ein HDMI-Kabel zu einem Audioverarbeitungsgerät, wie z.B. einem AV-Verstärker, zu leiten. Wenn der ARC-Modus
auf dem Umschalter aktiv ist, wird der ARC-Stream an das aktive HDMI-Quellgerät weitergeleitet, sofern dieses das
8.Signal
ARC mode kann.
verarbeiten
The
NurAudio Return
der vierte Channel (ARC)
HDMI-Eingang verfügtallows the sound from a display to be routed "upstream" via an HDMI
über ARC!
cable to an audio processor such as an AV amplifier.
Der Bildschirm und der AV-Verstärker müssen auch ARC unterstützen !!!
Note: Only HDMI4 input supports ARC! The screen and AV amplifier must also support ARC!
ARCwiring
ARC Anschlussschema
diagram isist wie folgt
shown dargestellt:
below:
Speakers
ARC AUDIO:
Speaker
Amplifier
IN 1 IN 2 IN 3 OUT AUDIO RS232 IR IN EDID DC 5V
TV
9. Panel drawing
15.00 mm
194.00 mm
ON 4 3 2 1
DC 5V EDID IR IN RS232 AUDIO OUT IN 4 (ARC) IN 3 IN 2 IN 1
81.00 mm
15
AUTO
SOURCE AUDIO MODE 1 2 3 4
HDMI Switch 41 automatic 4K60
FIRMWARE
2610. Technical data
Video inputs
Input 4 x HDMI
Input port HDMI socket type A
HDMI input resolution Up to 4Kx2K@60Hz 4:4:4
Bandwidth 18Gbps
HDMI standard 2.0
HDCP version 2.3
Video outputs
Output 1 x HDMI
Output port HDMI socket type A
HDMI output resolution Up to 4Kx2K@60Hz 4:4:4
HDMI standard 2.0
HDCP version 2.3
Audio
Output 1 x AUDIO
Output port 3.5 mm mini stereo audio jack
Audio format PCM
Audio output impedance 70 Ohms
Frequency response 20Hz to 20kHz, ±3dB
Control
Control 1 x IR IN; 1 x RS232
Control port 2 x 3.5 mm mini jack
General
Operating temperature -10°C ~ +55°C
Storage temperature -25°C ~ +70°C
Relative air humidity 10%-90% (non-condensing)
Power supply Input: 100V~240V AC; Output: 5V DC 1A
Power consumption 5W (Max)
Dimensions (WxHxD) 194 x 15 x 81 mm
Net weight 324 g
Note:
Please use high-quality HDMI cables compatible with HDMI2.0 for reliable transmission and connection.
2711. Troubleshooting
Problems Possible cause Solution
No video signal on the display The connection cables may not Check that the cables are
No output signal despites correct be connected properly or may correctly connected and in
input signal be damaged good condition
Replace the connecting cables
Poor quality of the connecting with high-quality cables or add
Display shows "no signal"
cables additional amplification compo-
nents to improve the signal quality
Wrong RS232 communication Check the communication
Switch cannot be controlled via parameters parameters
the RS232 port
Wrong pins used at the cables Check the pinning
The device charges itself statically Bad grounding Check the grounding
Note:
If the problem persists after following the troubleshooting steps above, contact your local dealer
or distributor for further assistance.
12. CE declaration of conformity
Note:
The current commissioning and operating instructions can be downloaded from our website:
www.kindermann.com
The currently valid CE declaration can be viewed and downloaded at the following URL:
https://shop.kindermann.de/erp/webshop/navigationPath/5778000154.html
13. Available accessories
• HDMI cable, type A, 19-pin (5809002 0xx)
• Active HDMI cable, type A, 19-pin (5809003 0xx)
Please contact your local dealer for further support or solutions.
5778 000 154 D/GB 2021-02 Änderungen vorbehalten / Subject to alterations Printed in China
Kindermann GmbH · Mainparkring 3 · D-97246 Eibelstadt · E-Mail: info@kindermann.de · www.kindermann.comSie können auch lesen