Lindy.com - Single Display Pop Out Video Wall Mount User Manual - Etilize
←
→
Transkription von Seiteninhalten
Wenn Ihr Browser die Seite nicht korrekt rendert, bitte, lesen Sie den Inhalt der Seite unten
Single Display Pop Out Video Wall Mount
User Manual                                                 Eng lis h
Benutzerhandbuch                                            Deutsch
Manuel Utilisateur                                          Français
Manuale                                                     Italiano

                           No. 40880

                       lindy.com

               © LINDY Group - FIRST EDITION (April 2019)
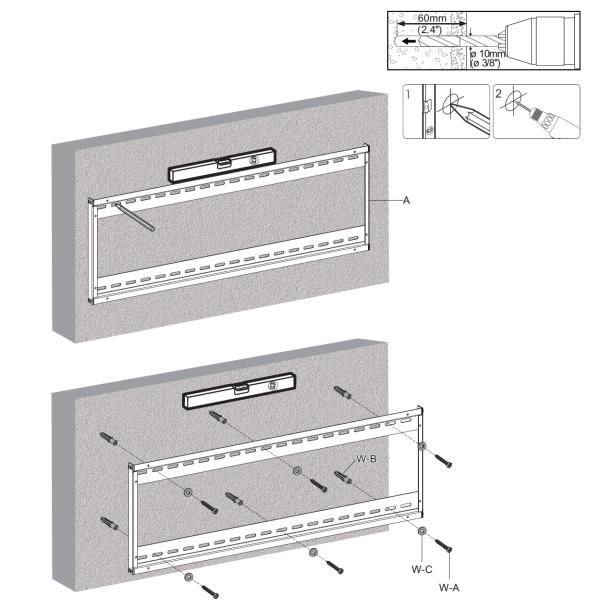
User Manual                                                                                       English
Introduction

Thank you for purchasing the Single Display Pop Out Video Wall Mount. This product has been designed
to provide trouble free, reliable operation. It benefits from both a LINDY 2 year warranty and free lifetime
technical support. To ensure correct use, please read this manual carefully and retain it for future
reference.
The Lindy Pop Out Video Wall Mount is a professional, sturdy mounting solution for a single display as a
standalone feature or within multi-display video walls. Featuring a simple pop out mechanism, the display
can be fitted securely to the wall with no hassle, whilst allowing for easy removal and access to the rear of
the screen.

Package Contents

▪   Wall Plate
▪   Pop Out Wall Mount
▪   Lindy Manual
▪   2 x Display Brackets
▪   2 x Anti-slip Blocks
▪   2 x Plastic Locking Pieces
▪   Allen Key
▪   Mounting Kit (Please see here):

Specification

▪   Fits displays from 45” to 70”
▪   Fits displays of weight up to 70kg (154.32lb)
▪   Fits VESA dimensions: 200x200, 300x300, 400x200, 400x400, 600x400
▪   Material: Steel
▪   Screen Distance From Wall: 143-306mm (5.6"-12")
▪   Tilt Adjustment: -5°~+3°
▪   Pivot Adjustment: -3°~+3°

Installation
Mounting the wall plate to a solid wall
Please note: please ensure the supporting wall can safely
support the combined weight of this mount and any
mounted hardware and components.

Using a pencil, mark the location of all mounting holes
and drill pilot holes with care.

Using W-A, W-B and W-C from the mounting kit, screw
the wall plate into the wall.
User Manual                                                                                    English
Installation within a video wall

X: Length of Display

Y: Height of Display

Installation of the Pop Out Bracket

Please remove the caps (see above) before installation of the pop out mount

Hang the Pop Out Mount onto the wall plate. Secure by tightening the screws indicated above.

Installing the Adapter Brackets

                                          Top of Display
User Manual                                                                              English
Installing the Adapter Brackets for
Flat Displays

Installing the Adapter Brackets for Recessed on Uneven Back Panel Displays

                                                     Please note: Please ensure the correct
                                                     screws, spacers and washers are used
                                                     according to the display

                                                     Once adapter brackets are screwed into the
                                                     display, please tighten taking care not to
                                                     over tighten

Installing the Display onto the Pop Out Mount

                                                         Please note: Prior to mounting the
                                                         display, please ensure all knobs (see
                                                         left) are rotated to the unlock position.

                                                         Rotate knobs to locking position once
                                                         display has been hooked onto the
                                                         mount to secure. A padlock can be
                                                         added as shown for additional security
                                                         (not included).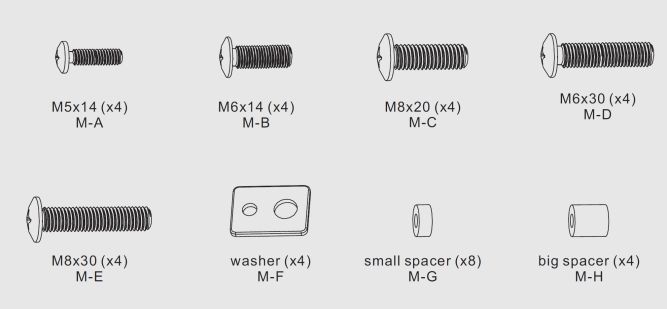
User Manual                                                                                        English
Aligning the display

                                                                      Push the display left or right to
                                                                      ensure correct alignment.

                                         Mount handles for tilt adjustment –
                                         Turn left to tilt backward, right to tilt forward.

                                         Mount screws for up and down micro-adjustments –
                                         Turn left to adjust upwards, right to adjust downwards, these
                                         can also be used for irregular video walls when one side of the
                                         screws are turned.

                                         Mount knobs for recess/push out (in/out) micro-adjustments –
                                         Turn left to push out the display, right to recess the display,
                                         these can also be used for easy access on either side of a
                                         display when one side of the mount’s knobs are turned.

“Pop Out” the display

Push the display inward and release to pop out the display. The mount provides a small kickstand for
easy access for cable management and maintenance.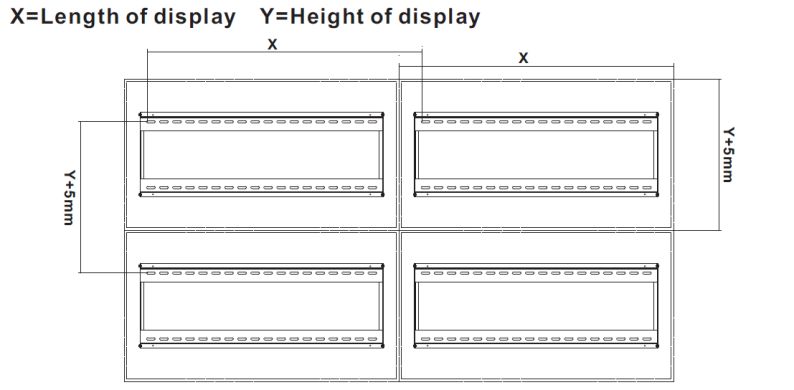
User Manual                                                                                  English
Levelling the displays

Adjust display to ensure this is level in both vertical and horizontal directions.

                                                                 When installing within a video wall
                                                                 please setup the displays in
                                                                 numerical order as shown

                                                                 Please use the plastic locking piece
                                                                 to measure and ensure a 1.2mm gap
                                                                 between each display

Ensure a fixed position of the mount

                                               Use the antiskid blocks and apply as close to the
                                               adapter brackets possible.

                                               Using the included Allen key, tighten the screws on the
                                               antiskid blocks to prevent the display from moving.

              Locking the Pop Out Mount
Benutzerhandbuch Deutsch Einführung Wir freuen uns, dass Ihre Wahl auf ein LINDY-Produkt gefallen ist und danken Ihnen für Ihr Vertrauen. Sie können sich jederzeit auf unsere Produkte und einen guten Service verlassen. Diese Lindy Pop-out- Wandhalterung für einen Monitor unterliegt einer 2-Jahres LINDY Herstellergarantie und lebenslangem kostenlosen technischen Support. Bitte lesen Sie diese Anleitung sorgfältig und bewahren Sie sie auf. Diese Lindy Pop-out-Wandhalterung für einen Monitor ist eine professionelle, stabile Montagelösung für ein Display oder für eine Videowand mit mehreren Displays. Die Halterung mit Pop-out- Federmechanismus kann mühelos an der Wand befestigt werden. Hinter dem Display ist genug Platz für bequeme Montage bzw. Demontage. Lieferumfang ▪ Wandplatte ▪ Pop-out-Wandhalterung ▪ Lindy Handbuch ▪ 2 x Displayhalterung ▪ 2 x Anti-Rutsch-Pad ▪ 2 x Kunststoff-Verriegelung ▪ Inbusschlüssel ▪ Montagekit (siehe rechts): Spezifikationen ▪ Geeignet für Displays von 45” bis 70” ▪ Geeignet für Displays bis 70kg (154.32lb) ▪ Für VESA-Standard 200x200, 300x300, 400x200, 400x400, 600x400 ▪ Material: Stahl ▪ Abstand zwischen Wand und Display: 143-306mm (5.6"-12") ▪ Neigungseinstellung: -5°~+3° ▪ Pivoteinstellung: -3°~+3° Installation Anbringen der Wandplatte an einer stabilen Wand Achten Sie bitte darauf, dass die Wand sowohl die Halterung mit Display als auch alle anderen montierten Komponenten sicher tragen kann. Markieren Sie mit einem Stift alle Montagelöcher und bohren Sie vorsichtig Löcher. Schrauben Sie die Wandplatte mithilfe von W-A, W-B und W-C aus dem Montagekit an die Wand.
Benutzerhandbuch                                                                         Deutsch
Installation in einer Videowand

X: Länge des Displays

Y: Höhe des Displays

Installation der Pop-out-Halterung

Entfernen Sie die Kappen (siehe oben) vor der Installation der Pop-out-Halterung.

Hängen Sie die Pop-out-Halterung an die Wandplatte. Sichern Sie diese durch Festziehen der
Schrauben (siehe oben).

Installieren der Adapterhalterungen
Benutzerhandbuch                                                                       Deutsch
Installieren der Adapterhalterungen
für Flachbildschirme

Installieren der Adapterhalterungen an einer vertieften oder unebenen Rückseite des Displays

                                                      Achten Sie darauf, dass Sie die korrekten
                                                      Schrauben, Abstandshalter und
                                                      Unterlegscheiben für das Display
                                                      verwenden.

                                                      Schrauben Sie die Adapterhalterungen am
                                                      Display fest, aber achten Sie darauf, die
                                                      Schrauben nicht zu stark festzuziehen.

Installieren des Displays an der Pop-out-Halterung

                                                          Achten Sie vor der Befestigung darauf,
                                                          dass alle Drehknöpfe (siehe links)
                                                          entriegelt sind.

                                                          Bringen Sie die Drehknöpfe in die
                                                          Verriegelungsposition, sobald Sie das
                                                          Display in die Halterung gehängt haben.
                                                          Für zusätzliche Sicherheit kann ein
                                                          Vorhängeschloss angebracht werden
                                                          (nicht enthalten).
Benutzerhandbuch Deutsch
Ausrichten des Displays
Schieben Sie das Display nach links
oder rechts, um es korrekt auszurichten.
Montieren Sie die Griffe zur Einstellung der Neigung – eine
Bewegung nach links führt zur Neigung nach hinten, eine
Bewegung nach rechts führt zur Neigung nach vorne.
Montieren Sie Schrauben für kleine Justierungen nach oben
und unten – drehen Sie nach links für eine Justierung nach
oben, nach rechts für eine Justierung nach unten. Diese
Einstellung kann man auch bei unregelmäßigen Videowänden
nutzen, wenn nur auf einer Seite die Schrauben justiert
werden.
Montieren Sie Drehknöpfe für kleine Justierungen beim
Zurücksetzen/Herausziehen (in/out) – drehen Sie nach links
zum Herausziehen, nach rechts zum Zurücksetzen des
Displays. Diese Methode kann auch für einfachen Zugriff auf
einer Seite des Displays verwendet werden, wenn die
Drehknöpfe nur auf einer Seite justiert werden.
“Pop-out” des Displays
Drücken Sie auf das Display und lassen es wieder los, so dass es freigegeben wird und nach vorne
kommt. Ein kleiner Abstandhalter sorgt für genug Platz für den Zugriff auf Kabel und zur Wartung.Benutzerhandbuch Deutsch
Nivellierung des Displays
Waagrechte und senkrechte Ausrichtung des Displays
Bei Installation in einer Videowand
montieren Sie die Displays bitte in der
gezeigten Zahlenfolge.
Verwenden Sie die Kunststoff-
Verriegelungen, um zwischen den
Displays einen 1,2mm großen
Abstand einzuhalten.
Sicherstellen einer festen Position der Halterung
Befestigen Sie die Anti-Rutsch-Pads möglichst nah bei
den Adapterhalterungen.
Ziehen Sie mit dem Inbus die Schrauben fest auf den
Anti-Rutsch-Pads fest um zu Vermeiden, dass das
Display sich bewegt.
Verriegeln der Pop-out-HalterungManuel Utilisateur Français Introduction Nous sommes heureux que votre choix se soit porté sur un produit LINDY et vous remercions de votre confiance. Vous pouvez compter à tout moment sur la qualité de nos produits et de notre service. Ce Support mural escamotable pour un écran (Single Display Pop Out Video Wall Mount) est soumis à une durée de garantie LINDY de 2 ans et d’une assistance technique gratuite à vie. Merci de lire attentivement ces instructions et de les conserver pour future référence. Le Pop Out Video Wall Mount de LINDY est une solution de professionnelle et robuste pour un écran, pour une installation autonome ou dans des murs d’écrans. Doté d’un mécanisme d’extraction simple, l’écran peut être fixé solidement au mur, tout en permettant un retrait et un accès facile à l’arrière de l’affichage. Contenu de l’emballage ▪ Support mural ▪ Système support escamotable ▪ Manuel LINDY ▪ 2 x fixations d’écran ▪ 2 x blocs de fixation à vis ▪ 2 x pièces de blocage en matière plastique ▪ Clé Allen ▪ Kit de montage (voir ci-contre): Spécifications ▪ Accepte des écrans de 45” à 70” ▪ Supporte un écran de jusqu’à 70kg (154.32lb) ▪ Compatible avec les dimensions VESA: 200x200, 300x300, 400x200, 400x400, 600x400 ▪ Matériau: métal ▪ Distance de l’écran au mur: 143-306mm (5.6"-12") ▪ Réglage de l’inclinaison: -5°~+3° ▪ Réglage de l’axe de rotation: -3°~+3° Installation Montage du support mural sur un mur plein Merci de noter: assurez-vous que le mur est en capacité de supporter le poids combiné du support d’écran et de tous les éléments s’y rapportant. Utilisez un crayon, marquez l’emplacement de tous les trous de fixation et percez les trous avec soin. En utilisant les éléments W-A, W-B et W-C du kit de montage, fixez le support au mur.
Manuel Utilisateur                                                                            Français
Installation dans un mur d’écrans

X: longueur de l’écran (Length of Display)

Y: hauteur de l’écran (Height of Display)

Installation du système escamotable (Pop Out Bracket)

Merci de retirer les capuchons (voir ci-dessus) avant l’installation du système escamotable

Accrochez le support Pop Out Mount sur la plaque murale. Sécurisez-le en serrant les vis indiquées ci-
dessus.
Manuel Utilisateur                                                                         Français
Installation des équerres de montage sur l’écran

                                       Haut de l’écran

Installation des équerres pour un
écran plat

Installation des équerres pour les écrans encastrés avec des panneaux arrières inégaux

                                                         Merci de noter: assurez-vous d’utiliser les
                                                         vis, entretoises et rondelles adéquates par
                                                         rapport à l’écran.

                                                         Une fois les équerres vissées à l’écran,
                                                         serrez avec soin sans trop forcer.
Manuel Utilisateur Français
Installation de l’écran sur le système escamotable
Merci de noter: avant de monter l‘écran,
assurez-vous que tous les boutons (voir
à ci-contre à gauche) sont en position
déverrouillée.
Tournez les boutons en position de
verrouillage une fois l’écran accroché
sur le support pour le sécuriser. Un
cadenas peut être ajouté pour une plus
grande sécurité (non inclus).
Alignement de l’écran
Poussez l’écran vers la droite ou la
gauche pour assurer un bon
alignement.
Poignées de montage pour le réglage de l’inclinaison –
Tournez à gauche pour basculer vers l’arrière, à droite pour
basculer vers l’avant.
Vis de montage pour affiner l’ajustement –
Tournez à gauche pour régler vers le haut, à droite pour régler
vers le bas, ils peuvent également être utilisés pour les murs
d’écrans irréguliers lorsqu’un côté des vis est tourné.
Boutons de montage pour les affiner l’ajustement (int./ext.) –
Tournez à gauche pour sortir l’écran, à droite pour le
repousser, ces boutons peuvent être également utilisés pour
un accès facile de chaque côté de l’écran lorsqu’un des
boutons est tourné.Manuel Utilisateur Français
“Pop Out” de l’écran
Poussez l'écran vers l'intérieur et relâchez-le pour le faire sortir. Le support dispose d’une petite béquille
de maintien pour un accès facile, pour la gestion et l'entretien des câbles.
Mise à niveau des écrans
Ajustez l’écran pour assurer la mise à niveau vertical et horizontal.
Lors de l'installation à l'intérieur d'un
mur d'images, veuillez installer les
écrans dans l'ordre numérique indiqué
ci-dessous.
Veuillez utiliser la pièce de
verrouillage en plastique pour
mesurer et assurer un espace de 1,2
mm entre chaque écran.Manuel Utilisateur Français
Assurer la position du support
Utilisez les blocs de fixation à vis et approchez-les au
maximum de l’équerre support de chaque côté.
Utilisez la clé Allen fournie pour serrer les vis pour
empêcher tout mouvement de l’écran.
Verrouillage du support Pop OutManuale Italiano Introduzione Vi ringraziamo per aver acquistato il supporto per Video Wall Pop Out Lindy. Questo prodotto è stato progettato per garantirvi la massima affidabilità e semplicità di utilizzo ed è coperto da 2 anni di garanzia LINDY oltre che da un servizio di supporto tecnico a vita. Per assicurarvi di farne un uso corretto vi invitiamo a leggere attentamente questo manuale e a conservarlo per future consultazioni. Il supporto per Video Wall Pop Out Lindy è una soluzione professionale e robusta per il montaggio a parete di schermi singoli o di sistemi multi schermo (video wall). Grazie ad un semplice meccanismo di rilascio (Pop Out) lo schermo può essere fissato con semplicità e sicurezza alla parete consentendo nel contempo in caso di necessità un semplice e rapido accesso al retro del display. Contenuto della confezione ▪ Piastra di montaggio a muro ▪ Meccanismo Pop Out ▪ Manuale Lindy ▪ 2 x Staffe per Display ▪ 2 x Blocchi anti scorrimento ▪ 2 x Spessori in plastica ▪ Chiave a brugola ▪ Kit di montaggio (Vedete qui a fianco): Specifiche ▪ Adatto a schermi da 45” a 70” ▪ Supporta schermi fino ad un peso di 70kg (154.32lb) ▪ Compatibile con le seguenti dimensioni VESA: 200x200, 300x300, 400x200, 400x400, 600x400 ▪ Materiale: Acciaio ▪ Distanza dello schermo dalla parete: 143-306mm (5.6"-12") ▪ Regolazione inclinazione: -5°~+3° ▪ Regolazione allineamento: -3°~+3 Installazione Fissare la piastra di montaggio a muro NOTA BENE: Vi preghiamo di assicurarvi che la parete a cui volete appendere il o i monitor possa reggere in piena sicurezza il peso combinato dei supporti, dei monitor e di qualsiasi ulteriore accessorio ad essi connessi. Utilizzando una matita ed una bolla segnate sul muro la posizione di tutti i fori da effettuare come indicato in figura. Rimuovete poi la piastra e procedete a forare con un trapano dotato di punta da 10mm (non inclusi). Utilizzando i componenti W-A, W-B e W-C del kit di montaggio procedete al fissaggio della piastra a muro.
Manuale                                                                                          Italiano
Installazione di un video wall

X: Lunghezza del display

Y: Altezza del display

Installazione della staffa Pop Out

Vi preghiamo di rimuovere le protezioni (vedi sopra) prima di installare la staffa pop out

Agganciare la staffa Pop Out sulla piastra a muro. Assicuratela stringendo le viti indicate sopra.

Installare le staffe di ancoraggio al display

                                            Top of Display
Manuale Italiano
Installare le staffe di ancoraggio su
schermi piani.
Installare le staffe di ancoraggio su schermi non piani o con fondo irregolare
NOTA BENE: Vi preghiamo di assicurarvi
che le viti, dadi e distanziali utilizzati siano
adatti allo schermo che state installando.
Fissate le staffe di ancoraggio al display
avendo cura di non stringere
eccessivamente le viti per evitare di creare
eccessive tensioni o danneggiare il telaio
dello schermo.
Installare lo schermo sulla staffa Pop Out
NOTA BENE: prima di montare il
display assicuratevi che tutti i pomelli
(vedi figura a lato) siano ruotati in
posizione di sblocco.
Inserite il display sulla staffa Pop Out
inserendo i ganci delle staffe di
ancoraggio sull’apposito binario e poi
ruotate i pomelli nella posizione di
blocco. E’ possibile aggiungere un
lucchetto (non incluso) come mostrato a lato per maggiore sicurezza.Manuale Italiano
Allineamento del display
Spingete lateralmente il display per
raggiungere un corretto allineamento
con il centro del supporto
Montate le maniglie per la regolazione dell’inclinazione. Girate
verso sinistra per inclinare verso l’alto e a destra per inclinare
verso il basso.
Montate le viti per le regolazioni fini verso l’alto e verso il
basso. Girate verso sinistra per alzare lo schermo e verso
sinistra per abbassarlo. Possono essere anche utilizzate per la
realizzazione di video wall irregolari abbassando e alzando da
un solo lato le viti.
Montate le manopole per la regolazione fine della profondità di
montaggio dello schermo girando a sinistra per spostare lo
schermo in avanti e a destra per farlo rientrare verso la parete.
E’ possibile anche utilizzarle per accedere al fianco del display
ruotandole da un solo lato.
Estrarre (“Pop Out”) lo schermo
Premete lo schermo verso la parete per rilasciare il meccanismo di Pop Out. Questo sistema include una
guida per alloggiare i cavi e renderne più semplice la gestione.Manuale Italiano
Allineamento e livellamento dei display
Regolate gli schermi per assicurarvi che siano livellati sia in orizzontale che in verticale.
Quando realizzate un Video Wall
assicuratevi di installare gli schermi
nell’ordine numerico indicato a lato.
Vi preghiamo di utilizzare gli spessori in
plastica per mantenere una distanza di
1,2mm fra ogni schermo.
Bloccare la staffa di montaggio in una posizione prefissata
Utilizzate i blocchi anti scorrimento applicandoli il più
possibile vicini alle staffe di ancoraggio.
Stringete poi le viti presenti su questi blocchi utilizzando la
chiave a brugola inclusa per evitare che lo schermo possa
muoversi.
Blocco della staffa Pop OutCE Statement
LINDY Herstellergarantie – Hinweis für Kunden in Deutschland
LINDY gewährt für dieses Produkt über die gesetzliche Regelung in Deutschland hinaus eine zweijährige Hersteller-
garantie ab Kaufdatum. Die detaillierten Bedingungen dieser Garantie finden Sie auf der LINDY Website aufgelistet
bei den AGBs.
Hersteller / Manufacturer (EU):.
LINDY-Elektronik GmbH LINDY Electronics Ltd
Markircher Str. 20 Sadler Forster Way
68229 Mannheim Stockton-on-Tees, TS17 9JY
Germany England
Email: info@lindy.com , T: +49 (0)621 470050 postmaster@lindy.co.uk , T: +44 (0)1642 754000
No. 40880
1st Edition, April 2019
lindy.comSie können auch lesen