Montageanleitung Installation instructions Notice de montage Istruzioni di montaggio - Robotunits
←
→
Transkription von Seiteninhalten
Wenn Ihr Browser die Seite nicht korrekt rendert, bitte, lesen Sie den Inhalt der Seite unten
Montageanleitung
Installation instructions
Notice de montage
Istruzioni di montaggio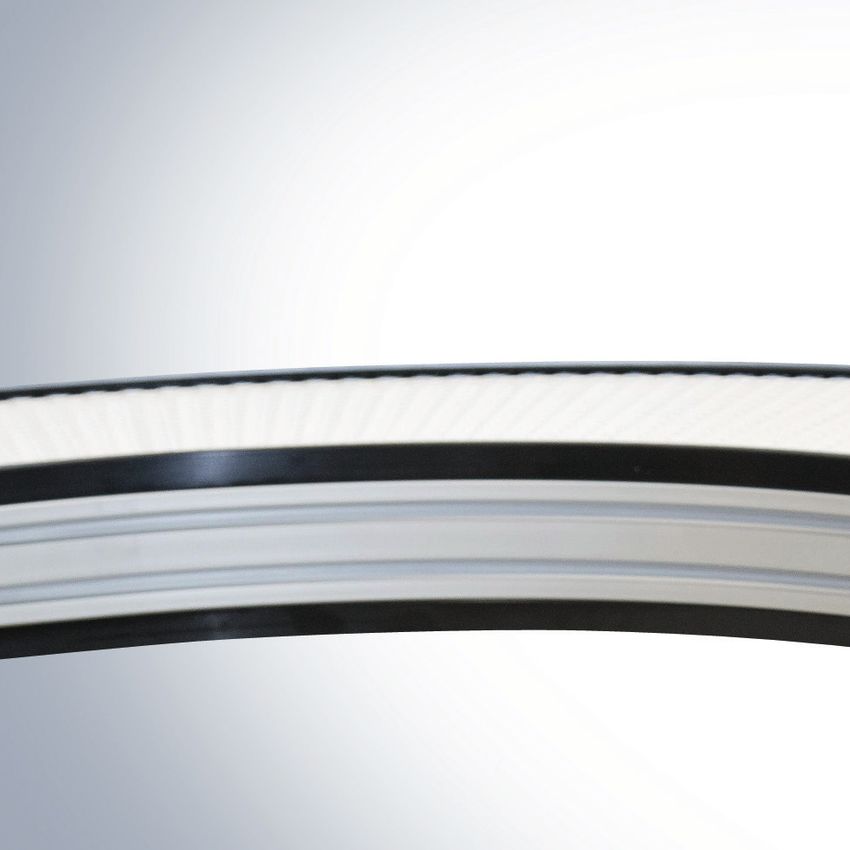
Deutsch

           Montageanleitung Modulketten Förderband .  .  .  .  .  .  .  .  .  .  .  .  .  .  .  .  .  .  .  .  .  .  .  .  .  .  .  . 3
           Original
English

           Installation instructions Modular Belt Conveyor .  .  .  .  .  .  .  .  .  .  .  .  .  .  .  .  .  .  .  .  .  .  .  . 13
           Translation
Français

           Notice de montage Convoyeur à bande modulaire .  .  .  .  .  .  .  .  .  .  .  .  .  .  .  .  .  .  .  .  .  . 23
           La traduction
Italiano

           Istruzioni di montaggio Nastro trasportatore modulare.  .  .  .  .  .  .  .  .  .  .  .  .  .  .  .  .  . 33
           La traduzione
3

Das Inhaltsverzeichis

1.    Allgemeines. . . . . . . . . . . . . . . . . . . . . . . . . . . . . . . . . . . . . . . . . . . . . . . . . . . . . . . . 4
1.1. Hersteller der Anlage . . . . . . . . . . . . . . . . . . . . . . . . . . . . . . . . . . . . . . . . . . . . . . . . 4
1.2. Verwendungszweck. . . . . . . . . . . . . . . . . . . . . . . . . . . . . . . . . . . . . . . . . . . . . . . . . . 4

                                                                                                                                             Deutsch
1.3.	Geforderte Voraussetzungen/Bedingungen, an die Stelle/den Montageort
      für den Anbau der unvollständige Maschine:. . . . . . . . . . . . . . . . . . . . . . . . . . . . . 4
1.4. Historie. . . . . . . . . . . . . . . . . . . . . . . . . . . . . . . . . . . . . . . . . . . . . . . . . . . . . . . . . . . . 4
2.    Sicherheit. . . . . . . . . . . . . . . . . . . . . . . . . . . . . . . . . . . . . . . . . . . . . . . . . . . . . . . . . . 5
2.1. Allgemeines. . . . . . . . . . . . . . . . . . . . . . . . . . . . . . . . . . . . . . . . . . . . . . . . . . . . . . . . 5
2.2. Vernünftiger Weise vorhersehbare Fehlanwendung . . . . . . . . . . . . . . . . . . . . . . . 5
3.    Transport/Montage . . . . . . . . . . . . . . . . . . . . . . . . . . . . . . . . . . . . . . . . . . . . . . . . . . 5
3.1. Lager-/Transportbedingungen unvollständigen Maschine. . . . . . . . . . . . . . . . . . . 5
3.2. Anforderungen Transportmittel . . . . . . . . . . . . . . . . . . . . . . . . . . . . . . . . . . . . . . . . 5
4.    Inbetriebnahme. . . . . . . . . . . . . . . . . . . . . . . . . . . . . . . . . . . . . . . . . . . . . . . . . . . . . 6
4.1. Vor der ersten Inbetriebnahme ist zu prüfen . . . . . . . . . . . . . . . . . . . . . . . . . . . . 6
5.    Wartung. . . . . . . . . . . . . . . . . . . . . . . . . . . . . . . . . . . . . . . . . . . . . . . . . . . . . . . . . . . 7
5.1. Anforderungen Wartungspersonal. . . . . . . . . . . . . . . . . . . . . . . . . . . . . . . . . . . . . . 7
5.2. Wartungstabelle. . . . . . . . . . . . . . . . . . . . . . . . . . . . . . . . . . . . . . . . . . . . . . . . . . . . . 7
5.3. Instandsetzungsarbeiten / Reparatur. . . . . . . . . . . . . . . . . . . . . . . . . . . . . . . . . . . . 7
5.4. Lagerwechsel. . . . . . . . . . . . . . . . . . . . . . . . . . . . . . . . . . . . . . . . . . . . . . . . . . . . . . . 7
6.    Installationshinweis Modulkettenband. . . . . . . . . . . . . . . . . . . . . . . . . . . . . . . . . . 8
6.1. Zahnradausrichtung auf den Wellen . . . . . . . . . . . . . . . . . . . . . . . . . . . . . . . . . . . . 8
6.2. Positionierung der Zahnräder . . . . . . . . . . . . . . . . . . . . . . . . . . . . . . . . . . . . . . . . . 8
6.3. Prüfen des korrekten Zahnradeingriffs . . . . . . . . . . . . . . . . . . . . . . . . . . . . . . . . . . 8
6.4.	Gelenkstab. . . . . . . . . . . . . . . . . . . . . . . . . . . . . . . . . . . . . . . . . . . . . . . . . . . . . . . . . 9
6.5.	Gelenkstab Anordnung bei Kurven. . . . . . . . . . . . . . . . . . . . . . . . . . . . . . . . . . . . . 9
6.6. Einsetzen des Gelenkstabes. . . . . . . . . . . . . . . . . . . . . . . . . . . . . . . . . . . . . . . . . . . 9
6.7. Ausbau des Gelenkstabes. . . . . . . . . . . . . . . . . . . . . . . . . . . . . . . . . . . . . . . . . . . . . 9
7.    EU-Einbauerklärung . . . . . . . . . . . . . . . . . . . . . . . . . . . . . . . . . . . . . . . . . . . . . . . .  10

Modulketten Förderband spezifische Stückliste. . . . . . . . . . . . . . . . . . . . . . . . .  beigelegt
Technische Unterlagen . . . . . . . . . . . . . . . . . . . . . . . . . . . . . . . . . . . . . . . . . . . . .  beigelegt
4

              1.     Allgemeines

              1.1.   Hersteller der Anlage

                     Robotunits GmbH
Deutsch

                     Dr. Walter Zumtobel Str. 2
                     A-6850 Dornbirn
                     Tel. +43 5572 22000 200
                     Fax +43 5572 22000 9200
                     www.robotunits.com

              1.2.   Verwendungszweck

                     Die unvollständige Maschine ist für das fördern von Transportgut bis zu einer
                     maximalen Belastung (siehe technischer Anhang) vorgesehen.

              1.3.	Geforderte Voraussetzungen/Bedingungen, an die Stelle/den Montageort für
                    den Anbau der unvollständige Maschine:

                     •	Genügend Tragfähigkeit zur Aufnahme des Förderbandes
                        (Gewicht ergibt sich aus technischen Datenblatt)
                     • Plane Flächen an der Anflanschstelle
                     • Bohrungen für die Verschraubung
                     • Einbaulage (lt. technischem Datenblatt)
                     •	Wenn erforderlich Abdeckungen der Antriebseinheit
                     • Elektrische Anschlußwerte und Anschlußart (lt. technischem Datenblatt)

              1.4.   Historie

               Version      Anpassungsgrund                                 Betroffene Seiten
               01.00        Neuanlage                                       Alle
5
2. Sicherheit
2.1. Allgemeines
Die Sicherheit für den Bedienenden und ein störungsfreier Betrieb der unvoll-
Deutsch
ständigen Maschine ist nur bei der Verwendung von Originalmaschinenteilen
gewährleistet.
2.2. Vernünftiger Weise vorhersehbare Fehlanwendung
Die unvollständige Maschine ist nicht für den Betrieb bei Umgebungstemperaturen
i ausserhalb von 0 bis +60 °C konzipiert. In Bezug auf die Luftfeuchtigkeit sind die
Grenzwerte der Schutzklasse IP54 einzuhalten.
Das Verwenden der unvollständigen Maschinen in explosionsgefährdeten
Bereichen ist untersagt.
3. Transport/Montage
3.1. Lager-/Transportbedingungen unvollständigen Maschine
Bei Transport und Lagerung muss die unvollständige Maschine gegen das
Umkippen gesichert werden. Nicht im Freien lagern.
3.2. Anforderungen Transportmittel
Beim Heben der Maschine ist auf die Lage des Schwerpunktes zu achten.
Der Aufenthalt unter der Last ist verboten.
Es sind geeignete Transportmittel zu verwenden.6
4. Inbetriebnahme
4.1. Vor der ersten Inbetriebnahme ist zu prüfen:
1. Die ordnungsgemäße Installation aller Sicherheitseinrichtungen
Deutsch
i und Abdeckungen.
Bei erhöhter Gefahr durch das Transportgut ist eine entsprechende
Schutzvorrichtung vorzusehen und/oder der Gefahrenbereich abzusichern.
2. Nach dem ersten Anlaufen des Bandes ist die Bandgeschwindigkeit,
Bandlauf und Laufrichtung zu prüfen. Um einen sicheren
Betrieb zu gewährleisten, muss die Laufrichtung „ziehend“ sein.
Antriebsseite
Laufrichtung
ziehend7
5. Wartung
Die Sicherheit für den Betreiber und ein störungsfreier Betrieb der Maschine ist nur bei
der Verwendung von Originalmaschinenteilen gewährleistet. Eine korrekte Maschinen-
pflege ist Voraussetzung für einen störungsfreien Betrieb und eine lange Lebensdauer.
Deutsch
Sämtliche Wartungsarbeiten, mit Ausnahme der Einstellung des Bandlaufes und der
Überprüfung der Laufrichtung, dürfen nur im stromlosen Zustand der Maschine
vorgenommen werden.
5.1. Anforderungen Wartungspersonal
Bei Wartungsarbeiten ist die Standsicherheit der Maschine zu gewährleisten.
Die Wartung ist nur durch eine qualifizierte und befugte Fachkraft auszuführen.
5.2. Wartungstabelle
Wartungsstelle Wartungsintervall Tätigkeit
Lager 2 x jährlich Auf Verschleiß prüfen
Optisch auf
Elektroinstallationen 2 x jährlich
Beschädigung prüfen
Zahnriemen Optisch auf
1 x monatlich
(falls vorhanden) Beschädigung prüfen
Optisch auf Verschleiß/
Transportgurt 1 x monatlich
Beschädigung prüfen
Bandlauf und
Transportgurt 1 x monatlich
Laufrichtung prüfen
Antriebszahnräder 2 x jährlich Auf Verschleiß prüfen
Umlenkrollen / Zahnräder 2 x jährlich Auf Verschleiß prüfen
Schraubenverbindung 1 Monat nach
Auf Festigkeit prüfen
nach Erstinbetriebnahme Erstinbetriebnahme
Schraubenverbindungen 1 x jährlich Auf Festigkeit prüfen
5.3. Instandsetzungsarbeiten / Reparatur
Instandsetzungs- bzw. Reparaturarbeiten dürfen nur durch Robotunits oder durch
eine von Robotunits autorisierte Stelle durchgeführt werden.
5.4. Lagerwechsel
Siehe beiliegende Zeichnungen oder auf unserer Homepage:
www.robotunits.com/Produkte/Downloads8
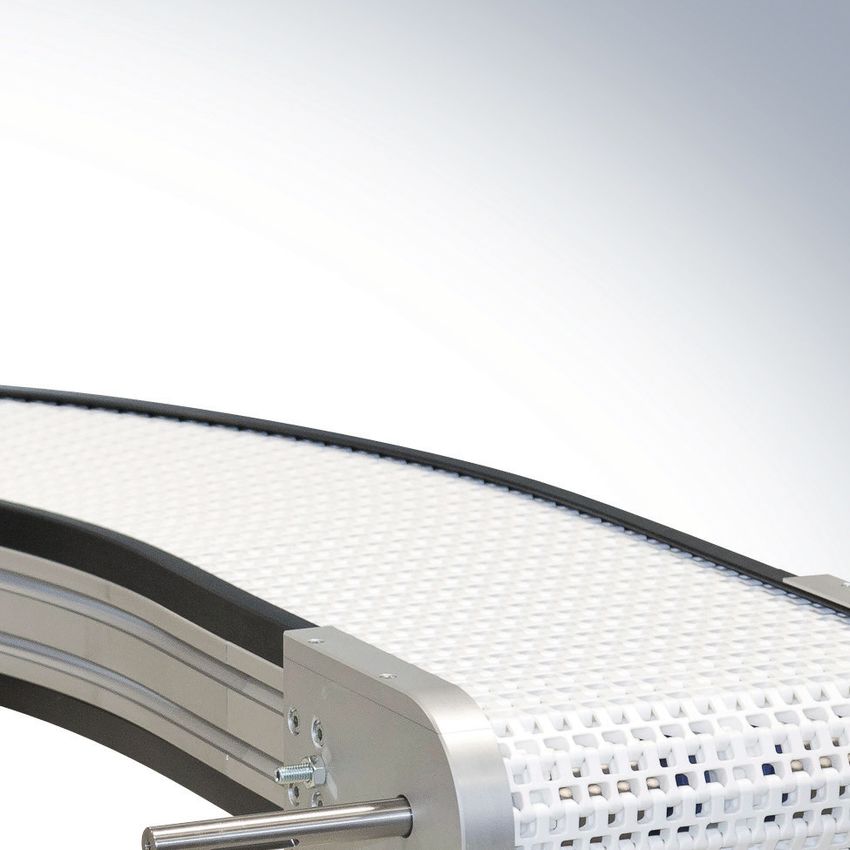
6. Installationshinweis Modulkettenband
6.1. Zahnradausrichtung auf den Wellen
Prüfen Sie anhand der Ausrichtmarke, dass die
Deutsch
entsprechenden Zähne axial ausgerichtet sind. Ist
die Bohrung quadratisch und die Anzahl der Zähne
durch 4 teilbar, so ist eventuell keine Ausrichtmarke
vorhanden.
6.2. Positionierung der Zahnräder
Platzieren Sie die Zahnräder zwischen dem min. und
max. Abstand (a). Halten Sie den seitlichen Zahn-
radabstand XL und XR ein. Der Versatz (e) wird durch
die Wellenkonstruktion vorgegeben. Befestigen Sie
nur das Zahnrad in der Mitte mit geringem Spiel.
Bandtyp Zahnradabstand a Seitlicher Zahnradabstand min.
M2500 min. = 50 mm max. = 100 mm XL = 25 mm XR = 25 mm
6.3. Prüfen des korrekten Zahnradeingriffs
Die Zahnradzähne müssen korrekt in das Band
eingreifen. Die Bandrückseite berührt den Kranz des
Zahnrads.
Prüfen Sie bei Flush Grid-Bändern den korrekten
Zahnradeingriff von der Bandoberfläche.9
6. Installationshinweis Modulkettenband
6.4. Gelenkstab
Der Stab Ø 5 mm mit rund geformtem
Deutsch
Kopf muss ein angefastes Ende besitzen.
6.5. Gelenkstab Anordnung bei Kurven
Linkskurve Rechtskurve S-Kurve
6.6. Einsetzen des Gelenkstabes
• Zusammenfügen der Bandabschnitte
• Für ein einfaches Einsetzen des Stabes muss das Ende angefast sein.
• Schlagen Sie den Stabkopf mit einem Hammer hinein.
Überprüfen Sie, ob der Stabkopf vollständig eingelassen ist.
6.7. Ausbau des Gelenkstabes
Ausbau des Stabs mit Habasit-Stabentfernungs-
werkzeug (Stababzieher) oder Seitenschneider.
Hebeln Sie den Stabkopf heraus
Schneiden Sie den Stabkopf nicht ab!
Das Band darf sich nicht unter Spannung befinden!
Stabentfernung mit Hammer und Durchschlag
Schlagen Sie den Sicherungskopf heraus, indem Sie
auf das Stabende schlagen, das dem Sicherungs-
kopf gegenüberliegt. Stützen Sie dabei die Modul-
kante auf der gegenüberliegenden Seite ab.
Das Band darf sich nicht unter Spannung befinden!10
7. EU-Einbauerklärung
(nach 2006/42/EG vom 09.06.2006, Anhang IIB für den Einbau einer unvollständigen
Maschine)
Deutsch
Wir als Hersteller der unvollständigen Maschine erklären in alleiniger Verantwortung
dass für die nachfolgend bezeichnete Maschine:
- die unten aufgelisteten grundlegenden Anforderungen der Harmonisierungsrechts-
vorschrift 2006/42/EG zur Anwendung kommen und eingehalten werden
- die speziellen technischen Unterlagen gemäss Anhang VII Teil B erstellt wurden
- diese speziellen technischen Unterlagen gemäss Anhang VII Teil B und auf begründetes
Verlangen den einzelstaatlichen Behörden in gedruckten Dokumenten oder elektronisch
(pdf) übermittelt werden
Hersteller: Robotunits GmbH
Dr. Walter Zumtobel Strasse 2
6850 Dornbirn, AUSTRIA
Produkt:
Harmonisierungsrechtsvorschrift (Richtlinie):
2006/42/EG (09.06.2006) Angewandte und erfüllte grundlegende Anforderung:
1.1.2. - 1.1.3., 1.1.5. - 1.1.7., 1.3.1. - 1.3.9., 1.4.1. - 1.4.2., 1.5.1. - 1.5.9., 1.6.1. - 1.6.5., 1.7.1. - 1.7.4.
Bevollmächtigter für die technischen Unterlagen: Robotunits GmbH
Dr. Walter Zumtobel Strasse 2
6850 Dornbirn, AUSTRIA
Diese unvollständige Maschine darf erst dann in Betrieb genommen werden wenn
gegebenenfalls festgestellt wurde, dass die Maschine in die diese unvollständige Ma-
schine eingebaut werden soll, den Bestimmungen der Richtlinie 2006/42/EG entspricht.
Unterzeichnet für und im Namen von: Robotunits GmbH
Dornbirn, 30.09.2018 Christian Beer
Geschäftsführender Gesellschafter11 Deutsch
12
     English
13
Index
1. General. . . . . . . . . . . . . . . . . . . . . . . . . . . . . . . . . . . . . . . . . . . . . . . . . . . . . . . . . . 14
1.1. Manufacturer of the system. . . . . . . . . . . . . . . . . . . . . . . . . . . . . . . . . . . . . . . . . 14
1.2. Intended use . . . . . . . . . . . . . . . . . . . . . . . . . . . . . . . . . . . . . . . . . . . . . . . . . . . . . 14
1.3. Required preconditions / conditions at the site / the installation site for
installing the incomplete machinery:. . . . . . . . . . . . . . . . . . . . . . . . . . . . . . . . . . 14
1.4. History . . . . . . . . . . . . . . . . . . . . . . . . . . . . . . . . . . . . . . . . . . . . . . . . . . . . . . . . . . 14
2. Safety. . . . . . . . . . . . . . . . . . . . . . . . . . . . . . . . . . . . . . . . . . . . . . . . . . . . . . . . . . . 15
2.1. General. . . . . . . . . . . . . . . . . . . . . . . . . . . . . . . . . . . . . . . . . . . . . . . . . . . . . . . . . . 15
2.2. Reasonably foreseeable misuse. . . . . . . . . . . . . . . . . . . . . . . . . . . . . . . . . . . . . . 15
3. Transport / assembly. . . . . . . . . . . . . . . . . . . . . . . . . . . . . . . . . . . . . . . . . . . . . . . 15
3.1. Storage / transport conditions of incomplete machinery . . . . . . . . . . . . . . . . . 15
English
3.2. Requirements for transport materials. . . . . . . . . . . . . . . . . . . . . . . . . . . . . . . . . 15
4. Operating instructions . . . . . . . . . . . . . . . . . . . . . . . . . . . . . . . . . . . . . . . . . . . . . 16
4.1. The following is to be checked before initial operation: . . . . . . . . . . . . . . . . . . 16
5. Maintenance . . . . . . . . . . . . . . . . . . . . . . . . . . . . . . . . . . . . . . . . . . . . . . . . . . . . . 17
5.1. Requirements of maintenance personnel. . . . . . . . . . . . . . . . . . . . . . . . . . . . . . 17
5.2. Maintenance schedule . . . . . . . . . . . . . . . . . . . . . . . . . . . . . . . . . . . . . . . . . . . . . 17
5.3. Courrective maintenance / repairs. . . . . . . . . . . . . . . . . . . . . . . . . . . . . . . . . . . . 17
5.4. Bearing replacement. . . . . . . . . . . . . . . . . . . . . . . . . . . . . . . . . . . . . . . . . . . . . . . 17
6. Installation of Modular Belt Conveyor. . . . . . . . . . . . . . . . . . . . . . . . . . . . . . . . . 18
6.1. Alignment of sprockets. . . . . . . . . . . . . . . . . . . . . . . . . . . . . . . . . . . . . . . . . . . . . 18
6.2. Positioning of sprockets. . . . . . . . . . . . . . . . . . . . . . . . . . . . . . . . . . . . . . . . . . . . 18
6.3. Checking of correct sprocket engagement . . . . . . . . . . . . . . . . . . . . . . . . . . . . . 18
6.4. Rod. . . . . . . . . . . . . . . . . . . . . . . . . . . . . . . . . . . . . . . . . . . . . . . . . . . . . . . . . . . . . 19
6.5. Rod arrangement for curved application. . . . . . . . . . . . . . . . . . . . . . . . . . . . . . . 19
6.6. Insertion of the rod. . . . . . . . . . . . . . . . . . . . . . . . . . . . . . . . . . . . . . . . . . . . . . . . 19
6.7. Extraction of the rod. . . . . . . . . . . . . . . . . . . . . . . . . . . . . . . . . . . . . . . . . . . . . . . 19
7. EU Declaration for Incorporation. . . . . . . . . . . . . . . . . . . . . . . . . . . . . . . . . . . . . 20
Modular Belt Conveyor specific spare parts list. . . . . . . . . . . . . . . . . . . . . . . . . . enclosed
Technical Specifications . . . . . . . . . . . . . . . . . . . . . . . . . . . . . . . . . . . . . . . . . . . . . enclosed14
1. General
1.1. Manufacturer of the system
Robotunits GmbH
Dr. Walter Zumtobel Str. 2
A-6850 Dornbirn
Tel. +43 5572 22000 200
Fax +43 5572 22000 9200
www.robotunits.com
1.2. Intended use
English
The incomplete machine is intended for transport of products or materials
up to a maximum load (see technical attachment).
1.3. Required preconditions / conditions at the site / the installation site for
installing the incomplete machinery:
• Sufficient load capacity to accommodate the conveyor
(weight can be taken from technical data sheet)
• Plane surfaces on the flange positions
• Bores for the screw connections
• Installation position (according to technical data sheet)
• Where required, covering for the drive unit
• Electrical connection values and connection type
(according to technical data sheet)
1.4. History
Version Modification Affected pages
01.00 New installation All15
2. Safety
2.1. General
The security of the operator and trouble-free operation of the incomplete machine
is only guaranteed with the use of original machine parts.
2.2. Reasonably foreseeable misuse
The incomplete machine is not designed for operation at environmental
i temperatures outside 0 to +60 °C. In relation to the atmospheric moisture,
the limit values of protection class IP54 are to be observed.
English
The use of the incomplete machine in explosive atmospheres is prohibited.
3. Transport / assembly
3.1. Storage / transport conditions of incomplete machinery
During transport and storage, the incomplete machinery must be secured
against tipping over. Movable parts (e.g. carriages) must be fixed in position.
Do not store the incomplete machine outdoors.
3.2. Requirements for transport materials
When lifting consider the center of gravity of the machine.
Do not stand under the load.
Be sure to use adequate packaging and transport materials.16
4. Operating instructions
4.1. The following is to be checked before initial operation:
1. All safety devices are correctly installed and functioning properly (covers etc.).
i With an elevated risk due to the transported goods, the appropriate protection
and / or safety guarding is to be fitted.
2. Check the belt speed, belt tracking and belt direction at the start-up of the
conveyor. In order to guarantee a safe operation the belt must always “pull”
the load.
English
drive type
drive
direction17
5. Maintenance
The security of the operator and trouble-free operation of the machine is only guaran-
teed with the use of original machine parts. Proper machine maintenance is essential
for reliable operation and long life.
Any maintenance, with the exception of the tracking of the belt and monitoring of the
driving direction, may only be carried out after the conveyor has been disconnected
from the power supply.
5.1. Requirements of maintenance personnel
English
For maintenance work, the stability of the machine must be ensured.
Any maintenance is only to be carried out by suitably qualified personnel.
5.2. Maintenance schedule
Service point / to do Service interval Info
Bearing 2 x per year Check for wear
Optical check for
Electrical installation 2 x per year
damage
Timing belt Optical check for
1 x per month
(if applicable) damage
Check for wear and/or
Transport belt 1 x per month
damage
Check the tracking and
Transport belt 1 x per month
drive direction
Drive sprockets 2 x per year Check for wear
Idler sprockets 2 x per year Check for wear
Screws / bolts, after the 1x month after initial
Check the tightness
initial operation operation
Screws / bolts 1x per year Check the tightness
5.3. Courrective maintenance / repairs
Repairs of the conveyor may only be carried out by Robotunits or an approved
service center technician appointed by Robotunits.
5.4. Bearing replacement
See the attached drawings or check out our homepage:
www.robotunits.com/Products/Downloads18
6. Installation of Modular Belt Conveyor
6.1. Alignment of sprockets
Check the axial alignment of the sprockets using the
alignment mark. If the bore is square and the num-
ber of sprockets is a multiple of four, the alignment
mark may be missing.
6.2. Positioning of sprockets
Position the sprockets between the min. and max.
English
distance (a). Maintain the lateral distance between
sprockets XL and XR. The offset is determined by the
shaft design. Fasten the center sprocket only with
moderate play.
Belt type sprocket distance a min. lateral sprocket distance
M2500 min. = 50 mm max. = 100 mm XL = 25 mm XR = 25 mm
6.3. Checking of correct sprocket engagement
The sprockets and modular belt must be properly
engaged. The bottom of the belt must touch the
bottom of the sprocket tooth.
Check the correct sprocket engagement of flush
grid belts from the belt top surface.19
6. Installation of Modular Belt Conveyor
6.4. Rod
The rod has a diameter of 5 mm must
have a chamfered end.
6.5. Rod arrangement for curved application
left curve right curve s-curve
English
6.6. Insertion of the rod
• Join the belt sections
• The rod end must have a chamfer for easy insertion
• The round rod head allows the use of a hammer to drive the rod into the belt
Check that rod head is flush with the belt!
6.7. Extraction of the rod
Extraction of the rod with the Habasit extraction
tool or a narrow side cutter.
Pull out the rod
Be careful not to cut off the rod head!
The belt must not be under tension!
Extraction of the rod using a punch and a hammer
Hit the rod with punch and hammer from the op-
posite side. Secure the module edge to avoid link
breakage.
The belt must not be under tension!20
7. EU Declaration for Incorporation
(Translation form the original German document) According to Directive 2006/42/EC,
appendix IIB for incorporation of partly completed machinery
As manufacturer of the partly completed machine we declare under the sole responsi-
bility that:
- the specified machine corresponds to the listed essential requirements of the directive
2006/42/EG, as listed below
- the relevant technical documentation is compiled in accordance with part B of Annex VII
- the relevant technical documentation in accordance with part B of Annex VII will be
transmitted in response to a reasonable request by the national authorities in printed
form or in electronic form (pdf)
English
Manufacturer: Robotunits GmbH
Dr. Walter Zumtobel Strasse 2
6850 Dornbirn, AUSTRIA
Product:
Directive:
2006/42/EG (09.06.2006) Applied and fulfilled essential requirements:
1.1.2. - 1.1.3., 1.1.5. - 1.1.7., 1.3.1. - 1.3.9., 1.4.1. - 1.4.2., 1.5.1. - 1.5.9., 1.6.1. - 1.6.5., 1.7.1. - 1.7.4.
Autorised for technical file: Robotunits GmbH
Dr. Walter Zumtobel Strasse 2
6850 Dornbirn, AUSTRIA
This partly completed machinery must not be put into service until the final machinery
into which it is to be incorporated has been declared in conformity with the provisions
of this Directive 2006/42/EG, where appropriate.
Signed for and on behalf of: Robotunits GmbH
Dornbirn, 30.09.2018 Christian Beer
Geschäftsführender Gesellschafter21 English
22
     Français
23
Sommaire
1. Généralités. . . . . . . . . . . . . . . . . . . . . . . . . . . . . . . . . . . . . . . . . . . . . . . . . . . . . . . 24
1.1. Fabricant de l'installation. . . . . . . . . . . . . . . . . . . . . . . . . . . . . . . . . . . . . . . . . . . 24
1.2. Utilisation prévue . . . . . . . . . . . . . . . . . . . . . . . . . . . . . . . . . . . . . . . . . . . . . . . . . 24
1.3. Conditions préalables nécessaires sur le site pour le montage
de la machine incomplète :. . . . . . . . . . . . . . . . . . . . . . . . . . . . . . . . . . . . . . . . . . 24
1.4. Historique. . . . . . . . . . . . . . . . . . . . . . . . . . . . . . . . . . . . . . . . . . . . . . . . . . . . . . . . 24
2. Sécurité . . . . . . . . . . . . . . . . . . . . . . . . . . . . . . . . . . . . . . . . . . . . . . . . . . . . . . . . . 25
2.1. Généralités. . . . . . . . . . . . . . . . . . . . . . . . . . . . . . . . . . . . . . . . . . . . . . . . . . . . . . . 25
2.2. Utilisation incorrecte raisonnablement prévisible. . . . . . . . . . . . . . . . . . . . . . . 25
3. Transport/Montage . . . . . . . . . . . . . . . . . . . . . . . . . . . . . . . . . . . . . . . . . . . . . . . . 25
3.1. Conditions de transport/stockage de la machine incomplète. . . . . . . . . . . . . . 25
3.2. Exigences pour le moyen de transport. . . . . . . . . . . . . . . . . . . . . . . . . . . . . . . . 25
4. Mise en service . . . . . . . . . . . . . . . . . . . . . . . . . . . . . . . . . . . . . . . . . . . . . . . . . . . 26
4.1. À vérifier avant la première mise en service : . . . . . . . . . . . . . . . . . . . . . . . . . . 26
5. Maintenance . . . . . . . . . . . . . . . . . . . . . . . . . . . . . . . . . . . . . . . . . . . . . . . . . . . . . 27
5.1. Exigences concernant le personnel d'entretien. . . . . . . . . . . . . . . . . . . . . . . . . 27
5.2. Tableau des opérations d'entretien. . . . . . . . . . . . . . . . . . . . . . . . . . . . . . . . . . . 27
5.3. Opérations d’entretien et maintenance corrective. . . . . . . . . . . . . . . . . . . . . . . 27
5.4. Changement de palier. . . . . . . . . . . . . . . . . . . . . . . . . . . . . . . . . . . . . . . . . . . . . . 27
Français
6. Notice d’installation d’un convoyeur à bande modulaire. . . . . . . . . . . . . . . . . . . . 28
6.1. Alignement des roues dentées sur l’axe. . . . . . . . . . . . . . . . . . . . . . . . . . . . . . . 28
6.2. Positionnement des roues dentées. . . . . . . . . . . . . . . . . . . . . . . . . . . . . . . . . . . 28
6.3. Contrôle du bon engrènement des roues dentées. . . . . . . . . . . . . . . . . . . . . . . 28
6.4. Axe d’assemblage de maillons modulaires . . . . . . . . . . . . . . . . . . . . . . . . . . . . 29
6.5. Position de l’axe d’assemblage dans les courbes . . . . . . . . . . . . . . . . . . . . . . . 29
6.6. Installation axe d’assemblage de maillons modulaires. . . . . . . . . . . . . . . . . . . 29
6.7. Démontage d’axe d’assemblage de maillons modulaires. . . . . . . . . . . . . . . . . 29
7. Déclaration d‘incorporation UE. . . . . . . . . . . . . . . . . . . . . . . . . . . . . . . . . . . . . . 30
Liste de pièces de rechanges spécifiques au convoyeur à bande modulaire. . . . . . jointe
Documents techniques. . . . . . . . . . . . . . . . . . . . . . . . . . . . . . . . . . . . . . . . . . . . . . . . . jointe24
1. Généralités
1.1. Fabricant de l'installation
Robotunits GmbH
Dr. Walter Zumtobel Str. 2
A-6850 Dornbirn
Tél. +43 5572 22000 200
Fax +43 5572 22000 9200
www.robotunits.com
1.2. Utilisation prévue
La machine incomplète est destinée au transport de produit d‘une charge
maximale ( voir annexe technique)
1.3. Conditions préalables nécessaires sur le site pour le montage de la machine
incomplète :
Français
• Capacité de charge suffissante pour le convoyeur
(poids consultable dans les Caractéristiques techniques)
• Surface plane pour la bride
• Alésages pour le vissage
• Emplacement de montage (voir caractéristiques techniques)
• Si nécessaire, protection de l‘unité motorisée
• Type et valeurs de raccordement électrique (voir caractéristiques techniques)
1.4. Historique
Version Motif de modification Pages concernées
01.00 Création Toutes25
2. Sécurité
2.1. Généralités
La sécurité pour les utilisateurs ainsi qu'un fonctionnement sans pannes de la
machine incomplète ne sont garantis qu'en cas d'utilisation de pièces d'origine.
2.2. Utilisation incorrecte raisonnablement prévisible
La machine incomplète n'est pas conçue pour des températures ambiantes hors de
i la plage de 0 à + 60 °C. Concernant l'humidité de l'air, les valeurs de la classe de
protection IP54 doivent être respectées.
L‘utilisation de machine incomplète dans une zone de risque explosive est interdite
3. Transport/Montage
3.1. Conditions de transport/stockage de la machine incomplète
Français
En cas de transport ou de stockage, la machine incomplète doit être protégée
des basculements. Les pièces mobiles (par ex. les chariots) doivent être fixées.
Ne pas stocker à l'air libre.
3.2. Exigences pour le moyen de transport
Lors du levage de la machine, veiller à l’emplacement du centre de gravité.
Il est interdit de séjourner sous la charge.
Des moyens de transport adaptés doivent être utilisés.26
4. Mise en service
4.1. À vérifier avant la première mise en service :
1. Mise en place dans les règles des dispositifs de sécurité et des capots.
i Prévoir des mesures de sécurité supplémentaires adéquates si les produits
transportés présentent un danger.
2. Après le premier démarrage de la bande, vérifier la vitesse, le centrage de la
bande et le sens de marche. Pour assurer un fonctionnement sans incident, la
bande doit avancer « en tirant »
côté entraînement
sens de circulation
en tirant
Français27
5. Maintenance
Utiliser des pièces de rechange d'origine constructeur pour assurer la fiabilité de
fonctionnement de la machine et une exploitation sans incident. Une longue durée de
service suppose un entretien suivi et effectué dans les règles.
N'intervenir pour les opérations d'entretien ou de maintenance que la machine hors
tension (sauf pour le réglage de la bande et le contrôle du sens de marche)
5.1. Exigences concernant le personnel d'entretien
Vérifier que la machine est dans un état sûr lors des opérations d'entretien ou de
maintenance. Les opérations seont assurées par du personnel qualifié.
5.2. Tableau des opérations d'entretien
tableau des opérations
périodicité action
d'entretien
palier 2 fois par an vérifier si usure
Français
équipements électriques 2 fois par an vérifier l'absence de dommage
courroie crantée (si installée) 1 fois par mois vérifier l'absence de dommage
vérifier visuellement si usure
bande transporteuse 1 fois par mois
ou dommage
vérifier le sens et la bonne
bande transporteuse 1 fois par mois
circulation de la bande
Roues d’entraînement
2 fois par an contrôler l’usure
dentées
Axe de renvoi / roues
2 fois par an contrôler l’usure
dentées
fixations vissées après la 1 mois après la première vérifier le serrage, la tenue
première mise en service mise en service mécanique
vérifier le serrage, la tenue
fixations vissées 1 fois par an
mécanique
5.3. Opérations d’entretien et maintenance corrective
Les interventions pour maintenance corrective, réparation seront assurées
exclusivement par la société Robotunits ou son représentant autorisé.
5.4. Changement de palier
Voir les plans joints ou consultez notre page internet:
www.robotunits.com/Produits/Téléchargements28
6. Notice d’installation d’un convoyeur à bande modulaire
6.1. Alignement des roues dentées sur l’axe
Vérifier à l’aide du symbole d’alignement, que les
roues dentées soient en bonne position axiale. Si
l’axe des roues est quadratique et que le nombre
de dents est divisible par 4, il est possible qu’aucun
symbole d’alignement soit représenté.
6.2. Positionnement des roues dentées
Positionner les roues dentées entre l’entraxe mini et
maxi (a). Respecter l’écartement XL et XR. Le déport
(e) est induit par la construction de l’axe. Ne fixer
que la roue au centre avec un jeu minimum.
Type de bande Entraxe roues a Entraxe latéral min.
M2500 min. = 50 mm max. = 100 mm XL = 25 mm XR = 25 mm
Français
6.3. Contrôle du bon engrènement des roues dentées
Les roues dentées doivent parfaitement s’engrener
dans la bande. La face intérieure de la bande doit
entre en contact avec la roue.
Sur des bandes Flush, vérifier la bonne mise en
place à partir de l’extérieur de la bande.29
6. Notice d’installation d’un convoyeur à bande modulaire
6.4. Axe d’assemblage de maillons modulaires
L’axe Ø 5 mm avec une tête arrondie
doit avoir un bout chanfreiné.
6.5. Position de l’axe d’assemblage dans les courbes
Courbe Courbe Courbe
à gauche à droite en S
6.6. Installation axe d’assemblage de maillons modulaires
• Assemblage des éléments de la bande
• Pour un assemblage facile de l’axe, un bout de celui-ci doit être chanfreiné.
Français
• Emmancher l’axe à l’aide d’un coup de marteau.
Vérifier si la tête de l’axe est complètement emmanchée !
6.7. Démontage d’axe d’assemblage de maillons modulaires
Démontage de l’axe avec un outil spécifique
d’Habasit ou une pince coupante.
Sortir l’axe en faisant levier
Veuillez à ne pas couper la tête!
La bande ne doit pas être tendue!
Démontage de l’axe avec marteau et chasse-goupille
Frapper sur l’axe du coté opposé de la tête de l’axe.
Mettre en butée la bande du coté opposé.
La bande ne doit pas être tendue!30
7. Déclaration d‘incorporation UE
(Traduction de l‘original en allemand) selon la directive 2006/42/CE du 09/06/2006,
Annexe IIB pour l‘incorporation d‘une quasi-machine
En tant que fabricant de la quasi-machine, nous déclarons sous notre seule responsabilité,
que pour la machine désignée ci-après :
- Les exigences fondamentales mentionnées ci-après des dispositions réglementaires
d‘harmonisation 2006/42/CE ont été appliquées et respectées
- La documentation technique spécifique a été constituée conformément à l‘annexe VII B
- Cette documentation technique spécifique conforme à l‘annexe VII B est transmise sur
demande motivée des autorités compétentes du pays sous format papier ou
électronique (pdf)
Fabricant: Robotunits GmbH
Dr. Walter Zumtobel Strasse 2
6850 Dornbirn, AUTRICHE
Produit:
Français
Disposition réglementaire d‘harmonisation (directive) :
2006/42/CE (09/06/2006) Exigences fondamentales appliquées et remplies :
1.1.2. - 1.1.3., 1.1.5. - 1.1.7., 1.3.1. - 1.3.9., 1.4.1. - 1.4.2., 1.5.1. - 1.5.9., 1.6.1. - 1.6.5., 1.7.1. - 1.7.4.
Responsable de la documentation technique : Robotunits GmbH
Dr. Walter Zumtobel Strasse 2
6850 Dornbirn, AUTRICHE
La quasi-machine ne doit pas être mise en service avant que la machine finale dans
laquelle elle doit être incorporée ait été déclarée conforme aux dispositions de la
directive 2006/42/CE.
Signé pour et au nom de : Robotunits GmbH
Dornbirn, le 30.09.2018 Christian Beer
Associé gérant31 Français
32
     Italiano
33
Sommario
1. Condizioni generali. . . . . . . . . . . . . . . . . . . . . . . . . . . . . . . . . . . . . . . . . . . . . . . . 34
1.1. Produttore . . . . . . . . . . . . . . . . . . . . . . . . . . . . . . . . . . . . . . . . . . . . . . . . . . . . . . . 34
1.2. Descrizione ed utilizzo. . . . . . . . . . . . . . . . . . . . . . . . . . . . . . . . . . . . . . . . . . . . . . 34
1.3. Prescrizioni richieste / condizioni per il montaggio / luogo del montaggio. . . 34
1.4. Legenda. . . . . . . . . . . . . . . . . . . . . . . . . . . . . . . . . . . . . . . . . . . . . . . . . . . . . . . . . 34
2. Sicurezza . . . . . . . . . . . . . . . . . . . . . . . . . . . . . . . . . . . . . . . . . . . . . . . . . . . . . . . . 35
2.1. Generale. . . . . . . . . . . . . . . . . . . . . . . . . . . . . . . . . . . . . . . . . . . . . . . . . . . . . . . . . 35
2.2. Utilizzo previsto. . . . . . . . . . . . . . . . . . . . . . . . . . . . . . . . . . . . . . . . . . . . . . . . . . . 35
3. Trasporto/montaggio. . . . . . . . . . . . . . . . . . . . . . . . . . . . . . . . . . . . . . . . . . . . . . . 35
3.1. Condizioni per lo stoccaggio ed il trasporto. . . . . . . . . . . . . . . . . . . . . . . . . . . . 35
3.2. Requisiti per il trasporto. . . . . . . . . . . . . . . . . . . . . . . . . . . . . . . . . . . . . . . . . . . . 35
4. Messa in servizio. . . . . . . . . . . . . . . . . . . . . . . . . . . . . . . . . . . . . . . . . . . . . . . . . . 36
4.1. Alla prima messa in servizio bisogna controllare: . . . . . . . . . . . . . . . . . . . . . . . 36
5. Manutenzione . . . . . . . . . . . . . . . . . . . . . . . . . . . . . . . . . . . . . . . . . . . . . . . . . . . . 37
5.1. Requisiti dell'addetto alla manutenzione . . . . . . . . . . . . . . . . . . . . . . . . . . . . . . 37
5.2. Tabella per le manutenzioni. . . . . . . . . . . . . . . . . . . . . . . . . . . . . . . . . . . . . . . . . 37
5.3. Lavori di ripristino / riparazione. . . . . . . . . . . . . . . . . . . . . . . . . . . . . . . . . . . . . . 37
5.4. Sostituzione cuscinetti . . . . . . . . . . . . . . . . . . . . . . . . . . . . . . . . . . . . . . . . . . . . . 37
6. Indicazioni per il montaggio del tappeto modulare. . . . . . . . . . . . . . . . . . . . . . 38
6.1. Allineamento dei pignoni sugli alberi. . . . . . . . . . . . . . . . . . . . . . . . . . . . . . . . . 38
6.2. Posizionamento dei pignoni. . . . . . . . . . . . . . . . . . . . . . . . . . . . . . . . . . . . . . . . . 38
6.3. Controllo del corretto ingranamento dei pignoni. . . . . . . . . . . . . . . . . . . . . . . . 38
6.4. Perno di fissaggio. . . . . . . . . . . . . . . . . . . . . . . . . . . . . . . . . . . . . . . . . . . . . . . . . 39
6.5. Posizionamento perni nelle curve. . . . . . . . . . . . . . . . . . . . . . . . . . . . . . . . . . . . 39
6.6. Montaggio del perno di fissaggio . . . . . . . . . . . . . . . . . . . . . . . . . . . . . . . . . . . . 39
6.7. Smontaggio del perno di fissaggio. . . . . . . . . . . . . . . . . . . . . . . . . . . . . . . . . . . 39
7. Dichiarazione di incorporazione UE. . . . . . . . . . . . . . . . . . . . . . . . . . . . . . . . . . . 40
Italiano
Nastro trasportatore modulare: lista ricambi specifica . . . . . . . . . . . . . . . . . . . . . allegata
Documentazione tecnica. . . . . . . . . . . . . . . . . . . . . . . . . . . . . . . . . . . . . . . . . . . . . . allegata34
1. Condizioni generali
1.1. Produttore
Robotunits GmbH
Dr. Walter Zumtobel Str. 2
A-6850 Dornbirn
Tel. +43 5572 22000 200
Fax +43 5572 22000 9200
www.robotunits.com
1.2. Descrizione ed utilizzo
La quasi macchina supporta un carico ffino ad un massimo di (vedi allegato
tecnico).
1.3. Prescrizioni richieste / condizioni per il montaggio / luogo del montaggio
• Sufficiente portata per l‘inserimento del nastro trasportatore
(il peso si evince dalla scheda tecnica)
• Superficie piana per il punto d‘attacco alla flangia
• Forature per l‘avvitamento
• Posizione per il montaggio (vedi dati tecnici)
• Se necessario mettere delle coperture sull‘azionamento
• Dati e tipologie di collegamenti elettrici (vedi scheda tecnica)
Italiano
1.4. Legenda
Versione Modifiche Pagine interessate
01.00 Nuova installazione Tutte35
2. Sicurezza
2.1. Generale
La sicurezza dell‘operatore ed il funzionamento corretto della quasi-macchina è
garantita solamente con l‘utilizzo di parti di ricambio originali.
2.2. Utilizzo previsto
La quasi macchina non è concepita per l‘uso in ambienti di lavoro con temperature
i al di fuori dei 0° C fino ai +60°C. Pe quanto riguarda l‘umidità dell‘aria sono da man-
tenere i limiti inidicati dalla classe di protezione IP54.
E‘ vietato l‘utilizzo delle quasi macchine in ambienti a rischio esplosioni.
3. Trasporto/montaggio
3.1. Condizioni per lo stoccaggio ed il trasporto
Per il trasporto e lo stoccaggio della quasi-macchina bisogna accertarsi che non
si capovolga. Parti mobili (p. es. i carrelli) devono essere fissati. Non stoccare
all‘aperto.
3.2. Requisiti per il trasporto
Durante il sollevamento della macchina tenere in considerazione la posizione del
Italiano
baricentro. È vietato sostare sotto al carico.
Bisogna utilizzare mezzi di trasporti idonei.36
4. Messa in servizio
4.1. Alla prima messa in servizio bisogna controllare:
1. L'installazione a regola d'arte di tutti i dispositivi di sicurezza e coperture.
i In caso di elevato rischio dovuto alla merce trasportata va prevista una ade-
guata barriera di protezione e/o messa in sicurezza della zona di pericolo.
2. Dopo la prima messa in funzione del nastro bisogna controllare la velocità, la
traslazione e la direzione del tappeto. Per garantire il corretto funzionamento,
la direzione deve essere “in trazione”.
Lato azionamento
Direzione
in trazione
Italiano37
5. Manutenzione
La sicurezza dell'utilizzatore e il buon funzionamento del macchinario si ottengono
solamente utilizzando pezzi di ricambio originali. Una buona manutenzione è prerogativa
per un buon servizio e lunga durata.
Tutti i lavori di manutenzione ad eccezione della taratura della traslazione del tappeto e
della verifica della direzione, devono essere eseguiti solo dopo aver tolto la corrente al
macchinario.
5.1. Requisiti dell'addetto alla manutenzione
Durante i lavori di manutenzione è necessario garantire la stabilità della macchina.
La manutenzione deve essere fatta da personale qualificato ed autorizzato.
5.2. Tabella per le manutenzioni
Oggetto della manutenzione Periodo Attività
Cuscinetto semestrale Controllo usura
Parti elettriche semestrale Controllo visivo danni
Cinghie dentate
mensile Controllo visivo danni
(se presenti)
Controllo visivo per
Tappeto mensile
usura e danni
Verificare la traslazione
Tappeto mensile
del tappeto e la direzione
Pignoni lato motore semestrale Controllo usura
Italiano
Pignoni lato rinvio / rulli folli semestrale Controllo usura
Regolazione delle viti dopo 1 mese dopo la prima
Verificare la solidità
la prima messa in servizio messa in servizio
Regolazione delle viti annuale Verificare la solidità
5.3. Lavori di ripristino / riparazione
I lavori di ripristino oppure di riparazione devono essere eseguiti da personale
della Robotunits oppure autorizzato dalla Robotunits.
5.4. Sostituzione cuscinetti
Come da disegno allegato oppure nella nostra homepage:
www.robotunits.com/Prodotti/Downloads38
6. Indicazioni per il montaggio del tappeto modulare
6.1. Allineamento dei pignoni sugli alberi
Verificare che i denti dei pignoni siano in fase medi-
ante il riferimento dell’allineamento, se il numero di
denti è multiplo di 4 è possibile qualsiasi orientazi-
one del pignone sull’albero, pertanto potrebbe non
esserci alcun riferimento sul pignone.
6.2. Posizionamento dei pignoni
Posizionare i pignoni ad una distanza (a) compresa
tra la minima e la massima. Rispettare le distanze
dal bordo XL e XR. Fissare solo il pignone centrale
lasciando un minimo gioco.
Tipo catena distanza tra i pignoni a distanza dal bordo minima
M2500 min. = 50 mm max. = 100 mm XL = 25 mm XR = 25 mm
6.3. Controllo del corretto ingranamento dei pignoni
Il dente del pignone deve agganciarsi correttamente
alla cerniera.Il retro del tappeto modulare tocca la
corona del pignone.
Italiano
Nel caso di tappeti modulari Flush Grid, controllare
il corretto inserimento del pignone dalla superficie
del tappeto.39
6. Indicazioni per il montaggio del tappeto modulare
6.4. Perno di fissaggio
Il perno di fissaggio è da Ø 5 mm con
testa arrotondata ed estremità smussata.
6.5. Posizionamento perni nelle curve
Curva sinistra Curva destra Curva ad S
6.6. Montaggio del perno di fissaggio
• avvicinamento delle sezioni del nastro
• inserire il perno e per agevolarne l’installazione, l’estremità del perno deve
essere smussata
• battere il martello sulla testa del perno
Controllare che la testa del perno sia totalmente inserita nel nastro!
Italiano
6.7. Smontaggio del perno di fissaggio
La rimozione del perno può essere eseguita mediante
un apposito strumento (estrattore) o una pinza.
Non tagliare la testa del perno.
Fare leva sulla testa del perno per rimuoverlo.
L’operazione deve essere effettuata con il nastro
non in tesione!
Rimozione del perno con martello e punteruolo
Il perno deve essere estratto dalla sede agendo
sulla sua estremità priva di testa Bloccare i moduli
presenti sul bordo opposto del nastro.
L’operazione deve essere effettuata con il nastro
non in tensione!40
7. Dichiarazione di incorporazione UE
(Traduzione dell‘originale tedesco) conformemente alla 2006/42/CE del 09/06/2006,
appendice IIB per l‘incorporazione di una quasi-macchina
In qualità di costruttori della quasi-macchina dichiariamo sotto la nostra esclusiva
responsabilità che per la macchina denominata di seguito:
- vengono applicati e rispettati i requisiti fondamentali indicati sotto della normativa
di armonizzazione 2006/42/CE
- la documentazione tecnica specifica è stata redatta conformemente all‘appendice
VII parte B
- tale documentazione tecnica specifica redatta conformemente all‘appendice
VII parte B viene trasmessa sotto forma di documenti stampati o in formato elettrico
(pdf) alle autorità nazionali dietro richiesta motivata
Costruttore: Robotunits GmbH
Dr. Walter Zumtobel Strasse 2
6850 Dornbirn, AUSTRIA
Prodotto:
Normativa (Direttiva) di armonizzazione:
2006/42/CE (09/06/2006) Requisiti fondamentali applicati e soddisfatti:
Italiano
1.1.2. - 1.1.3., 1.1.5. - 1.1.7., 1.3.1. - 1.3.9., 1.4.1. - 1.4.2., 1.5.1. - 1.5.9., 1.6.1. - 1.6.5., 1.7.1. - 1.7.4.
Incaricata della compilazione Robotunits GmbH
della documentazione tecnica: Dr. Walter Zumtobel Strasse 2
6850 Dornbirn, AUSTRIA
Questa quasi-macchina può essere messa in funzione soltanto quando è stato even-
tualmente constatato che la macchina nella quale tale quasi-macchina deve essere
incorporata è conforme alle disposizioni della Direttiva 2006/42/CE.
Firmato in nome e per conto di: Robotunits GmbH
Dornbirn, 30.09.2018 Christian Beer
Socio e amministratore41 Italiano
42
Italiano

                Wir behalten uns vor, technische Änderungen jederzeit durchzuführen.
                Für Satz- und Druckfehler übernehmen wir keine Haftung.

                We reserve the right to alter technical specifications at any time.
                We assume no liability for typing and printing errors.

                Nous nous reservons la possibilité de proceder à des modifications techniques à tout moment.
                Nous déclinons toute responsabilité pour d‘éventuelles erreurs de texte et d‘imprimerie.

                Ci riserviamo di fare modifiche tecniche in ogni momento.
                Non ci prendiamo responsabilità alcuma per errori di scrittura e/o di stampa.
D/CH/FR/A: Italia: Robotunits GmbH Robotunits Italia S.r.l. Dr. Walter Zumtobel Str. 2 Z.I. di Cima Gogna 68 A-6850 Dornbirn 32041 Auronzo di Cadore (BL) T +43/5572/22000-200 T +39/0435/409928 F +43/5572/22000-9200 F +39/0435/408819 e-mail: austria@robotunits.com e-mail: info.ita1@robotunits.com www.robotunits.com www.robotunits.com USA: Australia: Robotunits INC. Robotunits Pty Ltd. 8 Corporate Drive 23 Barrie Road Cranbury, NJ 08512 Tullamarine VIC 3043 T +1/732/438-0500 T +61/3/9334 5182 F +1/732/438-0509 F +61/3/9334 5264 e-mail: info.usa1@robotunits.com e-mail: info.aus1@robotunits.com www.robotunits.com www.robotunits.com.au
Sie können auch lesen


