Linear SE Linear SE USB - Lehmannaudio
←
→
Transkription von Seiteninhalten
Wenn Ihr Browser die Seite nicht korrekt rendert, bitte, lesen Sie den Inhalt der Seite unten
DE

                                                                                        EN

                                                                                        FR

                                                                                        ES

                                                                                        IT

   Linear SE
   Linear SE USB
   Kopfhörerverstärker
   Headphone Amplifier/Amplificateur Casques
   Amplificador de cascos/Amplificatore per cuffia

Bedienungsanleitung/Manual/Mode d‘emploi/Manual de instrucciones/Istruzioni per l’uso
Linear SE 3
DE
Inhalt Vorwort
2 | Inhalt
Verehrter Kunde,
3 | Vorwort
herzlichen Dank für das Vertrauen, das Sie uns mit dem Kauf des Linear SE
4 | Sicherheitshinweise
entgegengebracht haben. Der Linear SE ist ein äußerst sorgfältig handge-
10 | Installation arbeiteter Kopfhörer- und Vorverstärker zum Anschluss an Line-Ausgänge
von handelsüblichen HiFi-Geräten. Wie all unsere Produkte wurde auch
12 | Funktionsbeschreibung: Anschlüsse und Bedienelemente
er in Deutschland entwickelt und hergestellt. Seit der Firmengründung im
16 | Einstellung der Maximalverstärkung Jahr 1988 stehen wir für erstklassige Geräte, die stets dem Originalklang
verpflichtet sind und mit Liebe zum Detail gefertigt werden. Aufgrund
18 | Anwendungsbeispiele
bester Komponenten und eines ausgeklügelten Schaltungsdesigns können
20 | Gerätevariante Linear SE USB wir Hörgenuss auf überragendem Niveau garantieren. Industriellen
Massenprodukten ist der Linear SE in jeder Hinsicht überlegen. Er erfüllt
24 | Technische Daten
die höchsten Ansprüche an detailgetreue Musikwiedergabe über praktisch
25 | Zubehör alle gebräuchlichen Kopfhörer. Unsere Klangsensation kann außerdem
simultan zwei Kopfhörer gleicher Impedanz speisen – natürlich mit
26 | Fehlersuche
gleichbleibend fabelhaftem Hörerlebnis. Für die Musikwiedergabe über PC,
29 | Rechtliche Hinweise iPad und Co. bietet der Linear SE mit seiner optionalen USB-Variante eine
Lösung. Durch seine attraktiven Gehäusevariationen können Sie ihn zu
Auch wenn Sie schon Kopfhörerverstärker anderer Hersteller betrieben haben, Ihrem ganz persönlichen Juwel gestalten.
lesen Sie bitte vor der Inbetriebnahme des Linear SE/Linear SE USB die Bedie-
nungsanleitung genau durch und bewahren Sie diese für künftigen Gebrauch Weitere Informationen finden Sie in der vorliegenden Bedienungsanleitung
in der Nähe des Gerätes auf! sowie auf unserer Webseite unter www.lehmannaudio.com.
Freuen Sie sich nun auf Ihre Musik, die mit dem Linear SE genauso klingt,
wie Sie es sich wünschen: ausgewogen, dynamisch und voller Klangfülle!
Lehmannaudio Vertriebs GmbH Ihr Norbert Lehmann
Waltherstraße 49 – 51 info@lehmannaudio.de Geschäftsführer
51069 Köln www.lehmannaudio.de
Tel.: +49 (0)221 – 29 49 33 20 www.facebook.de/lehmannaudio
Fax: +49 (0)221 – 29 49 33 19 www.twitter.com/lehmannaudio4 Linear SE Linear SE 5
DE DE
Wichtige Sicherheitshinweise Allgemeine Sicherheitshinweise
In diesem Handbuch werden hierarchische Warnhinweise verwendet. Warnhin-
weise sind fett gedruckt und zusätzlich durch ein Symbol (Warnzeichen) im Text Achtung!
gekennzeichnet und hervorgehoben. Lesen Sie vor Inbetriebnahme des Gerätes alle Sicherheits- und
Bedienungshinweise.
Die Warnhinweise sind hierarchisch nach folgender Ordnung eingestuft:
1. WARNUNG! Aufbewahrung
2. ACHTUNG! Bewahren Sie die Sicherheits- und Bedienungshinweise zum späteren Nachschla-
3. HINWEIS! gen auf.
Warnhinweise
Dieses Symbol verweist auf wichtige Bedienungs- und Wartungs- Beachten Sie alle Warnhinweise, die auf dem Gerät aufgedruckt oder in der
hinweise in der Begleitdokumentation. Bitte lesen Sie in der Bedienungsanleitung angegeben sind.
Bedienungsanleitung nach.
Bedienungshinweise
Folgen Sie allen Bedienungs- und Anwendungshinweisen.
Dieses Symbol verweist auf das Vorhandensein einer nicht
isolierten und gefährlichen Spannung im Inneren des Gerätes und Wärme
auf eine Gefährdung durch lebensgefährlichen Stromschlag. Das Gerät darf nicht in der Nähe von Wärmequellen, wie Heizkörpern, Wärme-
speichern, Öfen oder anderen wärmeerzeugenden Geräten (z. B. Verstärker),
aufgestellt werden.
Dieses Symbol verweist auf zusätzliche Informationen in der
Bedienungsanleitung. Hier finden Sie ergänzende Informationen, Belüftung
Empfehlungen und Tipps zum Gebrauch des Produktes. Verdecken Sie keine Lüftungsschlitze am Gerät und sorgen Sie beim Einbau in
ein Rack für eine ausreichende Belüftung. Beachten Sie bei der Installation des
Gerätes stets die entsprechenden Hinweise des Herstellers.
Wasser und Feuchtigkeit
Setzen Sie das Gerät nicht Regen aus und betreiben Sie es nicht in unmittelbarer
Nähe von Wasser (Badewanne, Schwimmbecken usw.) oder bei hoher Luftfeuch-
tigkeit (Kondensation).6 Linear SE Linear SE 7
DE DE
Eindringen von Flüssigkeiten Netzkabel
Stellen Sie sicher, dass kein Tropf- oder Spritzwasser ins Geräteinnere eindringen Verwenden Sie ausschließlich Netzkabel, welche in Ihrem Land zugelassen sind.
kann. Platzieren Sie keine mit Flüssigkeiten gefüllten Objekte, wie Vasen oder Das Netzkabel muss für das Produkt und die entsprechende Leistungsaufnahme
Trinkgefäße, auf dem Gerät. (Spannung/Strom) ausgelegt sein, wie auf dem Gerätelabel und in der Bedie-
nungsanleitung angegeben.
Stromversorgung
Betreiben Sie das Gerät nur mit der auf dem Gerätelabel oder in der Bedienungs- Gewitter
anleitung angegebenen Netzspannungen. Sollten Sie nicht sicher sein, welche Ziehen Sie zum Schutz gegen Blitzschlag und Überspannung den Netzstecker.
Netzspannung bei Ihnen vorhanden ist, fragen Sie Ihr örtliches Stromversor-
gungsunternehmen. Elektrische Überlastung
Überschreiten Sie nicht den maximalen Laststrom für Steckdosen, Verlänge-
Sicherung rungskabel oder eingebaute Stromverteilern. Eine Überlastung kann zu einem
Verwenden Sie nur Sicherungen vom gleichen Typ und gleichen Kenndaten, wie Brand führen.
vom Hersteller vorgeschrieben. Lesen Sie dazu in der Bedienungsanleitung nach!
Brandquellen
Stellen Sie keine offenen Brandquellen, wie z. B. brennende Kerzen, auf das Gerät.
Erdung/Polung
Zubehör
Verwenden Sie mit dem Gerät ausschließlich Zubehör/Erweiterungen, die vom
Achtung! Hersteller hierfür vorgesehen sind.
Gerät nur an Netzsteckdose mit Schutzleiteranschluss und rich-
tiger Polung betreiben. Setzen Sie die Funktion des Schutzleiter- Montage
anschlusses am mitgelieferten Netzanschlusskabel nicht außer Betreiben Sie das Gerät nur in einer sicheren, ebenen Position auf einem Tisch,
Kraft. Sollte der Stecker des mitgelieferten Kabels nicht in Ihre Wagen oder dafür vorgesehenen Stativ. Vermeiden Sie einen Fall des Gerätes, da
Netzsteckdose passen, setzen Sie sich mit Ihrem Elektriker in dies zu Verletzungen an Personen und Schäden am Gerät führen kann. Achten Sie
Verbindung. beim Einbau des Gerätes darauf, dass der Netzstecker leicht zugänglich bleibt.
Reinigung
Netzkabelschutz Verwenden Sie zum Reinigen des Gerätes ausschließlich ein trockenes Tuch.
Schützen Sie das Stromkabel vor Tritteinwirkung und Quetschung, insbesondere
am Gerätestecker, der Verlängerung und beim Kabelabgang am Gerät. Nichtgebrauch
Ziehen Sie bei längerem Nichtgebrauch des Gerätes den Netzstecker.8 Linear SE Linear SE 9
DE DE
Service
Alle Servicearbeiten und Reparaturen sind von einem autorisierten Kundendienst- Achtung!
techniker auszuführen. Mit Kopfhörern können Lautstärken erreicht werden, die gesund-
heitsschädlich sind. Vergewissern Sie sich deshalb immer vor dem
Servicearbeiten sind notwendig, sobald das Gerät auf irgendeine Weise beschä-
Aufsetzen Ihres Kopfhörers, dass die gewählte Lautstärke nicht
digt wurde, z. B. wenn
zu hoch ist.
≠
Netzkabel oder Netzstecker beschädigt wurden,
≠
Flüssigkeit oder ein Gegenstand in das Gerät eingedrungen ist,
≠
das Gerät Regen oder Feuchtigkeit ausgesetzt wurde Zulässige Einwirkzeiten abhängig vom Schallpegel (dBA)
≠
oder wenn es nicht normal funktioniert oder fallengelassen wurde. Schallpegel zulässige Dauer zulässige Dauer zulässige Dauer
(dBA) (Stunden) (Minuten) (Sekunden)
Ersatzteile 85 8 – –
Für Reparaturen sind ausschließlich Ersatzteile zu verwenden, die vom Hersteller
88 4 – –
spezifiziert und zugelassen sind.
91 2 – –
94 1 – –
97 – 30 –
100 – 15 –
103 – 7,5 –
106 – – 225
109 – – 112
112 – – 56
115 – – 28
118 – – 14
121 – – 7
Berechnungen auf Basis der deutschen Lärm- und Vibrations-Arbeitsschutz
verordnung (LärmVibrationsArbSchV)10 Linear SE Linear SE 11
DE DE
Installation
2 | Aufstellen
In diesem Kapitel erfahren Sie mehr über die Anschlüsse, Stellen Sie den Linear SE stets auf eine stabile Unterlage. Alternativ können
Bedienelemente sowie die Verwendungsmöglichkeiten Ihres Sie das Gerät auch mit dem als Zubehör lieferbaren Montageset unter einem
Lehmannaudio Linear SE Kopfhörerverstärkers. Tisch befestigen. Durch die kompakten Abmessungen und das geringe Gewicht
können Sie den Linear SE mühelos transportieren.
1 | Auspacken
3 | Anschließen
Überprüfen Sie den Linear SE nach dem Auspacken auf eventuelle Transport-
Prüfen Sie die vorliegende Netzspannung, da der Linear SE nur mit der für das
schäden. Sollten Sie sichtbare Schäden feststellen, dürfen Sie das Gerät auf
Gerät vorgesehenen Netzspannung betrieben werden kann. Diese finden Sie auf
keinen Fall an die Stromversorgung anschließen. Wenden Sie sich in diesem Fall
einem Aufkleber auf der Unterseite des Gerätes. Verbinden Sie nun den Linear
umgehend an Ihren Händler.
SE mit Hilfe des Netzkabels und dem Anschluss auf der Rückseite des Gerätes
Die Lieferung enthält folgende Komponenten: mit dem Stromnetz.
≠
Linear SE Gerät Beachten Sie die Sicherheitshinweise ab Seite 4!
≠
Netzkabel
≠
Bedienungsanleitung
≠
Garantieschein
Hinweis
Wir empfehlen Ihnen, die komplette Verpackung für einen
späteren Versand aufzubewahren. So vermeiden Sie Transport
schäden. Verwenden Sie auf keinen Fall „Schaumstoff-Chips“
oder ähnliches Verpackungsmaterial. Im Laufe des Transports
„rüttelt“ sich das Gerät sonst bis zum Verpackungsboden durch
und kann beschädigt werden!
Wenn die originale Verpackung nicht mehr zur Verfügung steht,
verwenden Sie am besten eine Luftpolsterfolie, in die Sie das Ge-
rät großzügig einwickeln. Das Ganze packen Sie dann zusätzlich
in einen stabilen Karton.12 Linear SE Linear SE 13
DE DE
Funktionsbeschreibung 1 | Betriebs-LED
Die Leuchtdiode (LED) an der Gerätefront zeigt an, ob das Gerät eingeschaltet
In diesem Kapitel erfahren Sie mehr über die Anschlüsse, ist. Leuchtet die LED, ist der Linear SE eingeschaltet.
Bedienelemente sowie die Verwendungsmöglichkeiten Ihres
2 | Kopfhörerausgänge
Lehmannaudio Linear SE Kopfhörerverstärkers.
6,35-mm-Stereo-Klinkenanschlüsse für Kopfhörer mit einem entsprechenden
Stecker. Kopfhörer mit einem kleineren Klinkenstecker (3,5 oder 2,5 mm) können
Vorderseite mittels eines Adapters ebenfalls angeschlossen werden. Entsprechende Adapter
erhalten Sie im Fachhandel.
Die zwei Kopfhörerausgänge können dazu genutzt werden, zwei Kopfhörer
parallel zu betreiben. Dabei sollte nach Möglichkeit der gleiche Kopfhörer-Typ
verwendet werden.
Sobald am linken Klinkenanschluss ein Kopfhörer eingesteckt ist, wird der Line-
Ausgang an der Rückseite des Gerätes stumm geschaltet (Mute-Funktion).
Achtung!
Wenn Sie Aktivlautsprecher oder Endstufen am Line-Ausgang
des Linear SE angeschlossen haben, achten Sie bitte vor dem He
rausziehen eines Steckers aus diesem Kopfhörerausgang darauf,
1 2 3 dass der Lautstärkeregler ganz nach links gedreht ist.
3 | Lautstärkeregler
Achtung!
Mit Kopfhörern können Lautstärken erreicht werden, die Mit dem Lautstärkeregler justieren Sie die Ausgabelautstärke des Line-Ausgangs
gesundheitsschädlich sind. Vergewissern Sie sich deshalb immer und der Kopfhörerausgänge. Drehen Sie den Lautstärkeregler gegen den Uhrzei-
vor dem Aufsetzen Ihres Kopfhörers, dass die gewählte Laut- gersinn, um die Lautstärke zu verringern, im Uhrzeigersinn, um die Lautstärke zu
stärke nicht zu hoch ist! erhöhen.
Wir empfehlen, den Regler nach der Benutzung des Gerätes gegen den Uhr
Nähere Information zu den zulässigen Einwirkzeiten abhängig vom Schall-
zeigersinn bis zum Anschlag zu drehen und somit die Ausgabelautstärke auf null
pegel (dBA) auf Basis der deutschen Lärm- und Vibrations-Arbeitsschutz
zu stellen.
verordnung (LärmVibrationsArbSchV) finden Sie auf Seite 9.14 Linear SE Linear SE 15
DE DE
Funktionsbeschreibung 1 | Line-Eingang (Stereo)
An den Cinchbuchsen des Line-Eingangs können Sie Ihre Signalquelle anschlie-
ßen. Dies kann z. B. ein CD-Player, DA-Wandler, Receiver oder Medienplayer sein.
Die untere Buchse mit dem roten Ring steht für den rechten Line-Eingang, die
obere Buchse mit der schwarzen Umrandung steht für den linken Line-Eingang.
2 | Line-Ausgang (Stereo)
An den Cinchbuchsen des Line-Ausgangs können Sie alle Geräte mit Line-
Rückseite Eingang anschließen. Dies kann z. B. ein Endverstärker, Aktivlautsprecher oder
Receiver sein. Die untere Buchse mit dem roten Ring steht für den rechten Line-
Ausgang, die obere Buchse mit der schwarzen Umrandung steht für den linken
Line-Ausgang.
3 | Netzschalter
Mit dem Netzschalter können Sie den Linear SE ein- und ausschalten.
4 | Sicherung
Sicherungshalter für eine Schmelzsicherung (siehe technische Daten S. 24). Es
dürfen nur Sicherungen des gleichen Typs verwendet werden.
5 | Netzanschluss
1 2 3 4 5
Stromanschluss des Gerätes zur Verwendung mit dem beigelegten Stromkabel
oder einem Kabel mit gleicher Steckerbauart. Der Linear SE darf nur mit der für
das Gerät vorgesehenen Netzspannung betrieben werden. Diese finden Sie auf
dem Typenschild auf der Unterseite des Gerätes.16 Linear SE Linear SE 17
DE DE
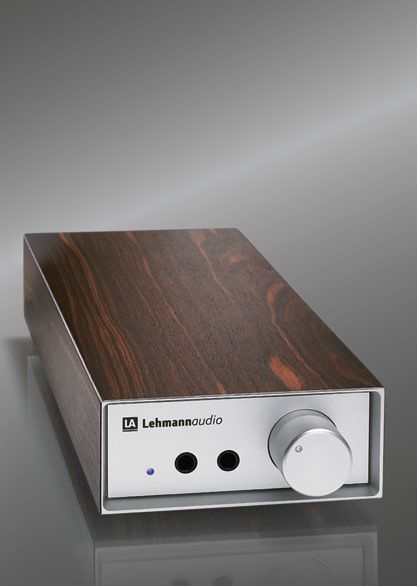
Einstellung der Maximalverstärkung Einstellungen für verschiedene Kopfhörermodelle
Die Verstärkungsvorschläge in der untenstehenden Tabelle sind nur Näherungs
Zur Einstellung der Verstärkung befinden sich auf der Unter werte und von persönlichen Hörgewohnheiten sowie der Effektivität der
seite des Gerätes zwei identische DIP-Schalter, einer für den verschiedenen Modelle abhängig. Fangen Sie zunächst mit der geringeren Ver
stärkungseinstellung an. Nehmen Sie eine höhere Verstärkungseinstellung nur
rechten Kanal, einer für den linken Kanal. Stellen Sie für eine
vor, wenn Sie bei der Lautstärkeeinstellung häufig an den Rechtsanschlag des
korrekte Stereowiedergabe beide Schalter identisch ein. Reglers kommen, ohne dass Sie Ihre gewünschte Maximallautstärke erreichen.
Hersteller Modell laut sehr laut
1 | +0 dB 2 | +10 dB
AKG K141Studio +0 dB +0 dB
ON ON ON ON K501, K601, K701, K702 +0 dB +10 dB
K240DF, K272HD, K1000 +10 dB +20 dB
Beyerdynamic DT660, T5P +0 dB +0 dB
1 2 1 2 1 2 1 2
DT880, T1, T70 +0 dB +10 dB
Grado alle Typen +0 dB +0 dB
3 | +18 dB 4 | +20 dB
Sennheiser HD25-1 II, HD439, HD500 +0 dB +0 dB
ON ON ON ON HD555, HD600/HD650, HD800 +0 dB +10 dB
Ultrasone HFI450, ED8, ED10 +0 dB +0 dB
HFI2400 +0 dB +10 dB
1 2 1 2 1 2 1 2
Die Einstellung der Verstärkung ist optimal, wenn bei Erreichen der gewünsch-
ten Maximallautstärke noch ein wenig Reserve bleibt, um nachzuregeln. Für die
Verwendung als Vorverstärker ist in der Regel die Verstärkungseinstellung +0 dB
sinnvoll. In der nachfolgenden Tabelle sind Verstärkungsempfehlungen für einige
Kopfhörermodelle aufgelistet.18 Linear SE Linear SE 19
DE DE
Anwendungsbeispiele
1 | SACD-Player und ein Kopfhörer 2 | Medienplayer, Aktiv-Lautsprecher
In diesem Beispiel wird der Linear SE als Kopfhörerverstärker an einem SACD- In diesem Beispiel wird der Linear SE als Vorverstärker für Aktivlautsprecher an
Player betrieben. einem Medienplayer betrieben.
Nach dem Anschließen des Linear SE an das Stromnetz schließen Sie den Nach dem Anschließen des Linear SE an das Stromnetz schließen Sie den
SACD-Player mit Hilfe eines Cinchkabels am Line-Eingang an der Rückseite Medienplayer mit Hilfe eines Cinchkabels am Line-Eingang an der Rückseite des
des Gerätes an. Gerätes an. Die Aktivlautsprecher schließen Sie am Line-Ausgang des Linear SE
mit Hilfe eines Cinchkabels an.
Den Kopfhörer schließen Sie an der Vorderseite des Gerätes an.
An der Geräteunterseite stellen Sie die Verstärkung auf +0 dB ein (siehe Seite
An der Geräteunterseite stellen Sie die Verstärkung für den verwendeten 16/17).
Kopfhörer ein (siehe Seite 16/17).20 Linear SE Linear SE 21
DE DE
Gerätevariante Linear SE USB 2 | Status-LEDs
Diese LEDs zeigen den Status der USB-Verbindung.
Die nachfolgenden Beschreibungen gelten ausschließlich für den Rot: Es besteht keine USB-Verbindung mit dem Computer.
Gerätetyp Linear SE USB. Grün: Audiodaten werden übertragen.
Keine: Die USB-Verbindung funktioniert, es werden jedoch keine Audiodaten
übertragen.
3 | Loop-Ausgang oder alternativer Line-In (Stereo)
Rückseite
An diesem Ausgang können Sie alle Geräte mit 3,5-mm-Klinkenstecker an-
4 5 6 schließen. Alternativ kann diese Buchse auch als Eingang verwendet werden. In
diesem Fall dienen die Line-In-Cinchbuchsen als Loop-Ausgang.
Achtung!
Schließen Sie NIE beide Eingänge gleichzeitig an Signalquellen an!
4 – 5 | Line-Eingang (Stereo)
An den Cinchbuchsen des Line-Eingangs können Sie Ihre Signalquelle anschlie-
ßen. Dies kann z. B. ein CD-Player, DA-Wandler, Receiver oder Medienplayer
sein. Die linke Buchse mit dem roten Ring (4) steht für den rechten Line-Ein-
gang, die angrenzende Buchse (5) mit der schwarzen Umrandung steht für den
linken Line-Eingang.
1 2 3 7 8 9 10
6 – 7 | Line-Ausgang (Stereo)
An den Cinchbuchsen des Line-Ausgangs können Sie alle Geräte mit Line-Eingang
anschließen, z. B. einen Endverstärker, Aktivlautsprecher oder Receiver. Die obere
1 | USB-Eingang (Stereo) Buchse (6) mit der schwarzen Umrandung steht für den linken Line-Ausgang.
Die untere Buchse mit dem roten Ring (7) steht für den rechten Line-Ausgang.
USB-Buchse (Typ B) zum Anschluss eines Computers mit USB-Port. Üblicherweise
ist dazu keine Treiberinstallation notwendig, der Linear SE USB wird als externes
8 | Netzschalter
Audiogerät erkannt. Empfängt der USB-Anschluss kein Audiosignal, schaltet der
Verstärker automatisch auf den analogen Eingang um. Mit dem Netzschalter können Sie den Linear SE USB ein- und ausschalten.22 Linear SE Linear SE 23
DE DE
9 | Sicherung 3 | Samplingrate
Sicherungshalter für eine Schmelzsicherung (siehe technische Daten S. 24). Es Geben Sie Audiodateien in ihrer originalen Samplingrate wieder. Schalten Sie nach
dürfen nur Sicherungen des gleichen Typs verwendet werden. Möglichkeit interne Samplingratenumrechnungen in Ihrem Rechner ab. Besonders
die Umrechnung von 44,1 kHz auf 48 kHz, die in vielen Rechnern standardmäßig
10 | Netzanschluss eingestellt ist, kann zu klanglichen Einbußen führen.
Stromanschluss des Gerätes zur Verwendung mit dem beigelegten Stromkabel
4 | Kabelverbindung
oder einem Kabel mit gleicher Steckerbauart. Der Linear SE darf nur mit der für
das Gerät vorgesehenen Netzspannung betrieben werden. Diese finden Sie auf Ziehen Sie das USB-Kabel nicht während des Abspielvorgangs aus dem Gerät.
dem Typenschild auf der Unterseite des Gerätes. Üblicherweise friert dann das Playerprogramm ein und muss neu gestartet
werden.
5 | ASIO-Treiber
Optimierung Ihres Computers Fachleute können unter Windows sogenannte ASIO-Treiber installieren, müssen
für die Audiowiedergabe über den dann aber darauf achten, dass dies vom Abspielprogramm auch unterstützt wird.
Gegebenenfalls muss dann für das Abspielprogramm eine ASIO-Unterstützung
Linear SE USB nachinstalliert werden. Eine Quelle für einen kostenlosen ASIO-Treiber (Windows)
ist www.asio4all.com.
1 | Lautstärke
Die Lautstärkeregelung sollte aus Qualitätsgründen immer am Linear SE USB
erfolgen. Stellen Sie dazu sämtliche Lautstärkeregler in Ihrem Rechner auf
Maximalleistung. Das können durchaus bis zu drei verschiedene Regler sein:
Signalquelle/Mixerkanal (z. B. Wave), Mixer Masterregler, Anwendung (z. B.
Mediaplayer). Anderenfalls erscheint die erzielbare Lautstärke mit dem Linear SE
USB als deutlich zu leise.
Bei einem Neustart der Wiedergabesoftware oder des Betriebssystems kann es
dazu kommen, dass die Lautstärke immer wieder auf einen niedrigeren Wert
zurückgesetzt wird. Um dies zu vermeiden, ändern Sie am besten die
Voreinstellungen.
2 | Mixer
Wenn möglich, umgehen Sie rechnerinterne Mixer.24 Linear SE Linear SE 25
DE DE
Technische Daten
Linear SE USB-Wandler (Linear SE USB)
Eingangsimpedanz 47 kOhm Abtastrate digital bis 48 kHz
Maximalverstärkung +0 dB, +10 dB, +18 dB, +20 dB Wortbreite 16 Bit
auf Geräteunterseite schaltbar
Maximalpegel USB-DAC 1 V eff.
Frequenzgang analog 10 Hz (-0,3 dB) bis 35 kHz (-1 dB)
Frequenzgang USB 10 Hz bis 20 kHz (-1,5 dB)
Rauschabstand analog > 95 dB bei Gain +0 dB
USB-Standard vollständig kompatibel mit USB 1.0
Klirrfaktor analog < 0,001 % bei 6 mW/300 Ohm
Kanaltrennung > 70 dB/10 kHz
Ausgangsleistung ≠
300 Ohm/200 mW
≠
60 Ohm/400 mW
Ausgangsimpedanz ≠
Line Out 60 Ohm
≠
Phones Out 5 Ohm
Anschlüsse Audio ≠
Neutrik Kopfhörerbuchsen mit vergoldeten Kontakten
≠
1x Line out schaltend, 1x Line Out nicht schaltend
≠
vergoldete Cinchbuchsen mit Teflonisolation
≠
Miniklinkenbuchse Stereo (Loop Out/Line In) 3,5 mm
Anschluss Netzspannung 230 V Wechselspannung
Sicherung 315 mA, T
Leistungsaufnahme ca. 10 W über internes, geregeltes Netzteil
im Betrieb
Gehäusemaße B x T x H 297 mm x 120 mm x 50 mm
Gewicht 1,8 kg netto26 Linear SE Linear SE 27
DE DE
Fehlersuche Kein Signal am Es kommt kein Tonsignal Stellen Sie sicher, dass die
Line-Ausgang am Gerät an. Signalquelle ein Signal an das
Gerät abgibt.
Lautstärkeregler ist auf Stellen Sie den Lautstärkeregler
Fehler Ursache Lösung Minimum. auf die gewünschte Lautstärke.
Betriebs-LED Netzteil oder Netzkabel Stecken Sie das Netzteil bzw. Signal ist zu leise Lautstärkeregler ist nicht Drehen Sie den Lautstärke
leuchtet nicht ist nicht in Steckdose. das Netzkabel in die Steckdose. weit genug aufgedreht. regler weiter auf.
Gerät ist nicht einge- Schalten Sie das Gerät mit dem Signalquelle ist zu leise. Wählen Sie eine andere Signal-
schaltet. Netzschalter auf der Geräte- quelle oder erhöhen Sie wenn
rückseite ein. möglich deren Lautstärke.
Sicherung ist defekt. Stellen Sie zunächst sicher, Verstärkungsfaktor ist zu Erhöhen Sie den Verstärkungs
dass die beiden o. g. Punkte niedrig. faktor gemäß der Bedienungs-
als Fehlerursache ausfallen. anleitung und platzieren Sie den
Überprüfen Sie dann die Siche- DIP-Schalter entsprechend.
rung: Ist der Draht durchtrennt,
tauschen Sie die Sicherung aus. Einer oder mehrere der Kontrollieren Sie die computer
Fällt mehrere Male kurz hinter möglichen computerinter- internen Regler und stellen
einander die Sicherung aus, nen Regler stehen nicht Sie diese gegebenenfalls auf
liegt wahrscheinlich ein Defekt auf Maximum Maximum.
am Gerät vor. Bringen Sie das (nur USB-Varianten!).
Gerät dann zu dem Händler, bei
Signal im Kopf Das von der Signalquelle Stecken Sie das von der Signal-
dem Sie es erworben haben.
hörer spricht nicht kommende Kabel steckt quelle kommende Kabel in die
Kein Signal im Es kommt kein Tonsignal Stellen Sie sicher, dass die auf den Laut in den Ausgangsbuchsen. Eingangsbuchsen.
Kopfhörer am Gerät an. Signalquelle ein Signal an das stärkeregler an
Gerät abgibt.
Signal nur auf DIP-Schalter sind un- Überprüfen Sie die Position bei-
Lautstärkeregler ist auf Stellen Sie den Lautstärkeregler einem Kanal gleichmäßig eingestellt. der DIP-Schalter und korrigieren
Minimum. auf die gewünschte Lautstärke. Sie diese gegebenenfalls gemäß
dieser Bedienungsanleitung.
Kopfhörer ist nicht in die Stecken Sie den Kopfhörer in
Buchse gesteckt. die Kopfhörerbuchse. Verbindungskabel Überprüfen Sie das
zwischen Quelle und Verbindungskabel hinsichtlich
Kein Signal am Kopfhörer steckt im Ziehen Sie den Kopfhörer Kopfhörerverstärker hat Wackelkontakts, loser Steck-
Line-Ausgang linken Kopfhörer- stecker aus dem Gerät heraus einen Wackelkontakt, verbindung und Defekts und
Ausgang. oder stecken Sie ihn in die steckt nicht richtig in den tauschen Sie es gegebenen
rechte Kopfhörerbuchse. Buchsen oder ist defekt. falls aus.28 Linear SE Linear SE 29
DE DE
Falls sich ein Problem nicht mit Hilfe dieser Übersicht beseitigen lässt,
Linker und Im Verbindungskabel ist Überprüfen Sie alle verwen-
rechter Kanal sind ein Kanaltausch. deten Verbindungskabel und kontaktieren Sie bitte den Fachhändler, bei dem Sie das Gerät erworben
vertauscht tauschen Sie gegebenenfalls haben. Ist dies nicht möglich, können Sie mit unserer Händlersuche unter
die Kanäle. www.lehmannaudio.com/de/service/haendler/ einfach und bequem einen
anderen geeigneten Händler in Ihrer Nähe finden.
Der Kopfhörer sitzt falsch Überprüfen Sie, ob Sie den
herum auf dem Kopf. Kopfhörer gemäß der Beschrif-
tung aufgesetzt haben und
setzen Sie ihn gegebenenfalls
richtig herum auf. Rechtliche Hinweise
Signal ist Der Eingangspegel ist zu Regeln Sie die Lautstärke der Garantie
verzerrt hoch. angeschlossenen Signalquelle
herunter. Jedes Gerät von Lehmannaudio wird einzeln geprüft und einer vollständigen
Funktionskontrolle unterzogen. Die Verwendung ausschließlich hochwertigster
Der Kopfhörer ist defekt. Benutzen Sie einen anderen
Bauteile erlaubt die Gewährung von zwei Jahren Garantie.
Kopfhörer.
Als Garantienachweis dient der Kaufbeleg/die Quittung. Ein Registrierungsformular
Das Signal selber ist Verwenden Sie einen anderen
verzerrt. Titel oder einen anderen ist dem Produkt beigelegt oder kann unter www.lehmannaudio.com/de/service/
Tonträger. registrierung.html abgerufen werden. Schäden, die durch unsachgemäßen Einbau
oder unsachgemäße Behandlung entstanden sind, unterliegen nicht der Garantie.
Der Verstärkungsfaktor Setzen Sie den Verstärkungs- Ihre Beseitigung ist daher kostenpflichtig. Schadensersatzansprüche jeglicher
und die Gesamtlautstärke faktor gemäß dieser Bedie- Art, insbesondere von Folgeschäden, sind ausgeschlossen. Eine Haftung, die den
sind zu hoch. nungsanleitung herunter und Warenwert des Gerätes übersteigt, ist außerdem ausgeschlossen.
platzieren Sie die DIP-Schalter
entsprechend. Es gelten die Allgemeinen Geschäftsbedingungen der Firma:
Brummen ist zu Mehrere angeschlossene Stellen Sie eine korrekte
hören Geräte verursachen eine Erdungsverbindung her. Ziehen
Brummschleife. Sie gegebenenfalls einen
Elektriker hinzu.
Lehmannaudio Vertriebs GmbH
Radio-Störungen Falsche Signalkabel Verwenden Sie geeignete
Waltherstraße 49 – 51
sind im Hinter- wurden verwendet. Signalkabel.
grund zu hören 51069 Köln
Abschirmung am Signal- Überprüfen Sie die Abschirmung Tel.: +49 (0)221 – 29 49 33 20
kabel ist defekt. am Signalkabel und ersetzen Sie Fax: +49 (0)221 – 29 49 33 19
das Kabel gegebenenfalls. www.lehmannaudio.de30 Linear SE Linear SE 31
DE DE
Stand der Technik EMV Richtlinie (elektromagnetische Kompatibilität) 2004/108/EG:
EN 55103-1:2009, EN 55103-2:2009
Um höchste Audioqualität zu gewährleisten, werden die Geräte von Lehmann-
audio stets dem aktuellen Stand der Technik angepasst. Erforderliche Änderun-
gen in Konstruktion und Schaltung werden ohne Ankündigung vorgenommen.
Technische Daten und Erscheinungsbild können daher von der vorliegenden
RoHS-Konformität
Bedienungsanleitung abweichen.
Das Produkt wurde konform zur Richtlinie 2002/95/EG gefertigt.
Service
Eventuelle Wartungen oder Reparaturen müssen in jedem Fall durch qualifiziertes
Fachpersonal erfolgen. Wenn Sie das Gerät zurücksenden möchten, wenden Sie WEEE-Nr.
sich bitte direkt an Lehmannaudio, um das konkrete Vorgehen zu besprechen. DE 40695871
Für Servicearbeiten am Linear SE wenden Sie sich bitte an den Händler, bei dem WEEE-Altgeräteentsorgung
Sie das Gerät erworben haben. Ist dies nicht möglich, können Sie mit unserer
Die durchgestrichene Mülltonne ist das EG-Symbol für die getrennte Entsor-
Händlersuche unter www.lehmannaudio.com/de/service/haendler/ einfach und
gung von Elektronikschrott. Der Linear SE enthält elektrische und elektronische
bequem einen anderen geeigneten Händler in Ihrer Nähe finden.
Bauteile, die nach der Entsorgung des Gerätes erneut verwendet oder durch
Änderungen jeglicher Art am Gerät sind nicht erlaubt. Bei Nichtbeachtung ver- stoffliche Verwertung recycelt werden. Nach der Richtlinie 2003/108/EG darf er
liert das Gerät seine CE-Konformität und Garantieansprüche. deshalb nicht mit dem Hausmüll entsorgt werden. Im Entsorgungsfall bringen
Sie das zu entsorgende Gerät zu Ihrem Fachhändler zurück oder erfragen dort
Warenzeichen und Urheberrecht weitere Auskünfte.
Alle in dieser Bedienungsanleitung verwendeten Warenzeichen und eingetrage- Die Lehmannaudio Vertriebs GmbH ist im Elektro-Altgeräteregister eingetragen.
nen Marken sind Eigentum der jeweiligen Inhaber.
Diese Bedienungsanleitung ist urheberrechtlich geschützt. Jede Vervielfältigung
bzw. jeder Nachdruck, auch auszugsweise, ist nur mit schriftlicher Genehmigung
der Lehmannaudio Vertriebs GmbH gestattet. Dies gilt auch für die verwendeten
Bilder und Grafiken.
Norbert Lehmann, Geschäftsführer
CE-Konformität
Köln, 30.1.2018
Dieses Produkt ist bei ordnungsgemäßer Installation gemäß dieses Handbuchs
konform zu folgenden europäischen Richtlinien:
Niederspannungsrichtlinie 2006/95/EG: EN 60065Linear SE 33
Table of content Introduction EN
32 | Table of content
Dear customer,
33 | Introduction
thank you very much for your trust you have shown us by purchasing the
34 | Safety notes
Linear SE. The Linear SE is a very accurately handcrafted headphone and
42 | Installation preamplifier designed for the connection to line outputs of off-the-shelf hifi
devices. Like all our products it was also developed and built in Germany.
44 | Functional description: connections and controls
Since our company foundation back in 1988 we’ve been representing first-
48 | Setting the maximum gain class devices, always devoted to the original sound and manufactured with a
passion for detail. Owing to the best components and a sophisticated circuit
50 | Sample applications
layout, we’re able to guarantee listening pleasure on an excellent level. The
52 | Device type Linear SE USB Linear SE is superior in every respect to industrial mass products. It meets
the highest standards in authentic music reproduction through practically all
56 | Technical specifications
customary headphones. In addition, our reference model can simultaneously
57 | Accessories feed two headphones of identical sensitivity – with a constant fabulous
listening experience, of course. For the music playback via PC, iPad & co. the
58 | Troubleshooting
Linear SE offers a solution with its optional USB variant. For fixing the Linear
61 | Legal notes SE we also carry a suitable mounting kit.
Although you may have had some experience with headphone amplifiers from You will find more information in this manual and also on our website under
other manufacturers, please read the manual carefully before putting the www.lehmannaudio.com.
Linear SE/Linear SE USB to service and keep it close to the device for future
reference! Now look forward to your music which will sound over the Linear SE exactly
the way you wish it to sound: well-balanced, dynamic and full-bodied!
Your Norbert Lehmann
Managing Director
Lehmannaudio Vertriebs GmbH
Waltherstr. 49 – 51 info@lehmannaudio.com
51069 Köln (Germany) www.lehmannaudio.com
Phone: +49 221 – 29 49 33 20 www.facebook.com/lehmannaudio
Fax: +49 221 – 29 49 33 19 www.twitter.com/lehmannaudio34 Linear SE Linear SE 35
EN Important safety notes Important safety instructions EN
In this manual we use hierarchic ‘red flags’. Warning notes are printed in bold 1 | Read these instructions.
and also marked and highlighted by a symbol (warning sign) in the text.
2 | Keep these instructions.
The warning notes are classified hierarchically according to the following
scheme: 3 | Heed all warnings.
1. WARNING! 4 | Follow all instructions.
2. Caution!
3. Note! 5 | Do not use this apparatus near water.
6 | Clean only with dry cloth.
This symbol points to important operation and maintenance
notes in the accompanying documentation. Please refer to the 7 | Do not block any ventilation openings. Install in accordance with the
manual. manufacturer’s instructions.
8 | Do not install near any heat sources such as radiators, heat registers,
This symbol warns of the presence of a non-insulated stoves, or other apparatus (including amplifiers) that produce heat.
hazardous voltage inside the device and the risk of a potentially
life-threatening electric shock. 9 | Do not defeat the safety purpose of the polarized or grounding-type plug.
A polarized plug has two blades with one wider than the other. A grounding
type plug has two blades and a third grounding prong. The wide blade or
This symbol refers to additional information in the manual. Here the third prong are provided for your safety. If the provided plug does not
you will find supplementary information, recommendations and fit into your outlet, consult an electrician for replacement of the obsolete
tipps regarding the use of the product. outlet.
10 | Protect the power cord from being walked on or pinched particularly at
plugs, convenience receptacles, and the point where they exit from the ap-
paratus.
11 | Only use attachments/accessories specified by the manufacturer.36 Linear SE Linear SE 37
EN
12 | Use only with the cart, stand, tripod, bracket, or table specified by the
manufacturer, or sold with the apparatus. When a cart is used, use caution
General safety notes EN
when moving the cart/apparatus combination to avoid injury from tip-over.
13 | Unplug this apparatus during lightning storms or when unused for long peri-
Caution!
ods of time.
Read all safety and operation notes before putting the device
to service.
14 | Refer all servicing to qualified service personnel. Servicing is required when
the apparatus has been damaged in any way, such as power-supply cord
or plug is damaged, liquid has been spilled or objects have fallen into the
Storage
apparatus, the apparatus has been exposed to rain or moisture, does not
Keep the safety and operation notes for future reference.
operate normally, or has been dropped.
Warning notes
15 | Connection to mains voltage/disconnection from from MAINS voltage:
Observe all warning notes printed on the device or contained in the manual.
the socket outlet shall be installed near the equipment and shall be easily
accessible. Where the MAINS plug or an appliance coupler is used as the
Operation notes
disconnect device, the disconnect device shall remain readily operable.
Follow all operation notes and advice for users.
16 | An apparatus with CLASS I construction shall be connected to a MAINS
Heat
socket outlet with a protective earthing connection.
The device must not be placed near heat sources like radiators, heat accumu
lators, stoves or other heat-generating appliances (e.g. amplifiers).
17 | This apparatus shall only be powered by the original power supply made for
this apparatus.
Ventilation
Do not cover any ventilation slots on the device and when mounting it in a rack,
18 | The power supply of this apparatus shall not be used to power other
make sure that there is sufficient air circulation. Always heed the appropriate
manufacturer’s products.
manufacturer notes when installing the unit.
Water and moisture
Do not expose the unit to rain nor use it in close proximity to water (bath tub,
swimming pool etc.) or in high air humidity (condensation).
Power cable
Use only power cables which are officially approved for your country. The power
cable must be designed for the product and its corresponding power consump-
tion (voltage/current) as stated on the device label and in the user manual.38 Linear SE Linear SE 39
Thunderstorm your area, ask your local electricity utilities.
EN EN
Disconnect the unit from mains to protect it from lightning strokes and excess
voltage. Fuse
Use only fuses of the same type and rating as required by the manufacturer.
Electric overload Please refer to the manual!
Do not exceed the maximum load current for power outlets, extension cables or
integrated multi sockets. Overload may cause a fire. Earth/polarity
Fire sources
Do not put any open fire sources (e.g. burning candles) on the device. Caution!
Use the device only on a power outlet with protective conductor
Accessories connection and correct polarity. Do not disable the function of
Use only accessories/extensions with the device which have been approved by the protective conductor connection on the included power cord.
the manufacturer for this purpose. If the plug of the included cable won’t fit into your mains outlet,
contact your local electrician.
Mounting
Use the device only in a safe, level position on a table, dolly or a special
designed stand. Don’t drop the unit, since this may cause personal injuries and Mains connection
damages to the device. When installing the device, make sure that the mains Protect the power cord from footsteps and crushing, notably on the device plug,
plug will remain easily accessible. the extension cord and the cable outlet on the device.
Cleaning Service
Use only a dry cloth for cleaning the device. All service and repair works must be carried out by an authorised service techni-
cian. Service is required if the device has been damaged in any way, for instance
Non-use if
Pull the mains plug if the unit is not used over prolonged periods of time. ≠
the power cord or mains plug have been damaged,
≠
liquid or some object has got into the unit,
Ingress of liquids
Make sure that no dripping or spray water can enter into the interior of the unit. ≠
the device has been exposed to rain or moisture
Don’t place objects filled with liquids (such as vases or drinking vessels) on the ≠
or if it does not function normally or after it has been dropped.
device.
Power supply Spare parts
Operate the device only on those mains voltages stated either on the device Only such spare parts must be used exclusively for repair works which have been
label or in the manual. When in doubt about the value of the mains voltage in specified and approved by the manufacturer.40 Linear SE Linear SE 41
EN EN
Caution!
Headphones can produce volume levels which may be hazardous
to your health. So before you put on your headphones, always
check that the selected volume level is not too high.
Permissible exposure times depending on SPL (dBA)
Sound pressure Permissible Permissible Permissible
level duration duration duration
(dBA) (hours) (minutes) (seconds)
85 8 – –
88 4 – –
91 2 – –
94 1 – –
97 – 30 –
100 – 15 –
103 – 7,5 –
106 – – 225
109 – – 112
112 – – 56
115 – – 28
118 – – 14
121 – – 7
Calculations based on the German Lärm- und Vibrations-Arbeitsschutzverord-
nung (LärmVibrationsArbSchV) [Noise and Vibrations Occupational Safety and
Health Directive]42 Linear SE Linear SE 43
EN Installation 2 | Placement
EN
Always put the Linear SE on a solid base. Alternatively the device may also be
In this chapter you’ll learn more about the connections, controls mounted under a table using the optional accessory kit. Due to its compact
and possible applications of your Lehmannaudio Linear SE dimensions and low weight you can take the Linear SE easily with you.
headphone amplifier.
3 | Wiring
First check the present mains voltage since the Linear SE can only be operated
1 | Unpacking
on the mains voltage which the unit has been designed for. This can be read on
After unpacking the Linear SE check it for possible transport damages. If you a sticker on the bottom side of the device. Now connect the Linear SE to the
notice visible damages, you must by no means connect the device to mains. In mains grid using the power cord and the mains inlet located on the rear side of
this case consult your dealer immediately. the unit.
The delivery comprises the following components: Observe the safety notes from page 34!
≠
Linear SE unit
≠
Power cord
≠
User manual
≠
Guarantee voucher
Note
We recommend keeping the entire packaging for later shipment.
That way you will avoid transport damages. Use by no means
‘foam chips’ or similar packaging material. Otherwise the device
will jolt through to the bottom of the cardboard box during
transport and can be damaged! If the original packaging is no
longer available, it’s best to use bubble wrap in which to wrap up
the device in a generous manner. Finally the whole should be put
into a solid cardboard box.44 Linear SE Linear SE 45
EN Functional description 1 | LED indicator
EN
The light emitting diode (LED) on the front panel indicates the operating status
In this chapter you will learn more about the connections, of the device. When the LED is lit, the Linear SE is ready for operation.
controls and also the application possibilities of your
2 | Headphone outputs
Lehmannaudio Linear SE headphone amplifier.
6.35 mm (1⁄4 ") stereo jack sockets for headphones with a corresponding con-
nector. Headphone models with a smaller jack plug (3.5 or 2.5 mm) can also
be connected using an adapter. Suitable adapters are available at specialist
Front panel
retailers. The two headphone outputs may be used to drive two headphones in
parallel mode, preferably of the same type if possible. Whenever a headphone is
plugged into the left jack socket, the line output on the rear panel will be muted
(mute function).
Caution !
With active loudspeakers or power amplifiers connected to
the line out of the Linear SE, make sure the volume control is
turned fully counterclockwise before pulling a plug out of this
headphone output.
3 | Volume control
1 2 3
Using the volume control you can adjust the output level of both the line output
and the headphone outputs. Turn the volume control counterclockwise to lower
Caution! the volume; turning it clockwise will increase the level.
Headphones can produce volume levels which may be hazardous
We suggest you turn this control fully counterclockwise at the end of operation,
to your health. So before you put on your headphones, always
thus setting the output level to zero.
check that the selected volume level is not too high.
More information about the permissible exposure times depending on the
sound pressure level (dBA) based on the German Lärm- und Vibrations-
Arbeitsschutzverordnung (LärmVibrationsArbSchV) [Noise and Vibrations
Occupational Safety and Health Directive] can be found on page 40.46 Linear SE Linear SE 47
EN Functional description 1 | Line input (stereo)
EN
The RCA sockets of the line input are used to connect your signal source. This
may be e.g. a CD player, DA converter, receiver or media player. The lower socket
with the red ring stands for the right line input, the upper socket with the black
ring for the left line input.
2 | Line output (stereo)
The RCA sockets of the line output can be used to connect all devices with a line
Rear panel input, for instance a power amplifier, active loudspeaker or receiver. The lower
socket with the red ring stands for the right line output, the upper socket with
the black ring for the left line output.
3 | Mains switch
Use the mains switch to turn the Linear SE on and off.
4 | Fuse
Fuse holder for a safety fuse (see technical specifications p. 56). Only fuses with
identical ratings must be used.
5 | Mains connection
Power inlet of the device to be used with the supplied power cord or a cable
1 2 3 4 5
with the same plug type. The Linear SE must only be operated on the mains
voltage which the unit has been designed for. This can be read on the type label
on the bottom side of the device.48 Linear SE Linear SE 49
EN Setting the maximum gain Gain settings for various headphone models
EN
The suggested gain settings in the table below are merely approximate values
The gain can be set by means of two identical DIP switches and depend on personal listening habits and also on the sensitivity of the differ-
located on the bottom side of the unit, one for the right ent headphone types. Start by selecting the lower gain setting. Only switch to a
higher gain setting if you get to the right-hand stop of the control quite often
channel and one for the left channel. For a correct stereo
without achieving your desired maximum volume level.
image both switches must be set to the same position.
Manufacturer Model loud very loud
1 | +0 dB 2 | +10 dB AKG K141Studio +0 dB +0 dB
K501, K601, K701, K702 +0 dB +10 dB
ON ON ON ON
K240DF, K272HD, K1000 +10 dB +20 dB
Beyerdynamic DT660, T5P +0 dB +0 dB
DT880, T1, T70 +0 dB +10 dB
1 2 1 2 1 2 1 2
Grado all types +0 dB +0 dB
3 | +18 dB 4 | +20 dB Sennheiser HD25-1 II, HD439, HD500 +0 dB +0 dB
HD555, HD600/HD650, HD800 +0 dB +10 dB
ON ON ON ON Ultrasone HFI450, ED8, ED10 +0 dB +0 dB
HFI2400 +0 dB +10 dB
1 2 1 2 1 2 1 2
The gain setting is optimal if, upon reaching the desired maximum volume,
there is still a little reserve for readjustments. For use as preamp, the +0 dB
gain setting will be just right in most cases. The following table contains some
recommended gain settings for various headphone models.50 Linear SE Linear SE 51
EN Sample applications EN
1 | SACD player and one headphone 2 | Media player, active loudspeakers
In this sample configuration the Linear SE is used as a headphone amp with an In this sample configuration the Linear SE is used as a preamp för active loud-
SACD player. speakers in combination with a media player.
After connecting the Linear SE to the mains grid connect the SACD player to the After connecting the Linear SE to the mains grid connect the media player to
line input located on the rear panel of the device by means of an RCA cable. the line input located on the rear panel of the device by means of an RCA cable.
Now connect the active speakers to the line output of the Linear SE by using an
The headphone is then connected on the front panel of the device.
RCA cable.
Finally set the gain on the bottom side of the device for the headphone you’re
Finally set the gain on the bottom side of the device to +0 dB (see p. 48/49).
using (see p. 48/49).52 Linear SE Linear SE 53
EN Device type Linear SE USB 2 | Status LEDs
EN
These LEDs indicate the status of the USB connection.
The following descriptions apply exclusively to the device type Red: No USB connection with the computer.
Linear SE USB. Green: Transmission of audio data.
None: The USB connection is working, but no audio data are transmitted.
3 | Loop output or alternative line in (stereo)
Rear panel
This output may be used to connect all devices with a 3.5 mm mini jack connec-
tor. Alternatively this socket can also double as an input, in which case the line
4 5 6
in RCA sockets are used as loop output.
Caution !
NEVER connect both inputs simultaneously to signal sources!
4 – 5 | Line input (stereo)
The RCA sockets of the line input are used to connect your signal source. This
may be e.g. a CD player, DA converter, receiver or media player. The left socket
with the red ring (4) stands for the right line input, the socket next to it with the
black ring (5) for the left line input.
1 2 3 7 8 9 10
6 – 7 | Line output (stereo)
The RCA sockets of the line output can be used to connect all devices with a line
input, for instance a power amplifier, active loudspeaker or receiver. The upper
1 | USB input (stereo) socket (6) with the black ring stands for the left line output, the lower socket
with the red ring (7) for the right line output.
USB socket (type B) for linking a computer with USB port. Normally there is no
need to install a driver, the Linear SE USB will be recognised as external audio
8 | Mains switch
device. If the USB port receives no audio signal, the amp switches automatically
to the analogue input. Use the mains switch to turn the Linear SE USB on and off.54 Linear SE Linear SE 55
9 | Fuse 44.1 kHz to 48 kHz, which is a standard setting on many PCs, can produce sonic
EN EN
drawbacks.
Fuse holder for a safety fuse (see technical specifications p. 56). Only fuses with
identical ratings must be used.
4 | Cable connection
10 | Mains connection Do not pull the USB out of the device while in playback mode. Normally this will
cause the software player to freeze and therefore require a reboot.
Power inlet of the device to be used with the supplied power cord or a cable
with the same plug type. The Linear SE must only be operated on the mains
5 | ASIO drivers
voltage which the unit has been designed for. This can be read on the type label
on the bottom side of the device. Experts may install so-called ASIO drivers under Windows, but must make sure
then that this will also be supported by the software player. If necessary, an ASIO
support for the software player must be installed later on. A source for a free ASIO
driver (Windows) can be found at www.asio4all.com.
Optimising your computer for the
audio playback via the Linear SE USB
1 | Volume
For quality reasons the volume adjustment should always be made on the Linear
SE USB. To this purpose set all volume controls in your computer to maximum.
Those may well be up to three different controls: signal source/mixer channel (e.g.
Wave), mixer master output, application (e.g. media player). Otherwise the volume
level achievable with the Linear SE USB will appear far too soft. When rebooting
the playback software or the operating system it may occur that the volume will
always be reset to a lower value. To void this, you’d better adjust your default
settings.
2 | Mixer
If possible, bypass PC onboard mixers.
3 | Sampling rate
Play back audio files in their original sampling rate. If possible, bypass internal
sampling rate conversions on your computer. In particular the conversion from56 Linear SE Linear SE 57
EN Technical specifications EN
Linear SE USB converter (Linear SE USB)
Input impedance 47 kOhm Digital sampling rate up to 48 kHz
Maximum gain setting +0 dB, +10 dB, +18 dB, +20 dB Word length 16 Bit
switchable on bottom side
Maximum level USB-DAC 1 V eff.
Analogue frequency 10 Hz (-0,3 dB) to 35 kHz (-1 dB)
response Frequency response USB 10 Hz to 20 kHz (-1,5 dB)
Analogue S/N ratio > 95 dB at +0 dB gain USB standard fully compatible with USB 1.0
Analogue THD < 0,001 % at 6 mW/300 Ohm
Channel separation > 70 dB/10 kHz
Power output ≠
300 Ohm/200 mW
≠
60 Ohm/400 mW
Output impedance ≠
Line out 60 Ohm
≠
Phones out 5 Ohm
Audio Connections ≠
Neutrik headphone sockets with gold-plated contacts
≠
1 x switching line out, 1 x non-switching line out
≠
gold-plated RCA sockets with teflon insulation
≠
stereo mini jack socket (loop out/line in) 3.5 mm
Mains connections 230 V AC
Fuse 250 mA, Slo-Blo
Power consumption in ca. 10 W through internal, regulated power supply
operation
Enclosure dimensions 297 mm x 120 mm x 50 mm
WxDxH
Weight 1,8 kg net58 Linear SE Linear SE 59
EN Troubleshooting No signal at the Device receives no sound Make sure the signal source EN
line output signal. provides a signal to the device.
Volume control is at Turn the volume control to the
Fault Cause Solution minimum. desired volume level.
LED indicator is Power supply or power Connect the power supply Signal is too soft Volume control is not Turn up the volume control
not on cord is not connected to or power cord resp. with the turned up high enough. higher.
a power outlet. power outlet.
Signal source is too weak. Select another signal source or
Device is not turned on. Turn on the device with the raise its level, if possible.
mains switch located on the
rear side of the unit. Gain factor is too low. Increase the gain factor
according to the user manual
Fuse is defective. First make sure that the two and adjust the DIP switch
points mentioned above can be accordingly.
excluded as error causes. Then
check the fuse: It the wire is One or more of the pos- Check the PC internal controls
broken, replace the fuse. If sible PC internal controls and, if required, turn them up
the fuse fails several times in is not set to maximum to maximum.
a row, the device is probably (only USB versions!).
faulty. In this case take the
device to the dealer where you Headphone signal The cable coming from Plug the cable coming from
purchased it. does not respond the signal source has the signal source into the input
to the volume been plugged into the sockets.
No headphone Device receives no sound Make sure the signal source control output sockets.
signal signal. provides a signal to the device.
Signal only on one DIP switches have been Check the settings of both DIP
channel set unequally. switches and, if applicable,
Volume control is set to Set the volume control to the correct them according to this
minimum. desired volume level. user manual.
Headphone is not Plug the headphone into the Connection cable Check the connection cable for
plugged into the socket. headphone socket. between source and a faulty contact, loose pushfit
headphone amplifier and defects and replace it
No signal at the Headphone is plugged Pull the headphone connector has a loose contact, has when necessary.
line output into the left headphone out of the device or plug it into not been fully inserted
output. the right headphone socket. into the sockets or is
defective.60 Linear SE Linear SE 61
EN
Left and right The channels in the con- Check all connection cables in Legal notes EN
channels have nection cable have been use and reverse the channels, if
been messed up interchanged. necessary. Warranty
The headphone has been Check if you have put on the Each device from Lehmannaudio is tested individually and subject to a compre-
put on the wrong way headphone in line with its
hensive functional check. The use of only the very best components enables us
round. labelling and, if needed, put it
to grant a warranty of two years.
on correctly
The receipt/proof of purchase shall serve as warranty proof. A registration form
Signal is distorted The input level is too Turn down the volume of the
high. connected signal source. is supplied with the product or can be downloaded at www.lehmannaudio.com/
service/register.html. Damages due to incorrect installation or inappropriate
The headphone is Use another headphone set. handling are not covered by warranty and will therefore be repaired at the
defective. owner’s expense. Claims for damage of any kind, notably for secondary failures,
The signal itself is Play another track or use are excluded. In addition we exclude any liability which exceeds the merchandise
distorted. another sound carrier. value of the device.
The gain factor and the Lower the gain factor accord- The general terms and conditions apply of:
overall volume are too ing to this user manual and set
high. the DIP switches accordingly.
There is an audi- Several connected devices Establish a correct earth con-
ble hum cause a ground loop. nection. If necessary, contact
an electrician. Lehmannaudio Vertriebs GmbH
Waltherstr. 49 – 51
51069 Köln (Germany)
Radio interfe- Wrong signal cables were Use suitable signal cables. Phone: +49 221 – 29 49 33 20
rence can be used.
Fax: +49 221 – 29 49 33 19
heard in the
background Screen on signal cable is Check the screen on the signal www.lehmannaudio.com
defective. cable and replace the cable, if
necessary. State of technology
To ensure the highest audio quality, Lehmannaudio devices are constantly
If a problem cannot be remedied with the help of this summary, please contact updated to the current state of the art. We reserve the right to make necessary
the specialist retailer where you purchased the device. If this is not possible, you alterations in design and circuitry without prior notice. Technical data and visual
can easily find another competent dealer in your area with the dealer search at appearance may therefore differ from the present user manual.
www.lehmannaudio.com/service/dealers/.Sie können auch lesen