MYCHAMPI MANUAL WHAT ARE MUSHROOMS? MUSHROOM-RECIPES MYCHAMPI GEBRAUCHSANWEISUNG WAS SIND CHAMPIGNONS? CHAMPIGNONS-REZEPTEN - EN / DE
←
→
Transkription von Seiteninhalten
Wenn Ihr Browser die Seite nicht korrekt rendert, bitte, lesen Sie den Inhalt der Seite unten
EN / DE

       MyChampi Manual
       What are Mushrooms?
       Mushroom-recipes

       MyChampi Gebrauchsanweisung
       Was sind Champignons?
       Champignons-rezepten

MAXI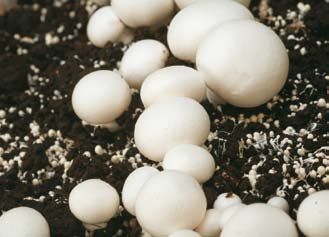
EN

Manual                                                                                                           MyChampi Maxi

                                                                                                               D
                                                       B

                                                                                                     C
                  A
 20-22° C                                                                                                                               20-22° C

DAY 1
Remove the little bag of casing soil from the packaging, close           Turn the lid around again and as indicated (opening to the top)
the growing kit again and set it away at room temperature                press into the top of the packaging box and fasten by pressing
(20-22° C). Open the bag of casing soil, put the casing soil in          the points in the top corners of the packaging box inwards (F).
a bucket or tray and add 300 ml of clean water (A). Just shake           The lid is fixated now and hangs tight up in the packaging box
firmly (do not stir), so that the casing soil does not become            where it will function as a water tank (G).
too fine. Use your hands to break any large lumps into smaller
pieces. Next, cover the bucket or tray with casing soil (e.g. with       Then press the points in the bottom corners of the packaging
aluminium or plastic foil), so that the moisture added can soak          box inwards.
well into the casing soil in 24 hours time.
                                                                         The packaging box can now be left, with the points in the
DAY 2                                                                    bottom corners, on the edge of the white under-tray, leaving
Open the growing kit and put the moist casing soil carefully             the system closed but yet allowing air circulation (H).
in an even layer on the compost (B). Do not press the casing
soil. Then fully close the growing kit again with upended lid (C)        Through the hole at the top of the packaging box, pour 200 ml
and set it away for 3 days at room temperature (20-22° C). The           water into the lid (water tank) (I) fastened under it. Then seal the
mycelium will now start to grow through the casing soil.                 hole with the designated cap. During the growing stage, make
                                                                         sure there is always a thin layer of water in the water tank.
DAY 5
Open the growing kit and spray with a plant spray 150 ml of              Set the growing kit carefully away in a suitable place, so that it
clean water all over the casing soil (D). Then fully close the           does not have to be removed again. A place with a temperature of
growing kit again with upended lid and leave this for another            16-18° C is preferable. The place chosen must be well ventilated,
2 days at room temperature (20-22° C).                                   so not in a cupboard or a small place with inadequate ventilation.

DAY 7                                                                    DAY 10
The next phase has now begun, where the growing kit is                   For a good result it is recommended to 1x daily spray the casing
opened:                                                                  soil slightly damp with clean water starting from the 10th day.
                                                                         Make sure that you do not spray too much water, because
Open the growing kit and first of all spray again with a plant           this will be harmful to the development of the mycelium and
spray 150 ml of clean water all over the casing soil (E).                mushrooms.

                                                                                                                       .I

             E                                                       G

                               F

                   17-20° C
                                                                                                         H
DE

Anleitung                                                                                                MyChampi Maxi

                                                                                                         20-22° C

                                                         B                                                                  D

                                                                                                 C
20-22° C
                      A

TAG 1
Nehmen Sie das Säckchen mit der Deckerde aus der                  Den Deckel wieder umdrehen und wie angegeben (Öffnung
Verpackung, verschließen Sie das Zuchtset und stellen Sie es      nach oben) (F) oben in den Verpackungskarton drücken. Die
bei Zimmertemperatur (20-22° C) auf. Öffnen Sie das Säckchen      Durchdrückpunkte in den 4 oberen Ecken nach innen drücken
mit der Deckerde, schütten Sie die Erde in einen Eimer oder       und oben befestigen (G).
eine Schüssel und fügen Sie 300 ml sauberes Wasser hinzu (A).
Nur ein bisschen schütteln (nicht rühren), so dass die Deckerde   Dann auch die Durchdrückpunkte in den unteren Ecken nach
nicht zu fein wird. Große Brocken mit der Hand in kleinere        innen drücken.
Stücke bröckeln. Danach den Eimer oder die Schüssel mit der
Deckerde gut abdecken (z. B. mit Aluminium- oder Plastikfolie),   Der Verpackungskarton wird jetzt mit den Durchdrückpunkten
damit die zugefügte Feuchtigkeit in 24 Stunden gut in die         in den unteren Ecken auf den Rand des weißen Unterteils
Deckerde einziehen kann.                                          gestellt. Das System ist jetzt abgeschlossen, die Luft kann
                                                                  jedoch trotzdem zirkulieren (H).
TAG 2
Das Zuchtset öffnen und die feuchte Deckerde lose und gleich-     Durch das Loch oben im Verpackungskarton (I) 200 ml Wasser
mäßig auf dem Kompost anbringen (B). Die Deckerde nicht           in den darunter befestigten Deckel (Wasser-Reservoir) gießen.
andrücken. Danach das Zuchtset wieder vollständig mit dem         Danach das Loch mit dem dazugehörigen Verschluss abdichten.
umgekehrten Deckel (C) verschließen und 3 Tage bei                Achten Sie darauf, dass sich während der gesamten Zucht
Zimmertemperatur (20-22° C) stehen lassen. Das Mycelium           etwas Wasser im Reservoir befindet.
wächst jetzt in der Deckerde weiter.
                                                                  Stellen Sie das Zuchtset vorsichtig an einen Ort, wo es nicht
TAG 5                                                             mehr bewegt werden muss. Am besten ist ein Ort mit 16-18° C.
Öffnen Sie das Zuchtset und sprühen Sie mit einer Pflanzen-       Wichtig ist dabei eine gute Lüftung, also keine Schränke oder
spritze 150 ml sauberes Wasser gleichmäßig über die Deckerde      schlecht belüftete kleine Räume.
(D). Danach das Zuchtset wieder vollständig mit dem
umgekehrten Deckel abschließen und noch 2 Tage bei                TAG 10
Zimmertemperatur (20-22° C) stehen lassen.                        Um ein optimales Ergebnis zu erzielen, empfiehlt es sich, die
                                                                  Deckerde ab dem 10. Tag einmal täglich mit sauberem Wasser
TAG 7                                                             leicht feucht zu sprühen. Achten Sie darauf, dass Sie nicht
Jetzt hat die folgende Phase begonnen, in der das Zuchtset        zu viel Wasser verwenden, denn das beeinträchtigt die
geöffnet wird: Das Zuchtset öffnen und erst wieder mit einer      Entwicklung des Myceliums und der Champignons.
Pflanzenspritze 150 ml sauberes Wasser gleichmäßig über die
Deckerde sprühen (E).

                                                                                                                    .I

                 E                                                   G

                                     F

                          17-20° C
                                                                                                     H
EN
Picking the 1st run MyChampi Maxi
17-20° C
D
B
C
A
Day 18 Extra runs
Depending on the circumstances, the first fungus buds could After picking the 2nd run, you can still get extra runs in the
appear, which will then grow into mushrooms. Harvest the same way, until the compost runs out and there is no more or
mushrooms when their button is 3-5 cm, or just whenever you hardly any more yield from the subsequent runs.
think they are nice. Do not wait too long before harvesting
because ultimately the mushroom cap will open out, like any The substrate and the environment of the mushrooms are
other mushroom. excellent breeding grounds for other fungi and bacterium. After
more than 3 successive runs the growing kit could gradually
Pick the mushrooms by carefully breaking or twisting them become more contaminated. In that case, it would be better
out of the casing soil (A). If you are too rough when harvesting and more hygienic to cease the growing. The mushrooms that
the mushrooms, you will destroy part of the mycelium (in the do then grow, however, are just as edible.
casing soil) and you will get less of a harvest. Fill large holes
that may have occurred with some damp earth. In roughly one Some tips
week’s time, you will be able to pick the 1st batch or harvest • Should green mould occur (clearly recognizable by the green
of mushrooms. We call this the 1st run. Each time you finish colour) you could try to control this by covering the infected
picking, you must place the packaging box back on the white area with salt. This is not harmful.
under-tray. • Any small flies should be eliminated as soon as possible.
These tiny flies lay eggs which hatch into grubs which then
Later runs feed on the mycelium, giving you less or no mushroom
After picking the 1st run, remove the packaging box from the harvest.
breeding tray and again spray the casing soil with a plant spray • What is left after growing is a combination of compost and
with 150 ml of clean water (B). Then put the packaging box back casing soil known as Champost. This is a very good soil
on the white under-tray again (C). improver that can be used in the garden or kitchen garden.
Through the hole at the top of the packaging box, pour a further Place the growing kit:
200 ml of water into the lid (water tank) (D) fastened under it. NEVER directly in the sun
Then seal the hole with the designated cap. Once more, make NEVER in the vicinity of a heater or radiator
sure there is a thin layer of water in the water tank during the NEVER in a draught
growing stage. ALWAYS in a smoke-free environment
Your growing kit will then not work correctly.
For best results, it is recommended to now leave the growing
kit at rest for the first 3 days and then slightly damp the casing
soil 1x daily with clean water. Again make sure that you are not
spraying too much water.
After 1-2 weeks new buttons will have grown and a few days
later you will be able to pick the 2nd run.
Visit www.mychampi.com for further information on
mushrooms, the history, cultivation, recipes, etc.
Also try the cultivation of other exclusive and very tasty
mushrooms using the various MyFungi growing kits for grey
oyster mushrooms and shiitake, for example.DE
Pflücken der ersten Welle MyChampi Maxi
17-20° C
D
B
C
A
Tag 18 Weitere Wellen
Je nach Bedingungen erscheinen etwa ab dem 18. Tag die Auf dieselbe Art können Sie nach der zweiten Welle weitere
ersten Pilzknospen, die sich dann zu Champignons entwickeln. Wellen erreichen, bis der Kompost ausgelaugt ist und das
Ernten Sie die Champignons, wenn der Hut ca. 3-5 cm groß ist, Wachstum der Pilze nach und nach aufhört.
oder einfach, wenn Sie sie schön finden. Warten Sie aber nicht
zu lange, denn sonst öffnet sich – wie bei allen Pilzen – der Der Nährboden und die Umgebung der Champignons sind auch
Hut. Pflücken Sie die Pilze, indem Sie sie vorsichtig aus der ideal für andere Schimmel und Bakterien. Nach mehr als drei
Deckerde brechen oder drehen (A). Wenn die Champignons zu aufeinander folgenden Wellen kann es vorkommen, dass das
unvorsichtig geerntet werden, wird ein Teil des Geflechts in der Zuchtset dadurch langsam verunreinigt wird. Dann ist es besser
Erde beschädigt und dadurch verringert sich die Ernte. Wenn und hygienischer, die Zucht zu beenden. Die Champignons, die
große Löcher entstehen, füllen Sie diese mit etwas feuchter dann wachsen, sind übrigens noch gut essbar.
Erde auf. Sie können ca. eine Woche lang die erste Ernte
Champignons pflücken. Das nennen wir die erste Welle. Nach Einige Tipps
dem Pflücken den Verpackungskarton auf das weiße Unterteil • Falls grüner Schimmel entsteht (an der grünen Farbe gut zu
zurückstellen. erkennen), können Sie die betreffende Stelle mit Salz
bedecken. Dies ist nicht schädlich.
Spätere Wellen • Sollten Fliegen angelockt werden, sind diese so schnell wie
Nach der ersten Welle den Verpackungskarton vom Zuchtset möglich zu vernichten. Es entwickeln sich sonst Würmer, die
entfernen und die Deckerde wieder mit 150 ml sauberem Was- sich vom Mycelium ernähren. Die Folge sind geringere oder
ser einsprühen(B) und den Verpackungskarton wieder auf das gar keine Erträge.
weiße Unterteil zurückstellen (C). • Nach der Pilzzucht bleibt eine Kombination von Kompost und
Deckerde zurück, die man Champost nennt. Champost ist ein
Durch das Loch oben im Verpackungskarton erneut 200 ml sehr guter Bodenverbesserer für den Garten.
Wasser in den darunter befestigten Deckel (Wasser-Reservoir)
gießen (D). Danach das Loch wieder mit dem dazugehörigen Stellen Sie das Zuchtset:
Verschluss abdichten. Achten Sie erneut darauf, dass sich NIE direkt in die Sonne
während der gesamten Zucht etwas Wasser im Reservoir NIE auf oder in die Nähe der Heizung
befindet. NIE in Zugluft
IMMER in eine rauchfreie Umgebung
Um ein optimales Ergebnis zu erzielen, empfiehlt es sich, das Sonst kann das Zuchtset nicht einwandfrei funktionieren.
Zuchtset zunächst 3 Tage ruhen zu lassen und anschließend
die Deckerde einmal täglich mit sauberem Wasser leicht feucht
zu sprühen. Achten Sie auch jetzt wieder darauf, dass Sie nicht
zu viel Wasser verwenden.
Nach 1-2 Wochen wachsen wieder neue Knospen, und einige
Tage später können Sie die zweite Welle pflücken.
Auf www.mychampi.com finden Sie weitere Informationen über
die Champignons, ihre Geschichte und die Zucht sowie leckere
Rezepte und Vieles mehr.
Versuchen Sie auch einmal, mit den verschiedenen MyFungi-
Zuchtpaketen, andere exklusive und schmackhafte Pilze zu
züchten, zum Beispiel Austernseitlinge oder Shiitakes.EN
What are mushrooms? Incubation and inoculation
The mushroom propagates by releasing spores. One single
Fungi were most likely cultivated for the first time around fungus produces billions of spores. The compost, however, is
the year 600 in Asia. In Europe, the first cultivated fungi, the not inoculated with spores because then the cultivation would
mushroom, was introduced in the 17th century. be too timeconsuming. That is why it is inoculated with the
so-called spawn.
The word mushroom is derived from the French word for fungi
and moulds. One day, around 1650, a melon grower near Paris Spawn is a substance that consists of sterile compost or corn
discovered mushrooms growing on his growth fertiliser. He grains and is fully colonised with the mushroom mycelium.
decided to cultivate this new exotic delicacy commercially and The mushroom compost is inoculated with this spawn. Once
to introduce it in exclusive Parisian restaurants. It was at that inoculated, it takes approximately 2 weeks before the compost
time that the mushroom was given the nickname ‘Parisian is fully colonised with the mycelium.
mushroom’.
Covering with casing soil
Later on, the French gardener, Chambry, discovered that the Mushrooms will not grow in colonised compost alone. That is
caves had just the right cool and moist environment for why the compost has to be covered with a so-called top layer
cultivating mushrooms, afterwich a large-scale mushroom made up of a mixture of different types of peat and lime residue
cultivation developed in the caves around Paris. (a by-product from the sugar industry). This top layer is called
casing soil. The casing soil is critical and must be free of
The mushroom is by far the most familiar fungi pathogenic bacteria, have the correct structure, an acidity
A mushroom (Agaricus bisporus) is one of the many species of degree of pH 7.5, and be capable of retaining a lot of water.
fungi. Some 3,000 different species of fungi can be found in
Western Europe, approximately 50 of which are fit for human The bacteria that live in the casing soil stimulate the mycelium
consumption. Of the edible fungi, the mushroom is by far the to produce the mushrooms. Without these bacteria, no
most familiar one. mushrooms would grow, therefore good casing soil is
imperative to mushroom cultivation.
Fungi are classified as moulds. A fungus is actually the visible
fruit body of a mould and as such only a small part of that The growth during the cultivation
mould. The mould fungus, or mycelium, grows under the The growth during cultivation can be subdivided into 3 phases:
ground, invisible to the naked eye. This is a tight network of
fine threads, which with some species can even extend across Ingrowth in casing soil: the casing soil is colonised with
a surface area of several hectares. mycelium in a well-closed area.
Clearly, a fungus is not a plant, because plants contain Fruiting: The cultivation area is ventilated, which stimulates the
chlorophyll and with the aid of sunlight can store energy in the mycelium to form fruit bodies in the form of tiny buttons.
form of carbohydrates. The plant uses these carbohydrates
for its growth. Fungi do not contain chlorophyll and therefore Button outgrowth: the tiny buttons will grow into ready to
are unable to produce their own carbohydrates. They depend harvest mushrooms in approximately 5 days, the quantity
on the organic matter of dead or living organisms for their and size of the mushrooms depends on the temperature and
energy supply, from which they can extract their nutrients humidity of the air.
(carbohydrates). Since the mould in turn provides nutrients for
the plants, balance is restored to the food chain. The entire process from covering the compost with casing soil to
harvesting the first mushrooms takes approximately 3 weeks.
How do mushrooms grow? The harvest
Compost preparation The mushrooms do not grow continuously, but appear in
Cultivated mushrooms grow on compost. In the Netherlands, weekly “flushes”. Such a “flush” can be defined as a harvesting
this culture medium is made with the following ingredients: period. After three to four harvest weeks, a culture terminates.
straw, poultry and horse manure, gypsum and a lot of water. There is a substantial decline in the harvest and a considerable
For the rest, no chemicals are used. After these ingredients increase in the likelihood of disease.
have been mixed, a fermentation process begins. The product
at the end of this process is called “mushroom compost”.DE
Was sind Champignons?
Die ersten gezüchteten Pilze kamen wahrscheinlich um das Jahr
600 aus Asien. Nach Europa kam der erste gezüchtete Pilz, der
Champignon, erst im 16. Jahrhundert.
Champignon ist ursprünglich das französische Wort für Pilz
und Schimmelpilz. Um 1650 entdeckte ein Melonenzüchter aus
der Nähe von Paris eines Tages, dass auf dem Brutmist seiner
Melonen Champignons wuchsen. Er beschloss, diese neue
exotische Leckerei zu züchten, und sie in den exklusiven
Pariser Restaurants anzubieten.
Der Champignon bekam damals den Beinamen: „Pariser Pilz“.
Später entdeckte der französische Gärtner Chambry, dass in Das Abdecken mit Deckerde
Grotten das richtige kühle und feuchte Klima zur Champignon- In dem durchwachsenden Kompost können sich noch keine
zucht herrscht. Danach entwickelte sich in den Grotten um Champignons bilden. Dazu muss der Kompost mit einer so
Paris eine umfangreiche Champignonzucht. genannten „Deckerde“ abgedeckt werden, die aus
verschiedenen Sorten Torf und Schaumerde (einem Abfall-
Der Champignon ist von den essbaren Pilzen der Bekannteste produkt der Zuckerindustrie) besteht.
Es gibt zahlreiche Pilzarten; der Champignon (Agaricus bisporus)
gehört dazu. In Westeuropa kommen mehr als 3.000 verschie- Diese Decklage nennen wir “Deckerde”. Die Deckerde ist sehr
dene Pilzarten vor, ungefähr 50 Arten davon sind essbar. Der empfindlich und muss frei von Krankheitskeimen sein, die
Champignon ist von den essbaren Pilzen der Bekannteste. richtige Struktur und einen Säuregrad von 7,5 pH haben und
muss viel Wasser aufnehmen können.
Pilze gehören zu der Familie der Schimmelpilze. Ein Pilz ist
eigentlich die sichtbare Frucht eines Schimmels und darum Die Bakterien, die in der Deckerde leben, stimulieren das
nur ein kleiner Teil des Schimmelpilzes. Unterirdisch und Mycelium zur Bildung von Champignons. Ohne diese Bakterien
unsichtbar für das Auge wächst der Schimmelschwamm, auch können keine Champignons ausgebildet werden - gute
Mycelium genannt. Dies ist ein dichtes Netzwerk feiner Fäden, Deckerde ist also von größter Wichtigkeit beim Züchten
das bei manchen Arten bis zu einer Oberfläche von mehreren von Champignons.
Hektar groß werden kann.
Wachstum während der Züchtung
Ein Pilz ist eindeutig keine Pflanze. Pflanzen haben Blattgrün Das Wachstum während der Zucht erfolgt in drei Phasen:
und können mit Hilfe des Lichts Energie in Form von Kohle-
hydraten lagern. Die Pflanze braucht diese Kohlehydrate für ihr Durchwachsen der Deckerde: die Deckerde wird in einem gut
Wachstum. Pilze haben kein Blattgrün und können darum keine abgeschirmten Raum mit Mycelium durchwachsen.
Kohlehydrate produzieren. Für ihre Energieversorgung sind sie
abhängig von organischen Bestandteilen von lebenden oder Knospenbildung: Der Zuchtraum wird ventiliert. Dadurch
toten Organismen, denen sie Nährstoffe (Kohlehydrate) wird das Mycelium stimuliert, Früchte in der Form von kleinen
entziehen. Die Schimmelpilze sorgen wiederum für Nahrung Knospen zu bilden.
für die Pflanzen und so schließt sich der Nahrungskreislauf.
Knospenwachstum: Die kleinen Knospen wachsen in
WIe wachsen Champignons? c.a. 5 Tagen zu erntereifen Champignons heran. Die Menge
und Größe der Champignons hängt von Lufttemperatur und
Herstellung von Kompost Luftfeuchtigkeit ab.
Kultivierte Champignons wachsen auf Kompost. Dieser
Nährboden wird aus folgenden Bestandteilen hergestellt: Der ganze Prozess vom Abdecken des Komposts mit Deckerde
Stroh, Hühner- und Pferdemist, Gips und viel Wasser. Weiter bis zur Ernte der Champignons dauert es ungefähr 3 Wochen.
werden keine Chemikalien zugefügt. Nach der Mischung dieser
Bestandteile beginnt ein Fermentationsprozess. Dieser Prozess Die Ernte
endet mit dem so genannten „Champignonkompost”. Die Champignons wachsen nicht fortlaufend weiter, sondern
erscheinen in wöchentlichen “Wellen”. Eine “Welle” ist eine
Das Brüten und Impfen Ernteperiode. Nach drei bis vier Erntewochen wird die Pilzkultur
Der Champignon pflanzt sich durch Sporen fort. Ein einziger beendet. Die Erntemenge wird immer kleiner und die Chancen,
Pilz produziert Milliarden Sporen. Der Kompost wird aber nicht Krankheiten zu bekommen, nehmen zu.
mit den Sporen geimpft, da das zu zeitaufwändig wäre. Darum
wird mit der so genannten „Pilzbrut” geimpft. Die Pilzbrut bes-
teht aus sterilem Kompost oder Getreidekörnern, der mit Cham-
pignonmycelium durchwachsen ist. Mit dieser Pilzbrut wird
der Champignonkompost geimpft. Nach der Impfung dauert es
noch ungefähr 2 Wochen, bis der Kompost vollständig mit dem
Mycelium durchwachsen ist.Recipes Rezepten
Pasta Putanesca Pasta Putanesca
No of persons: 2 Portionen: 2
Preparation time: 15 min. Zubereitungszeit: 15 Min
Meal: lunch Mittagessen
Ingredients Zutaten
• 200g pasta (penne) 200 g Pasta (Penne) •
• 1-2 tablespoons olive oil 1-2 Esslöffel Olivenöl •
• 1/2 tin (approx. 15g) anchovy fillets 1/2 Dose (circa 15 g) Sardellenfilets •
(net weight of tin, total 30g) (Nettogewicht Dose 30 g) •
• 1 red pepper 1 rote Chilischote •
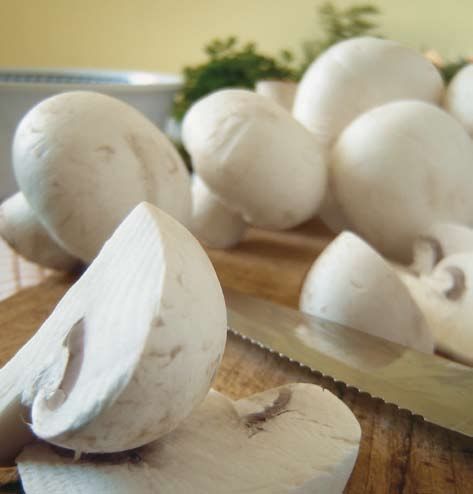
• 200g sliced mushrooms 200 g Champignons in Scheibchen •
• 2 cloves of garlic 2 Knoblauchzehen •
• 10 black pitless olives 10 schwarze Oliven ohne Stein •
• 10 fresh basil leaves 10 Blätter frisches Basilikum •
• salt and pepper Salz und Pfeffer •
• 75g grated Parmesan cheese 75 g frisch geriebener Parmesan •
Preparation method Zubereitung
Cook the pasta al dente (firm, but not soft) according to the Die Pasta “al dente” (bissfest) nach Anweisung auf der
instructions on the packet. Heat 1 tablespoon of olive oil in a Verpackung kochen. 1 Esslöffel Olivenöl in der Pfanne erhitzen
frying pan, add the anchovy, and melt on a low heat. Cut the und die Sardellenfilets darin auf kleiner Flamme schmelzen
red pepper lengthways, remove the seeds, and dice the pepper. lassen. Die Chilischote der Länge nach aufschneiden, die Kerne
Add the mushrooms together with the red pepper to the entfernen und in kleine Stücke schneiden. Die Champignons
anchovy in the pan. Crush the garlic, add to the pan, and mit der Chilischote zu den Sardellenfilets in die Pfanne geben.
cook the mixture for approximately 5 minutes. Cut the olives Knoblauch darüber pressen und alles ca. 5 Min kochen lassen.
into rings and chop the basil finely. Drain the pasta well and stir Die Oliven in Ringe schneiden und das Basilikum fein hacken.
it together with the olives and basil through the mushrooms. Pasta gut abtropfen lassen und mit den Oliven und dem Basili-
Salt and pepper to taste, and possibly a little extra olive oil. kum durch die Champignons rühren. Abschmecken
Serve with grated Parmesan cheese. mit Pfeffer und ev. etwas Olivenöl.Mit dem geriebenen
Parmesan servieren.
Stir fried celery Im Wok gebackener Sellerie
with mushrooms mit Champignons
No of persons: 2 Portionen: 2
Preparation time: 15 min. Zubereitungszeit: 15 Min
Meal: side dish Beilage
Ingredients Zutaten
• 200g pasta celery 1/2 Strauch Bleichsellerie •
• 125g mushrooms 125 g Champignons •
• 1 onion 1 Zwiebel •
• 1 tablespoon oil 1 Esslöffel Öl •
• 1 garlic clove 1 Knoblauchzehe •
• salt and pepper Salz und Pfefferl •
Preparation method Zubereitung
Cut the stalk and leaves from the celery. Wash the stalks and Den Strunk und die Blätter des Selleries klein schneiden.
cut them into small strips. Cut the mushrooms into slices. Stängel waschen und in Scheiben schneiden. Die Champignons
Peel and dice the onion. Heat the oil in a wok or frying pan and säubern und in Scheiben schneiden. Zwiebel schälen und fein
fry the onions until glazed. Crush the garlic clove and add to schneiden. Öl in der Pfanne erhitzen und die Zwiebel glasig
the pan. Stir the celery and mushrooms through the onion. braten. Den Knoblauch darüber pressen und den Sellerie und
Cook the vegetables on a medium heat for a few minutes so die Champignons mit der Zwiebel verrühren. Das Gemüse unter
that they are still crunchy to the bite. Add salt and pepper to regelmäßigem Rühren auf mittlerer Hitze in einigen Minuten
taste. gar, aber noch bissfest werden lassen. Nach Geschmack mit
Pfeffer und Salz abschmecken.
ENJOY YOUR MEAL GUTEN APPETITSie können auch lesen