NI DataFinder Server Edition - Search Engine for Technical Data
←
→
Transkription von Seiteninhalten
Wenn Ihr Browser die Seite nicht korrekt rendert, bitte, lesen Sie den Inhalt der Seite unten
NI DataFinder Server Edition
Search Engine for Technical Data

NI DataFinder Server Edition

July 2014
374430J

Support

Worldwide Technical Support and Product Information
ni.com

Worldwide Offices
Visit ni.com/niglobal to access the branch office websites, which provide up-to-date
contact information, support phone numbers, email addresses, and current events.

National Instruments Corporate Headquarters
11500 North Mopac Expressway Austin, Texas 78759-3504 USA Tel: 512 683 0100

For further support information, refer to the Technical Support and Professional Services
appendix. To comment on National Instruments documentation, refer to the National
Instruments website at ni.com/info and enter the Info Code feedback.

© 2006–2014 National Instruments Ireland Resources Limited. All rights reserved.

Legal Information
Limited Warranty
This document is provided ‘as is’ and is subject to being changed, without notice, in future editions. For the latest version,
refer to ni.com/manuals. NI reviews this document carefully for technical accuracy; however, NI MAKES NO EXPRESS
OR IMPLIED WARRANTIES AS TO THE ACCURACY OF THE INFORMATION CONTAINED HEREIN AND
SHALL NOT BE LIABLE FOR ANY ERRORS.
NI warrants that its hardware products will be free of defects in materials and workmanship that cause the product to fail to
substantially conform to the applicable NI published specifications for one (1) year from the date of invoice.
For a period of ninety (90) days from the date of invoice, NI warrants that (i) its software products will perform substantially
in accordance with the applicable documentation provided with the software and (ii) the software media will be free from
defects in materials and workmanship.
If NI receives notice of a defect or non-conformance during the applicable warranty period, NI will, in its discretion: (i) repair
or replace the affected product, or (ii) refund the fees paid for the affected product. Repaired or replaced Hardware will be
warranted for the remainder of the original warranty period or ninety (90) days, whichever is longer. If NI elects to repair or
replace the product, NI may use new or refurbished parts or products that are equivalent to new in performance and reliability
and are at least functionally equivalent to the original part or product.
You must obtain an RMA number from NI before returning any product to NI. NI reserves the right to charge a fee for
examining and testing Hardware not covered by the Limited Warranty.
This Limited Warranty does not apply if the defect of the product resulted from improper or inadequate maintenance,
installation, repair, or calibration (performed by a party other than NI); unauthorized modification; improper environment;
use of an improper hardware or software key; improper use or operation outside of the specification for the product; improper
voltages; accident, abuse, or neglect; or a hazard such as lightning, flood, or other act of nature.
THE REMEDIES SET FORTH ABOVE ARE EXCLUSIVE AND THE CUSTOMER’S SOLE REMEDIES, AND SHALL
APPLY EVEN IF SUCH REMEDIES FAIL OF THEIR ESSENTIAL PURPOSE.
EXCEPT AS EXPRESSLY SET FORTH HEREIN, PRODUCTS ARE PROVIDED "AS IS" WITHOUT WARRANTY OF
ANY KIND AND NI DISCLAIMS ALL WARRANTIES, EXPRESSED OR IMPLIED, WITH RESPECT TO THE
PRODUCTS, INCLUDING ANY IMPLIED WARRANTIES OF MERCHANTABILITY, FITNESS FOR A
PARTICULAR PURPOSE, TITLE OR NON-INFRINGEMENT, AND ANY WARRANTIES THAT MAY ARISE FROM
USAGE OF TRADE OR COURSE OF DEALING. NI DOES NOT WARRANT, GUARANTEE, OR MAKE ANY
REPRESENTATIONS REGARDING THE USE OF OR THE RESULTS OF THE USE OF THE PRODUCTS IN TERMS
OF CORRECTNESS, ACCURACY, RELIABILITY, OR OTHERWISE. NI DOES NOT WARRANT THAT THE
OPERATION OF THE PRODUCTS WILL BE UNINTERRUPTED OR ERROR FREE.
In the event that you and NI have a separate signed written agreement with warranty terms covering the products, then the
warranty terms in the separate agreement shall control.
Copyright
Under the copyright laws, this publication may not be reproduced or transmitted in any form, electronic or mechanical,
including photocopying, recording, storing in an information retrieval system, or translating, in whole or in part, without the
prior written consent of National Instruments Corporation.
National Instruments respects the intellectual property of others, and we ask our users to do the same. NI software is protected
by copyright and other intellectual property laws. Where NI software may be used to reproduce software or other materials
belonging to others, you may use NI software only to reproduce materials that you may reproduce in accordance with the
terms of any applicable license or other legal restriction.
End-User License Agreements and Third-Party Legal Notices
You can find end-user license agreements (EULAs) and third-party legal notices in the following locations:
• Notices are located in the \_Legal Information and
   directories.
• EULAs are located in the \Shared\MDF\Legal\license directory.
• Review \_Legal Information.txt for information on including legal information in
   installers built with NI products.
U.S. Government Restricted Rights
If you are an agency, department, or other entity of the United States Government (“Government”), the use, duplication,
reproduction, release, modification, disclosure or transfer of the technical data included in this manual is governed by the
Restricted Rights provisions under Federal Acquisition Regulation 52.227-14 for civilian agencies and Defense Federal
Acquisition Regulation Supplement Section 252.227-7014 and 252.227-7015 for military agencies.
Trademarks
Refer to the NI Trademarks and Logo Guidelines at ni.com/trademarks for more information on National Instruments
trademarks.
ARM, Keil, and µVision are trademarks or registered of ARM Ltd or its subsidiaries.
LEGO, the LEGO logo, WEDO, and MINDSTORMS are trademarks of the LEGO Group.
TETRIX by Pitsco is a trademark of Pitsco, Inc.
FIELDBUS FOUNDATION™ and FOUNDATION™ are trademarks of the Fieldbus Foundation.
EtherCAT® is a registered trademark of and licensed by Beckhoff Automation GmbH.
CANopen® is a registered Community Trademark of CAN in Automation e.V.
DeviceNet™ and EtherNet/IP™ are trademarks of ODVA.
Go!, SensorDAQ, and Vernier are registered trademarks of Vernier Software & Technology. Vernier Software & Technology
and vernier.com are trademarks or trade dress.
Xilinx is the registered trademark of Xilinx, Inc.
Taptite and Trilobular are registered trademarks of Research Engineering & Manufacturing Inc.
FireWire® is the registered trademark of Apple Inc.
Linux® is the registered trademark of Linus Torvalds in the U.S. and other countries.
Handle Graphics®, MATLAB®, Real-Time Workshop®, Simulink®, Stateflow®, and xPC TargetBox® are registered
trademarks, and TargetBox™ and Target Language Compiler™ are trademarks of The MathWorks, Inc.
Tektronix®, Tek, and Tektronix, Enabling Technology are registered trademarks of Tektronix, Inc.
The Bluetooth® word mark is a registered trademark owned by the Bluetooth SIG, Inc.
The ExpressCard™ word mark and logos are owned by PCMCIA and any use of such marks by National Instruments is under
license.
The mark LabWindows is used under a license from Microsoft Corporation. Windows is a registered trademark of Microsoft
Corporation in the United States and other countries.
Other product and company names mentioned herein are trademarks or trade names of their respective companies.
Members of the National Instruments Alliance Partner Program are business entities independent from National Instruments
and have no agency, partnership, or joint-venture relationship with National Instruments.
Patents
For patents covering National Instruments products/technology, refer to the appropriate location: Help»Patents in your
software, the patents.txt file on your media, or the National Instruments Patent Notice at ni.com/patents.
Export Compliance Information
Refer to the Export Compliance Information at ni.com/legal/export-compliance for the National Instruments global
trade compliance policy and how to obtain relevant HTS codes, ECCNs, and other import/export data.
WARNING REGARDING USE OF NATIONAL INSTRUMENTS PRODUCTS
YOU ARE ULTIMATELY RESPONSIBLE FOR VERIFYING AND VALIDATING THE SUITABILITY AND
RELIABILITY OF THE PRODUCTS WHENEVER THE PRODUCTS ARE INCORPORATED IN YOUR SYSTEM OR
APPLICATION, INCLUDING THE APPROPRIATE DESIGN, PROCESS, AND SAFETY LEVEL OF SUCH SYSTEM
OR APPLICATION.
PRODUCTS ARE NOT DESIGNED, MANUFACTURED, OR TESTED FOR USE IN LIFE OR SAFETY CRITICAL
SYSTEMS, HAZARDOUS ENVIRONMENTS OR ANY OTHER ENVIRONMENTS REQUIRING FAIL-SAFE
PERFORMANCE, INCLUDING IN THE OPERATION OF NUCLEAR FACILITIES; AIRCRAFT NAVIGATION; AIR
TRAFFIC CONTROL SYSTEMS; LIFE SAVING OR LIFE SUSTAINING SYSTEMS OR SUCH OTHER MEDICAL
DEVICES; OR ANY OTHER APPLICATION IN WHICH THE FAILURE OF THE PRODUCT OR SERVICE COULD
LEAD TO DEATH, PERSONAL INJURY, SEVERE PROPERTY DAMAGE OR ENVIRONMENTAL HARM
(COLLECTIVELY, “HIGH-RISK USES”). FURTHER, PRUDENT STEPS MUST BE TAKEN TO PROTECT AGAINST
FAILURES, INCLUDING PROVIDING BACK-UP AND SHUT-DOWN MECHANISMS. NI EXPRESSLY DISCLAIMS
ANY EXPRESS OR IMPLIED WARRANTY OF FITNESS OF THE PRODUCTS OR SERVICES FOR HIGH-RISK
USES.

Contents
About This Manual
Related Documentation .................................................................................................... vii

Chapter 1
Creating and Connecting DataFinder Servers
Creating DataFinder Servers ............................................................................................ 1-1
Exporting Client Configurations ...................................................................................... 1-4
Connecting Clients to DataFinder Servers ....................................................................... 1-5
DIAdem as a Client of a DataFinder Server..................................................................... 1-6
LabVIEW as a Client of a DataFinder Server .................................................................. 1-7

Chapter 2
Configuring DataFinder Servers
Configuring DataFinder Servers....................................................................................... 2-1
    Defining Search Areas.............................................................................................. 2-1
    Reading File Types with DataPlugins ..................................................................... 2-2
    Planning Indexing..................................................................................................... 2-3
    Specifying the Security Settings............................................................................... 2-3
    Optimizing Custom Properties ................................................................................. 2-4
    Specifying the Start Options of DataFinder Servers ................................................ 2-4
Server Manager................................................................................................................. 2-5
    Duplicating and Upgrading DataFinder Servers ...................................................... 2-6
    Importing the Local DataFinder ............................................................................... 2-7
    Exporting a DataFinder Server Configuration.......................................................... 2-7
Browsing Data .................................................................................................................. 2-7

Chapter 3
DataFinder as ASAM ODS Server
Configuring a DataFinder Server as ASAM ODS Server ................................................ 3-1
    Exporting a Client Configuration ............................................................................. 3-2
    Connecting Clients with ASAM ODS DataFinder Servers...................................... 3-2
          DIAdem as the Client of an ASAM ODS Server ............................................. 3-2
          Third Party Software as Client ......................................................................... 3-3
Properties of the ASAM ODS Server............................................................................... 3-4
    Structure of the Data Model ..................................................................................... 3-4
    Further Capabilities of the ASAM ODS Server ....................................................... 3-5

                                                                    © National Instruments Ireland Resources Limited                   |   v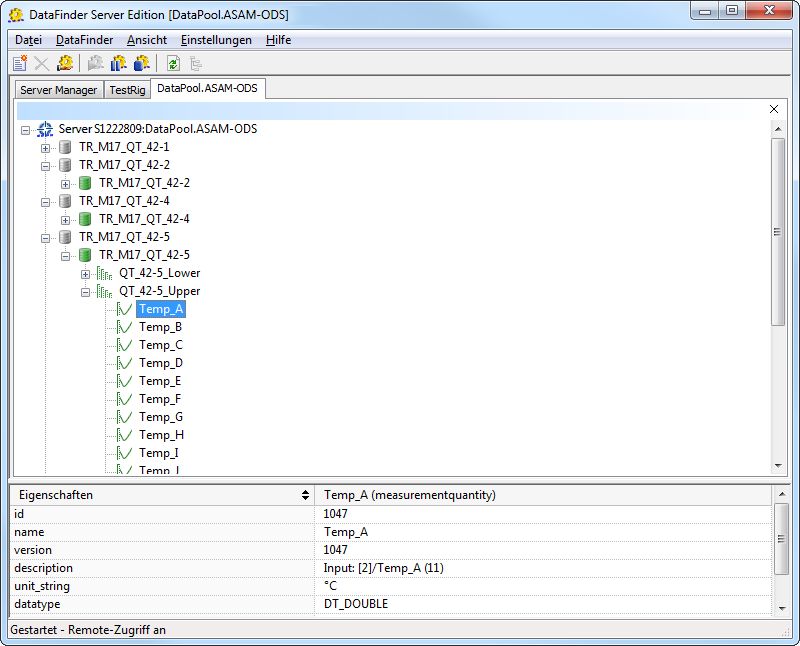
Contents

Chapter 4
DataFinder Federation
Creating a DataFinder Federation..................................................................................... 4-1
    Adding a DataFinder Server to a Federation ............................................................ 4-2
    Connecting Clients to a DataFinder Federation........................................................ 4-3
Configuring a DataFinder Federation ............................................................................... 4-3
    Configuration ............................................................................................................ 4-3
    Start Options ............................................................................................................. 4-4

Chapter 5
Integrating the DataFinder Server in the Work Environment
NI License Manager.......................................................................................................... 5-1
Hardware and System Requirements ................................................................................ 5-1
Backing Up Configuration and Indexes............................................................................ 5-2
Uninstalling DataFinder Server Edition ........................................................................... 5-3
Connecting Databases with Adaptors ............................................................................... 5-3
Configuring Firewalls and Network Address Translating Routers .................................. 5-3
    Firewalls.................................................................................................................... 5-4
    Network Address Translating Routers...................................................................... 5-4
Supporting Archiving Systems ......................................................................................... 5-5

Appendix A
Technical Support and Professional Services

Index

vi   |   ni.com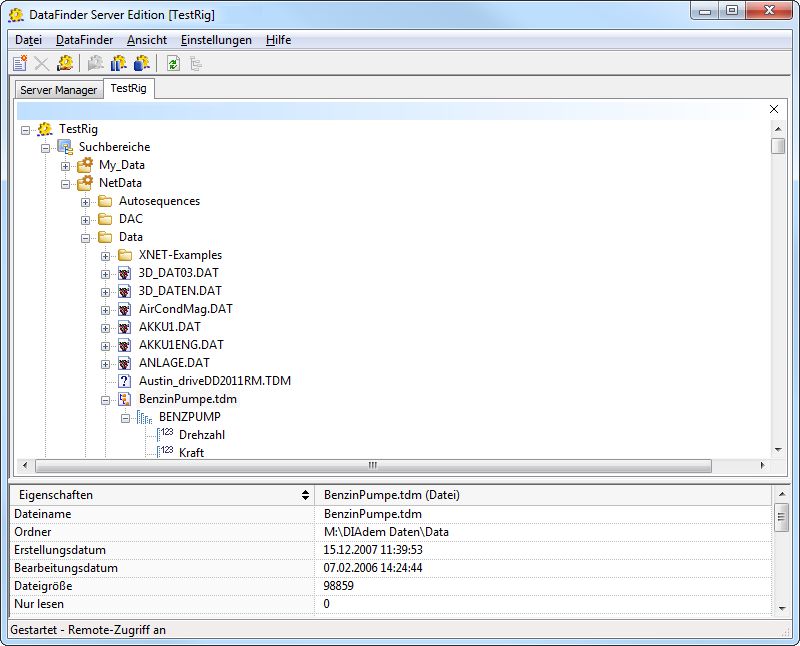
About This Manual
You can use this manual to familiarize yourself with the DataFinder Server Edition features and
how to use them.

The first chapter shows you how to create a DataFinder server in a few easy steps and how to
connect clients to this DataFinder server. The second chapter describes the DataFinder Manager
and shows you how to configure DataFinder servers. The third chapter describes how you can
use a DataFinder server as an ASAM ODS server. The fourth chapter describes how you can
combine several DataFinder servers to form a federation, and the fifth chapter describes how to
configure firewalls and NAT routers, and how to connect archiving systems.

Related Documentation
For more detailed information on the DataFinder Server Edition, refer to the following
documentation:
•    NI DataFinder Server Edition Help which you can open in every dialog box with the Help
     button, on the toolbar with Help»Contents, or with .
•    NI DIAdem: Data Mining, Analysis, and Report Generation
     This DIAdem manual describes the structure of DIAdem and how you use DIAdem to find
     data, to execute analyses, to create reports, and to combine all the functions in scripts.
     DIAdem can access DataFinder servers as a client.
•    NI LabVIEW DataFinder Toolkit
     Use the LabVIEW DataFinder Toolkit to work with the DataFinder in LabVIEW. You can
     use the DataFinder to search for simple text in indexed data, or to execute advanced
     searches for data properties.
     LabVIEW can access the DataFinder server with the DataFinder toolkit as client.

                                              © National Instruments Ireland Resources Limited   |   vii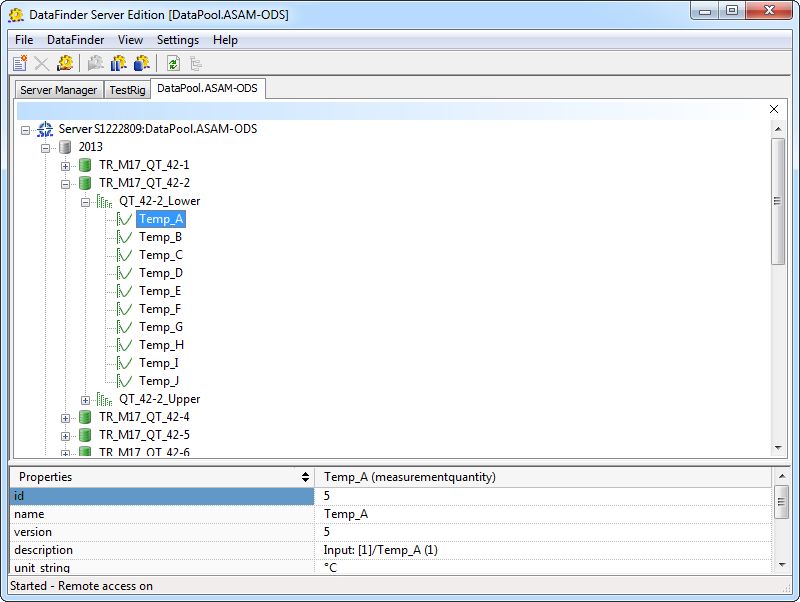
Creating and Connecting
                                                                                            1
DataFinder Servers
A DataFinder server is a search engine that you install on a server. The DataFinder server
searches for files that contain technical data in specified folders on computers in a network. The
DataFinder server indexes the data files to provide the clients with data properties. The
DataPlugins registered in the server manager determine which file types the DataFinder server
indexes.

You can define several DataFinder servers in the server manager to provide different data for
different work groups. Clients, such as DIAdem or LabVIEW, communicate with the DataFinder
servers to query the indexed data and to load search results.

You can use a DataFinder server as an ASAM ODS server to display, browse, and filter data with
an ASAM conform data model. All applications which support the ASAM ODS Corba interface
can access the ASAM ODS server in order to find and load this data.

You can combine several DataFinder servers to form a DataFinder federation. A client addresses
a DataFinder federation in the same way as it addresses a single DataFinder server.

           Note The license specifies how many DataFinder servers you can create and how
           many users can access the DataFinder server simultaneously. For more information
           about licensing, refer to the section on NI License Manager in Chapter 5, Integrating
           the DataFinder Server in the Work Environment.

Creating DataFinder Servers
When you start DataFinder Server Edition, the server manager opens. In the server manager you
create and configure DataFinder servers and test the functionality of the DataFinder servers. To
create a DataFinder server, complete the following steps:
1.   To start DataFinder Server Edition, select Start»All Programs»National Instruments»
     DataFinder Server Edition»DataFinder Manager.
     If the server manager does not have a DataFinder server, the New DataFinder Server
     dialog box opens automatically the first time you launch the server manager.
2.   Enter, for example, TestRig as the name of the DataFinder server to be created.

                                              © National Instruments Ireland Resources Limited   |   1-1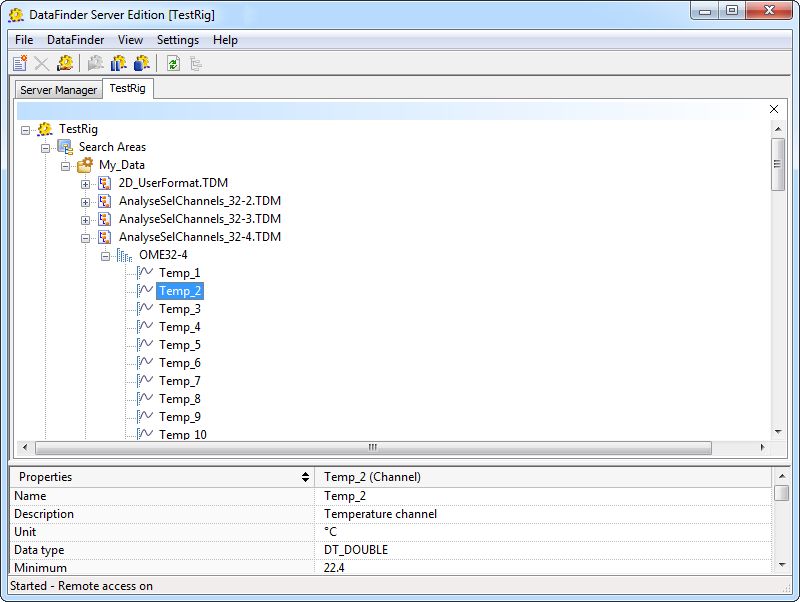
Chapter 1       Creating and Connecting DataFinder Servers

3.   Click Add Search Area to specify a search area.

     Search areas are the file system folders where clients can search for data files.
4.   Enter My_Data as the alias name for the search area.
5.   Click Choose a Folder.

     a.     Select the folder that you want the DataFinder server to index.
     b.     Click OK to close the dialog box.
6.   Click Share Folder.

     The server manager opens the Windows share dialog box, where you share folders with
     other users on the network. You must share the folders in the search area so the clients can
     read the descriptive information and also load the files found in the search.
7.   Click OK to close the Windows share dialog box.
8.   Open the list in the Client path textbox and select the shared network path. The Add
     Search Area dialog box displays the path of the shared folder, as shown in the following
     figure:
                                 Figure 1-1. Defining a Search Area

               Note Use shared folders (\\Data_Server\..) and not the network drives to
               which you assigned a drive letter (M:\..). You cannot use these mapped network
               drives with a letter together with the start option Run as service.

1-2 | ni.com
NI DataFinder Server Edition

9.   Click OK to close the Add Search Area dialog box.
     The New DataFinder Server dialog box displays the newly created search area My_Data,
     as shown in the following figure:
                      Figure 1-2. Creating a New DataFinder Server

     You can now define more search areas where clients can search for data. Select Exclude
     Subfolder from the context menu of a search area to exclude folders from the search. Click
     Advanced to set the service registration, security settings, and desktop shortcuts for the
     DataFinder server.

                                             © National Instruments Ireland Resources Limited   |   1-3
Chapter 1 Creating and Connecting DataFinder Servers
10. Click Finish to close the dialog box.
The server manager displays the new DataFinder server, as shown in the following figure.
Figure 1-3. Server Manager with Configured DataFinder Server
Exporting Client Configurations
You must connect the clients to a DataFinder server so that they can execute queries on a server
and load data. You can export the required connection settings, save the settings in a file, and
then enable the settings on the client. To export a client configuration, complete the following
steps.
1. Select the TestRig DataFinder server in the server manager.
2. Click Export a Client Configuration on the toolbar.
3. Accept the suggested name for the export file TestRig@. The name
consists of the name of the DataFinder server and the name of the server that DataFinder
Server Edition is installed on.
4. Enable the Include DataPlugins in client configuration checkbox to save all the
DataPlugins in the export file, as shown in the following figure.
When you export the DataPlugins, you provide the client with all the DataPlugins for
loading the files that the DataFinder server TestRig indexes and finds.
1-4 | ni.comNI DataFinder Server Edition
5. Select Synchronize DataPlugins automatically to synchronize DataPlugins with the
DataPlugins installed on the server and to refresh them, if necessary, every time the client
connects to the server.
Figure 1-4. Exporting a Client Configuration
Note You can integrate only VBScript DataPlugins or VBCrypt DataPlugins into a
URF file or synchronize them with the client.
6. Click OK to open the Save As dialog box.
7. Click Save to save the client configuration. The server manager saves the connection
parameters in a file that has the extension .urf.
Connecting Clients to DataFinder Servers
For a client to connect to the DataFinder server TestRig, you must register the connection
configuration on the client computer.
1. Copy the TestRig@Computer.urf file to the client computer.
2. Double-click the TestRig@Computer.urf file to register the connection parameters and
the DataPlugins on the client computer.
If you import DataPlugins that are already registered on this computer when you register
the connection parameters, you can specify for each DataPlugin whether the originally
installed DataPlugin is overwritten or not.
A message indicates that the connection configuration and the new DataPlugins are
registered.
© National Instruments Ireland Resources Limited | 1-5Chapter 1 Creating and Connecting DataFinder Servers
DIAdem and LabVIEW can use any DataFinder server that is connected to the DIAdem or to the
LabVIEW computer on a network. You can use security settings to limit the clients’ access rights
for DataFinder servers.
DIAdem as a Client of a DataFinder Server
After registering the connection settings on the client computer, you can use DIAdem to navigate
in the folders, which the TestRig server shares, and search for data.
1. Open DIAdem.
2. Select DIAdem NAVIGATOR.
3. Select Settings»DataFinder Server.
The following figure shows the DataFinder Server - Connections dialog box with all the
DataFinder servers registered in DIAdem.
Figure 1-5. DataFinder Server Registered in DIAdem
1-6 | ni.comNI DataFinder Server Edition
Note To import a URF file, click Import DataFinder Server Connections in the
DataFinder Server - Connections dialog box. After importing the file, click
Properties to open the client configuration settings. Click Test to check the
connection to the DataFinder server.
4. Click Open to open the DataFinder server in DIAdem NAVIGATOR.
The file browser in the following figure shows a tree view of the search areas of the
DataFinder server. If the associated DataPlugin allows, you can navigate to channel level
in the files.
Figure 1-6. Navigating in Search Areas of a DataFinder Server
LabVIEW as a Client of a DataFinder Server
After registering the connection settings on the client computer, you can use LabVIEW to
connect the TestRig DataFinder server.
1. Open LabVIEW with an empty VI.
2. Right-click the block diagram and select Connectivity»DataFinder Toolkit to open the
palette.
© National Instruments Ireland Resources Limited | 1-7Chapter 1 Creating and Connecting DataFinder Servers
3. Click Search Text in the DataFinder Toolkit palette and drag and drop the VI into the
block diagram.
4. Right-click the DataFinder reference terminal and select Create»Constant from the
context menu.
5. Open the context menu of the previously created constant and select Manage DataFinders.
LabVIEW opens the Manage DataFinders dialog box that you can use to create, delete,
or configure DataFinders.
Figure 1-7. DataFinder Server Registered in LabVIEW
6. Select the TestRig DataFinder server from the list of registered DataFinders.
Note The LabVIEW DataFinder Toolkit is not included in the standard LabVIEW
package. You can use the functions of the LabVIEW DataFinder Toolkit only when
you have installed and activated the toolkit.
1-8 | ni.comConfiguring DataFinder Servers
2
Use the server manager to create, configure, duplicate, or delete DataFinder servers. In the server
manager you also can make general settings, export the settings for connecting clients to a
DataFinder server, optimize custom properties, and open the search areas of a DataFinder server
in a browser view.
Configuring DataFinder Servers
To configure a DataFinder server, double-click the DataFinder server in the server manager. In
the DataFinder server configuration, you can define search areas, export or import DataFinder
server configurations, and see which file types the DataFinder server uses for the search. You
can define global indexing schedulers for all data files of a DataFinder server, but you also can
create individual indexing schedulers for search areas.
You can export and import the configuration of a DataFinder server. The configuration files have
the filename extension .dfc and contain all DataFinder server settings, for example, the search
areas, the index path, and the indexing schedule.
In Settings»Global Options»General you set the index path for all DataFinder servers and the
memory reserved for the DataFinder, and specify the editor with which you edit DataPlugin
scripts.
Defining Search Areas
You select the folders, which the DataFinder server indexes for the search, on the Search Areas
tab of the configuration dialog box. You can add, edit, and delete search areas and specify the
order in which the DataFinder server indexes the search areas and displays the search areas in
the browser. You must define the search areas of the DataFinder server with path names that are
unique within the network. If you select Edit Client Path from the context menu of the
DataFinder server, you can see in the Client path entry line which path the client uses to access
files in the network, for example, \\Testrig4a\NewCar\DATA.
Use the Windows share settings to share the folders in the search areas. Clients can load files
from the search areas. You define the share mode when you create a search area or edit an
existing search area. Click Share Folder to open the Windows system dialog box for sharing
files. In the Windows sharing settings, you specify which users and how many simultaneous
users have read and write access. You can enter individual users and user groups that are defined
in a network, for example, to provide access rights for an entire department. Refer to the
Microsoft Windows Help for more information about sharing folders.
© National Instruments Ireland Resources Limited | 2-1Chapter 2 Configuring DataFinder Servers If you use the DataFinder server as an ASAM ODS server or in a DataFinder federation, you need no further access rights on file level. Only the security settings defined in the DataFinder server apply here. For each search area, you can define specific security settings which replace the global security settings for this search area. Refer to the section on Specifying the Security Settings in this chapter for more information. To block remote access to all the search areas of a DataFinder server, deselect the Allow remote access to this computer checkbox on the General tab in the configuration dialog box. Reading File Types with DataPlugins DataFinder servers decide on the basis of the filename extension whether to index a file. The File Extensions tab has two lists that contain all the filename extensions that the DataFinder server recognizes. The Indexable extensions list displays all the file types that correspond to the TDM data model. In indexable files, the DataFinder server can search for properties of files, groups, and channels. Clients can navigate to channel level in indexed files. Click a filename extension to see which DataPlugins the DataFinder server uses to index these files. The Non-indexable extensions list displays all the file types that do not correspond with the TDM data model. In non-indexable files, the DataFinder server cannot search for properties of groups or channels. The DataFinder server only can search for properties that the file system provides, such as the filename and the creation date. The registered DataPlugins determine which file types the DataFinder server can index. A DataPlugin analyzes files that are a specific type and makes the results available to the DataFinder server. The DataPlugins tab shows you which DataPlugins the DataFinder uses for indexing. By default, only TDM DataPlugins, the TDMS DataPlugin, and the ATFX DataPlugin for the ASAM ODS server are enabled. Select Reindex DataPlugin to reindex all files of a specified DataPlugin. To add DataPlugins, select Settings»Global Options»DataPlugins. In this dialog box you can define, import, export, update, and delete DataPlugins. If you change the properties of a DataPlugin, these changes apply to all the DataFinder servers. Click Update to open the DataPlugin Update Manager. The DataPlugin Update Manager lists the DataPlugins installed on your computer for which later versions are available on the ni.com/dataplugins website. You can update all listed DataPlugins or only selected DataPlugins. This website contains DataPlugins, which have been written and tested by developers and users, for various data formats. The site also provides programming help for the creation of DataPlugins, including a description of the objects, properties, and methods, and many examples. 2-2 | ni.com
NI DataFinder Server Edition

Planning Indexing
When indexing, the DataFinder server reads properties from data files and saves this
information. When clients search for data files, the DataFinder server browses the index for the
properties. DataFinder Server Edition can run several parallel indexing processes and therefore
profits from the multi-core systems.

Click the Indexer tab in the configuration dialog box to specify when and how often the
DataFinder server indexes all search areas. Click the Start Now button to start indexing the
DataFinder server immediately. Depending on the amount of data, it can take quite a while to
index a search area for the first time. Use the Scheduler to start the indexing regularly, for
example, daily at 00:00 o’clock when no changes in the search areas and no search queries from
clients are expected.

You can enable regular indexing and also automatic indexing. Click the button with the three
dots next to Automatic indexing triggered by to open the settings. The setting Data file
changes ensures that a changed or new file is indexed immediately within a search area. Use the
Job file setting for automation systems. In this case the automation system copies a job file,
which contains a list of files and folders to be indexed, to a specific folder. The DataFinder server
edits these job files in regular intervals and executes the indexing tasks defined in the job file.
After completing the tasks, the DataFinder server deletes the job file.

You can specify a schedule for individual search areas in order to index these folders separately
from the global schedule. This way, the DataFinder server indexes the folders, in which new files
are constantly being created, more often than folders whose contents change only rarely. Switch
to the Search Areas tab, select the search area to be changed, and click Search Area Settings.
Enable the setting Specific schedule, and specify the time point for indexing the search area.
Then start the first indexing.

Select Settings»Index Optimization to configure and enable a schedule for the regular
optimization of the index. Because the client cannot use the index during optimization, plan the
optimization for every Sunday night at 01:00 o’clock, when no search queries are expected.

Specifying the Security Settings
You can use security settings to limit the clients’ access rights to DataFinder servers. If you do
not enable the security settings, every client can connect to this DataFinder server and browse
and search in all existing search areas. Assign global security settings to restrict access to the
entire DataFinder. Assign security settings on the search area to restrict access to specific search
areas. A client must have access rights to one search area in order to connect to a DataFinder
server. If the security settings in the DataFinder do not match the security settings of the file
system, the client receives an error message when he tries to load data from a search area for
which he has no access rights.

If the DataFinder is operated as an ASAM ODS server, an ASAM ODS client can access all
visible data depending on the security settings made in the DataFinder server. The access rights
of the ASAM ODS client on the file system do not apply.

                                               © National Instruments Ireland Resources Limited   |   2-3
Chapter 2 Configuring DataFinder Servers You enable the security settings for a DataFinder server either in the New DataFinder Server» Advanced dialog box when you create a new DataFinder server, or later on the General tab of the configuration dialog box. To use the security settings, you require a network with a domain. After you have enabled the security settings, you can create and edit the global security settings in this dialog box. To simplify the process, you can import security settings of shared folders from the file system. Use the global security settings to restrict access to the entire DataFinder server. You can also specify security settings for individual search areas in order to manage access to these search areas, regardless of the security settings for the entire DataFinder server. Switch to the Search Areas tab, select the search area to be changed, and click Search Area Settings. In the search areas you can, for example, restrict access to a search area for specified users. If specific security settings are assigned to a search area, the global security settings are not applied to this search area. If possible, use the global security settings in order to ensure the best possible search performance. Note that the DataFinder server needs read rights for all search areas, in order to be able to index the data files in the search areas. Note also that the data between client and server is transferred unencrypted, even if the security settings are enabled. Optimizing Custom Properties You can optimize the custom properties for a DataFinder server so that the client finds these custom properties faster. Custom properties are user-defined properties that you can create for files, groups, and channels of the data that is saved in the TDM data model. Custom properties give data additional characteristics that are not included in the standard data model. To speed up the search for custom properties, select a DataFinder server in the server manager and select Settings»Custom Properties. On the tabs File, Group, and Channel, you select custom properties that you want to optimize. If you click Optimize All, the server manager optimizes all custom properties as soon as you close the dialog box. The DataFinder server always optimizes custom properties for the data type that the DataFinder server used most frequently for indexing the custom property. For example, if you use DIAdem as the client, DIAdem suggests a value for the search when you select an optimized custom property in the Advanced Search properties. Which operators you can use for a query depends on the data type of the property searched for. You only can search for date/time custom properties if the DataFinder server has optimized these custom properties. Specifying the Start Options of DataFinder Servers You do not need to open the server manager to start a DataFinder server. Select a DataFinder server in the overview, select Settings»Start Options, and select the Enable autostart checkbox. The DataFinder server now launches automatically when the user logs in. 2-4 | ni.com
NI DataFinder Server Edition

The setting Run as service specifies whether the operating system executes a DataFinder server
as a Windows service the next time the operating system starts. This setting also guarantees that
the DataFinder server is automatically available when you restart the computer after the server
computer was down.

A service is a Windows application that starts automatically when Windows starts, and runs in
the background until you shut down Windows. You only can run a DataFinder server as a
Windows service if you are logged on as an administrator on Windows. If a DataFinder server
is running as a service on a network drive to which you have assigned a drive letter, it cannot
index search areas. Use an UNC path instead.

Server Manager
The server manager contains an overview of all DataFinder servers and provides access to the
most important settings of every DataFinder server. If you enable the security settings, a little
lock is added to the DataFinder symbol. The Version lists the version numbers of the DataFinder
servers. The Status indicates whether the DataFinder server, for example, has started, paused,
or stopped. The Remote Access shows whether clients can access the DataFinder server. The
Index Frequency and the Indexer Start Time show when the regular indexing of this
DataFinder server starts. If you disable regular indexing, the entry Never appears here.
            Figure 2-1. The Server Manager Displays All DataFinder Servers

The properties display at the bottom of the server manager shows other properties of the
DataFinder server selected in the overview. The Autostart property provides information on
whether the DataFinder starts automatically when the computer launches, and the Observe
File System property provides information on whether the DataFinder server automatically
indexes new and changed files.

                                              © National Instruments Ireland Resources Limited   |   2-5
Chapter 2 Configuring DataFinder Servers If you want to interrupt data file indexing, select a DataFinder server in the server manager and click Pause Indexing on the Windows toolbar. If you want to close the selected DataFinder server, click Stop. If you close a DataFinder server, the indexing process stops, all clients are disconnected from the server, and the server shuts down. Click Start to reactivate a DataFinder server. Clients can now browse in the indexed files again. You can open the context menu of each activated DataFinder server, independently of the server manager, in the information area on the Windows task bar. Select About to see when a DataFinder server was last completely indexed and how many files, groups, and channels are indexed. You can also use the context menu to stop or continue indexing and to configure or to exit the DataFinder server. The menu DataFinder»Statistics in the server manager also contains information on the status of the indexing. If you want to monitor a DataFinder server because of occurring error messages, enable Help» Diagnosis»Logging to record messages. Now the DataFinder manager writes every client access and every DataFinder server reaction in different logfiles. The menu item Create Diagnosis File packs all log files, together with the system information, into a ZIP file which the system administrator can use for error analysis. When the diagnosis has completed, you can delete these files again in the Help menu. To do so, you must stop the DataFinder server. Duplicating and Upgrading DataFinder Servers Duplicate a DataFinder server to create a new DataFinder server with the same configuration or to upgrade to a later version. To do so, select a DataFinder server in the server manager and select File»Duplicate. Then you specify the name of the new DataFinder server and specify whether the server manager also duplicates the index of the DataFinder server. The server manager does not copy the start options of this DataFinder server when duplicating. Observe the license conditions for operating several DataFinder servers. If you want to replace the existing installation with the current DataFinder Server Edition, you must proceed in two steps. First install the current DataFinder Server Edition. Then you must upgrade the individual DataFinder servers separately. To do so, open the View»Display all Versions menu in the current version and display all existing DataFinder servers. The DataFinder servers which are not the same version as the server manager have a red exclamation mark. Select Duplicate/Upgrade from the context menu to create a duplicate of this DataFinder server in order to upgrade the DataFinder server. You can test the upgraded DataFinder server while the client still has access to the earlier DataFinder server. After deleting the earlier version, assign the name of the deleted DataFinder server to the new DataFinder server to avoid having to make changes to the clients. If you install a new version of DataFinder Server Edition, you can use the new version with the existing license for 30 days parallel to the earlier version. In this time you can set up the new DataFinder server. 2-6 | ni.com
NI DataFinder Server Edition

Importing the Local DataFinder
If you are already using a local My DataFinder on a computer, create a DataFinder server from
My DataFinder in order to use this DataFinder together with other clients. First export the
My DataFinder configuration to the client. For example, open the configuration in DIAdem in
Settings»My DataFinder»Configure, click Export, and create a configuration file with the
filename extension .dfc. Then copy this configuration file to the DataFinder server computer.
Open the server manager and create a new DataFinder server. Select Settings»Configure to
open the DataFinder server configuration dialog box. Click Import and open the DFC file of
My DataFinder. The new DataFinder server indexes the same search areas as the local
My DataFinder, where clients can now also search for and access data.

Exporting a DataFinder Server Configuration
To connect clients with the configured DataFinder server, export the associated connection
settings. Select a DataFinder server in the server manager and select Settings»Export Client
Configuration. The server manager creates a URF file with the connection settings, such as the
name of the DataFinder server, the IP address of the computer, and the registered DataPlugins.
You can also specify whether clients automatically synchronize their DataPlugins with the
DataPlugins of the server when setting up the connection. Copy this URF file to the client and
double-click the file to transfer the settings. Now a client, such as DIAdem or LabVIEW can
connect to this DataFinder server and search for and load data in the search areas of the
DataFinder server if you have specified the necessary share parameters.

Browsing Data
The server manager provides a browser view of the search areas of the DataFinder servers or the
hierarchy of the ASAM ODS server on separate tabs.

To open a tree view of the search areas of a DataFinder server, select a DataFinder server in the
server manager and click Open in Browser on the toolbar. If the DataPlugin that is associated
with the selected file type allows, you can navigate to channel level in the folders of the search
areas and in the indexed files.

The properties display below the tree view shows the properties of the selected file, the selected
channel group, or the selected channel. Click one of the indexed files to view the file properties,
as shown in the following figure. In the properties display, the server manager displays file
properties such as the filename, path, creation date, name, and author. Drag up the top edge of
the properties display to view the entire properties list.

                                               © National Instruments Ireland Resources Limited   |   2-7
Chapter 2 Configuring DataFinder Servers
Figure 2-2. Browsing in the Search Areas of a DataFinder Server
In the browser view, you can open the context menu to define other folders as search areas, to
edit and delete existing search areas, and also to exclude subfolders. You also can reindex
individual files and folders. You can choose whether the DataFinder reindexes all files in the
specified folder or whether only the files that were changed or added since the last indexing
process are reindexed. You also can specify whether the DataFinder also includes the subfolders
of the specified folder in the indexing process.
If you select View»Client View, the server manager displays the selected DataFinder server in
the view in which the client sees it. In the client view, the server manager displays only the search
areas and hides the My Computer path. Depending on the security settings, the view of a
specific client can differ from the client view of the server manager.
To display the hierarchy of an ASAM ODS server, select View»Open in ASAM ODS Browser
for the DataFinder server selected in the server manager. In the data store, you can navigate
through the ASAM ODS test hierarchy to the measurement values (channels). The property
display below the tree view displays the properties of the selected element.
2-8 | ni.comNI DataFinder Server Edition
Figure 2-3. Browsing in the Hierarchy of an ASAM ODS Server
© National Instruments Ireland Resources Limited | 2-9DataFinder as ASAM ODS Server
3
Use a DataFinder server as an ASAM ODS server to read the data from a DataFinder server
through the ASAM ODS Corba interface. You can connect programs as ASAM-conform clients
with this server through the ASAM ODS interface.
You need a suitable license in order to use a DataFinder server as an ASAM ODS server.
Configuring a DataFinder Server as ASAM ODS
Server
Open the ASAM configuration dialog box in Settings»ASAM ODS to specify an existing
DataFinder server as ASAM ODS server. Enable the ASAM ODS server and select a model
hierarchy for the server, as shown in the following figure. The DataFinder server provides two
default model hierarchies for the display of the data: Year - Month and Author - Year - Month.
You can also create a model hierarchy from the template or open an existing hierarchy.
Figure 3-1. ASAM ODS Server Configuration
© National Instruments Ireland Resources Limited | 3-1Chapter 3 DataFinder as ASAM ODS Server Exporting a Client Configuration You must connect the ASAM clients with this DataFinder server so that the clients can execute search queries, filter data, and load data on the ASAM ODS server. To do so, you must save the required connection settings in a file and then enable these on the client. Click Export a Client Configuration on the toolbar. Select the setting Include ASAM ODS server connection parameters and use the name suggestion from the export dialog box. This name comprises the name of the DataFinder server and the computer name. The server manager saves the connection parameters in a file with the extension .urf, for example, engine@test_server.urf. Connecting Clients with ASAM ODS DataFinder Servers You must register the connection settings on the client computer so that the client can connect with the DataFinder server as an ASAM ODS server. To do so, copy the engine@test_server.urf file to the client computer. Double-click the URF file to transfer the connection parameters to the client computer. DIAdem can now use the DataFinder server as an ASAM ODS server over the network. Use the security settings of the DataFinder server to restrict the access rights of the client. Refer to Specifying the Security Settings in Chapter 2, Configuring DataFinder Servers for further information. DIAdem as the Client of an ASAM ODS Server If you have registered the connection settings on a DIAdem computer, DIAdem can either access the indexed data files of the DataFinder server directly or can open the indexed data as ASAM ODS data in the DIAdem NAVIGATOR data browser. Open Settings»Data Stores in DIAdem NAVIGATOR in order to use the DataFinder server as ASAM ODS server in DIAdem. Select engine_ASAM-ODS@test_server from the list of registered data stores. Double-click the data store to view and edit the settings of the ASAM ODS server. If you click Open, DIAdem opens the ASAM ODS data store in the data browser. 3-2 | ni.com
NI DataFinder Server Edition
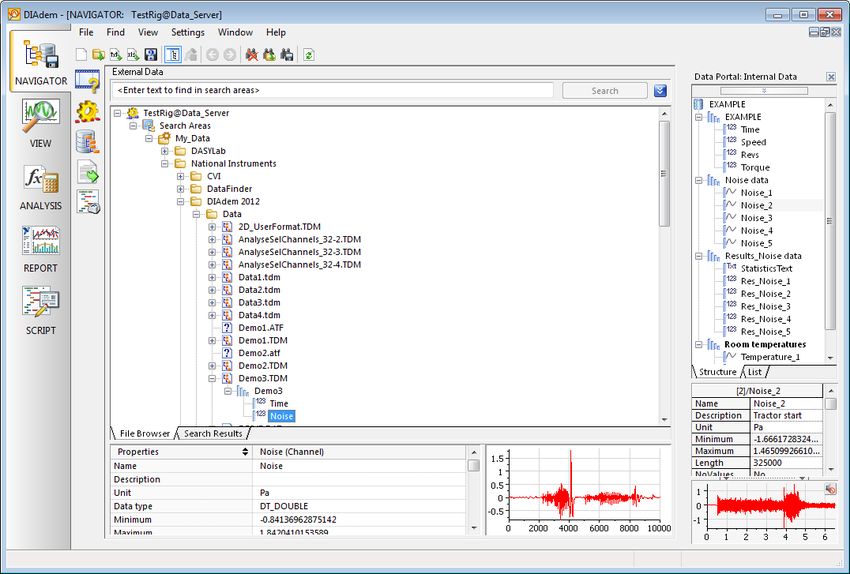
The data browser in DIAdem NAVIGATOR uses a model hierarchy configured on the
DataFinder server to display the data. The following figure shows the model hierarchy Year -
Month with the hierarchy levels Year - Month - File - Group - Channel. You can
browse in the files down to channel level and search for data. You can define search conditions
for individual levels of the model hierarchy. DIAdem lists the tests, measurements, or
measurement quantities it finds in the search results. You also can use search conditions to filter
data. The data browser only displays the branches whose data meets the search conditions.
Figure 3-2. Navigating in the ASAM ODS Data Display of a DataFinder Server
Third Party Software as Client
Every program that supports the Corba interface of ASAM ODS can connect to the DataFinder
server. To access the DataFinder server as an ASAM ODS server, click Show ASAM ODS
Connection Information in the configuration dialog box of the ASAM ODS server. The
display shows the necessary connection parameters such as server name, port address, and URL.
© National Instruments Ireland Resources Limited | 3-3Chapter 3 DataFinder as ASAM ODS Server
Properties of the ASAM ODS Server
A DataFinder server as ASAM ODS server has the following functions.
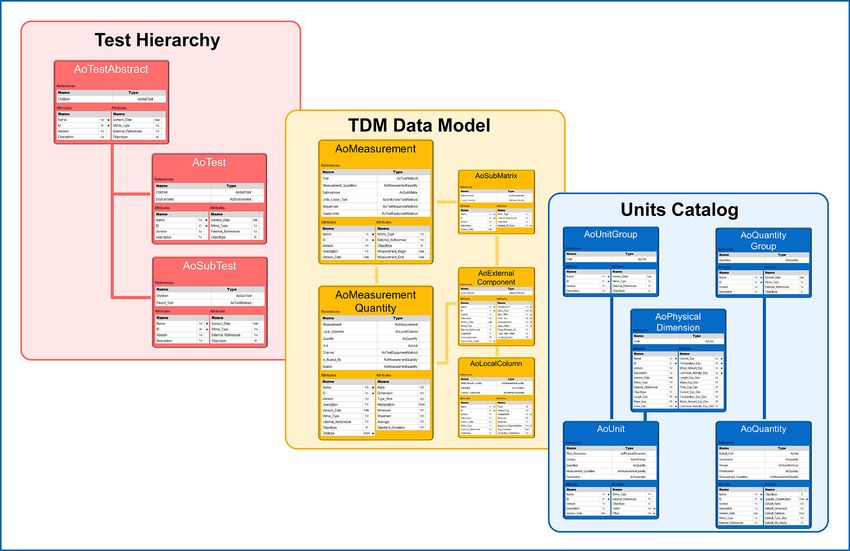
Structure of the Data Model
The DataFinder server as ASAM ODS server combines the TDM data model with a user-defined
test hierarchy and a predefined extendable unit model.
Figure 3-3. TDM Data Model with Unit Model
The test hierarchy is defined either by the properties and optimized custom properties of the root
level or by the properties and optimized custom properties of the group level of the TDM data
model. The DataFinder server has two predefined test hierarchies for displaying data: Year
Month and Author/Year/Month. You can also define further hierarchies.
Note Elements of the test hierarchy cannot be used in queries. Instead, use the
properties of the test level in order to get the same search results.
3-4 | ni.comNI DataFinder Server Edition
The elements of the TDM data models are below the test hierarchy and are named in the
ASAM ODS server according to the ASAM ODS data model. The root level corresponds to the
test of the ASAM model, the channel group corresponds to the measurement, and the channel
corresponds to the measurement quantity.
1. root → test (AoSubtest)
2. channelgroup → measurement (AoMeasurement)
3. channel → measurementquantity (AoMeasurementQuantity)
If you enable the DataFinder server as ASAM ODS server, you must optimize custom properties
for searching and filtering to make these properties available over the ASAM ODS Corba
interface.
The measurement quantities are assigned to units which are defined in ASAM ODS. A
DIAdem units catalog with the filename extension *.tuc, which you load, edit, and save in
DIAdem, is the basis. The name of the units catalog and its path are in the properties of the
DataFinder server in the server manager.
Further Capabilities of the ASAM ODS Server
In addition to the ASAM ODS standard, the DataFinder server offers a full text search through
the ASAM ODS Corba interface as well.
The DataFinder server as ASAM ODS server provides text files in Unicode. Unicode characters
include special characters and also Chinese, Japanese, and Arabic characters.
The ASAM ODS server can immediately read data from different ATF-XML files over the
ATFX TDM DataPlugin installed with the DataFinder server. The ASAM ODS server can also
read all the data files provided by a DataPlugin.
The ASAM ODS server uses the security settings defined in the DataFinder server. Therefore
user accounts in the Windows Active Directory can also be used. As is ASAM ODS standard,
the user name and password are transferred unencrypted over the ASAM ODS Corba interface.
© National Instruments Ireland Resources Limited | 3-5DataFinder Federation
4
A DataFinder federation is a combination of several DataFinder servers. The DataFinder servers
can be distributed across the entire network at different sites and do not need to be on the same
computer or on the computer on which the DataFinder federation is defined.
A client addresses a DataFinder federation in the same way as it addresses a single DataFinder
server. The client sends a query to the federation server, then transfers this query to the
DataFinder servers registered with the federation server. Then the federation server compiles the
returned search results and sends the results back to the client.
You need a license in order to create a DataFinder federation.
Creating a DataFinder Federation
You create a DataFinder federation in two steps. In the first step, you define the federation in the
server manager and in the second step, you register the participating DataFinder servers with this
federation.
To create a federation, select File»New Federation in the server manager. Enter a name for the
federation.
Figure 4-1. New DataFinder Federation
© National Instruments Ireland Resources Limited | 4-1Chapter 4 DataFinder Federation
The member connection displayed in the dialog box consists of the federation name and the
name of the computer on which you set up the DataFinder federation. If you click the Member
Connection Information area, the server manager displays further information. Moreover, the
optional server parameters offer the possibility of entering additional information for a server
connection.
Click Finish. The server manager now displays a message that asks you to create a connection
file that has the extension .fed. The federation connection file contains all information a
participating DataFinder server needs to join a federation. When you close the Save dialog box,
the server manager displays the new DataFinder federation.
Adding a DataFinder Server to a Federation
Once the DataFinder federation has been created, DataFinder servers must register with the
federation. A DataFinder federation can accept up to 100 members.
For the DataFinder server to become a member of a DataFinder federation, the DataFinder server
must read the connection settings. To do so, copy the federation connection file to the server
computer, where the DataFinder server is located. Open the server manager and double-click the
DataFinder server you want to add to the federation. Open the General tab in the configuration.
Enable the setting Join a federation and load the connection file, for example,
MyFederation.fed. To conclude, stop and restart the DataFinder server to allow this
DataFinder server to join the DataFinder federation as a member.
Figure 4-2. Federations which DataFinder Server Joined
A DataFinder server can join several DataFinder federations.
4-2 | ni.comNI DataFinder Server Edition
Connecting Clients to a DataFinder Federation
You can register clients with the DataFinder federation in the same way as with a DataFinder
server. To do so, you must save the required connection settings of the DataFinder federation in
a file and then enable these on the client computer.
Select the MyFederation DataFinder federation in the server manager and click Settings»
Export Client Configuration in the context menu. Apply the proposed name, which comprises
the name of the DataFinder federation and the name of the server computer. Click OK to save
the client configuration in a file with the .urf extension.
Copy the client configuration MyFederation@Computer.urf to the client computer and
double-click this file to register the connection parameters. Open Settings»Data Stores in
DIAdem NAVIGATOR in order to use the indexed data files from members of the DataFinder
federation, for example, in DIAdem. Select MyFederation_ASAM-ODS@computer from the
list of registered data stores. Double-click the data store to view and edit the settings of the
DataFinder federation. If you click Open, DIAdem connects to the federation and displays the
data in the data browser. The data browser in DIAdem NAVIGATOR uses the model hierarchy
configured on the DataFinder federation to display all data through which you can navigate in
the same way as you do through a coherent data store. Refer to Chapter 1, Creating and
Connecting DataFinder Servers, for more information on registering clients.
Configuring a DataFinder Federation
Once you have created a DataFinder federation and joined DataFinder servers, you can edit the
configuration and the start options and view the list of members.
Configuration
To open the configuration of a DataFinder federation, double-click the federation server in the
server manager. To display the member information, you can specify a model hierarchy. You
can select one of the two model hierarchies Year - Month or Author - Year - Month, create a
specific view on your data from the template, or load an existing model hierarchy. If you select
Open in Browser in the context menu of the DataFinder federation, the browser uses the model
hierarchy you specified to display the data from all registered DataFinder servers, through which
you can navigate in the same way as you do through a coherent data store. Click Federation»
Member Information to see which DataFinder servers belong to a DataFinder federation and
whether the connection to a DataFinder server was interrupted.
© National Instruments Ireland Resources Limited | 4-3Sie können auch lesen


