VACUUMCLEANERALPINE690CH1 - GEBRAUCHSANWEISUNG MODE D'EMPLOI ISTRUZIONI PER L'USO INSTRUCTIONS FOR USE
←
→
Transkription von Seiteninhalten
Wenn Ihr Browser die Seite nicht korrekt rendert, bitte, lesen Sie den Inhalt der Seite unten
VACUUMCLEANERALPINE690CH1
U690CH1
• GEBRAUCHSANWEISUNG
• MODE D’EMPLOI
• ISTRUZIONI PER L’USO
• INSTRUCTIONS FOR USE
Gebrauchsanweisung ○ Mode d’emploi ○ Istruzioni per l’uso ○ Instruction for use
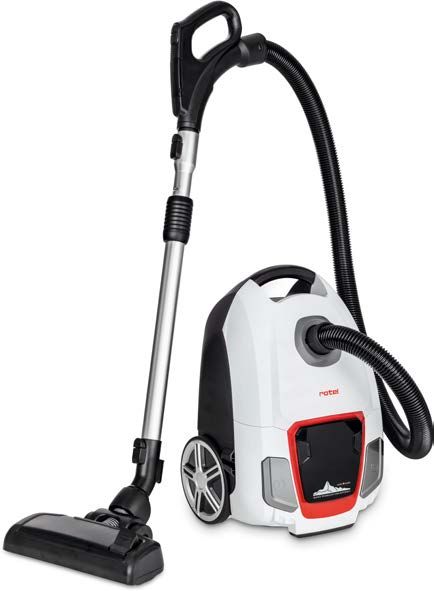
U690CH1_BED_DFIE_Rev03_2018-05-09SCHEMATISCHE DARSTELLUNG
• Vue d’ensemble
• Diagramma della struttura
• Structure diagram
2
Gebrauchsanweisung ○ Mode d’emploi ○ Istruzioni per l’uso ○ Instruction for useDeutsch Français Italiano English
A. Universaldüse A. Suceur universel A. Ugello universale A. Universal nozzle
B. Grosses Rad B. Grosse roue B. Ruota B. Big wheel
C. Teleskoprohr C. Tube télescopique C. Tubo telescopico C. Telescopic tube
D. Längenregulierung des D. Réglage de la longueur D. Regolazione della D. Length adjustment of
Teleskoprohr du tube télescopique lunghezza del tubo telescopic tube
telescopico
E. Batterieabdeckung E. Couvercle du E. Coperchio del vano E. Battery cover
compartiment à piles batterie
F. Fernsteuerung F. Commande à distance F. Controllo a distanza F. Remote control
(Ein/Aus/Stufe) (Marche /Arrêt/Ni- (acceso /spento/rego- (on/off/level)
veau) lazione)
G. Griff G. Poignée G. Impugnatura G. The horse handle
H. Hauptgehäuse H. Bloc central H. Corpo principale H. Main body
I. Fusstaste für Ein-/ I. Pédale I. Tasto a pedale, I. On/Off foot switch
Aus-Schaltung d'enclenchement inserito/disinserito
J. LED-Anzeige J. Écran LED J. Display a LED J. LED screen
K. Saugkraftregulierung K. Bouton de contrôle de K. Pulsante di controllo K. Speed control button
la vitesse della velocità
L. Fusstaste für L. Pédale d'enroulement L. Tasto a pedale per L. Foot switch for
automatische du câble il riavvolgimento del automatic cord rewind
Kabelaufwicklung cavo
M. Saugschlauch M. Tuyau d'aspiration M. Tubo flessibile M. Suction hose
Ersatz-Staubbeutel (Bestell-Nr. 269.900.6164)
Ersatz-Motorschutzfilter (Bestell-Nr. 269.000.0066)
HEPA-Ersatzfilter (Bestell-Nr. 269.000.0046)
Sacs à poussière de rechange (N° de commande 269.900.6164)
Filtre de protection du moteur de rechange (N° de commande 269.000.0066)
Filtre de rechange H.E.P.A. (N° de commande 269.000.0046)
Sacchetti raccoglipolvere di carta (codice di ordinazione 269.900.6164)
Filtro protezione motore di ricambio (codice di ordinazione 269.000.0066)
Filtro H.E.P.A. di ricambio (codice di ordinazione 269.000.0046)
Spare filter for dustbag (order no. 269.900.6164)
Spare motor protection filter (order no. 269.000.0066)
Spare HEPA filter (order no. 269.000.0046)
3
Gebrauchsanweisung ○ Mode d’emploi ○ Istruzioni per l’uso ○ Instruction for useTECHNISCHE DATEN
• Caractéristiques techniques
• Specifiche tecniche
• Technical specifications
220-240 V Nennspannung
Tension nominale
Tensione nominale
Rated voltage
50/60 Hz Nennfrequenz
Fréquence nominale
Frequenza nominale
Rated frequency
700 W Nenneingangsleistung
Puissance d’entrée nominale
Potenza nominale
Rated input power
4
Gebrauchsanweisung ○ Mode d’emploi ○ Istruzioni per l’uso ○ Instruction for useInhaltsverzeichnis / Table des matières / Indice / Table of contents
Deutsch................................................................................................................................................ 6
• Sicherheitshinweise ......................................................................................................................... 6
• Zusammenbau und Nutzung des Staubsaugers .............................................................................. 9
• Wechseln des Staubbeutels .......................................................................................................... 10
• Wechseln der Filter ....................................................................................................................... 10
• Entsorgung..................................................................................................................................... 11
Français.............................................................................................................................................. 12
• Consignes de sécurité .................................................................................................................... 12
• Assemblage et utilisation de l'aspirateur ...................................................................................... 15
• Remplacement du sac ................................................................................................................... 16
• Remplacement des filtres.............................................................................................................. 16
• Élimination..................................................................................................................................... 17
Italiano............................................................................................................................................... 18
• Avvertenze di sicurezza ................................................................................................................. 18
• Assemblaggio e utilizzo dell'aspirapolvere.................................................................................... 21
• Sostituzione del sacchetto raccoglipolvere ................................................................................... 22
• Sostituzione dei filtri...................................................................................................................... 22
• Smaltimento .................................................................................................................................. 23
English ............................................................................................................................................... 24
• Safety instructions ......................................................................................................................... 24
• Assembling and using the vacuum cleaner ................................................................................... 27
• Replacing the dust bag .................................................................................................................. 28
• Replacing the filters ....................................................................................................................... 28
• Disposal ......................................................................................................................................... 29
D / F / I / E.......................................................................................................................................... 30
• Garantie / Garantie / Garanzia / Warranty ................................................................................... 30
5
Gebrauchsanweisung ○ Mode d’emploi ○ Istruzioni per l’uso ○ Instruction for useDeutsch
• SICHERHEITSHINWEISE
Lesen Sie erst alle Hinweise, bevor Sie das Gerät in Be-
trieb nehmen.
o Dieses Gerät kann von Personen mit eingeschränk-
ten physischen, sensorischen oder geistigen Fähig-
keiten oder einem Mangel an Erfahrung und/oder
Wissen verwendet werden, wenn sie beaufsichtigt
werden oder bezüglich des sicheren Gebrauchs des
Geräts unterwiesen wurden und die daraus resul-
tierenden Gefahren verstanden haben.
o Dieses Gerät darf nicht von Kindern benutzt wer-
den. Das Gerät und seine Anschlussleitung sind von
Kindern fernzuhalten.
o Das Gerät ist bei nicht vorhandener Aufsicht und
vor dem Zusammenbau, dem Auseinandernehmen
oder Reinigen stets vom Netz zu trennen.
o Der Staubsauger soll vor jeder Reinigung/Wartung
oder bei Nichtgebrauch ausgeschaltet und der
Netzstecker aus der Steckdose gezogen sein.
6
Gebrauchsanweisung ○ Mode d’emploi ○ Istruzioni per l’uso ○ Instruction for useo Dieses Gerät ist nur dazu bestimmt, im Haushalt
trockenen Schmutz und Staub aus Teppichen, von
Bodenbelägen und Stoffen zu entfernen.
o Dieser Staubsauger soll nicht für die Entfernung
von Baumaterialien - einschliesslich Bauprodukte
und ähnliches wie Holz, Fasern, Sand, Zement,
Glasfasern, usw. - benutzt werden. Das Aufsaugen
dieser Materialien könnte das Gerät beschädigen
und führt zum Verlust der Garantieansprüche.
o Das Gerät darf nur angeschlossen werden, wenn
die Anschlussdaten vom Netz mit denen auf dem
Typenschild des Staubsaugers übereinstimmen.
Das Gerät soll nur für seinen vorgesehenen Zweck
verwendet werden, gemäss dieser Anleitung.
o Den Staubsauger nie ohne die Filter benutzen.
o Niemals entzündliche Flüssigkeiten wie Reini-
gungsmittel, Benzin, usw., oder deren Dämpfe mit
dem Gerät aufsaugen.
o Das Gerät nicht im Freien, auf nassen Oberflächen
oder zur Aufnahme von Wasser, Flüssigkeit oder
nassen Materialien benutzen.
o Während des Saugens nicht über das Netzkabel
fahren.
7
Gebrauchsanweisung ○ Mode d’emploi ○ Istruzioni per l’uso ○ Instruction for useo Besondere Aufsicht ist notwendig, wenn das Gerät
in der Nähe von Kindern benutzt wird.
o Wenn ein Verlängerungskabel benutzt wird, ist da-
rauf zu achten, dass es den Sicherheitsstandards
entspricht und voll ausgerollt ist, damit keine Über-
hitzung oder Schäden auftreten.
8
Gebrauchsanweisung ○ Mode d’emploi ○ Istruzioni per l’uso ○ Instruction for use• ZUSAMMENBAU UND NUTZUNG DES STAUBSAUGERS
o Stellen Sie vor dem Zusammenbau sicher, dass der Staubsauger ausgeschaltet und
vom Netz getrennt ist.
o Stecken Sie den Schlauchanschluss in die Aufnahme des Staubsaugerhauptgehäuses
und drehen Sie ihn im Uhrzeigersinn, bis er mit einem Klicken einrastet (Abb. 1).
o Stecken Sie das Teleskoprohr in den Griff, bis es mit einem Klicken einrastet (Abb. 2).
o Stecken Sie das andere Ende des Teleskoprohrs in die benötigte Düse ein, zum Bei-
spiel die Universaldüse (A) für Teppiche oder Böden.
o Entfernen Sie die Batterieabdeckung (E) und legen Sie zwei AAA-Batterien ein.
o Wickeln Sie das Netzkabel ab und stecken Sie es in eine Steckdose ein. Betätigen Sie
den Ein/Aus-Fussschalter (Abb. 3).
o Drücken Sie die Power-Taste auf der Fernsteuerung des Griffs (F).
o Das Gerät beginnt mit der Stufe 4 (MAX); die Stufe wird auf der LED-Anzeige ange-
zeigt.
o Die Stufe kann durch Drücken von „+“/„-“ auf der Fernsteuerung des Griffs (F) oder
am Hauptgehäuse geändert werden.
o Schalten Sie das Gerät durch Drücken der Power-Taste auf der Fernsteuerung des
Griffs (F) oder Betätigen des Ein/Aus-Fussschalters (I) aus.
o Ziehen Sie den Netzstecker und wickeln Sie das Netzkabel durch Betätigen des Fuss-
schalters für die automatische Kabelaufwicklung wieder auf (Abb. 4).
1 2 3 4
9
Gebrauchsanweisung ○ Mode d’emploi ○ Istruzioni per l’uso ○ Instruction for use• WECHSELN DES STAUBBEUTELS
o Betreiben Sie das Gerät immer mit einem Staubbeutel im Staubbeutelfach.
o Wechseln Sie den Staubbeutel, wenn die Anzeige rot leuchtet (Abb. 5) oder bei feh-
lender Saugleistung.
o Öffnen Sie den Deckel des Staubbeutelfachs (Abb. 6 und 7).
o Nehmen Sie den Beutelhalter heraus, entfernen Sie den vollen Staubbeutel (Abb. 8)
und setzen Sie einen neuen ein.
• WECHSELN DER FILTER
o Betreiben Sie den Staubsauger immer mit eingesetzten Filtern.
o Wenn die Filter nicht rechtzeitig gewechselt werden, kann dies zu reduzierter Saug-
leistung oder zu einer Beschädigung des Motors führen.
o Der Motorschutzfilter und der HEPA-Filter sollten einmal jährlich oder bei sichtbaren
Verschmutzungen gewechselt werden.
o Motorschutzfilter: Öffnen Sie den Deckel des Staubbeutelfachs (Abb. 6 und 7), ent-
fernen Sie den Staubbeutel, ziehen Sie den Motorschutzfilter heraus und setzen Sie
einen neuen ein (Abb. 9).
o HEPA-Filter: Entfernen Sie die Auslassabdeckung (Abb. 10), entfernen Sie den HEPA-
Filter durch Herunterdrücken des Clips (Abb. 11) und setzen Sie einen neuen Filter
ein.
5 6 7 8
9 10 11
10
Gebrauchsanweisung ○ Mode d’emploi ○ Istruzioni per l’uso ○ Instruction for use• ENTSORGUNG
o Zur ordnungsgemässen Entsorgung geben Sie das Gerät bitte an einen Händler, den
Kundendienst oder Rotel AG zurück.
o Die Richtlinie 2012/19/EU über Elektro- und Elektronik-Altgeräte (WEEE) legt fest,
dass Haushaltsgeräte nicht mit dem normalen Hausmüll entsorgt werden dürfen. Alt-
geräte sind getrennt zu sammeln, um einerseits Wiederverwertung und Recycling zu
optimieren und andererseits potenzielle Gesundheits- und Umweltgefahren zu ver-
hindern. Die durchgestrichene Mülltonne erscheint auf allen Produkten, um die Be-
sitzer an ihre Verpflichtung zur Mülltrennung zu erinnern. Für weitere Informationen
zur fachgerechten Entsorgung von Haushaltsgeräten setzen Sie sich bitte mit ihren
lokalen Behörden oder dem Händler in Verbindung.
Dieses Gerät entspricht den folgenden EU-Richtlinien:
2014/35/EU (Niederspannungsrichtlinie)
2014/30/EU (Richtlinie über die elektromagnetische Verträglichkeit)
11
Gebrauchsanweisung ○ Mode d’emploi ○ Istruzioni per l’uso ○ Instruction for useFrançais
• CONSIGNES DE SÉCURITÉ
Veuillez lire toutes les instructions avant la mise en ser-
vice de l’appareil.
o Cet appareil peut être utilisé par des personnes aux
capacités physiques, sensorielles ou intellectuelles
limitées ou manquant d’expérience ou de connais-
sance si elles sont sous surveillance ou ont été ins-
truites sur l’utilisation sûre de l’appareil et si elles
ont compris les risques pouvant en résulter.
o Cet appareil ne peut pas être utilisé par des enfants.
L’appareil et son cordon d’alimentation doivent
être tenus hors de portée des enfants.
o L’appareil doit toujours être débranché du secteur
lorsqu’il est hors surveillance et avant son assem-
blage, son désassemblage ou nettoyage.
o L’aspirateur doit être éteint et débranché avant
tout nettoyage, entretien, ou lorsqu’il n’est pas uti-
lisé.
12
Gebrauchsanweisung ○ Mode d’emploi ○ Istruzioni per l’uso ○ Instruction for useo Ce produit est uniquement destiné à un usage do-
mestique, afin de retirer saletés et poussières
sèches des sols, tapis et tissus.
o Il n’est pas conçu pour éliminer les résidus de ma-
tériaux de construction et produits similaires tels
sciure, fibre, sable, ciment, fibre de verre, etc. L’as-
piration de ces matériaux est susceptible d’endom-
mager l’appareil et représente une clause d’annu-
lation de la garantie constructeur.
o L’aspirateur doit être raccordé à une prise élec-
trique en courant alternatif dont la tension corres-
pond à celle de la plaque signalétique de l’appareil.
Cet appareil doit être utilisé conformément à
l’usage auquel il est destiné et selon les directives
de ce manuel.
o L’aspirateur ne doit pas être utilisé sans ses filtres.
o L’aspirateur ne doit en aucun cas être utilisé pour
aspirer des liquides inflammables tels que produits
de nettoyage, essence, etc., ou en présence de va-
peurs de tels produits.
o L’appareil ne doit pas être utilisé en extérieur ou
sur une surface mouillée ou pour aspirer de l'eau,
des liquides ou de la boue.
13
Gebrauchsanweisung ○ Mode d’emploi ○ Istruzioni per l’uso ○ Instruction for useo La tête d’aspiration de l’appareil ne doit pas être
passée sur le câble d’alimentation électrique.
o Des précautions particulières sont nécessaires lors-
que l'appareil est utilisé à proximité d'enfants.
o Si une rallonge électrique est utilisée, il faut veiller
à ce qu’elle soit conforme aux normes de sécurité et
qu’elle soit complètement déroulée afin d’éviter
toute surchauffe ou dommage consécutif.
14
Gebrauchsanweisung ○ Mode d’emploi ○ Istruzioni per l’uso ○ Instruction for use• ASSEMBLAGE ET UTILISATION DE L'ASPIRATEUR
o Avant le montage, assurez-vous que l'aspirateur est éteint et débranché du secteur.
o Insérez le raccord de tuyau dans la douille du bloc central du nettoyeur et tournez-le
dans le sens des aiguilles d'une montre jusqu'à ce qu'il s'enclenche (Fig. 1).
o Insérez le tube télescopique dans la poignée jusqu'à ce qu'il s'enclenche (Fig. 2).
o Insérez l'autre extrémité du tube télescopique dans la buse souhaitée : par exemple,
la buse universelle (A) pour tapis ou sol.
o Retirez le couvercle du compartiment à piles (E) et insérez deux piles AAA.
o Déroulez le câble d'alimentation et branchez-le à une prise de courant. Appuyez sur
l'interrupteur à pédale marche/arrêt (Fig. 3).
o Appuyez sur le bouton d’alimentation de la commande à distance au niveau de la
poignée (F).
o L'appareil démarre au niveau MAX 4, le niveau est indiqué sur l'affichage LED.
o Le niveau peut être modifié en appuyant sur « + » ou « - » sur la commande de la
poignée (F) ou du bloc central.
o Éteignez l'appareil en appuyant sur le bouton d’alimentation de la commande à di-
stance au niveau de la poignée (F) ou sur l'interrupteur à pédale marche/arrêt (I).
o Débranchez le câble d'alimentation et rembobinez-le en appuyant sur l'interrupteur
à pédale pour le rembobinage automatique du câble (Fig. 4).
1 2 3 4
15
Gebrauchsanweisung ○ Mode d’emploi ○ Istruzioni per l’uso ○ Instruction for use• REMPLACEMENT DU SAC
o Utilisez toujours l'appareil avec un sac installé dans le compartiment à poussière.
o Remplacez le sac lorsque l'indicateur devient rouge (Fig. 5) ou lorsque l'aspirateur
n'aspire plus.
o Ouvrez le couvercle du compartiment à poussière (Fig. 6 & 7).
o Retirez le porte-sac, puis retirez le sac plein (Fig. 8) et remplacez-le.
• REMPLACEMENT DES FILTRES
o Utilisez toujours l'aspirateur avec des filtres.
o Une puissance d'aspiration réduite ou des dommages au moteur peuvent apparaître
si les filtres ne sont pas remplacés à temps.
o Les filtres de protection du moteur et HEPA doivent être remplacés une fois par an
ou lorsqu'ils sont visiblement sales.
o Filtre de protection du moteur : Ouvrez le couvercle du compartiment à poussière
(Fig. 6 & 7), enlevez le sac, retirez et remplacez le filtre de protection du moteur (Fig.
9).
o Filtre HEPA : Retirez le couvercle de la prise de courant (Fig. 10), retirez le filtre HEPA
en appuyant sur le clip (Fig. 11) et remplacez-le.
5 6 7 8
9 10 11
16
Gebrauchsanweisung ○ Mode d’emploi ○ Istruzioni per l’uso ○ Instruction for use• ÉLIMINATION
o Pour une élimination dans les règles de l’art, veuillez remettre l’appareil à un reven-
deur, un responsable du service après-vente ou Rotel SA.
o Selon la directive européenne 2012/19/UE relative aux déchets d’équipements élec-
triques et électroniques (DEEE), les appareils électroménagers ne doivent pas être
éliminés avec les déchets solides urbains normaux. Les appareils hors d’usage doivent
être collectés séparément pour optimiser le coût de réutilisation et de recyclage des
matériaux contenus dans la machine tout en évitant les risques potentiels pour la
santé publique et l’environnement. Le symbole de poubelle barrée figure sur tous les
produits pour rappeler à leur propriétaire les obligations de tri sélectif des déchets.
Pour de plus amples informations sur la mise au rebut correcte des appareils électro-
ménagers, les consommateurs sont invités à contacter les autorités locales ou ven-
deurs d’électroménagers.
Cet appareil est conforme aux directives européennes suivantes :
2014/35/UE (Équipement basse tension)
2014/30/UE (Compatibilité électromagnétique)
17
Gebrauchsanweisung ○ Mode d’emploi ○ Istruzioni per l’uso ○ Instruction for useItaliano
• AVVERTENZE DI SICUREZZA
Prima dell'uso leggere tutte le istruzioni.
o Questo apparecchio può essere usato da persone
con ridotte capacità fisiche, sensoriali o mentali, o
con insufficiente esperienza e conoscenza, a condi-
zione che siano sotto sorveglianza o che abbiano ri-
cevuto istruzioni sull'uso sicuro dell'apparecchio e
siano consapevoli dei rischi connessi.
o Questo apparecchio non deve essere utilizzato dai
bambini. L'apparecchio e il cavo di alimentazione
devono essere tenuti fuori dalla portata dei bam-
bini.
o L'apparecchio deve essere scollegato dalla rete elet-
trica ogniqualvolta lasciato incustodito nonché
prima di essere montato, smontato o pulito.
o Quando l'aspirapolvere non è in uso, prima di pu-
lirlo o di sottoporlo a qualunque intervento di ma-
nutenzione, spegnere sempre l'apparecchio e stac-
care la spina dalla presa di corrente.
18
Gebrauchsanweisung ○ Mode d’emploi ○ Istruzioni per l’uso ○ Instruction for useo Questo prodotto è destinato esclusivamente
all'uso domestico e alla rimozione di polvere e
sporco secco da tappeti, tessuti e pavimenti di abi-
tazioni.
o L'aspirapolvere non è progettato per la rimozione
di materiali edili vetrosi, ivi compresi prodotti da
costruzione e di natura simile, quali legno / fibre,
sabbia, cemento, vetroresina, ecc. L'aspirazione di
tali materiali può danneggiare l'elettrodomestico e
annulla la garanzia del produttore.
o L'aspirapolvere deve essere collegato esclusiva-
mente a una fonte di alimentazione in corrente al-
ternata alla tensione indicata nella targhetta del
prodotto. L'apparecchio deve essere utilizzato solo
per gli usi cui è destinato così come specificati nelle
presenti istruzioni.
o Non utilizzare mai l'aspirapolvere senza i filtri.
o Non aspirare liquidi infiammabili quali detersivi li-
quidi, benzina, ecc. né usare l'apparecchio in pre-
senza di vapori emessi da liquidi di tal sorta.
o Non utilizzare l'elettrodomestico all'aperto o su su-
perfici bagnate né per aspirare acqua, liquidi o
sporco umido.
19
Gebrauchsanweisung ○ Mode d’emploi ○ Istruzioni per l’uso ○ Instruction for useo Non passare con la spazzola sopra al cavo di ali-
mentazione.
o Prestare attenzione quando si utilizza l'aspirapol-
vere nelle vicinanze di un bambino.
o Se si usa una prolunga, accertarsi che sia conforme
agli standard di sicurezza e che sia completamente
srotolata per evitarne il surriscaldamento o possibili
danni.
20
Gebrauchsanweisung ○ Mode d’emploi ○ Istruzioni per l’uso ○ Instruction for use• ASSEMBLAGGIO E UTILIZZO DELL'ASPIRAPOLVERE
o Prima dell'assemblaggio, verificare che l'aspirapolvere sia spento e scollegato dalla
rete elettrica.
o Inserire il connettore del tubo nella relativa sede sul corpo principale dell'aspirapol-
vere e ruotarlo in senso orario finché scatta in posizione (Fig. 1).
o Introdurre il tubo telescopico nell'impugnatura finché scatta in posizione (Fig. 2).
o Inserire l'altra estremità del tubo telescopico nell'ugello opportuno, ad esempio, l'u-
gello universale (A) per moquette o pavimento.
o Rimuovere il coperchio del vano batterie (E) e inserire due batterie di tipo AAA.
o Srotolare il cavo di alimentazione e inserire la spina in una presa elettrica. Premere
l'interruttore di accensione a pedale (Fig. 3).
o Premere il pulsante di accensione sul controllo a distanza dell'impugnatura (F).
o L'unità si avvia al livello 4 (MAX); il livello viene visualizzato sul display a LED.
o Il livello si può modificare premendo "+" / "-" sul controllo a distanza dell'impugna-
tura (F) o sul corpo principale.
o Per spegnere l'unità, premere il pulsante di alimentazione sul controllo a distanza
dell'impugnatura (F) o l'interruttore di alimentazione a pedale (I).
o Disinserire la spina dalla presa e riavvolgere il cavo di alimentazione premendo l'in-
terruttore a pedale per riavvolgere automaticamente il cavo (Fig. 4).
1 2 3 4
21
Gebrauchsanweisung ○ Mode d’emploi ○ Istruzioni per l’uso ○ Instruction for use• SOSTITUZIONE DEL SACCHETTO RACCOGLIPOLVERE
o Utilizzare sempre il dispositivo con un sacchetto raccoglipolvere installato nel vano
raccoglipolvere.
o Sostituire il sacchetto raccoglipolvere quando l'indicatore diventa rosso (Fig. 5) o
quando l'aspirapolvere non è più efficace.
o Aprire il coperchio del vano raccoglipolvere (Fig. 6 e 7).
o Estrarre il supporto del sacchetto, quindi rimuovere il sacchetto pieno (Fig. 8) e sosti-
tuirlo.
• SOSTITUZIONE DEI FILTRI
o Utilizzare sempre l'aspirapolvere con i filtri installati.
o Se i filtri non vengono sostituiti tempestivamente, la potenza di aspirazione può ri-
dursi e il motore può subire danni.
o Il filtro di protezione del motore e il filtro H.E.P.A. devono essere sostituiti una volta
all'anno o quando sono visibilmente sporchi.
o Filtro di protezione del motore: Aprire il coperchio del vano raccoglipolvere (Fig. 6 e
7), rimuovere il sacchetto raccoglipolvere, estrarre il filtro di protezione del motore
(Fig. 9) e sostituirlo.
o Filtro H.E.P.A.: Rimuovere il coperchio del bocchettone (Fig. 10), rimuovere il filtro
H.E.P.A. premendo la clip verso il basso (Fig. 11) e sostituirlo.
5 6 7 8
9 10 11
22
Gebrauchsanweisung ○ Mode d’emploi ○ Istruzioni per l’uso ○ Instruction for use• SMALTIMENTO
o Per lo smaltimento corretto, la macchina deve essere restituita al rivenditore specia-
lizzato, al servizio di assistenza o alla ditta Rotel AG.
o La Direttiva UE 2012/19/CE sui rifiuti di apparecchiature elettriche ed elettroniche
(WEEE) sancisce che gli elettrodomestici non possono essere smaltiti usando il nor-
male ciclo di rifiuti solidi urbani. Le apparecchiature dismesse vanno invece raccolte
separatamente al fine di ottimizzare il costo di riutilizzo e dei materiali di riciclo che
compongono la macchina, escludendo così un danno potenziale alla salute pubblica
e all’ambiente. Il simbolo del bidone su ruote barrato appare su tutti i prodotti per
ricordare ai proprietari le obbligazioni inerenti la raccolta differenziata. I proprietari
dovrebbero rivolgersi alle autorità locali o al rivenditore delle apparecchiature per
raccogliere ulteriori informazioni in merito al corretto smaltimento delle apparec-
chiature stesse.
Questo apparecchio è conforme con le seguenti Direttive UE:
2014/35/UE (Direttiva sulla Bassa Tensione)
2014/30/UE (Direttiva sulla Compatibilità Elettromagnetica)
23
Gebrauchsanweisung ○ Mode d’emploi ○ Istruzioni per l’uso ○ Instruction for useEnglish
• SAFETY INSTRUCTIONS
Please read all instructions before using the device.
o This appliance can be used by persons with reduced
physical, sensory or mental capabilities or lack of ex-
perience and knowledge if they have been given su-
pervision or instruction concerning use of the appli-
ance in a safe way and understand the hazards in-
volved.
o This appliance must not be used by children. The ap-
pliance and its connecting cable must be kept away
from children.
o The appliance must be disconnected from the mains
during periods of no supervision and prior to assem-
bling, disassembling or cleaning.
o Before cleaning the appliance, when not in use, or
attempting any maintenance task, the vacuum
cleaner shall be switched off and the plug removed
from the mains supply.
24
Gebrauchsanweisung ○ Mode d’emploi ○ Istruzioni per l’uso ○ Instruction for useo This product is only intended for domestic use, to
remove dry dirt and dust from household carpets,
floorings and fabrics.
o This vacuum cleaner is not designed to remove vit-
reous building material including construction
products and similar products such as wood/fibres,
sand, cement, fibreglass, etc. The removal of these
materials may damage the device and will void the
manufacturer’s warranty.
o The vacuum cleaner must only be connected to an
AC supply at the voltage shown on the rating plate.
This vacuum shall only be used for its intended pur-
pose, as described in these instructions.
o The vacuum cleaner shall never be operated with-
out its filters.
o The vacuum cleaner must never be used to suck up
flammable liquids such as cleaning fluids, petrol
etc., or in the presence of such vapours.
o The appliance shall never be used outdoors, on any
wet surface or to vacuum up water, liquid or damp
dirt.
o The power cable shall not be run over with the
power brush.
25
Gebrauchsanweisung ○ Mode d’emploi ○ Istruzioni per l’uso ○ Instruction for useo Close attention is necessary when used near chil-
dren.
o If using an extension cord, it shall be ensured it fits
the safety standards and is fully extended to pre-
vent overheating and possible damage.
26
Gebrauchsanweisung ○ Mode d’emploi ○ Istruzioni per l’uso ○ Instruction for use• ASSEMBLING AND USING THE VACUUM CLEANER
o Ensure that the vacuum cleaner is switched off and disconnected from the mains sup-
ply before assembling.
o Insert the hose connector into the socket on the main body of the cleaner and turn it
clockwise until it clicks into position (Fig. 1).
o Fit the the telescopic tube into the handle until it clicks into position (Fig. 2).
o Insert the other end of the telescopic tube into the nozzle required: For example, the
universal nozzle (A) for carpet or floor.
o Remove the battery cover (E) and insert two AAA batteries.
o Unwind the mains cable and plug it into a socket. Press the On/Off foot switch
(Fig. 3).
o Press the power button on the remote control of the handle (F).
o The unit will start at the MAX level 4, the level is shown on the LED display.
o The level can be changed by pressing “+” / “-“ on the remote control of the handle
(F) or the main body.
o Switch off the unit by pressing the power button on the remote control of the handle
(F) or the On/Off foot switch (I).
o Unplug the mains cable and rewind it by pressing the foot switch for automatic cord
rewind (Fig. 4).
1 2 3 4
27
Gebrauchsanweisung ○ Mode d’emploi ○ Istruzioni per l’uso ○ Instruction for use• REPLACING THE DUST BAG
o Always operate the device with a dust bag installed in the dust compartment.
o Change the dust bag when the indicator turns red (Fig. 5) or if the vacuum cleaner is
no longer effective.
o Open the dust compartment lid (Fig. 6 & 7).
o Take out the bag holder, then remove the full dust bag (Fig. 8) and replace it.
• REPLACING THE FILTERS
o Always operate the vacuum cleaner with its filters installed.
o Reduced suction power or motor damage may occur if the filters are not replaced in
good time.
o The motor protection and HEPA filters should be replaced once a year or when they
become visibly dirty.
o Motor protection filter: Open the dust compartment lid (Fig. 6 & 7), remove the dust
bag, pull out and replace the motor protection filter (Fig. 9).
o HEPA filter: Remove the outlet cover (Fig. 10), remove the HEPA filter by pressing
down the clip (Fig. 11) and replace it.
5 6 7 8
9 10 11
28
Gebrauchsanweisung ○ Mode d’emploi ○ Istruzioni per l’uso ○ Instruction for use• DISPOSAL
o For proper disposal, please return device to a retailer, a service agent or Rotel AG.
o European Directive 2012/19/EC concerning Waste Electrical and Electronic Equip-
ment (WEEE) states that household appliances should not be disposed of using the
normal solid urban waste cycle. Exhausted appliances should be collected separately
in order to optimise the cost of re-using and recycling materials comprising the ma-
chine, while preventing potential damage to public health and the environment. The
crossed-out wheeled bin symbol appears on all products to remind owners of the
obligations regarding separate waste collection. Owners should contact their local
authorities or appliance dealers for further information concerning the correct dis-
posal of household appliances.
This appliance conforms to the following EU directives:
2014/35/EU (Low Voltage Directive)
2014/30/EU (Electromagnetic Compatibility Directive)
29
Gebrauchsanweisung ○ Mode d’emploi ○ Istruzioni per l’uso ○ Instruction for useD/F/I/E
• GARANTIE / GARANTIE / GARANZIA / WARRANTY
• 2 JAHRE GARANTIE
• 2 ANS DE GARANTIE
• 2 ANNI DI GARANZIA
• 2 YEARS WARRANTY
o Garantieverpflichtung
Wir verpflichten uns, dieses Gerät kostenlos wieder instand zu setzen, falls es bei sachgemässer Behandlung innerhalb der Ga-
rantiezeit versagen sollte. Wir beseitigen alle Mängel, die auf Material- oder Fabrikationsfehlern beruhen. Die Garantieleistung
erfolgt durch Instandsetzung oder Austausch mangelhafter Teile nach unserer Wahl. Eine Garantieleistung entfällt für Schäden
an Verschleissteilen, für Schäden und Mängel, die durch unsachgemässe Behandlung oder Wartung auftreten (insbesondere
Verkalkung und gewerblicher Einsatz). Sie wird nur gewährt, wenn entweder die Garantiekarte mit Kaufdatum, Händlerstempel
und Unterschrift versehen oder die Kaufquittung mit dem Gerät an die zutreffende Servicestation eingesandt wird (siehe Ad-
resse unten). Rücksendungen sollen in der Originalverpackung erfolgen. Transportkosten gehen zu Lasten des Käufers. Bitte
vergessen Sie nicht, der Sendung Ihre Adresse und, falls der Fehler nicht offensichtlich ist, eine Erklärung beizufügen.
o Obligation de garantie
Nous nous engageons à réparer gratuitement cet appareil s'il devait tomber en panne durant la période de garantie, pour autant
qu’il ait été utilisé de manière appropriée. Nous prenons en charge tous les défauts occasionnés par des vices de matériel ou
de fabrication. La prestation de garantie s’effectue sous forme d’une réparation ou d’un échange de pièces, selon notre appré-
ciation. La garantie n'est pas applicable pour les dommages survenant sur les pièces d'usure, pour les dommages et vices dus à
une manipulation ou un entretien inappropriés (en particulier l'entartrage et l'utilisation à des fins professionnelles). Elle n'est
également accordée que si la quittance d'achat ou la carte de garantie mentionnant la date d'achat, le cachet du revendeur et
la signature est retournée avec l'appareil au point de service compétent (voir adresse ci-dessous). Les renvois doivent se faire
dans l'emballage d'origine. Les frais de transport sont à la charge de l'acheteur. Veuillez également indiquer votre adresse com-
plète et, si le défaut n'est pas évident, joindre une note explicative à votre envoi.
o Impegno di garanzia
Ci impegniamo a riparare gratis questo apparecchio, qualora – malgrado un uso corretto - si fosse gua-stato durante il periodo
di garanzia. Eliminiamo tutti i difetti causati da difetti del materiale o di fabbrica. La prestazione di garanzia avviene con il ripri-
stino o la sostituzione di pezzi difettosi a nostra discrezione. Una prestazione di garanzia decade nel caso di danni a pezzi soggetti
a usura, di danni e difetti dovuti a trattamento o a manutenzione non corretti (in particolare calcificazione e utilizzo industriale).
Viene concessa solo se la cartolina di garanzia munita della data d’acquisto, del timbro del rivenditore e della firma o la ricevuta
d’acquisto e l’apparecchio vengono inviati al rispettivo servizio di assistenza (vedi indirizzo in basso). L’invio deve avvenire
nell’imballaggio originale. Le spese di trasporto sono a carico dell’acquirente. Non dimenticatevi p.f. di allegare all’invio il vostro
indirizzo e, qualora il difetto non fosse chiaro, anche una spiegazione.
o Warranty commitment
We commit ourselves to repair this device free of charge, should a failure occur within the period of warranty despite proper
handling. We repair all defects caused by material or manufacturing faults. The guarantee will be fulfilled either by repairing
the device or replacing the defective parts, according to our judgement. A warranty does not cover damages due to wearing
parts, damages and defects caused by improper handling or maintenance (such as limescale and commercial use). It will only
be granted if either the warranty card stating date of purchase, dealer's stamp and signature, or the purchase receipt is sent
with the device to the relevant after-sales service (see address below). Devices shall be returned in their original packaging.
Transport costs are to be borne by the purchaser. Remember to specify your address to your sending, as well as a short decla-
ration about the failure, shall the defect not be obvious.
Servicestation:
Service après-vente: Rotel AG
Servizio Assistenza: Parkstrasse 43 Telefon: 062 787 77 00
After-sales service: 5012 Schönenwerd E-mail: office@rotel.ch
30
Gebrauchsanweisung ○ Mode d’emploi ○ Istruzioni per l’uso ○ Instruction for useSie können auch lesen