70M CAT.6 HDMI 10.2G & IR EXTENDER WITH POC & LOOP OUT - DEUTSCH FRANÇAIS ITALIANO
←
→
Transkription von Seiteninhalten
Wenn Ihr Browser die Seite nicht korrekt rendert, bitte, lesen Sie den Inhalt der Seite unten
70m Cat.6 HDMI 10.2G & IR Extender
               with PoC & Loop Out
User Manual                                                  Eng li sh
Benutzerhandbuch                                             Deutsch
Manuel Utilisateur                                           Français
Manuale                                                      Italiano

                           No. 38208

                        lindy.com

              © LINDY Group - FIRST EDITION (January 2021)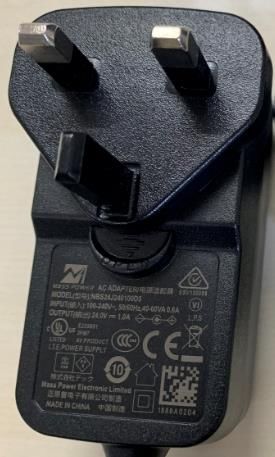
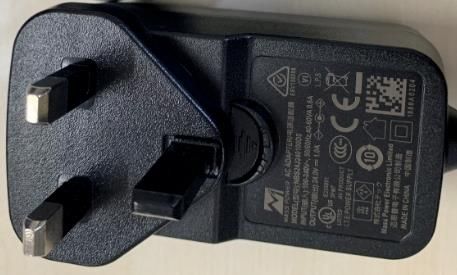
User Manual                                                                                   English
Safety Instructions

! WARNING !
Please read the following safety information carefully and always keep this document with
the product.
Failure to follow these precautions can result in serious injuries or death from electric
shock, fire or damage to the product.
Touching the internal components or a damaged cable may cause electric shock, which
may result in death.
This device is a switching type power supply and can work with supply voltages in the range 100 - 240
VAC For worldwide usability four different AC adapters are enclosed: Euro type, UK type, US/Japan type
and Australia/New Zealand type. Use the appropriate AC adapter as shown in the picture and ensure it
is firmly secured in place and does not detach by pulling before installing into a power socket.
To reduce risk of fire, electric shocks or damage:
▪   Do not open the product nor its power supply. There are no user serviceable parts inside.
▪   Only qualified servicing personnel may carry out any repairs or maintenance.
▪   Never use damaged cables.
▪   Do not expose the product to water or places of moisture.
▪   Do not use this product outdoors it is intended for indoor use only.
▪   Do not place the product near direct heat sources. Always place it in a well-ventilated place.
▪   Do not place heavy items on the product or the cables.
▪   Please ensure any adapters are firmly secured and locked in place before inserting into a wall socket

Instructions for Use of Power Supply

To connect the adapter
Slide the desired plug adapter into the power supply and rotate
clockwise until it locks into place.

To remove the adapter
Press the push button latch.
While pressed, rotate the adapter anticlockwise.

User Manual                                                                                       English
Introduction

Thank you for purchasing the 70m Cat.6 HDMI 10.2G & IR Extender with PoC & Loop Out. This product
has been designed to provide trouble free, reliable operation. It benefits from both a LINDY 2-year warranty
and free lifetime technical support. To ensure correct use, please read this manual carefully and retain it
for future reference. The Lindy 70m Cat.6 HDMI 10.2G & IR Extender is a simple to use solution which
lets the user extend HDMI signals up to 70m using a single low-cost Cat.6 U/UTP cable (not included).
For added convenience, IR signals (20-60 kHz) can also be extended using the supplied IR receiver and
emitter cables.

Package Contents

▪   Transmitter Unit
▪   Receiver Unit
▪   12VDC 1A Multi-country Power Supply (UK, EU, US & AUS), Screw Type Barrel Size: 5.5/2.1mm
▪   IR Emitter Cable, 1.5m
▪   IR Receiver Cable, 1.5m
▪   Lindy Manual

Features

▪   Supports resolutions up to 3840x2160@30Hz 4:4:4 8bit
▪   Supports transmission up to the following distances using Cat.5e or Cat.6 cable:
    Cat.6: 70m (229.66ft) – 1920x1080, 40m (131.23ft) - 3840x2160@30Hz 4:4:4 8bit
    Cat.5e: 60m (196.85ft) – 1920x1080, 35m (114.83ft) - 3840x2160@30Hz 4:4:4 8bit
▪   EDID Copy function from the local loop-out or remote display
▪   Cascadeable using the HDMI loop-out connection
▪   Supports PoC (Power over Cable) functionality from the transmitter side of the installation
▪   IR control from the receiver side of the installation

Specification

▪   Interface Standard: HDMI 1.4
▪   Supported Bandwidth: 10.2Gbps
▪   HDCP Support: HDCP 1.4
▪   Supported Audio: Up to 7.1 (Pass-through)
▪   IR Support: 20-60kHz
▪   Housing Material: Metal
▪   Colour: Black
▪   Operating Temperature: 0°C - 40°C (32°F - 104°F)
▪   Storage Temperature: -20°C - 60°C (-4°F - 140°F)
▪   Humidity: 20 – 90% RH (no condensation)
▪   Input TMDS Signal: 3.3 volts
▪   Input DDC Signal: 5.0 volts/P-P
▪   ESD Protection: Human Body model: +/- 8 kV (air-gap discharge), +/- 4 kV (contact discharge)

Connectors
▪ Transmitter Input: HDMI Type A (Female)
▪ Transmitter Output: HDMI Type A (Female), RJ-45 (Female), IR (Female)
▪ Receiver Input: RJ-45 (Female), IR (Female)
▪ Receiver Output: HDMI Type A (Female)
User Manual English
Product Diagram
Transmitter
▪ HDMI In: Connect an HDMI source device.
▪ EDID Dipswitch: This switch can be used to select an EDID to copy. If switched to Tx, the extender will
copy the local HDMI loop-out display’s EDID. If switched to Rx, the extender will copy the remote
display’s EDID.
▪ HDMI Out: Connect a local HDMI display.
▪ IR Out: Connect the included IR emitter cable for controlling the source device.
▪ Power LED: This LED will illuminate once power has been connected.
▪ Cat Out: Connect a Cat.5e or Cat.6 cable.
▪ 12VDC: Connect the included power supply.
Receiver
▪ HDMI Out: Connect an HDMI display.
▪ IR In: Connect the included IR receiver cable for control of the source device from the display side.
▪ Power LED: This LED will illuminate once power has been connected.
▪ Cat In: Connect the Cat.5e or Cat.6 cable from the transmitter.User Manual English
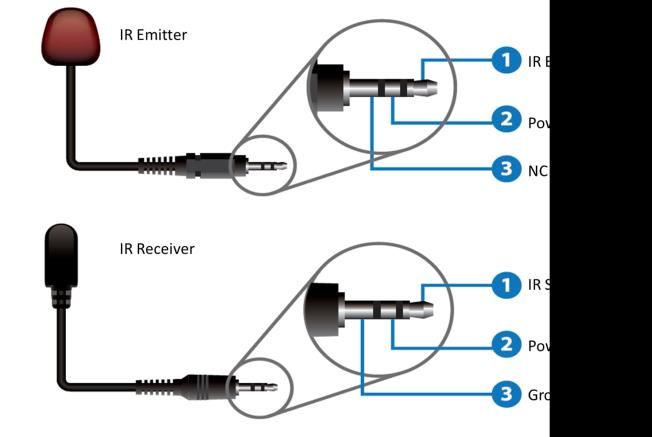
IR Pin Out
Installation & Operation
The following steps are for an installation using HDMI equipment, if you are using DVI equipment, please
substitute HDMI cables for DVI to HDMI cables where required. The suggested maximum input and output
HDMI cable length is 3m (9.84ft) in, and 3m (9.84ft) out.
▪ Connect the HDMI source to the “HDMI IN” port on the transmitter using an HDMI cable.
▪ Connect one end of a Cat.5e/6 cable or higher to the “CAT OUT” port on the transmitter, and the other
end to the “CAT IN” port on the receiver.
▪ To utilize the loop out feature, connect a local display or projector to the “HDMI OUT” port on the
transmitter using an HDMI cable.
▪ Connect the remote display to the “HDMI OUT” port on the receiver using an HDMI cable.
▪ Connect the included IR emitter cable to the “IR OUT” port on the transmitter, and the IR receiver cable
to the “IR IN” port on the receiver.
▪ Ensure the emitter’s eye is in line with the IR receiver on the source device.
▪ Ensure that the IR receiver is in a clear line of sight of the remote control.
▪ To copy the EDID of the local display, please move the dipswitch to Tx. To copy the EDID of the remote
display, please move the dipswitch to Rx.
▪ Connect the locking DC power supply to the 12VDC port on the transmitter. The transmitter and
receiver will immediately turn on, then switch on the display(s) and finally the source device.
▪ The installation is now complete.Benutzerhandbuch Deutsch
Sicherheitshinweise
! GEFAHR !
Bitte lesen Sie die folgenden Sicherheitshinweise sorgfältig durch und bewahren Sie
dieses Dokument immer zusammen mit dem Produkt auf.
Die Nichtbeachtung dieser Vorsichtsmaßnahmen kann zu schweren Verletzungen oder
zum Tod durch Stromschlag, Feuer oder Schäden am Produkt führen.
Das Berühren der internen Komponenten oder eines beschädigten Kabels kann einen
elektrischen Schlag verursachen, der zum Tod führen kann.
Dieses Schaltnetzteil arbeitet mit Anschlussspannungen im Bereich von 100…240 VAC. Für weltweiten
Einsatz sind vier verschiedene AC-Adapter für Europa, Großbritannien, USA/Japan und
Australien/Neuseeland enthalten. Verwenden Sie den geeigneten Adapter wie es die Abbildung zeigt.
Stellen Sie bitte sicher, dass der Adapter fest eingerastet ist und sich nicht abziehen lässt, bevor Sie ihn
in die Steckdose stecken.
Um die Gefahr von Bränden, Stromschlägen oder Schäden zu verringern:
▪ Öffnen Sie weder das Produkt noch sein Netzteil. Es befinden sich keine vom Benutzer zu
wartenden Teile im Inneren.
▪ Ausschließlich qualifiziertes Personal darf Reparaturen oder Wartungen durchführen.
▪ Verwenden Sie niemals beschädigte Kabel.
▪ Setzen Sie das Produkt nicht Wasser oder Feuchtigkeit aus.
▪ Dieses Produkt ist nur für den Gebrauch in geschlossenen Räumen bestimmt.
▪ Stellen Sie das Produkt nicht in der Nähe von direkten Wärmequellen auf. Stellen Sie es immer an
einem gut belüfteten Ort auf.
▪ Stellen Sie keine schweren Gegenstände auf das Produkt oder die Kabel.
▪ Bitte stellen Sie vor der Verwendung sicher, dass alle Adapter sicher und fest eingerastet sind
Anwendungshinweise für das Netzteil
Zum Anbringen des Adapters
Schieben Sie den gewünschten Steckeradapter in das Netzteil
und drehen Sie ihn im Uhrzeigersinn bis er einrastet.
Zum Entfernen des Adapters
Drücken Sie die Druckknopfverriegelung und drehen Sie den
Adapter währenddessen gegen den Uhrzeigersinn.Benutzerhandbuch Deutsch
Einführung
Wir freuen uns, dass Ihre Wahl auf ein LINDY-Produkt gefallen ist und danken Ihnen für Ihr Vertrauen.
Sie können sich jederzeit auf unsere Produkte und einen guten Service verlassen. Dieser 70m Cat.6
HDMI 10.2G & IR Extender mit PoC & Loop Out unterliegt einer 2-Jahres LINDY Herstellergarantie und
lebenslangem kostenlosen technischen Support. Bitte lesen Sie diese Anleitung sorgfältig und bewahren
Sie sie auf.
Lieferumfang
▪ Transmitter
▪ Receiver
▪ 12VDC 1 A Multi-Country Netzteil (UK, EU, US & AUS) mit Schraubverbindung, DC-Hohlstecker:
5.5/2.1mm
▪ IR-Emitterkabel, 1.5m
▪ IR-Receiverkabel, 1.5m
▪ Lindy Handbuch
Eigenschaften
▪ Unterstützt Auflösungen bis 3840x2160@30Hz 4:4:4 8Bit
▪ Unterstützt folgende Maximaldistanzen über Cat.5e- oder Cat.6-Kabel:
Cat.6: 70m (229.66ft) – 1920x1080, 40m (131.23ft) - 3840x2160@30Hz 4:4:4 8Bit
Cat.5e: 60m (196.85ft) – 1920x1080, 35m (114.83ft) - 3840x2160@30Hz 4:4:4 8Bit
▪ EDID-Kopierfunktion von der lokalen Loop-Out- oder Remote-Anzeige
▪ Kaskadierbar über HDMI Loop-Out-Verbindung
▪ PoC (Power over Cable) erlaubt die Verwendung nur eines Netzteils für Transmitter und Receiver
▪ IR-Steuerung über den Receiver
Spezifikationen
▪ Schnittstellen-Standard: HDMI 1.4
▪ Unterstützte Bandbreite: 10.2 Gbit/s
▪ HDCP-Unterstützung: HDCP 1.4
▪ Audio: Bis zu 7.1 (Pass-through)
▪ IR-Unterstützung: 20-60kHz
▪ Gehäusematerial: Metall
▪ Farbe: Schwarz
▪ Betriebstemperatur: 0°C - 40°C (32°F - 104°F)
▪ Lagertemperatur: -20°C - 60°C (-4°F - 140°F)
▪ Feuchtigkeit: 20 – 90% RH (nicht kondensierend)
▪ Eingang TMDS-Signal: 3.3 Volt
▪ Eingang DDC-Signal: 5.0 Volt/P-P
▪ ESD-Schutz: Human Body Model: +/- 8 kV (Luftspaltentladung), +/- 4 kV (Kontaktentladung)
Anschlüsse
▪ Transmitter-Eingänge: HDMI Typ A (Buchse)
▪ Transmitter-Ausgänge: HDMI Typ A (Buchse), RJ45 (Buchse), IR (Buchse)
▪ Receiver-Eingänge: RJ45 (Buchse), IR (Buchse)
▪ Receiver-Ausgänge: HDMI Typ A (Buchse)Benutzerhandbuch Deutsch
Produkt Diagramm
Transmitter
▪ HDMI IN: Schließen Sie ein HDMI-Quellgerät an.
▪ EDID DIP-Schalter: Dieser Schalter kann verwendet werden, um eine EDID zum Kopieren
auszuwählen. Steht der Schalter auf TX, kopiert der Extender die EDID vom lokalen HDMI-Loop-
Out-Display. Steht er auf RX, kopiert der Extender die EDID des Remote-Displays.
▪ HDMI Out: Schließen Sie ein HDMI-Display zur lokalen Überwachung an.
▪ IR OUT: Schließen Sie das beiliegende IR-Emitterkabel an.
▪ Power LED: Diese LED leuchtet, sobald der Transmitter mit Strom versorgt wird.
▪ Cat OUT: Schließen Sie ein Cat.5e- oder Cat.6-Kabel an.
▪ 12VDC: Schließen Sie das beiliegende Netzteil an.
Receiver
▪ HDMI Out: Schließen Sie ein HDMI-Display an.
▪ IR In: Schließen Sie das beiliegende IR-Receiverkabel an.
▪ Power LED: Diese LED leuchtet, sobald der Receiver mit Strom versorgt wird.
▪ Cat In: Schließen Sie hier das Cat.5e- oder Cat.6-Kabel vom Transmitter an.Benutzerhandbuch Deutsch
IR Pin Out
Installation & Betrieb
Die folgenden Schritte gelten für HDMI-Geräte. Bei Verwendung von DVI-Geräten, ersetzen Sie bitte die
HDMI Kabel mit DVI an HDMI Kabel. Die empfohlene maximale HDMI-Kabellänge für Ein- und Ausgang
beträgt 3m (9.84ft) und 3m (9.84ft).
▪ Schließen Sie das HDMI-Quellgerät mit einem HDMI-Kabel am “HDMI IN“-Anschluss des
Transmitters an.
▪ Verbinden Sie ein Ende eines Cat.5e/Cat.6-Kabels (oder höher) mit dem “CAT OUT“-Anschluss des
Transmitters und das andere Ende mit dem “CAT IN“-Anschluss des Receivers.
▪ Zur Verwendung der Loop-Out-Funktion, schließen Sie eine lokale Display-Einheit oder einen
Projektor mit einem HDMI-Kabel am “HDMI OUT“-Anschluss des Transmitters an.
▪ Verbinden Sie das Remote-Display mit einem HDMI-Kabel mit dem “HDMI OUT“-Anschluss des
Receivers.
▪ Schließen Sie das beiliegende IR-Ermitterkabel am “IR OUT“-Anschluss des Transmitters an und
das IR-Receiverkabel am “IR IN“ -Anschluss des Receivers.
▪ Stellen Sie sicher, dass das Auge des Senders/Emitters direkte Sichtverbindung zum IR Receiver
des Quellgeräts hat.
▪ Stellen Sie sicher, dass der IR-Receiver direkte Sichtverbindung zur Fernbedienung hat.
▪ Zum Kopieren der EDID des lokal angeschlossenen Displays, stellen Sie den Dip-Schalter auf TX.
Zum Kopieren der EDID des Remote-Displays stellen Sie den Dip-Schalter auf RX.
▪ Schließen Sie das DC-Netzteil am 12VDC-Port des Transmitters an. Transmitter und Receiver
werden sofort eingeschaltet. Schalten Sie danach das Display und zum Schluss das Quellgerät ein.
Die Installation ist nun abgeschlossen.Manuel Utilisateur Français
Consignes de sécurité
! ATTENTION !
Merci de lire attentivement ces instructions de sécurité et de les conserver avec le
produit.
Le non-respect de ces précautions peut causer un choc électrique entrainant des
blessures graves, voire mortelles, un incendie ou des dommages au produit.
Toucher les composants internes ou un câble endommagé peut provoquer un choc
électrique pouvant entraîner la mort.
Cet appareil est une alimentation à découpage et peut fonctionner avec des tensions d'alimentation de
100...240 VAC Pour une utilisation dans le monde entier, quatre adaptateurs secteur différents sont
inclus : Type Euro, type UK, type US/Japon et type Australie/Nouvelle-Zélande. Utilisez l'adaptateur
secteur approprié comme indiqué sur la photo et assurez-vous qu'il est solidement fixé en place et qu'il
ne se détache pas en tirant avant de l'installer dans une prise électrique.
Pour éviter les risques d'incendie, de choc électrique ou de dommages:
▪ N'ouvrez pas l'appareil ni son alimentation électrique. Il n'y a pas de pièces réparables par
l'utilisateur à l'intérieur.
▪ Seul un personnel d'entretien qualifié est autorisé à effectuer toute réparation ou entretien.
▪ Ne jamais utiliser de câble endommagé.
▪ Ne pas mouiller le produit et ne pas l'exposer à l'humidité.
▪ N'utilisez pas ce produit à l'extérieur, il est destiné à un usage intérieur uniquement.
▪ Ne pas placer le produit à proximité de sources de chaleur. Toujours le placer dans un endroit
suffisamment ventilé.
▪ Ne pas déposer de charge lourde sur le produit ou sur les câbles.
▪ Veuillez vous assurer que l'adaptateur utilisé est fermement fixé et verrouillé en place avant de
l'insérer dans une prise murale.
Instructions d’utilisation de l’alimentation
Pour connecter l’adaptateur
Glisser l’adaptateur secteur requis dans l’alimentation et tournez
dans le sens horaire pour le verrouiller.
Pour retirer l’adaptateur
Appuyez sur le bouton de déverrouillage.
Tout en appuyant, tournez l’adaptateur dans le sens anti-horaire.Manuel Utilisateur Français
Introduction
Nous sommes heureux que votre choix se soit porté sur un produit LINDY et vous remercions de votre
confiance. Vous pouvez compter à tout moment sur la qualité de nos produits et de notre service. Cet
extender Cat.6 HDMI 10.2G & IR avec PoC et Loop Out 70m est soumis à une durée de garantie LINDY
de 2 ans et d’une assistance technique gratuite à vie. Merci de lire attentivement ces instructions et de
les conserver pour future référence.
Contenu de l’emballage
▪ Emetteur
▪ Récepteur
▪ Alimentation multi-pays 12VDC 1A (UK, EU, US & AUS), prise ronde DC à visser: 5.5/2.1mm
▪ Câble émetteur IR, 1.5m
▪ Câble récepteur IR, 1.5m
▪ Manuel Lindy
Caractéristiques
▪ Prend en charge les résolutions jusqu’à 3840x2160@30Hz 4:4:4 8bit
▪ Prend en charge la transmission sur les distances suivantes à l’aide de câbles Cat.5e ou Cat.6:
Cat.6: 70m (229.66ft) – 1920x1080, 40m (131.23ft) - 3840x2160@30Hz 4:4:4 8bit
Cat.5e: 60m (196.85ft) – 1920x1080, 35m (114.83ft) - 3840x2160@30Hz 4:4:4 8bit
▪ Fonction de copie EDID à partir de la boucle locale ou de l’écran distant
▪ Cascadable en utilisant le port HDMI de boucle locale
▪ Prise en charge de la fonction PoC (Power over Cable) à partir de l’émetteur
▪ Contrôle IR à partir du récepteur
Spécifications
▪ Norme de l’interface: HDMI 1.4
▪ Bande passante prise en charge: 10.2Gbit/s
▪ Prise en charge HDCP: HDCP 1.4
▪ Audio pris en charge: jusqu’à 7.1 (Pass-through)
▪ Prise en charge IR: 20-60kHz
▪ Matériau du boitier: métal
▪ Couleur: noir
▪ Température de fonctionnement: 0°C - 40°C (32°F - 104°F)
▪ Température de stockage: -20°C - 60°C (-4°F - 140°F)
▪ Humidité relative: 20 – 90% RH (sans condensation)
▪ Signal TMDS en entrée: 3.3 volts
▪ Signal DDC en entrée: 5.0 volts/P-P
▪ Protection ESD: modèle corps humain: +/- 8 kV (décharge dans l’air), +/- 4 kV (décharge par contact)
Connectiques
▪ Entrée émetteur: HDMI Type A (femelle)
▪ Sorties émetteur: HDMI Type A (femelle), RJ-45 (femelle), IR (femelle)
▪ Entrées récepteur: RJ-45 (femelle), IR (femelle)
▪ Sortie récepteur: HDMI Type A (femelle)Manuel Utilisateur Français
Vue d’ensemble du produit
Emetteur
▪ HDMI In: Connecte une source HDMI.
▪ Dipswitch EDID: ce switch peut être utilisé pour sélectionner un EDID à copier. Si Tx est sélectionné,
l’extender va copier l’EDID de la boucle de sortie locale. Si Rx est sélectionné, l’extender va copier
l’EDID de l’écran distant.
▪ HDMI Out: Connecte un écran HDMI local.
▪ IR Out: Connecte l’émetteur IR inclus pour contrôler l’appareil source.
▪ LED Power: cette LED s’éclaire une fois que l’alimentation est connectée.
▪ Cat Out: Connecte un câble Cat.5e ou Cat.6.
▪ 12VDC: Connecte l’alimentation fournie.
Récepteur
▪ HDMI Out: Connecte un affichage HDMI.
▪ IR In: Connecte le récepteur IR fourni pour contrôler la source à partir de l’écran.
▪ LED Power: cette LED s’éclaire une fois l’alimentation connectée.
▪ Cat In: Connecte le câble Cat.5e ou Cat.6 relié à l’émetteur.Manuel Utilisateur Français
Brochage IR
Installation & Utilisation
Les étapes suivantes concernent une installation utilisant un équipement HDMI. Si vous utilisez un
équipement DVI, veuillez remplacer les câbles DVI par des câbles HDMI lorsque cela est nécessaire. La
longueur maximale suggérée pour les câbles HDMI d'entrée et de sortie est de 3m (9,84ft) en entrée et
3m (9,84ft) en sortie.
▪ Connectez la source HDMI au port “HDMI IN” de l’émetteur en utilisant un câble HDMI.
▪ Connectez une extrémité du câble Cat.5e/6 ou supérieur au port “CAT OUT” de l’émetteur et l’autre
extrémité au port “CAT IN” du récepteur.
▪ Pour utiliser la sortie en boucle locale, connectez un affichage local au port “HDMI OUT” de l’émetteur
en utilisant un câble HDMI.
▪ Connectez l’affichage distant au port “HDMI OUT” sur le récepteur en utilisant un câble HDMI.
▪ Connectez l’émetteur IR fourni au port “IR OUT” sur l’émetteur, et le récepteur IR au port “IR IN” sur
le récepteur.
▪ Assurez-vous que l’émetteur IR est en ligne de mire avec le récepteur IR de la source.
▪ Assurez-vous que le récepteur IR est en ligne de mire de la télécommande.
▪ Pour copier l’EDID de l’écran local, placez le sélecteur en position Tx. Pour copier l’EDID de l’écran
distant, veuillez placer le dipswitch sur Rx.
▪ Branchez l’alimentation avec connecteur DC à visser au port 12VDC de l’émetteur. L’émetteur et le
récepteur vont être alimentés en même temps, démarrez ensuite le(les) écran(s) et finissez par la
source.
▪ L’installation est à présent terminée.Manuale Italiano
Istruzioni di sicurezza
! ATTENZIONE !
Per favore leggete la seguente informativa e conservate sempre questo documento con
il prodotto.
La mancata osservanza di queste precauzione può causare seri infortuni o la morte per
folgorazione, incendi o danneggiare il prodotto.
Toccare i componenti interni o un cavo danneggiato può causare uno shock elettrico che
può condurre alla morte.
Questo dispositivo ha un alimentatore a commutazione che può funzionare con tensioni di alimentazione
all’interno del range 100…240 VAC. La fornitura comprende quattro adattatori AC per prese di tutto il
mondo: Euro, UK, US/Giappone e Australia/Nuova Zelanda. Utilizzate l’adattatore AC appropriato e
montatelo come mostrato nell’immagine, assicurandovi che sia fissato correttamente e che non si
stacchi estraendolo dalla presa.
Per ridurre il rischio di incendi, folgorazione o danni:
▪ Non aprite il prodotto o l’alimentatore. Non esistono componenti utilizzabili all'interno.
▪ La riparazione o manutenzione del prodotto può essere effettuata solo da personale qualificato.
▪ Non utilizzare mai cavi danneggiati.
▪ Non fate entrare il prodotto in contatto con acqua e non utilizzatelo in luoghi umidi.
▪ Questo prodotto è pensato esclusivamente per l’uso in ambienti interni.
▪ Non posizionate il prodotto nelle vicinanze di sorgenti di calore. Installatelo sempre in luoghi ben
ventilati.
▪ Non appoggiate oggetti pesanti sul prodotto o sui cavi.
▪ Vi preghiamo di assicurarvi che ogni adattatore sia fermamente inserito e bloccato in sede prima di
collegarlo a una presa di corrente.
Istruzioni per l’uso dell’alimentatore
Per collegare l'adattatore
Far scorrere l'adattatore ad innesto desiderato nell'alimentatore e
ruotarlo in senso orario fino a quando non si blocca in posizione.
Per rimuovere l'adattatore
Premere il pulsante di chiusura.
Mentre è premuto, ruotare l'adattatore in senso antiorarioManuale Italiano
Introduzione
Vi ringraziamo per aver acquistato L'Extender Cat.6 HDMI 10.2G & IR con PoC e Loop Out, 70m. Questo
prodotto è stato progettato per garantirvi la massima affidabilità e semplicità di utilizzo ed è coperto da da
2 anni di garanzia LINDY oltre che da un servizio di supporto tecnico a vita. Per assicurarvi di farne un
uso corretto vi invitiamo a leggere attentamente questo manuale e a conservarlo per future consultazioni.
Contenuto della confezione
▪ Trasmettitore
▪ Ricevitore
▪ Alimentatore 12VDC 1A Multi-paese (UK, EU, US & AUS), tipo a vite Dimensioni: 5.5/2.1mm
▪ Cavo emettitore IR, 1,5m
▪ Cavo ricevitore IR, 1,5m
▪ Manuale Lindy
Caratteristiche
▪ Supporta risoluzioni fino a 3840x2160@30Hz 4:4:4 8bit
▪ Supporta la trasmissione fino al seguente metraggio (utilizzando il cavo Cat.5e o Cat.6):
Cat.6: 70m (229.66ft) - 1920x1080, 40m (131.23ft) - 3840x2160@30Hz 4:4:4 8bit
Cat.5e: 60m (196.85ft) - 1920x1080, 35m (114.83ft) - 3840x2160@30Hz 4:4:4 8bit
▪ Funzione di copia EDID dal display locale in loop-out o remoto
▪ Collegabile in cascata tramite il collegamento in loop-out HDMI
▪ Supporta la funzionalità PoC (Power over Cable) dal lato trasmettitore dell'installazione
▪ Controllo IR dal lato ricevitore dell'impianto
Specifiche
▪ Standard Interfaccia: HDMI 1.4
▪ Larghezza di banda supportata: 10.2Gbps
▪ Supporto HDCP: HDCP 1.4
▪ Audio supportato: fino a 7.1 canali (Pass-through)
▪ Supporto IR: 20-60kHz
▪ Materiale alloggiamento: Metall
▪ Colore: Nero
▪ Temperatura operativa: 0°C - 40°C (32°F - 104°F)
▪ Temperatura di stoccaggio: -20°C - 60°C (-4°F - 140°F)
▪ Umidità: 20 – 90% RH (senza condensa)
▪ Segnale in ingresso TMDS: 3.3 volts
▪ Segnale in ingresso DDC: 5.0 volts/P-P
▪ Protezione ESD: Human Body model: +/- 8 kV (scarico a vuoto d'aria), +/- 4 kV (scarica a contatto)
Connettori
▪ Ingresso trasmettitore: HDMI Tipo A (Femmina)
▪ Uscita trasmettitore: HDMI Tipo A (Femmina), RJ-45 (Femmina), IR (Femmina)
▪ Ingresso ricevitore: RJ-45 (Femmina), IR (Femmina)
▪ Uscita ricevitore: HDMI Tipo A (Femmina)Manuale Italiano
Product Diagram
Trasmettitore
▪ HDMI In: Collega un dispositivo sorgente HDMI.
▪ EDID Dipswitch: Questo interruttore può essere utilizzato per selezionare un EDID da copiare. Se
commutato su Tx, l'estensore copierà l'EDID del display loop-out HDMI locale. Se commutato su Rx,
l'estensore copierà l'EDID del display remoto.
▪ HDMI Out: Collega un display HDMI locale.
▪ IR Out: Collega il cavo dell'emettitore IR incluso per il controllo del dispositivo sorgente.
▪ Power LED: Questo LED si illumina se viene collegata l'alimentazione.
▪ Cat Out: Collega un cavo Cat.5e o Cat.6.
▪ 12VDC: Collega l'alimentatore in dotazione.
Ricevitore
▪ HDMI Out: Collega un display HDMI.
▪ IR In: Collega il cavo del ricevitore IR incluso per il controllo del dispositivo sorgente dal lato del display.
▪ Power LED: Questo LED si illumina non appena viene collegata l'alimentazione.
▪ Cat In: Collega il cavo Cat.5e o Cat.6 dal lato trasmettitore.Manuale Italiano
IR Pin Out
Installazione & Utilizzo
I passaggi seguenti riguardano un'installazione che prevede l'utilizzo di dispositivi HDMI. Se si utilizzano
dispositivi DVI, si prega di sostituire i cavi HDMI con cavi DVI con cavi HDMI, se necessario. La lunghezza
massima suggerita per i cavi HDMI in ingresso e in uscita è di 3m (9.84ft) in ingresso, e 3m (9.84ft) in
uscita.
▪ Collega la sorgente HDMI alla porta "HDMI IN" del trasmettitore utilizzando un cavo HDMI.
▪ Collega un'estremità di un cavo Cat.5e/6 o superiore alla porta "CAT OUT" sul trasmettitore e l'altra
estremità alla porta "CAT IN" sul ricevitore.
▪ Per utilizzare la funzione Loop Out, collegare un display o un proiettore locale alla porta "HDMI OUT"
del trasmettitore usando un cavo HDMI.
▪ Collegare il display remoto alla porta "HDMI OUT" del ricevitore usando un cavo HDMI.
▪ Collegare il cavo dell'emettitore IR incluso alla porta "IR OUT" sul trasmettitore e il cavo del ricevitore
IR alla porta "IR IN" sul ricevitore.
▪ Assicurarsi che la porta IR dell'emettitore sia fisicamente visibile dal ricevitore IR sul dispositivo
sorgente.
▪ Assicurarsi che il ricevitore IR sia fisicamente visibile dal ricevitore IR del telecomando.
▪ Per copiare l'EDID del display locale, spostare il dipswitch su Tx. Per copiare l'EDID del display remoto,
spostare il dipswitch su Rx.
▪ Collegare l'alimentazione DC alla porta 12VDC del trasmettitore. Il trasmettitore e il ricevitore si
accenderanno immediatamente, poi alimentare il/i display e infine il dispositivo sorgente.
▪ L'installazione è ora terminata.CE/FCC Statement
CE Certification
LINDY declares that this equipment complies with relevant European CE requirements.
CE Konformitätserklärung
LINDY erklärt, dass dieses Equipment den europäischen CE-Anforderungen entspricht
UKCA Certification
LINDY declares that this equipment complies with relevant UKCA requirements.
FCC Certification
This equipment has been tested and found to comply with the limits for a Class B digital device, pursuant
to part 15 of the FCC Rules. These limits are designed to provide reasonable protection against harmful
interference in a residential installation.
You are cautioned that changes or modification not expressly approved by the party responsible for
compliance could void your authority to operate the equipment.
This device complies with part 15 of the FCC Rules.
Operation is subject to the following two conditions:
1. This device may not cause harmful interference, and
2. This device must accept any interference received, including interference that may cause undesired
operation.
The enclosed power supply has passed Safety test requirements, conforming to the US American versions
of the international Standard IEC 60950-1 or 60065 or 62368-1.
LINDY Herstellergarantie – Hinweis für Kunden in Deutschland
LINDY gewährt für dieses Produkt über die gesetzliche Regelung in Deutschland hinaus eine zweijährige
Herstellergarantie ab Kaufdatum. Die detaillierten Bedingungen dieser Garantie finden Sie auf der LINDY
Website aufgelistet bei den AGBs.
Hersteller / Manufacturer (EU): Manufacturer (UK):
LINDY-Elektronik GmbH LINDY Electronics Ltd
Markircher Str. 20 Sadler Forster Way
68229 Mannheim Stockton-on-Tees, TS17 9JY
Germany England
Email: info@lindy.com , T: +49 (0)621 470050 sales@lindy.co.uk, T: +44 (0)1642 754000Recycling Information
WEEE (Waste of Electrical and Electronic Equipment),
Recycling of Electronic Products
Europe, United Kingdom
In 2006 the European Union introduced regulations (WEEE) for the collection and recycling of all waste electrical
and electronic equipment. It is no longer allowable to simply throw away electrical and electronic equipment. Instead,
these products must enter the recycling process.
Each individual EU member state, as well as the UK, has implemented the WEEE regulations into national law in
slightly different ways. Please follow your national law when you want to dispose of any electrical or electronic
products. More details can be obtained from your national WEEE recycling agency.
Germany / Deutschland Rücknahme Elektroschrott und Batterie-Entsorgung
Die Europäische Union hat mit der WEEE Direktive Regelungen für die Verschrottung und das Recycling von Elektro-
und Elektronikprodukten geschaffen. Diese wurden im Elektro- und Elektronikgerätegesetz – ElektroG in deutsches
Recht umgesetzt. Das Entsorgen von Elektro- und Elektronikgeräten über die Hausmülltonne ist verboten! Diese
Geräte müssen den Sammel- und Rückgabesystemen zugeführt werden! Dort werden sie kostenlos entgegen
genommen. Die Kosten für den weiteren Recyclingprozess übernehmen die Gerätehersteller.
LINDY bietet deutschen Endverbrauchern ein kostenloses Rücknahmesystem an, beachten Sie bitte, dass Batterien
und Akkus den Produkten vor der Rückgabe an das Rücknahmesystem entnommen werden müssen und über die
Sammel- und Rückgabesysteme für Batterien separat entsorgt werden müssen. Ausführliche Informationen zu
diesen Themen finden Sie stets aktuell auf der LINDY Webseite im Fußbereich.
France
En 2006, l'union Européenne a introduit la nouvelle réglementation (DEEE) pour le recyclage de tout équipement
électrique et électronique.
Chaque Etat membre de l’ Union Européenne a mis en application la nouvelle réglementation DEEE de manières
légèrement différentes. Veuillez suivre le décret d’application correspondant à l’élimination des déchets électriques
ou électroniques de votre pays.
Italy
Nel 2006 l’unione europea ha introdotto regolamentazioni (WEEE) per la raccolta e il riciclo di apparecchi elettrici ed
elettronici. Non è più consentito semplicemente gettare queste apparecchiature, devono essere riciclate. Ogni stato
membro dell’ EU ha tramutato le direttive WEEE in leggi statali in varie misure. Fare riferimento alle leggi del proprio
Stato quando si dispone di un apparecchio elettrico o elettronico.
Per ulteriori dettagli fare riferimento alla direttiva WEEE sul riciclaggio del proprio Stato.
No. 38208
Tested to comply with
st
FCC standards. 1 Edition, January 2021
For home and office use. lindy.comSie können auch lesen