Handbuch / User Manuel Smart Alarm System - C3 V2.0 - Jovision
←
→
Transkription von Seiteninhalten
Wenn Ihr Browser die Seite nicht korrekt rendert, bitte, lesen Sie den Inhalt der Seite unten

Handbuch / User Manuel

              Smart Alarm System
                    C3 V2.0

27.03.2018                            Version: 23.010.118
Inhaltsverzeichnis
Sicherheitsvorschriften................................................................................................................. 4
Konformitätserklärung .................................................................................................................. 5
    C3V2.0 Alarm System (Starter Set) .................................................................................. 5
    Anbindung der Zentrale in der Ontips Pro App (iOS & Android) ......................... 7
    Arten von Zubehör und deren Besonderheiten ........................................................ 10
    Erklärung des Tür-/Fenstersensors................................................................................ 12
    Vorbereitung des Fenster- Türsensors ......................................................................... 13
    Anbindung von Zubehörartikeln an die Zentrale ...................................................... 15
        Fenster-Türsensor (S03) ................................................................................................ 16
        Fernbedienung (F03)........................................................................................................ 16
        PIR-Sensor (PIR03) .......................................................................................................... 16
        Rauchmelder (RM03) ....................................................................................................... 17
        Sirene (SI03) ........................................................................................................................ 17
        Wassersensor (WS03)..................................................................................................... 18
    Die Steuerung nach der Einrichtung.............................................................................. 18
    Hinzufügen von Benutzern und teilen von Alarmanlagen ................................... 21
    C3V2.0 Alarm System Spezifikationen ......................................................................... 22
Europäische Union- Information zur Entsorgung ......................................................... 23
Safety regulations........................................................................................................................ 24
Declaration of Conformity ........................................................................................................ 25
    C3V2.0 Alarm System (Starter Set) ............................................................................... 25
    Explanation and preparation of the gateway ............................................................. 26
    Connection of the gateway in the Ontips Pro App (iOS & Android) ................ 27
    Types of accessories and their characteristics ......................................................... 30
    Explanation of the door/window sensor ....................................................................... 33
    Preparation of the window-door sensor ....................................................................... 34
    Connection of accessories to the central unit ........................................................... 36
        Window-door sensor (S03)............................................................................................ 37
        Remote control (F03) ....................................................................................................... 37
        PIR sensor (PIR03) ........................................................................................................... 37
        Smoke detector (RM03) .................................................................................................. 38

Deutsch                                                                                                                                Seite 2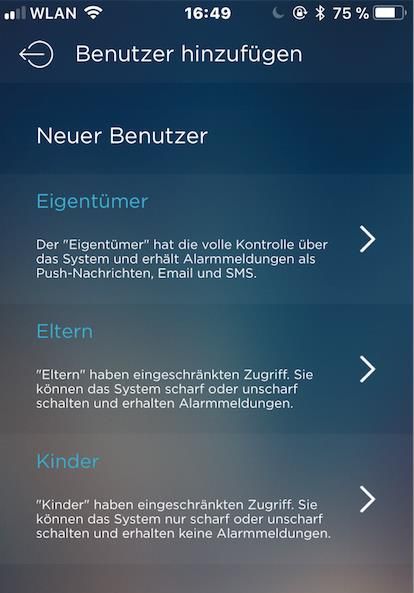
Siren (SI03) ........................................................................................................................... 38
       Water sensor (WS03) ....................................................................................................... 39
   Control after setup .................................................................................................................. 39
   Adding users and sharing alarm systems ................................................................... 42
   C3V2.0 Alarm System Spezifikationen ......................................................................... 43
European Union - Information on disposal ...................................................................... 44

Deutsch                                                                                                                                 Seite 3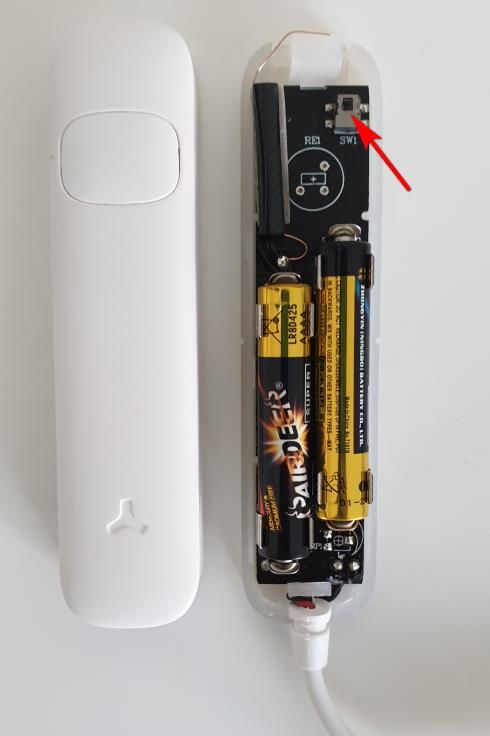
Sicherheitsvorschriften

Bitte lesen Sie die Anleitung aufmerksam und sorgfältig durch und bewahren
diese an einem sicheren Ort.

-   Achten Sie bitte darauf, dass die Geräte nicht auf heißen Flächen liegen.

-   Unsere Produkte sollten nicht durch Personen mit eingeschränkten physi-
    schen, sensorischen, oder geistigen Fähigkeiten oder mangels Erfahrung
    und/oder mangels Wissens benutzt werden. Nur in der Anwesenheit einer
    Bezugsperson sollte die Anlage bedient werden.

-   Eine Nutzung von Minderjährigen sollte jederzeit unter Beobachtung ste-
    hen, um eine falsche Nutzung auszuschließen.

-   Um die Gefährdungen bei beschädigtem Produkt zu vermeiden, sollten Sie,
    Kontakt mit dem Service von clarer (siehe letzte Seite) aufnehmen.

-   Bitte keine eigenen Reparaturen oder sonstige Veränderungen an den
    Produkten vornehmen. Ansonsten erlischt automatisch die Garantie. Kon-
    taktieren Sie bitte vorher den Service von clarer.

-   Die Smart Alarm Produkte sind nicht wasserdicht. Bitte daher bei Reini-
    gung niemals die Geräte ins Wasser oder andere Flüssigkeiten tauchen
    und keine Reinigungsmittel benutzen.

-   Die Anlage dient lediglich zur Unterstützung bei der Überwachung von
    Häusern, Wohnungen, Büros etc. Zur Installation und Überwachung von
    öffentlichen Räumen sollten Sie sich vorher eine Genehmigung einholen.

-   Bitte nutzen Sie die Produkte von clarer ausschließlich für den vorgesehe-
    nen Zweck.

-   Jovision Deutschland GmbH haften für keinerlei Schäden, die durch frem-
    des Zubehör oder Software von Drittanbieter entstehen.

Deutsch                                                                 Seite 4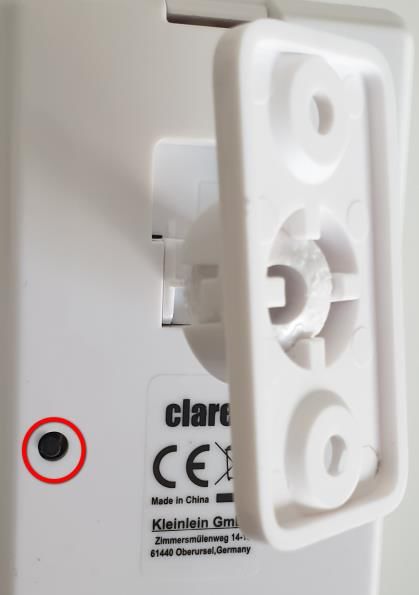
Konformitätserklärung

Hiermit erklärt Jovision Deutschland GmbH, dass der Funkanlagentyp C3
V2.0 der Richtlinie 2014/53/EU entspricht.

RED-Richtlinie 2014/53/EU, EMV-Richtlinie 2014/30/EU, RoHS-Richtlinie
2011/65/EU. Der vollständige Text der EU-Konformitätserklärung ist unter
der folgenden Internetadresse verfügbar: https://www.jovision.de/sup-
port/smart-alarmanlage.

C3V2.0 Alarm System (Starter Set)

Das Starter Set des Alarm System besteht aus einer Zentrale, einem Tür-
/Fenstersensor und einer Fernbedienung. Die Alarmanlage funktioniert so-
wohl mit oder auch ohne Internet. Bei einem Einsatz ohne eine Internetver-
bindung, kann natürlich die App bzw. die Push-Benachrichtigung nicht genutzt
werden.

    Zentrale & Sirene              Fernbedienung             Fenster- und
                                                              Türsensor

Die Zentrale (C3V2.0) kann mit bis zu 40 drahtlosen Sensoren und 10 Fernbe-
dienungen erweitert werden. Die Sensoren, Fernbedienungen und weitere Zu-
behör sind als Einzelartikel erhältlich. Die unterschiedliche LED-Beleuchtung
der Zentrale zeigt den gegenwärtigen Status der Alarm Anlage. Dank der kos-
tenlosen App „Ontips Pro“, erhältlich für iOS und Android Smartphones und
Tablets, sind Sie jederzeit mit Ihrem Alarmsystem verbunden und werden je-
derzeit über die Veränderungen bzw. Meldungen informiert.

Deutsch                                                                Seite 5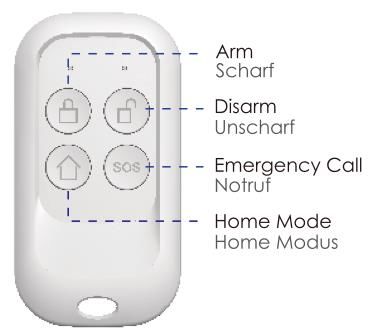
Wichtiger Hinweis:

Das Zubehör im Starter Set ist bereits ab Werk mit der Zentrale verbunden.
Die Anlage unterstützt nur die Frequenz 2.4 GHz.

Erklärung und Vorbereitung der Zentrale

  Nr.
      Name               Funktion
   .
                         Blinkt einmal rot: Bereit für die Konfiguration
                         Leuchtet dauerhaft grün: Alarm ist unscharf
  1    LED-Licht         Leuchtet dauerhaft blau: Alarm ist scharf
                         Blinkt blau: Home Modus ist aktiviert
                         Blink schnell: WLAN-Verbindung verloren
                         Einmal drücken: Startet die Konfiguration von einem Zu-
                         behör
                         Dreimal drücken: Startet die Konfiguration mit der App
                         Fünfmal drücken: Zentrale wird auf Werksteinstellung ge-
                         setzt
  2    Funktionstaste
                         Zehnmal drücken: Zentrale wird ausgeschaltet
                         Drücken und 3 Sekunden halten: Zentrale wird einge-
                         schaltet
                         Drücken und 5 Sekunden halten, bis die Zentrale ein-
                         mal piept: Alle angebundene Zubehör werden gelöscht.
                         Drücken und halten Sie den Knopf, um den Stecker mit
  3    Steckerknopf
                         Drehung abzunehmen.
                         Je nach Land, kann der individuelle Stecker verwendet
  4    Stecker
                         werden. Im Lieferumfang ist nur ein Eurostecker dabei.

Deutsch                                                                    Seite 6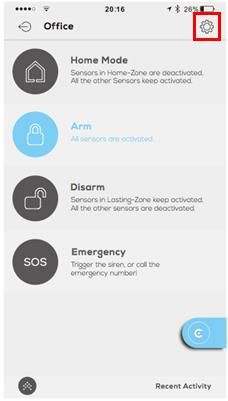
Wichtiger Hinweis:

-    Bei zum Beispiel Stromausfall wird die Zentrale über die Notbatterie mit
     Energie für ca. 2 Stunden versorgt. Nach ca. 2 Stunden fällt die Zentrale
     aus.
-    Die Zentrale kann durch fallenlassen, oder einem harten Schlag kaputt
     gehen. Bitte daher sorgfältig aufbewahren und bei Transport ausreichen
     polstern
-    Bitte vor einem geplanten Einsatz die Zentrale immer prüfen, um eine
     Fehlfunktion oder Defekt auszuschließen. Falls ein Defekt vorliegen
     sollte, setzten Sie sich bitte mit dem Service in Verbindung.

Anbindung der Zentrale in der Ontips Pro App (iOS & Android)

1. Laden Sie die kostenlose App „Ontips Pro“ im App Store oder Google Play
    Store herunter. (iOS & Android)

2. Registrieren Sie sich in der App und loggen Sie sich anschließend ein. Kli-
    cken Sie auf das „+“ Zeichen im oberen rechten Rand. (iOS & Android)

Deutsch                                                                    Seite 7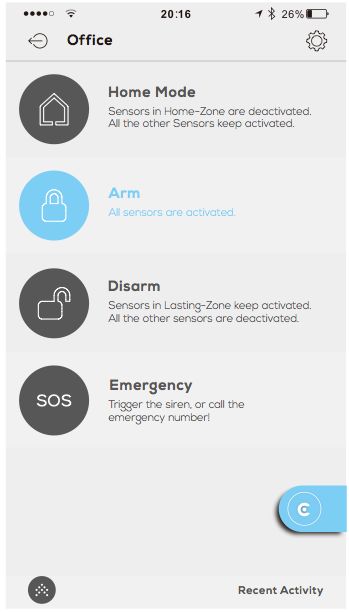
3. Drücken Sie dreimal hintereinander die Taste an der Seite der Zentrale.
   (iOS & Android)

4. Wählen Sie Ihr Netzwerk aus und geben Sie das geforderte Passwort ein.
(iOS & Android)

4. Wechseln Sie nun von der „Ontips Pro“ in die Einstellungen Ihres Smart-
   phones. (iOS & Android)

Deutsch                                                                Seite 8

5. Gehen Sie in die Netzwerkeinstellungen Ihres Smartphones und wählen
   Sie den Eintrag beginnend mit „Smart…“ aus. (iOS & Android)

Wichtiger Hinweis:

Bitte vergewissern Sie sich, dass Ihr Smartphone und die C3V2.0 Zentrale mit
demselben Netzwerk verbunden sind.

6. Nachdem Sie die Verbindung zu der Zentrale aufgebaut haben, wechseln
   Sie in die „Ontips Pro“ App. Die Anbindung zwischen die Zentrale und den
   Router wird hergestellt.

7. Klicken Sie im letzten Schritt auf „Weiter“. Nun sollte im anschließenden
   Fenster die Zentrale angezeigt werden (siehe nächstes Bild).

Deutsch                                                                  Seite 9
Bei Bedarf können Sie Ihrer Zentrale einen Namen vergeben. Bei mehreren
Anlagen empfehlen wir dies natürlich, um so eine klare Übersicht zu bewah-
ren. Das kann z.B. bei mehreren Objekten Interessant sein z.B. Haus, Büro,
Ferienhaus usw.

Arten von Zubehör und deren Besonderheiten

Neben dem Starter Set können weitere Zubehörartikel an die Zentrale ange-
bunden werden. Hierfür muss die Zentrale eingeschaltet sein und sich unmit-
telbar in der Nähe des Zubehörs befinden. Zur Auswahl stehen folgende Pro-
dukte zur Verfügung und können zusätzlich erworben werden:

PIR Sensor (PIR03)        Rauchmelder (RM03)               Sirene (SIR03)

 Mit dem Passiv-Infra-        Der optische Funk-      Die drahtlose Außensi-
rotsensor werden jegli-      Rauchmelder RM03           rene ist ein wichtiges
 che Bewegungen (7         erzeugt bei einer Rau-      Zubehör für die clarer
  bis 8 Meter / 110°       chentwicklung wird ein        Smart Alarmanlage.
Winkel) im Haus/Woh-       Alarm (85 dB) ausge-         Die 115 dB laute Si-
nung/Büro erfasst. Das       löst und die Zentrale    rene sorgt für Aufmerk-
 System ist mit einem       wird durch auslösen-        samkeit in der Nach-
intelligenten Chip aus-    den Rauchmelder per         barschaft. Das ausge-
   gestattet, so dass         Funk informiert. Die     feilte hochwertige vor
 Fehlalarme minimiert     Zentrale und alle ange-        äußeren Wetter Ein-
werden. Der integrierte    bundenen Sirenen be-       flüssen geschützte Ge-
Summer gibt Ihnen bei        ginnen mit dem laut-     häuse (IP 54) vereinigt
schwacher Batterie ei-      starken Alarmton. So       die notwendige Auffäl-
 nen Hinweis, so dass      werden alle Bewohner         ligkeit mit modernem
 Sie diesen rechtzeitig      bei einem Brand ge-         sachlichem Design.
 austauschen können.       warnt und können sich         Die Sirene ist mit ei-
            .             rechtzeitig in Sicherheit   nem Akku ausgestattet
                           bringen. Es wird emp-        und kann bei Strom-
                            fohlen, vor der festen      ausfall ca. 2 Stunden
                          Montage der Melder ei-          Betrieben werden.
                           nen Funktest durchzu-
                                    führen.

Deutsch                                                                 Seite 10
Fenster- und Türsensor
Fernbedienung (F03) (S03)
Wassersensor (WS03)
Die Fernbedienung Der Tür- und- Fens-
Der Wassersensor dient in erster Linie das tersensor ist eine zent-
WS03, löst bei einer System in den Scharf-, rale Einheit des
Überschwemmung in Unscharf-, Heim- und Alarmsystems und
Verbindung mit der SOS-Modus zu schal- dient der Absicherung
Zentrale ein Alarm aus. ten und kann bequem eines Fensters oder ei-
Der Wassersensor ist z.B. am Schlüsselbund ner Tür. Der Kontakt
batteriebetrieben und befestigt werden. So besteht aus zwei Ele-
kann daher unabhän- haben Sie jederzeit Zu- menten. Eines der
gig von der Stromver- griff auf die Hauptfunk- Elemente wird an
sorgung platziert wer- tionen Ihres Alarmsys- Fenster bzw. Tür, das
den. Der Installations- tems. Selbstverständ- andere Element am
ort für den Wassermel- lich ist auch die Fern- Rahmen angebracht.
der sollte so gewählt bedienung batteriebe- So erkennt der Sensor
werden, dass die Me- trieben und steht inner- sofort, wenn eine Tür
tallkontakte im Fall ei- halb der Funkreich- geöffnet oder ge-
nes Wasseraustritts weite in Funkkontakt schlossen wird. Es
sofort mit dem Wasser zur Alarmanlage. Eine können bis zu 40 Sen-
in Berührung kommen. Anbindung von bis zu soren angebunden
Im Idealfall montieren 10 Fernbedienungen werden. Wie alle ande-
Sie den Sensor direkt können mit der Zent- ren Zubehörteile ist
an der möglichen Aus- rale verbunden und auch der Tür-/Fenster-
trittsstelle, zum Bei- diese auch bei Bedarf kontakt batteriebetrie-
spiel am Boden oder personalisiert wer- ben und wird per Funk
unter einem Zulauf- den. an die Alarmanlage an-
hahn. gebunden.
Deutsch Seite 11Erklärung des Tür-/Fenstersensors
1. Magnetkontakt
2. Sabotageschalter
3. Zonen Jumper
4. LED-Indikator
5. Schilf
6. Batteriefach
Status Erklärung
Sensor piept einmal Der Sensor wurde erfolgreich mit der Zentrale ver-
LED blinkt einmal bunden
Sensor piept zweimal Der Sensor wurde bereit mit der Zentrale verbun-
LED blinkt einmal den
Sensor piept dreimal
Der Speicher der Zentrale ist voll
LED blinkt einmal
Tür oder Fenster wurde geöffnet // Manipulations-
LED blinkt einmal
alarm wurde ausgelöst
LED blinkt einmal alle drei
Batterie schwach, bitte tauschen
Sekunden
Deutsch Seite 12Wichtiger Hinweis: Der Sensor befindet sich im Auslieferungszustand in der Standard-Zone. Vorbereitung des Fenster- Türsensors Öffnen Sie die Abdeckung Ihres Sensors und entfernen Sie die Papierabdeckung zwischen der Batterie (AAAA) und dem Kontakt. Sobald die Batterie Kontakt eine Verbindung haben, wird ein LED-Licht kurz aufleuchten. Das bedeutet, dass der Sensor einsatzbereit ist. Der Verpackungen liegen zwei doppelseitige Klebestreifen bei. Wir empfehlen diese, um den Sensor und den Magnetkontakt an der gewünschten Stelle zu be- festigen. Bevor Sie jedoch den Sensor und den Magnetkontakt an die gewünschte Stelle anbringen wollen, sollten Sie vergewissern, dass die Stelle frei von Staub, Feuch- tigkeit und Schmutz ist. Ansonsten empfehlen wir diese Stelle zu reinigen. Deutsch Seite 13
Wichtiger Hinweis:

Der gewünschte Montagebereich sollte frei von Metall und elektrischen Leitungen
sein, da ansonsten der Sensor in seiner Funktion unbrauchbar wird. Sie können
den Sensor und den Magnetstift an Fenster und Türen sowohl Vertikal als auch
horizontal anbringen. Sensor und der Magnetkontakte darf dürfen versetzt, je-
doch nur maximal 1 cm voneinander entfernt sein.

Der Magnet streifen kann auf beiden Seiten des Sensors angebracht werden. Es
wird sofort ein Alarm ausgelöst, wenn er Magnet mehr als 2 cm vom Sender ent-
fernt ist.

Beispiele:

Hier ein paar Beispiel, wie die Montage des Sensors und des Magnetkontaktes
aussehen könnte:

Deutsch                                                                 Seite 14
Anbindung von Zubehörartikeln an die Zentrale

Zwei Möglichkeiten zur Anbindung stehen zur Auswahl.

Möglichkeit 1: über Zentrale (z.B. ohne Wifi und Internet)

Funktioniert mit und ohne WLAN. Sie Klicken Sie auf die einzige Taste der Zent-
rale. Die Zentrale sollte nun rot leuchten (Konfigurationsmodus) und somit zur
Anbindung bereit sein.

                        Knopf an der Zentrale einmal drücken

Möglichkeit 2: über App (Zentrale muss an Router über WLAN verbunden
sein; Internet ist nicht zwingend erforderlich)

Diese Option ist eine Alternative zur ersten. Statt hier den Knopf an der Zentrale
zu drücken, muss über die Zubehöroption in der App, das jeweilige Zubehör an-
gebunden werden.

                         Option zur Anbindung von Zubehör

Deutsch                                                                    Seite 15
Wichtiger Hinweis:
Bei der Anbindung des Zubehörs, muss die Zentrale unmittelbar in der Nähe
des Zubehörs sein
Ein Tipp, die Zentrale kann dank des integrierten Akkus, ca. 2 Stunden ohne Strom
in Betrieb bleiben. Das bedeutet, Sie können auch nach der Montage des Zubehörs,
die Zentrale in die Nähe des Zubehörs tragen und die Anbindung durchführen.
Die folgenden Schritte werden für beide Optionen verwendet. Nach einer
Anbindung von einem Zubehör ertönt immer ein kurzer Ton der Zentrale.
Fenster-Türsensor (S03)
• Den Sensor vom Kontakt trennen und wieder verbinden.
Fernbedienung (F03)
• Eine beliebige Taste drücken
PIR-Sensor (PIR03)
• Auf der Rückseite befindet sich ein Knopf (schwarz) bitte diesen ein-
mal drücken.
Deutsch Seite 16Rauchmelder (RM03)
• Auf der unteren Seite des Rauchmelders befindet sich ein Knopf.
Diesen bitte drücken.
Sirene (SI03)
• Hinteren Deckel entfernen, die Sirene mit der „POWER-Taste“ ein-
schalten und im Anschluss (nach Piepton) die „LEARN-Taste“ drü-
cken.
Deutsch Seite 17Wassersensor (WS03)
• Den Deckel abnehmen um dann den kleinen Knopf oben rechts in
der Ecke drücken. Wenn ein kurzer Ton von der Zentrale ertönt, ist
das Zubehör angebunden.
Wichtiger Hinweis:
Bitte beachten Sie, falls die Anbindung nicht funktionieren sollte, so prüfen Sie
bitte, ob die Batterie des Zubehörs voll ist. Falls nicht, sollten Sie bitte eine auf-
geladene Batterie einsetzen.
Die Steuerung nach der Einrichtung
Die Anlage ist nach der Einrichtung sowohl per App als auch über die Fernbe-
dienung einsatzbereit. In beiden Fällen werden jegliche Veränderungen der
Alarmanlage bei allen Teilnehmern, die mit der Anlage über die clarer App ver-
bunden sind, über die Änderung per Push Benachrichtigung in Kenntnis ge-
setzt.
App und Fernbedienung sind von der Aufteilung bzw. der Funktionstasten iden-
tisch (siehe Beispielbilder).
Deutsch Seite 18Fernbedienung (F03) Darstellung
Menü Ontips Pro App (iOS & Android)
Modus Status
Scharf Alle Sensoren sind aktiv.
Sensoren in Dauerhaft-Zone bleiben aktiv.
Unscharf
Alle anderen Sensoren sind deaktiviert.
Home Mo- Sensoren in Home-Zone sind deaktiviert.
dus Alle anderen Sensoren bleiben aktiv.
Über Fernbedienung: Sirene wird sofort gestartet.
Notruf Über App: Sie können wählen zwischen Sirene starten oder direkt den
Notruf wählen.
Deutsch Seite 19Wichtiger Hinweis: Die Fernbedienung wird in der App nicht unter Zubehör aufgelistet. Im nächsten Feld sollten die Option Fernbedienung-Name zu sehen sein. Hier können Sie sowohl den Namen der Fernbedienung ändern als auch den Batte- riestatus prüfen können. Deutsch Seite 20
Hinzufügen von Benutzern und teilen von Alarmanlagen

Sie können Ihre Alarmanlage mit Ihren Familienmitgliedern teilen und separate
Benutzergruppen erstellen. Das hat zur Folge, dass nicht jeder die Einstellungen
Ihrer Anlage verändern kann. Dadurch ist eine Veränderung und die damit ver-
bundene mögliche Fehlerquote ausgeschlossen. Nur der „Admin“ hat die vollum-
fänglichen Benutzerrechte, um alles zu verändern.

So können Sie einen Benutzer hinzufügen // entfernen

-   Öffnen Sie die „Ontips Pro“ App.

-   Klicken Sie im Hauptmenü links oben auf das folgende Symbol

-   Wählen Sie die Option „Benutzer“ aus und klicken Sie auf das + Symbo um
    ein Benutzer hinzufügen.

-   Wählen Sie nun eine Kategorie aus, unter der jeweilige Benutzer eingeord-
    net werden soll, zur Auswahl stehen: Super Benutzer (= Admin), Standard
    Benutzer und Kind. Die genauen Erläuterungen können Sie direkt aus der
    App entnehmen.

-   Fügen Sie im letzten Fenster den Benutzer hinzu, dieser jedoch bereits in
    der Ontips Pro App registriert sein.
-   Alle Geräte die unter dem „Admin“ angelegt sind, werden für den neuen
    Benutzer freigegeben.
-   Der neu angelegte Benutzer kann dann die Anlage je nach Rechten bedie-
    nen.

Deutsch                                                                  Seite 21
C3V2.0 Alarm System Spezifikationen
Produkt Zentrale & Sirene Tür-/Fens- Fernbedienung
tersensor
Modelbezeich- / S03 F03
nung
Input: AC DC 1.5V (1 x of DC 3V (2x
Spannungsver-
110~240V/50~60Hz AA, LR6 Batte- CR2032 Knopf-
sorgung
rie) zellen Batterie)
Integrierte Akku 600mh/3.7V / /
Standby-Strom / ≤30μA ≤30μA
Übertragungs- / ≤70mA ≤25mA
strom
Batteriedauer Bis zu 2 Stunden Bis zu 1 Jahr Bis zu 1 Jahr
Wird unterstützt (90 / /
Interne Sirene
dB)
40 x Tür-/Fens-
Max. Anzahl an tersensoren
/ /
Anbindungen 10 x Fernbedienun-
gen
Max. 100 Meter Max. 100 Meter
Übertragungsdis-
/ (ohne Wände, (ohne Wände, auf
tanz
auf freier Fläche) freier Fläche)
IEEE802.11b/g/n / /
Wi-Fi Standard:
(nur 2.4 Ghz)
433.2MHz, 433.2MHz, 433.2MHz,
Radio Frequenz 433.9MHz, 434.4MHz 433.9MHz, 433.9MHz,
434.4MHz 434.4MHz
Gehäuse Mate- ABS+PC-Kunststoff ABS+PC-Kunst- ABS+PC-Kunst-
rial stoff stoff
Temperatur: - Temperatur: - Temperatur: -
10°C~55°C 10°C~55°C 10°C~55°C
Bedienungsum-
Luftfeuchtigkeit: ≤ Luftfeuchtigkeit: Luftfeuchtigkeit: ≤
gebung
80% (nicht konden- ≤ 80% (nicht 80% (nicht kon-
sierend) kondensierend) densierend)
(L/B/H)
Sensor:
96.5x24.5x19.5 L/B/H: 70 x 35 x
Abmessung: Φ 80 × 41.7 mm
mm 12 mm
Magnetstift:
48x14x11 mm
Deutsch Seite 22Europäische Union- Information zur Entsorgung
Das Symbol oben bedeutet, dass dieses Produkt und/oder die Batterie entspre-
chend den geltenden gesetzlichen Vorschriften und getrennt vom Hausmüll ent-
sorgt werden muss. Muss dieses Produkt entsorgt werden, geben Sie es bei ei-
ner offiziellen Sammelstelle ab. Durch getrenntes Sammeln und Recycling wer-
den die Rohstoffreserven geschont und es ist sichergestellt, dass beim Recyc-
ling des Produkts und/oder der Batterie alle Bestimmungen zum Schutz von
Gesundheit und Umwelt eingehalten werden.
clarer ist eine eingetragene Marke der Kleinlein GmbH. Alle clarer Überwa-
chungsprodukte werden ausschließlich über die Jovision Deutschland GmbH
vertrieben.
Gerne stehen wir Ihnen in allen Fragen zum Thema Beratung und Kundenser-
vice zur Verfügung.
Jovision Deutschland GmbH
In der Riedwiese 1
61440 Oberursel
E-Mail: service@jovision.de
© 2021 clarer. Alle Rechte vorbehalten. Alle Angaben ohne Gewähr, Irrtümer und Änderungen
vorbehalten.
Deutsch Seite 23Safety regulations
• Please read the instructions carefully and carefully and keep them in a safe
place.
• Please make sure that the devices are not placed on hot surfaces.
• Our products should not be used by persons with limited physical, sensory or
mental abilities or lack of experience and/or knowledge. The equipment should
only be operated in the presence of a reference person.
• Any use by minors should be monitored at all times in order to rule out incorrect
use.
• In order to avoid the dangers of damaged products, you should contact the clarer
service department (see last page).
• Please do not make any repairs or other changes to the products yourself. Other-
wise the warranty will automatically expire. Please contact clarer's service depart-
ment beforehand.
• The Smart Alarm products are not waterproof. When cleaning, never immerse the
devices in water or other liquids and never use cleaning agents.
• The system is only intended to assist in the surveillance of houses, apartments,
offices, etc. For the installation and monitoring of public spaces, you should ob-
tain a permit beforehand.
• Please use Ontips Products exclusively for the intended purpose.
• Jovision Deutschland GmbH is not liable for any damage caused by third-party
accessories or software.
English 24Declaration of Conformity
Hereby Jovision Deutschland GmbH declares that the radio equipment type
C3 V2.0 complies with the Directive 2014/53/EU.
RED Directive 2014/53/EU, EMC Directive 2014/30/EU, RoHS Directive
2011/65/EU. The full text of the EU Declaration of Conformity is available at
the following Internet address: https://www.jovision.de/support/smart-alarman-
lage.
C3V2.0 Alarm System (Starter Set)
The Starter Set of the Alarm System consists of a Gateway, a door/window
sensor and a remote control. The alarm system works with or without inter-
net. If the system is used without an internet connection, the app or the push
notification cannot be used.
Gateway & Siren Remote control Window and
Door sensor
The gateway (C3V2.0) can be expanded with up to 40 wireless sensors and
10 remote controls. The sensors, remote controls and other accessories are
available as single items. The different LED lighting of the gateway shows the
current status of the alarm system. Thanks to the free app "Ontips Pro",
available for iOS and Android smartphones and tablets, you are always
connected to your alarm system and are informed about changes or messa-
ges at any time.
English Seite 25Important notice:
The accessories in the Starter Set are already connected to the gateway ex
works. The system only supports the frequency 2.4 GHz.
Explanation and preparation of the gateway
Nr.
Name Funktion
.
Flashing red once: Ready for configuration
Permanently green: Alarm is not armed
1 LED light Permanently blue: Alarm is armed
Flashing blue: Home mode is activated
Flashing fast: WLAN connection lost
Press once: Starts the configuration of an accessory
Press three times: Starts the configuration with the app
Press five times: The central unit is set to factory settings
Press ten times: The central unit is switched off
2 Function button
Press and hold for 3 seconds: The gateway unit is swit-
ched on
Press and hold for 5 seconds until the central unit
beeps once: all connected accessories are deleted.
Button for re-
3 Press and hold the button to remove the plug with rotation.
move
Depending on the country, the individual plug can be used.
4 Connector
Only one Euro plug is included in the delivery.
English Seite 26Important notice:
- In the event of a power failure, for example, the gateway is supplied with
energy for approx. 2 hours via the emergency battery. After approx. 2
hours the central unit fails.
- The gateway can be damaged by dropping it or by a hard blow. Please
store it carefully and pad it sufficiently during transport.
- Please always check the gateway before a planned use to exclude a mal-
function or defect. If there is a defect, please contact the service depart-
ment.
Connection of the gateway in the Ontips Pro App (iOS & Android)
1. Download the free app "Ontips Pro" from the App Store or Google Play
Store (iOS & Android)
2. Register in the app and then log in. Click on the "+" sign in the upper right
corner. (iOS & Android)
English Seite 273. Press the button on the side of the panel three times in succession. (iOS & Android) 4. Select your network and enter the required password. (iOS & Android) 4. Now switch from the "Ontips Pro" to the settings of your smartphone. (iOS & Android) English Seite 28
5. Go to the network settings of your smartphone and select the entry starting
   with Smart…. (iOS & Android)

Important notice:

Please make sure that your smartphone and the C3V2.0 central unit are
connected to the same network.

6. After you have established the connection to the central unit, switch to the
   "Ontips Pro" app. The connection between the central office and the router
   is established (iOS & Android).

7. Click "Next" in the last step. Now the central office should be displayed in
   the following window (see next picture). (iOS & Android)

English                                                                   Seite 29
If required, you can assign a name to your central office. If you have several
systems, we recommend this, of course, to maintain a clear overview.
This can be interesting e.g. with several objects e.g. house, office, holiday
home etc.

Types of accessories and their characteristics

In addition to the starter set, other accessories can be connected to the gate-
way. For this purpose, the gateway must be switched on and located in the
immediate vicinity of the accessories. The following products are available
and can be purchased additionally:

English                                                                  Seite 30
Smoke detector (RM03)
PIR Sensor (PIR03)                                             Siren (SIR03)
                           The      optical     radio
The passive infrared       smoke detector RM03           The wireless outdoor
sensor detects any mo-     generates an alarm (85        sensor is an important
vement (7 to 8 metres      dB) in case of smoke          accessory for the clarer
/ 110° angle) in the       development and the           Smart alarm system.
house/flat/office. The     gateway is informed by        The 115 dB loud siren
system is equipped         radio via a triggering        attracts attention in the
with an intelligent chip   smoke detector. The           neighbourhood.       The
so that false alarms are   gateway       and       all   sophisticated,      high-
minimized. The in-         connected sirens start        quality housing (IP 54)
tegrated buzzer gives      with the loud alarm tone.     protected against ex-
you a warning when the     This warns all residents      ternal    weather      in-
battery is low, so that    in the event of a fire and    fluences combines the
you can replace it in      allows them to get to         necessary        eye-cat-
time.                      safety in time. It is         ching features with mo-
                           recommended to carry          dern, functional design.
                           out a radio test before       The siren is equipped
                           permanently installing        with a rechargeable
                           the detectors.                battery and can be ope-
                                                         rated for approx. 2
                                                         hours in case of power
                                                         failure).

English                                                                     Seite 31
Window and door sensor Water sensor (WS03) Remote control (F03) (S03) The WS03 water sen- The remote control is The door and window sor triggers an alarm in primarily used to switch sensor is a central unit the event of flooding in the system to arm, dis- of the alarm system connection with the ga- arm, home and SOS and serves to protect a teway. The water sen- mode and can be con- window or door. The sor is battery operated veniently attached to a contact consists of and can be placed key ring, for example. two elements. One of there independently of In this way you have the elements is atta- the power supply. The access to the main ched to the window or installation location for functions of your alarm door, the other element the water sensor system at all times. Of to the frame. This way should be selected in course, the remote the sensor immediately such a way that the me- control is also battery detects when a door is tal contacts come into operated and is in radio opened or closed. Up to contact with the water contact with the alarm 40 sensors can be immediately in the system within the radio connected. Like all event of water leakage. range. A connection of other accessories, the Ideally, the sensor up to 10 remote con- door/window contact is should be installed di- trols can be connected battery operated and is rectly at the possible to the gateway and connected to the alarm outlet point, for exa- these can also be per- system by radio. mple on the floor or un- sonalised if required. der an inlet tap. English Seite 32
Explanation of the door/window sensor

1. Magnetic contact
2. Sabotage switch
3. Zone Jumpers
4. LED indicator
5. Reeds
6. Battery compartment

 Status                   Declaration
 Sensor beeps once        The sensor was successfully connected to the
 LED flashes once         central unit
 Sensor piept zweimal     Sensor beeps twice
 LED blinkt einmal        LED flashes once
 Sensor piept dreimal     Sensor beeps three times
 LED blinkt einmal        LED flashes once
                          Door or window was opened // Manipulation alarm
 LED flashes once
                          was triggered
 LED flashes once every
                          Battery low, please replace
 three seconds

English 33
Important notice: The sensor is in the standard zone when delivered. Preparation of the window-door sensor Open the cover of your sensor and remove the paper cover between the battery (AAAA) and the contact. Once the battery contact is connected, an LED light will illuminate briefly. This indicates that the sensor is ready for use. Two double-sided adhesive strips are enclosed in the packaging. We recom- mend these to fix the sensor and the magnetic contact at the desired position. However, before you attach the sensor and magnetic contact to the desired lo- cation, make sure that the location is free of dust, moisture and dirt. Otherwise, we recommend cleaning the area. English 34
Important notice:

The desired mounting area should be free of metal and electrical wires, other-
wise the sensor will be unusable in its function. You can attach the sensor and
the magnetic pen to windows and doors both vertically and horizontally. The
sensor and the magnetic contact may be offset, but only 1 cm apart.

The magnet strip can be placed on both sides of the sensor. An alarm is triggered
immediately if the magnet is more than 2 cm away from the transmitter.

Examples:

Here are a few examples of how the sensor and magnetic contact could be
mounted:

English 35
Connection of accessories to the central unit

Two connection options are available.

Option 1: via central office (e.g. without Wifi and Internet)

Works with and without WLAN. You click on the only button on the panel. The
central unit should now light up red (configuration mode) and thus be ready for
connection.

                       Press the button on the control panel once

Option 2: via app (central office must be connected to router via WLAN;
Internet is not absolutely necessary)

This option is an alternative to the first one. Instead of pressing the button on the
central unit, the respective accessory must be connected via the accessory op-
tion in the app.

                           Option for connecting accessories

English 36
Important notice:
When connecting the accessories, the gateway must be located in the immedi-
ate vicinity of the accessories
A note, the gateway unit can remain in operation for approx. 2 hours without
power with the integrated rechargeable batteries. This means that even after
mounting the accessory, you can still carry the central unit near the accessories
and make the connection.
The following steps are used for both options. After an accessory is
connected, a short tone from the central unit always sounds.
Window-door sensor (S03)
• -Disconnect and reconnect the sensor from the contact.
Remote control (F03)
• Press any key
PIR sensor (PIR03)
• There is a button (black) on the back, please press it once.
English 37Smoke detector (RM03)
• There is a button on the lower side of the smoke detector. Please press this
button.
Siren (SI03)
• Remove the rear cover, switch on the siren with the "POWER button" and
then press the "LEARN button" (after beeping).
English 38Water sensor (WS03)
• Remove the cover and press the small button in the top right corner.
Important information:
• Please note, if the connection does not work, please check if the battery of
the accessory is full. If not, please insert a charged battery.
Control after setup
The system is ready for use after setup via app as well as via remote control. In
both cases, any changes to the alarm system will be communicated to all partici-
pants connected to the system via the clarer app by push notification.
App and remote control are identical in their layout and function keys (see exa-
mple pictures).
English 39Remote control (F03) Display
Menu Ontips Pro App (iOS & Android)
Mode Status
Arm All sensors are active.
Sensors in permanent zone remain active.
Disarm
All other sensors are deactivated.
Home Sensors in home zone are disabled.
Mode All other sensors remain active.
Via remote control: siren is started immediately.
Emergency
Via App: You can choose between starting the siren or directly dial the
Call
emergency call.
English 40Important information: The remote control is not listed in the app under accessories. In the next field you should see the option Remote Control Name. Here you can change the name of the remote control as well as check the bat-teriestatus. English Seite 41
Adding users and sharing alarm systems

You can share your alarm system with your family members and create sepa-
rate user groups. This means that not everyone can change the settings of your
system. This eliminates the possibility of changes and the associated possible
error rate. Only the "Admin" has the full user rights to change everything.

To add // remove a user

-   Open the "Ontips Pro" app.

-   Click on the following icon in the main menu at the top left

-   Select the option "User" and click on the + symbol to add a user.

-   Now select a category under which the respective users are to be classi-
    fied: Super User (= Admin), Standard User and Child. You can get the
    exact explanations directly from the app.

-   In the last window, add the user who is already registered in the Ontips
    Pro App.Alle Geräte die unter dem „Admin“ angelegt sind, werden für den
    neuen Benutzer freigegeben.

-   The newly created user can then operate the system according to his
    rights.

English                                                                 Seite 42
C3V2.0 Alarm System Spezifikationen
Product Control Center & Si- Door & Window Sensor Remote Control
ren
Model No. / S03 F03
Input: AC DC 1.5V (1pc of AA, DC 3V (2pcs
Power Supply 110~240V/50~60Hz LR6 battery) CR2032 button cell
battery)
Built in Battery 600mh/3.7V / /
Standby Cur- / ≤30μA ≤30μA
rent:
Transmit Cur- / ≤70mA ≤25mA
rent:
Battery lasting up to 2 hours up to 1 year up to 1 year
time (Standby
status):
Internal siren : 90 dB / /
40 x Door Sensor / /
Max. Acces-
10 x Remote Con-
sories
trol
Transmit Dis- ≤100m (in open area) ≤100m (in open
tance area)
Wireless IEEE802.11b/g/n / /
Standards:
433.2MHz, 433.2MHz, 433.9MHz, 433.2MHz,
Radio Fre- 433.9MHz, 434.4MHz 433.9MHz,
quency 434.4MHz 434.4MHz
Housing Mate- ABS+PC plastic ABS+PC plastic ABS+PC plastic
rial
Temperature: - Temperature: - Temperature: -
10°C~55°C 10°C~55°C 10°C~55°C
Operation Con-
Humidity: ≤ Humidity: ≤ 80%(non- Humidity: ≤
dition:
80%(non-con- condensing) 80%(non-con-
densing) densing)
Φ 80 × 41.7 mm (L/W/H) L/W/H: 70 x 35 x 12
Transmitter: mm
Dimension :
96.5x24.5x19.5mm
Magnet: 48x14x11mm
English Seite 43European Union - Information on disposal
The symbol above indicates that this product and/or the battery must be dis-
posed of separately from household waste in accordance with applicable laws
and regulations. If this product must be disposed of, please return it to an offi-
cial collection point. Separate collection and recycling helps to conserve raw
material reserves and ensures that when the product and/or battery is recyc-
led, all regulations for the protection of health and the environment are obser-
ved.
clarer is a registered trademark of Kleinlein GmbH. All clarer monitoring pro-
ducts are exclusively distributed by Jovision Deutschland GmbH.
We will be pleased to answer all your questions about consulting and custo-
mer service.
Jovision Deutschland GmbH
In der Riedwiese 1
61440 Oberursel
E-Mail: service@jovision.de
© 2021 clarer. All rights reserved. All information without guarantee, errors and changes reser-
ved
English Seite 44Sie können auch lesen