TYPHOON NEO - TURNTABLE / PLATTENSPIELER INSTRUCTION MANUAL BEDIENUNGSANLEITUNG - Acoustic Signature
←
→
Transkription von Seiteninhalten
Wenn Ihr Browser die Seite nicht korrekt rendert, bitte, lesen Sie den Inhalt der Seite unten

TURNTABLE / PLATTENSPIELER

INSTRUCTION MANUAL
BEDIENUNGSANLEITUNG

        TYPHOON NEO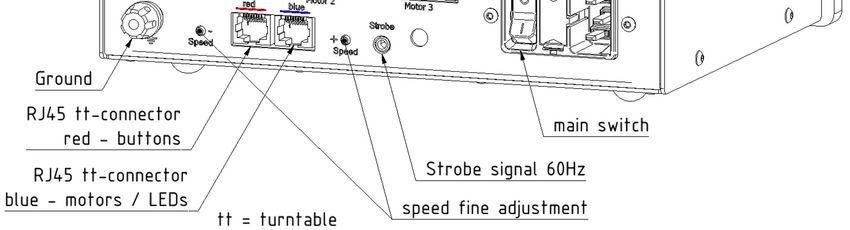
Dear Acoustic Signature customer,                                         Sehr geehrter Acoustic Signature Kunde,

many thanks for your confidence in our product, the turntable             herzlichen Dank für Ihr Vertrauen in unser Produkt, den Plat-
Typhoon NEO With the purchase of your turntable you ac-                   tenspieler Typhoon NEO Mit dem Kauf dieses Plattenspielers
quired a precision instrument for the play-back of records. To            haben Sie ein Präzisionsinstrument zur Wiedergabe von Schall-
make it sound perfect, there is some attention necessary for              platten erworben, das um seiner Aufgabe gerecht zu werden,
setup and handling. The manufacturing of this turntable and its           mit Sorgfalt behandelt und eingerichtet werden muss. Die Fer-
assembly takes place completely in Germany at the highest en-             tigung dieses Plattenspielers und die Montage erfolgen komplett
gineering standards - this still guarantees highest quality after         nach höchsten Qualitätsstandards in Deutschland.
years. Understandably you want to start immediately as possi-             Verständlicherweise wollen Sie möglichst sofort mit dem Musik-
ble with listening to music. We kindly ask you however to read            hören loslegen. Wir bitten Sie jedoch diese Anleitung vor dem
this guidance before the first use attentively, so that you can           ersten Gebrauch aufmerksam durchzulesen, damit Sie den Plat-
use your turntable optimally.                                             tenspieler optimal nutzen können und lange Freude daran ha-
We tried to put all the necessary information into this manual.           ben.                   Wir haben uns bemüht, alles Notwendige
If you still should have questions, which are not answered here,          und Wissenswerte in dieser Anleitung unterzubringen. Sollten
then feel free to contact us directly at www.acoustic-signa-              Sie noch Fragen haben, die hier nicht beantwortet werden, so
ture.com or by e-mail: info@as-distribution.de                            wenden Sie sich direkt an uns über www.acoustic-signa-
                                                                          ture.com oder per E-Mail: info@as-distribution.de.
Your team of Acoustic Signature
                                                                          Ihr Team von Acoustic Signature

Declaration of Conformity                                                 Konformitätserklärung

We acknowledge the fact that the device Typhoon NEO belongs               Hiermit wird bestätigt, dass der Plattenspieler Typhoon NEO
to this instruction manual corresponds to valid EEC guidelines            den wesentlichen Schutzanforderungen entspricht, die in der
at the time of printing for the acquisition of the CE-Sign. All the       Richtlinie des Rates zur Angleichung der Rechtsvorschriften der
necessary checks were made with positive result                           Mitgliedstaaten über die elektromagnetische Verträglichkeit
                                                                          (2014/30/EU) festgelegt sind.

Product/Warranty registration                                             Produkt-/Garantieregistrierung

PRODUCT REGISTRATION                                                      PRODUKTREGISTRIERUNG
ACOUSTIC SIGNATURE is introducing an extended warranty of                 ACOUSTIC SIGNATURE führt eine verlängerte Garantie von 15
15 years for ACOUSTIC SIGNATURE turntables / 5 years for                  Jahren für ACOUSTIC SIGNATURE-Plattenspieler / von 5 Jahren
ACOUSTIC SIGNATURE tonearms (applies exclusively to NEO                   für ACOUSTIC SIGNATURE-Tonarme ein (gilt ausschließlich für
products manufactured from October 2020). By introducing the              Produkte der Neo Serie - hergestellt ab Oktober 2020). Hierdurch
extended warranty you will benefit from our constantly                    profitieren Sie von unseren ständig optimierten Prozessen zur
optimized quality control process.                                        Qualitätskontrolle.

REGISTRATION ONLINE                                                       REGISTRIERUNG ONLINE
To apply for the extended warranty you have to register your              Um sich für eine Verlängerung der Garantie zu bewerben,
product including serial number and some purchase                         müssen Sie Ihr Produkt mit der Seriennummer und einigen
information on the ACOUSTIC SIGNATURE website at                          weiteren Informationen zum Kauf auf der ACOUSTIC
www.acoustic-signature.com/en/product-warranty-                           SIGNATURE-Website        registrieren   unter    www.acoustic-
registration/. The registration has to occur no later than one            signature.com/de/
month after the date of purchase. The registration process is             produkt-garantie-registrierung/.    Die   Registrierung muss
only on the website.                                                      spätestens einen Monat nach Kaufdatum erfolgt sein. Die
                                                                          Registrierung erfolgt auf der Website.
WARRANTY GUIDELINES
More information and our Warranty Guidelines can be found on              GARANTIEBEDINGUNGEN
our website at www.acoustic-signature.com/en/product-                     Weitere Informationen und unsere Garantiebedingungen finden
warranty-registration/                                                    Sie   auf   unserer   Website    unter    www.acoustic-signa-
                                                                          ture.com/de/produkt-garantie-registrierung/

Use of the turntable                                                      Verwendung

Your turntable has been built to be used in closed rooms.                 Ihr Plattenspieler wurde zur Verwendung in geschlossenen Räu-
Please use it only in such rooms. Make sure that there is no              men konstruiert. Bitte verwenden Sie ihn nur in Wohnräumen.
water or humidity close to the turntable or the power supply.             Achten Sie darauf, dass der Plattenspieler und das Netzteil kei-
In any case of a damage or question please contact your im-               ner Feuchtigkeit ausgesetzt werden.
porter / dealer.                                                          Das Netzteil wird mit 230V Netzspannung betrieben. Bitte zie-
                                                                          hen Sie vor dem Öffnen unbedingt den Netzstecker.

                                                                      2
Packing                                 Verpackung

Parts                                   Teile

1    Digital Motor Control DMC-20       1       Digitale Motorsteuerung DMC-20
2    Subplatter                         2       Subteller
3    Chassis Typhoon NEO                3       Typhoon NEO - Chassis
4    Power cord                         4       Netzanschlusskabel
5    Tool set                           5       Werkzeugset
6    Patch cables RJ45 blue             6       RJ45-Patchkabel blau
7    Patch cables RJ45 red              7       RJ45-Patchkabel rot
8    Platter                            8       Plattenteller
9    Control unit                       9       Bedienteil
10   Leather mat                        10      Ledermatte
11   Armbase wrench                     11      Schraubenschlüssel Armbasis
12   3 Drive belts (not shown)          12      3 Antriebsriemen (nicht dargestellt)
13   Manual (not shown)                 13      Bedienungsanleitung (nicht dargestellt)

                                    3
Setup                                                     Aufbau

Preparation                                               Vorbereitung

To avoid transport damages the Typhoon NEO                Um Transportschäden zu vermeiden wird der
comes in a carefully designed packing and is par-         Plattenspieler sorgfältig verpackt und teilweise
tially preassembled.                                      zerlegt geliefert.
We recommend having a plane area of about                 Für den Aufbau benötigen Sie eine ebene Fläche
600x600mm² / 24x24 square inch for setup.                 von ca. 600x600mm².
First, take the Chassis and place it on the desig-        Nehmen Sie nun das Chassis und stellen es auf
nated operating place.                                    den vorgesehenen Betriebsplatz.

Before starting the setup, remove the motor               Nehmen Sie vor Beginn der Aufbauarbeiten zuerst
cover, using an Allen key size 2 for the 6 hex            die Motorabdeckung ab. Dazu lösen Sie die
screws of the lid. Put the cover aside.                   Sechskantschrauben mit einem Inbusschlüssel
                                                          Gr. 2.

Levelling                                                 Ausrichten

After placing the chassis you can now level the           Nach dem Aufstellen des Chassis können Sie nun
turntable by turning the 3 feet in the chassis. Use       den Plattenspieler durch Verdrehen der 3 Füsse
a suitable bubble level for adjustment (e. g.             im Chassis mit Hilfe einer geeigneten Wasser-
Acoustic-Signatures dual axis bubble level, see           waage (z. B. Acoustic-Signatures Doppel-Wasser-
picture below).                                           waage, siehe Bild unten) ausrichten.

                                                      4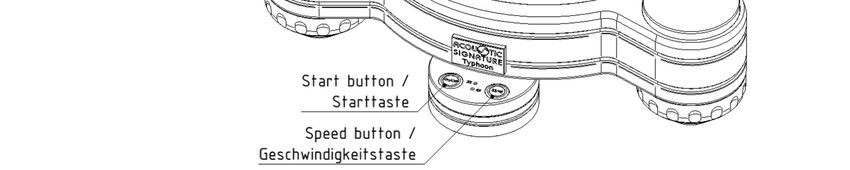
Mounting the subplatter                                  Subteller montieren

Take away the cover strip over the bearing hole.         Entfernen Sie den Schutzaufkleber über der La-
                                                         gerbohrung.
Insert the subplatter carefully into the bearing.
Take care that it slides in slowly and easily.           Setzen Sie nun den Subteller vorsichtig in die La-
Do not let the subplatter drop into the bear-            gerbohrung ein und senken ihn ab. Achten Sie da-
ing hole, as this may damage the bearing.                bei darauf, dass er leicht und ohne erkennbaren
                                                         Widerstand ins Lager gleitet
Turn the subplatter by hand to make sure it spins        Lassen Sie den Subteller nicht in die La-
easily.                                                  gerbohrung fallen, da dies das Lager be-
                                                         schädigen kann.

                                                         Drehen Sie den Subteller von Hand und prüfen
                                                         Sie, ob er sich leicht drehen lässt.

Mounting the belts                                       Antriebsriemen montieren

Place the three provided belts around the pulleys        Legen Sie die drei mitgelieferten Riemen einzeln
and the subplatter as shown in the pictures              um jeweils zwei benachbarte Pulleys und den
above. Each belt must be placed around two adja-         Subteller. Verlegen Sie einen Riemen je Nut im
cent pulleys and the subplatter.                         Pulley, beginnend mit der untersten Nut (oberste
Start mounting the first belt in the lowest groove       Nut bleibt frei).
of the backside pulley.                                  Verwenden Sie keine scharfen Werkzeuge oder
Do not use sharp tools or pointed tweezers. This         spitzige Pinzetten, da dies zur Beschädigung von
may damage belts, subplatter and pulleys.                Riemen, Subteller führen kann.

                                                     5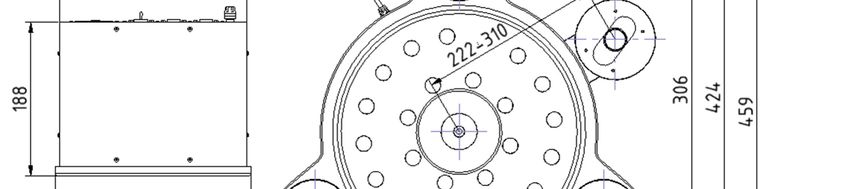
Mounting the motor cover                                   Motorabdeckung montieren

After mounting the belts, close the motor area             Nach erfolgter Riemenmontage verschliessen Sie
with the motor cover using the delivered screws            den Motorbereich mit der Motorabdeckung.
(Allen key size 2).                                        Verschrauben Sie anschliessend die Motorabde-
                                                           ckung mit den Originalschrauben (Inbus Gr. 2).

Mounting the platter                                       Teller montieren

Place the platter carefully on top of the subplatter       Setzen Sie den Teller vorsichtig auf den Subteller
as shown in the picture above. Make sure that              auf, wie im obigen Bild dargestellt. Achten Sie da-
both cones are free of any dirt. This may affect           rauf, dass beide Konen frei von Verunreinigungen
the precise run of your turntable.                         sind. Dies kann den präzisen Lauf Ihres Platten-
                                                           spielers beeinträchtigen
Please keep in mind that the platter weighs ap-
prox. 11kg or 24lbs. Perhaps ask someone to as-            Beachten Sie bitte das Gewicht des Tellers von ca.
sist.                                                      11kg. Fragen Sie gegebenenfalls jemanden um
                                                           Hilfe.
Do not let the platter drop onto the subplatter,           Lassen Sie den Teller nicht auf den Subteller fal-
this may damage the bearing.                               len, dies kann das Lager beschädigen.

                                                       6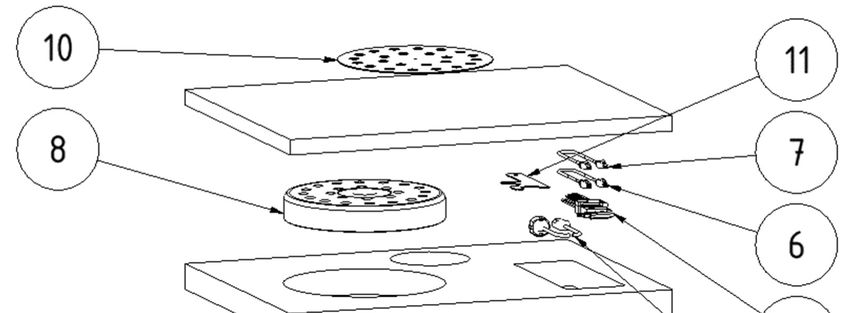
Mounting a tonearm                                      Tonarm einbauen

Now you can start to mount the tonearm and car-         Nun können Sie damit beginnen einen Tonarm zu
tridge according to the setup manual of the tone-       montieren. Beachten Sie hierzu die die Monta-
arm manufacturer.                                       geanweisung des Tonarmherstellers.

Your Typhoon NEO can carry up to 3 tonearms.            Ihr Typhoon NEO kann bis zu 3 Tonarme tragen.
The adjustment range of the armbase allows              Der Verstellbereich der Armbasis ermöglicht ei-
mounting distances between 222 mm and 310               nen Montageabstand von 222 mm bis 310 mm
mm (with customized armboards even more).               (mit angepassten Armboards auch mehr).

Before mounting a tonearm you need to mount             Vor der Montage des Tonarms müssen Sie gege-
the appropriate armboard (if not supplied already       benenfalls das passende Armboard montieren.
mounted).                                               Wir liefern Armboards für eine grosse Anzahl von
We provide armboards for a wide range of tone-          Tonarmen. Bitte wenden Sie sich an uns für wei-
arms. Please contact us for further information.        tere Informationen.

If wanted, you can dismount the tonearm base            Sie können die Armbasis für die Montage des
for changing the armboard by loosening the M8 –         Armboards durch Lösen der beiden M8–Schrau-
screw, using an Allen key size 6.                       ben abnehmen. Verwenden Sie hierzu einen In-
                                                        busschlüssel Grösse 6.
Place your chosen armboard onto the 3 spacer
and tighten it with the 3 M4x55 - screws.               Setzen Sie das Armboard auf die 3 Spacer auf
                                                        und befestigen es mit den M4x55 - Schrauben.

Use the delivered special wrench to handle the          Verwenden Sie den mitgelieferten Spezial-
central screw.                                          Schraubenschlüssel zum Bedienen der Zentral-
                                                        schraube.

                                                    7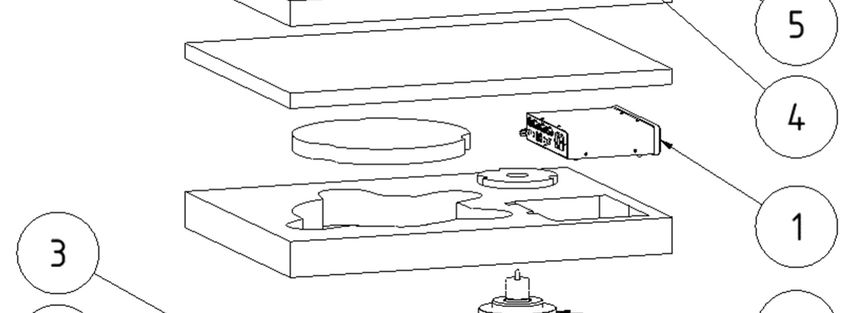
Connecting the Typhoon NEO                            Den Typhoon NEO anschliessen

Connect the Typhoon NEO in 3 steps:                   Schliessen Sie den Typhoon NEO in 3 Schritten
- Patch cable RJ45 black from control unit to         an:
  remote socket of the DMC-20                         - Patchkabel RJ45 schwarz von Bedienteil zu
- Patch cable RJ45 blue from turntable to blue          Remote-Eingang am DMC-20
  marked RJ45-socket of the DMC-20                    - Patchkabel RJ45 blau vom Plattenspieler blau
- Power cord to DMC-20                                  markierten RJ45-Ausgang am DMC-20
                                                      - Netzkabel am Netzeingang des DMC-20
Connect the power cable to your wall socket and
switch on the Motor Control on its backside.          Verbinden Sie das Netzkabel mit der Steckdose
                                                      und schalten die Motorsteuerung auf der Rück-
                                                      seite ein.

                                                  8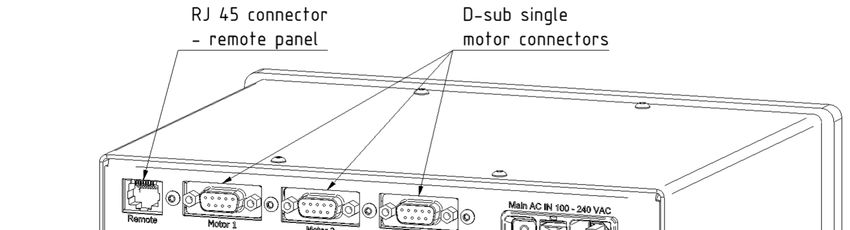
Operating the Typhoon NEO                               Bedienung des Typhoon NEO

Switch on the digital motor control DMC-20 on its       Schalten Sie die digitale Motorsteuerung DMC-20
backside (main switch).                                 auf der Rückseite ein (Hauptschalter).

Start rotation of turntable by pushing the start        Starten Sie den Plattenspieler durch Druck auf die
button (marked with On/Off).                            Starttaste (beschriftet mit On/Off).
The Typhoon NEO is equipped with a resume               Beim Start wird immer die zuletzt gewählte Dreh-
function, so the last chosen speed is active when       zahl von der Steuerung eingestellt.
turning on.

Change speed by pressing the speed button               Zum Ändern der Drehzahl drücken Sie die Ge-
(marked with 33/45).                                    schwindigkeitstaste (beschriftet mit 33/45).

While the Typhoon NEO speeds up or down, the            Solange der Teller seine Solldrehzahl noch nicht
target speed LED is blinking. When the blinking         erreicht hat, blinkt die entsprechende LED. Nach
stops your Typhoon NEO is locked into the se-           Erreichen der Solldrehzahl leuchtet die entspre-
lected speed.                                           chende Geschwindigkeits-LED dauerhaft.

                                                    9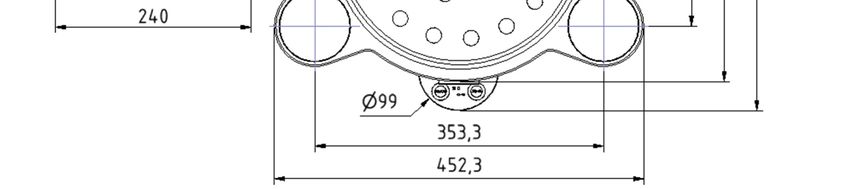
Dimensions        Abmessungen

             10
Typhoon NEO
Technical data Technische Daten
Dimensions: Abmessungen:
452 mm x 460 mm x 188 mm 452 mm x 460 mm x 188 mm
17,8“ x 18,1“ x 7,4“
Weight: Gewicht:
35 kg / 77 lbs 35 kg
Drive System: Antrieb:
3 integrated DC-Motors, subplatter technology 3 integrierte DC-Motoren, Subteller-Technik;
fine adjustment of speed possible Drehzahl feineinstellbar
Speed range: Drehzahlbereich:
33 1/3 RPM and 45 RPM 33 1/3 UpM und 45 UpM
Power supply: Stromversorgung:
Internal AC to DC power adaptor (in Digital Motor Internes Netzteil (in Digitaler Motorsteuerung
Control DMC-20), DMC-20 integriert)
Input 100V to 260V AC 50Hz Eingang: 100V - 260V AC, 50 Hz
Bearing: Lager:
High precision DTD - bearing Hochpräzises DTD - Lager
Chassis: Chassis:
452 mm x 424 mm x 72 mm, 452 mm x 424 mm x 72 mm;
17,8” x 16,7” x 2,3”; Aluminium;
Aluminium; 3 höhenverstellbare Füsse
3 height adjustable feet with gel damping mit Gel-Dämpfung
Platter: Teller:
Platter aluminium, with silencer technology; Teller in Sandwichbauweise Aluminium / Messing /
Ø310 mm x 50 mm / Ø12,2“ x 1,97“; Aluminium, mit Silencer-Technologie;
weight: 11 kg / 24 lbs. Ø310 mm x 50 mm;
Gewicht: 11kg
Armboards: Armboards:
1x designed to fit to customers tonearm 1x an kundenseitigen Tonarm angepasst
2 more armbases possible (sold separately) 2 weitere Armbasen montierbar (getrennt erhältlich)
11Acoustic Signature
Made by AS-Distribution GmbH
Hillenbrandstrasse 10
D-73079 Süssen / Germany
Rev. 1.1 / 2021-08-05
Tel: +49 7162 207970
www.acoustic-signature.com
E-Mail: info@as-distribution.deSie können auch lesen