Stila Benutzerhandbuch / user instructions - Austroflamm
←
→
Transkription von Seiteninhalten
Wenn Ihr Browser die Seite nicht korrekt rendert, bitte, lesen Sie den Inhalt der Seite unten
Benutzerhandbuch / user instructions
Istruzioni per l’uso   / manuel
                  Benutzerhandbuch     d’instructions
                                   / manual / manuale / manuel

Stila
Fig. 1

Fig. 2

                          Primär-Sekundär-Luftregler

deutsch                           english                     italiano                              français
Konvektionsluftschieber           convection air lever        regolazione dell' aria convettiva     manette de convection de l’air
Sekundärluftschieber              secondary air supply        regolazione aria secondaria           coulisseau d’entrée d’air second.
Primärluftschieber                primary air supply          regolazione aria primaria             coulisseau d’entrée d’air primaire

deutsch                           english                           italiano                            français
Inhalt                            Contents                          Indice                              sommaire
1. Techn. Daten             1     1. Techn. data               5    1. Dati tecnici                 9   1. Caractéristiques         13
2. Wichtige Informationen 1       2. Important information     5    2. Informazioni importanti      9   2. Infos importantes        13
3. So bedienen Sie Ihren          3. Correct operation              3. Per un uso corretto della        3. Bien utiliser votre
   Kaminofen richtig        2        of your stove             6       vostra Kaminofen            10      poêle                    14
4. Die wichtigsten                4. The most important             4. Prospetto dei ricambi            4. Principales pièces
   Ersatzteile - Übersicht  3        spare parts - overview    7       principali                  11      détachées                15
5. Ausstattungsmerkmale 4         5. Special features          8    5. Speciali caratteristiche    12   5. Particularites           16
   Garantie                17        Guarantee                17       Garanzia                    18      Garantie                 18
deutsch 1 Stila
1. TECHNISCHE DATEN
Als Kaminofen der Bauart 1 ist ein Anschluss an einen
bereits mit anderen Öfen und Herden für feste Brennstoffe
belegten Schornstein möglich, sofern die
Schornsteinbemessung gemäß DIN 4705, Teil 3, dem nicht
widerspricht.
TECHNISCHE DATEN Abgaswerte für die Mehrfachbelegung des Schorn-
Höhe 1695 mm steines nach DIN 4705, Teil 3 bzw. zur Bemessung des
Durchmesser 444 mm Schornsteines nach DIN 4705, Teil 2
Gesamtgewicht 142 kg
Abgasmassenstrom geschlossen 4,1 g/s
Gewicht HMS (Zubehör) 42 kg
Rauchrohrabgang Durchmesser 130 mm
Nennwärmeleistung lt. EN 13240 5 kW Abgastemperatur geschlossen 311 °C
Maximale Heizleistung 7 kW
Kleinste Heizleistung 2,5 kW Mindestförderdruck bei geschlossen 12 Pa
Nennwärmeleistung
Raumheizvermögen (abhängig bei 0,8facher
48 – 124 m³ (NWL) 10 Pa
von der Hausisolierung) NWL
2. WICHTIGE INFORMATIONEN
Die Informationen in diesem Handbuch sind allgemeiner Legen Sie keine Wäschestücke zum Trocknen auf den
Natur. Nationale und europäische Normen, örtliche und Ofen. Auch Wäscheständer oder dgl. müssen in
baurechtliche Vorschriften sowie feuerpolizeiliche ausreichendem Abstand vom Heizgerät aufgestellt werden –
Bestimmungen sind einzuhalten. Brandgefahr.
Der Kaminofen Stila ist keine Dauerbrand-Feuerstelle.
Allgemeine Sicherheitshinweise
zum Betrieb Ihres Kaminofens Beim Betrieb Ihres Heizgerätes ist das Verarbeiten von
leicht brennbaren und explosiven Stoffen im selben oder in
Lesen Sie vor der Inbetriebnahme des Ofens das
anschließenden Räumen verboten.
Technische und optische Änderungen, Satz- und Druckfehler vorbehalten.
gesamte Handbuch gründlich durch und beachten Sie die
Warnhinweise. Das Gerät ist nur mit geschlossenen Türen zu betreiben.
Für den Transport Ihres Heizgerätes dürfen nur Die Tür sowie alle Einstelleinrichtungen des Geräts sind
zugelassene Transporthilfen mit ausreichender zu schließen, wenn das Gerät außer Betrieb ist.
Tragfähigkeit verwendet werden.
Ihr Heizgerät ist nicht zur Verwendung als Leiter oder
Kaminofenaufstellung
Standgerüst geeignet. Einzuhaltende Sicherheitsabstände
Beachten Sie, dass sich (Mindestabstände - siehe auch Typenschild)
Oberflächen des Kaminofens während Fig. 2 – zu brennbaren Gegenständen
des Betriebes stark erwärmen. Zur a – vorne im Strahlungsbereich >1000 mm
Bedienung des Kaminofens empfehlen b – seitlich > 610 mm
wir die Benützung des c – hinten >120 mm
Schutzhandschuhs. Machen Sie Eckinstallation:
Kinder auf diese Gefahren aufmerksam und halten Sie sie a – vorne im Strahlungsbereich >800 mm
während des Betriebes von der Feuerstätte fern. b – seitlich > 120 mm
d – Decke > 700 mm
Achtung – Lack ist kein Rostschutz!
Verbrennen Sie ausschließlich das im Kapitel „saubere Bitte beachten Sie, dass der Aufstellungsraum mind. eine
Verbrennung“ angeführte, genehmigte Heizmaterial. Türe / ein Fenster ins Freie aufweist oder mit einem
derartigen Raum direkt verbunden sein muss. Andere
Das Verbrennen oder Einbringen von leicht brennbaren Feuerstätten und Dunstabzugshauben dürfen nicht im
oder explosiven Stoffen, wie leere Spraydosen und dgl. in Raumluftverbund mit Feuerstätten betrieben werden.
den Brennraum, sowie deren Lagerung in unmittelbarer
Nähe Ihres Heizgerätes, ist wegen Explosionsgefahr Bodentragfähigkeit
strengstens verboten. Prüfen Sie vor dem Aufstellen, ob die Tragfähigkeit der
Beim Nachlegen sollen keine weiten oder leicht Unterkonstruktion dem Gewicht Ihres Kaminofens standhält.
brennbaren Kleidungsstücke getragen werden.
Das Abstellen von nicht hitzebeständigen Gegenständen
auf dem Heizgerät oder in dessen Nähe ist verboten.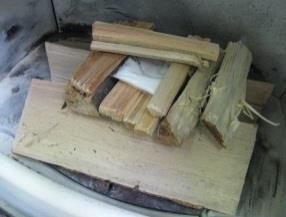
Stila 2 deutsch
Verbrennungsluft Rauchrohranschluss
Als Betreiber müssen Sie für ausreichende Für den Anschluss der Rauchrohre an den Schornstein gibt
Verbrennungsluft sorgen. Bei abgedichteten Fenstern und es zu Ihrer eigenen Sicherheit strenge Richtlinien. Ihr
Türen kann es sein, dass die Frischluftzufuhr nicht mehr Kaminofen-Fachhändler kennt diese. Beauftragen Sie daher
gewährleistet ist bzw. das Zugverhalten des Ofens unbedingt Ihren Fachhändler mit dem Rauchrohranschluss.
beeinträchtigt wird. Ggf. muss für eine zusätzliche
Frischluftzufuhr gesorgt werden. Bitte befragen Sie Ihren
Fachhändler. Die Lufteintrittsöffnung darf nicht verschlossen
werden.
3. SO BEDIENEN SIE IHREN KAMINOFEN RICHTIG
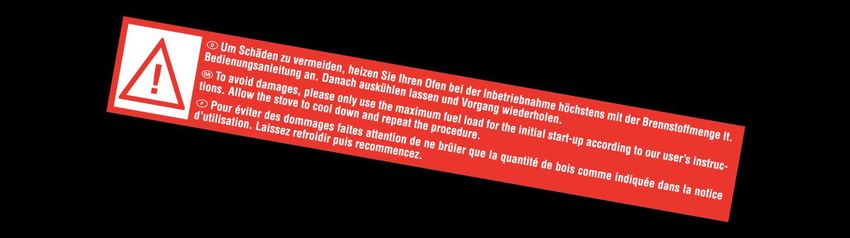
Zugelassene Brennstoffe Schließen Sie die Türe!
Trockenes, gut abgelagertes, naturbelassenes Holz
(Hartholz bevorzugt) und Holzbriketts. Am besten diese erste Holzauflage ohne Änderung der
Luftschieberstellung abbrennen lassen.
Maximale Brennstoffmenge Wenn nur noch Grundglut vorhanden ist (keine Flammen
Maximal aufzugebende Brennstoffmenge: 1,5 kg Holz. mehr), dann können Sie, falls gewünscht, wieder eine
Größere Brennstoffmengen können zu Überhitzung und Auflage Scheitholz (max. 1,5 kg) nachlegen.
Beschädigungen am Ofen führen!
Symbolabbildungen
Beim Nachlegen gehen Sie prinzipiell wie beim Anheizen
Saubere Verbrennung vor: Luftregler auf „AUF“ stellen, Ofentüre vorsichtig öffnen,
Das Brennholz muss trocken (rel. Holzfeuchte < 15 %) und Holz nachlegen, Türe schließen.
unbehandelt sein. Außerdem muss die richtige
Brennholzmenge verbrannt werden, um eine saubere,
emissionsarme Verbrennung zu erreichen.
Inbetriebnahme
Während der ersten 3-4 Abbrandzyklen - bei
Nennwärmeleistung - kann es zu Geruchsentwicklung
kommen und der Lack ist noch nicht ausgehärtet.
Richtig Feuer machen Fig. 4: Luftschieber
Für den richtigen und sicheren Betrieb der Feuerstätte ist
darauf zu achten, dass der Schornstein den erforderlichen Sobald nach einigen Minuten die Holzscheite rundherum gut
Förderdruck aufbaut. Dies muss besonders bei jeder brennen (helle, hohe Flammen – siehe Fig. 5), können Sie
Erstinbetriebnahme (z.B. nach der Sommerzeit) und in der nun mit dem Luftschieber die Heizleistung regulieren
Übergangszeit (z.B. bei starkem Wind) kontrolliert werden. (Regler auf Maximalstellung „AUF“ = maximale
Wenn nicht genügend Förderdruck vorhanden ist, dann Heizleistung), die Flammen sollten aber immer gelb und nie
können zunächst Papier oder Weichholzspäne verbrannt blau bzw. mit schwarzen Flammenspitzen brennen (sonst
werden, um Ofen und Kamin auf Temperatur zu bringen. wieder mehr Luft zuführen) – siehe Fig. 4. Während des
Die Lufteintrittsöffnung des Kaminofens darf nicht Abbrands die Luftzufuhr nicht gänzlich schließen.
verschlossen werden. (Verpuffungsgefahr!)
Rost reinigen, bei Bedarf Aschekasten entleeren (Vorsicht Die Feuerraumtüre darf nur zur Brennstoffaufgabe oder zum
auf Glutstücke). Entaschen geöffnet werden und ist danach wieder zu
schließen.
Regler für Verbrennungsluft ganz öffnen(Stellung „AUF“ in
Fig. 2, siehe auch Fig. 4). Um den Austritt von Heizgasen zu vermeiden, halten Sie
die Feuerraumtüre im Heizbetrieb immer geschlossen.
Legen Sie 2 – 3 Stück Scheitholz (gesamt ca. 1,0 kg) unten
quer in den Feuerraum (1), mit ausreichend Abstand
zueinander (mind. 2 cm). Darüber kommen ca. 0,5 kg
Weichholzspäne (2). Darauf legen Sie in die Mitte eine
Anzündhilfe und zünden diese an (3). siehe Fig. 3
2
3
Symbolabbildungen
Fig.5: Flammenbild
1
Fig. 3: Vor dem Anzünden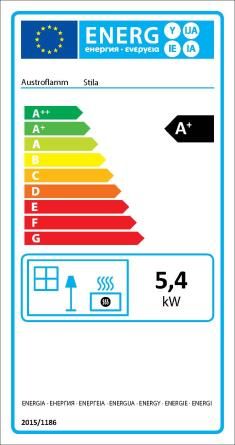
deutsch                                                      3                                                           Stila

Heizen in der Übergangszeit                                      Hinweis bei Schornsteinbrand
In der Übergangszeit, d.h. bei höheren Außentemperaturen,        Wird falscher oder zu feuchter Brennstoff verwendet, kann
kann es bei plötzlichem Temperaturanstieg zu Störungen           es aufgrund von Ablagerungen im Schornstein zu einem
des Schornsteinzuges kommen, so dass die Heizgase nicht          Schornsteinbrand kommen. Verschließen Sie sofort alle
vollständig abgezogen werden. Die Feuerstätte ist dann mit       Luftöffnungen am Kamin und informieren Sie die
geringeren Brennstoffmengen zu befüllen und bei weiter           Feuerwehr. Nach dem Ausbrennen des Schornsteins diesen
geöffnetem Luftregler so zu betreiben, dass der vorhandene       vom Fachmann auf Risse bzw. Dichtheit überprüfen lassen.
Brennstoff schneller (mit Flammentwicklung) abbrennt und
dadurch der Schornsteinzug stabilisiert wird.

4. DIE WICHTIGSTEN ERSATZTEILE - ÜBERSICHT
Keramott
                                     Nr.-
Bezeichnung                         Skizze   Artikelnr.
Keramott Umlenkung                    1      715880
Keramottboden vorne                   2      719591
Keramottboden rechts                  3      719593
Keramottboden links                   4      719592
Keramottboden hinten                  5      719594
Keramott Seitenwand                   6      719595
Keramott Rückwand                     7      719596
Keramott-Umlenkung                    8      719597

Dichtungen                                                                  Nummerierung Keramott = Einbaureihenfolge!
                                     Nr.-
Bezeichnung                         Skizze   Artikelnr.
Flachdichtung 10x5x L=2300mm           9     718438
Ovaldichtung 15x8x L=2231mm           10     718571

Sonstiges
                                     Nr.-
Bezeichnung                         Skizze   Artikelnr.
Tür komplett                          11     723298
Türgriff                              12     720185
Türglas                               13     719540
Glasreiniger 0,5l                     --     640070
Ofenlack                              --     650002

Zubehör
Bei Ihrem Fachhändler erhalten Sie Bodenplatten aus Glas oder Stahl und Pflegemittel, sowie das Heat Memory
Speichersystem.

WICHTIG:        Lassen Sie defekte Teile ausschließlich von Ihrem Kaminofenfachhändler austauschen. Damit ist
gewährleistet, daß Ihr Kaminofen sicher und funktionstüchtig ist und bleibt.
Die Feuerstätte darf nicht verändert werden.

Pflege
Zur Glasreinigung verwenden Sie bitte ein Spezialprodukt wie Thermohit Glasreiniger. Lackierte Oberflächen dürfen nur mit
einem Tuch (ev. feucht) gereinigt werden. Nur intakte Dichtungen gewährleisten die einwandfreie Funktion Ihres
Kaminofens!

Reinigung
Der Kaminofen, die Rauchgaswege und Rauchrohre sollten jährlich – evtl. auch öfter, z.B. nach der Reinigung des
Schornsteines – nach Ablagerungen untersucht und ggf. gereinigt werden. Der Schornstein muss ebenfalls regelmäßig
durch den Schornsteinfeger gereinigt werden. Über die notwendigen Intervalle gibt Ihr zuständiger Schornsteinfegermeister
Auskunft. Der Kaminofen sollte jährlich durch einen Fachmann überprüft werden.
Stila                                                          4                                                      deutsch

5. AUSSTATTUNGSMERKMALE Stila

Raumluftunabhängiger Betrieb
Das Modell Stila ist als raumluftunabhängiger Kaminofen durch das Deutsche Institut für Bautechnik allgemein
bauaufsichtlich zugelassen. Wird die Verbrennungsluft mittels dichter Leitung mit Absperrvorrichtung vom Freien direkt der
Feuerstätte zugeführt, so darf der Ofen auch in Nutzungseinheiten mit mechanischen Be- oder Entlüftungen betrieben
werden.

Wird der Kaminofen auf diese Art genutzt, ist jedoch die Mehrfachbelegung eines Schornsteins nicht zulässig.

Die DIBT Prüfung gilt für Deutschland.

 Problem                          Grund                               Lösung
                                                                      Grundsätzlich: von Zeit zu Zeit (je nach Gebrauch)
                                                                      muss jede Glasscheibe mit Austroflamm
                                  schlechter Kaminzug                 Glasreiniger gereinigt werden
                                                                      Klärung mit Schornsteinfeger (ev. Schornstein
                                                                      verlängern/Zugmessung)
                                                                      Unbedingt gemäß Bedienungsanleitung den
 Glasscheibe verrußt zu schnell                                       Luftregler bedienen (wenn Sekundärluft
                                  falsche Bedienung des Luftreglers
                                                                      geschlossen ist, verrußt die Glasscheibe sehr
                                                                      schnell)
                                  zu große Holzscheite                Menge lt. Bedienungsanleitung einhalten
                                  Betriebstemperatur wurde nicht      Mehr Brennstoff, trockenes Holz (< 15 %
                                  erreicht                            Restfeuchte) verwenden, Luftregulierung beachten
                                                                      Klärung mit Schornsteinfeger (ev. Schornstein
                                  Kaminzug unzureichend
                                                                      erhöhen/Zugmessung
 Ofen zieht nicht ordentlich
                                                                      Mehr Brennstoff, trockenes Holz (< 15 %
                                  Ofen ist innerlich verrußt
                                                                      Restfeuchte) verwenden, Luftregulierung beachten

 Ofen riecht stark und raucht     Einbrennphase des Lacks             In den ersten Heizzyklen riecht der Lack!
 außen
                                  Ofen ist verstaubt/verschmutzt      Reinigen vor der Saison!
                                                                      Verbindungsstellen überprüfen und ggf. neu
                                                                      abdichten
                                  Zu geringer Schornsteinzug,
 Rauchgasaustritt beim                                                Schornsteinzug überprüfen, Bedienung überprüfen
                                  Rauchrohranschluss undicht
 Nachlegen und während der                                            – Bedienvideo zu finden unter:
 Heizphase                                                            http://www.austroflamm.com/de/Video/index.html
                                  Tür geöffnet, bevor auf Grundglut   Erst nachlegen, wenn nur noch Grundglut
                                  abgebrannt                          vorhanden (keine sichtbaren Flammen mehr)
english 5 Stila
1. TECHNICAL DATA
As a stove of construction type 1, it is possible to connect it
to the chimney together with an existing other stove or
another hearth for solid fuels, as long as the chimney
calculation complies with DIN 4705, Part 3.
TECHNICAL DATA Exhaust values for multiple use of the chimney in
Height 1695 mm accordance with DIN 4705, Part 3 and for the calculation
of the chimney measurements in accordance with DIN
Diametre 444 mm
4705, Part 2
Weight 142 kg
Weight HMS 42 kg Fluegas mass flow closed 4,1 g/s
Flue pipe outlet diameter 130 mm
Subject to technical and optical modifications. Formatting and printing errors excepted.
Nominal thermal output (EN 13240) 5 kW Fluegas temperature closed 311 °C
Maximum thermal capacity 7 kW
Smallest heating capacity 2,5 kW closed 12 Pa
Minimum feed pressure
Room heating capacity (depending on Nominal thermal output at 0.8 times n.
48 - 124 m³ 10 Pa
building insulation) ther. outp.
2. IMPORTANT INFORMATION
The installation and operation information given here is of Do not lay laundry onto the stove for drying. Laundry
general nature. National and European standards, local and hung up to dry must be kept at a safe distance from the
building regulations as well as fire prevention laws must be stove because of the danger of fire.
observed during the operation of the stove.
The woodstove Stila is not suitable for long term heating.
General safety instructions for the During the operation of your heating unit it is forbidden to
use flammable or explosive materials in the same or an
operation of your stove adjacent room to the one in which your heating unit is
located.
Thoroughly read the entire manual before starting up
your stove and observe the caution notices. The appliance must be operated with the stove door
closed.
Your heating unit must not be moved without approved
means of transport with sufficient load-bearing capacity. The stove door and all fittings for adjusting the stove
must be closed, if the appliance is out of use.
Your heating unit is not suitable to be used as a stand or
as a ladder. Setting up your stove
Please keep in mind that your
stove’s surface heats up Required safety distances (Minimum distances –
considerably during operation. We see name plate - in Fig. 2) – towards flammable materials
therefore recommend wearing a a – toward the front in the radiated area > 1000 mm
safety mitten when operating your
b – to the side > 610 mm
stove. c – to the back > 120 mm
Make your children aware of this particular danger and Corner installation:
keep them at a distance from the heating unit whenever it is a – toward the front in the radiated area >800 mm
in operation. b – to the side > 120 mm
d – ceiling > 700 mm
Attention – stove varnish is no rust prevention!
Make sure that the room in which the stove is set up has at
Only burn approved fuels and materials listed in the
least one door or window into the outside or is directly
chapter “Clean Burning”.
adjacent to such a room. Other fireplaces and extractor
The burning or placing of flammable or explosive hoods must not be operated in the same room as the stove.
materials, such as empty spray cans, etc. into the firebox as
well as the storage of such materials in the immediate Floor load capacity
vicinity of your heating unit is strictly forbidden due the Make sure that the load capacity of the supporting
danger of explosion. construction is sufficient to carry the weight of the entire
unit, before the heating unit is installed.
Do not wear loose or flammable clothing when adding
fuel to the fire.
Placing non-heat-resistant objects on the heating unit or
in the vicinity of the heating unit is forbidden.Stila 6 english
Combustion air Stove pipe connection
Being the user of the stove you must take care of a For your own safety stringent laws apply for connecting the
sufficient combustion air supply. Sealed-up windows and stove pipes to the chimney. Your professional dealer or
doors may not allow a sufficient combustion air supply or distributor knows these laws. Please have your certified
disturb the draught behaviour of your stove. Please ensure retailer carry out the connection of your stove.
the additional supply of fresh combustion air if necessary.
For details please consult your specialist retailer.
Make sure that the combustion air intakes are not blocked!
3. CORRECT OPERATION OF YOUR STOVE
Approved fuels Close the door!
Dry, well cured and natural wood (hardwood preferred),
wood briquettes. We recommend to let the first load burn down without
changing the air lever position.
Maximum amount of fuel As soon as no visible flames are left (only embers in the
Maximum amount of fuel to be added: 1,5 kg wood or combustion chamber), you can put another load of
briquettes. Larger amounts of fuel can lead to overheating logs (max. 1,5 kg) in the combustion chamber if desired.
and thus damage the stove.
When reloading the stove please repeat the procedure as
Clean burning mentioned under “first lighting”: air lever position on “AUF”
The wood must be dry (relative wood moisture < 15%) and (= open), open door carefully, place logs, close door.
untreated and the right amount of wood must be burned in
order to ensure a clean fire that releases only small
amounts of emissions.
symbol figures
Startup procedures
During the first 3-4 operations - at nominal heat output -
there may be some odour development and the varnish has
not yet hardened.
Fig. 4: adjust air lever
Making a fire
For the correct and safe operation of your stove please pay After a few minutes, when the logs burn well on all sides
attention of the chimney developing the necessary feed (bright, high flames – see fig. 5), you can adjust the heat
pressure. This must especially be considered before the output with the air lever (lever on max. position “AUF” =
initial operation (or e.g. after the summer heating break) and maximum heat output), the flames should be yellow and
during the mid-season heating periods (e.g. at strong wind, never look blueish or have black tips (otherwise add more
etc.). air) – see fig. 4. Never close air supply completely during
If there is not enough feed pressure, please light only some operation. (danger of flash-fire!)
paper or small kindling first, in order to “warm up” the stove
and the chimney. The stove door may be opened only for refuelling or
disposing of ashes and is to be closed again afterwards.
The air inlet must not be covered or closed.
Clean grate, empty ash drawer if necessary (watch out for
ambers!)!
Position the lever for the combustion air to the open (“AUF”)
position (see fig. 2 and 4).
symbol figures
Place 2-3 logs (approx. 1,0 kg in total) crossways in the
combustion chamber (1) with sufficient distance from each
other (min. 2 cm), on top of that place some softwood
chippings (0,5 kg) (2) and some ignition aid and light (3).
(see fig. 3)
Figure 5
2
3
symbol figures
1
Figure 3:ignite the fireenglish 7 Stila
Heating in-between seasons Chimney fire
If you heat the stove in between seasons, when the outside A chimney fire may occur, due to sooting and deposits in the
temperatures are higher, the flue gases may not be able to chimney, if wrong or humid fuel is used. In case of a
escape completely and this may lead to disturbances in the chimney fire close all air inlets on the fireplace/chimney
chimney draught, especially if the temperatures are rising immediately and call the fire brigade. Please have an expert
suddenly. The stove has to be charged with less wood then inspect your chimney for cracks and air-tightness after the
and the primary air has to be increased so that the wood burning out of the chimney.
can burn down faster (with visible flames) and thus the
chimney draught can stabilize.
4. THE MOST IMPORTANT SPARES—OVERVIEW
Keramott
Description Nr.drawing Part number
Baffle plate Keramott 1 715880
Wood retainer, Keramott 2 719591
Bottom right, Keramott 3 719593
Bottom left, Keramott 4 719592
Bottom rear, Keramott 5 719594
Side Keramott 6 719595
Rear Keramott 7 719596
Baffle plate Keramott 8 719597
Gaskets
Description Nr.drawing Part number
Gasket flat 10x5 mm, L=2300 mm 9 718438
Keramott numbering = installation instructions
Gasket 15x8 mm, L=2231 mm 10 718571
Other parts
Description Nr.drawing Part number
Door complete 11 723298
Door handle 12 720185
Door glass 13 719540
Glass cleaner ½ litre -- 640070
Stove lacquer -- 650002
Accessories
You can obtain floor plates of glass or steel or care products from your certified dealer.
IMPORTANT: Have defective parts replaced by your certified dealer. This will guarantee that your stove functions
properly and safely.
The fireplace must not be amended.
Maintenance
To clean the glass, please use a specialized product such as Thermohit glass cleaner. Lacquered surfaces are to be
cleaned only with a cloth (may be damp). Special cleaning agents should also be used for stainless steel surfaces.
Only gaskets in good order ensure the proper function of your stove!
Cleaning
The stove, flue outlets and smoke pipes should be cleaned and inspected for deposits every year – if necessary more often,
e.g. after the cleaning of the chimney. The chimney also has to be cleaned regularly by the chimneysweeper. Your
chimneysweeper will inform you of the necessary inspection intervals. An expert should inspect the stove annually.Stila 8 english
5. SPECIAL FEATURES STILA
Operation with external air supply
The German institute for constructional engineering (DIBT) has given the Stila the general technical approval for operation
with exteranl air supply. If the combustion air is being supplied directly to the furnace by an air-tight pipe including closing
mechanism from the outside, then the stove may be used in residential property with mechanical ventilation.
If the stove in being used like that, a multiple stove installation on the same chimney is forbidden.
This stove has been approved by the German DIBT.
problem possible reason solution
generally: door glasses must be cleaned with
Austroflamm glass cleaner from time to time
bad chimney draught (depending on the frequency of use)
contact your chimney sweep (elongate
chimney/draught metering)
door glass gets sooty too fast please operate air lever according to user's
incorrect use of the combustion
instructions (if secondary air is closed, the door
air supply lever
glass soots rather fast)
keep to the max. fuel quantity according to user's
wood logs are too large
instruction
operating temperature was not more fuel, use dry wood (< 15 % residual moisture),
reached attend air regulation
contact your chimney sweep (elongate
chimney draught not sufficient
stove does not get enough chimney/draught metering)
combustion air more fuel, use dry wood (< 15 % residual moisture),
stove is sooted inside
attend air regulation
there may be some odour development during the
stove smells strongly and there is baking phase of the varnish first operations
smoke on the outside surface
stove is dusty/dirty cleaning before the heating season starts!
inspect joints and seal up again if necessary
chimney draught no sufficient, check chimney draught, examine operating - for info
exhaust gas emission while flue pipe connection leaky video follow:
putting more wood on the fire and http://www.austroflamm.com/de/Video/index.html
during operation
the stove door was opened put more fuel wood into the combustion chamber
before the wood has burnt down only if there are only embers left (no more visible
to embers flame)italiano 9 Stila
1. DATI TECNICI
Questa stufa-caminetto (Kaminofen del tipo Bauart 1) è
adatta per essere collegata ad una canna fumaria già
utilizzata per altre stufe o fonti di calore che impiegano
combustibili solidi, se le dimensioni della canna fumaria lo
consentono (norma DIN 4705, Parte 3).
DATI TECNICI Valori delle emissioni per allacciamento multiplo alla canna
Altezza 1695 mm fumaria (secondo norma DIN 4705, Parte 3) e per il calcolo
delle dimensioni della canna fumaria (secondo DIN 4705,
Diametro 444 mm Parte 2)
Peso 142 kg
Peso HMS 42 kg Flusso fumi chiuso 4,1 g/s
Diametro uscita fumi 130 mm
Rendimento nominale (secondo EN 13240 5 kW Temperatura fumi chiuso 311 °C
Rendimento massimo 7 kW Depressione minima con
chiuso 12 Pa
Rendimento minimo 2,5 kW rendimento nominale (r.nom.)
Volume riscaldabile (dipende dalle Con potenza calorifica con r.nom. di
48 - 124 m³ 10 Pa
condizioni di isolamento dellábitazione) nominale di 0,8 volte 0,8 volte
2. INFORMAZIONI IMPORTANTI
Questo manuale contiene informazioni generali. Devone Non appoggiate oggetti non resistenti al calore sulla
essere rispettate sia le norme nazionale e europee, le stufa o nelle sue immediate vicinanze.
disposizioni locali e le leggi sul edilizia ed anche le
disposizioni dei vigili del fuoco. Non mettete ad asciugare biancheria sopra la stufa.
Stendibiancheria o simili devono essere collocati ad
Salvo modifiche di carattere tecnico ed estetico o errori di fotocomposizione e stampa.
Avvertenze generali e precauzioni una distanza adeguata dalla stufa (pericolo di incendio).
nell'impiego della Kaminofen La stufa non e una stufa da tenere in funzione
ininterrotamente.
Prima di mettere in funzione la stufa vi raccomandiamo
di leggere attentamente l'intero manuale che vi fornisce Quando la stufa è in funzione è sconsigliato l’ utilizzo
importanti informazioni e avvertimenti. di sostanze facilmente infiammabili o esplosive nella stessa
stanza o in stanze adiacenti.
Per il trasporto della stufa utilizzate mezzi idonei, la cui
portata sia sufficiente a sostenerne il peso. L’apparecchio deve funzionare ad antina chiusa.
Non utilizzate la stufa come se fosse una scala o Antina e regolazioni devono essere chiusi quando il
un'impalcatura per salirvi sopra. modello non è in funzione.
Attenzione ! Durante il Installazione della stufa
funzionamento, la superficie del
apparecchio si riscalda. In caso di
contatto consigliamo l'utilizzo di un Distanze di sicurezza (distanze minime) Fig. 2 -
apposito guanto durante il richieste da materiali infiammabili
funzionamento. a – anteriormente nell’area di irradiazione > 1000 mm
b – lateralmente > 610 mm
Attenzione – questa vernice non è antiruggine c – posteriormente > 120 mm
posizionamento ad angolo:
Istruite i vostri bambini su questi inconvenienti e
a – anteriormente nell’area di irradiazione >800 mm
teneteli lontani dalla stufa quando è accesa.
b – lateralmente > 120 mm
Utilizzate solo i combustibili indicati nel capitolo d – soffitto > 700 mm
„Combustibili adatti“.
Il luogo in cui installate la stufa deve disporre di almeno una
Nella camera di combustione non devono essere porta / finestra che dia all’esterno oppure deve essere
infilate e bruciate sostanze facilmente infiammabili od collegato direttamente ad un ambiente con accesso
esplosive, come bombolette spray vuote e simili. E’
.
all’esterno. Non devono essere messi in funzione nella
severamente vietato lasciare tali oggetti nelle immediate stessa stanza, altre stufe, caminetti o estrattori fumi.
vicinanze della stufa (pericolo di esplosione).
Mentre si ricarica legna nella stufa accesa è Portata del pavimento
sconsigliato portare capi di abbigliamento che possano Prima di installare la stufa, accertatevi che la struttura
prendere fuoco facilmente. sottostante al punto in cui volete sistemarla sia in grado di
sopportarne il peso.Stila 10 italiano
Collegamento del tubo di uscita fumi
Fornimento d'arai fresca Per garantire la vostra sicurezza, il collegamento dei tubi di
Il gestore del focolare deve garantire la fornitura di un uscita fumi alla canna fumaria è regolato da apposite
sufficiente volume d'aria fresca. In ambienti con porte e norme. Per l’installazione e il collegamento rivolgetevi quindi
finestre chiuse ermeticamente la fornitura d'aria fresca non al vostro rivenditore, che è a conoscenza di tali disposizioni.
sempre e'garantita. Questo puo influenzare il tiraggio del
focolare. Eventualmente deve essere previsto un aflusso
d'aria supplementare. Rivolgetevi al vostro rivenditore per
ulteriori informazioni. Assicurarsi che le prese d’aria
comburenti non siano ostruite!
3. PER UN USO CORRETTO DELLA VOSTRA STUFA-CAMINETTO
Combustibili adatti Chiudete la porta!
Legna naturale e non trattata, secca e sufficiente-mente
depositata (preferibilmente legno resistente/ Lasciate ardere la prima carica di legna senza modificare la
duro), tronchetti di legno pressato. posizione della regolazione dell'aria.
Potete procedere alla successiva carica di legna (ca. 1,5 kg)
Quantità massime di combustibili quando all'interno della camera di combustione sono
La massima quantità di combustibile consigliata: 1,5 kg di rimaste solo le brace (e si vedono più le fiamme).
legna o bricchetto per volta. Non introducete quantità
eccessive di combustibile per evitare un surriscaldamento Quest’operazione va ripetuta per ogni carica successiva:
ed un conseguente danneggiamento della stufa. aprite la levetta della regolazione dell'aria spostandola in
posizione "AUF/aperto", poi aprite l'anta, aggiungete la
Combustione ed ecologia legna e richiudete infine l'anta.
Per ottenere una combustione corretta con un minimo di
emissioni la legna deve essere secca (< 15 % di umidità
Spiegazione dei simboli
relativa) e non trattata e non si devono superare le quantità
di combustibile consigliate.
Prime accensioni
Durante le prime 3-4 accensioni – a regime normale – la
vernice, biscottandosi, può liberare odore.
Per una corretta accensione Fig. 4: Regolazione della levetta dell'aria
Per un utilizzo corretto e sicuro della vostra stufa-caminetto
occorre prestare attenzione che all’interno della canna
Quando i ceppi avranno iniziato ad ardere bene (fiamma è
fumaria si sviluppi un tiraggio adatto. Soprattutto durante
chiara e alta – vedi fig. 5), potete regolare il rendimento
ogni prima accensione (per esempio dopo il periodo estivo)
della stufa con la levetta della regolazione dell'aria ( la
e durante le stagioni transitorie di primavera e autunno (per
levetta in posizione massima "AUF" corrisponde alla
esempio sotto condizioni di forte vento) questo controllo è
rendimento massimo). Qualora la fiamma sia blu anziché
molto importante. Se il tiraggio è insufficiente, potete usare
gialla oppure nera in punta aprite la levetta della regolazione
carta o trucioli di legno dolce per portare a temperatura la
d'aria per aumentare l'alimentazione d'aria - vedi fig.4. Non
stufa o il caminetto.
chiudete completamente la regolazione d'aria durante il
La presa d’aria non deve mai essere tappata o chiusa.
funzionamento. (pericolo d’incendio!)
Durante le operazione di pulizia griglia o svuotamento
Si consiglia di aprire l’antina solo per il ricaricamento di
ceneri, da eseguire all’occorrenza, prestare attenzione alle
legna o la sistemazione delle braci e di richiuderla poi
braci!
immediatamente.
Tirate in avanti la regolazione dell'aria ( Posizione " aperto"
Spiegazione dei simboli
come da fig.2 + 4).
Sistemate in diagonale 2 -3 ceppi di legna (peso totale ca.
1,0 kg) sul fondo della camera di combustione, ad una
distanza sufficiente l'uno dall'altro (minimo 2 cm) (1).
Distribuite sopra di essi ca. 0,5 kg di trucioli di legno dolce
(2) infine posizionate l'accendi fuoco e accendete (3). (vedi
fig. 3)
III. Fig. 5
2
3
Spiegazione dei simboli
1
lIl. Fig. 3 : Accensioneitaliano 11 Stila Il riscaldamento durante le mezze stagioni Autocombustione della canna fumaria Se accendete la stufa durante le mezze stagioni, quando le Fuliggine e depositi causati da legna inadeguata o troppo temperature sono più elevate, possono sussistere umida possono provocare l'autocombustione della canna condizioni di tiraggio sfavorevolli in modo tale da non fumaria. Chiudete immediatamente tutte le prese d'aria evacuare il fumo interamente, specialmente se le presenti su stufa e camino e chiamate i vigili del fuoco. Fate temperature si alzano in modo repentino. Consigliamo poi ispezionare la vostra canna fumaria da personale quindi di caricare meno legna e di tenere la presa d'aria specializzato che ne verifichi le crepe e la tenuta. aperta del tutto per permettere una combustione più rapida, con una fiamma più alta. In tal modo il tiraggio della canna fumaria si stabilisce. 4. PROSPETTO DEI RICAMBI PRINCIPALI Keramott Denominazione N. su dis. N. art. Keramott tagliafiamme 1 715880 Keramott fermalegna 2 719591 Keramott di base destra 3 719593 Keramott di base sinistra 4 719592 Keramott di base posteriore 5 719594 Keramott laterale 6 719595 Keramott posteriore 7 719596 Keramott tagliafiamme 8 719597 Guarnizioni Denominazione N. su dis. N. art. Guarnizione 10x5 mm, L=2300 mm 9 718438 Numerazione die refrattari = ordine da seguire per il montaggio! Guarnizione 15x8 mm, L =2231 mm 10 718571 Altre parti Denominazione N. su dis. N. art. Porta 11 723298 Maniglie 12 720185 Stila vetroceramico antina 13 719540 Detergente vetroceramico 0,5 l -- 640070 Vernice -- 650002 Accessori Presso il vostro rivenditore potete acquistare basi di protezione in vetro o acciaio e prodotti per la cura e pulizia. IMPORTANTE: per la sostituzione di parti difettose rivolgetevi esclusivamene al vostro rivenditore di Kaminofen, in questo modo avrete la garanzia che la vostra stufa continuerà a funzionare in modo corretto e sicuro. Il focolalere non deve essere modificato. Pulizia Per la pulizia del vetro ceramico dell'antina utilizzate gli appositi prodotti in vendita presso i rivenditori di stufe (ad es. Thermohit). Le superfici laccate della stufa vanno pulite solamente con un panno (eventualmente umido). Anche le superfici in acciaio inox vanno trattate con gli appositi detergenti. Il buon funzionamento della vostra stufa dipende dal buono stato delle guarnizioni Stufa, uscite fumi e tubi dovrebbero essere controllati e puliti ogni anno - anche più spesso, se necessario, per esempio in seguito alla manutenzione della canna fumaria, che dev'essere anch'essa eseguita periodicamente dal servizio spazzacamino. Sarà proprio il vostro spazzacamino ad indicarvi i regolari intervalli per la manutenzione. Personale specializzato dovrebbe ispezionare la stufa annualmente.
Stila                                                            12                                                          italiano

5. SPECIALI CARATTERISTICHE STILA

Funzionamento con presa d'aria esterna
La stufa caminetto Stila con funzionamento a presa d'aria esterna è testata e approvato dall'istituto tecnico per l'edilizia in
Germania. E' possibile installare la stufa caminetto in ambienti nei quali viene utilizzato un sistema di aereazione meccanico
se l'alimentazione con aria comburente avviene dall'esterno tramite un condotto ermetico dotato di valvola registro aria.

In caso di funzionamento con presa d'aria esterna non è consentito l'allacciamento multiplo ad una singola canna fumaria.

L'omologazione DIBT per la Germania è stata effettuata

 problema                          possibile causa                        soluzione
                                                                          in generale: i vetri antina devono essere puliti
                                                                          saltuariamente con un prodotto specifico (secondo la
                                   cattivo tiraggio                       frequenza di utilizzo)
                                                                          contattate lo spazzacamino di fiducia (allungare il
                                                                          tratto di evacuazione fumi)
 il vetro si annerisce troppo                                             la leva della presa d'aria deve essere utilizzata come
 velocemente                       uso improprio della presa d'aria
                                                                          da manuale (se la presa d'aria secondaria è chiusa, il
                                   comburente
                                                                          vetro si annerisce più rapidamente)
                                                                          rispettate le quantità di carico combustibile indicate
                                   i ceppi sono troppo grandi
                                                                          sul manuale
                                   non è stata raggiunta la               aggiungere legna con basso tasso d'umidità (< 15 %),
                                   temperatura interna necessaria         regolare presa d'aria
                                                                          contattate lo spazzacamino di fiducia (allungare il
                                   tiraggio insufficiente
 la stufa non riceve sufficiente                                          tratto di evacuazione fumi)
 aria comburente                                                          aggiungere legna con basso tasso d'umidità (< 15 %),
                                   la stufa è sporca internamente
                                                                          regolare presa d'aria
                                                                          può svilupparsi un forte odore durante le prime
 la stufa libera un forte odore    fase di indurimento della vernice
                                                                          accensioni
 ed il rivestimento esterno fa
 fumo                                                                     prima della stagione, procedere ad una pulizia
                                   la stufa è sporca / impolverata
                                                                          generale della stufa

                                                                          controllate le guarnizioni e risigillate se necessario
                                   tiraggio insufficiente, perdita nel
 fuoriuscita di fumo durante       condotto fumario                       controllate il tiraggio, controllate modalità d'uso - per
 operazione di ricaricamento e                                            info video: http:
 durante il funzionamento                                                 www.youtube.com/watch?v=5Mg5MahGEwA
                                   l'antina è stata aperta prima che la   ricaricare solo quando la legna si è trasformata in
                                   legna diventasse brace                 brace (e la fiamma non è più visibile)
français 13 Stila
1. CARACTÉRISTIQUES TECHNIQUES
Le poêle de type 1 peut être raccordé à une cheminée déjà
occupée par d’autres poêles ou cuisinières à combustibles
solides, à condition toutefois que les dimensions de la
cheminée selon la norme DIN 4705 Partie 3 l’autorisent..
CARACTÉRISTIQUES TECHNIQUES Caractéristiques des gaz de combustion en vue de
Hauteur 1695 mm l’installation de plusieurs appareils sur une cheminée
Diamètre 444 mm selon DIN 4705 Partie 3 ou du dimensionnement de la
cheminée selon DIN 4705 Partie 2
Poids 142 kg
Poids HMS 42 kg Débit de gaz de combustion fermé 4,1 g/s
Diamètre à la base du carneau 130 mm Température des gaz de
fermé 311 °C
Puissance calorifique selon EN 13240 5 kW combustion
Puissance calorifique maximale 7 kW fermé 12 Pa
Pression d’extraction
Puissance calorifique minimale 2,5 kW
minimale à 0,8 fois la
Volume chauffé (selon à la puissance nominale puissance 10 Pa
48 - 124 m³
l’isolation du bâtiment) nominale
2. INFORMATIONS IMPORTANTES
Les informations dans ce manuel, sont présentées d’une Les étendages et égouttoirs à linge ou autres doivent
façon générale. Les normes nationales et européennes, être placés suffisamment loin de l’appareil pour éviter tout
Sous réserve de modifications techniques et optiques, ainsi que d'erreurs de composition et d'impression.
les directives de construction régionales ainsi que les risque d’incendie.
accords concernant la sécurité incendie sont à respecter.
Lorsque le poêle est en marche, ne travaillez jamais
Remarques générales concernant la avec des matières facilement inflammables ou combustibles
dans le local où il se trouve ni dans une pièce adjacente.
sécurité
Le poêle Stila est un chauffage d'appoint.
Lisez attentivement l’ensemble du manuel avant de L’appareil doit être utilisé portes fermées.
mettre le poêle en service et respectez les avertissements
relatifs à la sécurité. La porte ainsi que tous les équipements de réglage de
l’appareil sont à fermer quand celui-ci ne fonctionne pas.
Le transport de l’appareil doit toujours être effectué au
moyen d’un appareillage de capacité suffisante.
Installation du poêle
Le poêle ne doit pas être utilisé comme marchepied ou
estrade.
Distances de sécurité à respecter (distances
Merci de prêter attention à la minimum – voir également plaque d’identification) (Fig. 2) -
surface du poêle qui devient trés aux objets inflammables
chaude pendant son fonction-nement. a : sur l’avant dans la zone de rayonnement > 1000 mm
Nous recom-mandons d’utiliser le gant b : sur les côtés > 610 mm (120 mm si installation en
de protection. angle)
c : sur l’arrière > 120 mm
Attention – la peinture n’est pas une protection anti- installation en angle
rouille a – sur l’avant dans la zone de rayonnement > 800 mm
Expliquez bien le risque de brûlures à vos enfants et b – sur les côtés > 120 mm
tenez-les éloignés de l’appareil lorsque celui-ci fonctionne. d – plafond > 700 mm
Utilisez toujours le combustible autorisé selon le chapitre Attention : le local dans lequel vous installez le poêle doit
« Combustion non polluante ». être pourvu au minimum d’une porte ou d’une fenêtre
donnant à l’extérieur, ou communiquer avec une autre pièce
La combustion ou l’introduction de matières très
donnant à l’extérieur.
inflammables ou explosives dans le foyer, par exemple de
bombes aérosols vides, est strictement interdite en raison
du risque d’explosion, de même que la conservation de tels Capacité portante du sol
produits à proximité de l’appareil. Avant d’installer l’appareil, vérifiez si le sol pourra en
supporter le poids.
Ne rechargez pas le poêle alors que vous portez des
vêtements amples ou en matières inflammables.
Il est interdit de déposer des objets ne résistant pas à la
chaleur sur l’appareil ou à proximité.
Ne faites pas sécher de linge sur le poêle.Stila 14 français
Air de combustion Raccordement au conduit de cheminée
En tant qu’utilisateur, vous devez faire en sorte qu’il y ait Pour votre sécurité, des consignes strictes doivent être
suffisamment d’air de combustion. Si toutes les fenêtres et respectées pour le raccordement des tuyaux au conduit.
portes sont fermées hermétiquement , il se peut que l’entrée Votre installateur professionnel connaît bien ces règles. Il
d’air frais ne se fasse plus correctement voire même que le faut donc impérativement confier à ce professionnel le
tirage du poêle en soit affecté. Dans ce cas, une arrivée raccordement au conduit.
d’air frais supplémentaire est nécessaire. Merci de vous
adresser alors à votre revendeur.
3. POUR BIEN UTILISER VOTRE POÊLE
Combustibles autorisés Fermer la porte !
Bois naturel sec et bien conservé, briquettes de bois.
Le mieux est de laisser cette charge brûler sans modifier la
position de la manette d’arrivée d’air.
Quantité maximale de combustible
Au maximum 1,5 kg de bois ou de briquettes. N’utilisez pas Et seulement quand il n’y a plus qu’un tas de braise (plus de
plus de combustible, sous peine de provoquer une flammes donc), vous pouvez, si vous le souhaitez, remettre
surchauffe qui endommagera le poêle. des bûches de bois (max. 1,5 kg).
Combustion non polluante Au moment de la recharge, procédez de la même façon
Le bois doit être sec (humidité relative < 15 %) et non traité. qu’à l’allumage : manette d’arrivée d’air sur position
Il doit être utilisé en quantité adéquate pour obtenir une « ouvert », ouvrir la porte prudemment, poser le bois, fermer
combustion propre et dégageant peu d’émissions. la porte.
Représentation des symboles
Mise en service
Lors des 3-4 premiers feux, en puissance nominale, des
odeurs peuvent se faire sentir, dûes à la peinture pas
encore durcie.
Pour bien faire du feu
Pour un fonctionnement correct et sécurisé de votre
appareil de chauffe, il faut vérifier que le conduit produit Fig. 4: régler l’arrivée d’air
suffisamment de tirage (pression de refoulement). Cela doit
tout particuliérement être contrôlé à chaque début de saison Dés que les bûches de bois sont bien enflammées – aprés
(aprés l’été) et dans les intersaisons (en cas de vent fort par quelques minutes (flammes claires et hautes – voir
exemple). Si le tirage dans le conduit n’est pas assez image 5), vous pouvez alors réduire l’arrivée d’air (manette
important, il suffit de brûler tout d’abord du papier ou du petit sur position maximale « ouvert » = puissance de chauffe
bois pour amener le poêle et le conduit à température. maximale) mais les flammes doivent rester bien jaunes et
ne jamais devenir bleues ou présenter des pointes noires
L’arrivée d’air ne doit pas être obstruée. (sinon il faut faire entrer plus d’air) – voir image 4. Lors de la
flambée il ne faut jamais fermer l’arrivée d’air complétement.
Nettoyer la grille et au besoin vider le cendrier (attention aux (risque d’explosion!)
braises !)
La porte du foyer ne peut être ouverte que pour recharger
Tirer la manette de l’arrivée d’air ainsi que la manette de la du bois ou enlever la cendre et doit ensuite être refermée.
grille de décendrage complétement vers l’avant (voir
position « ouvert » sur image 2 et image 4).
Poser 2-3 bûches (en tout 1,0 kg) dans le travers du foyer,
avec suffisamment de distance entre elles (au moins 2 cm)
(1). Ensuite ajouter environ 0,5 kg de petit bois (2). Puis
poser dans le milieu un allume-feu et allumer (3). (voir
image 3)
Représentation des symboles
3 2
Fig. 5
1
Fig. 3: Allumagefrançais 15 Stila Chauffer à la mi-saison Information en cas d’incendie dans le A la mi-saison, c’est-à-dire quand les températures conduit extérieures sont plus élevées, il arrive que le tirage du En cas d’utilisation d’un mauvais combustible ou d’un conduit de cheminée soit mauvais à cause de l’élévation combustible trop humide, il en résulterait des dépôts dans le soudaine des températures : les gaz ne sont pas conduit qui pourraient alors provoquer un incendie. Fermez complètement tirés vers le haut. aussitôt toutes les arrivées d’air de la cheminée et prévenez Il faut alors remplir la cheminée avec des quantités de bois les pompiers. moindres et ouvrir le régulateur d’air primaire à fond afin Après l’incendie, faîtes vérifier votre conduit par un que le combustible brûle plus vite (formation de flammes), spécialiste car il peut avoir subi des dommages (félures, ce qui stabilisera le tirage du conduit. détérioration de l’étanchéité.). 4. PRINCIPALES PIÈCES DÉTACHÉES Céramique réfractaire Désignation N° sur schéma Réf. article Keramott déflecteur 1 715880 Keramott pare-bûche 2 719591 Keramott en bas á droit 3 719593 Keramott en bas á gauche 4 719592 Keramott en bas 5 719594 Keramott côte 6 719595 Keramott au centre 7 719596 Keramott déflecteur 8 719597 Joints Désignation N° sur schéma Réf. article Joint 10x5 mm, L= 2300 mm 9 718438 Numérotation des céramiques réfractaires = Joint 15x8 mm, L= 2231 mm 10 718571 instructions de montage ! Autres Désignation N° sur schéma Réf. article Porte 11 723298 Poignée 12 720185 Vitre du porte 13 719540 Nettoyant pour vitres 0,5 l -- 640070 Vernis pour poêle -- 650002 Accessoires Vous trouverez chez votre revendeur spécialisé des plaques de fond en verre ou en métal et des produits d’entretien. IMPORTANT : Les pièces défectueuses doivent toujours être remplacées par votre revendeur spécialisé, afin que le poêle reste sûr et en bon état de marche. L'appareil ne doit pas être modifié. Entretien Pour le nettoyage de la vitre, utilisez un produit pour vitre comme "Thermohit". Les parties laquées doivent être nettoyés uniquement avec un chiffon (éventuellement humide). Utilisez pour les superficies en inox, des produits spéciaux prévus pour ce revêtement. Nettoyage Le poêle, le dispositif d’évacuation des fumées et les tuyaux doivent être contrôlés et en cas de dépôts, être nettoyés au moins une fois par an, si ce n’est plus, par exemple lors du ramonage du conduit de cheminée. Le conduit doit également être nettoyé régulièrement par un ramoneur. C’est celui-ci qui vous indiquera dans quelles intervalles un ramonage est nécessaire. Le poêle doit être vérifier une fois par an par un spécialiste.
Stila                                                            16                                                        français

5. PARTICULARITES DU STILA

Utilisation indépendante de l’air ambiant
Le modèle Stila a été certifié par l’Institut Allemand pour les Techniques de Construction en tant que poêle-cheminée
indépendant de l’air ambiant. Dans le cas où l’air de combustion et ammené directement de l’extérieur vers la chambre de
combustion moyennant une prise d’air extérieur étanche munie d’un système de verouillage, le poêle peut être utilisé dans
des pièces équipées de systèmes mécaniques d’aération ou d’évacuation d’air.

Si le poêle est installé dans ce genre de pièce, une utilisation multiple du conduit de cheminée n’est pas autorisée.

L’homologation au DIBT n’est valable que pour l’Allemagne.

 problème                          cause                                solution
                                                                        En règle générale, il est nécessaire de nettoyer
                                                                        chaque vitre de temps en temps (selon utilisation)
                                   mauvais tirage                       avec un produit nettoyage vitre Austroflamm
                                                                        A vérifier avec l'installateur (surélever
                                                                        éventuellement le conduit / mesurer le tirage)
 La vitre noircit trop vite        mauvaise utilisation de la manette   Vérifier absolument la notice d'utilisation (si l'air
                                   d'arrivée d'air                      secondaire est fermé, la vitre noircit trés vite)
                                   Bûches de bois trop grosses          Respecter la quantité de bois recommandée
                                                                        Utiliser plus de combustible, du bois bien sec (<
                                   Température de fonctionnement
                                                                        15% d'humidité), ne pas fermer complétement
                                   non atteinte
                                                                        l'arrivée d'air.
                                                                        Vérifier avec l'installateur (surélever le conduit /
                                   Tirage du conduit insuffisant
                                                                        mesurer le tirage)
 Le poêle ne tire pas
 correctement                                                           Utiliser davantage de combustible, du bois bien sec
                                   Le poêle est noir de suie à
                                                                        (< 15% d'humidité), ne pas fermer complétement
                                   l'intérieur
                                                                        l'arrivée d'air.
                                                                         Lors des premiers feux, la peinture dégage une
 Le poêle dégage de fortes         Période de cuisson de la peinture
                                                                        forte odeur
 odeurs et fume à l’extérieur
                                   Le poêle est poussiéreux, sale       Nettoyer avant le début de la saison!
                                                                        Vérifier les points de raccordements, changer
                                                                        éventuellement les joints
                                   Tirage insuffisant, raccordement
 Dégagement de fumées lors         non étanche                          Vérifier le tirage, vérifier le mode d'utilisation -
 de la recharge et de la chauffe                                        Regarder la vidéo
                                                                        http://www.austroflamm.com/de/Video/index.html
                                   La porte a été ouverte, avant que     Ne recharger que lorsqu'il ne reste que de la braise
                                   tout le bois soit devenu de la braise (plus de flammes visibles)
GARANTIE / GUARANTEE / GARANZIA / GARANTIE
Garantie Guarantee
Für Ihren AUSTROFLAMM-Kaminofen garantieren wir We guarantee full functionality of the stove carcass for 6
für die einwandfreie Funktion des Korpus 6 Jahre, aller years and all stove components made of steel or cast
weiteren Bauteile aus Stahl und Guß 2 Jahre ab dem iron for a full two years from the date of purchase. Steel
Erstverkaufsdatum. Stahl- und Gußteile, die während der and cast-iron components which show defect in materials
Garantiezeit Material- und / oder Verarbeitungsmängel or workmanship during the guarantee period shall be
aufweisen, werden gegen Neuteile ersetzt. replaced with new components.
Wir gewähren keine Garantie auf Verschleißteile (z. B.: We do not guarantee wearable components (such as
Keramott, Dichtungen, Bodenrost), Keramott, gaskets, floor grid), surface coatings, lacquer,
Oberflächenbeschichtungen, Lack, Glas und Keramiken. glass and ceramics.
Voraussetzungen für unsere Garantieleistung sind:
Conditions of the Guarantee:
1. Ihr AUSTROFLAMM-Kaminofen wurde gemäß dem
Benutzerhandbuch betrieben und von einem 1. Your AUSTROFLAMM stove was installed by a
Fachmann installiert. certified professional and is operated in accordance
2. Der Garantieanspruch wird mit der vollständig with the operator’s manual.
ausgefüllten Garantiekarte und der Rechnung bei 2. Claims to the guarantee shall be subject to a
einem AUSTROFLAMM-Fachhändler geltend completely filled-out Guarantee Card and submittal
gemacht. of the original invoice issued by a certified
AUSTROFLAMM sales agent.
WICHTIG: Unsere Garantieleistung umfaßt die
kostenlose Lieferung der Neuteile. Arbeits- und IMPORTANT: Our guarantee includes free
Wegzeiten werden dadurch nicht umfaßt. Eine shipping of new components. Work and travel times
ungerechtfertigte Garantieinanspruchnahme wird dem are not included. Unwarranted claims shall be re-
Betreiber rückbelastet. invoiced to the operator.
----------------------------------------------------------------------------------------------------------------------------------
Im Garantiefall herausschneiden und Ihrem AUSTROFLAMM-Fachhändler vorlegen!
In the event of claims to the guarantee, separate here and present this proof of purchase to your certified AUSTROFLAMM dealer.
GARANTIE / GUARANTEE / GARANZIA / GARANTIE
Kaufdatum / date of purchase / data d’acquisto / date d’achat
Händlerstempel / Dealer’s Stamp / Timbro concessionario /
tampon du concessionnaire
Modellname / Name of model / modello / nom du produit
STILA
Serien No. / serial no. / no. di serie / no. de série angeschlossen von / Installed by / installato da / raccordée par
(siehe Typenschild / see manufacturer’s plate /
vedi targhetta / voir plaque signalétique)Sie können auch lesen