GEBRAUCHSANWEISUNG USER MANUAL - DYNACOX - TEUFEL INTERNATIONAL
←
→
Transkription von Seiteninhalten
Wenn Ihr Browser die Seite nicht korrekt rendert, bitte, lesen Sie den Inhalt der Seite unten
Gebrauchsanweisung
DynaCox®                       User Manual

www.teufel-international.com
FR

   EN

   DE     DynaCox® Gebrauchsanweisung

             Inhalt                                          Indikation
        BeschreibungDE-2                              •   Nach Reposition luxierter Hüftgelenke
        IndikationDE-2                                •   Instabilität nach T.E.P.
        KontraindikationDE-2                          •   Muskuläre Dysbalance
        FunktionDE-2                                  •   Nach Revisionseingriff
        AbrechnungspositionDE-2
        Medizinprodukt DE-2
        SicherheitDE-3                                      Kontraindikation
        Vorgesehener EinsatzbereichDE-3
        REF/GrößenDE-4                                • Fehlende Patienten-Compliance (z.B. ver-
        Maße nehmenDE-5                                 ursacht durch fortgeschrittene Demenz)
        Anwendung/AnpassungDE-5                       • Schwere Hautveränderungen
        Komfort/HygieneDE-11                            (Wundheilungsstörung mit Fistelung)
        MaterialDE-11
        Produktpflege/Reinigung/WartungDE-11
        Lagerung/EntsorgungDE-12                            Funktion
        ZeichenerklärungDE-12
                                                       • Sicherung des OP-Ergebnisses
                                                       • Luxationsprophylaxe
                                                       • Frühfunktionelle Bewegungstherapie
             Beschreibung

        Die Hüftorthese DynaCox vereint die körper-          Abrechnungsposition
        nahe Wirkung einer Bandage (Propriozeption)
        mit den integrierten Stabilisationselementen   DynaCox mit ROM-Flex-Gelenk:
        einer Orthese im 3-Punkt-Prinzip.              DE: HMV-Nr.: 23.05.01.0002*
                                                       AT: Tarif Nr.: 35141 019*
        Das elastische Form-Gestrick bewirkt           *Auslaufteil, Lieferung solange Produkt verfügbar.
        eine gleichmäßige Kompression bei
        optimalem Tragekomfort.
                                                             Medizinprodukt
        Das ROM-Flex-Gelenk ermöglicht das
        Einstellen der Flexion/ Extension in                         Die DynaCox ist ein
        Schritten von 15°.                                           Medizinprodukt.

        Die modulare Bauweise lässt eine schnel-
        le Versorgung mit voller Anpassbarkeit zu.
        Die Hüftorthese DynaCox ist zugelassen
        zur Anwendung in der Klinik und im häus-
DE-2    lichen Bereich.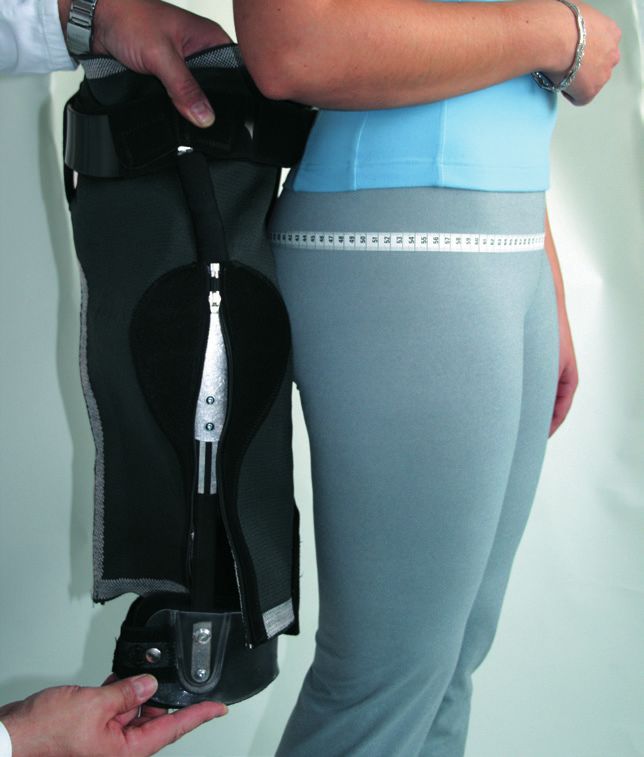
FR
EN
DynaCox® Gebrauchsanweisung DE
Sicherheit
• Vor der Benutzung ist eine individuelle • Die Orthese muss regelmäßig von einem
Anpassung des Produktes und eine Einwei- Arzt oder Orthopädietechniker auf ihre
sung in den Gebrauch durch einen erfah- Funktion, korrekten Sitz und eventuelle
renen Orthopädietechniker entsprechend Beschädigungen überprüft werden. Die
der ärztlichen Anweisung erforderlich. Abstände der Kontrollen sind für jeden
• Falsche Auswahl, Anpassung, Anwen- Patienten individuell festzulegen.
dung und/oder mangelhafte Kontrolle • Sollte das Produkt einer unverhältnismäßig
der Passform des Produktes können zu starken Belastung ausgesetzt gewesen
gesundheitlichen Schäden führen. sein, muss es vor der weiteren Verwen
• Die Orthese vor jedem Anlegen auf Be- dung von einem Orthopädietechniker auf
schädigungen überprüfen (z. B. lockere mögliche Schäden überprüft werden.
Verbindungen, Verschlüsse, Gurte, etc.). • Unzuträglicher Druck durch die Orthese
• Bei Textilprodukten ist zu beachten, kann zu Hautschädigungen und Durch-
dass das Abtrennen des Einnähetiketts blutungsstörungen führen und muss
nicht zulässig ist. daher vermieden werden.
• Bei vermuteten Leistungsstörungen • Das Produkt ist zur Anwendung
(z. B. dem Gefühl einer nachlassenden an einem Anwender vorgesehen
oder unzureichenden Wirkung) muss und nicht zur Wiederverwendung bei
unverzüglich der Arzt oder Orthopädie weiteren Personen geeignet!
techniker aufgesucht werden.
• Alle im Zusammenhang mit dem Produkt
aufgetretenen schwerwiegenden Vor- Vorgesehener
kommnisse sind der Wilhelm Julius Teufel Einsatzbereich
GmbH und der zuständigen Behörde des
Mitgliedstaats, in dem Sie niedergelas- Das Produkt ist zum Einsatz bei einem
sen sind, zu melden. „Schwerwiegendes Patienten vorgesehen.
Vorkommnis“ bezeichnet ein Vorkomm-
nis, das direkt oder indirekt eine der Kompatibilität
nachstehenden Folgen hatte, hätte Die DynaCox ist nicht zur Kombination mit
haben können oder haben könnte: anderen als in dieser Gebrauchsanleitung
a) den Tod eines Patienten, Anwenders genannten Produkten bestimmt.
oder einer anderen Person,
b) die vorübergehende oder dauerhafte Orthese abschulen
schwerwiegende Verschlechterung des Dem Therapieverlauf folgend können die
Gesundheitszustands eines Patienten, festen (orthetischen) Komponenten der
Anwenders oder anderer Personen, DynaCox von der Bandage getrennt werden.
c) eine schwerwiegende Gefahr für die
öffentliche Gesundheit.
• Die Orthese nie auf verletzter Haut tragen. DE-3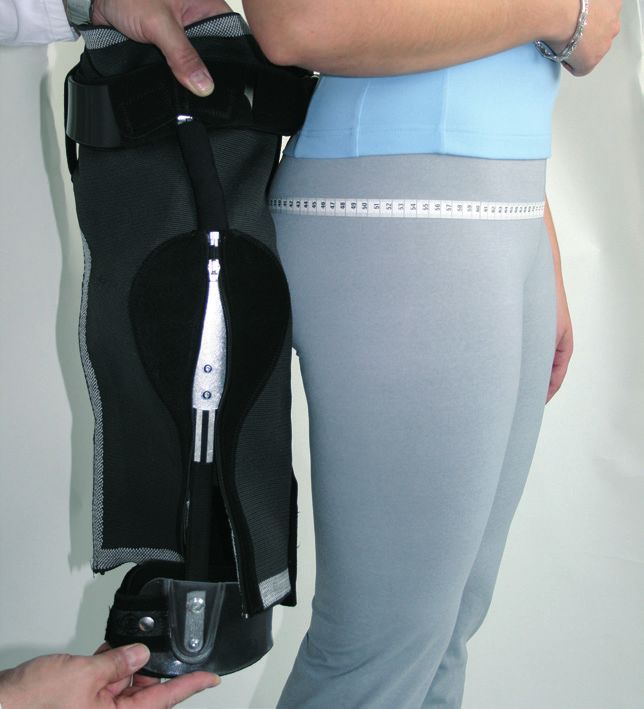
FR
EN
DE DynaCox® Gebrauchsanweisung
REF/Größen
Die DynaCox ist modular aufgebaut. Die Orthesen- und Bandagen-Komponenten sind
untereinander kombinierbar. Die Orthesenbauteile (nicht Bandage) sind rechts/links
verwendbar. Die DynaCox wird teilkonfektioniert geliefert.
DynaCox® mit TRI-Flex-Gelenk inklusive Bandage
REF links REF rechts Größe Umfang/cm
U1 U2 U3
(Hüfte) (Schenkel) (Suprakondylär)
Bandage Schenkelgurt Kondylenspange
22.300.101.00 22.300.201.00 S 70 - 85 40 - 52 32 - 40
22.300.102.00 22.300.202.00 M 85 - 100 48 - 60 37 - 45
22.300.103.00 22.300.203.00 L 100 - 120 56 - 68 42 - 50
22.300.104.00 22.300.204.00 XL 115 - 135 62 - 76 47 - 58
DynaCox® mit ROM-Flex-Gelenk inklusive Bandage
REF links REF rechts Größe Umfang/cm
U1 U2 U3
(Hüfte) (Schenkel) (Suprakondylär)
Bandage Schenkelgurt Kondylenspange
22.300.101.01 22.300.201.01 S 70 - 85 40 - 52 32 - 40
22.300.102.01 22.300.202.01 M 85 - 100 48 - 60 37 - 45
22.300.103.01 22.300.203.01 L 100 - 120 56 - 68 42 - 50
22.300.104.01 22.300.204.01 XL 115 - 135 62 - 76 47 - 58
Für Patienten unter 160 cm Körpergröße bzw. mit einer Femurlänge < 36 cm ist eine um 6 cm
kürzere seitliche Schiene erhältlich (Femurlänge = Distanz Kniespalt –Trochanter Major).
Die Schenkelgurte sind untereinander austauschbar und separat bestellbar.
Die Schenkelgurte erweitern/reduzieren den U2 (Umfang 2) um jeweils 3 cm.
Wir empfehlen bei längerer Tragezeit der DynaCox die Ausstattung mit einer Wechsel-
bandage (REF 22.301.XXX.XX).
DE-4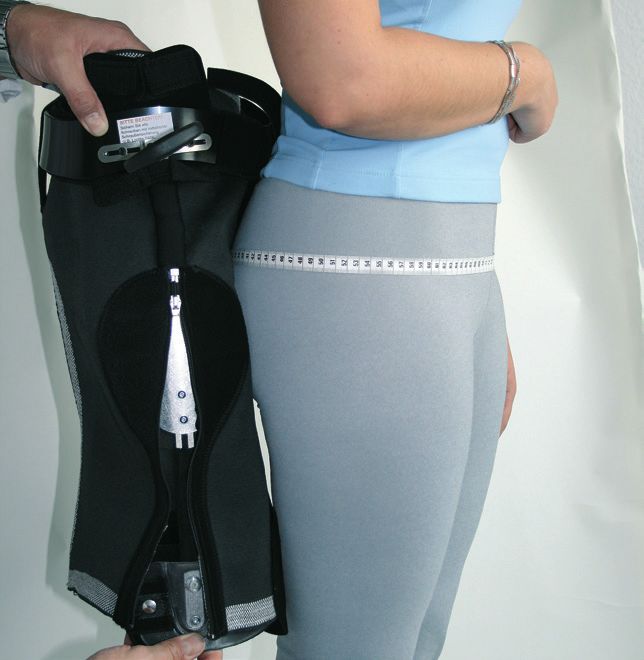
FR
EN
DynaCox® Gebrauchsanweisung DE
Maße nehmen
1. Der Ausgangspunkt im Beckenbereich 4. Umfang 3
ist der Trochanter Major (Abb. 1). Messen Sie zirkulär 5 cm über der
Patellaoberkante (Abb. 4).
1
4
2. Umfang 1
Messen Sie zirkulär 6 cm über dem
Trochanter (Abb. 2). Anwendung/Anpassung
Der Patient sollte zur besseren Einstel-
lung der DynaCox mit leicht abduzierten
Beinen stehen. Alle Schrauben besitzen
Schlüsselweite 3 mm Inbus.
1. Öffnen Sie den Reißverschluss der
2
Femurtasche und beide darunter
sichtbaren Schrauben (Abb. 5).
3. Umfang 2
Messen Sie zirkulär 25 cm unter dem
Trochanter (Abb. 3).
3
5
DE-5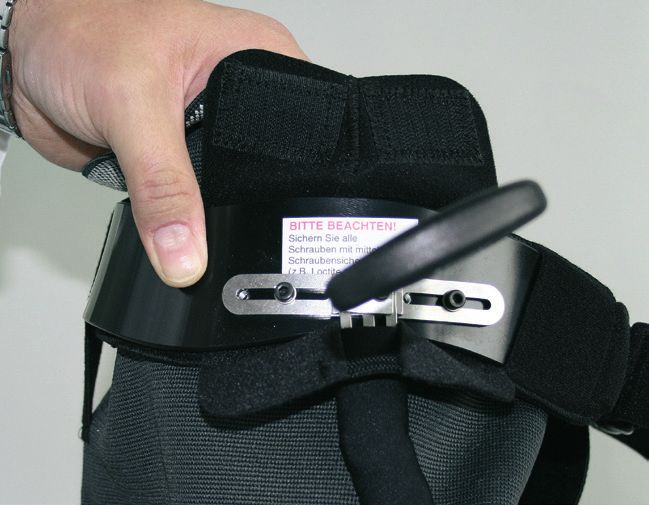
FR
EN
DE DynaCox® Gebrauchsanweisung
2. Halten Sie die Orthese zur Orientierung 4. Öffnen Sie den Klettverschluss der
neben das betroffene Patientenbein. Schraubenabdeckung und die beiden
Die obere Kante der Femurpelotte mittleren Schrauben (Abb. 8).
sollte direkt unter dem Trochanter
platziert werden (Abb. 6).
8
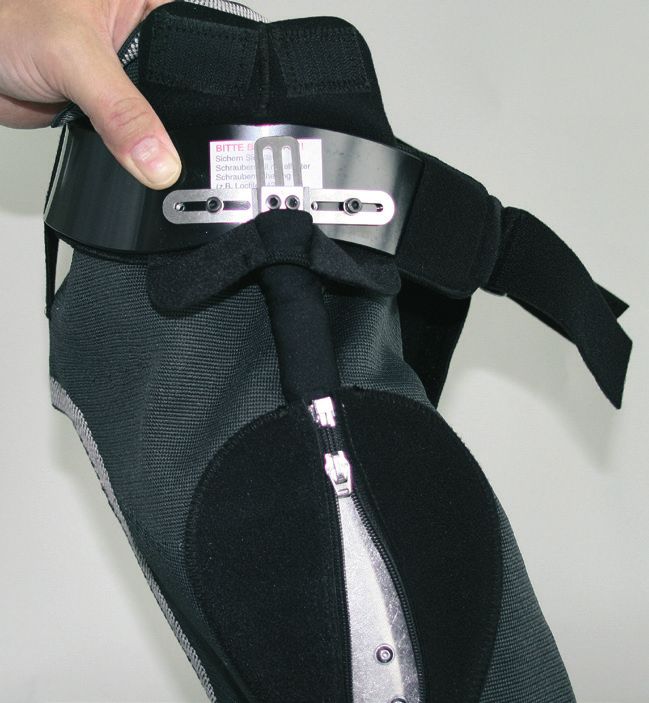
5. Halten Sie die Orthese zur Orientierung
neben das betroffene Patientenbein. Die
obere Kante der Femurpelotte sollte di-
rekt unter dem Trochanter platziert wer-
6
den. Die Beckenspange sollte zwischen
dem Beckenkamm und dem Trochanter
3. Ziehen bzw. schieben Sie die Kondy- platziert werden. (Abb. 9).
lenspange auf die gewünschte Länge.
Schließen Sie die Schrauben und den
Reißverschluss wieder (Abb. 7).
9
Wichtig: Die Beckenspange muss ther-
moplastisch angepasst werden (s. S. 12
Thermoplastische Anpassung).
7
DE-6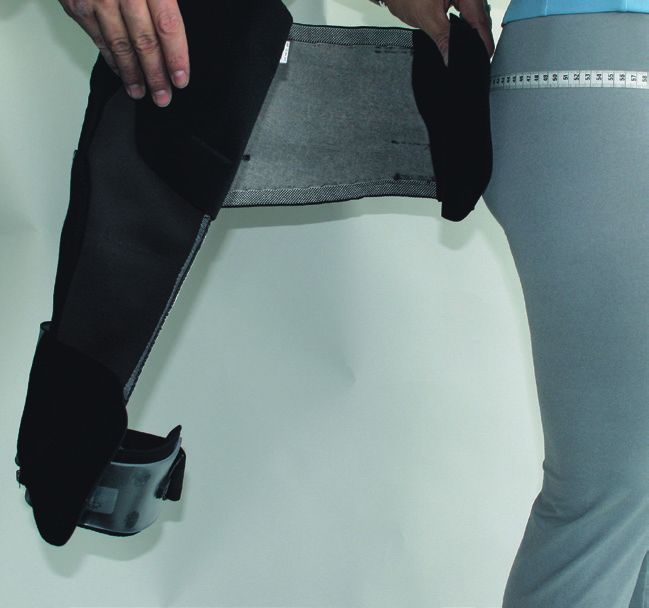
FR
EN
DynaCox® Gebrauchsanweisung DE
6. Ziehen bzw. schieben Sie die Becken- 9. Die Orthese ist nun zur Anprobe vorbe-
spange auf die gewünschte Länge reitet (Abb. 12).
(Abb. 10).
7. Schließen Sie die Schrauben und den
Klett der Schraubenabdeckung wieder
(Abb. 10).
12
Tipp: Zum leichteren Anziehen kletten Sie
die innere Beckenlasche mit ihrem Haken-
verschluss nach außen auf der Femurtasche
und die Schenkellasche von hinten auf ihren
Hakenverschluss nach außen fest.
10
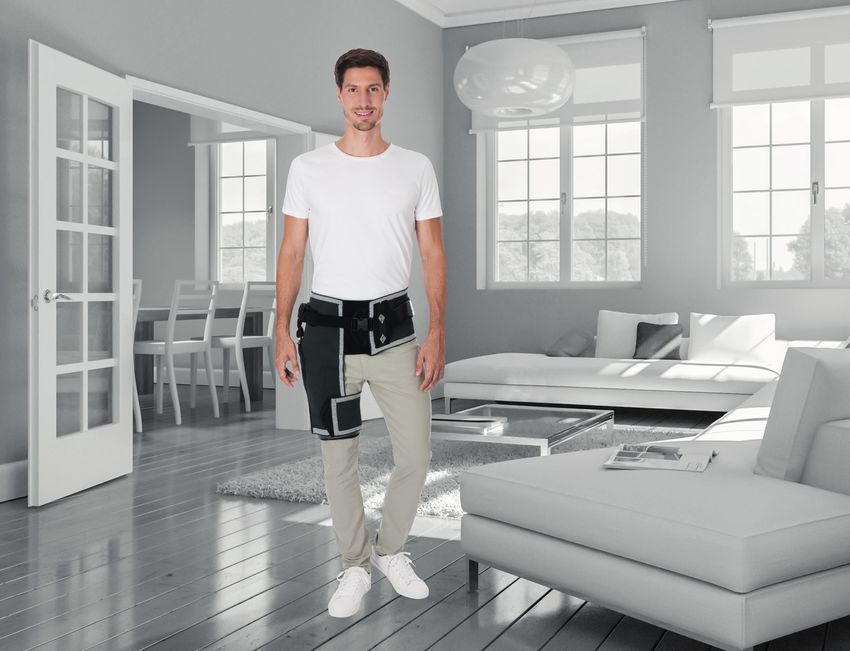
10. Legen Sie dem Patienten die Orthese
8. Öffnen Sie beide lateralen Schrauben locker um (Abb. 13).
der Kondylenspange leicht (Abb. 11).
11
13
DE-7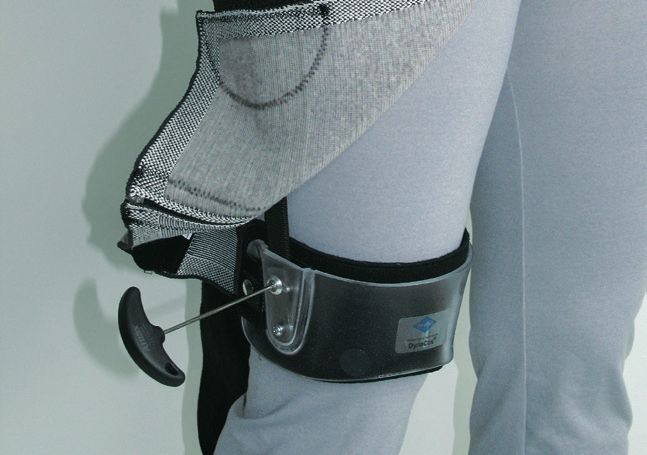
FR

   EN

   DE    DynaCox® Gebrauchsanweisung

        11. Schließen Sie als erstes den Kniekeh-     13. Kontrollieren Sie die flächige Anlage
            lengurt der Kondylenspange. Achten            der Kondylenspange und schließen
            Sie auf die richtige Höhe, die obere          Sie beide Schrauben (Abb. 16).
            Patellakante sollte ca. zwei Finger
            breit Abstand zur Kondylenspange
            aufweisen (Abb. 14).

                                                        16

                                                      14. Schließen Sie den Klettverschluss
          14
                                                          der Schenkellasche (Abb. 17).

        12. Schließen Sie mit Hilfe der Greiflasche
            den Klettverschluss der Bandage am
            Leib (Abb. 15).

                                                        17

                                                      15. Kürzen Sie die Schenkel- und Be-
                                                          ckenlasche mit einer Schere auf
                                                          das Patientenmaß (Abb. 18).

          15

                                                        18

DE-8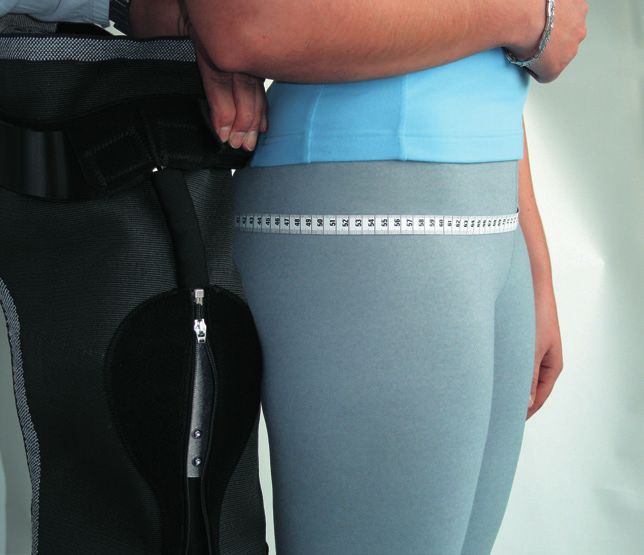
FR

                                                                                            EN
                                                DynaCox® Gebrauchsanweisung                 DE

16. Schließen Sie den Klickverschluss
    und ziehen Sie die Beckengurte der
    Orthese beidseitig fest an (Abb. 19).

                                              21

                                            19. Platzieren Sie die Anschlagschraube
                                                so in eines der Gewinde, dass die
                                                gewünschte Beugung bzw. Stre-
                                                ckung erreicht werden kann (Beispiel:
  19
                                                max. 30° Flexion). Schließen Sie die
                                                Schraube wieder. Sie können Flexion
17. Kürzen Sie die Beckengurte mit              und Extension in Schritten von 15°
    einer Schere auf das Patientenmaß.          einstellen (Abb. 22).
    (Abb. 20).

                                              22

  20
                                            20. Öffnen Sie die 2. Anschlagschraube und
                                                verfahren Sie gleichermaßen. Schlie-
Einstellen des ROM-Flex-Gelenkes                ßen Sie auch diese Schraube wieder
18. Ziehen Sie den Neopren-Gelenkschutz         (Beispiel: max. 15° Extension) (Abb. 23).
    nach oben weg, so dass Sie die beiden
    Einstellschrauben erreichen können.
    Öffnen Sie immer nur eine der beiden
    Anschlagschrauben! Drehen Sie die
    Anschlagschraube komplett heraus.
    Auf der Skalierung können Sie durch
    das Sichtfenster den momentanen
    Winkelwert ablesen (Abb. 21).
                                              23
                                                                                             DE-9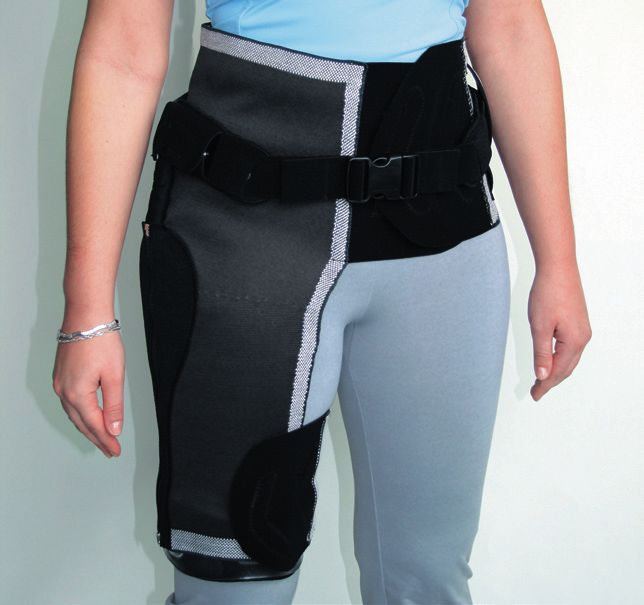
FR

    EN

    DE    DynaCox® Gebrauchsanweisung

         Hinweis: Falls das Gelenk ohne Bewe-        Tipp: Bei besonders adipösen Patienten
         gungsbegrenzung eingesetzt werden           kann zur Stabilisierung der Weichteile
         soll, entfernen Sie bitte beide Anschlag-   eine Kompressions-Innenbinde unter der
         schrauben. Gleichzeitig wird damit der      DynaCox-Bandage getragen werden.
         rückseitige Ring gelöst und kann abge-
         nommen werden. Dieser Ring kann bei         Wir empfehlen den Einsatz unserer Silva®
         Bedarf jederzeit wieder aufgeschraubt       Universal-Rumpfbandage REF 40.368.
         werden (Abb. 24).                           XXX.XX (siehe Katalog „Orthetik“).

                                                     • Thermoplastische
                                                       Anpassung

                                                     Die Kunststoffkomponenten können
           24
                                                     thermoplastisch nachgeformt werden.

         21. Ziehen Sie zum Schluss den bei-         1. Entfernen Sie das eingeklettete Polster.
             liegenden Neopren-Gelenkschutz          2. Die zu verändernde Stelle sollte durch
             wieder über das ROM-Flex-Gelenk.           leichte Kreisbewegungen des Heißluft-
             Dadurch wird ein eventuelles Ein-          gebläses erwärmt werden.
             klemmen von Kleidung verhindert.        3. Verarbeitungstemperatur: Beckenspange
                                                        140 °C / Kondylenspange 160 °C.
         22. Die fertig angepasste Orthese. Kein     4. Nachdem sich das Material an der Oberflä-
             Loctite nötig durch selbstsichernde        che wachsartig, glänzend darstellt, kann
             Tuflock®-Schrauben (Abb. 25).              mit dem Umformen per Hand begonnen
                                                        werden (Achtung : Verbrennungsgefahr
                                                        – Thermohandschuhe tragen!).
                                                     5. Nach kompletter Abkühlung das Polster
                                                        wieder passgenau einkletten.

           25

DE-10
FR
EN
DynaCox® Gebrauchsanweisung DE
• Nachpassung Produktpflege/
Reinigung/Wartung
Im Einzelfall kann es erforderlich sein, die
laterale Schiene distal der Femurplatte Der Schenkelgurt kann zum Waschen von der
nachzubiegen. Bandage abgenommen werden. Um die The-
rapie nicht zu unterbrechen, kann ein zweiter
• Verwenden Sie runde Schränkeisen (MW 4). Gurt (REF 22.303.XXX.XX) bestellt werden.
• Achtung: Falls die Schränkung der
Schiene direkt distal der Femurplatte Wir empfehlen bei längerer Tragezeit
stattgefunden hat, ist eine Verkürzung der DynaCox die Ausstattung mit einer
durch Einschieben nicht mehr möglich. Wechselbandage (REF 22.301.XXX.XX).
Die Bandage sollte zum Waschen vom
Komfort/Hygiene Fachbetrieb gewechselt werden.
Die Orthese nicht direkt auf der Haut Handwäsche
tragen, sondern über einem dünnen
Textil (z. B. Leggins).
Bleichen nicht erlaubt.
Material
Nicht trommeltrocknen.
Bandagenteil:
48% Polyester
36% CoolMax Nicht bügeln.
16% Elasthan
Orthesenteil: Nicht chemisch reinigen.
Hart-PVC
PETG
Aluminium
Stahlschienen
DE-11FR
EN
DE DynaCox® Gebrauchsanweisung
Lagerung/Entsorgung
Das Produkt enthält keine umweltgefähr- Trocken aufbewahren,
denden Stoffe. Es kann über den Hausmüll vor Nässe schützen
entsorgt werden.
Vor Lichteinstrahlung schützen
Zeichenerklärung Temperaturbegrenzung
Hersteller Luftfeuchte Begrenzung
Herstellungsdatum Atmosphärische Druck-
begrenzung, für Transport
Vertreiber und Lagerung
Importeur Medizinprodukt
Bevollmächtigter in der
Europäischen Gemeinschaft
Chargennummer
Artikelnummer
Seriennummer
Data Matrix der UDI
Gebrauchsanweisung
beachten
Achtung
CE-Kennzeichnung gemäß
EU-Verordnung 2017/745 über
Medizinprodukte (MDR)
Einzelner Patient, mehrfach
anwendbar
DE-12FR
EN
DynaCox® Gebrauchsanweisung DE
Notizen
DE-13ES
FR
EN DynaCox® User Manual
DE
Contents Indication
DescriptionEN-2 • After repositioning of luxated hip joints
IndicationEN-2 • Instability after Total Hip Replacement
ContraindicationEN-2 (THR)
FunctionEN-2 • After revision surgery
Reimbursement CodeEN-2
Medical DeviceEN-2
SafetyEN-3 Contraindication
Intended Product UseEN-3
REF/SizesEN-4 • Non-compliant patients
Taking MeasurementsEN-5 (e.g. due to dementia)
Application/AdjustmentEN-5 • Heavy skin alterations (wound
Comfort/HygieneEN-11 healing disorder with fistulas)
MaterialEN-11
Product Care/Cleaning/MaintenanceEN-11
Storage/Disposal EN-12 Function
Legend to SymbolsEN-12
• Securing surgical results
• Luxation prophylaxis
• Early functional motion therapy
Description
The DynaCox Hip Orthosis combines the Reimbursement Code
proximal effect of a bandage (propriocep
tion) and the integrated stabilizing ele DynaCox with ROM-Flex Joint
ments of an orthosis working according DE: HMV-No.: 23.05.01.0002*
to the three-point principle. AT: Tarif-No.: 35141 019*
*Discontinued product, available while stocks last.
The elastic, fully-fashioned knitted fabric
ensures an even compression and optimal
wearing comfort while completing the Medical Device
force system required to limit flexion.
The DynaCox
With the ROM-Flex joint, flexion and extensi is a medical device.
on can be adjusted in increments of 15°. The
modular design allows for quick treatment
and full adaptability. The DynaCox Hip Ortho
sis is approved for clinical and domestic use.
EN-2ES
FR
DynaCox® User Manual EN
DE
Safety
• Before this device is used, the orthosis individually for each patient.
has to be individually adapted to the • Should the product have been
patient by an experienced orthopedic subject to disproportionate stress,
technician and the patient has to be it must be checked for potential
trained in the orthosis’ use according to damage by an orthopedic technician
the doctor’s instructions. before further use.
• Incorrect selection, adaptation, applica- • Harmful pressure caused by the orthosis
tion, and/or failure to monitor the correct may cause skin injuries or disrupt blood
fit of this product may cause health flow and must be avoided.
damage. • This product is intended for use on
• Check orthosis for damage (such as loose one person. It may not be reused
connections, fasteners, belts, etc.) each on another person.
time it is put on.
• Do not remove the textile label from
textile products. Intended Product Use
• In case you suspect any performance
malfunctions (e.g. an apparent reduction This product is intended to be used on
or lack of effect), immediately call on your one patient only.
doctor or orthopedic technician.
• All serious incidents that occur in connec- Compatibility
tion with this product have to be reported The DynaCox may not be combined with
to the Wilhelm Julius Teufel GmbH and the products other than those mentioned in
competent authority of the member state this instruction manual.
in which you are established. A „serious
incident“ is any incident that caused, may Weaning Off
have caused, or may cause, directly or indi- Following the course of the therapy, the ri
rectly, one of the following consequences: gid (orthosis) components of the DynaCox
a) the death of a patient, user, or other can be separated from the bandage.
persons
b) temporary or permanent health
deterioration of a patient, user or
other persons
c) a serious public health threat.
• Never wear the orthosis on broken skin.
• The orthosis must be checked for pro-
per function, correct fit and potential
damage by a doctor or orthopedic tech-
nician at regular intervals. The timing
of these intervals has to be defined EN-3ES
FR
EN DynaCox® User Manual
DE
REF/Sizes
Thanks to the DynaCox‘s modular design, the orthosis and bandage components can be
combined with one another. The orthosis components (not the bandage) can be used on
the left or the right side. The DynaCox will be delivered partly preassembled.
DynaCox® with TRI-Flex Joint, including bandage
REF Left REF Right Size Circumference/cm
U1 U2 U3
(Hip) (Thigh) (Supracondylar)
Bandage Thigh Strap Condylar Clasp
22.300.101.00 22.300.201.00 S 70 - 85 40 - 52 32 - 40
22.300.102.00 22.300.202.00 M 85 - 100 48 - 60 37 - 45
22.300.103.00 22.300.203.00 L 100 - 120 56 - 68 42 - 50
22.300.104.00 22.300.204.00 XL 115 - 135 62 - 76 47 - 58
DynaCox® with ROM-Flex Joint, including bandage
REF Left REF Right Size Circumference/cm
U1 U2 U3
(Hip) (Thigh) (Supracondylar)
Bandage Thigh Strap Condylar Clasp
22.300.101.01 22.300.201.01 S 70 - 85 40 - 52 32 - 40
22.300.102.01 22.300.202.01 M 85 - 100 48 - 60 37 - 45
22.300.103.01 22.300.203.01 L 100 - 120 56 - 68 42 - 50
22.300.104.01 22.300.204.01 XL 115 - 135 62 - 76 47 - 58
For patients shorter than 160 cm and those with a femur length < 36 cm, a shorter bar
(shorter by 6 cm) is available. (Femur length = Distance between distal end of the femur
and greater trochanter).
The thigh straps are interchangeable and can be ordered separately. They increase/reduce
U2 (Circumference 2) by 3 cm.
We recommend the use of a spare bandage when the DynaCox needs to be worn for
EN-4 an extended period of time (REF 22.301.XXX.XX).ES
FR
DynaCox® User Manual EN
DE
Taking Measurements
1. The starting point for measuring in the 4. Circumference 3
pelvis area is the greater trochanter (fig. 1). Measure circumferentially 5 cm above
the top edge of the patella (fig. 4).
1
4
2. Circumference 1
Measure circumferentially 6 cm above
the trochanter (fig. 2). Application/Adjustment
The patient should be standing with
slightly abducted legs to allow for
easier adjustment of the DynaCox.
All screws are hex-wrench size 3 mm.
1. Open the zipper of the femoral pocket
2
and unscrew the two screws now
visible underneath (fig. 5).
3. Circumference 2
Measure circumferentially 25 cm
below the trochanter (fig. 3).
3
5
EN-5ES
FR
EN DynaCox® User Manual
DE
2. Hold the orthosis up next to the patient‘s 4. Open the hook-and-loop fastener on
leg for orientation. The upper edge of top of the screw cover and loosen the
the femoral pad should be positioned two center screws (fig. 8).
directly below the trochanter (fig. 6).
8
5. Hold the orthosis up next to the patient‘s
leg for orientation. The top edge of the
femoral pad should be positioned directly
below the trochanter. The pelvic brace
6
should be placed between the iliac crest
and the trochanter (fig. 9).
3. Pull or push the condylar clasp to the
desired length. Tighten the screws
and close the zipper (fig. 7).
9
Important: It is possible to thermoform
the pelvic brace (see p. 24 „Thermoplastic
Adjustment“).
7
EN-6ES
FR
DynaCox® User Manual EN
DE
6. Pull or push the pelvic brace to the 9. The orthosis can now be tried on by
desired length (fig. 10). the patient (fig. 12).
7. Tighten the screws and close the
hook-and-loop fastener of the
screw cover (fig. 10).
12
Tip: To make donning the orthosis easier,
attach the hook fastener of the medial pelvic
flap on the bandage to the outside of the fe
moral pocket bag, and fold the thigh flap over
to attach it to itself with the hook fastener.
10
10. Loosely put the orthosis on the
8. Slightly loosen the two lateral screws patient (fig. 13).
on the condylar brace (fig. 11).
11
13
EN-7ES
FR
EN DynaCox® User Manual
DE
11. First, close the popliteal strap on the 13. Make sure that the condylar brace fits
condylar clasp. Make sure the clasp the patient‘s leg closely, and tighten
is positioned correctly. The distance the two screws (fig. 16).
between the top edge of the patella
and the condylar clasp should approx.
be the width of two fingers (fig. 14).
16
14. Close the hook-and-loop fastener on
14
the thigh flap of the bandage (fig. 17).
12. Close the bandage‘s pelvic hook-and-
loop fastener, using the tabs to get
better grip (fig. 15).
17
15. Shorten the thigh flap and the pelvis flap
of the bandage to a fitting length for the
patient, using a pair of scissors (fig. 18).
15
18
EN-8ES
FR
DynaCox® User Manual EN
DE
16. Close the buckle and tighten the two
pelvic straps (fig. 19).
21
19.Place the stop screw in one of the
threaded holes, so the desired flexi
on or extension setting is achieved
(example: 30° flexion max.). Now
19
tighten the screw again. Flexion and
extension can be adjusted in incre
17. Shorten the pelvic straps to a fitting ments of 15° (fig. 22).
length for the patient with a pair of
scissors (fig. 20).
22
20
20. Unscrew the 2nd stop screw and
repeat the process. Tighten this
Adjusting the ROM-Flex Joint screw again as well (example: 15°
18. Pull the neoprene joint guard off the extension max.) (fig. 23).
joint so that the two stop are accessible.
Always loosen only one of the two stop
screws at any given time! Completely
unscrew one of the stop screws. The
current angle value can be seen on the
scale of the display (fig. 21).
23
EN-9ES
FR
EN DynaCox® User Manual
DE
Note: If you want to use the joint with- Tip: To stabilize soft tissue, particularly obe
out movement limitation, please remove se patients can wear a compression bandage
both stop screws. This will also release under the bandage of the DynaCox.
the ring on the back side of the joint. If
required, this ring can be screwed back We recommend using our Silva Universal
on at any time (fig. 24). Abdominal Bandage for this purpose,
REF 40.368.XXX.XX (see our current
Orthotics Catalog).
• Thermoplastic
Adjustment
The plastic components of the orthosis
24
can be reshaped through thermoforming.
21.Pull the enclosed neoprene joint 1. Remove the padding.
guard back over the ROM-Flex joint. 2. The area you wish to reshape should be
This will prevent items of clothing heated up by small circular movements
from becoming caught in the joint. with a hot-air blower.
22.The fully adjusted orthosis. No 3. Processing temperature:
threadlocking fluid is required thanks Pelvic brace 140 °C / condylar clasp 160 °C
to selflocking Tuflock® screws 4. As soon as the surface of the material
(fig. 25). begins to look wax-like and shiny you
can begin with manually reshaping the
material (Attention: Risk of burning –
wear thermal gloves!).
5. Once the material has cooled completely,
reattach the padding in its former location.
25
EN-10ES
FR
DynaCox® User Manual EN
DE
• Readjustment Product Care/
Cleaning/Maintenance
In some cases it may be necessary to
reshape the lateral bar on the distal side The thigh belt can be detached from the
of the femoral plate. bandage for washing. To avoid having to
interrupt the therapy, a spare strap (REF
• Use only round bending irons 22.303.XXX.XX) is also available.
(mouth opening 4).
• Attention: If the bar has been bent We recommend the use of a spare banda
directly where it meets the distal end ge (REF 22.301.XXX.XX) when the Dy
of the femoral plate, it will no longer naCox needs to be worn for an extended
be possible to shorten the bar by period of time.
pushing it into the plate.
For washing, bandages should be ex
changed by your orthopedic technician.
Comfort/Hygiene
Hand wash only.
Do not wear the orthosis directly on the
skin, but instead over thin clothing (e.g. a
pair of leggings). Do not bleach.
Material Do not tumble dry.
Bandage:
48% Polyester Do not iron.
36% CoolMax
16% Spandex
Do not dry-clean.
Orthosis Component:
Rigid PVC
PETG
Aluminum
Steel splints
EN-11ES
FR
EN DynaCox® User Manual
DE
Storage/Disposal
This product does not contain any environ Store in a Dry Place,
mentally hazardous substances. It can be Protect from Moisture
disposed of with regular household waste.
Protect from Sunlight
Legend to Symbols Temperature Limit
Manufacturer Humidity Limit
Date of Manufacture Atmospheric Pressure
Limit, for Transport
Distributor and Storage
Importer Medical Device
EC Authorized
Representative
Lot Number
Part Number
Serial Number
UDI Data Matrix
Follow
User Manual
Caution
CE-Marking According to European
Union Council Regulation 2017/745
Concerning Medical Devices (MDR)
Single Patient,
for Multiple Use
EN-12ES
FR
DynaCox® User Manual EN
DE
Notes
EN-13Notizen/Notes
Notizen/Notes
90.395.032.01 Rev. 2021/05 © Wilhelm Julius Teufel GmbH

Wilhelm Julius Teufel GmbH
Robert-Bosch-Straße 15
73117 Wangen
Deutschland
Telefon: +49 (0)7161 15684-0
Telefax: +49 (0)7161 15684-222                                             Made in Germany
www.teufel-international.com     Für dieses Druckerzeugnis wurde ausschließlich Recyclingpapier verwendet.
Sie können auch lesen