BENUTZERHANDBUCH USER MANUAL MANUEL D'UTILISATION MANUAL DE USUARIO MANUALE APPARECCHIO GEBRUIKERSHANDBOEK
←
→
Transkription von Seiteninhalten
Wenn Ihr Browser die Seite nicht korrekt rendert, bitte, lesen Sie den Inhalt der Seite unten
BENUTZERHANDBUCH
USER MANUAL
MANUEL D’UTILISATION
MANUAL DE USUARIO
MANUALE APPARECCHIO
GEBRUIKERSHANDBOEK
AVL DITEST MDS DRIVE 188

Identnummer:                        AT7694
Revision:                           05
Ausgabe:                            05 / 2018

Datenänderung und Irrtum vorbehalten.
Alle Daten gültig zum Zeitpunkt der Drucklegung.

                                                   FUTURE SOLUTIONS FOR TODAY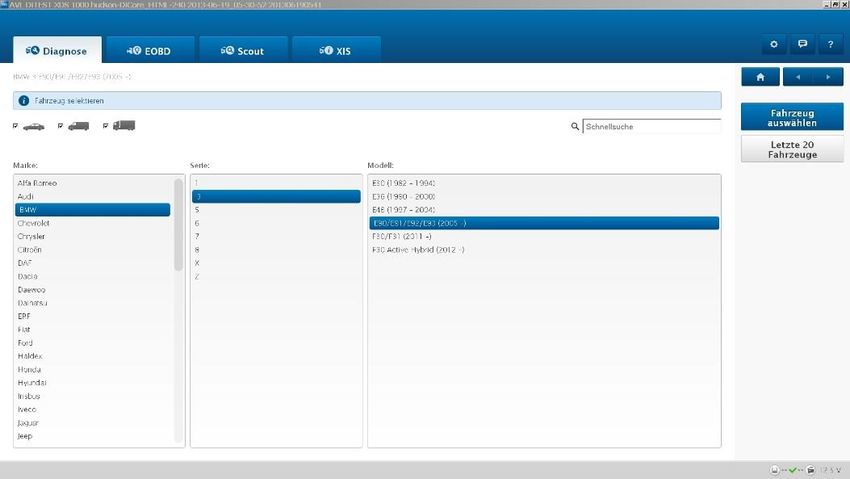
AVL DiTEST GmbH
Alte Poststraße 156
A-8020 Graz / AUSTRIA
Tel: +43 316 787-0
Fax: +43 316 787-1460
ditest@avl.com
www.avlditest.com

Copyright © 2018 AVL DiTEST GMBH, alle Rechte vorbehalten.
Der Inhalt dieser Publikation darf ohne vorherige schriftliche Zustimmung von AVL DiTEST weder ganz noch
teilweise in irgendeiner Form reproduziert oder an dritte Personen weitergegeben werden. Diese Publikation
wurde mit der nötigen Sorgfalt erstellt, sodass für verbleibende Fehler oder Auslassungen sowie für dadurch
eventuell entstehende Schäden von AVL DiTEST keine Haftung übernommen wird.

Copyright © 2018 AVL DiTEST GMBH, all rights reserved.
The contents of this publication, as a whole or in part, may not be reproduced in any form or passed on to third
parties without the prior written consent of AVL DiTEST. This publication was written exercising reasonable
care. AVL DiTEST can therefore not accept any liability whatsoever for any errors or omissions as well as for
any possible damage.

Copyright © 2018 AVL DiTEST GMBH H, tous droits réservés.
Le contenu de cette publication ne peut être reproduit ou transmis, complètement ou partiellement, à un tiers
sous aucune forme sans autorisation écrite préalable de AVL DiTEST. Cette publication a été élaborée avec
l’attention nécessaire de sorte que la société AVL DiTEST ne peut être tenue responsable ni des défauts ou
omissions encore présents ni des dommages consécutifs.

Copyright © 2018 AVL DiTEST GMBH. Reservados todos los derechos.
Queda estrictamente prohibido reproducir o divulgar, en todo o en parte, el contenido de esta publicación sin
la autorización expresa y por escrito de la empresa AVL DiTEST. No se podrá presentar reclamación alguna
ante la empresa AVL DiTEST por los daños que se desprendan de las erratas u omisiones que incluya esta
publicación.

Copyright © 2018 AVL DiTEST GMBH, tutti i diritti riservati.
Il contenuto della presente pubblicazione non può essere riprodotto in qualsiasi forma, né integralmente né
parzialmente, oppure trasmesso a terzi senza la precedente autorizzazione scritta di AVL DiTEST. La presente
pubblicazione è stata redatta con la necessaria attenzione, pertanto AVL DiTEST declina ogni responsabilità
per eventuali errori o omissioni come pure per eventuali danni da essi derivanti.

Copyright © 2018 AVL DiTEST GMBH, alle rechten voorbehouden.
De inhoud van deze publicatie mag zonder voorafgaande schriftelijke toestemming van AVL DiTEST noch
geheel noch gedeeltelijk in welke vorm dan ook gereproduceerd of aan derden verder gegeven worden. Deze
publicatie werd met de nodige zorgvuldigheid opgesteld, zodat voor fouten of tekortkomingen, evenals voor
daardoor eventueel optredende gevolgschade door AVL DiTEST geen aansprakelijkheid overgenomen wordt.
AVL DiTEST MDS DRIVE 188

Content

DEUTSCH
          1       Allgemein ................................................................................. 1
          2       Inbetriebnahme ....................................................................... 7
          3       Gewährleistung ....................................................................... 9
          4       Zubehör .................................................................................. 10
ENGLISH
          1       General ................................................................................... 11
          2       Initial Start-up ........................................................................ 17
          3       Warranty................................................................................. 19
          4       Accessory .............................................................................. 20
FRANÇAIS
          1       Généralités............................................................................. 21
          2       Mise en service ...................................................................... 27
          3       Garantie.................................................................................. 29
          4       Etendue de la livraison ......................................................... 30
ESPAÑOL
          1       Generalidades ....................................................................... 31
          2       Puesta en funcionamiento ................................................... 37
          3       Garantía.................................................................................. 39
          4       Alcance del suministro ........................................................ 40
ITALIANO
          1       Informazioni generali ............................................................ 41
          2       Messa in funzioni .................................................................. 47
          3       Garanzia ................................................................................. 49
          4       Portata della fornitura ........................................................... 50
NEDERLANDS
          1       Algemeen ............................................................................... 51
          2       In bedrijf nemen .................................................................... 57
          3       Garantie.................................................................................. 59
          4       Toebehoren............................................................................ 60

Content                                                                                                       I
AVL DiTEST MDS DRIVE 188 II Content
AVL DiTEST MDS DRIVE 188
Deutsch
1 Allgemein
1.1 Allgemeine Beschreibung
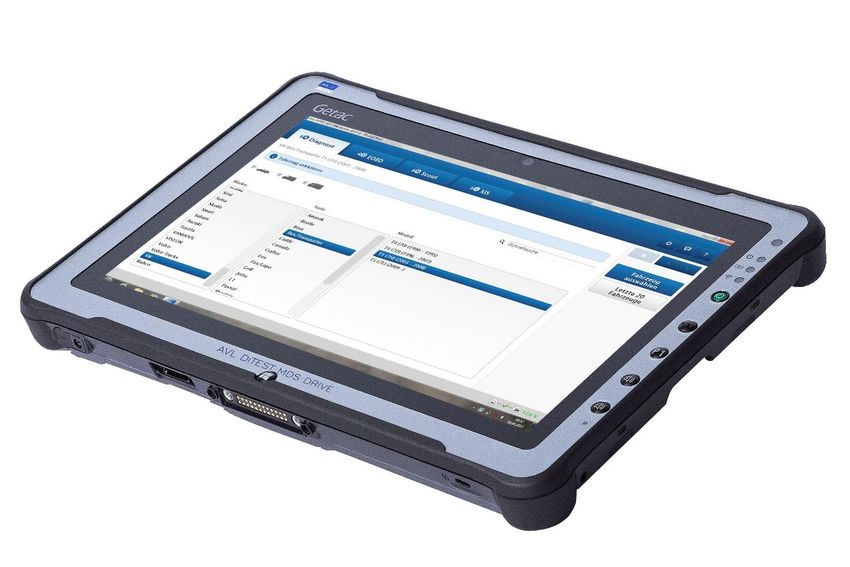
Das AVL DITEST MDS DRIVE ist ein modulares Diagnosesystem für den mobilen Einsatz.
Es ist ein robuster, werkstatttauglicher Tablet-PC mit folgenden Merkmalen:
■ 11,6” HD LCD-Display im Breitbildformat auch für den Außeneinsatz
■ resistiver Touchscreen mit Stift- oder Fingereingabe
■ einfachste Bedienung durch spezielle Bedienoberfläche
■ spritzwasser-, staub- und stoßgeschützt
■ stoßgeschützte Festplatte
■ leistungsstarker Akku, bis zu 12 Stunden Betriebszeit
■ inkl. stabilem Transportkoffer mit integrierten Staufächern für weiteres Zubehör
■ Kommunikation mit dem VCI/Scantool drahtlos per Bluetooth oder per USB-Kabel
Information
Beachten Sie immer auch folgende Dokumente:
■ Sicherheitshinweise, ID-Nr.: AT7673
■ Benutzerhandbuch AVL DiTEST VCI 1000, ID-Nr.: AT7706
■ Benutzerhandbuch AVL DiTEST XDS 1000, ID-Nr.: AT7669D
■ Reference Manual, siehe Seite 2-2
■ Handbuch auf der mitgelieferten CD/DVD
Beachten Sie insbesondere die Sicherheitshinweise in den Dokumenten!
HINWEIS
Bei Reinigungsarbeiten, starkem Staub oder Schmutz in der Werkstatt das AVL DiTEST MDS
DRIVE abdecken!
Besonders sorgfältig mit dem Display umgehen!
Nur mit dem Finger oder dem Bedienstift auf das Display tippen!
Keine spitzen Gegenstände verwenden!
Entsorgung:
Bei der Entsorgung sind unbedingt die lokalen gesetzlichen Pflichten zu erfüllen!
Benutzerhandbuch 1AVL DiTEST MDS DRIVE 188
1.2 Aufbau
Draufsicht:
1
2
3
4
5
6
7
8
9
10
11
12
Abb. 1-1
1 Kamera Kamera mit Signalleuchte und Sensoren
Siehe Referenz-Manual
2 Lichtsensor Misst das Licht der Umgebung für die automatische
Anpassung der Displaybeleuchtung
3 Anzeige Ein/Aus Leuchtet blau, wenn Gerät eingeschaltet ist
Blinkt blau, wenn sich das Gerät im Ruhezustand
befindet
4 Anzeige Ladezustand der Akkus
Leuchtet grün: Akku ist voll aufgeladen
Leuchtet gelb: Akku wird aufgeladen
Blinkt rot (1-mal pro Sekunde): Akkukapazität liegt unter 10%
Blinkt schnell rot Es gibt ein Problem mit dem Überhitzungsschutz.
(1-mal alle 0,5 Sekunden): Gerät muss zum Service
Blinkt gelb: Es gibt ein Problem beim Laden des Akkus:
Akku muss getauscht werden.
5 Anzeige WLAN / Bluetooth
LED leuchtet blau: WLAN und /oder Bluetooth ist eingeschaltet.
6 Netzschalter Schaltet Gerät ein oder aus.
7 Zusatztaste Startet die Getac-Kamerasoftware, dient als Auslöser.
Siehe Referenz-Manual
8 P1-Taster Öffnet Menü „Einstellungen“
9 Lautstärke-Plus-Taster Erhöht die Laustärke
10 Lautstärke-Minus-Taster Reduziert die Lautstärke
11 Mikrofon Siehe Referenz-Manual
12 Windows-Taste Öffnet das Windows-Startmenü
2 BenutzerhandbuchAVL DiTEST MDS DRIVE 188
Deutsch
Unterseite:
1 2 3
Abb. 1-2
1 Abdeckung der Zum Anschließen der Stromversorgung die Lasche
Stromversorgungsbuchse anheben
2 Anschlüsse der Dockingstation Wird bei AVL DITEST MDS DRIVE nicht verwendet
3 Diebstahlschutz (Kensington-Lock)
Oberseite:
1 2
Abb. 1-3
1 Abdeckung der USB 2.0-Buchse Zum Öffnen Lasche nach vorne ziehen
2 Lüftungsschlitze Während des Betriebes nicht verdecken!
Benutzerhandbuch 3AVL DiTEST MDS DRIVE 188
Linke Seite:
1
Abb. 1-2
1 Abdeckung diverser Anschlüsse Siehe Abschnitt „Rückseite“
Rechte Seite:
1
Abb. 1-2
1 Loch Zum Befestigen des Eingabestiftes (Stylus/Touchpen) mit
Befestigungsbandes
2 Eingabestift (Stylus/Touchpen) Siehe Abschnitt „Rückseite“
4 BenutzerhandbuchAVL DiTEST MDS DRIVE 188
Deutsch
Rückseite:
1 2 3 4
5
9
6
8
7
Abb. 1-2
1 Kontrollleuchte für Kamera Siehe Referenz-Manual
2 Blitzlicht für Kamera Siehe Referenz-Manual
3 Kamera Siehe Referenz-Manual
4 Abdeckung der USB 2.0-Buchse Siehe Abschnitt „Oberseite“
5 Lüftungsschlitze Im Betrieb nicht abdecken
6 Abdeckung der USB 3.0-, HDMI- Siehe Referenz-Manual
und Mikrofon/Kopfhörer-Buchse
7 Lautsprecher Siehe Referenz-Manual
8 Eingabestift (Stylus/Touchpen) Bedienung mit Finger oder Eingabestift möglich
9 Abdeckung der beiden Akkus Zum Entnehmen der Akkus die drei Laschen wie
dargestellt (rote Pfeile) schieben und Abdeckung in
der Gerätemitte nach oben heben. Akkus entnehmen.
1.3 Bedienung
Die Bedienung des Gerätes erfolgt im Wesentlichen durch Berührung des Bildschirms
(Anzeigedisplay) mittels mitgeliefertem Eingabestift oder Betätigung mit Finger. Weitere Eingaben
nehmen Sie mit den entsprechenden Bedientasten vor. (Siehe Kap. 1.2).
Abb. 1-6
Benutzerhandbuch 5AVL DiTEST MDS DRIVE 188
1.3.1 Eingaben mit der virtuellen Tastatur
Die virtuelle Tastatur (2) kann duch Tippen auf (rechts unten) ein/- ausgeschaltet werden.
Die mit der virtuellen Tastatur (2) getätigten Eingaben werden in das Eingabefeld (1) übernommen.
Durch Verlassen des Eingabefeldes oder durch Tippen auf (3) wird die virtuelle Tastatur
ausgeblendet.
(1)
(2) (3)
Neues
Tastaur-foto
Abb. 1-7
6 BenutzerhandbuchAVL DiTEST MDS DRIVE 188
Deutsch
2 Inbetriebnahme
2.1 Hardware
2.1.1 Laden des Akkus/Netzbetrieb
Öffnen Sie die Abdeckung (1).
Schließen Sie das Kabel der Stromversorgung an der Buchse an und stecken Sie den Netzstecker in
die Netzsteckdose.
Zum Ladezustand des Akkus beachten Sie die LED , Beschreibung siehe Seite 1-2.
(1)
Abb. 2-1
2.1.2 Einschalten
Schalten Sie das AVL DiTEST MDS DRIVE mit der Taste ein/aus.
Nach dem Einschalten erscheint nach kurzer Zeit die Bedienoberfläche:
Abb. 2-2
Benutzerhandbuch 7AVL DiTEST MDS DRIVE 188
AVL DiTEST XDS 1000 Starten:
2-mal kurzes Tippen startet AVL DiTEST XDS 1000.
AVL XDS 1000
Information
Beachten Sie zusätzlich auch folgende Dokumente:
■ Benutzerhandbuch AVL DiTEST VCI 1000, ID-Nr.: AT7706
■ Benutzerhandbuch AVL DiTEST XDS 1000, ID-Nr.: AT7669D
AVL DiTEST XDS 1000 Update und Freischalten:
Beachten Sie hierzu das Dokument AVL DiTEST XDS 1000 Handbuch.
AVL DiTEST VCI 1000 Firmwareupdate:
Falls Ihr AVL DiTEST VCI 1000 nicht über die aktuelle Firmware verfügt, so erfolgt ein
entsprechender Hinweis während der Freischaltung. Folgen Sie den Anweisungen am Bildschirm.
Beachten Sie hierzu auch das Benutzerhandbuch AVL DiTEST XDS 1000, Kap. 1.8.2 „Scantool“.
Dokumente:
Öffnet die Auswahlansicht mit allen verfügbaren Dokumenten.
Durch 2-mal kurzes Tippen mit dem Eingabestift/Finger auf ein Dokument wird
dieses dargestellt.
AVL XDS 1000
Dokumente
Reference Manual:
Öffnet das Reference Manual.
Reference
Manual
Software
Beachten Sie hierzu das XDS 1000 Handbuch, AVL DiTEST Identnummer AT7669,
Kapitel 1.3 Installation und Update.
8 BenutzerhandbuchAVL DiTEST MDS DRIVE 188
Deutsch
3 Gewährleistung
3.1 Neugeräte
Die Garantiezeit bei Neugeräten beträgt 12 Monate.
Für die Akkus beträgt die Garantiezeit 6 Monate.
Es gelten die Vereinbarungen mit Ihrem Lieferanten.
Grundsätzlich von der Garantie ausgeschlossen sind Verschleißteile und Zubehör.
Für die Abwicklung gilt das Datum des Lieferscheines an den Endkunden.
Die Garantie erlischt bei:
■ Mechanischer Beschädigung (z. B. durch Sturz usw.)
■ Eintritt von Flüssigkeiten (z. B. Wasser, Öl, Säuren usw.)
■ Fremdeingriffen (z. B. Reparaturversuchen von nicht autorisierten Personen)
■ Fehlbedienung (z. B. Bedienung des Touchscreens mit scharfen oder spitzen
Gegenständen, Reinigung mit Druckluft)
■ Falsche Lagerung, Wartung und Pflege (z. B. Reinigung des Gerätes mit lösungshaltigen
Reinigern)
3.2 Tausch- oder Leihgeräte
Es gelten die Vereinbarungen mit Ihrem Lieferanten.
Für die Abwicklung gilt das Datum des Lieferscheines an den Endkunden.
3.3 Schadensfall
Im Schadensfall wenden Sie sich an die jeweilige AVL DiTEST Niederlassung / den jeweiligen
AVL DiTEST Partner in Ihrem Land.
Beachten Sie auch unsere AGBs auf unserer Website: www.avlditest.com.
Benutzerhandbuch 9AVL DiTEST MDS DRIVE 188
4 Zubehör
4.1 AVL DiTEST MDS DRIVE 188
Zubehör:
Teil Bestell-Nummer
12-32V DC Fahrzeugadapter GAD4L1
GE7572
Dockingstation (EU), (mit AC Adapter) GDOFE5 GY7526
Siehe Referenz-Manual
Abnehmbare Falttastatur GDKPK1 GE7574
Handschlaufe GMHRX4 GY7527
Ersatzteile:
Teil Bestell-Nummer
AC Netzteil (EU) GAA6E4 GE7571
GE7573
Akku GBM3X2
Eingabestift (Stylus/Touchpen) GMPDX1 GE7575
Display Schutzfolie GMPFX9 GE7576
10 BenutzerhandbuchAVL DiTEST MDS 188
1 General
1.1 General Description
AVL DITEST MDS DRIVE is a modular diagnostics system for mobile use.
It is a sturdy workshop suitable tablet PC with the following features:
English
■ 11.6” HD LCD-Display in widescreen format also suitable for outdoor use
■ resistive touch screen with stylus or touch input
■ easy operation through special user interface
■ splash water, dust and shock resistant
■ shock resistant hard disk
■ powerful rechargeable battery, operating time about 12 hours
■ incl. sturdy carrying case with integrated storage compartments for further accessories
■ communication with the VCI/scan tool wireless via Bluetooth or USB cable
Information
Always note the following documents as well:
■ Safety Notes, ID No.: AT7673
■ Operating Manual AVL DiTEST VCI 1000, ID No.: AT7706
■ User Manual AVL DiTEST XDS 1000, ID No.: AT7669E
■ Reference Manual, see page 2-2
■ Manual on the enclosed CD/DVD
Please note in particular the safety instructions of those documents!
HINWEIS
Cover the AVL DiTEST MDS DRIVE while cleaning the area or if there is a great amount of dust and
dirt in the workshop!
Be especially careful with the display!
Touch the display only with your finger or the stylus!
Do not use any sharp pointed object!
Disposal:
When disposing of this system, you must comply with your local legal requirements!
User Manual 11AVL DiTEST MDS 188
1.2 Setup
Top view:
1
2
3
4
5
6
7
8
9
10
11
12
Fig. 1-1
1 Camera Camera with indicator lamp and sensors
See reference manual
2 Light sensor Measures the surrounding light to automatically adjust
the display brightness
3 On/off indicator Illuminated in blue when device is on
Blinking in blue when the device is in idle mode
4 Battery charge indicator
Illuminated in green:
Illuminated in yellow: Battery is fully charged
Blinking in red (once per second): Battery is being charged
Blinking fast in red Battery capacity below 10%
(Once every half second): Problem with the overheating protection.
Blinking in yellow: Device needs servicing
Problem with charging the battery:
Battery must be replaced.
5 WIFI / Bluetooth indicator
LED illuminated in blue: WIFI and / or Bluetooth turned on.
6 Mains switch Used to turn the device on and off.
7 Additional button Starts the Getac camera software, serves as shutter
button.
See reference manual
8 P1 button Opens the “setup” menu
9 Volume up button Increases the volume
10 Volume down button Reduced the volume
11 Microphone See reference manual
12 Windows Key Opens the Windows start menu
12 User ManualAVL DiTEST MDS 188
Underside:
English
1 2 3
Fig. 1-2
1 Cover for power supply connector To connect power supply, lift tab
2 Docking station connectors Is not being used on AVL DiTEST MDS DRIVE
3 Theft protection (Kensington lock)
Top side:
1 2
Fig. 1-3
1 USB 2.0 socket cover To open pull on tab
2 Ventilation slits Must not be covered during operation!
User Manual 13AVL DiTEST MDS 188
Left side:
1
Fig. 1-2
1 Various connector covers See chapter “rear side”
Right side:
1
Fig. 1-2
1 Hole To insert the stylus pen, includes attachment strap
2 Stylus pen See chapter “back side”
14 User ManualAVL DiTEST MDS 188
Rear Side
1 2 3 4
English
5
9
6
8
7
Fig. 1-2
1 Camera control lamp See reference manual
2 Camera flash See reference manual
3 Camera See reference manual
4 USB 2.0 socket cover See chapter “top side”
5 Ventilation slits Must not be covered during operation
6 USB 3.0, HDMI, See reference manual
and microphone/headphone cover
7 Speaker See reference manual
8 Stylus pen Can be operated using your finger or a stylus pen
9 Cover for the two batteries To remove the batteries, push on the three tabs as
illustrated (red arrows) and lift cover off in the center
of the device. Remove batteries.
1.3 Operation
The device is mainly operated via touch screen using the provided stylus or ones finger. Additional
input can be performed by using the appropriate control buttons. (See chapter 1.2).
Fig. 1-6
User Manual 15AVL DiTEST MDS 188
1.3.1 Input using the virtual keyboard
You can turn the virtual keyboard (2) on and off by tapping (bottom right).
Entries executed with the virtual keyboard (2) are applied in the input field (1).
By leaving the input field or by tapping on (3) the virtual keyboard is removed.
(1)
(2) (3)
Neues
Tastaur-foto
Fig. 1-7
16 User ManualAVL DiTEST MDS 188
2 Initial Start-up
2.1 Hardware
2.1.1 Charging the battery / Power supply operation
English
Open the cover (1).
Connect the power supply cord to the socket and insert the power plug into the power outlet.
For the charge state of the battery please note the LED , description see page 1-2.
(1)
Fig. 2-1
2.1.2 Switching-on
Switch on the AVL DiTEST MDS DRIVE with the key on/off.
Shortly after switching-on the unit the user interface appears.
Fig. 2-2
User Manual 17AVL DiTEST MDS 188
AVL DiTEST XDS 1000 start:
Two short taps start the AVL DiTEST XDS 1000.
AVL XDS 1000
Information
Please note the following documents as well:
■ Operating Manual AVL DiTEST VCI 1000, ID No.: AT7706
■ User Manual AVL DiTEST XDS 1000, ID No.: AT7669E
AVL DiTEST XDS 1000 update and activation:
Please refer to the document AVL DiTEST XDS 1000 user manual.
AVL DiTEST VCI 1000 firmware update:
If your AVL DiTEST VCI 1000 does not have the latest firmware, a corresponding message is
displayed during the activation. Follow the instructions on the screen. Please observe also the user
manual AVL DiTEST XDS 1000, chapter 1.8.2 "Scan tool".
Documents:
Opens the selection view with all available document.
With two short taps using stylus/finger on an icon that document is displayed.
AVL XDS 1000
Documents
Reference Manual:
Opens the reference manual.
Reference
Manual
Software
Please refer to the XDS 1000 manual, AVL DiTEST Ident number AT7669,
chapter 1.3 Installation and Update.
18 User ManualAVL DiTEST MDS 188
3 Warranty
3.1 New devices
The warranty for new units is a minimum 12 month warranty, subject to the agreements with your
supplier.
English
The warranty does not cover parts subject to wear and accessories.
The warranty is valid from the date of the delivery note to the final customer.
The warranty is not applicable in the following cases:
■ Mechanical damage (e.g. through dropping, etc.)
■ Damage due to liquids (e.g. water, oil, acids, etc.)
■ External intervention (e.g. repairs carried out by non-authorised personnel)
■ Improper use (e.g. cleaning with compressed air)
■ Usage of spare parts other than those supplied by AVL DITEST.
3.2 Exchange or Loaner Units
The agreements with your supplier apply.
The warranty is valid from the date of the delivery note to the final customer.
3.3 In Case of Damage
In the event of a claim, please contact your corresponding AVL DiTEST office / the corresponding
AVL DiTEST partner in your country.
Please note our general terms and conditions on our website: www.avlditest.com.
User Manual 19AVL DiTEST MDS 188
4 Accessory
4.1 AVL DiTEST MDS 188
Accessory:
Component Order Number
12-32V DC vehicle adapter
GE7572
GAD4L1
Docking station (EU), (including AC adapter) GDOFE5 GY7526
See reference manual
Removable folding keyboard GDKPK1 GE7574
Hand strap GMHRX4 GY7527
Spare parts:
Component Order Number
AC power supply unit (EU) GAA6E4 GE7571
GE7573
Battery GBM3X2
Stylus pen GMPDX1 GE7575
Display protection film GMPFX9
GE7576
20 User ManualAVL DiTEST MDS 188
1 Généralités
1.1 Présentation générale
AVL DITEST MDS DRIVE est un système de diagnostic modulaire à utilisation mobile.
Il s’agit d’une tablette tactile robuste, qui est conçue pour les environnements d’atelier et présente
les caractéristiques suivantes :
■ Ecran à LCD HD 11,6” conçu également pour les utilisations en extérieur
■ Ecran tactile résistif avec saisies par effleurement avec le doigt ou un stylet
■ Interface utilisateur spécifique, simplifiant l’utilisation à l’extrême
■ Produit étanche à l’eau et à la poussière, et antichocs
■ Disque dur antichocs
■ Batterie performante, assurant une autonomie d’environ 12 heures
Français
■ Livrée avec mallette de transport résistante intégrant des rangements pour des accessoires
■ Communication sans fil via Bluetooth ou par câble USB avec l’outil VCI/Scantool
Information
Veuillez vous reporter systématiquement aux documents suivants :
■ Consignes de sécurité, Réf. : AT7673
■ Manuel d’utilisation d’outil AVL DiTEST VCI 1000, Réf. : AT7706
■ Manuel d’utilisation de logiciel AVL DiTEST XDS 1000, Réf. : AT7669F
■ Manuel de référence, voir page 2-2
■ Manuel disponible sur les CD/DVD fournis
Faites particulièrement attention à respecter les consignes de sécurité dans les documents !
REMARQUE
Lors de travaux de nettoyage ou dans les environnements d’atelier très poussiéreux ou sales,
veuillez protéger l’AVL DiTEST MDS DRIVE !
Soyez particulièrement soigneux lors de l’utilisation de l’écran !
Effleurez uniquement l’écran avec le doigt ou le stylet pour les fonctions tactiles !
N’utilisez en aucun cas des objets pointus !
Élimination :
Les obligations légales locales doivent être absolument respectées lors de l’élimination.
Manuel d’utilisation 21AVL DiTEST MDS 188
1.2 Présentation de l’équipement
Vue de dessus :
1
2
3
4
5
6
7
8
9
10
11
12
Fig. 1-1
1 Caméra Caméra avec témoin lumineux et capteurs
Voir le manuel de référence
2 Capteur lumineux Mesure la lumière de l’environnement pour adapter
automatiquement l’éclairage de l’écran
3 Affichage Marche/Arrêt Est allumé en bleu lorsque l’appareil est allumé
Clignote en bleu lorsque l’appareil se trouve en veille
4 Affichage de l’état de chargement
des batteries
S’allume en vert : La batterie est chargée entièrement
S’allume en jaune : La batterie est en cours de chargement
Clignote en rouge (1 fois par La capacité de la batterie est inférieure à 10 %
seconde) : Il y a un problème avec la protection anti-surchauffe.
Clignote rapidement en rouge L’appareil doit faire l’objet d’une maintenance
(1 fois par 0,5 secondes) : Il y a un problème lors du chargement de la batterie :
Clignote en jaune : La batterie doit être changée.
5 Affichage WLAN / Bluetooth
La DEL s’allume en bleu : WLAN et / ou Bluetooth est allumé.
6 Commutateur principal Allume ou éteint l’appareil.
7 Touche supplémentaire Démarre le logiciel de caméra Getac, sert de
déclencheur.
Voir le manuel de référence
8 Touche P1 Ouvre le menu « Réglages »
9 Touche Plus de volume du son Augmente le volume du son
10 Touche Moins de volume du son Diminue le volume du son
11 Microphone Voir le manuel de référence
12 Touche Windows Ouvre le menu de démarrage Windows
22 Manuel d’utilisationAVL DiTEST MDS 188
Côté inférieur :
1 2 3
Fig. 1-2
Français
1 Cache de la prise électrique Soulever la languette pour raccorder l’alimentation
électrique
2 Raccords de la station d’accueil N’est pas utilisée pour AVL DITEST MDS DRIVE
3 Antivol (Kensington-Lock)
Côté supérieur :
1 2
Fig. 1-3
1 Cache de la prise USB 2.0 Tirer la languette vers l’avant pour ouvrir
2 Fentes de ventilation Ne pas recouvrir pendant le fonctionnement !
Manuel d’utilisation 23AVL DiTEST MDS 188
Côté gauche :
1
Fig. 1-2
1 Cache de divers raccords Voir la partie « Côté arrière »
Côté droit :
1
Fig. 1-2
1 Trou Pour fixer le stylet (stylus/touchpen) avec une bande de
serrage
2 Stylet (stylus/touchpen) Voir la partie « Côté arrière »
24 Manuel d’utilisationAVL DiTEST MDS 188
Côté arrière :
1 2 3 4
5
9
6
Français
8
7
Fig. 1-2
1 Témoin pour caméra Voir le manuel de référence
2 Flash pour caméra Voir le manuel de référence
3 Caméra Voir le manuel de référence
4 Cache de la prise USB 2.0 Voir la partie « Côté supérieur »
5 Fentes de ventilation Ne pas recouvrir pendant le fonctionnement
6 Cache de la prise USB 3.0, HDMI et Voir le manuel de référence
du microphone/des écouteurs
7 Haut-parleur Voir le manuel de référence
8 Stylet (stylus/touchpen) Commande possible avec le doigt ou un stylet
9 Cache des deux batteries Déplacer les trois languettes, tel que représenté
(flèches rouges), et soulever le cache au centre de
l’appareil pour enlever les batteries. Enlever les
batteries.
1.3 Utilisation
L’utilisation de l’équipement se déroule essentiellement par voie tactile, en effleurant l’écran avec le
doigt ou au moyen du stylet fourni. D’autres saisies sont possibles avec les touches de fonction
correspondantes. (Voir la section 1.2.)
Fig. 1-6
Manuel d’utilisation 25AVL DiTEST MDS 188
1.3.1 Saisies avec le clavier virtuel
Le clavier virtuel (2) peut être allumé/éteint en appuyant sur (en bas à droite).
Les saisies réalisées avec le clavier virtuel (2) sont reprises dans la zone de saisie (1).
La sortie de la zone de saisie ou l’effleurement de la case (3) masque le clavier virtuel.
(1)
(2) (3)
Neues
Tastaur-foto
Fig. 1-7
26 Manuel d’utilisationAVL DiTEST MDS 188
2 Mise en service
2.1 Matériel
2.1.1 Mise en charge de la batterie/Fonctionnement sur le secteur
Ouvrez le cache (1).
Branchez le câble d’alimentation sur la fiche et l’autre extrémité sur la prise secteur.
Pour connaître l’état de charge de la batterie, faites attention à la DEL . Pour une description,
voir page 1-2.
(1)
Français
Fig. 2-1
2.1.2 Mise en marche
Mettez en marche/arrêtez la tablette AVL DiTEST MDS DRIVE avec la touche .
Après la mise en marche, l’interface utilisateur s’affiche au bout de quelques instants :
Fig. 2-2
Manuel d’utilisation 27AVL DiTEST MDS 188
Lancement du logiciel AVL DiTEST XDS 1000 :
Effleurez deux fois rapidement l’icône pour démarrer le logiciel AVL DiTEST XDS 1000.
AVL XDS 1000
Information
Veuillez également vous reporter aux documents suivants :
■ Manuel d’utilisation d’outil AVL DiTEST VCI 1000, Réf. : AT7706
■ Manuel d’utilisation de logiciel AVL DiTEST XDS 1000, Réf. : AT7669FR
Mise à jour et activation du logiciel AVL DiTEST XDS 1000 :
Veuillez vous référer au document Manuel AVL DiTEST XDS 1000.
Mise à jour du firmware d’outil AVL DiTEST VCI 1000 :
Si votre outil AVL DiTEST VCI 1000 ne dispose pas du dernier firmware, un message
correspondant s’affiche pendant l’activation. Suivez les instructions affichées sur l’écran. A cet
égard, respectez les consignes du manuel utilisateur AVL DiTEST XDS 1000, section 1.8.2
« Scantool ».
Documents :
Ouvre la fenêtre de sélection de tous les documents disponibles.
Un double effleurement bref avec le stylet/doigt sur un document permet d’ouvrir ce
dernier.
AVL XDS 1000
Dokumente
Manuel de référence :
Ouvre le manuel de référence.
Reference
Manual
Logiciel
Veuillez vous reporter au manuel XDS 1000, numéro d'identification AVL DiTEST AT7669,
chapitre 1.3 Installation et mise à jour.
28 Manuel d’utilisationAVL DiTEST MDS 188
3 Garantie
3.1 Appareils neufs
La durée de garantie pour les appareils neufs est de 12 mois.
Les accords avec votre fournisseur s’appliquent.
Les pièces d’usure et les accessoires ne sont pas compris dans la garantie.
La date du bordereau de livraison au client final constitue la référence pour la période de garantie.
La garantie ne s’applique pas dans les cas suivants :
■ endommagement mécanique (par exemple choc, etc.)
■ endommagements par liquide (par exemple eau, huile, acides, etc.)
■ interventions extérieures (par exemple tentatives de réparation par des personnes non
habilitées)
Français
■ mauvaise manipulation (par exemple nettoyage avec de l’air comprimé)
3.2 Appareils de remplacement
Les accords avec votre fournisseur s’appliquent.
La date du bordereau de livraison au client final constitue la référence pour la période de garantie.
3.3 En cas de dommage
En cas de dommages, se référer à la succursale AVL DiTEST correspondante ou au représentant
AVL DiTEST correspondant dans votre pays.
Respectez également nos CGV sur notre site Internet : www.avlditest.com.
Manuel d’utilisation 29AVL DiTEST MDS 188
4 Etendue de la livraison
4.1 AVL DiTEST MDS 188
Accessoires :
Composant Référence
Adaptateur de véhicule 12-32 V CC
GE7572
GAD4L1
Station d’accueil (EU), (avec adaptateur CA) GDOFE5
GY7526
Voir le manuel de référence
Clavier souple amovible GDKPK1 GE7574
Dragonne GMHRX4 GY7527
Pièces de rechange :
Composant Référence
Bloc d’alimentation CA (EU) GAA6E4 GE7571
GE7573
Batterie GBM3X2
Stylet Stylus GMPDX1 GE7575
Feuille de protection d’écran GMPFX9 GE7576
30 Manuel d’utilisationAVL DiTEST MDS 188
1 Generalidades
1.1 Descripción general
El AVL DITEST MDS DRIVE es un sistema de diagnóstico modular de uso móvil.
Se trata de un robusto tablet PC apto para taller con las siguientes características:
■ Display LCD HD de 11,6” en formato de imagen ancho para uso también en exteriores
■ Pantalla táctil resistiva con introducción por lápiz o táctil
■ Manejo extremadamente sencillo gracias a la interfaz de usuario especial
■ A prueba de salpicaduras de agua, polvo y golpes
■ Disco duro a prueba de golpes
■ Potente batería, tiempo de servicio de aprox. 12 horas
■ Incluye estable maletín para el transporte con compartimentos guarda objetos integrados
para más accesorios
■ Comunicación con el VCI/Scantool inalámbrico por Bluetooth o por cable USB
Información
Español
Observe además siempre los documentos siguientes:
■ Indicaciones de seguridad, n.º de ID: AT7673
■ Manual de usuario AVL DiTEST VCI 1000, n.º de ID: AT7706
■ Manual del usuario de AVL DiTEST XDS 1000, n.º de ID: AT7669ES
■ Reference Manual, véase página 2-2
■ Manual en el CD/DVD suministrado
Observe especialmente las indicaciones de seguridad de los documentos.
INDICACIONES
Durante los trabajos de limpieza, o si hay gran cantidad de polvo o suciedad en el taller, cubrir el
AVL DiTEST MDS DRIVE.
Tratar la pantalla con especial cuidado.
Utilizar solamente el dedo o el lápiz táctil para tocar la pantalla.
No utilizar objetos afilados.
Eliminación:
¡Para la eliminación deberán cumplirse las obligaciones legales localmente establecidas!
Manual de usuario 31AVL DiTEST MDS 188
1.2 Estructura
Vista superior:
1
2
3
4
5
6
7
8
9
10
11
12
Illustr. 1-1
1 Cámara Cámara con indicador luminoso y sensores
Véase manual de referencia
2 Sensor de luz Mide la luz del entorno para realizar el ajuste automático
de la iluminación de la pantalla
3 Indicador encendido/apagado Encendido en azul cuando el dispositivo esté encendido
Parpadea en azul cuando el dispositivo está en reposo
4 Indicador del nivel de carga de los
acumuladores
Encendido en verde: El acumulador está completamente cargado
Encendido en azul: El acumulador se está cargando
Parpadea en rojo (una vez por La capacidad del acumulador es inferior al 10 %
segundo): Hay un problema con el protector térmico.
Parpadea rápidamente en rojo El dispositivo debe llevarse al Servicio de Asistencia
(1 vez cada 0,5 segundos): Técnica
Parpadea en amarillo: Hay un problema con la carga del acumulador:
Hay que cambiar el acumulador.
5 Indicador WLAN / Bluetooth
LED encendido en azul: El WLAN y/o el Bluetooth están encendidos.
6 Interruptor de red Enciende o apaga el dispositivo.
7 Tecla adicional Activa el software Getac de la cámara, actúa como
disparador.
Véase manual de referencia
8 Interruptor P1 Abre el menú «Ajustes»
9 Interruptor Aumentar volumen Aumenta el volumen
10 Interruptor Disminuir volumen Reduce el volumen
11 Micrófono Véase manual de referencia
12 Tecla de Windows Abre el menú de inicio de Windows
32 Manual de usuarioAVL DiTEST MDS 188
Parte inferior:
1 2 3
Illustr. 1-2
1 1 Cubierta del enchufe de alimentación
2 2 Conexiones del replicador de puertos
3 3 Protección antirrobo (conector de seguridad Kensington)
Parte superior:
Español
1 2
Illustr. 1-3
1 Cubierta del conector USB 2.0 Para abrirlo, tirar de la lengüeta hacia delante
2 Ranuras de ventilación ¡No cubrir en funcionamiento!
Manual de usuario 33AVL DiTEST MDS 188
Lado izquierdo:
1
Illustr. 1-2
1 Cubierta de diversas conexiones Véase apartado «Parte posterior»
Lado derecho:
1
Illustr. 1-2
1 Orificio Para fijar el puntero (lápiz táctil Stylus) con cordón de
sujeción
2 Puntero (lápiz táctil Stylus) Véase apartado «Parte posterior»
34 Manual de usuarioAVL DiTEST MDS 188
Parte posterior:
1 2 3 4
5
9
6
8
7
Español
Illustr. 1-2
1 Testigo para cámara Véase manual de referencia
2 Flash para cámara Véase manual de referencia
3 Cámara Véase manual de referencia
4 Cubierta del conector USB 2.0 Véase apartado «Parte superior»
5 Ranuras de ventilación No cubrir en funcionamiento
6 Cubierta de los conectores USB 3.0, Véase manual de referencia
HDMI,
y de micrófono y auriculares
7 Altavoz Véase manual de referencia
8 Puntero (lápiz táctil Stylus) Puede manejarse con el dedo o el Stylus
9 Cubierta de ambos acumuladores Para retirar los acumuladores, empujar las tres
lengüetas tal y como se indica (flecha roja) y levantar
la cubierta central del dispositivo. Retirar los
acumuladores.
1.3 Manejo
El dispositivo se maneja básicamente tocando la pantalla (indicador) con el lápiz táctil suministrado
o con el dedo. Realice otras entradas con las correspondientes teclas de mando. (Véase el capítulo
1.2).
Fig. 1-6
Manual de usuario 35AVL DiTEST MDS 188
1.3.1 Entradas mediante el teclado virtual
El teclado virtual (2) puede activarse y desactivarse pulsando sobre (parte inferior derecha).
Los datos introducidos mediante el teclado virtual (2) se incorporan en el campo de entrada de
datos (1).
Al salir del campo de entrada de datos o al tocar (3) se oculta el teclado virtual.
(1)
(2) (3)
Neues
Tastaur-foto
Fig. 1-7
36 Manual de usuarioAVL DiTEST MDS 188
2 Puesta en funcionamiento
2.1 Hardware
2.1.1 Carga del dispositivo / funcionamiento de red
Abra la cubierta (1).
Conecte el cable de la alimentación de corriente al casquillo y enchufe el conector de alimentación
a la toma de red.
Para conocer el estado de carga de la batería observe el LED , descripción en la página 1-2.
(1)
Fig. 2-1
Español
2.1.2 Conexión
El AVL DiTEST MDS DRIVE se enciende y se apaga mediante la tecla .
Poco después de encender el dispositivo aparece la interfaz de usuario:
Fig. 2-2
Manual de usuario 37AVL DiTEST MDS 188
Iniciar AVL DiTEST XDS 1000:
Con 2 toques breves se inicia AVL DiTEST XDS 1000.
AVL XDS 1000
Información
Observe además los siguientes documentos:
■ Manual de usuario AVL DiTEST VCI 1000, n.º de ID: AT7706
■ Manual del usuario de AVL DiTEST XDS 1000, n.º de ID: AT7669ES
Actualización y Desbloqueo AVL DiTEST XDS 1000:
Consulte el documento AVL DiTEST XDS 1000 manual.
Actualización del firmware del AVL DiTEST VCI 1000:
En el caso de que su AVL DiTEST VCI 1000 no disponga del firmware actual, se muestra la
indicación correspondiente durante la habilitación. Siga las instrucciones que aparecen en la
pantalla. También observe para ello el manual del usuario AVL DiTEST XDS 1000, capítulo 1.8.2
“Scantool”.
Documentos:
Abre la vista de selección con todos los documentos disponibles.
Al pulsar brevemente dos veces con el lápiz táctil o el dedo sobre un documento, se
mostrará dicho documento.
AVL XDS 1000
Documentos
del
Reference Manual:
Abre el Reference Manual.
Reference
Manual
Software
Consulte el manual de XDS 1000, AVL DiTEST Ident número AT7669,
capítulo 1.3 Instalación y actualización.
38 Manual de usuarioAVL DiTEST MDS 188
3 Garantía
3.1 Equipos nuevos
Se concede una garantía de 12 meses para los nuevos equipos.
Regirán las estipulaciones contractuales con el suministrador responsable.
Se excluirán de la garantía los componentes de desgaste y los accesorios.
El periodo de garantía comienza a partir de la fecha de entrega en las instalaciones del cliente final.
El derecho a garantía quedará nulo en los siguientes casos:
■ Daños mecánicos (caída, etc.)
■ Daños provocados por contacto con líquidos (agua, ácidos, aceite, etc.)
■ Manipulaciones no autorizadas (por ejemplo, reparaciones por personal no autorizado)
■ Manejo indebido (por ejemplo, limpieza con aire a presión)
3.2 Equipos de cambio o alquiler
Regirán las estipulaciones contractuales con el suministrador responsable.
El periodo de garantía comienza a partir de la fecha de entrega en las instalaciones del cliente final.
Español
3.3 Daños
En el caso de daños, diríjase a la delegación de AVL DiTEST correspondiente / al distribuidor de
AVL DiTEST en su país.
Tenga igualmente presentes nuestros Términos y Condiciones de Servicio tal y como figuran en
nuestro sitio web: www.avlditest.com.
Manual de usuario 39AVL DiTEST MDS 188
4 Alcance del suministro
4.1 AVL DiTEST MDS 188
Accesorios:
Pieza Número de pedido
Adaptador para vehículo 12-32V DC
GE7572
GAD4L1
Replicador de puertos (UE), (con adaptador CA) GDOFE5 GY7526
Véase manual de referencia
Teclado plegable extraíble GDKPK1 GE7574
Asidero GMHRX4 GY7527
Piezas de repuesto:
Pieza Número de pedido
Fuente de alimentación CA (UE) GAA6E4 GE7571
GE7573
Acumulador GBM3X2
Puntero Stylus GMPDX1 GE7575
Lámina protectora para pantalla GMPFX9 GE7576
40 Manual de usuarioAVL DiTEST MDS 188 a
1 Informazioni generali
1.1 Descrizione generale
AVL DITEST MDS DRIVE è un sistema di diagnosi modulare per impiego mobile.
Si tratta di un Tablet PC resistente, adatto per l’officina, avente le seguenti caratteristiche:
■ Display a LCD HD da 11,6” nel formato widescreen anche per uso esterno
■ Touchscreen resistente con penna o input tocco
■ Utilizzo più semplice grazie allo speciale pannello
■ Protetto contro spruzzi d’acqua, polvere e urti
■ Disco fisso protetto dagli urti
■ Batteria più efficiente, durata di circa 12 ore
■ Incl. valigetta per il trasporto resistente con vani portaoggetti integrati per altri accessori
■ Comunicazione wireless con il VCI/Scantool tramite Bluetooth o cavo USB
Informazione
Prestare sempre attenzione anche ai seguenti documenti:
■ Avvertenze di sicurezza, n. ID.: AT7673
■ Manuale dispositivo AVL DiTEST VCI 1000, n. ID.: AT7706
■ Manuale per l’utente AVL DiTEST XDS 1000, n. ID.: AT7669I
■ Reference Manual, vedere pagina 2-2
■ Manuale su CD/DVD in dotazione
Prestare attenzione in particolare alle Avvertenze di sicurezza riportate nei documenti!
Italiano
AVVERTENZA
In caso di interventi di pulizia, polvere eccessiva o forte imbrattamento nell’officina, coprire
l’AVL DiTEST MDS DRIVE!
Maneggiare il display con la massima attenzione!
Toccare il display solo con il dito o l’apposita penna!
Non utilizzare oggetti appuntiti!
Smaltimento:
Per lo smaltimento è obbligatorio adempiere agli obblighi previsti dalla normativa locale!
Manuale apparecchio 41AVL DiTEST MDS 188
1.2 Struttura
Vista dall'alto:
1
2
3
4
5
6
7
8
9
10
11
12
Fig. 1-1
1 Telecamera Telecamera con luci di segnalazione e sensori
Vedere manuale di riferimento
2 Sensore luminoso Misura la luce dell’ambiente circostante per l'adattamento
automatico dell’illuminazione display
3 Visualizzazione on/off È blu, quando l'apparecchio è accesso
Lampeggia di colore blu, quando l'apparecchio è in
modalità di sospensione
4 Visualizzazione stato carico della
batteria
È verde: La batteria è ricaricata
È gialla: La batteria è in carica
Lampeggia di colore rosso (1 volta Capacità batteria inferiore al 10%
al secondo): Si è verificato un problema con la protezione da
Lampeggia in modo rapido di surriscaldamento.
colore rosso L'apparecchio deve essere portato al centro assistenza
(1 volta ogni 0,5 secondi): Si è verificato un problema durante la ricarica della
Lampeggia di colore giallo: batteria:
La batteria deve essere sostituita.
5 Visualizzazione WLAN / Bluetooth
LED è blu: WLAN e/o Bluetooth accesi.
6 Interruttore di rete Accende o spegne l'apparecchio.
7 Tasto aggiuntivo Avvia il software telecamera Getac, funge da dispositivo
di scatto
Vedere manuale di riferimento
8 Tasto P1 Apre il menu “impostazioni”
9 Tasto aumento volume Aumenta il volume
10 Tasto abbassamento volume Abbassa il volume
11 Microfono Vedere manuale di riferimento
12 Tasto Windows Apre il menu di avvio Windows
42 Manuale ApparecchioAVL DiTEST MDS 188 a
Lato inferiore:
1 2 3
Fig. 1-2
1 Coperchio della presa Per collegare l'alimentazione sollevare la linguetta
d’alimentazione
2 Collegamenti della docking station Non vengono utilizzati per AVL DITEST MDS DRIVE
3 Antifurto (Kensington Lock)
Lato superiore:
Italiano
1 2
Fig. 1-3
1 Coperchio della presa USB 2.0 Per aprire tirare la linguetta in avanti
2 Fessura di ventilazione Non coprire quando l’apparecchio è in uso!
Manuale apparecchio 43AVL DiTEST MDS 188
Lato sinistro:
1
Fig. 1-2
1 Copertura di svariati collegamenti Vedere sezione “lato posteriore”
Lato destro:
1
Fig. 1-2
1 Foro Per fissare il pennino (stilo/touchpen) con fettuccia di
fissaggio
2 Pennino (stilo/touchpen) Vedere sezione “lato posteriore”
44 Manuale ApparecchioAVL DiTEST MDS 188 a
Lato posteriore:
1 2 3 4
5
9
6
8
7
Fig. 1-2
1 Spia di controllo per telecamera Vedere manuale di riferimento
2 Flash per telecamera Vedere manuale di riferimento
3 Telecamera Vedere manuale di riferimento
Italiano
4 Coperchio della presa USB 2.0 Vedere sezione “lato superiore”
5 Fessura di ventilazione Non coprire quando in funzione
6 Coperchio della presa USB 3.0, HDMI Vedere manuale di riferimento
e microfono/cuffie
7 Altoparlanti Vedere manuale di riferimento
8 Pennino (stilo/touchpen) Possibile utilizzo con stilo o dita
9 Coperchio delle due batterie Per rimuovere le batterie spingere le linguette come
raffigurato (frecce rosse) e sollevare la copertura al
centro dell'apparecchio verso l'alto. Rimuovere le
batterie.
1.3 Comando
Il dispositivo si comanda principalmente toccando lo schermo (display) con la penna in dotazione o
con il dito. Per effettuare le altre immissioni occorre utilizzare i tasti di comando corrispondenti.
(Vedere Cap. 1.2).
Fig. 1-6
Manuale apparecchio 45AVL DiTEST MDS 188
1.3.1 Immissioni con la tastiera virtuale
La tastiera virtuale (2) può essere disattivata/attivata premendo su (in basso a destra).
Le immissioni effettuate con la tastiera virtuale (2) vengono caricate nel campo di immissione (1).
Abbandonando il campo di immissione o toccando il tasto (3) la tastiera virtuale scompare.
(1)
(2) (3)
Neues
Tastaur-foto
Fig. 1-7
46 Manuale ApparecchioAVL DiTEST MDS 188 a
2 Messa in funzioni
2.1 Hardware
2.1.1 Carica della batteria/alimentazione da rete
Aprire la copertura (1).
Collegare il cavo dell’alimentazione di corrente alla porta ed inserire la spina nella presa.
Per lo stato di carica della batteria prestare attenzione ai LED , per la descrizione vedere
pagina 1-2.
(1)
Fig. 2-1
2.1.2 Accensione
Inserire/disinserire l’AVL DiTEST MDS DRIVE con il tasto .
Italiano
Una volta inserito, dopo un breve lasso di tempo viene visualizzato il pannello di controllo:
Fig. 2-2
Manuale apparecchio 47AVL DiTEST MDS 188
Avvio dell’AVL DiTEST XDS 1000:
toccandolo due volte brevemente si avvia l’AVL DiTEST XDS 1000.
AVL XDS 1000
Informazione
Prestare inoltre attenzione anche ai seguenti documenti:
■ Manuale dispositivo AVL DiTEST VCI 1000, n. ID.: AT7706
■ Manuale per l’utente AVL DiTEST XDS 1000, n. ID.: AT7669I
Aggiorna e abilitazione AVL DiTEST XDS 1000:
Fare riferimento al manuale AVL DiTEST XDS 1000.
Aggiornamento firmware AVL DiTEST VCI 1000
Se l’AVL DiTEST VCI 1000 non dispone del firmware aggiornato viene visualizzato un messaggio
di avvertenza corrispondente durante l’abilitazione. Seguire le istruzioni a video. A tal fine prestare
attenzione al manuale per l’utente dell’AVL DiTEST XDS 1000, Cap. 1.8.2 “Scantool”.
Documenti:
Si apre la schermata di selezione con tutti i documenti disponibili.
Toccando brevemente per due volte con la penna/il dito un documento, questo viene
visualizzato.
AVL XDS 1000
Documenti
Reference Manual:
Si apre il Reference Manual.
Reference
Manual
Software
Fare riferimento al manuale XDS 1000, numero di identificazione AVL DiTEST AT7669,
capitolo 1.3 Installazione e aggiornamento.
48 Manuale ApparecchioAVL DiTEST MDS 188 a
3 Garanzia
3.1 Apparecchi nuovi
I prodotti nuovi sono garantiti per un periodo di 12 mesi.
Trovano applicazione gli accordi con il fornitore.
La garanzia non copre le parti soggette ad usura e gli accessori.
Fa fede la data della bolla di consegna al cliente finale.
La garanzia non copre:
■ danni di natura meccanica (ad es. caduta ecc.)
■ danni causati da liquidi (ad es. acqua, olio, acidi ecc.)
■ interventi esterni (ad es. tentativi di riparazione ad opera di personale non autorizzato)
■ uso improprio (ad es. pulizia con aria compressa)
3.2 Apparecchi sostitutivi o in comodato d’uso
Trovano applicazione gli accordi con il fornitore.
Fa fede la data della bolla di consegna al cliente finale.
3.3 Danni
In una tale evenienza, rivolgersi alla filiale AVL DiTEST / al partner AVL DiTEST della propria zona.
Italiano
Vi preghiamo di tenere conto anche delle nostre condizioni commerciali al sito: www.avlditest.com.
Manuale apparecchio 49AVL DiTEST MDS 188
4 Portata della fornitura
4.1 AVL DiTEST MDS 188
Accessori:
Componente Numero categorico
Adattatore veicolo 12-32V DC
GE7572
GAD4L1
Docking station (EU), (con adattatore AC) GDOFE5
GY7526
Vedere manuale di riferimento
Tastiera pieghevole rimovibile GDKPK1 GE7574
Cinghia da polso GMHRX4 GY7527
Ricambi:
Componente Numero categorico
Alimentatore AC (EU) GAA6E4 GE7571
GE7573
Batteria GBM3X2
Pennino stilo GMPDX1 GE7575
Pellicola protettiva display GMPFX9 GE7576
50 Manuale ApparecchioAVL DiTEST MDS 188
1 Algemeen
1.1 Algemene beschrijving
De AVL DITEST MDS DRIVE is een modulair diagnosesysteem voor mobiel gebruik.
Het is een robuuste, voor de werkplaats geschikte tablet-pc met de volgende kenmerken:
■ 11,6” HD LCD-display in breedbeeldformaat ook voor gebruik buiten
■ resistive touchscreen met stift- of vingerinvoer
■ eenvoudigste bediening door speciale bedienoppervlak
■ tegen spatwater, stof en stoten beschermd
■ tegen stoten beschermde harde schijf
■ vermogensterke accu met circa 12 uren bedrijfstijd
■ inclusief stabiele transportkoffer met geïntegreerde opbergvakken voor verdere toebehoren
■ communicatie met VCI/Scantool draadloos via Bluetooth of via USB-kabel.
Informatie
Let u ook steeds op de volgende documenten:
■ Veiligheidsaanwijzingen, ID-Nr.: AT7673
■ Apparatuurhandboek AVL DiTEST VCI 1000, ID-Nr.: AT7706
■ Gebruikershandboek AVL DiTEST XDS 1000, ID-Nr.: AT7669NL
■ Referentiehandboek, zie pagina 2-2
■ Handboek op de bijgeleverde cd/dvd
Volgt u in het bijzonder de Veiligheidsaanwijzingen op in de documenten!
AANWIJZING
Bij reinigingswerkzaamheden, veel stof of vuil in de werkplaats de AVL DiTEST MDS DRIVE
afdekken!
Nederlands
Bijzonder zorgvuldig met de display omgaan!
Alleen met de vinger of de bedienstift op de display tippen!
Geen puntige voorwerpen gebruiken!
Afvalverwijdering:
bij de afvalbehandeling moeten de lokale wettelijke voorschriften bindend worden nageleefd!
Gebruikershandboek 51AVL DiTEST MDS 188
1.2 Opbouw
Bovenaanzicht:
1
2
3
4
5
6
7
8
9
10
11
12
Afb. 1-1
1 Camera Camera met signalering en sensoren
Zie referentiehandboek
2 Lichtsensor Meet het omgevingslicht voor automatische aanpassing
van de displayverlichting
3 Weergave aan/uit Brandt blauw wanneer het apparaat ingeschakeld is
Knippert blauw wanneer het apparaat stand-by is
4 Weergave van de acculading
Brandt groen:
Brandt geel: accu is volledig opgeladen
Knippert rood (1x per seconde): accu wordt opgeladen
Knippert snel rood acculading minder dan 10%
(1x per 0,5 seconde): Er bestaat een probleem met de
Knippert geel: oververhittingsbeveiliging.
Apparaat heeft service nodig
Er bestaat een probleem bij het opladen van de accu:
accu moet worden vervangen.
5 Weergave WiFi / Bluetooth
Led brandt blauw: WiFi en /of Bluetooth ingeschakeld.
6 Hoofdschakelaar Schakelt apparaat in of uit
7 Extra toets Start de Getac-camerasoftware, fungeert als
vrijschakeling.
Zie referentiehandboek
8 P1-toets Roept menu "Instellingen" op
9 Volume-plus-toets Verhoogt het volume
10 Volume-min-toets Verlaagt het volume
11 Microfoon Zie referentiehandboek
12 Windows-toets Roept het Windows-startmenu op
52 GebruikershandboekAVL DiTEST MDS 188
Onderzijde:
1 2 3
Afb. 1-2
1 Afdekking van de voedingsbus Voor aansluiting van de voeding de lip omhoog tillen
2 Aansluitingen van het Docking Wordt bij AVL DITEST MDS DRIVE niet gebruikt
station
3 Diefstalbeveiliging (Kensington-
Lock)
Bovenzijde:
1 2
Afb. 1-3
Nederlands
1 Afdekking van de USB 2.0- Om te openen de lip naar voren trekken
aansluiting
2 Ventilatieopening Tijdens het gebruik niet afdekken!
Gebruikershandboek 53AVL DiTEST MDS 188
Linkerzijde:
1
Afb. 1-2
1 Afdekking van diverse Zie paragraaf "Achterzijde"
aansluitingen
Rechterzijde:
1
Afb. 1-2
1 Opening Om de touch pen (stylus) met bevestigingsband vast te
maken
2 Touch pen (stylus) Zie paragraaf "Achterzijde"
54 GebruikershandboekAVL DiTEST MDS 188
Achterzijde:
1 2 3 4
5
9
6
8
7
Afb. 1-2
1 Controlelampje voor camera Zie referentiehandboek
2 Flitslicht voor camera Zie referentiehandboek
3 Camera Zie referentiehandboek
4 Afdekking van de USB 2.0-aansluiting Zie paragraaf "Bovenzijde"
5 Ventilatieopening Tijdens gebruik niet afdekken
6 Afdekking van de USB 3.0- HDMI- Zie referentiehandboek
en microfoon/hoofdtelefoon-
aansluitingen
Nederlands
7 Luidspreker Zie referentiehandboek
8 Touch pen (stylus) Bediening met vinger of touch pen mogelijk
9 Afdekking van de twee accu's Om de accu's uit te nemen de drie lippen volgens de
afbeelding (rode pijl) wegschuiven en de afdekking in
het midden van het apparaat optillen. Accu's
uitnemen.
1.3 Bediening
De bediening van het apparaat vindt in wezen plaats door aanraking van het beeldscherm
(aanwijzingdisplay) door middel van de bijgeleverde bedienstift of bediening met vinger. Verdere
invoeren voert u met de betreffende bedientoetsen uit. (Zie hoofdstuk 1.2).
Afb. 1-2
Gebruikershandboek 55Sie können auch lesen


