Montageanleitung Ford Ranger ab 2012 Mechanical Installation Manual - Ullstein Concepts GmbH
←
→
Transkription von Seiteninhalten
Wenn Ihr Browser die Seite nicht korrekt rendert, bitte, lesen Sie den Inhalt der Seite unten
Montageanleitung                                                                      Vorbereitung
Mechanical Installation Manual                                                        3. Bremslicht
Ford Ranger ab 2012                                                                   Light Cover
                                                                   Abdeckung 3. Bremslicht
                                                                   Light Cover

Equipment

   Stoff / Fabric                        Klebeband / Masking Tape          Handschuhe / Handcover

Werkzeuge / Tools
                                Kreuzschlitzschraubendreher   Lichtabdeckung Ford / Lightcover Ford
                                Phillips Screwdriver

                                                              Lichtabdeckung Neu / Lightcover New

Kunststoffhebel / Plastic for
Console Car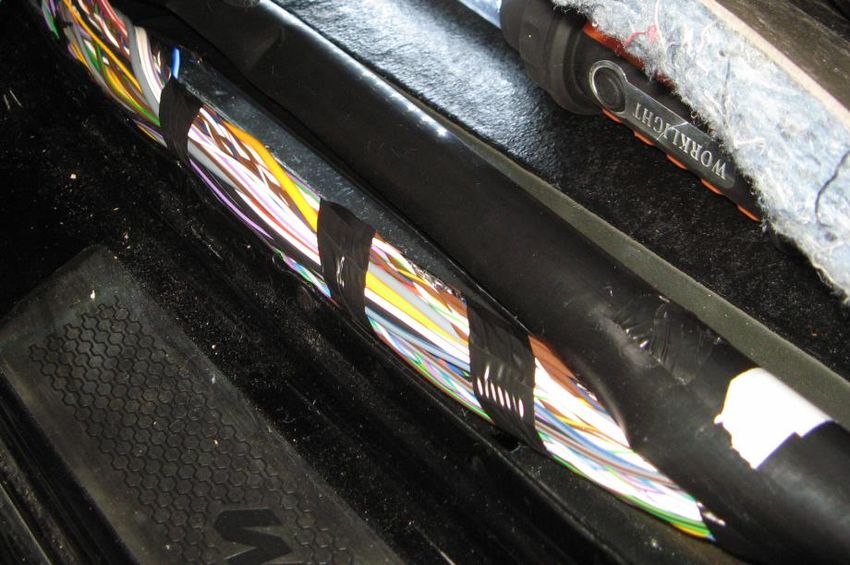
Überprüfung der Sammitr Verpackungsbox vor der Montage.
The Procedure of checking the Sammitr canopy box before installation.

                          1. Vergewissern Sie sich, dass die Verpackungsbox in gutem
                             Zustand ist, keine Druckstellen, Verformungen oder
                             Schäden aufweist.
                          2. Prüfen Sie, das Modell/Jahr des Hardtops und
                             Modell/Jahr des Fahrzeugs übereinstimmen.
                          3. Prüfen Sie ob die Seriennummer des Hardtop
                             (eingeschlagen in der Heckklappe mit der Seriennummer
                             des Kartons übereinstimmt.
                          4. Überprüfen Sie alle im Karton enthaltenen Zubehörteile
                             anhand der Packliste.
                                                         1.Make sure that Sammitr
                                                         canopy box is in good con-
                                                         dition, No marks, distorts or
                                                         any damages.
                                                         2.Check Model/ Year of the
                                                         canopy and Model / Year of
                                                         the vehicle which have to be
                                                         matching.
                                                         3.Check canopy serial number
                                                         / model code and vehicle
                                                         serial number / model code
                                                         which have to be matching by
                                                         looking at the rear canopy
                                                         handle.
                                                         4. Check all the accessories
                                                         received inside the box with
                                                         the Packing list.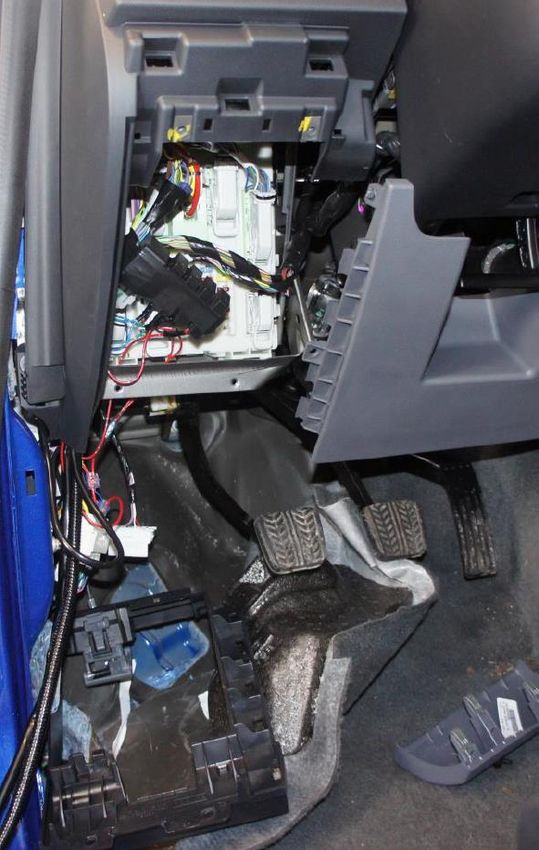
1
                                       Tuch zur Reinigung /
                                       Fabric for cleaning

    Reinigen der Lichtabdeckung am Ford / Cleaning the surface area of light cover on ford

2

        Benutzen Sie das Abdeckband um den Position der Bremsleuchte zu markieren.
         Stick the masking tape to meature a space of installation for new light cover.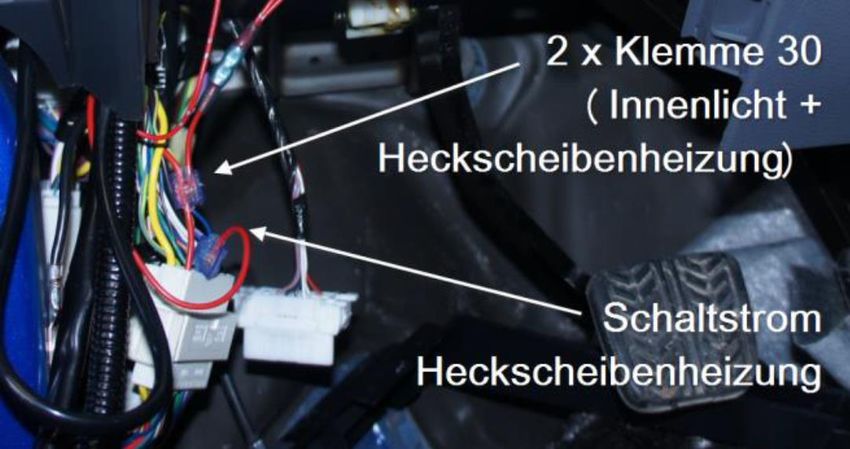
Drücken Sie die
3     Plastikabdeckung der                                   Abdeckung
      Bremsleuchte entsprechend                              herausziehen / Point
      Abbildung, so dass diese                               pull cover sheet out
      entriegelt

         Hilfmittel Kunststoffhebel (Aber meiden Sie direkten Druck auf das Blech).
    Using a plastic for console car pry a light cover on ford as picture above lock will unlock.

4

                     Ziehen Sie die Abdeckung ab / Pull a cover sheet out
5

Verwenden Sie einen Kreuzschlitzschraubendreher und drehen Sie              Ziehen Sie die Elektrikabdeckung
die Muttern heraus. / Use philips type screwdriver turn nut out on bolt     heraus / Pull the electric cover panel
position as in the picture.                                                 out

  6

                    Ziehen Sie die elektrische Verkabelung nach außen (noch verbunden)
            In the picture showing that pull the elecric panel out,wiring of vehicle as still connecting.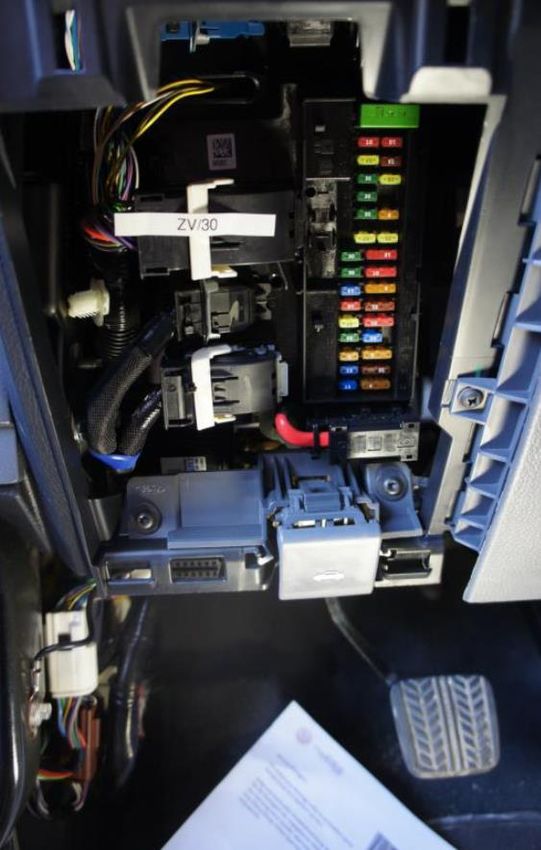
7

Drücken Sie die Position im Bild, um den Stecker zu        Ziehen Sie den Stecker aus der Panele / Pull a wiring
entriegeln / Press the position in the picture to take a   out from electric cover panel.
wiring off a panel

  8
                                                                Doppelseitiges Klebeband
                                                                / Double sided tape

Befestigen sie Kabel und Stecker im Fahrzeugdach           Nehmen Sie die neue Lichtabdeckung und ziehen Sie
(z. B. Mit Klebeband / Keep a vehicle's wiring into        das Klebeband auf beiden Seiten ab, 10 cm pro Seite
space                                                      / Take a new light cover sheet to peel tape off on both
                                                           side, 10 cm per side.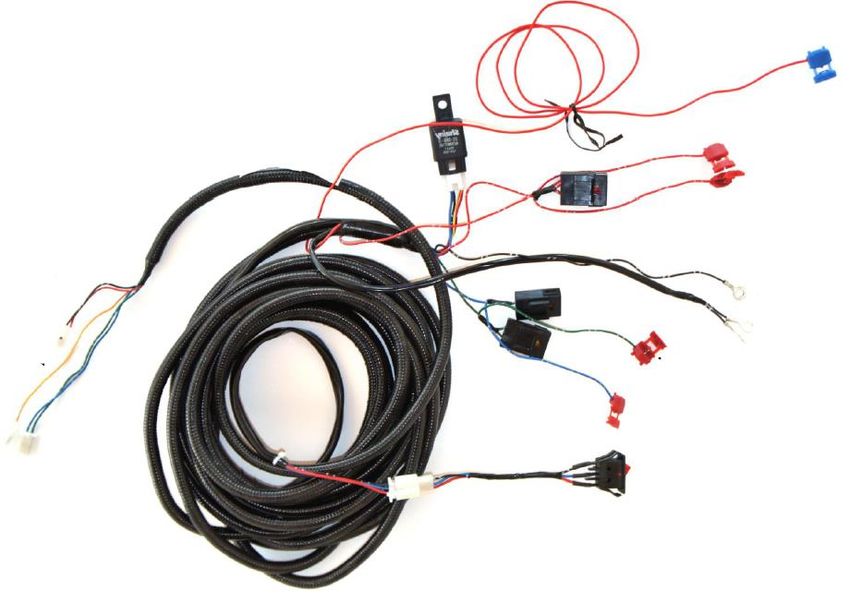
9

Positionieren Sie die neue Abdeckung entsprechend der Markierungen. / Then put a new light cover sheet over
     to measure a space compare to old mask line by using outer edge of light cover sheet must be in range
                                           between masking tape.

 10
                                  Abdeckband und Doppelseitiges Klebeband
                                  / Masking tape and Double side tape

Klebeband nun vollständig abziehen und fest andrücken / When got a space then peel all double sided tape off
                                    and peel masking tape out.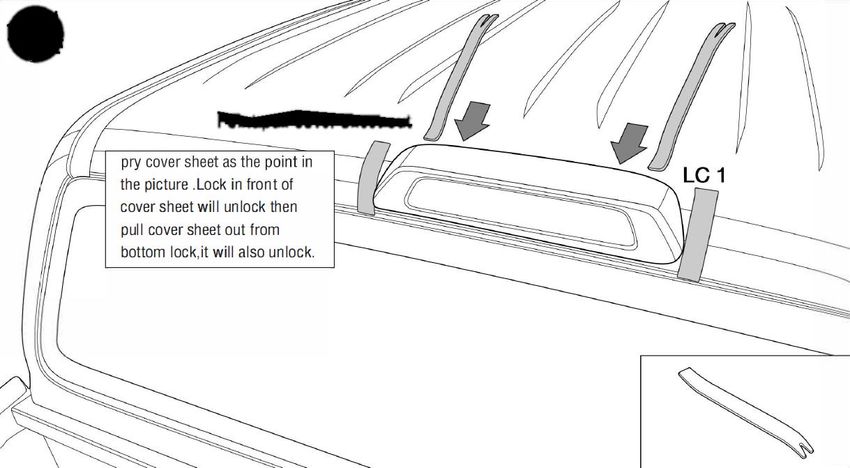
Sammtir Hardtop TL-1
Montageanleitung                                                               Vorbereitung
Installation Manual                                                            Hardtop
Ford Ranger ab 2012                                                            Support Roof

Equipment                                     Werkzeuge / Tools
                                                                                  Use for Hook

                                               No. 10 use for Bolt M6

    Stoff / Fabric   Handschuhe / Handcover
                                                   Linial / Ruler            No. 10 use for Bolt M8

Stützträger Set / Support Roof Set Schrauben/Scheiben / Bolt/Washer
                                                     Schraube / Bolt M8             Schraube / Bolt M6
                                                        C: 4 Stk / pieces              F: 2 Stk / pieces
 Support
                                                           Federscheibe                   Federscheibe
 Roof A                                                 / Spring Washer                / Spring Washer
                                                        D: 4 Stk / pieces              G: 2 Stk / pieces
                                                       Unterlegscheibe                Unterlegscheibe
                                                               / Washer                       / Washer
                                                        E : 4 Stk / pieces             H : 2 Stk / pieces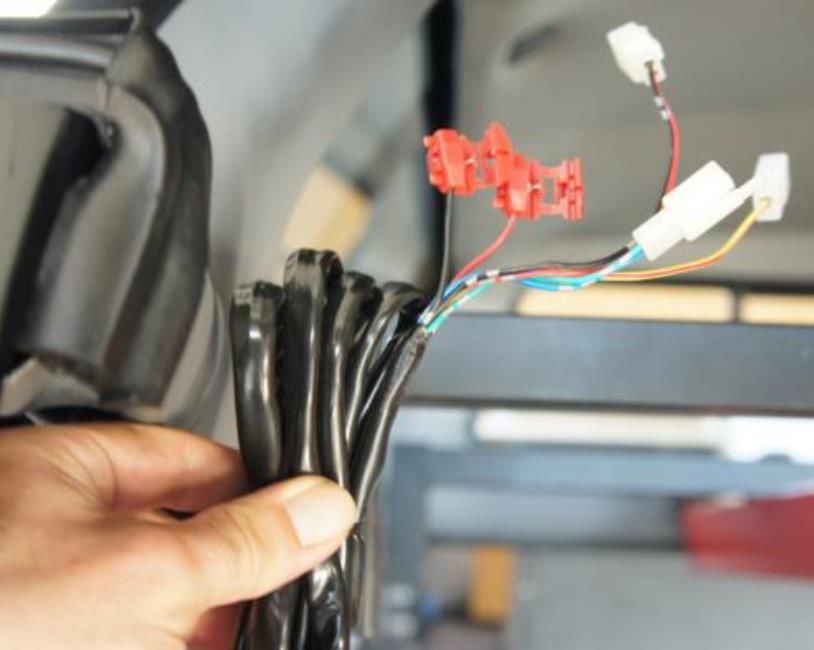
Sammtir Hardtop TL-1
Montageanleitung
                                                Abdichtung & Heckklappenschloss
Mechanical Installation Manual
                                                Frame Weather Strip &Tailgate Lock
Ford Ranger ab 2012

Equipment                                     Werkzeuge / Tool

                                                  Torxschlüssel # T40 / Hexalobular
    Stoff / Fabric   Handschuhe / Handcover       Wrench # T40

Dichtungsleiste                               Heckklappenschloss
/ Frame weather strip                         / Tailgate Lock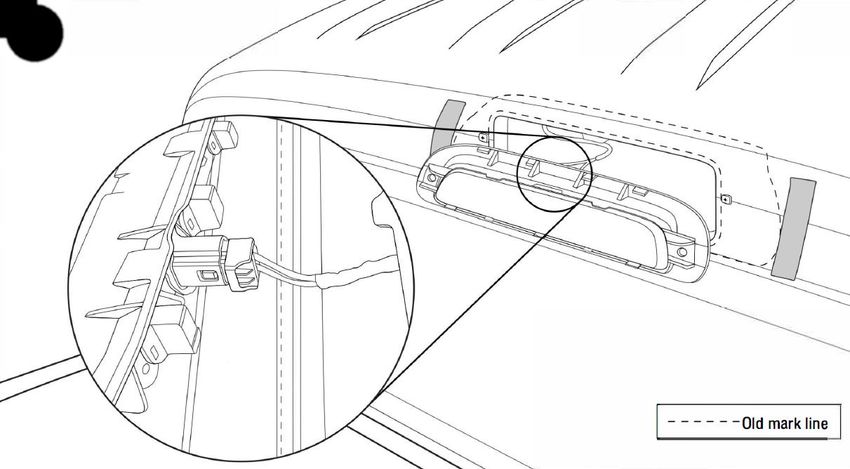
Dichten Sie den Spalt zwischen der Bugwand und den
seitlichen Bordwänden mittels schwarzer
Karosseriedichtband (z.B. Buthyl) oder Silikon

Seal the gap between the bow wall and the side drop sides
using black body sealing tape (e.g. Buthyl) or silicone
1

                 Reinigen Sie die Kanten der Heckklappe / Clean the edge of tailgate

  2

                                                   Ausrichtung der Heckklappenkante und
                                                   Dichtungsleiste / Alignment the position between the
                                                   edge of tailgate and Frame Weather Strip.

Klebeband auf jeder Seite 10 cm abziehen / Pull    Ziehen Sie das Klebeband ab / Pull the tape glue
tape glue out 10cm. On each side.
3
Position Montage der seitlichen Verriegelung / The position install of Lock Side
4
Lösen Sie den seitlichen Riegel der Heckklappe (linke Seite) / Remove the Lock Side of tailgate (left
side)5 Positionieren Sie den Klappenanschlag/
Press the Tailgate Lock attach to tailgate of the tab.
Ausrichten des Schlossriegel (linke Seite) / Alignment the Tailgate Lock (left side)
6
Verschrauben Sie den Anschlag und den Schlossriegel / Install the Lock Side and Tailgate Lock
together7
Verriegelung der Heckklappe entfernen (rechte Seite) / Remove the Lock Side of tailgate (right
side)
Positionieren Sie den Klappenanschlag/
8 Press the Tailgate Lock attach to tailgate of the tab.
Ausrichten des Schlossriegel (rechte Seite) / Alignment the Tailgate Lock (reft side)9
Montieren Sie den Anschlag und den Sclossriegel zusammen
/ Install the Lock Side and Tailgate Lock together
10
Montage abgeschlossen / Installation completeMontageanleitung
Mechanical Installation Manual Hardtop Sammitr TL-1 Montage
Ford Ranger ab 2012
Teile im Hauptkarton
Parts In Main Carton
P1: Stahlhardtop TL-1
P1: Steel Canopy TL-1
Bausatz
Kit Box
Stückliste Papier
Part List Paper
P2: Schlüssel
P2: Key
Equipment
K1: Klemme
K8: T Lack
K1: C-Clamp
K8: T Paint
K3: Verkabelung Nr. 38
K2: Schaltgehäuse K3: Wiring No. 38
K2: Switch Case
Benötigte Werkzeuge
Require Tools
T6 Torxschlüssel #T40
T6 Hexalobular Wrench #T40
T3: 10, 12 mm. Drehmomentschlüssel
T3: 10, 12 mm. Torque Wrench
T1: 13mm. Schraubenschlüssel
T8: Tuch
T1: 13 mm. Wrench
T8: Fabric
T2: 13mm. Schraubenschlüssel
T2: 10 mm. Wrench T4: Klebeband T5: Isoliertape T7: Maßband/Lineal
T4: Tape T5: Electric Tape T7: MeasuringTape/RulerDer Vorbereitungsprozess des Hardtops Sammitr TL-1 vor dem Einbau in das Fahrzeug.
1 The preparation process of Sammitr Canopy TL-1 model bevor installation with the vehicle.
1. Das Hardtop muss in gutem Zustand sein, glatte
Oberfläche, keine Beschädigungen, Beulen, Risse in
Lack sowie Fenstern.
1. Canopy have to be in good condition, no damage,
dent, cracks, smooth surface including no window
damages or cracks.
2. Das Schließsystem funktioniert für beide Schlüssel.
2. Locking system is working for both keys.
3. Die Hardtopseiten sind nicht beschädigt, verbeult
oder rissig.
3. Canopy sides are not damage, dent or cracks.
4. Die vordere Fensterscheibe des Hardtops
funktioniert (öffnen/schließen), keine Risse oder
Beschädigungen vorhanden.
4. Canopy front window panel is working (open/close),
no cracks or damages occurrences.
5. Prüfen Sie die Heckklappe durch Öffnen und
Schließen.
5. Check the Rear Ooor by open and close.Überprüfung und Vorbereitung des Ford Ranger-Fahrzeugs vor der Montage
2 des Hardtops.
The process of checking and preparing the Ford Ranger vehicle before install the canopy.
1. Reinigen Sie die Fahrzeugkarosserie einschließlich des Daches, aller
Seiten und der Heckwanne.
1. Clean up the vehicle body including the top, all sides and Rear tub.
2. Bedecken Sie das Fahrzeug zum Schutz vor Kratzern.
2. Cover the fabric to protect the scratches resistant.3 Vorbereitung des Sammitr Hardtops Modell TL-1 vor der Installation am Fahrzeug
The process of preparing Sammitr Canopy TL-1 model before install on the vehicle
4
Das Aufsetzen des Hardtops auf die Fahrzeugpritsche erfolgt mit 4 Personen.
The process of lifting the canopy onto the vehicle tub by using 4 people for lifting.5
Heben Sie das Hardtop über den Pickup, indem Sie den hinteren Teil höher und den
vorderen Teil so anheben, dass er parallel zur Kante der Fahrzeugpritsche liegt.
Lift canopy over the pick up truck by rising the rear part higher and the front part to be in the
parallel with the edge of the vehicle tub.
6 7
Nachdem Sie den vorderen Teil in die erforderliche Achten Sie darauf, dass der Abstand
Position gebracht haben, legen Sie den hinteren zwischen Hardtoprand und Bordwand
Teil des Hardtops ab. links/rechts gleich groß ist.
Make sure the distance between canopy edge
After get the distance in front part and then put
and vehicle rear tub are equivalent both left
the rear part to cover the vehicle tub. and right sides.8
Die Seitenkante des Hardtops muss parallel zur Kante der Pritsche verlaufen.
Side edge of canopy to be in the parallel with the side edge of the vehicle tub.
9
Prüfen Sie nach dem ausrichten der Seitenteile den Abstand am hinteren Teil des Hardtops, das
parallel zur Hinterkante der Fahrzeugwanne sein muss. Die Gummifahne der Heckklappe soll
nur leicht an der Fahrzeugklappe tuschieren oder einen leichten Abstand haben!
After finished measure the side part, check the distance at rear part of canopy which must habe to be
in the parallel with the rear edge of the vehicle tub. The rubber flag of the tailgate should only
lightly brush against the vehicle flap or have a slight gap!Ablauf Installation C-Klemmen TL-1 Hardtop mit dem Fahrzeug
10
The process of C-Clamp installation TL-1 canopy model with the vehicle
11
Öffnen / Abnehmen der Gummistopfen
Open / take off the rubber plugMutter / Nut M8
12
Mutter / Nut M8
Federscheibe / Spring Washer M8
C-Klemme / C-Clamp
Montage der C-Klemmen an der
Fahrzeugwanne, alle 4 Positionen
(Doppelkabine)
The process of C-Clamp installation onto
the vehicle tub, all 4 positions ( D-Cab)
C-Klemme / C-Clamp
Montage der C-Klemmen an der
Fahrzeugwanne, alle 6 Positionen
(Extrakabine)
The process of C-Clamp installation onto
the vehicle tub, all 6 positions ( C-Cab)13.1
Ziehen Sie die Schrauben der C-Klammern
mit einem Drehmomentschlüssel und
einem Druck von 16Nm an.
Tighten bolts of c-clamp by using pound
wrench, with the pressure of 16Nm.
D-Cab
Ziehen Sie die Schrauben der Klammern an allen 4 Positionen des Hardtops fest.
Tighten canopy C-Clamp bolts with vehicle all 4 positions.
Tighten canopy C-Clamp bolts with vehicle all 4 positions.
13.2
Achtung! Bevor Sie die Schrauben Position 3 und 4
anziehen, stellen Sie bitte sicher, dass der Abstand
zwischen dem hinteren linken und rechten Pol des
Hardtops gleich ist.
Caution: Before tighten bolts position 3 and 4 please make
sure that the distance between the rear left and right pole
of the canopy is equal.
Reihenfolge zum Anziehen der C-Klemmen-Schrauben auf dem Fahrzeug.
Steps of canopy C-Clamp bolts tightening onto vehicle.14.1
Anziehen der Klammern zuerst mit 8Nm
nach unten genannter Reihenfolge und
danach mit 16Nm an.
Tighten bolts of c-clamp by using pound
wrench, with the pressure of first 8Nm and
final with 16 Nm.
Ziehen Sie die Schrauben der Klammern an allen 6 Positionen des Hardtops fest.
Tighten canopy C-Clamp bolts with vehicle all 6 positions.
14.2
Achtung! Bevor Sie die Schrauben Position 5 und 6 anziehen,
stellen Sie bitte sicher, dass der Abstand zwischen der
hinteren linken und rechten Seite des Hardtops gleich ist.
Caution: Before tighten bolts position 5 and 6 please make sure
that the distance between the rear left and right pole of the
canopy is equal.
Reihenfolge zum Anziehen der C-Klemmen-Schrauben auf dem Fahrzeug.
Steps of canopy C-Clamp bolts tightening onto vehicle.15.1
Montagepositionen der C-Klemme am
Fahrzeug (links).
C-Clamp mountaing positions onto vehicle (Left).
15.2
Montagepositionen
Montagepositionen derder C-Klemme
C-Klemme am
am Fahrzeug
Fahrzeug
(rechts). (rechts).
C-Clampmountaing
C-Clamp mountaing positions
positionsonto vehicle
onto (Right).
vehicle (right).16.1
Montagepositionen der C-Klemme am
Fahrzeug (links).
C-Clamp mountaing positions onto vehicle (Left).
16.2
Montagepositionen der C-Klemme am
Fahrzeug (rechts).
C-Clamp mountaing positions onto vehicle (right).17
Schließen Sie den Gummistöpsel / Close the rubber plug
18
Hardtop Montage abgeschlossen / The process of canopy installation completedVerlegung und Anschluss der Elektrik / Installation and connection of the electrical system Nur durch Fachpersonal durchzuführen (only qualified professionals) Keine Gewähr – alle Kabel müssen vor Anschluss mittels Messgerät geprüft werden (following datas must be checked before connection) Weg Verlegung des Kabelstrang: Path Laying the wiring harness: - über Rücklicht zum Leiterrahmen - via tail light to ladder frame - 18mm Bohrung für Durchgang von Rücklichtkasten zur - 18mm hole for passage from rear light box to Ladefläche loading area - weiter entlang des Rahmens bis Fußraum unter Fahrersitz - further along frame to footwell under driver's - durch werksmäßig vorhandenes Loch in den Fußraum zu seat verlegen - to be routed through factory hole into footwell
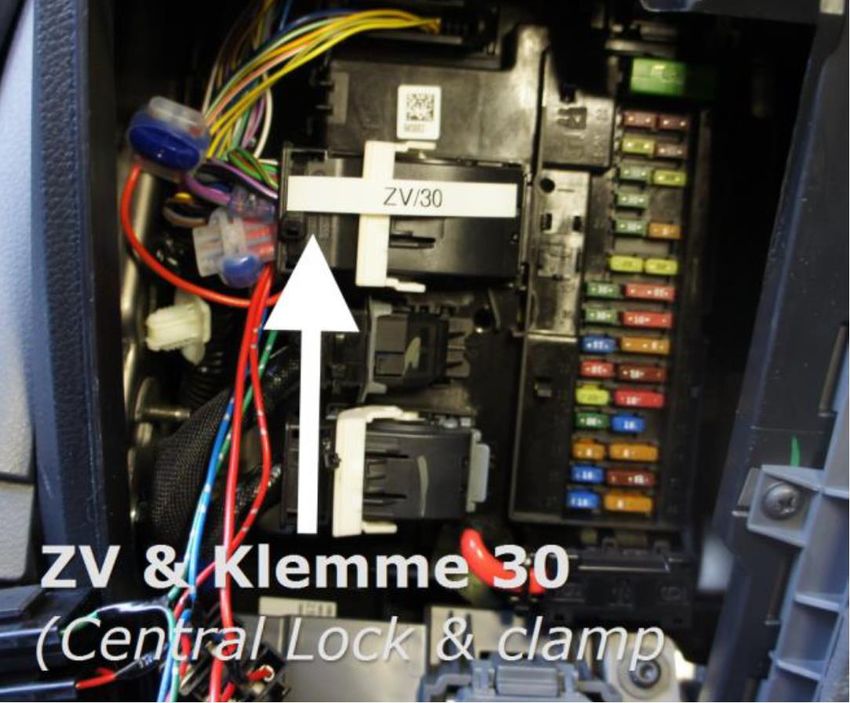
Kabel rot (ohne
                                       Sicherung) zur
Überblick der Anschlüsse:              Heckscheibenheizung
Overview of connections:               des Fahrzeug (als
                                       Schaltstrom) (1x red w/o
                                       fuse to Defogger of
                                       Vehicle)
                                             Kabel rot x2 zu
                                             Klemme 30 (2x red
                                             connect to 30)
                                              Kabel schwarz x3
                                              zu Klemme 31 (3x
                                              black connect to
                                              31)

                                            Kabel blau und
                                            Kabel grün
                                            zu
                                            Zentralverriegelung
                                            Fahrzeug (blue and
Anschluss Bremslicht                        green to central
Im linken Rücklicht des                     locking of vehicle)
Fahrzeugs (connection
to 3. Brakelight in left    Schalter wird nicht genutzt
rear light):                Stets auf AN oder Schalter
                            entfernen und blau mit rot
                            verbinden. (Switch will not
                            used! Should be permanently
                            ON or remove it and connect
                            wire blue with red )
Modell 2012 bis 2015: Anschlussplan Modell 2012: Wiring diagram model 2012:
Modell 2016:
Sonderhinweis für den Anschluss der Heckscheibenheizung:
Special Note alternative connection point for control line for defogger:

Der Anschluss der Heckscheibenheizung am Kontaktstecker ist während
der Laufzeit des Fahrzeugs mehrmals unabhängig von Baujahren und
Modellwechseln geändert worden.
Folgende Anschlussstelle für die Heckscheibenheizung ist seit dem
Baujahr 2012 inkl. Facelift 2016, 2018 und 2020 unverändert und kann als
alternative Anschlussstelle verwendet werden:
Alternative Anschlussstelle für Steuerleitung der Heckscheibenheizung:
Ort: Hauptkabelstrang im Schwellerbereich Fahrerseite
Kabel: Farbe schwarz (ohne jegliche andersfarbigen Streifen) – auffällig
dickes Kabel
Siehe Bild:

Alternative connection point for control line for defogger:
Position: main harness in the driver's side sill area
Cable: color black (without any other colored stripes) – cable is noticable thick
See image:
Sie können auch lesen