PODOSTRIPE Gebrauchsanweisung Instructions for use Gebruiksaanwijzing Istruzioni per l'uso Instrucciones de uso - 3TO
←
→
Transkription von Seiteninhalten
Wenn Ihr Browser die Seite nicht korrekt rendert, bitte, lesen Sie den Inhalt der Seite unten
DE

                           EN

                           NL

                           IT

PODOSTRIPE
                           ES
                       ®

Gebrauchsanweisung
Instructions for use
Gebruiksaanwijzing
Istruzioni per l’uso
Instrucciones de uso
01.10.2020
PS_DE_EN_NL_IT_ES_2020#1

3TO GmbH • Birkenstraße 8 • 82041 Deisenhofen • GERMANY
www.3to.de • info@3to-gmbh.de • +49 89 4520833-0

       Medizinprodukt / Medical Device / Medisch apparaat / Dispositivo medico /
       Dispositivo médico

       Hersteller / Manufacturer / Fabrikant / Fabbricante / Fabricante

       Gebrauchsanweisung beachten / Follow the instructions for use / Volg de instructies /
       Seguire le istruzioni / Sigue las instrucciones

       Nicht zur Wiederverwendung / Do not re-use / Niet voor hergebruik / Non per il riutilizzo
       / No para reutilizar

       Bestellnummer / Cataloque number / Bestelnummer / Numero d‘ordine /
       Número de orden

       Chargenbezeichnung / Batch Code / Batch naam / Nome del lotto / Nombre del lote

       Verwendbar bis / Use by / Bruikbaar tot / Utilizzabile fino a / Utilizable hasta que

       Informationsbeilage beachten (Sicherheitshinweise) /
       Observe information supplement (safety instructions) /
       Neem de bijsluiter in acht (veiligheidsinstructies) /
       Osservare il foglio illustrativo (istruzioni di sicurezza) /
       Observar el folleto informativo (instrucciones de seguridad)

       Durch die Anbringung der CE-Kennzeichnung bestätigt der Hersteller, dass das
       Produkt den geltenden europäischen Richtlinien entspricht /
       By using the CE Marking, the manufacturer confirms that the product complies with
       all applicable European directives /
       Door het aanbrengen van de CE-markering bevestigt de fabrikant dat het product
       voldoet aan de geldende Europese richtlijnen /
       Con l‘apposizione del marchio CE, il produttore conferma che il prodotto è conforme
       alle linee guida europee applicabili /
       Al colocar el marcado CE, el fabricante confirma que el producto cumple con las
       pautas europeas aplicables
       Herstellungsdatum / Date of manufacture / Fabricage datum / Data di produzione /
       Fecha de fabricación
Sicherheitshinweise....................................................................6
DE   Gebrauchsanweisung................................................................8

     Safety Instructions....................................................................11
EN   Instructions for use..................................................................13

     Veiligheidsinstructies...............................................................16
NL   Gebruiksaanwijzing..................................................................18

     Istruzioni di sicurezza...............................................................21
IT   Istruzioni per l’uso.....................................................................23

     Instrucciones de seguridad....................................................26
ES   Instrucciones de uso...............................................................28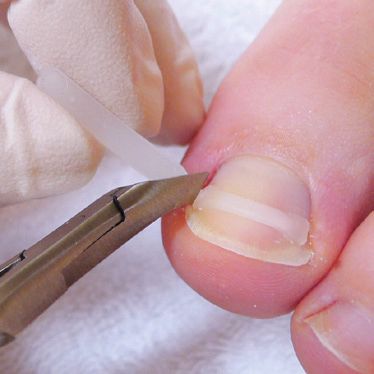
DEUTSCH

               Sicherheitshinweise
    Zweckbestimmung:
    Die Therapie mit Nagelspangen der 3TO GmbH dient dazu, das natürliche Wachstum des Nagels
    wieder herzustellen. Mit den Spangen kann durch Anheben des eingewachsenen Nagels eine
    Schmerzlinderung bzw. eine Korrektur des Wuchses von eingewachsenen und/oder deformierten
    Nägeln erreicht werden. Die Spange ist ein Einmalprodukt und wird unsteril ausgeliefert. Nagelkorrek-
    turspangen sind nicht invasive Medizinprodukte der Klasse I.

    Indikationen:
    Unguis incarnatus (eingewachsener Nagel), Unguis convolutus (Rollnagel), Onychophosis (übermä-
    ßige Verhornung im Nagelfalz), Clavi im Nagelfalz (Hühnerauge), nach Operationen zur Vermeidung
    eines Rezidivs.

    Kontraindikationen:
    Die Spange darf bei folgenden Krankheitsbildern nur nach sorgfältiger Abwägung des Nutzen-Risiko-
    verhältnisses und ggf. in Absprache mit einem Arzt angewendet werden: Onychomykose, Onycholyse,
    Wachstumsstillstand, tumoröse Veränderungen, subunguale Granulation, Onychorrhexis, pAVK -
    periphere arterielle Verschlusskrankheit - (in Einzelfällen), Polyneuropathie / Angiopathie (in Einzelfäl-
    len), Psoriasis (in Einzelfällen), allergische Reaktionen auf Cyanacrylsäureethylester.

    Anwenderkreis:
    Um den Schutz des Patienten zu gewährleisten, dürfen die Nagelkorrekturspangen der 3TO GmbH
    ausschließlich von medizinisch ausgebildeten Fachkräften (z. B. Podologen oder Ärzten) angewendet
    werden. Das medizinische Fachwissen zur Einschätzung von Risiken der Therapie sowie die Fähigkeit
    zum Umgang mit Instrumenten sind Grundvoraussetzung für die Anwendung von Nagelkorrekturspan-
    gen. Die Haftung für Folgen eines unsachgemäßen Gebrauchs wird ausgeschlossen.

    Dauer der Anwendung:
    Die Gesamtdauer der Therapie ist abhängig vom Ausgangsbefund und vom individuellen Wachstum
    des Nagels. Entsprechend der Anamnese muss die Häufigkeit der Verlaufskontrolle unter Austausch
    des Tamponadevlieses individuell festgelegt werden. Gegebenenfalls ist eine tägliche Kontrolle durch-
    zuführen. Die Spange muss in der Regel alle 3 - 6 Wochen gewechselt werden.

    Patienten- und Anwenderschutz:
    Reinigen und desinfizieren Sie den zu behandelnden Nagel. Zum Schutz für Patient und Anwender
    hat der Therapeut keimfreie handelsübliche Einmalhandschuhe anzuziehen. Zum Eigenschutz des
    Therapeuten sollte dieser bei jeder Behandlung einen Mundschutz und eine Schutzbrille tragen.
    Wenden Sie die Spangen ausschließlich wie in dieser Gebrauchsanweisung beschrieben und mit
    Originalzubehör an.

    Risiken:
    Gefahr von Hautreizungen, Verletzungen, Entzündungen und Schmerzen in der Nagelumgebung: Das
    korrekte Anpassen und Einsetzen von Nagelkorrekturspangen ist eine wichtige Voraussetzung um
    Hautreizungen, Hautverletzungen, Schmerzen, Verhornungen und Entzündungen zu vermeiden.

6
4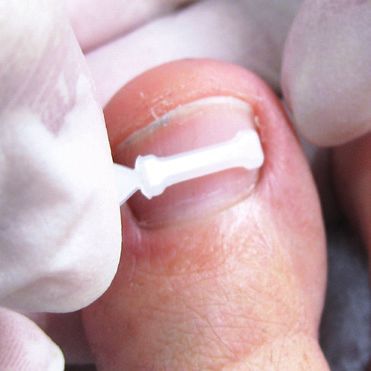
Gefahr der Nagelablösung (Onycholyse):
Das korrekte Einstellen der Zug- und Hebelkräfte von Nagelkorrekturspangen sind wichtige
Voraussetzungen um das Ablösen des Nagels zu vermeiden.

Gefährdung durch Infektion:
Eine Infektion der Nagelplatte, eine Vorschädigung des Nagels oder mangelnde Hygiene
(insbesondere beim Nachsetzen) kann zu einer Nagelmykose führen. Die Patientenaufklärung
sollte die laufende Hygienemaßnahmen zur Vermeidung einer Infektion beinhalten.

Gefährdung durch Verkleben:
Der Klebstoff OrthoGlue klebt innerhalb von Sekunden Haut und Augenlieder zusammen.
Enthält Cyanacrylat. Reizt Augen, Atmungsorgane und Haut. Berührungen mit Augen und
Haut vermeiden. Im Falle eines Kontakts mit Augen oder inneren Organen sofort einen Arzt
aufsuchen. Dämpfe nicht einatmen. Darf nicht in Berührung mit Wunden kommen - Wunden
vor der Anwendung durch Öl- oder Fettstrich abdecken. Eventuelle Hautverklebungen nicht
mit Gewalt lösen, sondern längere Zeit in warmer Seifenlauge einweichen oder mit Aceton
vorsichtig lösen.

Die Reaktionen treten i. d. R. rasch ein und werden vom Patienten und Anwender schnell
bemerkt. Gegenmaßnahmen müssen sofort getroffen werden.                                           DE
Besondere Vorkommnisse:
Sollte es bei der Anwendung von Produkten der 3TO GmbH zu besonderen Vorkommnissen
kommen, entfernen Sie die Spange sofort vom Patienten. Die betroffene Zehe ist zu desinfizieren
und steril zu verbinden. Konsultieren Sie oder der Patient sofort einen Arzt. Bitte wenden Sie
sich sofort telefonisch an die 3TO GmbH +49 89 4520833-0 (außerhalb der Öffnungszeiten per
E-Mail an info@3to-gmbh.de). Sie erhalten im Anschluss ein Formular „Besondere Vorkommnisse“
zugesandt. Dieses ist auszufüllen und schnellstmöglich an die 3TO GmbH zu senden.

Patienteninformationen:
Informieren Sie Ihren Patienten über die Ursachen und Vermeidungsmöglichkeiten von eingewach-
senen Nägeln.

                                                                                                  57
                                                                                                   5
1 2
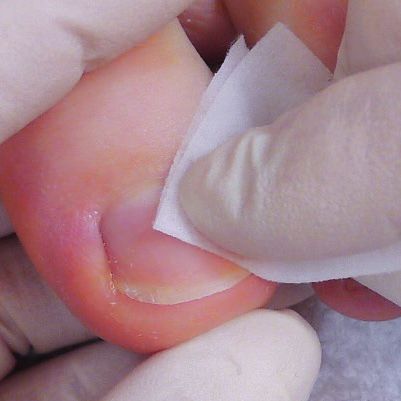
1 Entfernen Sie nicht haftende Teile von der Nageloberfläche. Glätten Sie
extrem raue Nägel oder rauen Sie extrem glatte Nägel mit einer Feile oder
einem Fräser ganz leicht an.
2 Wählen Sie die Größe so aus, dass die Spange so viel Nagelbreite wie
möglich abdeckt. Die Dehnung der Spange auf dem Nagel (ca. 0,7 - 2,7 mm)
muss aber berücksichtigt werden. Wählen Sie die Spange daher entspre-
chend um die Dehnungslänge kürzer als die Nagelbreite aus.
Die Spange soll so nah wie möglich am Nagelrand der schmerzenden
bzw. stärker eingewachsenen Seite gesetzt werden.
3 4 5
A
3 Reinigen und entfetten Sie die Spange und den Nagel gründlich mit dem
Alkoholtupfer und lassen Sie den Alkohol gut abtrocknen (ca. 30 Sekunden).
Gesundheitsrisiko: Gefährdung durch Infektion
siehe Sicherheitshinweise
4 Schrauben Sie den Klebstoff auf und streifen Sie den Pinsel von beiden
Seiten je 1 x leicht am Flaschenrand ab.
5 Benetzen Sie die Klebefläche A des Pads dünn mit Klebstoff. Verwenden
Sie den Klebstoff sparsam, bei zu viel Klebstoff hält die Spange nicht auf
dem Nagel. Halten Sie den Rand und das Gewinde des Fläschchens
sauber. Reinigen Sie diese bei Bedarf z. B. mit einem Tupfer.
Gesundheitsrisiko: Gefährdung durch Verkleben
siehe Sicherheitshinweise
8
6
4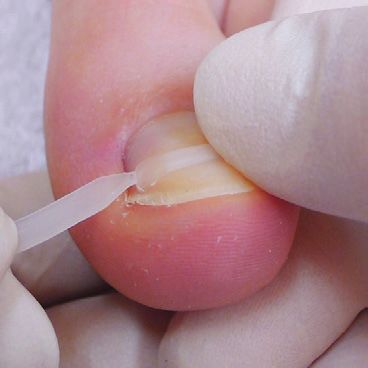
6

            2 MIN.

6   Positionieren Sie die Klebefläche A auf der stärker eingewachsenen Seite
    des Nagels. Drücken Sie die Klebefläche A für ca. 20 Sekunden mit dem
    Finger an den Nagel (in dieser Zeit nicht verschieben!), anschließend muss
    der Klebstoff für 2 Minuten ohne weitere Berührung aushärten.

            Gesundheitsrisiko: Gefährdung durch Verkleben
            siehe Sicherheitshinweise

7     B                                                                         DE

7   Streifen Sie den Pinsel von beiden Seiten leicht ab. Tragen Sie den Kleb-
    stoff dünn auf die Klebefläche B der Spange auf. Achten Sie darauf,
    dass auf die geklebte Seite A keine Kraft nach oben wirkt und diese
    nicht abgezogen wird.

            Gesundheitsrisiko: Gefährdung durch Verkleben
            siehe Sicherheitshinweise

                                                                                59
                                                                                 5
                                                                                 7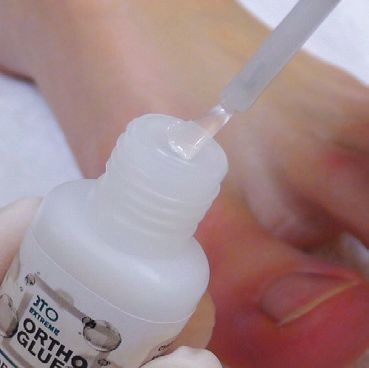
8                  9                   10

                                                          2 MIN.

 8 - 10         Die Spange wird um 0,7 bis 2,7 mm (abhängig von der Span-
                genbreite, der Nagelstärke und dem Befund) gedehnt. Ziehen
                Sie die Spange dabei parallel zum Nagel. Setzen Sie die Spange
                im gedehnten Zustand auf den Nagel auf und drücken Sie die
                Klebefläche B für ca. 30 Sekunden an. Achten Sie darauf, dass
                die Spange nach dem Aufsetzen nicht mehr verschoben wird.
                Anschließend muss der Klebstoff für 2 Minuten ohne weitere
                Berührung aushärten.

                        Gesundheitsrisiko: Gefährdung durch Verkleben
                        siehe Sicherheitshinweise

     11

     11   Setzen Sie die PODOSTRIPE Zange schräg unter das Haltelement an
          und zwicken Sie das Pad ab.

          Zum Entfernen von PODOSTRIPE werden die Ränder der Spange mit
          der Zange abgelöst. Die Spange kann dann abgezogen werden. Mit
          einer Feile oder einem Fräser können Reste des Klebstoffs vom Nagel
80
6
1
4
10        entfernt werden.
ENGLISH
Safety Instructions
Purpose:
The therapy with nail clips from 3TO GmbH serves to restore the natural growth of the nail. With the
braces, pain can be relieved or the growth of ingrown and/or deformed nails can be corrected by
lifting the ingrown nail. The brace is a disposable product and is delivered non-sterile. Nail correction
braces are Class I non-invasive medical devices.
Indications:
Unguis incarnatus (ingrown nail), Unguis convolutus (rolled nail), Onychophosis (excessive hornifica-
tion in the nail fold), Clavi in the nail fold (corn), after operations to prevent recurrence.
Contraindications:
The braces may only be used for the following clinical pictures after careful consideration of the
benefit-risk ratio and, if necessary, in consultation with a doctor Onychomycosis, onycholysis,
growth arrest, tumorous changes, subungual granulation, onychorrhexis, pAVK - peripheral
arterial occlusive disease - (in individual cases), polyneuropathy / angiopathy (in individual
cases), psoriasis (in individual cases), allergic reactions to ethyl cyanoacrylate.
Group of users:
To ensure the protection of the patient, the nail correction braces from 3TO GmbH may only
be used by medically trained specialists (e.g. podiatrists or doctors). The medical expertise to DE
EN
assess the risks of the therapy as well as the ability to handle instruments are basic requirements
for the application of nail correction braces. The liability for consequences of improper use shall
be excluded herewith.
Duration of the application:
The total duration of the therapy depends on the initial findings and the individual growth of the nail.
The frequency of follow-up examinations with replacement of the tamponade fleece must be deter-
mined individually according to the medical history. If necessary, a daily check must be carried out.
The braces usually have to be changed every 3 - 6 weeks.
Patient and user protection:
Clean and disinfect the nail to be treated. To protect the patient and user, the therapist must wear
sterile, commercially available disposable gloves. For the therapist‘s own protection, he or she should
wear a face mask and protective goggles during each treatment. Only use the braces as described in
this manual and with original accessories.
Risks:
Risk of skin irritation, injury, inflammation and pain in the nail environment: The correct fitting and
insertion of nail correction braces is an important prerequisite to avoid skin irritation, skin injury, pain,
cornification and inflammation.
11
511
7
9
5Risk of nail separation (onycholysis):
The correct adjustment of the pulling and levering forces of nail correction braces are important
prerequisites to prevent the nail from loosening.
Risk of infection:
An infection of the nail plate, a pre-damage of the nail or a lack of hygiene (especially during repo-
sitioning) can lead to a nail mycosis. Patient education should include ongoing hygiene measures
to prevent infection.
Danger from sticking:
The OrthoGlue adhesive bonds skin and eyelids together within seconds. Contains cyanoacrylate.
Irritating to eyes, respiratory system and skin. Avoid contact with eyes and skin. In case of contact
with eyes or internal Organs, please see your doctor immediately. Do not inhale vapours. May not
come into contact with wounds - Cover wounds with oil or grease before use. Do not remove any
skin adhesions by force but soak them in warm soapy water for a longer period of time or carefully
loosen them with acetone.
The reactions usually occur quickly and are quickly noticed by the patient and user. Counterme-
asures must be taken immediately.
Special incidents:
Should any special incidents occur when using products of 3TO GmbH, remove the brace imme-
diately from the patient. The affected toe must be disinfected and covered with sterile dressing.
Consult a doctor immediately. Please contact 3TO GmbH immediately by phone
+49 89 4520833-0 (outside opening hours by e-mail to info@3to-gmbh.de). You will then
be sent a „Special incidents“ form. This is to be filled in and sent to 3TO GmbH as soon as
possible.
Patient information:
Inform your patient about the causes and prevention possibilities of ingrown nails.
10
4
121 2
1 Remove non-adhesive parts from the nail surface. Smooth extremely rough
nails or roughen extremely smooth nails very lightly with a file or burr.
2 Select the size so that the brace covers as much nail width as possible.
However, the expansion of the brace on the nail (approx. 0.7 - 2.7 mm) must
be taken into account. Therefore, select the brace accordingly shorter than
the nail width by the expansion length.
The brace should be placed as close as possible to the edge of the nail on the
painful or more ingrown side.
3 4 5
A
EN
3 Clean and degrease the brace and nail thoroughly with the alcohol swab and
allow the alcohol to dry off well (approx. 30 seconds).
Health risk: danger of infection - see safety instructions
4 Open the adhesive and wipe the brush lightly from both sides of the bottle
once at the bottle edge.
5 Wet the adhesive surface A of the pad with very little adhesive. Use the adhe-
sive sparingly; if too much adhesive is used, the brace will not stick to the nail.
Keep the edge and the thread of the bottle clean. Clean them if necessary,
e.g. with a swab.
Health risk: Danger due to sticking - see safety instructions
13
511
56
2 MIN.
6 Position the adhesive surface A on the more ingrown side of the nail.
Press the adhesive surface A against the nail with your finger for approx.
20 seconds (do not move during this time!), then the adhesive must harden
for 2 minutes without further contact.
Health risk: Danger due to sticking - see safety instructions
7 B
7 Gently wipe the brush from both sides. Apply a thin layer of adhesive to the
adhesive surface B of the brace. Make sure that no force is applied to the
glued side A and that it is not pulled off.
Health risk: Danger due to sticking - see safety instructions
14
6
48 9 10
2 MIN.
8 - 10 The brace is stretched by 0.7 to 2.7 mm (depending on the
width of the brace, the nail thickness and the findings). Pull
the brace in parallel position to the nail. Place the brace on
the nail while stretched and press the adhesive surface B for
approx. 30 seconds. Make sure that the brace is no longer
displaced after it has been put on the nail. Afterwards the
adhesive must harden for 2 minutes without further touching.
Health risk: Danger due to sticking
see safety instructions
EN
11
11 Place the PODOSTRIPE pliers diagonally under the holding element and
pinch off the pad.
To remove PODOSTRIPE, the edges of the brace are detached
with the pliers. The brace can then be removed. Use a file or a
burr to remove remains of the glue from the nail. 15
57
5NEDERLANDS
Veiligheidsinstructies
Beoogd gebruik:
De behandeling met nagelbeugels van 3TO GmbH dient om de natuurlijke groei van de nagel te
herstellen. De beugels worden gebruikt om een ingegroeide nagel op te lichten, waardoor pijn wordt
verzacht of de groei van ingegroeide en/of vervormde nagels wordt gecorrigeerd. De beugel is een
product voor eenmalig gebruik en wordt niet-steriel geleverd. Nagelcorrectiebeugels zijn niet-invasieve
medische hulpmiddelen van klasse I.
Indicaties:
Unguis incarnatus (ingegroeide teennagel), unguis convolutus (krulnagel), onychophosis (overmatige
eeltvorming in de nagelwal), likdoorn in de nagelwal (eksteroog), na operaties ter voorkoming van een
recidive.
Contra-indicaties:
De beugel mag bij de volgende ziektebeelden alleen na zorgvuldige overweging van de verhouding
tussen de voordelen en de risico‘s en eventueel in overleg met een arts worden toegepast: onychomy-
cose, onycholyse, groeistilstand, tumorale veranderingen, subunguale granulatie, onychorrhexis, PAV
- perifeer arterieel vaatlijden - (in individuele gevallen), polyneuropathie / angiopathie (in individuele
gevallen), psoriasis (in individuele gevallen), allergische reacties op cyaanacrylzuurethylester.
Gebruikersdoelgroep:
Om de bescherming van de patiënt te verzekeren, mogen de nagelcorrectiebeugels van 3TO GmbH
uitsluitend worden toegepast door personen met een medische opleiding (bijv. podologen of artsen).
De medische vakkennis voor het inschatten van risico‘s van de behandeling en het vermogen om met
instrumenten om te gaan, zijn de basisvoorwaarde voor de toepassing van nagelcorrectiebeugels.
Aansprakelijkheid voor de gevolgen van onoordeelkundig gebruik wordt uitgesloten.
Duur van de toepassing:
De totale duur van de behandeling is afhankelijk van de initiële diagnose en van de individuele groei
van de nagel. Overeenkomstig de anamnese moet de frequentie van de opvolgingscontrole met ver-
vanging van de tampon individueel worden vastgelegd. Eventueel is een dagelijkse controle nodig. De
beugel moet doorgaans elke 3 - 6 weken worden verwisseld.
Bescherming van patiënt en gebruiker:
Reinig en desinfecteer de te behandelen nagel. Ter bescherming van patiënt en gebruiker moet de
therapeut aseptische, in de handel verkrijgbare wegwerphandschoenen aantrekken. Om zichzelf te
beschermen moet de therapeut bij elke behandeling een mondmasker en een veiligheidsbril dragen.
Gebruik de beugels uitsluitend zoals is beschreven in deze gebruiksaanwijzing en met originele
accessoires.
Risico‘s:
Gevaar van huidirritaties, letsel, ontstekingen en pijn in de omgeving van de nagel: Het correct
aanpassen en aanbrengen van nagelcorrectiebeugels is een belangrijke voorwaarde om huidirritaties,
huidletsel, pijn, eeltvorming en ontstekingen te voorkomen.
16
8
6
4Gevaar van nagelloslating (onycholyse):
Het correct instellen van de trek- en hefboomkrachten van nagelcorrectiebeugels zijn belangrijke
voorwaarden om het loslaten van de nagel te voorkomen.
Risico door infectie:
Een infectie van de nagelplaat, een bestaande beschadiging van de nagel of gebrekkige hygiëne
(met name achteraf) kan leiden tot nagelmycose. De informatie voor patiënten moet de bestaande
hygiënemaatregelen ter voorkoming van infecties bevatten.
Risico door verkleving:
De lijm OrthoGlue plakt binnen enkele seconden huid en oogleden aan elkaar. Bevat cyaana-
crylaat. Irriterend voor de ogen, luchtwegen en huid. Vermijd contact met de ogen en huid.
Raadpleeg onmiddellijk een arts in geval van contact met de ogen of inwendige organen. Adem
dampen niet in. Mag niet in aanraking komen met wonden. Dek wonden voor de toepassing af met
een olie- of vetlaag. Maak eventuele huidverklevingen niet met geweld los maar week ze geduren-
de langere tijd in een warm zeepsopje of werk ze voorzichtig los met aceton.
De reacties ontstaan doorgaans snel en worden door de patiënt en gebruiker snel opgemerkt. Er
moeten meteen tegenmaatregelen worden genomen.
Bijzondere incidenten:
Als er bij de toepassing van producten van 3TO GmbH bijzondere incidenten optreden, verwijder
de beugel dan meteen van de patiënt. De behandelde teen moet worden gedesinfecteerd en steri-
el worden verbonden. U of de patiënt dient onmiddellijk een arts te raadplegen. Neem onmiddellijk
telefonisch contact op met 3TO GmbH +49 89 4520833-0 (buiten de openingsuren per e-mail
via info@3to-gmbh.de). Aansluitend wordt een formulier „Bijzondere incidenten” naar u opgestu-
urd. Dit moet worden ingevuld en zo snel mogelijk worden verstuurd naar 3TO GmbH.
NL
Informatie voor de patiënt:
Informeer uw patiënt over de oorzaken en preventiemogelijkheden van ingegroeide nagels.
17
57
5
91 2
1 Verwijder losse delen van het nageloppervlak. Maak extreem ruwe nagels
glad of maak extreem gladde nagels met een vijl of een frees heel lichtjes
ruw.
2 Kies het formaat zodanig dat de beugel de nagelbreedte zoveel mogelijk
bedekt. Er moet echter rekening worden gehouden met een uitrekking van
de beugel op de nagel (ca. 0,7 - 2,7 mm). Kies daarom een beugel die de
uitreklengte korter is dan de nagelbreedte.
De beugel moet zo dicht mogelijk op de nagelrand aan de pijnlijke of sterk
ingegroeide kant worden geplaatst.
3 4 5
A
3 Reinig en ontvet de beugel en de nagel grondig met een alcoholdoekje en
laat de alcohol goed drogen (ca. 30 seconden).
Gezondheidsrisico: Risico door infectie - zie veiligheidsinstructies
4 Schroef de lijm open en veeg het borsteltje aan beide kanten 1 x lichtjes af
aan de rand van het flesje.
5 Breng een dun laagje lijm aan op het lijmoppervlak A van de strip. Gebruik
de lijm spaarzaam. Bij te veel lijm houdt de beugel niet op de nagel. Houd
de rand en de schroefdraad van het flesje schoon. Gebruik indien nodig
bijv. een alcoholdoekje om te reinigen.
Gezondheidsrisico: Risico door verkleving - zie veiligheidsinstructies
18
8
6
46
2 MIN.
6 Plaats het lijmoppervlak A op de sterker ingegroeide kant van de nagel.
Druk het lijmoppervlak A gedurende ca. 20 seconden met de vinger op de
nagel (ondertussen niet verschuiven!). Vervolgens moet de lijm gedurende
2 minuten zonder verdere aanraking uitharden.
Gezondheidsrisico: Risico door verkleving - zie veiligheidsinstructies
7 B
NL
7 Veeg het borsteltje aan beide kanten lichtjes af. Breng een dun laagje
lijm aan op het lijmoppervlak B van de beugel. Zorg dat er op de gelijmde
kant A geen kracht naar boven inwerkt en dat deze er niet wordt afgetrokken.
Gezondheidsrisico: Risico door verkleving - zie veiligheidsinstructies
19
57
58 9 10
2 MIN.
8 - 10 Die Spange wird um 0,7 bis 2,7 mm (abhängig von der Span-
genbreite, der Nagelstärke und dem Befund) gedehnt. Ziehen
Sie die Spange dabei parallel zum Nagel. Setzen Sie die Spange
im gedehnten Zustand auf den Nagel auf und drücken Sie die
Klebefläche B für ca. 30 Sekunden an. Achten Sie darauf, dass
die Spange nach dem Aufsetzen nicht mehr verschoben wird.
Anschließend muss der Klebstoff für 2 Minuten ohne weitere
Berührung aushärten.
Gesundheitsrisiko: Gefährdung durch Verkleben
siehe Sicherheitshinweise
11
11 Setzen Sie die PODOSTRIPE Zange schräg unter das Haltelement an
und zwicken Sie das Pad ab.
Zum Entfernen von PODOSTRIPE werden die Ränder der Spange mit
der Zange abgelöst. Die Spange kann dann abgezogen werden. Mit
einer Feile oder einem Fräser können Reste des Klebstoffs vom
20
8
6
4 Nagel entfernt werden.ITALIANO
Istruzioni di sicurezza
Scopo:
La terapia con lamelle per unghie della 3TO GmbH serve a ripristinare la crescita naturale dell‘unghia.
Con queste lamelle è possibile allievare il dolore oppure correggere la crescita di unghie incarnite e/o
deformate sollevando l‘unghia incarnita. La lamella è un prodotto monouso e viene consegnato non
sterile. Le lamelle per la correzione delle unghie sono dispositivi medici non invasivi di categoria I.
Indicazioni:
Unguis incarnatus (unghia incarnita), Unguis convolutus (unghia arrotolata), Onicofosi (eccessiva cor-
nificazione nella piega dell‘unghia), Clavi nella piega dell‘unghia (callo), dopo operazioni per prevenire
recidive.
Controindicazioni:
La lamella può essere utilizzata per i seguenti quadri clinici solo dopo un attento esame del rapporto
beneficio-rischio e, se necessario, in consultazione con un medico: onicomicosi, onicolisi, arresto della
crescita, alterazioni tumorali, granulazione subunguale, onicorrocemia, pAVK - malattia occlusiva arte-
riosa periferica - (in singoli casi), polineuropatia / angiopatia (in singoli casi), psoriasi (in singoli casi),
reazioni allergiche al cianoacrilato di etile.
Cerchio di utenti:
Per garantire la protezione del paziente, le lamelle per la correzione delle unghie della 3TO GmbH
possono essere utilizzate solo da specialisti con formazione medica (ad es. podologi o medici). La
competenza medica per valutare i rischi della terapia e la capacità di maneggiare gli strumenti sono
requisiti fondamentali per l‘applicazione di lamelle per la correzione delle unghie. È esclusa la respon-
sabilità per le conseguenze di un uso improprio.
Durata di applicazione:
La durata totale della terapia dipende dai risultati iniziali e dalla crescita individuale dell‘unghia.
La frequenza degli esami successivi con la sostituzione del tampone va determinata individual- IT
mente in base all‘anamnesi. Se necessario, va effettuato un controllo giornaliero. Le lamelle
vanno cambiate ogni 3 - 6 settimane.
Protezione del paziente e dell‘operatore:
Pulire e disinfettare l‘unghia da trattare. Per proteggere il paziente e l‘operatore, il terapista deve indos-
sare guanti sterili e monouso disponibili in commercio. Per la protezione del terapista, egli dovrebbe
indossare un paradenti e occhiali protettivi durante ogni trattamento. Utilizzare le lamelle solo come
descritto in questo manuale e con gli accessori originali.
Rischi:
Rischio di irritazione cutanea, lesioni, infiammazione e dolore nell‘ambiente delle unghie: l‘applicazione
e l‘inserimento corretto delle lamelle per la correzione delle unghie è un importante prerequisito per
evitare irritazioni cutanee, lesioni cutanee, dolori, cornificazione ed infiammazioni.
21
57
5Rischio di separazione delle unghie (onicolisi):
La corretta regolazione delle forze di trazione e di leva delle lamelle per la correzione delle unghie
è un prerequisito importante per evitare che l‘unghia si stacchi.
Rischio di infezione:
Un‘infezione della lamina ungueale, un pre-danneggiamento dell‘unghia o una mancanza di igiene
(soprattutto durante il riposizionamento) può portare ad una micosi dell‘unghia. L‘educazione del
paziente dovrebbe includere misure igieniche continue per prevenire l‘infezione.
Pericolo di incollamento:
La colla OrthoGlue unisce la pelle e le palpebre in pochi secondi. Contiene cianoacrilato. Irritante
per occhi, sistema respiratorio e pelle. Evitare il contatto con gli occhi e la pelle. In caso di con-
tatto con gli occhi o con gli organi interni, consultare immediatamente un medico. Non inalare i
vapori. Non deve venire a contatto con le ferite - coprire le ferite con olio o grasso prima dell‘uso.
Non rimuovere le aderenze cutanee con la forza, ma immergerle in acqua tiepida e saponata per
un lungo periodo di tempo o staccarle con cautela con l‘acetone.
Le reazioni si verificano di solito rapidamente e vengono rapidamente notate dal paziente e
dall‘operatore. Le contromisure vanno prese immediatamente.
Incidenti speciali:
In caso di incidenti particolari durante l‘utilizzo dei prodotti della 3TO GmbH, rimuovere imme-
diatamente la lamella dal paziente. Il dito interessato va disinfettato e fasciato in modo sterile.
Consultare immediatamente un medico. Si prega di contattare immediatamente la 3TO GmbH
al numero di telefono +49 89 4520833-0 (al di fuori degli orari di apertura per e-mail all‘indirizzo
info@3to-gmbh.de). Vi verrà quindi inviato un modulo „Incidenti speciali“. Questo modulo va
compilato e inviato alla 3TO GmbH quanto prima.
Informazioni sul paziente:
Informare il paziente sulle cause e sulle possibilità di prevenzione delle unghie incarnite.
22
8
6
41 2
1 Rimuovere le parti non adesive dalla superficie dell’unghia. Lisciare le unghie
estremamente ruvide o irruvidire le unghie estremamente lisce in modo leggero
con una lima o una fresa.
2 Selezionare la dimensione in modo che la lamella copra la massima larghezza
possibile delle unghie. Tuttavia, si deve tenere conto dell‘allungamento della
lamella sull‘unghia (circa 0,7 - 2,7 mm). Pertanto, selezionare la lamella più
corta della larghezza dell’unghia in relazione alla lunghezza di espansione.
La lamella va posizionata il più vicino possibile al bordo dell‘unghia sul lato
doloroso o più ingrossato.
3 4 5
A
3 Pulire accuratamente e sgrassare la lamella e l‘unghia con il tampone
di alcol e lasciare asciugare bene l‘alcol (circa 30 secondi).
IT
Pericolo per la salute: rischio di infezione
si prega di vedere le istruzioni di sicurezza
4 Svitare la colla e strofinare leggermente il pennello da entrambi i lati una volta
sul bordo del flacone.
5 Impregnare con un sottile strato di colla la superficie adesiva A della lamella.
Usare la colla con parsimonia, se si usa troppa colla la lamelle non si attac-
cherà all‘unghia. Tenere puliti il bordo e il filo del flacone. Se necessario, pulirli
con un tampone, ad esempio.
Pericolo per la salute: pericolo dovuto all‘incollaggio
si prega di vedere le istruzioni di sicurezza
236
2 MIN.
6 Posizionare la superficie adesiva A sul lato più ingrossato dell‘unghia.
Premere la superficie adesiva A contro l‘unghia con il dito per circa 20 se-
condi (non spostarla durante questo tempo!), poi la colla deve indurirsi per
2 minuti senza toccarla ulteriormente.
Pericolo per la salute: pericolo dovuto all‘incollaggio
si prega di vedere le istruzioni di sicurezza
7 B
7 Strofinare delicatamente il pennello da entrambi i lati. Applicare un sottile
strato di adesivo sulla superficie adesiva B della lamella. Assicurarsi che non
venga applicata nessuna forza verso l‘alto sul lato A incollato e che non venga
strappato.
Pericolo per la salute: pericolo dovuto all‘incollaggio
si prega di vedere le istruzioni di sicurezza
24
8
6
48 9 10
2 MIN.
8 - 10 La lamella viene allungata da 0,7 a 2,7 mm (a seconda della
larghezza della lamella, dello spessore dell‘unghia e dei risultati).
Tirare la lamella parallelamente all’unghia. Posizionare la lamella
sull‘unghia mentre è tesa e premere la superficie adesiva B per
circa 30 secondi. Assicurarsi che la lamella non venga spostata
dopo averla messa. La colla deve poi indurire per 2 minuti senza
ulteriore contatto.
Pericolo per la salute: pericolo dovuto all‘incollaggio
si prega di vedere le istruzioni di sicurezza
IT
11
11 Posizionare la pinza PODOSTRIPE in diagonale sotto l‘elemento di supporto
e stringere il tampone.
Per rimuovere PODOSTRIPE, i bordi della lamella vengono staccati
con la pinza. In seguito, si può rimuovere la lamella. I residui di colla
possono essere rimossi dall‘unghia con una lima o una fresa. 25
57
5Español
Instrucciones de seguridad
Propósito:
La terapia con retenedores de uñas de 3TO GmbH sirve para restaurar el crecimiento natural de la
uña. Con los retenedores, el dolor puede ser aliviado o el crecimiento de las uñas encarnadas y/o
deformadas puede ser corregido levantando la uña encarnada. El retenedor desencarnador es un
producto desechable y se suministra sin esterilizar. Los retenedores correctoras de uñas son dispo-
sitivos médicos no invasivos de clase I.
Indicaciones:
Unguis incarnatus (uña encarnada), Unguis convolutus (uña enrollada), Onychophosis (hornificación
excesiva en la retícula de la uña), Clavi en la retícula de la uña (callosidad), tras operaciones para
evitar su reaparición.
Contraindicaciones:
Los retenedores sólo pueden utilizarse en los siguientes cuadros clínicos tras un examen cuidadoso
de la relación beneficio/riesgo y, de ser necesario, tras consultarlo con un médico: Onicomicosis,
onicólisis, detención del crecimiento, cambios tumorales, granulación subungual, onicorrexis, pAVK -
enfermedad oclusiva arterial periférica - (en casos individuales), polineuropatía / angiopatía (en casos
individuales), psoriasis (en casos individuales), reacciones alérgicas al etil cianocrilato.
Círculo de usuarios:
Para garantizar la protección del paciente, las ortesis correctoras de uñas de 3TO GmbH sólo
pueden ser utilizadas por especialistas con formación médica (por ejemplo, podólogos o médicos).
Los conocimientos médicos para evaluar los riesgos de la terapia, así como la capacidad de manejar
instrumentos, son requisitos básicos para la aplicación de aparatos correctores de uñas. Se excluye
la responsabilidad por las consecuencias del uso indebido.
Duración de la aplicación:
La duración total de la terapia depende de los diagnósticos iniciales y del crecimiento individual de
la uña. La frecuencia de los exámenes de seguimiento con sustitución del vellón de taponamiento
debe determinarse individualmente según el historial clínico. Si es necesario, se debe realizar un
control diario. Las graps suelen tener que cambiarse cada 3 - 6 semanas.
Protección del paciente y del usuario:
Limpie y desinfecte la uña que va a tratar. Para proteger al paciente y al usuario, el terapeuta debe
usar guantes estériles desechables disponibles en el mercado. Para la propia protección del terapeu-
ta, debe usar un protector bucal y gafas protectoras durante cada tratamiento. Utilice las retenedores
como se describe en estas instrucciones de utilización y con los accesorios originales.
Riesgos:
Riesgo de irritación de la piel, lesiones, inflamación y dolor en el entorno de las uñas: El ajuste y la
inserción correcta de las graps de corrección de uñas es un prerrequisito importante para evitar la
irritación de la piel, las lesiones de la piel, el dolor, la cornificación y la inflamación.
26
8
6
4Riesgo de separación de las uñas (onicólisis):
El ajuste correcto de las fuerzas de tracción y de palanca de los retenedores correctores de uñas
son requisitos previos importantes para evitar que la uña se afloje.
Riesgo de infección:
Una infección de la placa de la uña, un daño previo de la uña o la falta de higiene (especialmente
durante el reposicionamiento) puede producir una micosis de la uña. El consejo al paciente debe
incluir medidas de higiene continuas para prevenir la infección.
Peligro por adherencia:
El pegamento OrthoGlue puede pegar la piel y los párpados en segundos. Contiene cianocrilato.
Irrita los ojos, el sistema respiratorio y la piel. Evite el contacto con los ojos y la piel. En caso de
contacto con los ojos o los órganos internos, consulte a un médico inmediatamente. No inhalar
los vapores. No debe entrar en contacto con las heridas - Cubrir las heridas con aceite o grasa
antes de usarlas. No elimine las adherencias de la piel a la fuerza, sino que las sumerja en agua
jabonosa tibia durante un período de tiempo más largo o aflójelas cuidadosamente con acetona.
Las reacciones suelen ser rápidas y el paciente y el usuario las notan rápidamente. Las contrame-
didas deben ser tomadas inmediatamente.
Incidentes especiales:
Si ocurre algún incidente especial al usar productos de 3TO GmbH, quítenle la ortesis inmediata-
mente al paciente. El dedo afectado debe ser desinfectado y vestido esterilizado. Consulte a
un médico inmediatamente. Por favor, póngase en contacto con 3TO GmbH inmediatamente
por teléfono +49 89 4520833-0 (fuera del horario de apertura por e-mail a info@3to-gmbh.de).
Luego se le enviará un formulario sobre „Incidentes especiales“. Este último debe ser completado
y enviado a 3TO GmbH lo antes posible.
Información del paciente:
Informe a su paciente sobre las causas y las posibilidades de prevención de las uñas encarnadas.
ES
27
57
51 2
1 Retire las partes no adherentes de la superficie de la uña. Alise las uñas
extremadamente ásperas o áspere las uñas extremadamente lisas muy
ligeramente con una lima o una fresa.
2 Seleccione el tamaño para que el retenedor desencarnador cubra el mayor
ancho de uña posible. Sin embargo, hay que tener en cuenta el alargamiento
del retenedor desencarnador en la uña (aprox. 0,7 - 2,7 mm). Seleccione el
retenedor en consecuencia más corto que el ancho de la uña en función de
la longitud de expansión.
El retenedor desencarnador debe colocarse lo más cerca posible del borde
de la uña en el lado doloroso o más encarnado.
3 4 5
A
3 Limpie y desengrase completamente el retenedor desencarnador y las uñas
con el hisopo con alcohol y deje que el alcohol se seque bien (unos 30
segundos).
Riesgo para la salud: Riesgo de infección -
ver instrucciones de seguridad
4 Enrosque el pegamento y limpie el cepillo una vez en el borde ligeramente
de ambos lados del frasco.
5 Humedezca la superficie adhesiva A de la almohadilla finamente con pega-
mento. Use el pegamento con moderación, el exceso de pegamento no
mantendrá el retenedor desencarnador en la uña. Mantenga el borde y la ros-
ca del frasco limpios. Si es necesario, límpielos con un hisopo, por ejemplo.
Riesgo para la salud: Peligro debido a la adherencia -
ver instrucciones de seguridad
28
8
6
46
2 MIN.
6 Coloque la superficie adhesiva A en el lado más encarnado de la uña.
Presione la superficie adhesiva A contra la uña con el dedo durante aprox.
20 segundos (¡no la mueva durante este tiempo!), después el adhesivo debe
endurecerse durante 2 minutos sin necesidad de volver a tocarlo.
Riesgo para la salud: Peligro debido a la adherencia -
ver instrucciones de seguridad
7 B
7 Limpie suavemente el cepillo por ambos lados. Aplique una fina capa de
pegamento a la superficie adhesiva B del retenedor desencarnador. Asegúre-
se de que no se aplique ninguna fuerza hacia arriba en el lado de adherencia
A y que no se tire de él.
Riesgo para la salud: Peligro debido a la adherencia - ES
ver instrucciones de seguridad
29
57
58 9 10
2 MIN.
8 - 10 El retenedor desencarnador se dilata entre 0,7 y 2,7 mm (depen-
diendo del ancho del retenedor desencarnador, el espesor de la
uña y del diagnóstico). Tire del retenedor desencarnador parale-
lamente a la uña. Coloque el retenedor desencarnador en la uña
mientras se estira y presione la superficie adhesiva B durante
unos 30 segundos. Asegúrese de que el retenedor desencarna-
dor no se mueva después de haberlo colocado. El pegamento
debe entonces endurcerse durante 2 minutos sin necesidad de
más contacto.
Riesgo para la salud: Peligro debido a la adherencia -
ver instrucciones de seguridad
11
11 Coloque el retenedor desencarnador PODOSTRIPE en diagonal bajo el
elemento de sujeción y pellizque la almohadilla.
Para quitar el PODOSTRIPE, los bordes del retenedor desencarnador
se desprenden con la pinza. El retenedor desencarnador pueden en-
tonces ser extraído. Con una lima o una fresa, se pueden remover los
30
8
6
4 residuos de pegamento sobre la uña.Sie können auch lesen