PX SYSTEM TÜR PX SYSTEM DOOR - *700002* 700002 - PIXLIP
←
→
Transkription von Seiteninhalten
Wenn Ihr Browser die Seite nicht korrekt rendert, bitte, lesen Sie den Inhalt der Seite unten
700002      *700002*

PX SYSTEM TÜR
PX SYSTEM DOOR

Aufbauanleitung
User manual

                       www.pixlip.com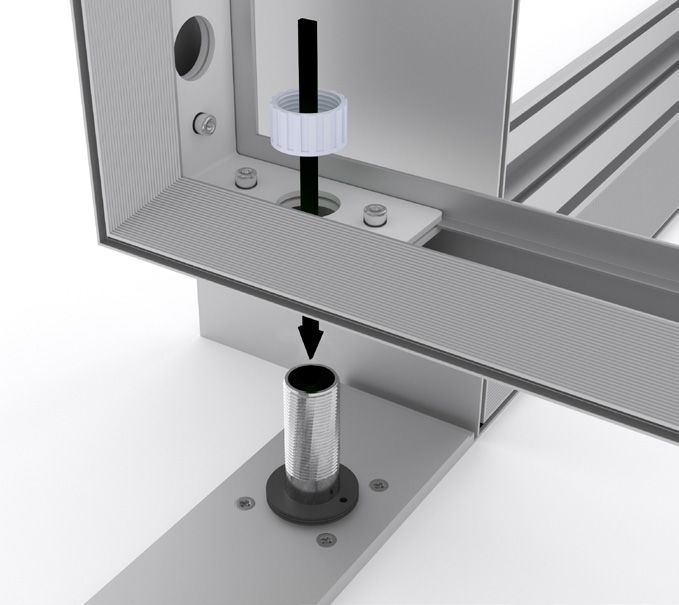
INHALT
CONTENT

01         KOMPONENTEN
           COMPONENTS
02         AUFBAU
           CONSTRUCTION
     02    VORBEREITUNG TÜRPROFIL
           PREPERATION DOOR PROFILE

     02    RAHMENECKVERBINDUNG
           FRAME CORNER CONNECTION

     03    TÜRFRIFFMONTAGE
           DOOR PULL ASSEMBLY

     03    MONTAGE STREBE
           ASSEMBLY

     04    MONTAGE SEILZUG
           WIRE ROPE HOIST ASSEMBLY

     04    MONTAGE TÜRBESCHLAG
           DOOR FITTING ASSEMBLY

     05    BEFESTIGUNG TÜRE
           DOOR FIXING

     06    MONTAGE LED MODUL
           LED MODULE ASSEMBLY

     07    EINSPANNUNG TEXTILE
           TEXTILE TENSIONING

INHALT | CONTENT                      www.pixlip.com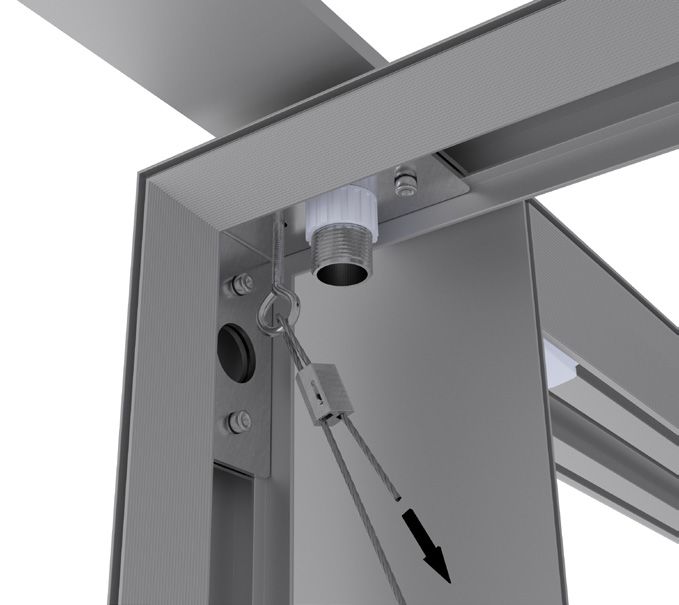
KOMPONENTEN
COMPONENTS

1                       2                          3                        4                          5
PX 100 Profil           Magnet                     Eckwinkel                Ösenschraube               Türgriff
PX 100 profile          Magnet                     Corner angle             Eyebolt                    Door pull

6                       7                          8                        9                          10
Blendschraube           Kontermutter Groß          Strebenhalter            Strebe                     Drahtseil
Veneer bolt             Log nut big                Strut holder             Strebe                     Wire rope

11                      12                         13                       14                         15
Zipclip                 Türbeschlag                L-Verbindungsblech       Gewindebolzen              Unterlegscheibe
Zip clip                Door fitting               L- Metal sheet           Threaded bolt              Washers

16
Kontermutter Klein
Log nut small

    Achtung
    Attention

Fachkundige Montage erforder-          schaffenheit und mit ausreich-       that wrong assembly can lead to        are uncertain, contact your local
lich. Unsachgemässe Monta-             ender Tragfähigkeit verwenden.       injury or damage. Note! Always         specialised retailer.
ge kann zu Unfällen führen.            Erkundigen sie sich ggfs. beim       choose screws and fittings that
Wichtig! Achten sie darauf, dass       Eisenwarenfachhandel. | The          are specially suited to the mater-
sie Schrauben / Beschläge ent-         assembly should be carried out by    ial in your wall / ceiling and have
sprechend der Wand-/Deckenbe-          a qualified person due to the fact   sufficient holding power. If you

KOMPONENTEN | COMPONENTS                                                    www.pixlip.com                                                         |1
AUFBAU
CONSTRUCTION

                                1

                                                                          3
                                                                                                                            4

                 2

VORBEREITUNG TÜRPROFIL
PREPERATION DOOR PROFILE
Schieben Sie den Magnetstein in die Enden
der PX100 Profile (oben und unten). Achten
Sie darauf, dass sich die Systembohrung auf
der anderen Seite des Profils befindet. Der                                                         Türgriffseite |
Magnetstein befindet sich nun auf Türgriff-                                                         Door handle side
seite. | Slide the magnetic stone into the ends
of the PX100 profiles (top and bottom). Make
sure that the system bore is on the other side
of the profile. The magnetic stone is now on
the door handle side.

1       PX100 Profil | PX100 profile
2       Magnet | Magnet

                                                  Schieben Sie die beiden Eckverbinder in ein       RAHMENECKVERBINDUNG
                                                  Profilstück. Fügen Sie ein zweites Profilstück    FRAME MOUNTING
                                                  über die Eckverbinder, sodass ein sauberer
                                                  90 Grad Winkel entsteht und fixieren sie          Die Ösenschraube wird nur in der unteren
                                                  die Ecken, indem Sie die Schrauben fest an-       Ecke auf Türgriffseite und diagonal gegen-
                                                  ziehen. | Slide the two corner connectors into    überliegend, oben auf Scharnierseite ver-
                                                  a profile piece. Place a second profile piece     wendet. | Place the M6 threaded bolts into the
                                                  over the corner connectors to create a clean 90   system hole, but do not tighten the screws.
                                                  degree angle and fix the corners by tightening    The eyebolt is only used in the lower corner on
                                                  the screws.                                       the door handle side and diagonally opposite,
                                                                                                    above on the hinge side (see illustration).
                                                  3       Eckwinkel | Corner angle
                                                                                                    Wiederholen Sie die Arbeitsschritte dieser Seite für
                                                                                                    alle vier Ecken Ihres Rahmens! | Repeat every step
                                                                                                    on this page for all four corners of your frame!

                                                                                                    4        Ösenschraube | Eyebolt

AUFBAU | CONSTRUCTION                                                         www.pixlip.com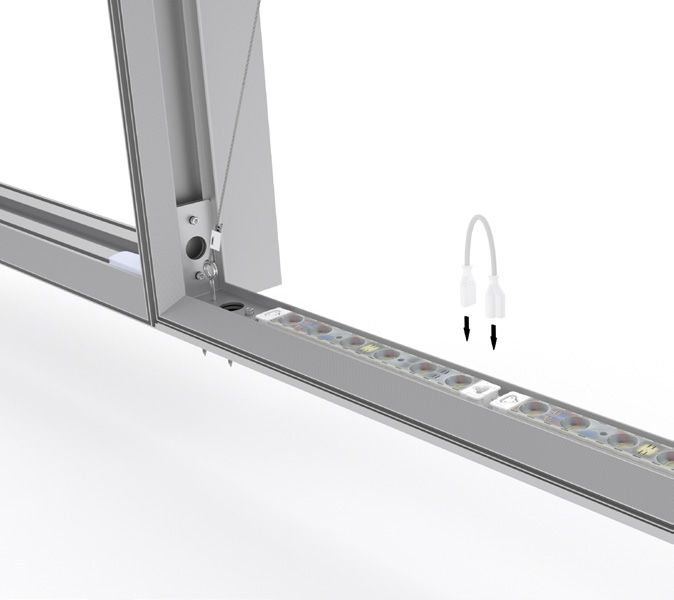
8
      6

                                                                                                                                                9

                                            7

                     5

TÜRGRIFFMONTAGE                                  MONTAGE STREBE                                    Fixieren Sie die Teile mit der beiliegenden
DOOR PULL ASSEMBLY                               STRUT ASSEMBLY                                    Madenschraube, aber ziehen Sie sie erst fest,
                                                                                                   wenn Sie den vorderen Teil des Streben-
Legen Sie den Türgriff an die im Rahmen vor-     Schieben Sie die Nutensteine in die Nut und       schlosses in die dafür vorgesehenen System-
handene Doppelsystembohrung und fixieren         drehen Sie solange an den Schrauben, bis          bohrung des Strebenhalters geschoben ha-
Sie ihn mit den Blendschrauben und Konter-       sich die Nutensteine quer im Rahmen drehen.       ben. | Fix the parts with the grub screw but do
muttern, wie in der Abbildung dargestellt.       | Slide both slot nut into the groove and turn    not tighten it before you slid the front part of
| Place the door handle against the double       the screws until the slot nuts rotate crosswise   the strut lock into the system bore provided.
system bore in the frame and secure it with      in the frame.
the blind screws and lock nuts as shown in the                                                     9       Strebe | Strut
picture.                                         8       Strebenhalter | Strut holder

5         Türgriff | Door pull
6         Blendschraube | Veneer bolt
7         Kontermutter Groß | Log nut big

AUFBAU | CONSTRUCTION                                                       www.pixlip.com                                                     2|3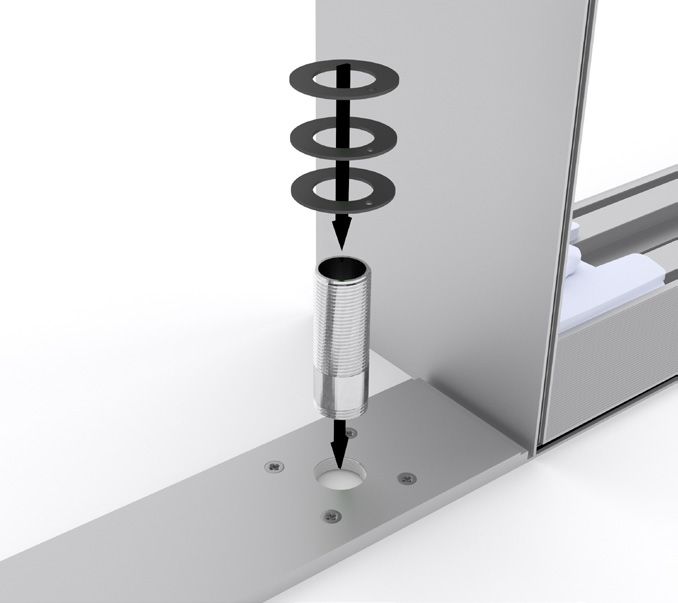
11

                                                   Das Drahtseil sollte nun diagonal im Rahmen      MONTAGE TÜRBESCHLAG
                                                   hängen. Um das Seil auf Spannung zu ziehen,      DOOR FITTING ASSEMBLY
                                                   nutzen Sie den Zipclip. | The wire rope should
                                                   now hang diagonally in the frame. To pull the    Justieren Sie die mit Hilfe der PX Anleitung
                                                   rope to tension, use the Zipclip.                zuvor aufgebauten Rahmen so, dass der
                                                                                                    untere Türbeschlag genau dazwischen passt.
                                                                                                    | Adjust the two frames you built up with the
                                       10
                                                                                                    help of the PX user manual before. Make sure
                                                                                                    the lower door fitting fits in perfectly.

                                                                                                                           12
MONTAGE SEILZUG
WIRE ROPE HOIST ASSEMBLY
Fädeln Sie das Drahtseil durch die erste
Öffnung des Zipclips (s. Abb), danach durch
die Ösenschraube und final durch die zweite
Öffnung des Zipclips. Gehen Sie bei der
zweiten Ösenschraube genauso vor, aber
achten Sie darauf, das Drahtseil vorher durch
die Öffnung der Strebe zu führen. | Thread
the wire rope through the first opening of the
zipclip (as seen in the picture). Then thread it                                                    Fixieren Sie den unteren Türbeschlag, ab-
through the eyebolt and finally through the                                                         hängig von Ihrem Untergrund, mit den
zipclip again. Repeat it for the second eyebolt                                                     Schrauben, oder kleben Sie ihn fest. Achten
but make shure that you lead the wire rope                                                          Sie darauf, das sich der im Beschlag integrier-
through the opening of the strut before.                                                            te Magnet auf Seite des Türgriffes befindet. |
                                                                                                    Depending on your surface, fix the lower door
10       Drahtseil | Wire rope                                                                      fitting with the screws or glue it in place. Make
11       Zipclip | Zip clip                                                                         sure that the magnet integrated in the fitting
                                                                                                    is on the side of the door handle.

                                                                                                    12       Türbeschlag | Door fitting

AUFBAU | CONSTRUCTION                                                       www.pixlip.com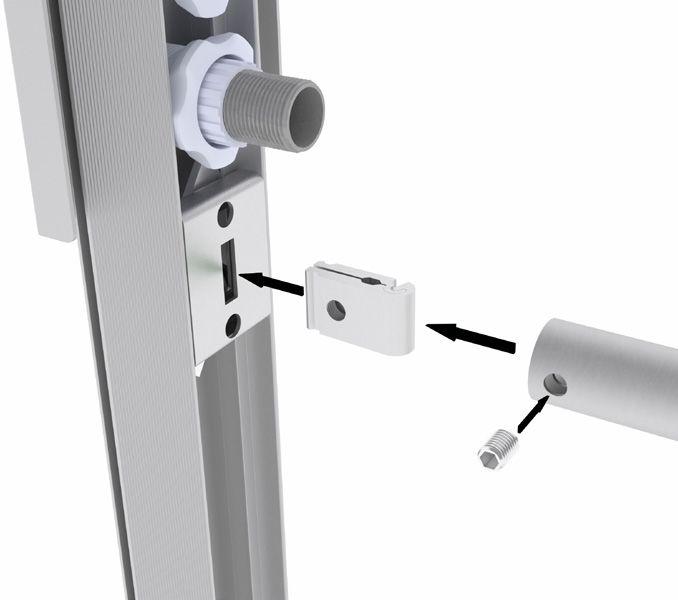
16
                                                                  15

      13

                                                                  14

Befestigen Sie den oberen Türbeschlag in          BEFESTIGUNG TÜRE                                 Platzieren Sie den Türrahmen auf der Seite
dem Sie die L-Verbindungsbleche mit den           DOOR FIXING                                      der Systembohrung auf den Gewindebolzen
Blendschrauben, den Kontermuttern und den                                                          und stabilisieren Sie ihn mit einer Konter-
M6 Gewindeschrauben fixieren. Achten Sie          Drehen Sie den Gewindebolzen in das Gewin-       mutter. | Place the door frame on the threaded
auch hier darauf, dass sich der im Beschlag       de des unteren Türbeschlags und legen Sie        bolt on the side of the system bore and stabi-
integrierte Magnet auf Seite des Türgriffes       danach die drei Unterlegsscheiben, wie auf       lize it with a lock nut.
befindet. | Fasten the upper door fitting by      der Abbildung, darüber. Screw the threaded
fixing the L connecting plates with the cover     bolt into the thread of the lower door fitting   14      Gewindebolzen | Threaded bolt
screws, the lock nuts and the M6 threaded         and then place the three washers over it, as     15      Unterlegscheibe | Washer
screws. Again, make sure that the magnet          shown in the picture.                            16      Kontermutter Klein | Log nut small
integrated in the fitting is on the side of the
door handle.

13         L-Verbindungsblech | L-Metal sheet

AUFBAU | CONSTRUCTION                                                      www.pixlip.com                                                       4|5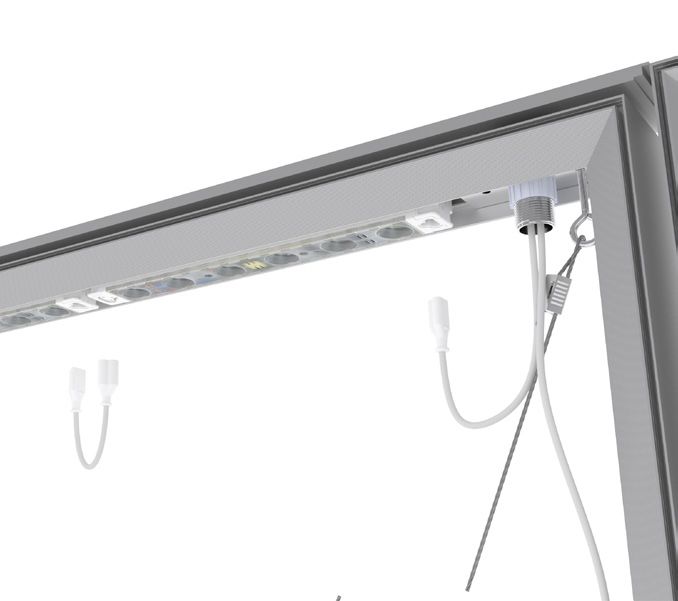
Finale Installation | Final installation

Schieben Sie den zweiten Gewindebolzen
durch die Systembohrung des Rahmens und                                                       MONTAGE LED MODUL
drehen ihn feste am oberen Türbeschlag ein.                                                   LED MODULE ASSEMBLY
Fixieren Sie ihn mit der zweiten Kontermut-
ter. Achten Sie darauf, zwischen Türbeschlag                                                  Montieren Sie die LED Module wie auf der Ih-
und Tür eine Unterlegsscheibe zu platzieren.                                                  nen beiliegenden Anleitung. | Mount the LED
| Slide the second threaded bolt through the                                                  modules as described in the enclosed manual.
system bore of the frame and turn it in at the
upper door fitting. Fix it with the second lock
nut. Make sure to place a washer between the
door fitting and the door.

Ziehen Sie den Zipclip solange, bis das Draht-
seil auf Spannung ist und die Tür gerade in
den Angeln hängt. | Pull the Zipclip until the
wire rope is taut and the door hangs straight
in the hinges.

AUFBAU | CONSTRUCTION                                                        www.pixlip.com

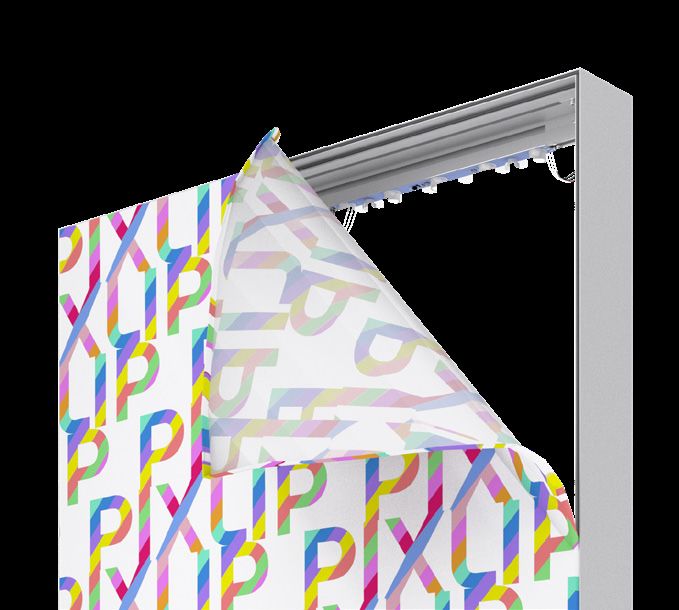
22

Wir empfehlen, die LEDs der Tür mit denen        EINSPANNUNG TEXTILIEN
des Rahmens auf Scharnierseite zu verbin-        TEXTILE TENSIONING
den. Verlegen Sie hierfür ein Kabel durch den
oberen Gewindebolzen der Tür, sowie durch        Führen Sie den Gummikeder des Blockouts in
die entsprechende Systembohrung auf der          die Nut des Rahmens ein. Fangen Sie mit den
Oberseite des benachbarten Rahmens. Inner-       Ecken an und gehen Sie von da aus über die
halb der Tür können Sie nun mithilfe eines       Ränder. Wiederholen Sie den Vorgang beim
Y-Verbinders das Kabel aufteilen um so die       Textil für die Frontseite. | Lead the rubber
oberen sowie unteren beiden LEDs anzu-           beading of the blockout through the slot of
schließen. | We recommend connecting the         the frame. Start with the corners, then do the
LEDs on the door with those on the hinge side    edges. Repeat the action for the front textile.
of the frame. Lay a cable through the upper
threaded bolt of the door and through the cor-   22         Textil und Blockout | Textile and blockout
responding system hole on top of the adjacent
frame. Inside the door you can now split the
cable using a Y-connector to connect the upper
and lower two LEDs.

AUFBAU | CONSTRUCTION                                                          www.pixlip.com            6|7

PX SYSTEM TÜR | DOOR
AUFBAUANLEITUNG
USER MANUAL

© 2018

PIXLIP GmbH
Raiffeisenstraße 17
40764 Langenfeld
Germany

info@pixlip.com
www.pixlip.com
Sie können auch lesen