WINKELBRANDMANSCHETTE "SYSTEM REHAU" - DE MONTAGEANLEITUNG 312665 EN IT INSTALLATION INSTRUCTIONS 312665 EN ISTRUZIONI DI MONTAGGIO 312665 IT
←
→
Transkription von Seiteninhalten
Wenn Ihr Browser die Seite nicht korrekt rendert, bitte, lesen Sie den Inhalt der Seite unten
winkelbrandmanschette „SYSTEM REHAU”
DE         montageanleitung 312665
en         installation instructions 312665 EN
IT         istruzioni di montaggio 312665 IT

www.rehau.de                                     Construction
Gültig ab Mai 2010                                Automotive
Technische Änderungen vorbehalten                    Industry
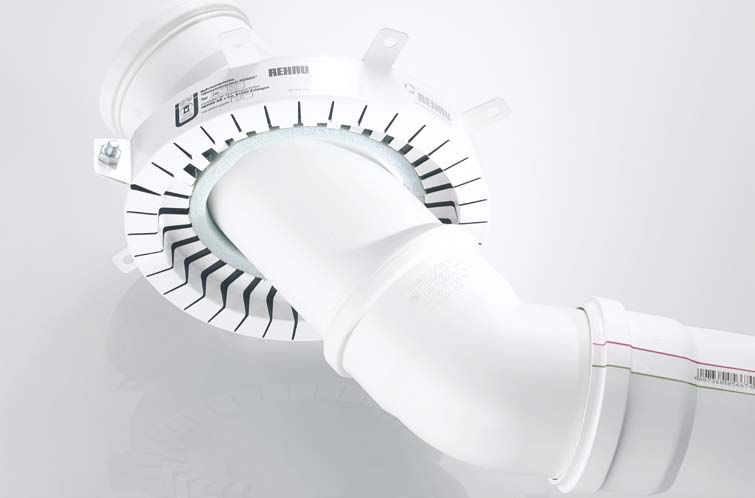
Die Winkelbrandmanschette System REHAU ist für den        umwickelt und der Restquerschnitt mit Mauermörtel,
nachträglichen Deckenanbau für das schalldämmende         Gips oder Beton geschlossen (Bild 1).
Hausabflusssystem RAUPIANO PLUS mit allgemeiner           Zur Manschettenmontage wird die vorgebogene
bauaufsichtlicher Zulassung Z-42.1-223 zugelassen.        Winkelbrandmanschette durch Auseinanderziehen des
                                                          Verbindungsflansches aufgebogen, der beiliegende
Sie wird angewandt zur Abschottung von RAUPIANO           Schaumstoffstreifen nach Abziehen der Trennfolie auf
PLUS-Fallleitungen, die Deckenbauteile durchdringen       den inneren Umfang der Manschette geklebt und die
und im Deckenbereich oder direkt unterhalb einen          Manschette um das Rohr gelegt (Bild 2). Wahlweise
Bogen beschreiben. Die Winkelbrandmanschette lässt        kann der Schaumstoffstreifen auch so auf das Rohr
sich in allen diesen Fällen montieren, unabhängig         geklebt werden, dass er bei der Montage zwischen
davon, ob das Rohr schräg oder rechtwinkelig aus der      Manschette und Rohr liegt. Die Manschette wird
Decke austritt. Da die Höhe der Manschetten nur           jetzt mit der beiliegenden Schraube/Mutter über den
30 mm (DN 50 und DN 75) bzw. 42 mm (DN 90;                Verbindungsflansch um das Rohr geschlossen und
DN 110 und DN 125) beträgt, stellt auch eine direkt       gegen die Decke geschoben (Bild 3). Es ist darauf zu
unterhalb der Decke geführte Rohrleitung kein Prob-       achten, dass die Manschette rundum gleichmäßigen
lem dar.                                                  Abstand vom Rohr hat. Hierzu kann die Manschette
                                                          ggf. auch in eine ovale Form gebogen werden. Durch
Die Rohrabschottung darf in mindestens 15 cm dicke        die Bohrungen in den Befestigungslaschen werden die
Decken aus Beton bzw. Stahlbeton (DIN 1045) oder          Bohrstellen angezeichnet (Bild 4). Jetzt wird die Man-
Porenbeton (DIN 4223) mindestens der Feuerwider-          schette zurückgeschoben und gebohrt (Bild 5). Bei der
standsklasse F 90 (feuerbeständig), Benennung (Kurz-      anschließenden Befestigung der Manschette an der
bezeichnung) F 90-AB, nach DIN 4102-2 eingebaut           Decke ist auf korrekte Positionierung der Schaumstof-
werden.                                                   feinlage zur Schallentkopplung zu achten (Bild 6).

Der Abstand zwischen den Rohrabschottungen –              Montage am Rohr DN 125
gemessen zwischen den Rohrmanschetten – muss              Der oben beschriebene Montageablauf gilt grundsätz-
mindestens 10 cm betragen.                                lich auch für den Manschettentyp DN 125. Abwei-
                                                          chend hiervon ist zu beachten: Nach der vollständigen
Es muss die zum jeweiligen Rohraußendurchmesser           Montage der Winkelbrandmanschette ist der im
passende kleinste Rohrmanschette verwendet werden.        Verpackungsumfang befindliche Glasseidenmantel zu
                                                          montieren. Hierbei ist folgendermaßen vorzugehen:
Vor dem Einbau der Rohrmanschette ist in jedem Fall       Zunächst wird durch den oberen und unteren Saum
zu kontrollieren, ob das Rohr und die Einbaubedin-        des Mantels je eines der beiliegenden Spannbänder
gungen den eingangserwähnten Voraussetzungen              gezogen. Dann wird ein Spannband so mit dem Mantel
entsprechen.                                              um die Manschette gelegt und verschraubt, dass es
                                                          die Decke berührt (Bild 7). Anschließend wird der
Montage an Rohren DN 50, DN 75, DN 90 und                 Mantel mit Hilfe des zweiten Spannbandes um das
DN 110                                                    Rohr geschlossen. Hierbei ist darauf zu achten, dass
Zunächst ist der Raum zwischen Decke und Rohr zu          durch das zweite Spannband der Glasseidenmantel
verschließen. Aus Schallschutzgründen ist ein max.        gespannt wird (Bild 8). Nach erfolgter Montage der
10 mm breiter Spalt mit Mineralwolle (nichtbrennbar,      Brandmanschette ist das beiliegende Kennzeichnungs-
Schmelzpunkt > 1000 °C) oder mit AF/ARMAFLEX              schild auszufüllen und neben der Rohrabschottung
auszufüllen. Ist der Spalt größer, so wird das Rohr mit   an der Wand/Decke zu befestigen. Die beiliegende
den oben genannten Baustoffen max. 10 mm dick             Übereinstimmungsbestätigung ist auszustellen und
                                                          dem Bauherren auszuhändigen.
2
1 2
3 4
5 6
7 8
3Anzahl Befesti-
Brandmanschetten- Betondecken Porenbetondecken
gungslaschen
typ
der Manschette
Fischer Bolzen FBN 6/10 Hilti Porenbetondübel
DN 50 und DN 75 Hilti Segmentanker HSA HPD M6/10 bzw. 4
M6x65/10/20 HPD M6/30
Fischer Ankerbolzen FAZ II 8/10 Hilti Porenbetondübel
DN 90 Hilti Segmentanker HSA HPD M8/10 bzw. 4
M8x75/10/23 HPD M8/20
Fischer Ankerbolzen FAZ II 8/10 Hilti Porenbetondübel
DN 110 Hilti Segmentanker HSA HPD M8/10 bzw. 6
M8x75/10/23 HPD M8/20
Fischer Ankerbolzen FAZ II 8/10 Hilti Porenbetondübel
DN 125 Hilti Segmentanker HSA HPD M8/10 bzw. 6
M8x75/10/23 HPD M8/20
Beachten Sie die Montagehinweise des Befestigungsmittelherstellers
(Bitte beachten: Die Setztiefe ist etwas geringer
als die Bohrlochtiefe!)
Wichtig: Beachten Sie sorgfältig die zutreffenden Brandschutz-
Diese Montageanleitung ist eine Empfehlung. Sie gilt vorschriften und die jeweils gültigen Bauordnungen /
ausschließlich für den Einbau einer oder mehre- Bauvorschriften, insbesondere bei
rer „Winkelbrandmanschetten System REHAU“. In -- Durchdringen von Decken
Kombination mit anderen Abschottungssystemen -- Räumen mit besonderen / verschärften Anforde-
können andere Abstände gelten, die den jeweiligen rungen an vorbeugende Brandschutzmaßnahmen
bauaufsichtlichen Zulassungen bzw. Prüfzeugnissen (nationale Vorschriften beachten!)
zu entnehmen sind. Die Vorgaben der Allgemeinen
bauaufsichtlichen Zulassung Z-19.17-1268 sind Beachten Sie die gültigen Unfallverhütungs- und
grundsätzlich zu beachten und einzuhalten. Sicherheitsvorschriften bei der Installation.
4The REHAU angled fireproofing collar system is appro- To install the collar, the pre-deformed angled fireproofing
ved for retrospective ceiling mounting for the RAUPIANO collar is opened by pulling the connecting flange apart
Plus sound insulating domestic waste water system and, after removing the separation foil, the foam strip is
with general technical approval Z-42.1-223. glued around the inner circumference of the collar, and
The REHAU angled fireproofing collar is employed the collar is placed over the pipe (Fig. 2). The foam strip
to provide fire-retardant sealing for RAUPIANO PLUS can also be installed on the pipe so that it lies between
downpipes which pass through ceiling components and the collar and the pipe once the collar is installed. Using
either directly in other ceiling components or describe a the enclosed screw/nut, the collar is then locked in
subsequent arc. place around the pipe and subsequently pushed against
It is used to seal RAUPIANO PLUS stack pipes which the ceiling (Fig. 3). Care should be taken to ensure that
penetrate ceilings at an angle. The angled fire proofing the space between the collar and the pipe is equal on all
collars can be installed in all these instances, regardless sides. The collar may need to be bent into an oval shape
of whether the pipe exits the ceiling at an angle or a to allow this. The drill locations are indicated by the drill
right angle. Because the collar’s height is a mere 30 holes on the fastening brackets (Fig. 4).
mm (DN 50 and DN 75) or 42 mm (DN 90, The collar is then pushed back and the holes drilled out
DN 110 and DN 125), a pipe mounted directly below (Fig. 5). When the collar is subsequently mounted on
the ceiling presents no serious problem. the ceiling, the correct placement of the foam insulation
The pipe section must be installed in a ceiling of at least to provide optimum sound dampening must be noted
15 cm in thickness made from concrete, reinforced (Fig. 6).
concrete (DIN 1045) or porous concrete
(DIN 4223) of at least fire resistance class F 90 (fire- Installation on DN 125 pipe
resistant), designation (short description) F 90-AB, to The installation procedure described above basically
DIN 4102-2. applies to the DN 125 type of collar. But deviates with
The distance between the pipe sections – measured respect to the following: Once the angled fire- proofing
between the pipe collars – must be at least 10 cm. collar has been completely installed, the glass fiber
The smallest pipe collar which will fit the external jacket included as part of the standard packaging
diameter of the pipe must be used in each case. must be installed. This is done as follows: One of the
Before assembling the pipe collar, a check is always to enclosed tightening straps is pulled through the upper
be carried out to ensure that the pipe and installation and lower jacket seam. Another tightening strap is then
conditions meet the requirements mentioned at the placed around the collar together with the jacket and
start. screwed in place so that it contacts the ceiling (Fig. 7).
Finally, a second tightening strap is used to wrap the
Installation on DN 50, DN 75, DN 90 and DN 110 collar around the pipe.
pipes In doing this last step, care must be taken to ensure that
First, the gap between the ceiling and the pipe must the second tightening strap puts tension on the glass
be sealed. For reasons of sound insulation, a gap no fiber jacket (Fig. 8). Once the fire-proofing collar has
wider than 10 mm must be filled with mineral cotton been completely installed, the enclosed identification
(nonflammable, melting point > 1000 °C) or with AF/ tag must be completed and attached next to the pipe
ARMAFLEX. If the gap is larger, the pipe is wrapped in partition on the wall/ceiling.
one of the materials mentioned above to a thickness of The enclosed declaration of compliance must then be
approx. 10 mm and the remaining gap is filled in using completed and handed to the contractor.
mortar, plaster or concrete (Fig. 1).
51 2 3 4 5 6 7 8 6
Angled fireproofing        Concrete                            Aircrete                      Number of
collar                     ceilings                            ceilings                      fastening clip
                                                                                             for the collar
                       Fischer bolt FBN 6/10
                                                            Hilti aircrete dowel
DN 50 and DN 75        Hilti stud anchor HSA                                                           4
                                                            HPD M6/10 or HPD M6/30
                       M6x65/10/20
                       Fischer anchor bolt FAZ II 8/10
                                                            Hilti aircrete dowel
DN 90                  Hilti stud anchor HSA                                                           4
                                                            HPD M8/10 or HPD M8/20
                       M8x75/10/23
                       Fischer anchor bolt FAZ II 8/10
                                                            Hilti aircrete dowel
DN 110                 Hilti stud anchor HSA                                                           6
                                                            HPD M8/10 or HPD M8/20
                       M8x75/10/23
                       Fischer anchor bolt FAZ II 8/10
                                                            Hilti aircrete dowel
DN 125                 Hilti stud anchor HSA                                                           6
                                                            HPD M8/10 or HPD M8/20
                       M8x75/10/23
Please regard the assembly instructions of the fastener manufacturer

(Please note: The insertion depth is somewhat
less than the drill hole depth!)

Important:                                                  Please also carefully comply with the applicable fire
These installation instructions represent a recommen-       protection regulations and all individually applicable
dation. It exclusively applies to the installation of one   contractor codes/contractor regulations, particularly
or more „REHAU angled fireproofing collar system“.          with regard to:
In combination with other sealing systems there might       -- passages through ceilings;
be other distances to be considered which can be            -- rooms with specific/tightened requirements related
taken from the general building approvals or from the          to preventative fire protection measures (comply with
test certificates.                                             all national regulations!).
The requirements set forth in the general technical
approval Z-19.17-1268 must basically be observed            Please also observe all applicable accident prevention
and complied with.                                          and safety regulations during installation.

                                                                                                                     7
Il manicotto tagliafiamma REHAU può essere installato rimanente utilizzando malta cementizia (vedere figura
a soffitto in un secondo momento ed è compatibile con 1).
il sistema di scarico domestico insonorizzato RAUPIANO -- Il disaccoppiamento del tubo dall’elemento strutturale
PLUS in base all’autorizzazione generale dell’ispettorato deve essere continuo
edile Z-42.1-223. Per il montaggio del manicotto tagliafiamma sistema
Il manicotto tagliafiamma „sistema REHAU“ è adatto per REHAU procedere come segue:
la compartimentazione delle colonne realizzate con tubi -- Aprire lo stesso piegandolo, staccare la pellicola del
per sistemi di scarico domestico RAUPIANO PLUS nel nastro adesivo della striscia di disaccoppiamento e
caso di attraversamenti strutturali (soffitto) o nel caso si fissarla sulla superficie interna del manicotto. Posi-
effettuino al di sotto di detti elementi cambi di direzione zionare il manicotto intorno al tubo (vedere figura 2).
mediante una curva. Il manicotto tagliafiamma „sistema Facoltativamente si può incollare la striscia sul tubo in
REHAU“ si può installare sia nel caso in cui il tubo tale modo che montandola si trovi fra manicotto e tubo
attraversi l’elemento strutturale in modo inclinato che -- Posizionare il manicotto intorno al tubo nella zona di
in modo perpendicolare. L’altezza del manicotto è pari attraversamento dell’elemento strutturale (soffitto) e
a 30 mm per DN 50, DN 75 mentre è di 42 mm per chiuderlo utilizzando l’apposita vite e dado (vedere
DN 90, DN 110 e DN 125. Quindi si potrebbe installare figura 3). Assicurarsi che il manicotto abbia su tutti i
avendo anche una tubazione che prosegue al di sotto punti la stessa distanza dal tubo
dell’elemento strutturale (soffitto). -- Disporre il manicotto a filo dell’elemento strutturale
In conformità alla normativa DIN 4102-2, la compar- (soffitto) e marcare i fori in corrispondenza delle
timentazione per tubi deve essere installata in soffitti staffette (vedere figura 4)
spessi almeno 15 cm in calcestruzzo/cemento armato -- Realizzare is fori somontando il manicotto (vedere fi-
(DIN 1045) o calcestruzzo poroso (DIN 4223) con classe gura 5). Assicurarsi, fissando il manicotto all’elemento
di resistenza minima F 90 (resistente al fuoco), denomi- strutturale (soffitto), che la striscia di disaccoppiamen-
nazione (abbreviata) F 90 AB. to sia posizionata correttamente (vedere figura 6)
Le compartimentazioni per tubi devono essere disposte
ad almeno 10 cm l’una dall’altra (distanza tra manicotti). Montaggio del manicotto con tubazioni DN 125
È necessario utilizzare il manicotto più piccolo adatto al Per il montaggio del manicotto DN 125 rispettare la se-
diametro del tubo. quenza di montaggio descritta in alto. Dopo aver fissato
Prima di montare il manicotto, verificare che il tubo il manicotto all’elemento strutturale (soffitto) si prosegue
sia conforme e che le procedure di montaggio seguite con il montaggio del mantello in lana di vetro a corredo
rispettino i presupposti descritti all’inizio. della fornitura come segue:
-- Infilare le corde a corredo della fornitura nel superiore
e inferiore orlo del mantello
Montaggio del manicotto con tubazioni DN 50, -- Mettere il mantello intorno al manicotto utilizzando
DN 75, DN 90 e DN 110 la corda e avvitarlo a contatto diretto con l’elemento
-- Sigillare l’interstizio fra il tubo e l’elemento strutturale strutturale (soffitto, vedere figura 7)
(soffitto). Per motivi di disaccoppiamento acustico si -- Di seguito mettere il mantello intorno al tubo utilizzan-
deve sigillare l’interstizio con larghezza max. 10 mm do la seconda corda. Assicurarsi che il mantello sia
usando materiali non infiammabili, quali ad esempio fissato in modo stabile (vedere figura 8)
lana di roccia (punto di fusione > 1000 °C) oppure Dopo il montaggio del manicotto tagliafiamma deve
ARMAFLEX AF essere compilata la relativa targhetta a corredo della
-- Nel caso in cui l’interstizio sia più largo il tubo deve fornitura a fissata a fianco della compartimentazione al
essere coperto con suddetti materiali non infiammabili soffitto.
di max. 10 mm. Di seguito si deve chiudera la fessura
81 2
3 4
5 6
7 8
9Manicotto Calcestruzzo Calcestruzzo poroso Numero delle lin-
tagliafiamma soffitto soffitto guette di fissaggio
sistema REHAU del manicotto
Fischer Ancorante FBN 6/10 Hilti Tassello per calce-
DN 50 e DN 75 Hilti Ancorante HSA struzzo poroso soffitto 4
M6x65/10/20 HPD M6/10 o HPD M6/30
Fischer Ancorante FAZ II 8/10 Hilti Tassello per calce-
DN 90 Hilti Ancorante HSA struzzo poroso soffitto 4
M8x75/10/23 HPD M8/10 o HPD M8/20
Fischer Ancorante FAZ II 8/10 Hilti Tassello per calce-
DN 110 Hilti Ancorante HSA struzzo poroso soffitto 6
M8x75/10/23 HPD M8/10 o HPD M8/20
Fischer Ancorante FAZ II 8/10 Hilti Tassello per calce-
DN 125 Hilti Ancorante HSA struzzo poroso soffitto 6
M8x75/10/23 HPD M8/10 o HPD M8/20
La preghiamo di leggere attentamente le istruzioni di montaggio del sistema di fissaggio del produttore
Attenzione: La profondità del tassello dovrà essere
inferiore rispetto quella del foro!
Importante: Inoltre, è necessario rispettare tutte le normative, le
Le informazioni riportate in questo documento sono da leggi, le direttive e le prescrizioni internazionali e nazi-
considerarsi indicative. onali applicabili in materia di protezione antincendio, in
Le istruzioni sono valide per il montaggio di un o più particolare per quanto attiene:
manicotti denominati „manicotto tagliafiamma sistema -- attraversamento di soffitti
REHAU“. -- vani che richiedono requisiti più rigorosi per quanto
In combinazione con altri sistemi di compartimenta- riguarda la protezione antincendio
zione possono variare le distanze di montaggio, che Durante le operazioni di installazione osservare tutte
devono essere in accordo con relativa omologazione o le norme di sicurezza e antinfortunistiche nazionali ed
rapporto di prova. internazionali.
È necessario rispettare tutte le prescrizioni
dell’omologazione Z-19.17-1268 emessa dall’istituto
tecnico tedesco per l’edilizia.
10Deutsch GT-Bereich
Soweit ein anderer als der in der jeweils gültigen Technischen Information beschriebene Einsatzzweck vorgesehen ist, muss der Anwender Rücksprache mit REHAU
nehmen und vor dem Einsatz ausdrücklich ein schriftliches Einverständnis von REHAU einholen. Sollte dies unterbleiben, so liegt der Einsatz allein im Verantwortungs-
bereich des jeweiligen Anwenders. Anwendung, Verwendung und Verarbeitung der Produkte stehen in diesem Fall außerhalb unserer Kontrollmöglichkeit. Sollte dennoch
eine Haftung in Frage
Urheberrecht kommen, so ist diese für alle Schäden auf den Wert der von uns gelieferten und von Ihnen eingesetzten Ware begrenzt.
Deutsch
Ansprüche aus gegebenen Garantieerklärungen erlöschen bei Einsatzzwecken, die in den Technischen Informationen nicht beschrieben sind.
Die Unterlage ist urheberrechtlich geschützt. Die dadurch begründeten Rechte, insbesondere die der Übersetzung, des Nachdruckes, der Entnahme von Abbildungen,
der Funksendungen, der Wiedergabe auf fotomechanischem oder ähnlichem Wege und der Speicherung in Datenverarbeitungsanlagen, bleiben vorbehalten.
Englisch HIS TI Prospekt
Insofar as the intended application deviates from that described in the relevant Technical Information brochure, the user must consult REHAU and must receive express
written consent from REHAU before commencing this utilization. If the user fails to do so, the sole responsibility for the utilization shall lie with the individual user. In this
case, the application, use and processing of products are beyond our control. Should a case of liability arise, however, this shall be limited to the value of the goods
delivered by us andEnglisch
Urheberrecht used by you in all cases of damage.
Claims arising from granted guarantees shall become invalid in the case of intended applications that are not described in the Technical Information brochures.
Italien GT
This document is protected by copyright. All rights based on this are reserved. No part of this publication may be translated, reproduced or transmitted in any form or by
any similar means, electronic or mechanical, photocopying, recording or otherwise, or stored in a data retrieval system.
Se è previsto un impiego diverso da quelli descritti nell’Informazione Tecnica attualmente in vigore, l’utilizzatore deve contattare la REHAU e, prima dell'impiego,
chiedere espressamente il nulla osta scritto della REHAU. Altrimenti l’impiego è esclusivamente a rischio dell’utilizzatore.
In questi casi l’impiego, l’uso e la lavorazione dei nostri prodotti sono al di fuori delle nostre possibilità di controllo. Se nonostante tutto, dovesse sorgere una
controversia su unaItalien
Urheberrecht nostra responsabilità, questa sarà limitata al valore dei prodotti da noi forniti e impiegati da Voi.
Diritti derivati da dichiarazioni di garanzia non sono più validi in caso d’applicazioni non descritte nelle Informazioni Tecniche.
Il presente documento è coperto da copyright. E’ vietata in particolar modo la traduzione, la ristampa, lo stralcio di singole immagini, la trasmissione via etere, qualsiasi
tipo di riproduzione tramite apparecchi fotomeccanici o similari nonché l’archiviazione informatica senza nostra esplicita autorizzazione.
11REHAU VERKAUFSBÜROS AE: Dubai, Tel.: +9714 8835677, dubai@rehau.com AR: Buenos Aires, Tel.: +54 11 489860-00, buenosaires@rehau.com AT: Linz, Tel.: +43 732 381610-0, linz@ rehau.com Wien, Tel.: +43 2236 24684, wien@rehau.com AU: Adelaide, Tel.+61 8 82990031, adelaide@rehau.com Brisbane, Tel.: +61 7 38897522 brisbane@ rehau.com Melbourne, Tel.: +61 3 95875544, melbourne@rehau.com Perth, Tel.: +61 8 94564311, perth@rehau.com Sydney, Tel.: +61 2 87414500, sydney@ rehau.com BA: Sarajevo, Tel.: +387 33 475-500, sarajevo@rehau.com BE: Brüssel, Tel.: +32 16 3999-11, bruxelles@rehau.com BG: Soa, Tel.: +359 2 89204-71, soa@rehau.com BR: Arapongas, Tel.: +55 43 3152 2004, arapongas@rehau.com Belo Horizonte, Tel.: +55 31 33097737, belohorizonte@rehau.com Caxias do Sul, Tel.:+ 55 54 32146606, caxias@rehau.com Mirassol, Tel.: +55 17 32535190, mirassol@rehau.com Sao Paulo, Tel.: +55 11 461339- 22, saopaulo@rehau.com BY: Minsk, Tel.: +375 17 2450209, minsk@rehau.com CA: Moncton, Tel.: +1 506 5382346, moncton@rehau.com Montreal, Tel.: +1 514 9050345, montreal@rehau. com St. John‘s, Tel.: +1 709 7473909, stjohns@rehau.com Toronto, Tel.: +1 905 3353284, toronto@rehau.com Vancouver, Tel.: +1 604 6264666, vancouver@ rehau.com Winnipeg, Tel.: +1 204 6972028, winnipeg@rehau.com CH: Bern, Tel.: +41 31 7202-120, bern@rehau.com Vevey, Tel.: + 41 21 94826-36, vevey@ rehau.com Zürich, Tel.: +41 44 83979-79, zuerich@rehau.com CL: Santiago, Tel.: +56 2 540-1900, santiago@rehau.com CN: Guangzhou, Tel.: +86 20 87760343, guangzhou@rehau.com Peking, Tel.: +86 10 64282956, beijing@rehau.com Shanghai, Tel.: +86 21 63551155, shanghai@rehau.com CO: Bogota, Tel.: +57 1 415 7590, bogota@rehau.com CZ: Prag, Tel.: +420 2 72190-111, praha@rehau.com DE: Berlin, Tel.: +49 30 66766-0, berlin@rehau.com Bielefeld, Tel.: +49 521 20840-0, bielefeld@rehau.com Bochum, Tel.: +49 234 68903-0, bochum@rehau.com Frankfurt, Tel.: +49 6074 4090-0, frankfurt@rehau.com Hamburg, Tel.: +49 40 733402-100, hamburg@rehau.com Leipzig, Tel.: +49 34292 82-0, leipzig@rehau.com München, Tel.: +49 8102 86-0, muenchen@rehau.com Nürnberg, Tel.: +49 9131 93408-0, nuernberg@rehau.com Stuttgart, Tel.: +49 7159 1601-0, stuttgart@rehau.com DK: Kopenhagen, Tel.: +45 46 7737-00, kobenhavn@rehau.com EE: Tallinn, Tel.: +372 6 0258-50, tallinn@rehau.com ES: Barcelona, Tel.: +34 93 6353-500, barcelona@rehau.com Bilbao, Tel.: +34 94 45386-36, bilbao@rehau. com Madrid, Tel.: +34 91 6839425, madrid@rehau.com FI: Helsinki, Tel.: +358 9 877099-00, helsinki@rehau.com FR: Agen, Tel.: +33 5536958-69, agen@rehau. com Lyon, Tel.: +33 472026-300, lyon@rehau.com Metz, Tel.: +33 3870585-00, metz@rehau.com Paris, Tel.: +33 1 348364-50, paris@rehau.com Rennes, Tel.: +33 2 996521-30, rennes@rehau.com GB: Glasgow, Tel.: +44 1698 50 3700, glasgow@rehau.com Manchester, Tel.: +44 161 7777-400, manchester@ rehau.com Slough, Tel.: +44 1753 5885-00, slough@rehau.com GE: Tiis, Tel.: +995 32 559909, tbilisi@rehau.com GR: Athen, Tel.: +30 210 6682-500, athens@ rehau.com HR: Zagreb, Tel.: +3 85 1 3444-711, zagreb@rehau.com HU: Budapest, Tel.:+36 23 5307-00, budapest@rehau.com ID: Jakarta, Tel.: +62 21 89907517, jakarta@rehau.com IE: Dublin, Tel.: +353 1 816502-0, dublin@rehau.com IN: Neu Delhi, Tel.: +91 11 450 44700, newdelhi@rehau.com Mumbai, Tel.: +91 22 67922929, mumbai@rehau.com IT: Mailand, Tel.: +39 02 95941-1, milano@rehau.com Pesaro, Tel.: +39 0721 2006-11, pesaro@rehau.com Rom, Tel.: +39 06 900613-11, roma@rehau.com Treviso, Tel.: +39 0422 7265-11, treviso@rehau.com KR: Seoul, Tel.: +82 2 5011656, seoul@rehau.com KZ: Almaty, Tel.: +7 727 394 1304, almaty@rehau.com LT: Vilnius, Tel.: +3 705 24614-00, vilnius@rehau.com LV: Riga, Tel.: +3 71 67 609080, riga@rehau.com MA: Casablanca, Tel.: +2 12522 250593, casablanca@rehau.com MK: Skopje, Tel.: +3 892 2402-670, skopje@rehau.com MX: Celaya, Tel.: +52 461 61880-00, celaya@rehau.com Monterrey, Tel.: +52 81 81210-130, monterrey@rehau.com NL: Nijkerk, Tel.: +31 33 24799-11, nijkerk@rehau.com NO: Oslo, Tel.: +47 22 5141-50, oslo@rehau.com NZ: Auckland, Tel.: +64 9 2722264, auckland@rehau.com PE: Lima, Tel.: +51 1 2261713, lima@rehau.com PL: Kattowitz, Tel.: +48 32 7755-100, katowice@rehau.com Posen, Tel.: +48 61 849-8400, poznan@rehau.com Warschau, Tel.: +48 22 2056-300, warszawa@rehau.com PT: Lissabon, Tel.: +3 51 21 94972-20, lisboa@rehau.com TW: Taipei, Tel.: +886 2 87803899, taipei@rehau.com RO: Bacau, Tel.: +40 234 512066, bacau@rehau.com Bukarest, Tel.: +40 21 2665180, bucuresti@rehau. com Cluj, Tel.: +40 264 415211, clujnapoca@rehau.com RS: Belgrad, Tel.: +3 81 11 3770-301, beograd@rehau.com RU: Chabarowsk, Tel.: +7 4212 411218, chabarowsk@rehau.com Jekaterinburg, Tel.: +7 343 2535305, jekatarinburg@rehau.com Krasnodar, Tel.: +7 861 2103636, krasnodar@rehau.com Moskau, Tel.: +7 495 6632060, moscow@rehau.com Nishnij Nowgorod, Phone: +7812 786927, nishnijnowgorod@rehau.com Nowosibirsk, Tel.: +7 383 2000353, nowosibirsk@ rehau.com Rostow am Don, Tel.: +7 8632 978444, rostow@rehau.com Samara, Tel.: +7 8462 698058, samara@rehau.com St. Petersburg, Tel.: +7 812 3266207, stpetersburg@rehau.com SE: Örebro, Tel.: +46 19 2064-00, oerebro@rehau.com SG: Singapore, Tel.: +65 63926006, singapore@rehau.com SK: Bratislava, Tel.: +4 21 2 682091-10, bratislava@rehau.com TH: Bangkok, Tel.: +66 2 7443155, bangkok@rehau.com TR: Istanbul, Tel.: +90 212 35547-00, istanbul@rehau.com UA: Dnepropetrowsk, Tel.: +380 56 3705028, dnepropetrowsk@rehau.com Kiew, Tel.: +380 44 4677710, kiev@rehau.com Lviv, Tel.: +380 32 2244810, lviv@rehau. com Odessa, Tel.: +380 48 7800708, odessa@rehau.com US: Chicago, Tel.: +1 630 3173500, chicago@rehau.com Detroit, Tel.: +1 248 8489100, detroit@rehau. com Grand Rapids, Tel.: +1 616 2856867, grandrapids@rehau.com Greensboro, Tel.: +1 336 8522023, greensboro@rehau.com Los Angeles, Tel.: +1 951 5499017, losangeles@rehau.com Minneapolis, Tel.: +1 612 253 0576, minneapolis@rehau.com ZA: Durban, Tel.: +27 31 657447, durban@rehau.com Johannesburg, Tel.: +27 11 201-1300, johannesburg@rehau.com www.rehau.com 312665 DE, EN, IT 05.2011
Sie können auch lesen