CAN BUS Interface Bedienungsanleitung Instruction manual - 66033_Kit
←
→
Transkription von Seiteninhalten
Wenn Ihr Browser die Seite nicht korrekt rendert, bitte, lesen Sie den Inhalt der Seite unten
CAN BUS Interface

                          Bedienungsanleitung
                           Instruction manual

                                                                                         66033_Kit
Audiotechnik Dietz® Vertriebs-GmbH ● Maybachstr. 10 ● 67269 Grünstadt ● verkauf@dietz.biz ●
                                      www.dietz.biz

                           Copyright © by Audiotechnik Dietz® Vertriebs-GmbH ● Germany
                                              Rev 1, Stand: 02 / 2021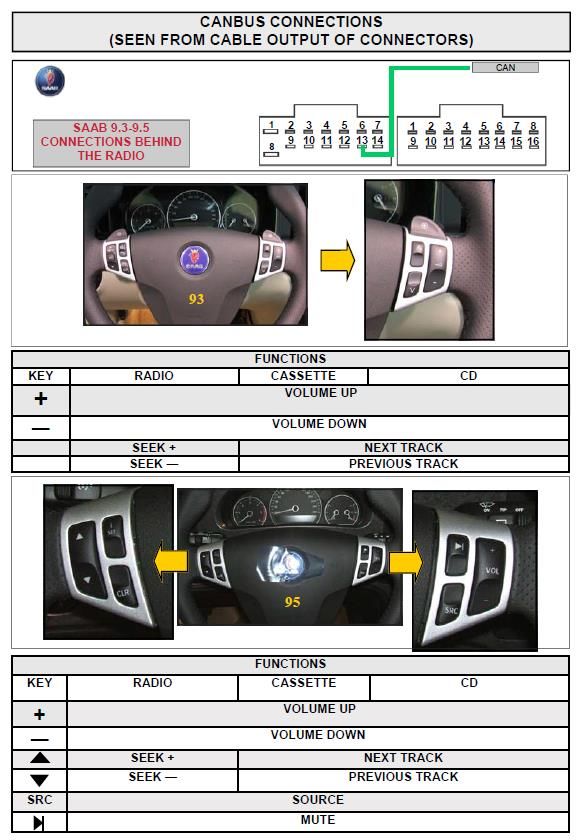
2

Lieferumfang
- 1 St. Bedienungsanleitung                     - 1 St. Anschlusskabel
- 1 St. Interface                               - 1 St. Jumper

Hinweise auf Voraussetzungen für den bestimmungsmäßigen Betrieb
Setzen Sie das Gerät nur in dem ihm zugedachten Bereich ein.
Bei zweckfremdem Gebrauch, nicht fachgerechter Installation oder bei Umbauten erlöschen die Betriebs-
erlaubnis und der Garantieanspruch.

Allgemeine Hinweise
Sehr verehrter Kunde,

vielen Dank, dass Sie sich für ein Produkt der Firma Audiotechnik Dietz entschieden haben. Sie haben eine
hervorragende Wahl getroffen.
Bei der Entwicklung des Produktes wurde besonders auf Ihre persönliche Sicherheit, kombiniert mit
bestmöglichstem Bedienungskomfort, modernem Design und aktuelle Produktionstechniken geachtet.
Aber trotz größtmöglicher Sorgfalt kann es bei unsachgemäßer Installation oder Benutzung, oder bei falscher
Bedienung zu Verletzungen oder/und Sachschäden kommen.
Bitte lesen Sie deshalb die Ihnen vorliegende Bedienungsanleitung sorgfältig und vollständig durch und
bewahren Sie diese auf!

Dieses Produkt erfüllt die Anforderungen der geltenden europäischen und nationalen Richtlinien. Die
Konformität wurde nachgewiesen, die entsprechenden Unterlagen und Erklärungen sind beim Hersteller
hinterlegt.

Alle Artikel aus unserer Produktion durchlaufen eine 100%ige Prüfung – zu Ihrer Sicherheit.

Wir behalten uns vor, jederzeit technische Änderungen durchzuführen, die dem Fortschritt dienen.

Je nach Artikel und Einsatzzweck ist es eventuell notwendig, vor der Installation bzw. Inbetriebnahme die
gesetzlichen Bestimmungen des jeweiligen Landes zu prüfen.

Das Gerät ist bei Garantieansprüchen in der Originalverpackung mit beigelegtem Kaufbeleg und detaillierter
Fehlerbeschreibung dem Verkäufer einzuschicken. Beachten sie hierbei die Rücksendebestimmungen des
Herstellers (RMA). Es gelten die gesetzlichen Gewährleistungsvorschriften.

Der Garantieanspruch und auch die Betriebserlaubnis erlischt durch:
  a) unbefugte Änderungen am Gerät oder Zubehör, die nicht vom Hersteller oder dessen Partnern
     durchgeführt oder genehmigt wurden
  b) öffnen des Gehäuses eines Gerätes
  c) selbst ausgeführte Reparaturen am Gerät
  d) unsachgemäße Nutzung / nicht bestimmungsgemäße Nutzung / Betrieb
  e) Gewalteinwirkung auf das Gerät (Herabfallen, mutwillige Zerstörung, Unfall, etc.)

Beachten Sie beim Einbau alle sicherheitsrelevanten und gesetzmäßigen Bestimmungen.

Das Gerät darf nur durch geschultes Fachpersonal oder ähnlich qualifizierte Personen eingebaut werden.

                                   Copyright © by Audiotechnik Dietz® Vertriebs-GmbH ● Germany
                                                      Rev23 Stand: 05 / 2015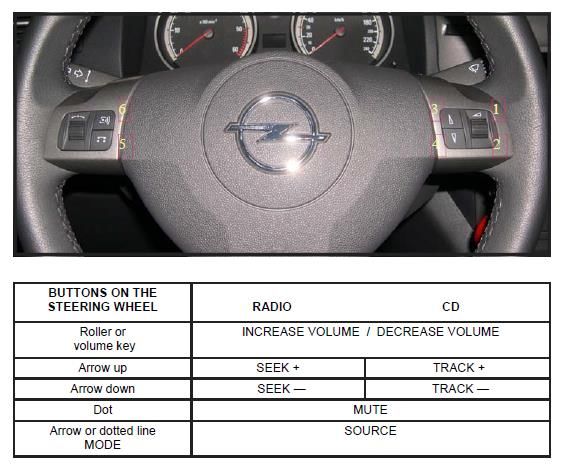
3

Allgemeine Sicherheitshinweise
Die hier aufgeführten Hinweise treffen zwar auf die meisten, aber nicht auf alle Produkte gleichermaßen zu!
Sollten Sie Fragen hierzu haben, wenden Sie sich bitte an Ihren Händler.

            Gefahr auf Beschädigung der Elektronik. Öffnen Sie nie das Gehäuse des Gerätes außer
            auf Anweisung der Anleitung oder des Serviceteams. Ansonsten erlischt die Garantie.

            Lassen Sie Reparaturen immer nur von unseren Servicepartnern durchführen! Bei selbst
            reparierten Geräten erlischt der Garantieanspruch!

            Achtung ! Überlasten Sie auf keinen Fall die Stromanschlüsse oder Verlängerungskabel.
            Brandgefahr

            Achtung ! Stecken Sie niemals Fremdkörper in die Öffnungen am Gehäuse! Die
            Gegenstände können die Elektronik beschädigen oder Kurzschlüsse verursachen.

            Achtung ! Sollten Kabel oder Anschlussstecker des Artikels beschädigt sein, machen Sie
            den Artikel Spannungsfrei und kontaktieren Sie Ihren Händler. Gefahr von Brand oder
            Elektroschock.

            Achtung ! Sollten Kabel oder Anschlussstecker des Artikels gequetscht sein machen Sie
            den Artikel Spannungsfrei und kontaktieren Sie Ihren Händler. Gefahr von Brand oder
            Elektroschock.

            Achtung ! Schalten Sie bei Rauch-, Geräusch- und/oder Geruchsentwicklung das Gerät
            sofort ab und trennen Sie es sofort von der Spannungsversorgung. Benutzen Sie das
            Gerät nicht weiter! Kontaktieren Sie Ihren Händler !

            Achtung ! Setzen Sie das Gerät keiner direkten Sonnenbestrahlung oder anderen Wärme
            Quellen aus! Montieren Sie das Gerät nie in der Nähe von Radiatoren,
            Warmluftschläuchen oder anderen Wärmequellen.

            Achtung ! Sorgen Sie für genügend Luftzirkulation um Schäden an den
            Gerätekomponenten zu vermeiden. Verdecken Sie keine Öffnung des Gerätes.

            Wenn Sie eine Sicherung austauschen müssen, schalten Sie das Gerät ab und trennen
            sie die Spannungsversorgung. Benutzen Sie nur Sicherungen gleicher Stärke als Ersatz.

            Achtung ! Bei verschiedenen Geräten ist ein Laser verbaut. Schauen Sie nicht ins Licht
            da dies zur Verletzung des Auges führen kann.

            Achtung ! Legen Sie keine Magnete oder magnetische Werkzeuge auf die Artikel. Dies
            kann zur Beschädigung des Artikels oder Datenverlust führen.

                                   Copyright © by Audiotechnik Dietz® Vertriebs-GmbH ● Germany
                                                      Rev 1, Stand: 03 / 2016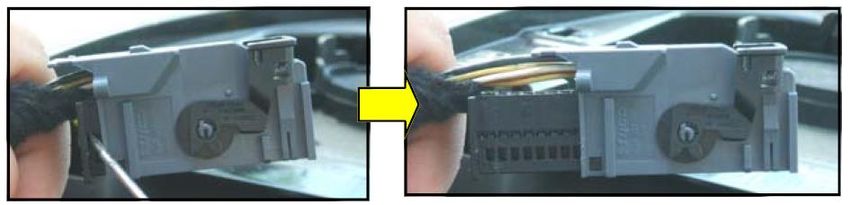
4

Wichtige Hinweise
Die Lenkradfernbedienung wird nur adaptiert, wenn diese im Originalzustand des Fahrzeugs
vorhanden ist und über den CAN Datenbus mit dem Original Radio kommuniziert.

Kompatible Geräte zur Adaption der Lenkradfernbedienung mit 66030 über Radiospezifischen
Adapter: ( ! Dieser ist zusätzlich zu bestellen und liegt nicht dem Interface bei ! )

    66401:    ALPINE
    66403:    CLARION – JVC
    66404:    KENWOOD
    66405:    PIONEER – SONY – DYNAVIN - AUDIOVOX

Funktionsweise 66033
Die o.g. Baugruppe ist ein Interface, das aus dem CAN Protokoll eines Fahrzeugs folgende Signale ausliest.
Decodiert werden fahrzeugabhängig:

       -     Zündung (Klemme 15, max. 500 mA belastbar!)
       -     Beleuchtung (Kl. 58, max. 100 mA belastbar!)
       -     Speedimpuls: Rechtecksignal 4,5 Hz bzw. 0,85 Hz pro km/h (max. < 5 mA belastbar!)
       -     Rückwärtsgang (Fahrzeugspezifisch, max. 100 mA belastbar!)
       -     Lenkradfernbedienung (wenn vorhanden) für nachfolgend aufgeführte Geräte
             unterschiedlicher Hersteller

Kompatibilität
Corsa D:     2009-2014

Saab 93 ab 2006

Saab 95 ab 2006

Anmerkung: Für Saab wird allerdings noch der Kabelsatz CBL007SAUN11 benötigt. Bitte anfragen!

                                     Copyright © by Audiotechnik Dietz® Vertriebs-GmbH ● Germany
                                                        Rev23 Stand: 05 / 2015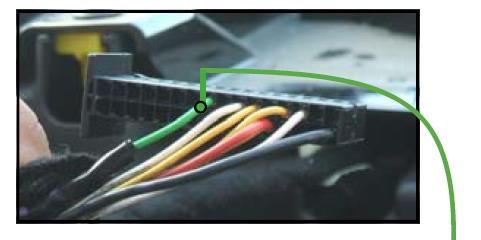
5
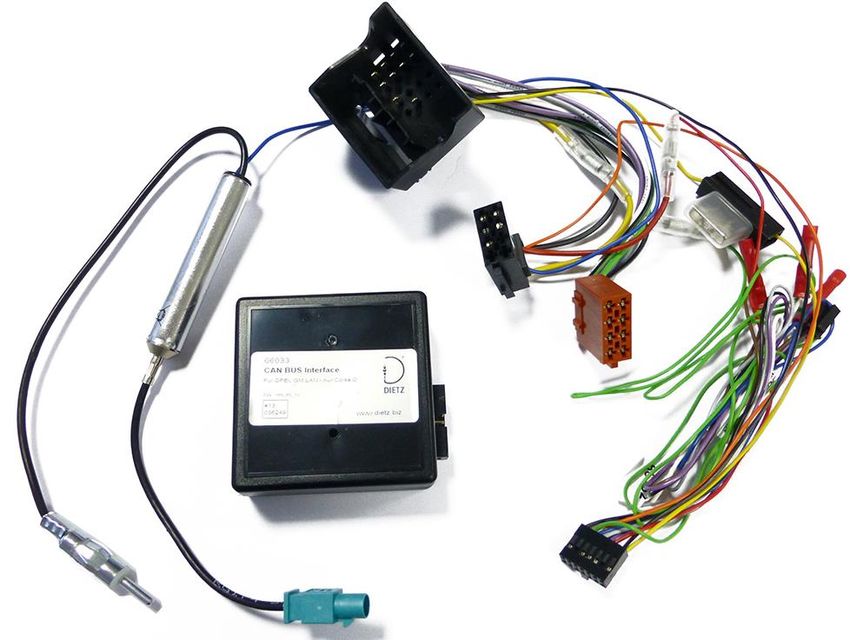
Kabelbelegung (Interface)
Kabel Funktion
Rot Dauerplus
Schwarz Masse
Grün CAN = GM LAN
Pink Zündungsausgang, positiv
Orange Beleuchtung Seitenlichtausgang, positiv
Grau Geschwindigkeitssignal
Blau Rückwärtsgang, positiv
Weiß/Gelb Handbremse, negativ
Achtung: Für Saab ab 95 ist kein Lichtausgang vorhanden! Wir empfehlen dazu das
Zündungssignal zu verwenden.
Installation
Es ist Wichtig, dass der Jumper JP1 in der richtigen Position für ALPINE und SONY
Autoradios gesetzt ist.
1-2 2-3
J1 ALPINE, SONY bei Auslieferung
J2 Handbremse negativ Handbremse positiv
J3 Rückwärtsgang negativ Rückwärtsgang positiv
J4 BLAUPUNKT
J5 K-Bus Fahrzeug CAN Bus Fahrzeug
Die Jumper sind bei der Auslieferung wie folgt gesetzt:
J1 auf 2-3, J2 auf 1-2, J3 auf 2-3, J4 offen und J5 auf 2-3
Copyright © by Audiotechnik Dietz® Vertriebs-GmbH ● Germany
Rev 1, Stand: 03 / 2016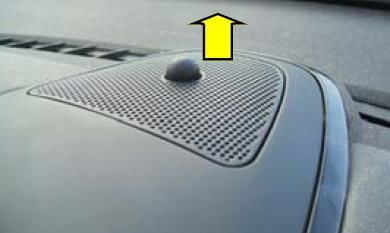
6

OPEL CAN BUS Anschluss:

Der Can Anschluss für die lange grüne Leitung des Interfaces befindet sich hinter dem
Display. Lösung sie die Plastikabdeckung und die Torxschraube:

Lösen sie das Display heraus und drehen sie das Display um, um an den Stecker zu
kommen:

Lösen sie den Bügel am Stecker wie abgebildet aus der Abdeckung:

Nun verbinden sie die grüne Leitung des Interfaces mit der grünen Leitung im Stecker.

Unterstützt werden folgende Lenkradtasten:

                             Copyright © by Audiotechnik Dietz® Vertriebs-GmbH ● Germany
                                                Rev23 Stand: 05 / 2015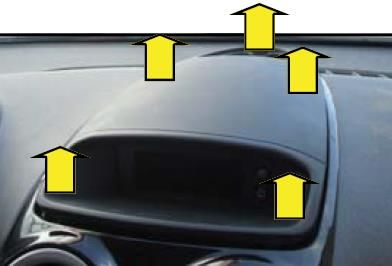
7

Copyright © by Audiotechnik Dietz® Vertriebs-GmbH ● Germany
                   Rev 1, Stand: 03 / 2016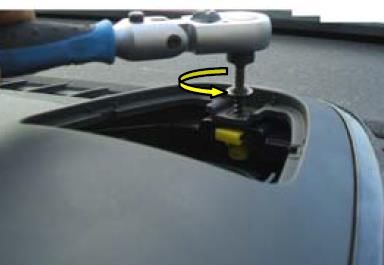
8

SAAB:

Unterstützt werden folgende Lenkradtasten. Schließen sie die lange grüne Leitung an PIN
13, wie im Diagramm angegeben an.

                            Copyright © by Audiotechnik Dietz® Vertriebs-GmbH ● Germany
                                               Rev23 Stand: 05 / 2015
9
Selbstständiges Anlernen und Radiohersteller programmieren!
Nachdem das Interface mit dem Fahrzeug verbunden ist erkennt es selbstständig in welchem Fahrzeug es
sich befindet und stellt das dementsprechende Fahrzeugprotokoll ein. Solange die Synchronisation läuft blinkt
die rote LED des Interfaces (Fahrzeug nicht erkannt oder keine CAN Bus Verbindung).
Sobald die Synchronisation des Fahrzeugs abgeschlossen ist, blinkt die LED kurz grün.
Je nachdem welche Radiomarke sie anschließen möchten, gehen sie wie folgt vor:
1. 2. 3. 4:
Drücken sie die Taste LED blinkt
„Lautstärke erhöhen“
Clarion - unverändert
Bestätigen indem sie
Kenwood 1x 2 x grün LED blinkt
1 x die
JVC 2x 3 x grün dauerhaft
„Suchlauftaste
Alpine 3x 4 x grün grün!
vorwärts“ oder „>“
Pioneer, Dynavin, Audiovox 5x 6 x grün drücken
Sony 6x 7 x grün Fertig!
RESET auf Originalzustand:
Wenn Sie die Prozedur wiederholen möchten gehen sie wie folgt vor:
Entfernen sie den breiten Stromstecker aus dem Interface. Drücken sie mit dem Plastikstift
durch die Gehäuseöffnung die Resettaste und schließen sie bei noch gedrückter
Resettaste den Stromstecker wieder an.
Die LED geht kurz aus, blinkt dann rot und blinkt danach grün. Wenn sie nicht grün blinkt
ist das Interface nicht richtig angeschlossen, z.B. können die Leitungen „Can High“ und
„Can Low“ vertauscht sein.
Nun können sie, wie in der Tabelle beschrieben, die gewünschte Radiomarke wieder
einstellen.
Copyright © by Audiotechnik Dietz® Vertriebs-GmbH ● Germany
Rev 1, Stand: 03 / 201610
Wartungshinweise
Das Gerät bedarf keiner Wartung.
Zum Reinigen des Gerätes benutzen Sie bitte nur ein trockenes Tuch zum Abwischen. Gegebenenfalls
können Sie bei stärkerer Verschmutzung das Gerät vorsichtig mit einem leicht angefeuchteten Tuch reinigen.
Benutzen Sie keinesfalls scharfe Reinigungsmittel zum Säubern des Gerätes.
Technische Daten
Spannungsversorgung: 12 V DC
Spannungs-Arbeitsbereich: 10,0 – 14,6 V DC
Ruhestrom: 2 mA
Leistungsaufnahme max.: 0,58 W
Temperaturbereich: -40 bis +85 °C
Gewicht: 0,068 kg
Abmessungen: 70 x 70 x 30 mm
Das Gerät ist für den automotiven Bereich gedacht und hat daher eine Lebensdauer von maximal 10 Jahren.
Copyright © by Audiotechnik Dietz® Vertriebs-GmbH ● Germany
Rev23 Stand: 05 / 2015Scope of delivery
- 1 pc Instruction manual - 1 pc Connection cable
- 1 pc Interface - 1 pc Jumper
References of legal regulations for operation
Only use this unit in the intended domain.
If you use it in a foreign domain, if the unit is not installed properly, or if the unit will be reconstructed, the
guarantee will expire.
General advice
Dear client,
many thanks for having chosen an Audiotechnik Dietz product. You have made a magnificent choice.
While developing this product, your personal safety combined with the best operating service, modern design
and an up-to-date production technique was especially taken into account.
Unfortunately, despite the utmost care injuries and/or damages might occur due to improper installation
and/or use.
Please read the attached instruction manual completely with great care and keep it!
This product meets the actual European and national directions. The conformity was proved; the respective
documents and explanations are stored with the manufacturer.
All articles of our production line pass through a 100 % check - for your safety and security.
We reserve the right to carry out technical changes which serve the improvement at any time.
According to each article and purpose, it is sometimes necessary to check each country’s legal regulations
before installing and starting the unit.
In case of guarantee claims, the device has to be sent back to the seller in the original packaging with the
attached bill of purchase and detailed defect's description. Please pay attention to the manufacturer's return
requirements (RMA). The legal warranty directions are valid.
The guarantee claim as well as the operating permission becomes invalid due to:
a) unauthorized changes to the device or accessories which have not been approved or carried out by the
manufacturer or its partners
b) opening the device's frame
c) device's repairs carried out by one's own
d) improper use / operation
e) brute force to the device (drop, wilful damage, accident etc.)
During installation, please pay attention to all safety relevant and legal directions.
The device has only to be installed by trained personnel or similarly qualified people.
Copyright © by Audiotechnik Dietz® Vertriebs-GmbH ● Germany
Rev 1, Stand: 03 / 2016General safety instructions
The references in this chapter apply to most of our products, but not to all. If you have further questions, please
contact your local dealer.
Warning do not open the case. Only open the case if you get the permission from the
manual or an authorized technician. In contravention the warranty expired.
Do not try to repair the unit yourself. If its needed to repair the unit use only our service
partner. In contravention the warranty expired.
Attention ! Do not overload the power cords or extension cables. Fire risk
Attention! Do not use foreign objects and put them into the the opening of the unit.
Danger of short circuit and damaged board.
Attention! If any cable or connector is damaged pls make the unit powerless and contact
your dealer.
Attention! If any cable is squeezed make the unit powerless and contact your dealer.
Attention! If the unit makes noises smolder or smell bad turn off the unit and contact your
dealer !
Attention! Don´t put the unit in direct sunrays heat sources or heater. The Unit can be
damaged by to high temperatures.
Attention! Be sure that the unit has a good airflow. Do not close the openings with
anything.
If you must change a fuse be sure that the power connection is separated and that you
use the same fuse as before.
Attention! On different units a Laser is installed do not open the case and do not look into
the light. Risk of eye injury.
Attention! Do not use any magnetic part or lay down a magnet to the unit. Danger of lost
files or damaged units.
Copyright © by Audiotechnik Dietz® Vertriebs-GmbH ● Germany
Rev23 Stand: 05 / 2015Important notes
Steering wheel remote control will only be adapted when it was originally built in and communicates via CAN
data bus with the OEM radio.
Compatible units for adaptation of the steering wheel controls with via radio specific adapter:
66401: ALPINE
66403: CLARION – JVC
66404: KENWOOD
66405: PIONEER – SONY – DYNAVIN - AUDIOVOX
Operating mode
The assembly mentioned above is an interface able to read out following signals from the CAN protocol of a
car. Decryption as follows (depending on car’s configuration):
- ignition (terminal 15, 500 mA maximum load!)
- illumination (terminal. 58, 100 mA maximum load!)
- speed impulse: square wave signal, 4,5 Hz or rather. 0,85 Hz per km/h (< 5 mA maximum load!)
- reverse gear (depends on cars’ configuration, 100mA maximum load!)
- steering wheel remote control (if exists) for afterwards mentioned units from different
manufacturers
Assignment of the wires with loose ends (Interface)
White, normally Can Low is not available at this interface! Because no need with GM LAN.
Compatibility
Corsa D: 2009-2014
Saab 93 from 2006 (Note: For Saab you need the additonal Cable Kit CBL007SAUN11!)
Saab 95 from 2006 (Note: For Saab you need the additonal Cable Kit CBL007SAUN11!)
Copyright © by Audiotechnik Dietz® Vertriebs-GmbH ● Germany
Rev 1, Stand: 03 / 2016Installation
It is also necessary to put the JUMPER JP1 in the correct position for ALPINE and SONY
head units.
1-2 2-3
J1 ALPINE, SONY by delivery
J2 Handbrake negativ Handbrake positiv
J3 Reverse gear negativ Reverse gear positiv
J4 BLAUPUNKT
J5 K-Bus vehicle CAN Bus vehicle
The Jumpers are set as follow by delivery:
J1 on 2-3, J2 on 1-2, J3 on 2-3, J4 open, J5 on 2-3
Troubleshooting:
Copyright © by Audiotechnik Dietz® Vertriebs-GmbH ● Germany
Rev23 Stand: 05 / 2015OPEL CAN BUS Connection:
To connect the canbus wire to the car it is necessary to do it directly to the display. First of
all remove the plastic panel shown below.
Once the panel is removed, please remove the torques that keeps the display chassis
blocked. Once the torques is removed, detach the display with its plastic . Now rotate the
display so to have the acces to the connector of the display.
Once disconnected the plug from the display remove the connector inside as shown in the
picture.
Now detect the GREEN wire and connect the GREEN long wire of the interface.
Copyright © by Audiotechnik Dietz® Vertriebs-GmbH ● Germany
Rev 1, Stand: 03 / 2016Steering wheel function:
Copyright © by Audiotechnik Dietz® Vertriebs-GmbH ● Germany
Rev23 Stand: 05 / 2015SAAB:
Connect the long green wire from the interface to Pin 13 like shown:
Copyright © by Audiotechnik Dietz® Vertriebs-GmbH ● Germany
Rev 1, Stand: 03 / 2016Self recognition and radio functions
The selection of the protocol comes through SELF-RECOGNITION. After connections for inserting the
module to the connector are terminated, the unit will undertake the synchronization in a few seconds,
signalled by RED quick flashes of the module’s LED.
As soon as the synchronization has been completed, the protocol of the vehicle must be selected. This
operation will be confirmed by the GREEN FLASHING light of the module’s LED. The unit is now ready for
SELECTING THE AUTORADIO.
Depending on the radio brand:
1. 2. 3. 4:
Press „Volume up“ LED flash
green
Clarion - 1x
Kenwood 1x 2x
Confirm LED is now
JVC 2x 3x
(Press once button green!
Alpine 3x 4x „arrow forward“)
Pioneer, Dynavin, Audiovox 5x 6x
Sony 6x 7x Ready!
If you want to get the procedure again proceed as follows:
Make it the interface de-energized by unplugging the connector.
Press for 3 sec. the reset button with the enclosed plastic stick.
The LED goes out briefly then flashes red and then green. If it does not flash green, the interface is correct
connected. May be "Can High" and "Can Low" wires are changed.
Copyright © by Audiotechnik Dietz® Vertriebs-GmbH ● Germany
Rev23 Stand: 05 / 2015Service notes
This unit does not need any servicing.
Do not open the housing. There are no user-serviceable parts inside.
Wipe gently with a dry cloth over the surface to clean the unit. If there is more tough dirt, first use a light wet
cloth and then uses a dry one. Never use corrosive cleaners to clean the unit.
Technical data
Power supply: 12 V DC
Working Voltage: 10,0 – 14,6 V DC
Quiescent current: 2 mA
Power consumption: 0,58 W
Temperature range: -40 - +85 °C
Weight: 0,068 kg
Dimensions: 70 x 70 x 30 mm
This unit is only for automotive use and has therefore a lifetime of max. 10 years.
Audiotechnik Dietz® Vertriebs-GmbH
Maybachstr. 10
D-67269 Grünstadt
Germany
verkauf@dietz.biz
www.dietz.biz
Copyright © by Audiotechnik Dietz® Vertriebs-GmbH ● Germany
Rev 1, Stand: 03 / 2016Sie können auch lesen