Digital Radio User Manual Music 5000 DAB+ Music 50 DAB+ - Manuals
←
→
Transkription von Seiteninhalten
Wenn Ihr Browser die Seite nicht korrekt rendert, bitte, lesen Sie den Inhalt der Seite unten
Digital Radio
            User Manual

          Music 5000 DAB+
           Music 50 DAB+

             DE - EN - FR

01M-GDB1010-4620-04   01M-GDB1050-4620-04
01M-GDB1020-4620-04   01M-GDB1060-4620-04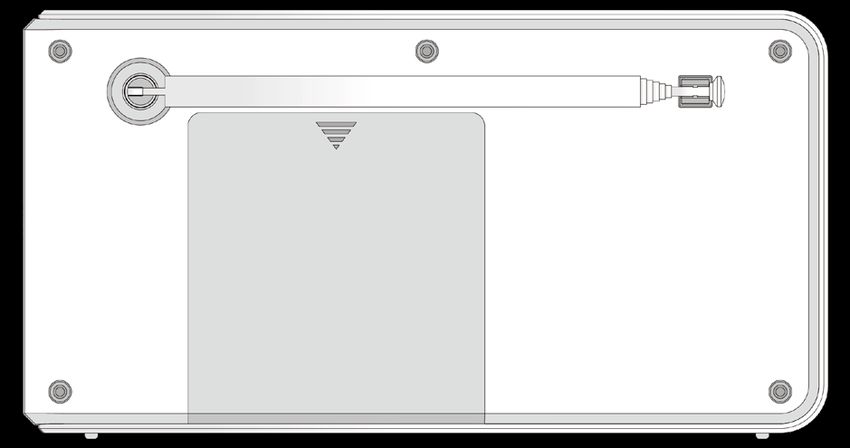
GRUNDIG Kundenberatungszentrum
                                                        Haben Sie Fragen?
Montag bis Freitag von 8.00 bis 18.00
Uhr                                                     Unser Kundenberatungszentrum
Deutschland: 0911 / 590 597 30                          steht Ihnen werktags stets von
Österreich: 0820 / 220 33 22 *                          8.00 – 18.00 Uhr zur Verfügung.

* gebührenpflichtig (0,14 €/Min. aus dem Festnetz,
  Mobilfunk: max. 0,42 €/Min.)
** gebührenpflichtig (0,145 €/Min. aus dem Festnetz,
    Mobilfunk: max. 0,20 €/Min.)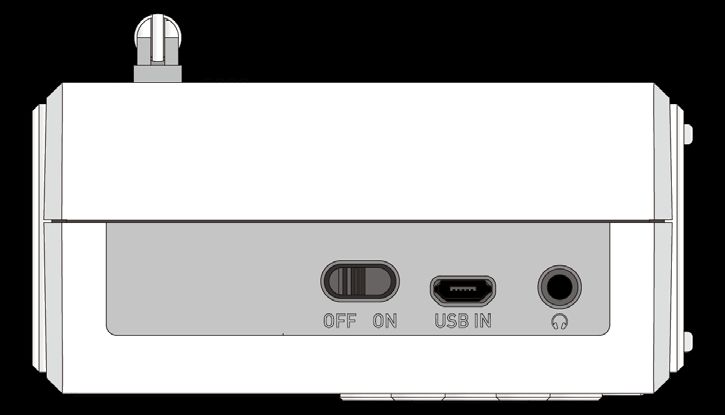
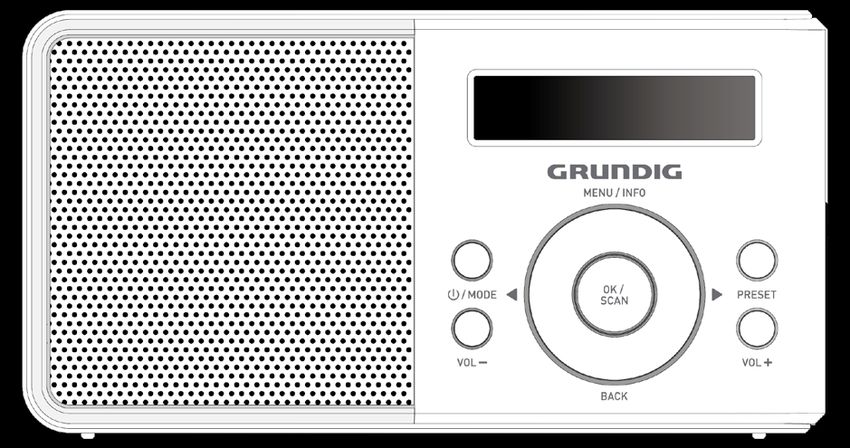
8/MODE Display PRESET
Menu/
INFO
VOL+
BACK
VOL- OK/
SCAN
ON/OFF USB U
Antenna
3----------------------------------------------------------------------------------------------------------------------------------------------
DEUTSCH 05-19
ENGLISH 20-33
FRANÇAIS 34-48
4SICHERHEIT UND INFORMATIONEN-------
Dieses Gerät ist für die Wiederga-
7 Diese Zusätze können u.a. das Ma-
be von Ton-signalen bestimmt. Jede terial der Gerätefüße angreifen, wo-
andere Verwendung ist ausdrücklich durch Rückstände auf der Möbelober-
ausgeschlossen. fläche entstehen, die sich nur schwer
7 S chützen Sie das Gerät vor Feuchtig- oder nicht mehr entfernen lassen.
keit (Tropf- und Spritzwasser). 7
Verwenden Sie keine Reinigungsmit-
7 S tellen Sie keine mit Flüssigkeit gefüll- tel, diese können das Gehäuse be-
schädigen. Reinigen Sie das Gerät
ten Gefäße (Vasen oder ähnliches)
mit einem sauberen, trockenen Tuch.
auf das Gerät. Gefäße könnten um-
kippen und mit der auslaufenden 7
S
ie dürfen das Gerät nicht öffnen. Für
Flüssigkeit die elektrische Sicherheit Schäden, die durch unsachgemäße
beeinträchtigen. Eingriffe entstehen, übernimmt der
7 S tellen Sie keine offenen Brandquel- Hersteller keine Garantie.
len, z.B. Kerzen, auf das Gerät. Sorgen Sie dafür, dass der Netzste-
7
7 B etreiben Sie das Gerät nur in einem ge- cker frei zugänglich ist!
mäßigten Klima. 7 Ständige Benutzung des
7 S orgen Sie für ausreichende Belüf- Kopfhörers bei hoher Laut-
tung des Gerätes, indem Sie einen stärke kann zu Schäden am
Mindestabstand von 10 cm zur Um- Gehör führen.
gebung einhalten. Bedecken Sie das Attention should be drawn to the envi-
7
Gerät nicht mit Zeitungen, Tischtü- ronmentalaspects of battery disposal.
chern, Vorhängen, etc.
BATTERIEN DÜRFEN NICHT VER-
7 T reten Fehlfunktionen auf, etwa wegen SCHLUCKT WERDEN, GEFAHR
einer kurzzeitigen Netzüberspannung CHEMISCHER VERBRENNUN-
oder wegen einer elektrostatischen GEN.
Aufladung, setzen Sie das Gerät zu-
rück. Ziehen Sie hierzu den Netzste- ewitter stellen für alle elektrischen
7 G
cker und schließen Sie ihn nach eini- Geräte eine Gefahr dar. Selbst wenn
gen Sekunden wieder an. das Hi-Fi-System ausgeschaltet ist,
kann es durch einen Blitzschlag in das
7 B itte beachten Sie beim Aufstellen des Stromnetz beschädigt werden. Ziehen
Gerätes, dass Oberflächen von Mö- Sie während eines Gewitters immer
beln mit den verschiedensten Lacken den Netzstecker.
und Kunststoffen beschichtet sind,
welche meistens chemische Zusätze
enthalten.
DEUTSCH 5SICHERHEIT UND INFORMATIONEN-------
7 Setzen Sie Batterien keinen extrem 7 Das Gerät sollte so installiert und be-
niedrigen, vor allem jedoch keinen ho- trieben werden, dass zur Vermeidung
hen Temperaturen aus – zum Beispiel einer übermäßigen HF-Aussetzung
durch pralles Sonnenlicht, Heizungen, ständig ein Mindestabstand von 20
offene Flammen und dergleichen. cm zwischen dem Sender (Antenne)
7 D ie Fernbedienung wird über eine und dem Körper des Nutzers oder ei-
ner in der Nähe befindlichen Person
Knopfzelle mit Strom versorgt. Bitte hal- eingehalten wird.
ten Sie Fernbedienung und Knopfzelle 7 Das Produkt kann ohne Einschränkung
immer von Kindern fern. überall in der EU genutzt werden.
7 Falls sich das Batteriefach nicht richtig
schließen lassen sollte, nutzen Sie das Technische Daten
Gerät nicht weiter, halten Sie Kinder Dieses Gerät ist funkentstört entspre-
fern. chend den geltenden EU-Richtlinien.
7 A CHTUNG: Falls die Batterie nicht Dieses Produkt erfüllt die europäi-
richtig ersetzt wird, besteht Explosions- schen Richtlinien 2014/53/EU und
gefahr. Nur durch den gleichen oder 2011/65/EU.
einen gleichwertigen Typ ersetzen. Den genauen Wortlaut der Konformi-
Wichtige Hinweise zu tätserklärung (DOC finden Sie auf der
GRUNDIG Homepage
Hochfrequenzaussendun- www.grundig.com/downloads/doc.
gen
Das Typenschild befindet sich an der
Dieses Gerät muss wie in der mitgelie-
7
Rückseite des Gerätes.
ferten Bedienungsanleitung beschrie-
ben aufgestellt und betrieben werden. Spannungsversorgung:
Micro-USB-Eingang: 5V 2.0A
Das Gerät besitzt eine integrierte An-
Batterie: 4x1.5V AA
tenne, darf nicht in der Nähe von ande-
ren Antennen oder Sendern aufgestellt Ausgangsleistung:
und betrieben werden. DIN 45324, 1% THD 1W
7
Das Gerät lässt sich nur zur Ziehen
des Netzsteckers vollständig von der Abmessungen und Gewicht:
Stromversorgung trennen. B x H x T 180 x 90 x 45 mm
Gewicht ca. 400 g
Frequency band:
DAB/DAB+ Band III
(174.928 – 239.200 MHz)
UKW 87.5 – 108.0 MHz, unterstützt
RDS
6 DEUTSCHSICHERHEIT UND INFORMATIONEN-------
Anzeige Einhaltung von RoHS-Vor-
LED-Display mit 2 Zeilen x 16 Zeichen
gaben:
Anschlüsse Das von Ihnen erworbene Produkt erfüllt
Micro-USB-Port (für Stromversorgung), die Vorgaben der EU-RoHS Direktive
3,5-mm-Kopfhöreranschluss. (2011/65/EU). Es enthält keine in der
Leistungsaufnahme im Bereitschaftsmo- Direktive angegebenen gefährlichen
dus < 1,0 W und unzulässigen Materialien.
Technische und optische Änderungen Informationen zur Verpa-
vorbehalten.
ckung
Entsorgung von Altgerä- Die Verpackung des Produkts
ten: wurde gemäß unserer natio-
Dieses Produkt erfüllt die Vorgaben der nalen Gesetzgebung aus
EU-WEEE-Direktive (2012/19/EU). Das recyclingfähigen Materialien
Produkt wurde mit einem Klassifizie- hergestellt. Entsorgen Sie die Verpa-
rungssymbol für elektrische und elektro- ckungsmaterialien nicht mit dem Haus-
nische Altgeräte (WEEE) gekennzeich- müll oder anderem Müll. Bringen Sie sie
net. zu einer von der Stadtverwaltung bereit-
gestellten Sammelstelle für Verpackungs-
Dieses Symbol zeigt an, dass material.
dieses Gerät am Ende seiner
Das Blitzsymbol mit Pfeilspitze
Einsatzzeit nicht mit anderem
in einem gleichschenkligen
Hausmüll entsorgt werden
Dreieck soll den Nutzer vor ho-
darf. Altgeräte müssen an of- her Spannung im Gerät war-
fizielle Sammelstellen zum Recycling nen, die stark genug ist, einen Strom-
elektrischer und elektronischer Geräte schlag zu verursachen.
abgegeben werden. Nähere Angaben
zu diesen Sammelstellen erhalten Sie Dieses Gerät ist ein Gerät der
von Ihrer Stadtverwaltung oder dem Klasse II bzw. ein zweifach
Händler, bei dem Sie das Gerät erwor- isoliertes Elektrogerät. Es
ben haben. Der Beitrag jedes Haushalts wurde so entwickelt, dass es
zum Umweltschutz ist wichtig. Eine an- keine Sicherheitsverbindung zu einer
gemessene Entsorgung von Altgeräten elektrischen Erdung benötigt.
hilft bei der Verhinderung negativer Aus- Bitte lesen Sie vor Inbe-
wirkungen auf Umwelt und menschliche triebnahme dieses Ge-
Gesundheit. rätes aufmerksam die
gesamte Anleitung
DEUTSCH 7STROMVERSORGUNG---------------------------------------------------------
Netz-Betrieb Umwelthinweis:
Die Batterien – auch schwermetall-
7
1 Verbinden Sie das USB-Kabel mit
freie – dürfen nicht im Hausmüll ent-
dem Micro-USB-Anschluss am Gerät. sorgt werden.
Verbrauchte Batterien müssen in die
Caution:
Altbatteriesammelgefäße bei Han-
7 Dieses Gerät ist über das Micro-
del und öffentlich-rechtlichen Entsor-
USB-Kabel mit der Stromversor- gungsträgern
gung verbunden. Ziehen Sie das
Micro-USB-Kabel heraus, wenn
Sie das Gerät vollständig von der
Stromversorgung trennen möchten.
Batterie-Betrieb
1 Batteriefach an der Geräteunterseite
öffnen, dazu auf den Verschluss drücken
und den Deckel abnehmen.
2 Beim Einlegen der Batterien (4 x 1.5V
AA battery) die im Batteriefachboden
markierte Polung beachten.
3 Den Deckel wieder einlegen und nach
unten drücken, bis er einrastet.
Hinweise:
7 Setzen Sie die Batterien keiner extre-
men Hitze wie z.B. durch Sonnenein-
strahlung, Heizungen, Feuer, etc. aus.
7 Entfernen Sie die Batterien, wenn Sie
verbraucht sind oder wenn Sie das
Gerät längere Zeit nicht benutzen.
Gehen die Batterien zur Nei-
ge, erscheint in der Anzeige
»Battery Low«.
7 Für Schäden, die durch ausgelaufene
Batterien entstehen, kann nicht gehaf-
tet werden.
7 Die Batterien werden bei Netz-Betrieb
abgeschaltet.
8 DEUTSCHAUF EINEN BLICK-----------------------------------------------------------------------------
Beachten Sie die Abbildung auf Seite 3. Menu/INFO Halten Sie die Taste
dann zum Aufrufen
Bedienelemente an der Vorder- des Menüs gedrückt.
seite Drücken Sie diese
Durch Gedrückthalten
8/MODE Taste, um Informatio-
der Taste schalten Sie nen über DAB- oder
das Gerät ein und UKW-Radiosender
aus. anzuzeigen.
Drücken Sie zum BACK Drücken Sie, um einen
Wechseln zwischen Schritt zurückzuge-
DAB- und UKW- hen.
Modus die „MODE“-
Taste. Bedienelemente an der rech-
Display Zeigt verschiedene ten seite
Informationen, wie ON/OFF chalter zum Ein- und
S
Kanalname, Zeit, Ausschaltendes Ger-
Alarmzeit, Lautstärke
äts.
und Menü.
USB Micro-USB-Anschluss
PRESET AB und UKW Modi:
D
zur Stromversorgung.
drücken und halten,
um das Preset-Spei- Earphone socket (3.5
0
chermenü zu öffnen; mm stereo plug).
drücken, um das Vor-
einstellungsmenü zu
Bedienelemente an der Rück-
öffnen.
seite
OK/SCAN Bestätigt Einstellungen. Antenna T e l e s k o p a n t e n n e
UKW-Modus: Zum für DAB-/DAB+ und
Suchen des nächsten UKW-Empfang.
Senders drücken.
VOL- Lautstärke verringern.
VOL+ Lautstärke erhöhen.
Nach rechts durch das
Menü blättern.
Nach links durch das
Menü blättern.
DEUTSCH 9VERBINDUNG UND VORBEREITUNG--
Kopfhörer anschließen Umwelthinweis:
1 Schließen Sie den Kopfhörer (ø 3,5 Batterien, einschließlich jener, die
7
mm) am „0“-Anschluss an der Rück- Schwermetalle enthalten, dürfen
seite des Gerätes an. nicht über den Hausmüll entsorgt
– Die Lautsprecher des Gerätes sind werden. Entsorgen Sie verbrauch-
ausgeschaltet. te Batterien immer in Übereinstim-
mung mit örtlichen Umweltrichtlini-
Hinweis:
en.
7 Übermäßiger Schalldruck von den
Ohrhörern oder Kopfhörern kann
Hörverlust verursachen.
EINSTELLUNGEN------------------------------------------------------------------------------
Rundfunk-Programme DAB- und UKW-Rundfunk-
(DAB und UKW) Programme einstellen und
einstellen und speichern – speichern – nach einem
Erstinstallation Ortswechsel
Wenn das Gerät erstmals an das Strom- Sie können den automatischen Pro-
netz angeschlossen wird oder nach gramm-Suchlauf erneut starten. Dies
einem Reset, startet das Gerät einen ist sinnvoll, wenn Sie das Gerät an ei-
automatischen Programm-Suchlauf nem anderen Ort betreiben wollen oder
nach DAB-Rundfunk-Programmen und wenn Sie nach neuen DAB-Rundfunk-
speichert diese in der Programmliste. Programmen suchen wollen.
Beim Aufrufen des UKW-Modus scannt 1 Halten Sie zum Einschalten des Ger-
das Gerät durch das UKW-Frequenz- ätes die »8/MODE«-Taste gedrückt.
band und speichert die ersten 10 Radi-
osender als Voreinstellungen 1 bis 10. 2 Das Menü mit »MENU/INFO« au-
Die Uhrzeit wird automatisch eingestellt. frufen.
1 Für den bestmöglichen DAB/UKW- 3 Menüpunkt »Full scan« mit
Empfang die Teleskopantenne her- »r« oder »e« wählen und mit
auszuziehen. »OK/SCAN« bestätigen.
2 Betätigen Sie die »ON/OFF«-Taste –D er automatische Programm-
zum Einschalten des Gerätes. Suchlauf startet, sucht und spei-
chert die gefundenen Rundfunk-
–D
isplay: »GRUNDIG«. Programme.
– Danach schaltet das Gerät ab,
die Uhrzeit wird angezeigt.
10 DEUTSCHEINSTELLUNGEN------------------------------------------------------------------------------
DAB-Rundfunk-Programme DAB-Rundfunk-Programme
auf Programmplätze einstellen und speichern –
speichern manuell
Nach dem automatischen Programm- 1 Programmquelle DAB mit
Suchlauf werden alle DAB-Rund- »8/MODE« wählen.
funk-Programme in der Programmliste
gespeichert. Ihre bevorzugten DAB- 2 Das Menü mit »MENU/INFO« au-
Rundfunk-Programme können Sie auch frufen.
auf den Programmplätzen (Presets) 1 3 Menüpunkt »Manual tune« mit
bis 10 speichern. »r« oder »e« wählen und mit
1 DAB-Rundfunk-Programm mit »r« »OK/SCAN« bestätigen.
oder »e« wählen. – Anzeige: zum Beispiel »5A
–A
nzeige: der Name des Rund- I74.928MHz« (Kanal und Fre-
funk-Programmes, das angezeig- quenz eines DAB-Rundfunk-Pro-
te DAB-Rundfunk-Programm wird grammes).
nach 1 Sekunde aktiviert. 4 Gewünschte Frequenz/Kanal mit »r«
2 »PRESET« drücken und gedrückt oder »e« einstellen.
halten. 5 Frequenz/Kanal mit »OK/SCAN«
–A
nzeige: »Preset Store« und bestätigen.
der erste Programmplatz. – Der Empfangspegel wird an-
3 Gewünschten Programmplatz mit gezeigt.
»r« oder »e« wählen und mit 6 Einstellung mit »OK/SCAN« bestäti-
»OK/SCAN« bestätigen. gen.
–A
nzeige: »Preset1 stored«. – Das DAB-Rundfunk-Programm
wird in der Programmliste ges-
peichert.
DEUTSCH 11EINSTELLUNGEN------------------------------------------------------------------------------
UKW-Rundfunk- 6 »PRESET« drücken und gedrückt
Programme einstellen und halten.
speichern – Anzeige: »Preset Store« und
1 Programmquelle UKW mit »8/ der erste Programmplatz.
MODE« wählen. 7 Gewünschten Programmplatz mit
2 Das Menü mit »MENU/INFO« au- »r« oder »e« wählen und mit »OK/
frufen. SCAN« bestätigen.
–A
nzeige: »FM« und »Scan set- – Anzeige: »Preset1 stored«.
ting«.
Uhrzeit aktualisieren –
3 Menüpunkt »Scan setting« mit
»OK« bestätigen. automatisch
Die Uhrzeit wird automatisch aktualisi-
–A
nzeige: »Strong stations
ert, wenn ein Rundfunk-Programm ein
only«.
Zeitsignal sendet.
Hinweis:
Wählen Sie, ob nach empfangsstar-
7
ken Rundfunk-Programmen gesucht
werden soll (Anzeige »Strong
stations only«) oder nach al-
len Rundfunk-Programmen (Anzeige:
»All stations«).
4 Gewünschte Option mit »r« oder »e«
wählen und mit »OK« bestätigen.
5 Gewünschtes Rundfunk-Programm
einstellen, dazu »r« oder »e« länger
drücken.
–D
er Programmsuchlauf startet und
stoppt beim nächsten Programm
mit gutem Empfangssignal;
oder
»r« oder »e« wiederholt kurz drück-
en, bis die gewünschte Frequenz er-
reicht ist.
–D ie Frequenz ändert sich pro
Tastendruck um 50 kHz.
12 DEUTSCHRADIO-BETRIEB----------------------------------------
Allgemeine Funktionen DAB-Programm wählen
Teleskopantenne 1 Gewünschtes Programm aus der Pro-
grammliste mit »r« oder »e« schritt-
1 Für den bestmöglichen DAB/UKW- weise wählen und mit »OK/SCAN«
Empfang die Teleskopantenne bestätigen.
herausziehen.
Gespeicherte Programme
Ein- und ausschalten aufrufen
1 Schalten Sie das Gerät vom Bere- 1 »PRESET« drücken.
itschaftsmodus aus ein, indem Sie die
Taste »8/MODE« gedrückt halten. 2 Gewünschten Programmplatz mit
»r« oder »e« wählen und mit »OK/
2 Versetzen Sie das Gerät in den Bere- SCAN« bestätigen.
itschaftsmodus, indem Sie die Taste
»8/MODE« gedrückt halten. DAB-Programminformationen
einblenden
Lautstärke ändern 1 Informationen zum aktuellen DAB-Pro-
1 Gewünschte Lautstärke mit »VOL+« gramm kurzzeitig einblenden, dazu
oder »VOL–« einstellen. »MENU/INFO« wiederholt drücken.
– F olgende Informationen werden
Mit Kopfhörern hören angezeigt: Infos vom Program-
1 Kopfhörer an die Kopfhörerbuchse manbieter (z.B. Titel des aktuellen
»0« (ø 3,5 mm) anschließen. Stückes, E-Mail-Anschrift), die Sig-
nalstärke, das Genre, das Ensemb-
–D
er Lautsprecher des Gerätes wird le (z.B. BR Bayern), der Kanal und
abgeschaltet. die Frequenz des Programmanbie-
ters, die Bit-Rate, der Übertragungs-
DAB-Radio-Betrieb standart, Uhrzeit und Datum.
Programmquelle DAB-Radio
wählen
1 Programmquelle DAB mit »8/
MODE« wählen.
–A
nzeige: der Name eines DAB-
Programmes.
DEUTSCH 13RADIO-BETRIEB----------------------------------------
Dynamic Range Control (DRC) UKW-Radio-Betrieb
für DAB-Programme einstel- Programmquelle UKW-Radio
len wählen
Wenn Sie Dynamic Range Control aktiv-
ieren, können Sie leise Passagen in einer 1 Programmquelle UKW mit »8/
lauten Umgebung besser hören. MODE« wählen.
1 Das Menü mit »MENU/INFO« au- –A
nzeige: die Frequenz eines
frufen. UKW-Programmes.
2 Menüpunkt »DRC off« mit »r« oder Selecting stored stations
»e« wählen und mit »OK/SCAN« 1 »PRESET« drücken.
bestätigen.
2 Gewünschten Programmplatz mit
– Anzeige: »DRC off«. »r« oder »e« wählen und mit
3 Option »DRC low« oder »DRC »OK/SCAN« bestätigen.
high« mit »r« oder »e« wählen und
mit »OK/SCAN« bestätigen. RDS Informationen aufrufen
4 Betätigen und halten Sie die Taste RDS (Radio-Data-System) ist ein Infor-
»MENU/INFO«. mationssystem, das zusätzlich von den
meisten UKW (UKW)-Programmen aus-
Hinweis: gestrahlt wird.
DRC muss vom jeweiligen DAB-Pro-
7
gramm unterstützt werden. Hinweise:
7 Es kann einige Zeit dauern, bis alle
RDSInformationen übertragen wor-
den sind.
7 GRUNDIG hat keinen Einfluss auf die
Richtigkeit dieser Informationen.
1 »INFO« wiederholt drücken.
– Die folgenden Informationen wer-
den eingeblendet: der Name des
Rundfunk-Programmes, Radiotext
(wenn angeboten), der Programm-
typ (PTY), die Frequenz, die Signal-
stärke, Mono-/ oder Stereosignal,
die aktuelle Uhrzeit und das Datum.
14 DEUTSCHWECK-BETRIEB-----------------------------------------
Alarmtimer 9 Weckmodus (Weekdays = am
Wochentag, Weekends = am
Alarmtimer einstellen Wochenende, 1 -6 = ausser Sontag,
1 Das Menü mit »MENU/INFO« au- Daily = Täglich, ONCE = Einmal)
frufen. mit »r« oder »e« eingeben und mit
»OK/SCAN« « bestätigen.
2 Menüpunkt »System« mit »r« oder
»e« wählen und mit »OK/SCAN« Hinweis:
bestätigen. 7 Wurde der Weckmodus „Once =
Einmal“ gewählt, das Datum (Tag,
3 Menüpunkt »Alarm« mit »OK/ Monat und Jahr) jeweils mit »r« oder
SCAN« bestätigen. »e« eingeben und mit »OK/SCAN«
– Anzeige: »Alarm1 Setup«. bestätigen.
7 Wurde als Wecksignal »DAB« oder
4 Weckbereitschaft mit »r« oder »e«
»FM« gewählt, mit »r« oder »e«
aktivieren (»Alarm ON«) und mit
das gewünschte Rundfunkprogramm
»OK/SCAN« bestätigen. wählen (nur Programme, die auf den
–A
nzeige: »On time«, die Stun- Stationstasten 1 bis 10 gespeichert
den der Uhrzeit blinken. sind) oder die Option »Last lis-
tened« wählen (das zuletzt gehörte
5 Stunden der Uhrzeit mit »r« oder
Programm) und mit »OK/SCAN«
»e« eingeben und mit »OK/SCAN«
bestätigen.
bestätigen.
10 Gewünschte Wecklautstärke des
6 Minuten der Uhrzeit mit »r« oder Wecksignals mit »r« oder »e«
»e« eingeben und mit »OK/SCAN« eingeben und mit »OK/SCAN«
bestätigen. bestätigen.
7 Wählen Sie mit »r« oder »e« die Dau- – Display: »Alarm saved«.
er (15, 30, 45, 60, 90 oder 120 Mi-
nuten) und bestätigen Sie Ihre Wahl mit 11 Schalten Sie den Alarm mit »r«
»OK/SCAN«. oder »e« ein oder aus und bestäti-
gen Sie die Einstellung mit »OK/
8 Wecksignal (»DAB« = DAB-Pro- SCAN«.
gramm, »FM« = UKW-Rundfunkpro-
gramm oder »Buzzer« = Weckton,) 12 Betätigen und halten Sie die Taste
mit »r« oder »e« wählen und mit »MENU/INFO«.
»OK/SCAN« bestätigen.
DEUTSCH 15WECK-BETRIEB-----------------------------------------
Wecken unterbrechen Sleep-Timer
1 Während des Weckens Das Gerät verfügt über einen Sleep-
»OK/SCAN« drücken. Timer, der es während des Betriebes zu
– Das Wecksignal (Rundfunk-Pro- einer voreingestellten Zeit ausschaltet.
gramm oder Signalton) stoppt. Die mögliche Ausschaltzeit ist von 10
– Es setzt in 5 Minuten-Intervallen von bis 90 Minuten oder Aus.
neuem ein (bis die Alarmdauer ein� -
gestellt wurde). Sleep-Timer aktivieren
Wecken beenden 1 Das Menü mit »MENU/INFO« au-
frufen.
1 Während des Weckens »8/MODE«
drücken. 2 Menüpunkt »System« mit »r« oder
– Das Wecksignal (Rundfunk-Pro- »e« wählen und mit »OK/SCAN«
gramm oder Signalton) stoppt. bestätigen.
– Die Weckbereitschaft bleibt mit der 3 Menüpunkt »Sleep« mit »OK/
eingestellten Zeit erhalten. SCAN« bestätigen.
Weckbereitschaft deaktivie- – Anzeige: »Sleep OFF«.
ren/aktivieren 4 Gewünschte Ausschaltzeit mit
1 Das Menü mit »MENU/INFO« au- »r« oder »e« wählen und mit
frufen. »OK/SCAN« bestätigen.
2 Menüpunkt »System« mit »r« oder – Nach Ablauf der eingestellten Aus-
»e« wählen und mit »OK/SCAN« schaltzeit schaltet sich das Gerät
bestätigen. automatisch aus.
3 Menüpunkt »Alarm 1 Setup« mit 5 Betätigen und halten Sie die Taste
»OK/SCAN« bestätigen. »MENU/INFO«.
– Anzeige: »Alarm ON«.
Sleep-Timer deaktivieren
4 Weckbereitschaft mit »r« oder »e«
ausschalten (»Alarm OFF«) und mit 1 Sleep-Timer vorzeitig deaktivieren,
»OK/SCAN« bestätigen. dazu das Gerät mit »8/MODE« in
Bereitschaft (Stand-by) schalten.
5 Betätigen und halten Sie die Taste
»MENU/INFO«.
16 DEUTSCHSONDERFUNKTIONEN--------------------------
Software-Version abrufen DAB-Rundfunkprogramme
1 Das Menü mit »MENU/INFO« aufru- aus der Programmliste
fen. entfernen
Nach einem Ortswechsel können Sie
2 Menüpunkt »System« mit »r« oder
nicht mehr zur Verfügung stehende
»e« wählen und mit »OK /SCAN«
DAB-Rundfunkprogramme aus der Pro-
bestätigen.
grammliste entfernen, diese DAB-Rund-
3 Menüpunkt »SW version« mit »OK funkprogramme sind mit einem „?“ vor
/SCAN« bestätigen. dem Namen markiert.
–D
ie Softwareversion wird ange- 1 Das Menü mit »MENU/INFO« au-
zeigt. frufen.
4 Das Menü mit »MENU/INFO« ab- 2 Menüpunkt »Prune« mit »r« oder
schalten. »e« wählen und mit »OK/SCAN«
bestätigen.
Alle Einstellungen löschen – Eine Sicherheitsbestätigung wird
(Reset) angezeigt.
1 Das Menü mit »MENU/INFO« aufru- 3 Wählen Sie mit »r«, »e« die option
fen. »Yes«.
2 Menüpunkt »System« mit »r« oder Hinweis:
»e« wählen und mit »OK /SCAN« 7 Zum Abbrechen der Resetfunktion die
bestätigen. Option »No« (Nein) mit »r« oder »e«
3 Menüpunkt »Factory Reset« mit wählen.
»r« oder »e« wählen und mit »OK / 4 Einstellung mit »OK/SCAN« bestäti-
SCAN« bestätigen. gen.
– E ine Sicherheitsabfrage wird ein- 5 Betätigen und halten Sie die Taste
geblendet. »MENU/INFO«.
4 Die Option »Yes« (Ja) mit »r« oder
»e« wählen.
Hinweis:
Zum Abbrechen der Resetfunktion die
7
Option »No« (Nein) mit »r« oder »e«
wählen.
5 Einstellung mit »OK /SCAN« bestäti-
gen.
–A
nzeige: »GRUNDIG«.
DEUTSCH 17SONDERFUNKTIONEN--------------------------
Zeiteinstellungen Uhrzeit aktualisieren – au-
Zeitformat für die Uhrzeit ein- tomatisch
stellen (12- oder 24 Stunden) Die Uhrzeit wird automatisch aktualisi-
1 Das Menü mit »MENU/INFO« au- ert, wenn ein Rundfunk-Programm ein
frufen. Zeitsignal sendet.
Sie können einstellen, ob die Aktualisier-
2 Menüpunkt »System« mit »r« oder ung von DAB- oder UKW-Programmen
»e« wählen und mit »OK/SCAN« durchgeführt werden soll oder Sie kön-
bestätigen. nen diese Funktion ausschalten.
3 Menüpunkt »Time« mit »OK/SCAN« 1 Das Menü mit »MENU/INFO« au-
bestätigen. frufen.
–A
nzeige: »Set Time/Date«. 2 Menüpunkt »System« mit »r« oder
4 Menüpunkt »Set 12/24 hour« mit »e« wählen und mit »OK/SCAN«
»OK/SCAN« bestätigen. bestätigen.
5 Das gewünschte Zeitformat 12- oder 3 Menüpunkt »Time« mit »OK« bestäti-
24 Stunden mit »r« oder »e« wählen gen.
und mit »OK/SCAN« bestätigen. – Anzeige: »Set 12/24 hour«.
6 Betätigen und halten Sie die Taste 4 Menüpunkt »Auto update« »r«
»MENU/INFO«. oder »e« wählen und mit »OK/
SCAN« bestätigen.
5 Mit »r« oder »e« den Menüpunkt
wählen, von dessen Programmquelle
die Uhrzeit aktualisiert werden soll
(Update from Any = DAB und UKW,
oder DAB oder UKW); oder den
Menüpunkt »No update« wählen,
wenn keine Aktualisierung stattfinden
soll.
6 Einstellung mit »OK/SCAN« bestäti-
gen.
7 Betätigen und halten Sie die Taste
»MENU/INFO«.
18 DEUTSCHSONDERFUNKTIONEN--------------------------
Uhrzeit einstellen – manuell
1 Das Menü mit »MENU/INFO« au-
frufen.
2 Menüpunkt »System« mit »r« oder
»e« wählen und mit »OK/SCAN«
bestätigen.
3 Menüpunkt »Time« mit »OK/SCAN«
bestätigen.
–A
nzeige: »Set 12/24 hour«.
4 Menüpunkt »Set Time/date«
»r« oder »e« wählen und mit
»OK/SCAN« bestätigen.
5 Daten für Uhrzeit und Datum jeweils
mit »r« oder »e« eingeben und mit
»OK/SCAN« bestätigen.
6 Nach der letzten Eingabe wird
»Time Safed« angezeigt.
7 Betätigen und halten Sie die Taste
»MENU/INFO«.
DEUTSCH 19SAFETY AND INFORMATION----------------------------------
7 This device is designed for the play- Never open the device casing. The
7
back of audio signals. manufacturer will not accept any li-
Any other use is expressly prohibited. ability for damage resulting from im-
7 M ake sure the device is protected proper handling.
from dripping or splashing water. Make sure the power plug is freely
7
7 D o not place any vessels such as accessible.
vases on the device. These may be 7 Note, prolonged listening at
knocked over and spill fluid on the loud volumes with the ear-
electrical components, thus presenting phones can damage your
a safety risk. hearing.
7 Do not place any naked flames such Attention should be drawn to the envi-
7
as candles on the device. ronmentalaspects of battery disposal.
7 Only use the device in a moderate DO NOT INGEST THE BATTERY,
climate. CHEMICAL BURN HAZARD.
7 Ensure that the device is adequately 7 Thunderstorms are a danger to all
ventilated by placing it at least 10 cm electrical devices. Even if the hi-fi sys-
from any other object. Do not cover tem is switched off, it can be damaged
the device with newspapers, table by a lightning strike to the mains. Al-
cloths, curtains, etc. ways remove the power plug during a
7 If malfunctions occur due to static elec- thunder storm.
tricity charges or fast transient (burst), 7 Do not expose the battery to extreme
reset the device. To do this, pull out heat, such as for example sunlight, ra-
the power plug and connect it again diators, fire, etc.
after a few seconds. 7 Keep new and used batteries out of
7 W hen deciding where to place the reach of children.
device, please note that furniture sur- 7 If the battery compartment cannot be
faces are covered by various types closed safely, do not continue to use
of varnish and plastic, most of which the device and keep out of reach of
contain chemical additives. These children.
additives can corrode the device sup- 7 C AUTION: Danger of explosion if
ports, leaving residues on the furniture battery is incorrectly replaced. Re-
surfaces which can be difficult or im- place only with the same or equiva-
possible to remove. lent type.
7 D o not use any cleaning agent, as this
may damage the casing. Clean the
device with a clean, dry cloth.
20 ENGLISHSAFETY AND INFORMATION----------------------------------
RF Exposure Warning Power supply:
7 This equipment must be installed and Micro USB Input: 5V 2.0A
operated in acordance with provided Battery: 4x1.5V AA
manual. Power output:
The device comprised a built-in anten- DIN 45324, 1%THD 1W
na, and must not be co-located or op- Dimensions and weight:
erating in conjunction with any other
B x H x T 180 x 90 x 45 mm
antenna or transmitter.
Weight ca. 400 g
he only way to completely discon-
7 T
nect the device from the mains is to Frequency band:
unplug the mains cable. DAB/DAB+ Band III
(174.928 – 239.200 MHz)
7
The device should be installed and FM 87.5 – 108.0 MHz, support RDS
operated such that a minimum sepa-
ration distance of 20 cm is maintained Display
between the radiator (antenna) and 2 lines x 16 characters LCD display
the user’s or nearby person’s body at Connections
all times for RF exposure safety. Micro USB port (for power supply)
7 Product can be used all over EU
The 3.5mm headphone socket
without any restriction. Standby mode power consumption
Technical data < 1.0W
This device is noise-suppressed accord- Technical and design modifications re-
ing to the applicable EU directives. This served.
product fulfils the European directives
2014/53/EU and 2011/65/EU.
You can find the CE declaration of con-
formity for the device in the form of a
pdf file on the Grundig Homepage
www.grundig.com/downloads/doc.
The type plate is located on the back
side of the device.
ENGLISH 21SAFETY AND INFORMATION----------------------------------
Compliance with the WEEE Package information
Directive and Disposing of Packaging materials of the
the Waste Product: product are manufactured
This product complies with EU WEEE from recyclable materials in
Directive (2012/19/EU). This product accordance with our Na-
bears a classification symbol for waste tional Environment Regulations. Do not
electrical and electronic equipment dispose of the packaging materials to-
(WEEE). gether with the domestic or other wastes.
Take them to the packaging material col-
This symbol indicates that this lection points designated by the local
product shall not be disposed authorities.
with other household wastes
at the end of its service life. The lightning flash represented
Used device must be re- by the arrow symbol in an
turned to offical collection point for recy- equilateral triangle is intended
cling of electrical and electronic devices. to alert users to the presence
To find these collection systems please of the high voltage within the device
contact to your local authorities or re- which could cause an electric shock.
tailer where the product was puchased. This equipment is a class II or
Each household performs important role double insulated electrical ap-
in recovering and recycling of old appli- pliance. It has been designed
ance. Appropriate disposal of used ap- in such a way that it does not
pliance helps prevent potential negative require a safety connection to electrical
consequences for the environment and earth.
human health. Please read the entire
Compliance with RoHS Di- manual carefully be-
fore operating this de-
rective vice.
The product you have purchased com-
plies with EU RoHS Directive (2011/65/
EU). It does not contain harmful and pro-
hibited materials specified in the Direc-
tive.
22 ENGLISHPOWER SUPPLY----------------------------------------------------------------------------------
Mains operation Environmental note:
Batteries, including those which con-
7
1 Connect the USB cable on the
tain no heavy metal, must not be
MICRO USB socket on the device. disposed of with household waste.
Please dispose of used batteries in an
Caution:
environmentally sound manner. Ob-
7 The device is connected to the
serve the legal regulations which ap-
mains with the MICRO USB cable. ply in your area.
Pull out the MICRO USB cable
when you want to completely dis-
connect the device from the mains.
Battery operation
1 Open the battery compartment un-
derneath the device by pressing the
catch and removing the lid.
2 Insert the batteries (4 x 1.5V AA bat-
tery) according to the polarity marked
on the battery compartment.
3 Close the battery compartment.
Notes:
7 Do not expose the batteries to ex-
treme heat, caused for example by
direct sunlight, heaters or fire.
7 Remove the batteries when they are
flat or when you know that the device
will not be used for a long period of
time.
When the batteries are low,
»Battery Low« appears in the dis�-
play.
7 No liability is accepted for damage
resulting from leaking batteries.
7 The batteries are switched off during
mains operation.
ENGLISH 23OVERVIEW ---------------------------------------------------------------------------------------------------
See the figure on page 3. BACK Press to go back one
step.
Controls on the front
Press and hold the but-
8/MODE Controls on the right
ton, turns the device ON/OFF It is a switch , to power
on and off. on or off the device.
Press “MODE” button USB MicroUSB socket for
to swap between DAB power supply.
and FM modes.
Earphone socket (3.5
0
Display Shows various infor-
mm stereo plug).
mation such as chan-
nel name, time, alarm
time, volume and the Controls on the back
menu.
Antenna T elescopic antenna
PRESET AB and FM modes:
D for DAB/DAB+ and
press and hold to FM reception.
save a station to pre-
set list; press to recall
the preset list.
OK/SCAN Confirms settings.
FM mode: press to
scan the next station.
VOL- Decrease the volume
VOL+ Increase the volume
Scroll right through the
menu.
Scroll left through the
menu.
Menu/INFO Press and hold to enter
menu.
Press to display infor-
mation of the DAB and
FM radio.
24 ENGLISHCONNECTION AND PREPARATION---------
Connecting the head- Environmental note:
phones 7 Batteries, including those which do
1 Insert the headphone plug (ø 3.5 mm) not contain heavy metal, should
into the »0« socket on the back of not be disposed of with household
the device. waste. Always dispose of used bat-
– The loudspeakers of the device are teries in accordance with local en-
switched off. vironmental regulations.
Note:
7 Excessive sound pressure from the
earphones or headphones can
cause hearing loss.
SETTINGS---------------------------------------------------------------------------------------------------------
Tuning and storing radio Tuning and storing DAB
stations (DAB and FM) – and FM radio stations –
first installation after a removal
When the device is switched on for the After the automatic station search, all ra-
first time or after factory reset, the Auto dio stations will be stored in the program
Tuning System will start to scan the list. That is reasonable, if you will use the
whole DAB bandwidth and store in the device in another place or search new
program list. DAB radio stations.
When entering FM mode, the device 1 Press and hold »8/MODE« to turn
will scan the FM waveband and store on the device.
the first 10 radio stations as presets 1
to 10. 2 Open the menu with »MENU/INFO«.
The time is updated automatically. 3 Select the option »Full scan« with
1 For the best DAB/FM reception, it is »r« or »e« and confirm by pressing
sufficient to extend the telescopic an- »OK/SCAN«.
tenna and direct it accordingly. – The automatic station search
2 Switch the »ON/OFF« button starts, searches and stores the ra-
to switch on the device. dio stations.
– After the automatic scan, the de-
–D
isplay: »GRUNDIG«. vice switches to standby, the cur-
rent time lights up.
ENGLISH 25SETTINGS---------------------------------------------------------------------------------------------------------
Storing DAB radio stations Programming DAB radio
to presets stations – manually
After the automatic station search, all ra- 1 Select the input source DAB with
dio stations will be stored in the program »8/MODE«.
list. You can store your favored DAB ra-
dio stations on presets 1 to 10. 2 Open the menu with »MENU«.
1 Select DAB radio stations with »r« or 3 Select the option »Manual tune«
»e«. with »r« or »e« and confirm by press-
–D
isplay: the name of the radio sta- ing »OK/SCAN«.
tion, the radio station will be acti- – Display: e.g. »5A I74.928MHz«
vated in 1 second. (channel and frequency of a DAB
2 Press and hold down »PRESET«. radio station).
–D
isplay: »Preset Store« and 4 Select the desired frequency/channel
the first preset. with »r« oder »e«.
3 Select the preset with »r« or 5 Press »OK/SCAN« to confirm the fre-
»e« and confirm by pressing quency/channel.
»OK/SCAN«. – Display: the signal strength.
–D
isplay: »Preset1 stored«. 6 Press »OK/SCAN« to confirm the set-
ting.
– The DAB radio stations will be
stored in the program list.
26 ENGLISHSETTINGS---------------------------------------------------------------------------------------------------------
Tuning and storing FM 6 Press and hold down »PRESETS«.
radio stations – Display: »Preset Store« and
1 Select the input source FM with the first preset.
»8/MODE«. 7 Select the preset with »r« or »e« and
confirm by pressing »OK«.
2 Open the menu with
»MENU/INFO«. – Display: »Preset1 stored«.
–D
isplay: »FM« and »Scan set-
ting«.
Updating the time –
automatically
3 Confirm the option »Scan setting«
by pressing »OK«. The device will update the time automat-
ically, when a time signal is received for
–D
isplay: »Strong stations a radio station.
only«.
Note:
You can select whether the device
7
will scan radio stations with weak sig-
nal (display »Strong stations
only«) or all radio stations (display:
»All stations«).
4 Select the desired option with »r« or
»e« and confirm by pressing »OK«.
5 Press and hold down »r« or »e« to
search the desired radio station.
– T he automatic station search
starts, and stops at the next station
with a strong signal;
or
press briefly »r« or »e« until you
have found the frequency you want.
– T he frequency changes in steps of
50 kHz.
ENGLISH 27RADIO MODE------------------------------------------
General functions Selecting DAB radio station
Telescopic antenna 1 Select the desired station from the
program list step by step by pressing
1 For the best DAB/FM (UHF) recep- »r« or »e« and confirm by pressing
tion, it is sufficient to extend the tel- »OK/SCAN«.
escopic antenna and direct it accord-
ingly.
Selecting stored stations
Switching on and off 1 Press »PRESETS«.
1 Switch the device from standby with 2 Select the station you want to use
press and hold »8/MODE«. »r« or »e« and confirm by pressing
»OK/SCAN«.
2 Switch the device to standby with
press and hold »8/MODE«. Displaying DAB station infor-
mation
Adjusting the volume 1 To display information on the
1 Adjust the volume with »VOL+« or » current DAB station, press
VOL–«. »MENU/INFO« repeatedly.
– The following display appears in
Listening with headphones succession: Information from the
1 Connect the headphones to the »0« provider (e.g. the title of the song,
headphone jack (ø 3.5 mm). the e-mail address), the signal
strength, the genre, the ensemble
– This switches off the loudspeaker. (e.g. BR Bayern), the current chan-
nel and frequency, the bit rate, the
DAB mode broadcasting format, the current
Selecting the input source DAB time and date.
1 Select the input source DAB with »8/
MODE«.
– Display: the name of a DAB radio
station.
28 ENGLISHRADIO MODE------------------------------------------
Setting Dynamic Range Con- Displaying RDS station infor-
trol (DRC) for DAB stations mations
When you activate Dynamic Range RDS (Radio Data System) is an informa-
Control, you can hear lower sounds bet- tion system which is transmitted addition-
ter in a loud environment. ally by most FM stations.
1 Open the menu with »MENU/INFO« Notes:
. 7 It may take some time before all RDS
information is available.
2 Select the option »DRC off« with
7 GRUNDIG has no influence on the
»r« or »e« and confirm by pressing
correctness of such information.
»OK/SCAN«.
1 Press »MENU/INFO« repeatedly.
– Display: »DRC off«.
– The following display appears in
3 Select the option »DRC low« or »DRC succesion: The name of the radio
high« with »r« or »e« and confirm station, radio text (if offered), sta-
by pressing »OK/SCAN«. tion type (PTY), the signal strength,
4 Press and hold »MENU/INFO« to the frequency, mono-/ or stereo sig-
end the display. nal, the current time and date.
Note:
The DAB station must support DRC.
7
FM mode
Selecting the input source FM
1 Select the input source FM with
»8/MODE«.
– Display: the frequency of a FM ra-
dio station.
Selecting stored stations
1 Press »PRESET«.
2 Select the station you want to use
»r« or »e« and confirm by pressing
»OK/SCAN«.
ENGLISH 29TIMER MODE--------------------------------------------
Alarm mode 9 Select the desired alarm mode
(Weekdays, Weekends, 1 - 6, Daily,
Setting the alarm time Once) with » r « or »e« and confirm
1 Open the menu with by pressing »OK/SCAN«.
»MENU/INFO«. Note:
2 Select the option »System« with 7 If the alarm is set to „Once“, select
»r« or »e« and confirm by pressing the date (day, month and year) with
»OK/SCAN«. »r« or »e« and confirm by pressing
»OK/SCAN«.
3 Confirm the option »On time« by
7 If the alarm is set to »DAB« or »FM«,
pressing »OK/SCAN«.
then select the desired station (only
– Display: »Alarm1 Setup«. if stations are stored on presets 1 to
4 Activate the alarm stand-by with »r« 10) by using »r« or »e« or select the
or »e« (»Alarm ON«) and confirm by option »Last listened« (the last
listened station) and press »OK« to
pressing »OK/SCAN«.
confirm.
–D
isplay: »On time«, the hours 10 Select the alarm volume with »r«
flash.
or »e« and confirm by pressing
5 Set the hours with »r« or »e« and »OK/SCAN«.
confirm by pressing »OK/SCAN«. – Display: »Alarm saved«.
6 Set the minutes with »r« or »e« and 11 Turn on or off the alarm with »r«
confirm by pressing »OK/SCAN«. or »e« and confirm by pressing
7 Select the duration (15, 30, 45, »OK/SCAN«.
60, 90 or 120 minutes) with »r« or 12 Press and hold »MENU/INFO« to
»e« and confirm by pressing »OK/ end the display.
SCAN«.
8 Select alarm (»DAB« = DAB station, Interrupting the alarm
»FM« = FM station or »Buzzer« = sig- 1 Press »OK/SCAN« while the alarm is
nal tone) with »r« or »e« and confirm sound.
by pressing »OK/SCAN«. – The alarm signal (radio station, or
signal) stops.
– The alarm signal goes on again at
five-minute intervals (until the alarm
duration has been set).
30 ENGLISHTIMER MODE--------------------------------------------
End the alarm Activating the sleep timer
1 Press »8/MODE« while the alarm is 1 Open the menu with »MENU/INFO«.
sound. 2 Select the option »System« with
– The alarm signal (radio station, or »r« or »e« and confirm by pressing
signal) stops. »OK/SCAN«.
– The alarm retains the set time.
3 Confirm the option »Sleep« by press-
Activating and deactivating ing »OK/SCAN«.
the alarm
– Display: »Sleep OFF«.
1 Open the menu with
»MENU/INFO«. 4 Set the switch-off time with »r«
or »e« and confirm by pressing
2 Select the option »System« with »r« »OK/SCAN«.
or »e« and confirm by pressing »OK/
SCAN«. – After the selected switch-off time has
elapsed, the device switches off au-
3 Confirm the option »Alarm 1 Set- tomatically.
up« by pressing »OK/SCAN«. 5 Press and hold »MENU/INFO« to
– Display: »Alarm ON«. end the display.
4 Deactivate the alarm stand-by with
»r« or »e« (»Alarm OFF«) and con- Deactivating the sleep timer
firm by pressing »OK/SCAN«. 1 To switch off the sleep timer early,
5 Press and hold »MENU/INFO« to press »8/MODE«.
end the display.
Sleep timer
The device has a sleep timer, which
switches it off at a preset time. The switch
off time can be set in a range between
15 to 90 minutes or off.
ENGLISH 31SPECIAL FUNCTIONS------------------------------
Call up the software Removing DAB radio
version stations from the program
1 Open the menu with »MENU/INFO«. list
2 Select the option »System« with If you move to a different part of the
»r« or »e« and confirm by pressing country, you should remove DAB radio
»OK /SCAN «. stations, which are no longer available
from the program list.
3 Confirm the option »SW version« These DAB radio stations are marked
by pressing »OK/SCAN«. with “?“.
–D
isplay: actual software version 1 Open the menu with »MENU/INFO«.
4 Press and hold »MENU/INFO« to 2 Select the option »Prune« with »r«
end the display. or »e« and confirm by pressing
»OK/SCAN«.
Deleting all settings (Reset) – A safety confirmation is displayed.
1 Open the menu with »MENU/INFO«. 3 Select the option »Yes« with »r« or
»e«.
2 Select the option »System« with
»r« or »e« and confirm by pressing Note:
»OK/SCAN«. 7 To cancel the function select the op-
tion »No« with »r« or »e«.
3 Select the option »Factory Reset«
with with »r« or »e« and confirm by 4 Press »OK/SCAN« to confirm setting.
pressing »OK/SCAN«. 5 Press and hold »MENU/INFO« to
–A
safety confirmation is displayed. end the display.
4 Select the option »Yes« with »r« or
»e«.
Note:
7 T o cancel the function select the op-
tion »No« with »r« or »e«.
5 Press »OK/SCAN« to confirm setting.
– Display: »GRUNDIG«.
32 ENGLISHSPECIAL FUNCTIONS------------------------------
Time settings 4 Select the option »Auto update«
Setting the clock format (12 or with »r« or »e« and confirm by press-
24 hours) ing »OK/SCAN«.
1 Open the menu with 5 Select the desired source (Any = DAB
»MENU/INFO«. and FM, or DAB or FM) from which
the update starts with »r« or »e«; or
2 Select the option »System« with select the option »No update«, if you
»r« or »e« and confirm by pressing want to disable the update.
»OK«.
6 Press »OK/SCAN« to confirm the set-
3 Confirm the option »Time« by press- ting.
ing »OK/SCAN«.
7 Press and hold »MENU/INFO« to
–D
isplay: »Set Time/Date«. end the display.
4 Confirm the option »Set 12/24
hour« by pressing »OK/SCAN«. Updating the time – manually
5 Select the desired clock format (12 or 1 Open the menu with »MENU/INFO«.
24 hours) by pressing »r« or »e« and
2 Select the option »System« with
confirm by pressing »OK/SCAN«.
»r« or »e« and confirm by pressing
6 Press and hold »MENU/INFO« to »OK/SCAN«.
end the display.
3 Confirm the option »Time« by press-
ing »OK/SCAN«.
Updating the time – automati-
cally – Display: »Set 12/24 hour«.
The device will normally update the 4 Select the option »Set Time/date«
time automatically, when a time signal with »r« or »e« and confirm by press-
is received. You can select from which ing »OK/SCAN«.
source (DAB or FM) the update starts or
5 Enter the time and date using »r«
you can disable this function.
oder »e« respectively and confirm by
1 Open the menu with pressing »OK/SCAN«.
»MENU/INFO«.
6 After the last input, »Time Saved«
2 Select the option »System« with appears.
»r« or »e« and confirm by pressing
»OK/SCAN«. 7 Press and hold »MENU/INFO« to
end the display.
3 Confirm the option »Time« by press-
ing »OK/SCAN«.
–D
isplay: »Set 12/24 hour«.
ENGLISH 33INFORMATIONS RELATIVES À LA SÉCURITÉ---------
7 Cet appareil est conçu pour la lecture 7 Lors de l’installation de votre appareil,
des signaux audio. tenez compte du fait que la plupart
Son utilisation à d’autres fins est for- des meubles sont recouverts de vernis,
mellement interdite. de peinture ou de matières plastiques
7 A ssurez-vous que l’appareil est pro- et que ces revêtements contiennent
tégé contre les éclaboussures ou les des additifs chimiques. Ces additifs
gouttes d’eau. peuvent entre autres attaquer le ma-
tériau des pieds de votre appareil et
7 N e posez pas de récipients contenant laisser ainsi sur les meubles des traces
des liquides (vases ou autres) sur l’ap- indélébiles ou difficiles à enlever.
pareil. Ces récipients pourraient se
7 N ’utilisez pas de détergents, ceux-ci
renverser et les liquides s’en écoulant
pourraient endommager le système risqueraient d’endommager le boîtier.
électrique. Nettoyez l’appareil à l’aide d’un chif-
fon propre et sec.
7 N e posez pas d’objets produisant une
7 N e jamais ouvrir le boîtier de l’appa-
flamme nue, comme des bougies, sur
l’appareil. reil. Le fabricant dénie toute respon-
sabilité en cas de dégâts dus à une
7 Utilisez l’appareil uniquement à tem- utilisation incorrecte.
pérature modérée.
Veillez à ce que la fiche d’alimenta-
7
7 Assurez-vous que l’appareil est parfai- tion soit facile d’accès.
tement aéré en le plaçant à environ 7 Veuillez remarquer qu’une
10 cm de tout autre objet. N’obstruez
écoute prolongée à des vo-
pas les fentes d’aération avec des
lumes excessifs avec les
journaux, des nappes, des rideaux,
écouteurs peut avoir une in-
etc.
cidence sur votre capacité auditive.
7 Si un dysfonctionnement intervient l convient d’attirer l’attention sur les
7 I
suite à des charges électriques sta-
aspects environnementaux de mise au
tiques ou de brèves surtensions de
rebut de la batterie.
secteur, réinitialisez l’appareil. Dans
ce cas débranchez la prise d’ali- NE PAS INGÉRER LA BATTERIE,
mentation puis rebranchez-la après RISQUE DE BRÛLURES
quelques secondes. CHIMIQUES
34 FRANÇAISSie können auch lesen


