Gravity Action 3D Gimbal - Benutzerhandbuch
←
→
Transkription von Seiteninhalten
Wenn Ihr Browser die Seite nicht korrekt rendert, bitte, lesen Sie den Inhalt der Seite unten

Gravity Action 3D Gimbal

                                    Benutzerhandbuch
Vers. 1.0

"FlyCamOne" und „CamOne” sind registrierte Marken von ACME the game company GmbH, Deutschland
© copyright 2015 von ACME the game company GmbH
Dieses Benutzerhandbuch ist durch internationale Urheberrechtsgesetze geschützt.
Kein Teil dieses Benutzerhandbuchs darf ohne die vorherige schriftliche Genehmigung von ACME the game company GmbH
in irgendeiner Form oder durch irgendwelche Mittel, elektronisch oder mechanisch, einschließlich von
Fotokopieren, Aufzeichnen oder Speichern in einem Informationsspeicher- und -abrufsystem, reproduziert,
verteilt, übersetzt oder übertragen werden.

                                             www.CamOneTec.com
www.CamOneTec.com

                                   Sicherheitshinweise
WARNUNG:                                                            SERVICE & SUPPORT

BEACHTEN SIE FOLGENDE HINWEISE,                                 ACME the game company GmbH
UM STROMSCHLÄGE ODER SCHÄDEN                                             Boikweg 24
AM PRODUKT AUSZUSCHLIESSEN:
- SETZEN SIE DAS GERÄT NICHT REGEN,                                     33129 Delbrück
  FEUCHTIGKEIT, TROPF- ODER                                                Germany
  SPRITZWASSER AUS
- HALTEN SIE DAS GERÄT UND ALLE BESTANDTEILE                         Tel: +49 2944 9738 30
  VON WASSER FERN                                                  service@CamOneTec.com
- VERWENDEN SIE AUSSCHLIESSLICH                                               oder
  EMPFOHLENE ZUBEHÖRTEILE                                         http://www.CamOneTec.com
- DEMONTIEREN SIE NICHT DAS GERÄT
- IM INNERN BEFINDEN SICH KEINE TEILE,
  DIE VOM BENUTZER GEWARTET
  WERDEN KÖNNEN.
  LASSEN SIE WARTUNGSARBEITEN VON
  QUALIFIZIERTEN KUNDENDIENST-MITARBEITERN
  DURCHFÜHREN

Informationen zur Verwendung von Li-Ion Akkus
ACHTUNG                                                       Es besteht Brand-, Explosions- und
Wenn ein Akku nicht ordnungsgemäß                             Verbrennungsgefahr. Zerlegen Sie
ausgetauscht wird, besteht Explosionsgefahr.                  nicht den Akku.
Tauschen Sie den Akku stets durch einen vom Hersteller        Vermeiden Sie die Erhitzung des
empfohlenen Akku desselben oder eines entsprechenden          Akkus über die unten genannte
Typs aus. Entsorgen Sie alte Akkus entsprechend den           Temperatur und verbrennen Sie
Anweisungen durch den Hersteller.                             diesen nicht.

                                                              Li-Ion Akku
www.CamOneTec.com

                                               Lieferumfang
                 Überprüfen Sie die Vollständigkeit bevor Sie das Gerät in Betrieb nehmen
                                              Gerätehalter 1x
             Gimbal 1x              (Abbildung kann je nach Variante                   Akku 1x
                                                abweichen)

               Tasche                                Lade Netzteil                         Ausgleichsgewicht

Wichtige Hinweise!
Auf der Internetseite von CamOneTec (http://www.CamOneTec.com) finden Sie weitere Hinweise,
Informationen und Anpassungen zu dieser Anleitung.

Halten Sie sich unbedingt bei der Montage an diese Anleitung!

Haftungsausschluss und Warnhinweise
Lesen Sie diese Hinweise vor der Inbetriebnahme und Verwendung des Artikels und seiner Komponenten!
Mit der Inbetriebnahme des Artikels erklären Sie sich mit den Bedingungen zum Haftungsausschluss und den
Hinweisen einverstanden.

Bauen Sie den Artikel gemäß der Anleitung auf. Jegliche Veränderungen an diesem oder Verwendungen von
Fremdprodukten/Ersatzteilen kann zu Schäden führen.
Dieses schließt die Übernahme von Gewährleistungsansprüchen aus!
Der Artikel befindet sich bereits im Lieferzustand in einem funktionsfähigen Zustand. Nehmen Sie sich für die
erste Inbetriebnahme Zeit.
Es wird keine Verantwortung für Schäden oder Verletzungen vom Hersteller, Importeur oder Händler
übernommen, die bei der Nutzung des Produktes entstehen.

              Nur den Akku aus dem Lieferumfang verwenden.
      !Inbetriebnahme nur mit eingelegter Kamera oder Smartphone!
      Äußerliche Krafteinflüsse im Betrieb beschädigen den Gimbal!

                                                           3
www.CamOneTec.com

Ladevorgang
Verwenden Sie für den Ladevorgang das Steckernetzteil bzw. das KFZ Ladgerät (separat erhältlich)
aus dem Lieferumfang.
Stecken Sie dieses in eine geeignete Steckdose und führen Sie dessen Stecker in die Buchse vom
Akku ein.
Die LED-Anzeige an der Unterseite des Akkus leuchtet auf. Die Anzeige zeigt durch die einzelnen
LEDs den Ladezustand an.
Wenn der Akku vollständig geladen ist, leuchten alle LEDs auf.

Einschieben des Akkus in Gimbal
Wurde der Akku vollständig geladen, kann dieser (nicht eingeschaltet) in das Akkufach eingeschoben
werden. Achten Sie darauf, dass dieser nur in einer Richtung eingeschoben werden kann. Der Akku
rastet hörbar ein Fach ein.
Schalten Sie den Akku noch nicht ein!

                                                4
www.CamOneTec.com

Montage der Haltervorrichtung

Der Gimbal ist mit einer Haltevorrichtungen für das Endgerät (Action Kamera, Smartphone oder
Phablet) ausgestattet.
Der Lieferumfang weicht je nach gekaufter Variante ab. Es liegt jeweils nur eine Halterung bei.

Diese weisen auf der Rückseite eine Verschlussführung auf, schieben Sie Halterung in die passende
Auskerbung am Gimbal ein, bis diese einrastet und Sie die Schraubvorrichtung sehen können.

                                                 5
www.CamOneTec.com

                              Funktions Erklärung 3 Achsen

     Neigungs-/Pitch-Achse
     Verlangsamt die Neigungs-/Pitchrate, um
     plötzliche und schnelle
     Neigungsbewegungen zu stabilisieren.
     Um den Kamerawinkel zu neigen, bewegen
     Sie den Gimbal vorwärts (weg von Ihnen)
     oder rückwärts (zu Ihnen hin).
                                                                                  Rollachse
                                                                                  Stabilisiert das
                                                                                  Smartphone bei
                                                                                  ungewollten
                                                                                  Bewegungen am
                                                                                  Griff.

Schwenkachse
Verlangsamt die Schwenk-
/Drehrate, um plötzliche und
schnelle Drehbewegungen zu
stabilisieren.
Dies stellt eine kontrollierte
Drehrate sicher, die die
Aufnahme vor zu plötzlichen
Drehbewegungen schützt.
Bewegen Sie den Gimbal
einfach nach links und rechts,
um sich ein Bild dieser Funktion
machen zu können.

            Tipps:
            Nehmen Sie sich ein wenig Zeit, um sich ein Bild von den Funktionen und
            Bewegungen des Gimbals zu machen.
            Bitte schalten Sie den Gimbal aus, bevor Sie Ihr Smartphone abmontieren, da
            dieser ansonsten stark vibriert.
            Der Gimbal verfügt über einen Unterspannungsschutz. Der Gimbal stoppt die
            Stabilisierung, sobald der Akku über wenig Kapazität verfügt. Bitte schalten Sie den
            Gimbal aus und laden den Akku auf.

                                                  6
www.CamOneTec.com

Erste Inbetriebnahme
Alle Bauteile wurden von Ihnen gemäß den vorangegangenen Punkten beachtet und montiert.

!Inbetriebnahme nur mit installierter Kamera/Smartphone!

Äußerliche Krafteinflüsse im Betrieb können den Gimbal beschädigen!
Bewegen Sie den Gimbal (Kopf/Kamerahalter) im Betrieb nicht per Hand.

Verschieben Sie Ihr Endgerät in der Klemmvorrichtung so, dass dieses waagerecht sich ausrichtet.
Mit dem beiliegenden Gewicht können Sie dieses noch fein abstimmen.

Zusätzlich kann über das Zusatzgewicht eine Feinaussichtung vorgenommen werden. Dieses wird
unterhalb der Gerätehalterung geschraubt.

                                                7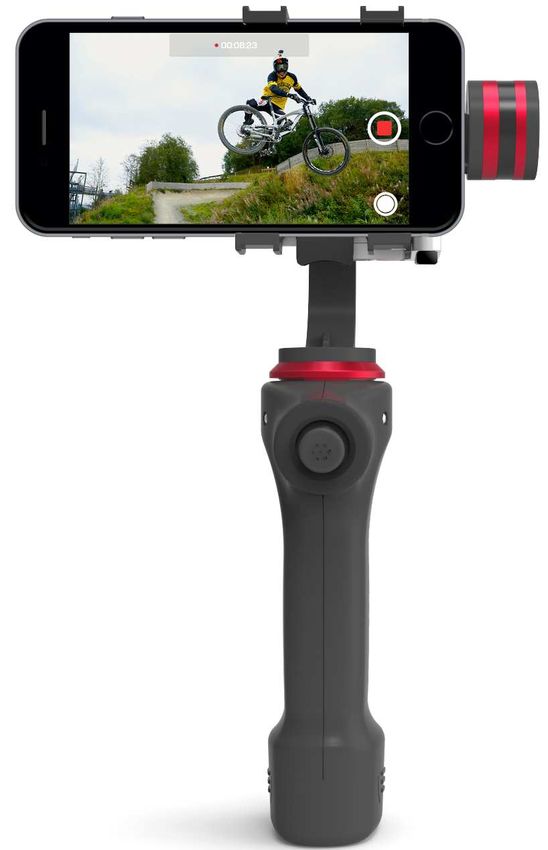
www.CamOneTec.com

Halten Sie den Gimbal-Griff senkrecht und unbewegt fest, betätigen Sie den Ein-/Aus Schalter.

                          (Ein-/Aus Schalter auf der Unterseite des Akkus)

Nach einigen Sekunden stellt sich der Gimbal automatisch ein. Bewegen Sie den Gimbal-Griff nun
vorsichtig und testen die Funktionen an.

Achten Sie darauf, das die Funktionsweise des Gimbals nicht durch Verschmutzung
oder Feuchtigkeit beeinträchtigt wird!

Joystick / Taster
Mit dem auf dem Handgriff angebrachten Joystick / Taster können Sie den Betriebsmodus des
Gimbals ändern. Um die Modi zu aktivieren drücken Sie wie unten beschrieben auf den Joystick
Taster.

Mode 1:      automaisch nach dem Start aktiv
             Gimbal arbeitet selbständig (der Joystick ist nicht aktiv)
Mode 2:      2 mal drücken >der Gimbal kann mit Hilfe des Joystick auf der Neigungs- / Rollachse
             gesteuert werden (Tilt + Roll)
Mode 3:      3 mal drücken >der Gimbal kann mit Hilfe des Joystick auf der Neigungs- / Gierachse
             gesteuert werden (Tilt + Yaw)

FAQ
F: Der Gimbal stabilisiert nicht und hält das Smartphone nicht horizontal.
A: Stellen Sie sicher, dass der Akku vollständig geladen ist und wiederholen Sie Schritt 2 aus der
   Schnellanleitung. Überprüfen Sie ebenfalls, dass das Smartphone richtig in der Halterung sitzt
   und der Gimbal keine Balance-Probleme hat.

F: Mein Smartphone passt nicht in die Halterung.
A: Leider scheint die Halterung nicht mit Ihrem Smartphone kompatibel zu sein.

F: Ich bekomme kein Bild auf meinem Smartphone.
A: Stellen Sie sicher, dass das Smartphone entsprechend dieser Anleitung in die Halterung
   eingesetzt wurde.

F: Wie lange hält der Akku des Gimbals?
A: Der Akku hält im Normalfall ca. 3 Stunden.

Bei weiteren Fragen und Problemen kontaktieren Sie bitte unseren Service!
                                                  8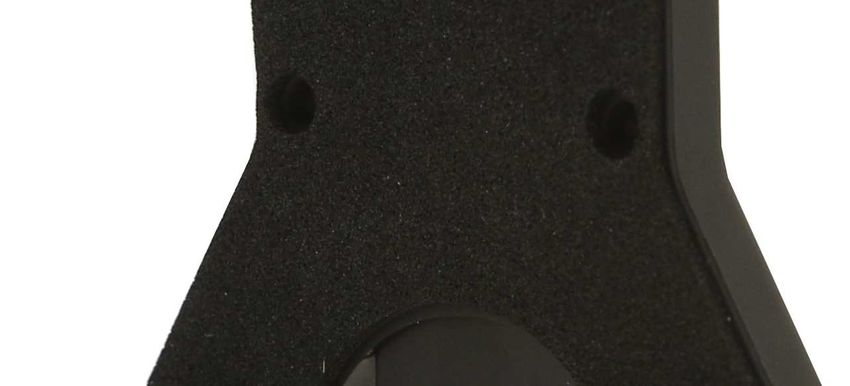
www.CamOneTec.com

Gewährleistung & Garantie
Dem Verbraucher wird unbeschadet seiner Mängelansprüche gegenüber dem Verkäufer eine
Haltbarkeitsgarantie zu den nachstehenden Bedingungen eingeräumt:

»Neugeräte und deren Komponenten, die aufgrund von Fabrikations- und / oder
Materialfehlern innerhalb von 24 Monate, ab Kauf einen Defekt aufweisen, werden von
ACME the game company GmbH nach eigener Wahl gegen ein dem Stand der Technik entsprechendes Gerät
dem Erstkäufer kostenlos ausgetauscht oder repariert.
Für Verschleißteile gilt diese Haltbarkeitsgarantie für 3 Monate ab Kauf.

»Diese Garantie gilt nicht, soweit der Defekt der Geräte auf unsachgemäßer Behandlung
und/oder Nichtbeachtung der Anleitung beruht.

»Diese Garantie erstreckt sich nicht auf vom Kunden selbsterbrachte Leistungen
(z. B. Umbauten)

»Garantieansprüche sind sofort nach Kenntnis des Garantiefalles geltend zu machen.

»Ersetzte Geräte bzw. deren Komponenten, die im Rahmen des Austauschs an ACME the game company
GmbH zurückgeliefert werden, gehen in das Eigentum
von ACME the game company GmbH über.

»Durch eine erbrachte Garantieleistung verlängert sich der Garantiezeitraum nicht

»Soweit kein Garantiefall vorliegt, behält sich ACME the game company GmbH vor, dem Kunden den
Austausch, die Reparatur oder die Versandkosten in Rechnung zu stellen. Der Kunde wird hierüber vorab
informiert.

Service & Support
ACME the game company GmbH
Westwood
Boikweg 24
33129 Delbrück
Germany

Telefon: +49 2944 9738 30
E-Mail: service@CamOneTec.com

                                                     9
www.CamOneTec.com

              Gravity Action 3D Gimbal

                                                             Manual
Vers. 1.0

"FlyCamOne" and "CamOne" are registered trademarks of ACME the game company GmbH, Germany
© copyright 2015 by ACME the game company GmbH
This user manual is protected by international copyright laws. No part of this manual may be reproduced without the prior written permission of ACME
the game company GmbH in any form or by any means, electronic or mechanical, including photocopying, recording or storing in any information
storage and retrieval reproduced, distributed, translated, or transmitted.

                                                                        10
www.CamOneTec.com
Safety Advice
WARNING: SERVICE & SUPPORT
Follow these instruction to prevent damage of the unit: ACME the game company GmbH
• DO NOT USE UNPROTECTED IF RAIN OR WATER. Boikweg 24
PREVENT CONTACT WITH ANY KIND OF LIQUIDS
• USE RECOMMENDED ACCESSORIES ONLY 33129 Delbrück
Germany
• DO NOT DISASSEMBLE
• THERE ARE NO PARTS AT THE INSIDE THAT NEED
Phone: +49 2944 9738 30
TO ME MAINTAINED
service@CamOneTec.com
REPAIRS SHOULD BE MADE BY QUALIFIED
or
PERSONNEL ONLY
http://www.CamOneTec.com
Warning Li-Ion batteries
WARNING Li-Ion BATTERY
• Mishandling the battery may occur explosion, fire and • Charge and store the Li-Ion
smoke including damage of health or goods. It will battery pack at a temperature of
also reduce battery performance. 0°C to 40°C – avoid a
• Never charge a damaged LiPo battery pack. temperature higher than 50°C
• Stop charging if the Li-Ion battery pack is getting when discharging.
deformed (blown up). • Do not shortcut – Risk of
explosion and fire!
CE Declaration
Herewith we declare that this item is in accordance with the WEEE Reg. Nr.: DE64989527
essential requirements and other relevant regulations of the
directive 2004/108/EC. A copy of the original declaration of Information for disposal of crossed
conformity can be obtained at the address above. Bin marked products
This symbol is marked on a product or
packaging, it means that the product
including the batteries must not be
disposed of with your general household
waste. Only discard electrical/electronic
items in separate collection schemes,
which cater for the recovery and recycling
of materials contained within. Your co-
operation is vital to ensure the success of
To dispose the battery, remove it and take it to a resource these schemes and for the protection of
recovery facility. the environment.
11www.CamOneTec.com
Content of the box
Please check the completeness before using the product
Device mount 1x
Gimbal 1x (photo may differ from the version Battery 1x
you have bought)
Case Charger Counterweight
Important Note!
More information and updates on this manual are available at CamOneTec (http://www.CamOneTec.com).
Please follow this manual before you assemble the product!
Disclaimer and Warnings
Read these instructions before commissioning and use of the product and its components!
With the launch of the product, you agree to the terms of the disclaimer and agree to the instructions.
Assemble the items on according to the instructions. Any changes to this or uses of Third-party products / spare parts can
cause damage.
This excludes the acquisition of warranty claims!
The product is already in a functional state in the delivery condition. Take your time to start it.
There is no responsibility for damage or injury from the manufacturer, importer or distributor acquired, resulting from the
use of the product.
Only use the supplied and original battery!
Only start to use the product with an inserted camera or smartphone!
External influences while using the gimbal may damage it!
12www.CamOneTec.com
Charging
Please use the supplied module to charge the battery, or alternately the optionally available car
charger.
Plug it into a compatible socket and connect the plug to the batterys port.
The LEDs on the bottom of the battery will start to flash. This shows the charging process.
As soon as the battery is fully charged, the LEDs will shine permanently.
Insert the battery
As soon as the battery is fully charged, you can slide it into the grip. Please note that it can be
inserted in one way only. The sliding is confirmed by a „click“.
Do not switch on the battery yet!
13www.CamOneTec.com
Mountage
The gimbal is equipped with a mount for your device (Action camera, smartphone or phablet).
The content of the box depends on your purchased version. One mount per version is included.
Matching notches are located on the backside of each mount. Carefully slide it into the recess on the
gimbal until it is firmly locked and you can see the screwing holes.
14www.CamOneTec.com
The 3 Axes
Tilt-/Pitch-Axis
Slows down the Tilt-/Pitchrate, to stabilize
sudden and fast tilt movements.
To tilt the camera angle, move the gimbal
forwards (away from you) or backwards
(towards you).
Roll-Axis
Stabilizes the
smartphone at
unwanted
movements on the
grip.
Pan-Axis
Slows down the Pan-/Rollrate, to stabilize sudden and fast roll movements.This
ensures a controlled turning rate sicher, that safes the recording from sudden
movements.
To have an impression of this function, simply move the gimbal to the left and right.
Tips:
Take your time, to have an impression of all functions and movements of the
gimbal.
Please switch off the gimbal before you unmount the smartphone as it will otherwise
start to vibrate strongly.
The gimbal is equipped with a undervoltage protection. The stabilization will be
automatically stopped as soon as the battery is low. Please switch off the gimbal
and charge the battery.
15www.CamOneTec.com
First use
!Only use with installed camera/smartphone!
External influences during usage may harm the gimbal!
Do not move the gimbals head or camera mount by hand during usage.
Slide your device inside the clamp and make sure that it has a horizontal adjustment. The
counterweight helps you to have the perfect balance.
The counterweight helps you to fine-adjust the balance. Please attach it underneath the mount.
16www.CamOneTec.com
Hold the grip vertically and still, now press the On/Off- button.
(The On/Off- button is located on the battery)
The gimbal will automatically adjust itself after a few seconds. Move the grip carefully and test all
functions and movements.
Make sure that no dirt or moisture is interfering the gimbals functions!
Joystick
You can activate the gimbals modes through the joystick that is located on the grip. Press the joystick
as described below to activate the modes.
Mode 1: automatically activated after start
Gimbal works autonomously (joystick deactivated)
Mode 2: Double press >the gimbal can be controlled on the tilt and roll axis by using the joystick
Mode 3: Triple press > the gimbal can be controlled on the tilt and yaw axis by using the joystick
FAQ
Q: The stabilization is not working and the device is not holding horizontally.
A: Make sure that the battery is fully charged and repeat Step 2 of this manual. Also check that the
device is mounted correctly and is well balanced.
Q: My smartphone does not fit inside the mount.
A: Your smartphone seems not to be compatible to the mount.
Q: My smartphone does not show any picture.
A: Make sure that the smartphone is mounted correctly and that the display is pointing towards you.
Q: How long is the battery life?
A: The battery has a duration of 3 hours at normal usage.
Feel free to contact our Service & Support!
17www.CamOneTec.com
Warranty
The consumer is without prejudice to any claim against the seller a Manufacturer's Guarantee under the
conditions set out below:
» New devices and their components , or arising from manufacturing and /Material faults within 24 months of
purchase develop a fault , are of ACME the game company GmbH exchanged at its option against a prior -art
device to the original purchaser or repaired free of charge . For wear parts, this warranty is valid for 3 months
from purchase.
"This warranty does not apply if the device defect is attributable to improper treatment and / or non-observance
of the information presented is based.
"This warranty does not extend to self- paid by the customer services (eg conversions).
»Warranty claims are to be claimed at once, to the knowledge of the warranty claim .
"Ownership of devices or components that are returned to ACME the game company GmbH in the framework
of exchange, become the property ACME the game company GmbH.
» By services rendered under warranty, the warranty period is not extended
“Insofar as no Guarantee default exists, ACME the game company GmbH reserves the right to charge the
customer for replacement, repair, or shipping costs. The customer will be informed in advance.
Service & Support
ACME the game company GmbH
Westwood
Boikweg 24
33129 Delbrück
Germany
Phone: +49 2944 9738 30
E-Mail: service@CamOneTec.com
18www.CamOneTec.com
Gravity Action 3D Gimbal
Manuel d’utilisation
Vers. 1.0
"FlyCamOne", “CarCamOne”, CamOne Infinity, CamOne Xplore et le logo FlyCamOne HD” sont des marques déposées par la société ACME the game
company GmbH, en Allemagne © copyright 2014 de ACME the game company GmbH.
Ce manuel est protégé par un copyright international.
Aucune partie de ce manuel ne peut être copiée sans l’autorisation préalable de la société ACME the game company GmbH.
19www.CamOneTec.com
Conseils de sécurité
Avertissements: SERVICE & SUPPORT
Il est indispensable de suivre les instructions ci-après afin ACME the game company GmbH
d’éviter d’endommager votre caméra: Boikweg 24
-NE PAS UTILISER LA CAMERA EN CONDITIONS 33129 Delbrück
PLUVIEUSES SI CELLE-CI N’EST PAS PROTEGEE Germany
-MAINTENIR A L’ECART DE L’HUMIDITE
-N’UTILISER QUE LES ACCESSOIRES COMPATIBLES Phone: +49 2944 9738 30
-NE PAS TENTER DE DEMONTER service@CamOneTec.com
-AUCUN COMPOSANT INTERNE NE NECESSITE ou
D’ENTRETIEN PARTICULIER http://www.CamOneTec.com
-LES REPARATIONS NE DOIVENT ETRE FAITES QUE
PAR LE PERSONNEL QUALIFIE.
Informations relatives à la batterie Li-Ion
Avertissements sur les batteries LiIon
• Une mauvaise utilisation de la batterie peut être à l’origine
d’explosion ou de fumées qui peuvent être nuisibles pour • La charge et le stockage de la
les biens et personnes. batterie doivent se faire dans des
• Ne jamais charger une batterie Li-Ion endommagée. pièces dont la température est
• Arrêter immédiatement la charge si la batterie Li-Ion comprise entre 10°C et 50°C. Ne
devenait chaude ou se déformait. jamais entreposer dans un endroit où
• Ne pas mettre en court-circuit, risque d’incendie ou la température est supérieure à
d’explosion 50°C.
Déclaration CE
Nous déclarons par la présente que ce produit est en règle WEEE Reg. Nr.: DE64989527
avec les directives relatives aux normes 2004/108/EC.
Une copie de l’original de la déclaration de conformité est Informations relatives aux produits
disponible sur simple demande à l’adresse suivante : recyclables.
info@acme-online.de Le symbole ici présent sur le produit
que vous venez d’acheter signifie que
celui-ci contient des composants
susceptibles d’être recyclés. Pour
cette raison vous ne pouvez pas jeter
ce produit avec vos déchets
ménagers. Il est indispensable que
vous preniez contact avec un centre
Les batteries en fin de vie doivent être collectées en vue de recyclages des déchets sensibles
d’être recyclées. afin d’assurer le recyclage de ce
Vous devez pour cela vous rapprocher du centre de collecte produit.
le plus proche de chez vous..
20www.CamOneTec.com
Contenu de la boite
Assurez-vous que votre produit est complet avant la première utilisation!
Support de fixation 1x
Gimbal 1x (photo non contractuelle en Batterie 1x
fonction de la version)
Pochette Chargeur Contrepoids
Remarque importante!
Plus d’informations et de mise à jour sont disponibles sur notre site CamOneTec
(http://www.CamOneTec.com).
Merci de lire attentivement ce manuel avant de procéder au montage du produit!
Limite de responsabilité et avertissement
Merci de lire ces instructions avant de mettre en œuvre le produit ou l’un de ses composants!
En mettant en marche le produit, vous validez les éléments de la limite de responsabilité ainsi que les instructions
d’utilisation.
Assembler le produit en suivant les instructions de ce manuel. Si vous tentez de modifier le produit ou la mise en œuvre
de celui-ci, vous pourriez nuire à son bon fonctionnement.
La garantie ne pourrait alors s’appliquer!
Le produit est livré neuf en état de fonctionnement et ne nécessite aucun réglages particulier. Prenez votre temps lors de
la mise en marche.
La responsabilité du fabricant ne pourrait être engagée en cas de blessures ou de dommages qui résulteraient de
l’utilisation de ce matériel.
N’utilisez que les batteries d’origine!
Ne pas mettre en marche le produit sans y avoir fixé une caméra ou un
smartphone!
Une action manuelle sur la nacelle durant son utilisation pourrait l’endommager!
21www.CamOneTec.com
Charge
Utiliser le module de charge livré avec la nacelle afin de la recharger. Des accessoires optionnels de
charge sont également disponibles pour recharger depuis votre véhicule.
Connecter votre chargeur au secteur et relier au port de la batterie.
Les témoins LED situés sur la batterie vont se mettre à clignoter. Ils permettent de visualiser la
charge. Une fois la batterie complétement chargée, les témoins LED vont s’allumer de manière
permanente.
Mise en place de la batterie
Une fois la batterie complètement chargée, vous pouvez la positionner en lieux et place, en la
glissant dans son logement. La batterie ne peut être introduite dans son logement que d’une seule
façon. Un “click” viendra confirmer son bon positionnement.
Ne mettez pas encore le produit en marche!
22www.CamOneTec.com
Montage
La nacelle est équipée avec une platine de montage pour votre périphérique (caméra, smartphone
ou phablet). Le contenu de la boite dépend de la version achetée. Chaque version a une platine
incluse.
Les encoches qui correspondent à votre périphérique sont situées sur la face arrière de la platine.
Faites glisser délicatement votre périphérique dans la platine jusqu’à ce qu’il soit fermement fixé.
Sécuriser l’ensemble avec les vis adéquates, comme illustré ci-après.
23www.CamOneTec.com
Les 3 Axes
Axes Tilt-/Pitch
En inclinant la nacelle vers le bas, le taux
de déplacement vers de la nacelle va
diminuer. A l’inverse, vers le haut il
augmente.
Axe de roulis
Permet de stabiliser
votre contre les
mouvements
involontaires sur le
grip.
Axe latéral
En inclinant la nacelle latéralement, vous agissez sur l’axe lateral. Cela permet de
stabiliser les mouvements lors des déplacements à gauche et à droite lorsque vous
réalisez des prises de vue. Incliner la nacelle vers la gauche ou la droite afin de
visualiser la correction sur cet axe.
Astuces:
Prenez votre temps afin de visualiser toutes les fonctions de la nacelle.
Pensez à éteindre la nacelle avant d’en retirer le périphérique afin de ne pas
l’endommager en générant de fortes vibrations.
La nacelle est équipée d’une protection contre la sous charge. Elle s’éteindra
automatiquement une fois la batterie déchargée.
Première utilisation
N’utilisez que si la caméra ou le smartphone est monté!
Une influence extérieure sur la nacelle pourra causer des dommages au produit!
24www.CamOneTec.com
Ne pas manipuler la caméra ou la nacelle à la main une fois qu’elle est sous
tension
Positionner votre périphérique dans son logement et vérifier qu’il est horizontalement droit. Le
contrepoids permet d’ajuster la balance afin d’obtenir l’équilibre parfait.
Le contrepoids permet d’obtenir la balance exacte. Vous devez le fixer sous la platine comme illustré
ci-après.
Maintenir le grip verticalement et presser le bouton On/Off.
25www.CamOneTec.com
(Le bouton On/Off est situé sur la batterie)
La nacelle va alors automatiquement ajuster sa position après quelques secondes. Agir sur le grip
avec précaution afin de tester la différente fonction.
Veillez à ce qu’il n’y ait pas de moisissure ou de poussière dans le mécanisme de la nacelle!
Joystick
Vous pouvez activez les différents modes de la nacelle en utilisant le joystick qui se situe sur le grip.
Appuyer sur le joystick comme indiqué ci-après pour en active les fonctions.
Mode 1: Activation automatique après la mise en marche
La nacelle fonctionne de manière autonome (le joystick est désactivé)
Mode 2: Appuyer deux fois > La nacelle peut être contrôlée sur l’axe tilt et l’axe de roulis en
utilisant le joystick
Mode 3: Appuyer trois fois > La nacelle peut être contrôlée sur l’axe de tilt mais également sur
l’axe latéral en utilisant le joystick
FAQ
Q: La stabilisation ne fonctionne pas et la nacelle ne se maintient as horizontalement.
R: Veillez à ce que la batterie soit correctement chargée et répéter si besoin l’étape 2 de ce manuel.
Veillez également à ce que le périphérique soit correctement monté et équilibré.
Q: Mon smartphone ne rentre pas dans la nacelle.
A: Votre smartphone semble ne pas être compatible avec la platine.
Q: Mon smartphone n’affiche pas d’image.
A: Assurez-vous que votre smartphone est correctement monté et qu’il est dans la bonne position,
écran vers vous.
Q: Qu’elle est l’autonomie de la batterie?
A: Lors d’une utilisation normale, la batterie a une autonomie de 3 heures.
N’hésitez pas à nous contacter sur notre site dans la partie Service & Support!
26www.CamOneTec.com
Garantie
Le consommateur accepte les conditions de prise en charge par le fabricant du matériel sous garante dans les
conditions qui suivent :
» Un matériel défectueux ou présentant des défauts dans une période de 24 mois devrait être renvoyé à la
charge du client au fabricant ACME the game company GmbH pour expertise et si besoin réparation ou
échange. Cette garantie se limite à 3 mois pour les pièces d’usure.
" En cas d’utilisation impropre su matériel, la garantie ne pourra s’appliquer.
" Le matériel retourné en garantie restera la propriété de la société ACME the game company GmbH dans le
cas d’un échange de matériel.
" ACME the game company GmbH se réserve le droit de facturer les réparations éventuelles ainsi que les frais
d’expédition retour du matériel. Le client sera informé préalablement.
Service & Support
ACME the game company GmbH
Westwood
Boikweg 24
33129 Delbrück
Germany
Téléphone: +49 2944 9738 30
E-Mail: service@CamOneTec.com
27Sie können auch lesen