HI-TECH SYSTEM

       ERSTE SCHRITTE

       FIRST STEPS
←
→
Transkription von Seiteninhalten
Wenn Ihr Browser die Seite nicht korrekt rendert, bitte, lesen Sie den Inhalt der Seite unten

HI-TECH SYSTEM
ERSTE SCHRITTE
FIRST STEPS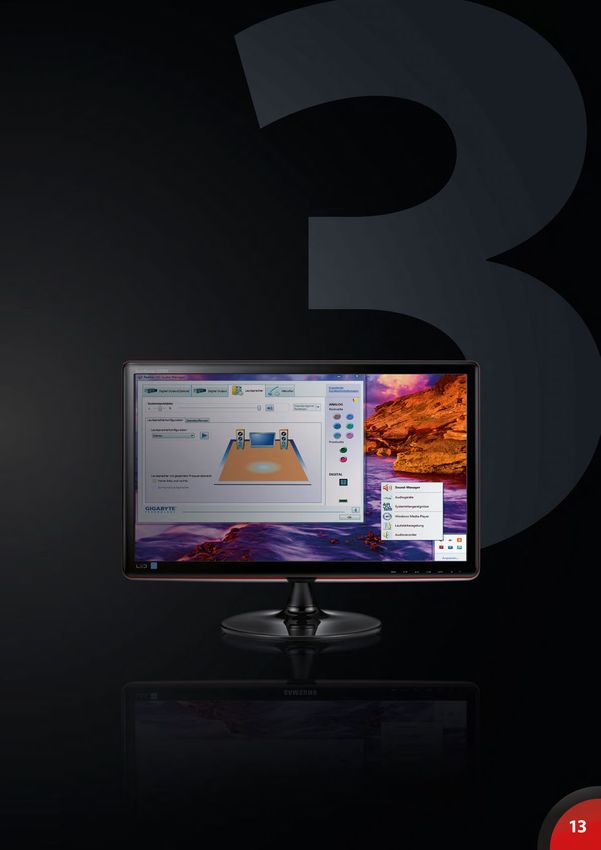
INHALT

    1DANKE!

    2BESCHÄDIGUNGEN, RÜCKSENDUNG & KONTAKT 			                          4

    3ERSTE SCHRITTE
     		               — Achtung! Sicherheitshinweise			                 6
     		               — Anschlüsse (Monitor/USB)			                     6
     		               — Verpackungsmaterial/Zubehör 			                 8
     		               — Windows/Testversion/Virenschutz 			             10
     		               — Betriebstemperatur & Reinigung 			12
     		               — Sound - Richtige Verwendung der Soundkarte 12 – 14
     		               — BIOS Profil - Einstellungen laden      16   –   20

    4EXTRAS
     		               — Wasserkühlung			22
     		               — Anschlüsse und Einstellungen
     			                  bei unterschiedlichen PC-Systemen			 24

TABLE OF CONTENTS

    1THANK YOU!

    2DAMAGE, RETURN & CONTACT			                                        5

    3FIRST STEPS
     		               — Attention! Safety Informations			               7
     		               — Connections (Monitor/USB)			                    7
     		               — Package/Accessories			9
     		               — Windows/Trial/Antivirus 			 11
     		               — Operating & Maintenance			                      13
     		               — Sound - Proper use of the sound card 13 –       15
     		               — BIOS profile - Settings for Loading    17   –   21

    4EXTRAS
     		               — Watercooling			23
     		               — Connections and settings
     			                  of different PC systems			25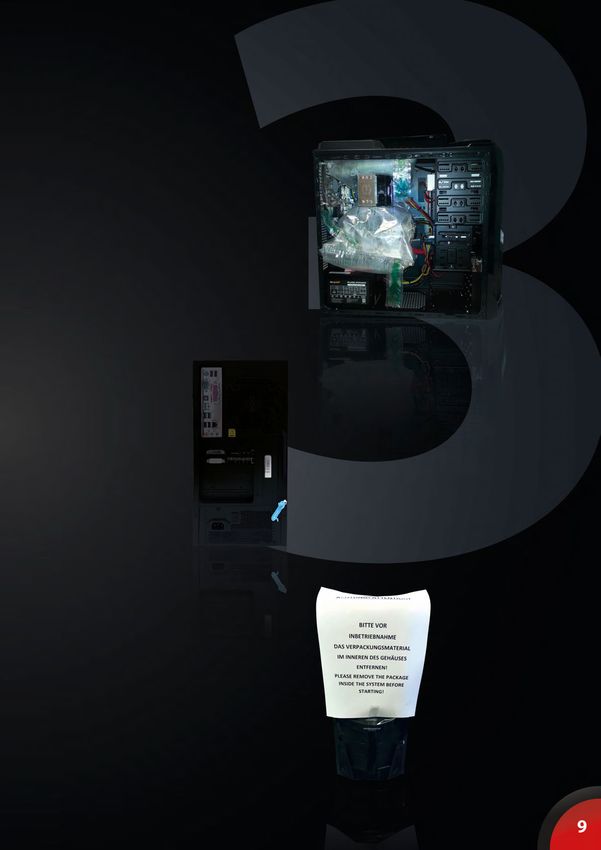
DANKE!

Es ist soweit, hier ist dein neues HI-TECH System! Erstmals vielen Dank für deinen Einkauf! Um dir deinen
Einstieg so einfach wie möglich zu gestalten, haben wir diese Broschüre zusammengestellt, die dir Fragen
beantworten und weiterhelfen soll. Bitte lies diese aufmerksam durch, damit deinem Gaming-Erlebnis nichts
im Weg steht!

THANK YOU!

This is it, here‘s your new HI-TECH system! First thank you for your purchase! To make your entry as easy as
possible, we have prepared this paper to help you answer your questions. Please read it carefully for your
gaming experience!
BESCHÄDIGUNGEN, RÜCKSENDUNG & KONTAKT

BESCHÄDIGUNGEN

     Bitte prüfe bei der Übernahme das Paket         wehren sollte, im Unterschriftsfeld einen Vermerk an-
     sofort auf äußere Mängel. Solltest du Trans-    zubringen, verweigere bitte die Annahme des Pakets
     portschäden feststellen (z.B. deutliche         und gib uns Bescheid!
     Risse im Außenkarton), so übernimmst du         Vereinzelt führen wir Testsendungen zur Qualitäts-
     das Paket bitte nur mit dem Vermerk„Paket       sicherung durch, um unsere Standards weiterzuent-
     beschädigt“ im Unterschriftsfeld. Dieses        wickeln. In so einem Fall würde sich ein roter oder
     Feld ist Teil des Paket-Scanners des Fahrers.   violetter Sticker mit der Bezeichnung SHOCKWATCH
     Weise bitte den Fahrer auf die Mängel hin       auf dem Paket befinden. Bitte achte darauf, ob das
     und mache zusätzlich Fotos vom Schaden.         Kontrollstäbchen auf diesem Aufkleber weiß oder rot
     Diese übermittle bitte umgehend an uns,         ist. Sollte es rot verfärbt sein, vermerke bitte auf dem
     damit wir dich bei der Wahrung deiner           Übernahmeschein – auch wenn das Paket äußerlich
     Ansprüche unterstützen können.                  unversehrt ist – dass das Kontrollstäbchen rot und der
     Wenn dir der Fahrer die Möglichkeit ver-        Versand somit unsachgemäß durchgeführt wurde.

RÜCKSENDUNG

     Bei etwaigen Problemen bieten wir dir als       benutzen. Andernfalls können aufgrund mangelhaf-
     besonderen Service eine transportversi-         ter Verpackung unnötige Transportschäden entste-
     cherte Abholung deines Gerätes bei dir zu       hen. Für diese Transportschäden können weder wir
     Hause während der üblichen Geschäftszei-        noch der Frachtführer Ersatz leisten! Daher bitten wir
     ten. Achte dabei bitte verstärkt darauf, dass   dich, das System mit einer sicheren und ordentlichen
     das Gerät auch transportsicher verpackt ist.    Verpackung auszustatten und alle Hohlräume aufzu-
     Hierfür ist es dringend ratsam Originalkar-     füllen, damit etwaige Beschädigungen am Transport-
     ton und Originalverpackungsmaterial zu          weg vermieden werden.

KONTAKT

     Wenn du dich entschließt eine Rücksendung        uns in Verbindung zu setzen, um einen Termin zu
     vorzunehmen, bitte kontaktiere uns, damit        vereinbaren.
     wir das gemeinsam koordinieren können.           Erreichen kannst du uns via
                                                      Telefon: +43 7229 61000
     Flexible Geschäftszeiten:                        oder E-Mail: office@hi-tech.at
     Wenn du eine persönliche Anlieferung oder        Unsere Anschrift lautet:
     Abholung eines Neugerätes durchführen            HI-TECH - REAL OVERCLOCKED GAMING
     möchtest, würden wir dich bitten, dich mit       Johann Roithner-Straße 131, 4050 Traun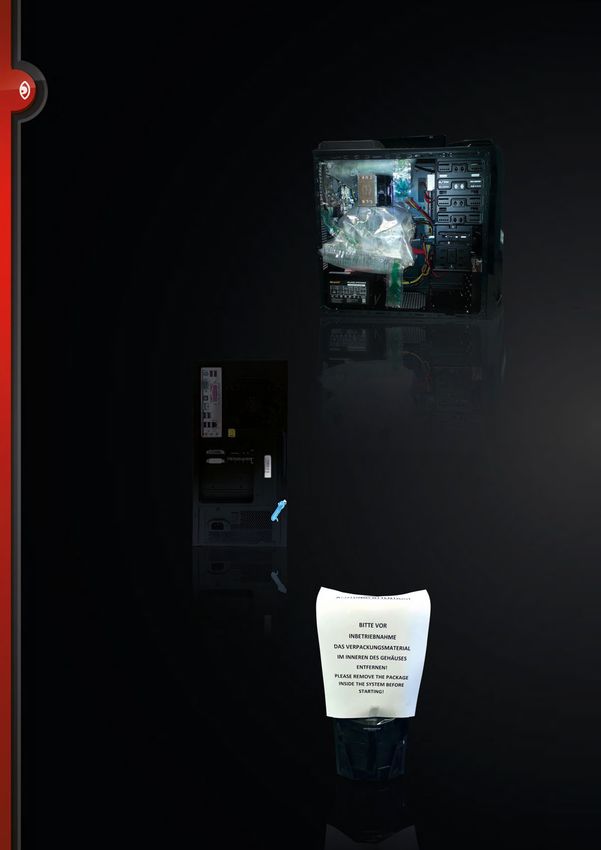
2
DAMAGE, RETURN & CONTACT

DAMAGES

     In spite of all care during the forwarding        After that you need to inform HI-TECH about the
     process, damage may occur during trans-           identified transport damage.
     port. In this case the carrier will replace the   We occasionally run test-shippings through quality
     damaged products only if you respect the          assurance in order to offer highest standards. In such
     following procedure.                              a case a red or purple sticker labeled SHOCKWATCH is
     Basically, transport damage has to be com-        located on the package. Please pay special attention
     plained about immediately when the pro-           to whether the control rod on this sticker is white
     duct is handed over to you by the carrier         or red. If it should be colored red, it means that the
     (the deliverer of the parcel).                    package has been partially carried out improperly. In
     Clearly visible damage: demand a written          this case, please indicate that on the removal order
     confirmation of the damage on receipt of          - even if the package is undamaged externally - that
     the parcel – by means of a written report         the control is red and the shipping was thus carried
     on the scanner of the deliverer.                  out improperly. We thank you very much for the help
                                                       and hope you will enjoy your device!

RETURN

     If problems occur with your PC which en-          Please also be aware that you keep the original
     title you to warranty claims, we have your        packaging (inner and outer packaging) safe in case
     PC picked up from your home address. If           of return! Otherwise your PC may show unnecessary
     our inspection of the PC proves that the          transport damage due to insufficient packaging. We
     damage is not our responsibility and thus         cannot assume liability for this kind of transport da-
     is excluded from any guarantee, you have          mage! We thank you very much for the help and hope
     to bear the costs of this transport.              you will enjoy your device!

CONTACT

     If you do decide to make a return, please          You can reach us via
     contact us so that we can coordinate               Phone: +43 7229 61000
     together.                                          or E-Mail: office@hi-tech.at

     Flexible business hours:                           Our address:
     If you want to personally deliver or pick up a     HI-TECH - REAL OVERCLOCKED GAMING
     new device, we would ask you to contact us.        Johann Roithner-Straße 131, 4050 Traun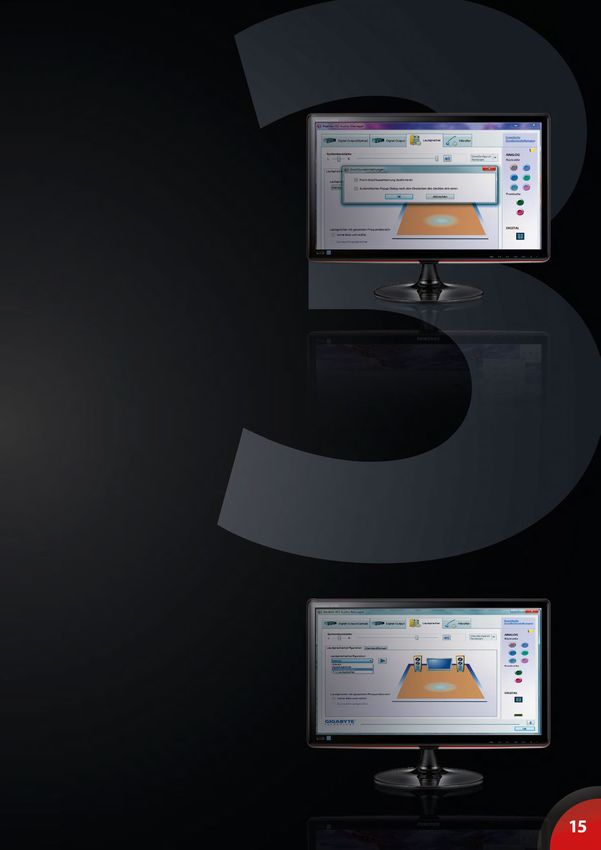
ACHTUNG!
Bitte befolge diese Sicherheitsanweisungen:

       WARNUNG: Es dürfen keine Objekte oder Flüssigkeiten in das Innere des Computers gelangen.

       ACHTUNG: Da du dich beim Öffnen oder Entfernen des Schutzgehäuses gefährlichen Stromspannun-
       gen und anderen Risiken aussetzt, sei hier bitte besonders vorsichtig und stelle sicher, dass dein PC
       vom Stromnetz getrennt ist. Im Falle eines Missbrauchs oder eines Unfalls (z.B. Fallenlassen des Gerä-
       tes) wende dich umgehend an das HI-TECH Wartungspersonal.

ANSCHLÜSSE

MONITOR

         Bitte schließe deinen Monitor an der
         vorhandenen Grafikkarte (waagrechte
         Anschlüsse) und NICHT am Mainboard
         (senkrechte Anschlüsse) an.
         Falls dein Monitor nur über einen VGA-An-
         schluss und nicht über einen DVI/HDMI An-
         schluss verfügt, ist es eventuell notwendig
         einen Adapter zu verwenden, sofern die
         Grafikkarte über keinen entsprechenden
         VGA-Anschluss verfügt.

                                                         Abbildung eines DVI auf VGA Adapters wie er man-
                                                         chen Grafikkarten-Typen beiliegt (in diesem Fall in
                                                         der kleinen Schachtel zu finden)

                                                         ACHTUNG: wird nicht automatisch von jedem Gra-
                                                         fikkarten-Hersteller mitgeliefert!
USB

         Damit du den Front-USB-3 korrekt nutzen
         kannst, stecke ihn am hinteren blauen USB-
         Slot laut Abbildung korrekt an.
         (Das blaue Kabel, wie in der Abbildung
         sichtbar, ist nicht bei jedem Gehäusemo-
         dell verfügbar)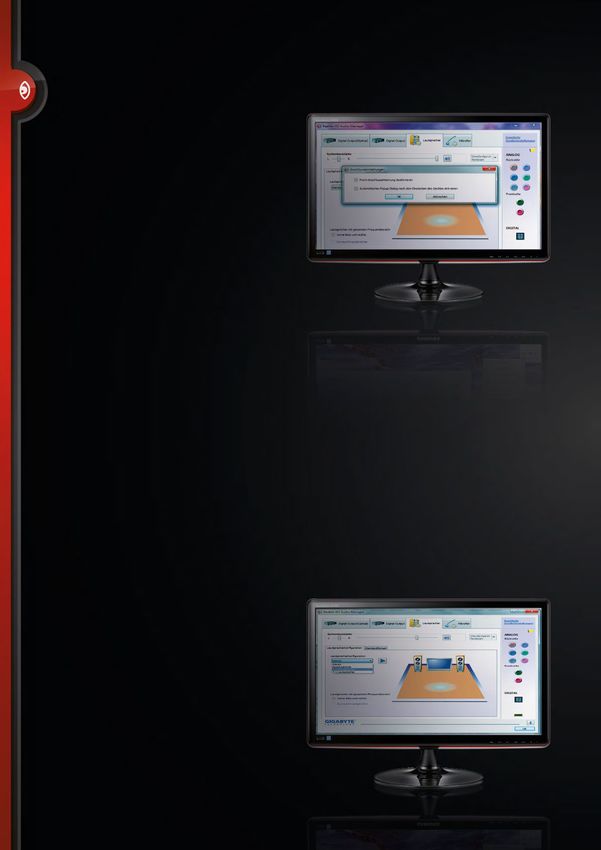
3
ATTENTION!
Please follow these safety instructions:

        WARNING: Never push objects or spill liquid of any kind into this product.

        ATTENTION: As openening or removing covers expose you to dangerous voltages or other risks plea-
        se be very careful and make sure your PC is disconnected from any power source. If any of the above
        mentioned misuse or other accident such as dropping or mishandling occurs, contact the HI-TECH
        team or qualified service personell in your area immediately.

CONNECTIONS

MONITOR

          Please connect your monitor to the exis-
          ting graphics card (horizontal lines) and
          NOT on the mainboard (vertical) ports.
          If your monitor only has a VGA port and
          no DVI / HDMI connection, you may need
          to use an adapter, if your video card does
          not have a corresponding VGA connector.

                                                          Picture of a DVI to VGA adapter as included at some
                                                          graphics cards types (in this case you can find it in
                                                          the small box)

                                                          ATTENTION: is not supplied by all graphics card man-
                                                          ufacturers!
USB

          To use the Front-USB-3 correctly, connect
          the USB cable to one of the blue USB ports
          on the backside as you can see here.
          (The blue cable, that you see in the picture
          is not available for every case)
VERPACKUNGSMATERIAL/ZUBEHÖR

    Bitte das gesamte Verpackungsmaterial
    auch im Inneren des Gehäuses restlos ent-
    fernen! Falls der PC eine Transportsiche-
    rung besitzt, muss diese vor dem Betrieb
    entfernt werden.

                                                 Entfernung der Transportsicherung:

                                                 Dazu ist eine Entfernung der blauen Sicherheits-
                                                 plombe, falls vorhanden, und der Seitenwand des
                                                 PC erforderlich, um das entsprechende Material aus
                                                 dem Inneren des Systems entfernen zu können.

    Falls dein PC-System mit einer solchen
    Transportsicherung ausgestattet ist, be-
    findet sich ein Aufkleber mit einem Warn-
    hinweis zur Entfernung an der Vorder- bzw.
    Rückseite des Systems.
3
PACKAGE/ACCESSORIES

    Please remove the packaging material also
    inside the case completely! The transport
    lock needs to be removed before starting.

                                                     Transport lock removal:

                                                     Remove the blue security seal (if present) and the
                                                     side panel of the PC and then remove the material
                                                     from the interior of the system.

    If your PC system is equipped with such a
    transport lock, there is a sticker with a war-
    ning on the front or the rear of the system.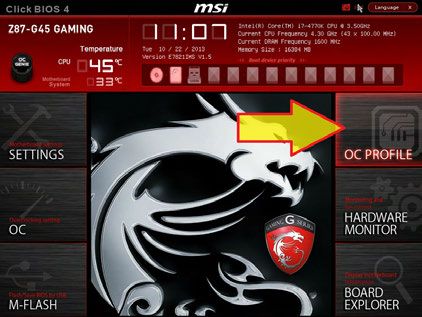
WINDOWS/TESTVERSION/VIRENSCHUTZ
          Wenn du ein Betriebssystem erworben              lediglich ein gültiger Produktschlüssel/Key erworben
          hast, so ist dieses inkl. ALLER Treiber und      und eingegeben werden.
          Updates vorinstalliert, wenn nicht ander-        Ebenso vorinstalliert ist ein Antivirus-Programm
          weitig besprochen. D.h. das Gerät ist somit      (Microsoft Security Essentials).
          voll EINSATZFÄHIG!                               Solltest du ein anderes Programm installieren wollen,
          Wenn du KEIN Betriebssystem erworben             so ist es zwingend notwendig Microsoft Security
          hast, so ist eine 30 Tage Testversion in-        Essentials VORHER zu DEINSTALLIEREN.
          stalliert ebenso inkl. ALLER Treiber und         Außerdem möchten wir dich darauf hinweisen, dass
          Updates, d.h. nach Ablauf der 30 Tage muss       dieses System NICHT mit Windows XP kompatibel ist!

             Wenn kein Betriebssystem erworben wurde, so ist eine 30 Tage Testversion vorinstalliert. Nach Ablauf
             der 30 Tage ist ein gültiger Key einzugeben - die Testversion muss aber NICHT deinstalliert werden!

DIE FOLGENDEN AUSFÜHRUNGEN BENÖTIGST DU NUR IM FALLE EINER NEU-
INSTALLATION VON WINDOWS VISTA, WINDOWS 7 ODER EINER AKTUELLEREN VERSION.

Achte vor Partitionserstellung darauf, dass du die von uns angelegte Partition „HI-TECH Treiber“ nicht löschst/
formatierst, da hier die neuesten Treiber für deinen PC abgelegt wurden.

          Nach Abschluss der Windows Installation
          sollte mit der Treiberinstallation fortge-
          setzt werden.

          Um die Installation der Motherboard-Trei-
          ber erfolgreich durchzuführen, starte nun
          bitte alle Setup.exe-Dateien in den Unter-
          ordnern der Kategorie Mainboardtreiber
          aus der „HI-TECH Treiberpartition“.              Nach der abgeschlossenen Installation ist ein weiterer
          Nach dem Abschluss dieses Vorgangs ist           Neustart durchzuführen.
          ein Neustart durchzuführen.
                                                           Um Windows 7 in voller Funktionalität nutzen zu
          Anschließend installiere bitte auf der „HI-      können, ist es erforderlich die Systembewertung ab-
          TECH Treiberpartition“ die im Ordner „Gra-       zuschließen. Drücke die „Windows“+ „Pause“-Taste.
          fikkartentreiber” abgelegte Datei.               Anschließend klickst du auf „Die Systembewertung ist
          Während der Installation des Grafikkarten-       nicht verfügbar“. Mit einem Klick auf „Diesen Compu-
          treibers kann es dazu kommen, dass das           ter bewerten“, wird die Bewertung vollautomatisch
          Bild kurz flackert oder komplett schwarz         abgeschlossen.
          wird. Hierbei handelt es sich lediglich um       Nun können sämtliche von dir benötigte Programme
          die Monitorerkennung.                            installiert werden
3
WINDOWS/TRIAL/ANTIVIRUS
If you have purchased an operating system, Also pre-installed is an antivirus software (Microsoft
it is installed including ALL drivers and up- Security Essentials).
dates. That means that your system is thus If you want to install a different program, it is impe-
fully CAPABLE OF USE! rative to UNINSTALL Microsoft Security Essentials
If you DO NOT have purchased any opera- BEFORE INSTALLING the other one.
ting system, a 30-day trial version is also in- In addition, we have to make you aware that this
stalled including ALL drivers and updates, system is NOT compatible with Windows XP!
that means a valid Product Key is needed
and has to be entered after 30 days.
If no operating system was purchased, a 30-day trial version is pre-installed. After the 30 days, a
valid key has to be entered - it is not necessary to uninstall the trial version!
THE FOLLOWING STATEMENTS DO YOU ONLY NEED IN CASE OF A NEW INSTALLATION
OF WINDOWS VISTA, WINDOWS 7 OR A LATER VERSION.
Please check that you don’t delete or format the partition "HI-TECH driver" before partition creation as the latest
drivers for your PC are stored there.
After completing the Windows installa-
tion you should continue with the driver
installation.
In order to install the motherboard driver
successfully, start all setup.exe files in
subfolders of the category motherboard
drivers from the "HI-TECH driver partition".
After this process is complete, restart the After the installation is complete, restart the system
system. again.
Then please download and install the file To use the full functionality of Windows 7, it is nec-
in the Folder graphics card driver on the essary to complete the evaluation system. Press the
"Hi-Tech Drivers Partition" . "Windows" + "Pause" button. Then you click on "The
During the installation of the graphics rating system is not available". By clicking on "Rate
driver, it may happen that the image flick- this computer" the review will be completed auto-
ers briefly or gets completely black. This is matically.
simply the monitor detection. Now, you can install the programs you need.BETRIEBSTEMPERATUR & REINIGUNG
PC-System nicht extremen Temperaturen aussetzen (nur Raumtemperatur).
Um die Langlebigkeit deines PC-Systems optimal zu garantieren, empfehlen wir in regelmäßigen Abständen
eine Innenreinigung des Systems vorzunehmen. Insbesondere die Kühlkörper & Lüfter setzen sehr leicht Staub
an, was im Betrieb zur Überhitzung und Beschädigung führen kann.
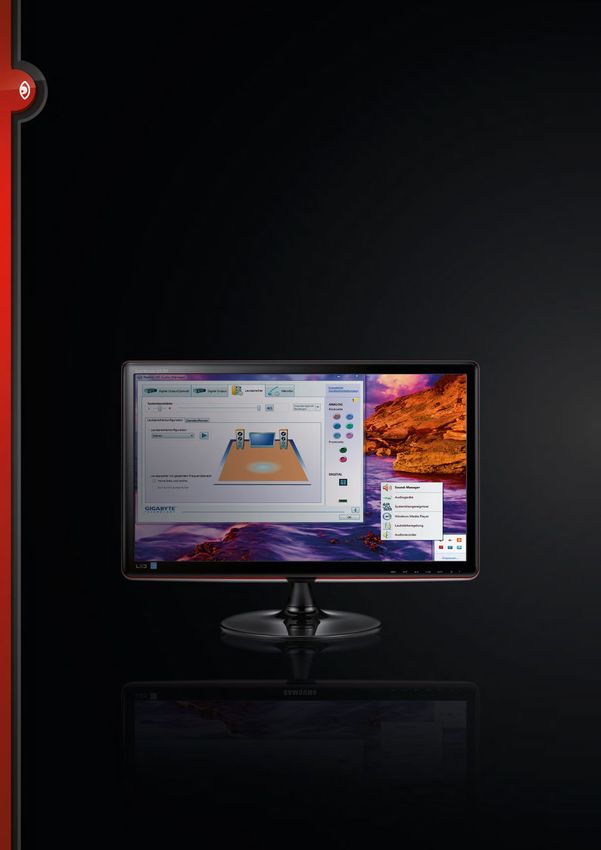
SOUND [1]
Sollten deine Lautsprecher nach dem Anschluss nicht erkannt werden, musst du eventuell die Frontanschlus-
serkennung deaktivieren. Das machst du wie folgt:
Audio Realtek
In der Symbolleiste rechts unten findest Nun klicke mit Rechtsklick auf den Lautsprecher und
du einen kleinen orangen Lautsprecher. wählen anschließend „Sound-Manager“ aus.3
OPERATING & MAINTENANCE
Do not expose your PC system to extreme temperatures (room temperature only).
To ensure the longevity of your PC system optimally, we recommend an internal cleaning of the system on a
regular basis. In particular, the heatsink & fan set very easily to dust, which can lead to overheating in operation
and damage.
SOUND [1]
Should your speakers after connecting not be detected, you may need to disable the front jack detection. You
do that as follows:
Realtek Audio
In the toolbar right below you will find a Now click right click on the speaker, and then select
small orange speaker. "Sound Manager".SOUND [2]
Im Sound-Manager angelangt klickst du
im rechten oberen Rand des Fensters auf
den kleinen Ordner-Button.
Nun öffnet sich ein weiteres kleines
Fenster mit Anschlusseinstellungen. nun
„Front-Anschlusserkennung deaktivieren“.
Frontanschlusserkennung
Die Lautsprecher sollten jetzt ordnungsgemäß funktionieren!
5.1 SOUNDSYSTEM
Für ein 5.1 Soundsystem beachte bitte wie du die Anschlüsse anschließen musst:
Center/Subwoofer
SPDIF Out Rear Speaker
Microphone Line In
Line Out
Anschlüsse-Sound
Nachdem du dein 5.1 Soundsystem richtig
angeschlossen hast, musst du noch folgen-
des im Realtek-Menü umstellen:
5.1 umstellen3
SOUND [2]
In the “Sound manager” you click on the
upper right edge of the window on the
small folder button.
Now another small window opens with
port settings. "Disable front jack detec-
tion" now.
Front jack detection
The speakers should work now!
5.1 SOUND SYSTEM
For a 5.1 sound system please note how you have to connect the terminals:
Center/Subwoofer
SPDIF Out Rear Speaker
Microphone Line In
Line Out
Connections Sound
Once you've connected your 5.1 sound
system properly, you need to add the fol-
lowing change in the Realtek menu:
5.1 changeBIOS-EINSTELLUNGEN LADEN [1]
Wenn du die BIOS-Einstellungen neu laden willst, bitte befolge folgende Anweisungen:
GIGABYTE
1 Starte den PC und drücke mehrmals
die „Entf“-Taste um ins BIOS zu
gelangen.
2 Drücke nun die Taste „F12“.
3 Wähle das zweite Profil (HI-TECH)
aus und bestätige mit der Enter-Taste.
4 Die Einstellungen sind nun geladen.
Drücke einmal die „Esc“-Taste um ins
Hauptmenü zurück zu gelangen.
5 Drücke jetzt auf die „F10“-Taste (Safe & Exit) und
bestätige mit der Enter-Taste.
6 Der PC startet sich neu und sollte jetzt mit
den richtigen Einstellungen starten.
GIGABYTE MIT UEFI
1 Starte den PC und drücke mehrmals
die „Entf“-Taste um ins BIOS zu
gelangen.
2 Steuere mit den Cursor-Tasten zum
Menü ganz rechts „Safe & Exit“.
3 Wähle nun den Befehl „Load
Profiles“ aus.
4 Lade das zweite Profil: „HITECH“ und
bestätige mit der Enter-Taste.
5 Drücke jetzt auf die „F10“-Taste (Safe & Exit) und
bestätige mit der Enter-Taste.
6 Der PC startet sich neu und sollte jetzt mit
den richtigen Einstellungen starten.3
BIOS SETTINGS FOR LOADING [1]
If you want to load the BIOS settings again, please follow the following instructions:
GIGABYTE
1 Restart the PC and press repeatedly
the "Del“ button to enter the BIOS.
2 Now press the key "F12".
3 Choose the second profile (HI-TECH)
and press the Enter key.
4 The settings are now loaded. Press
the "Esc" key to return to the main
menu.
5 Now press the "F10" button (Safe & Exit) and
confirm with the Enter key.
6 The PC restarts itself, and should start with the
right settings.
GIGABYTE UEFI
1 Restart the PC and press repeatedly
the "Del" button to enter the BIOS.
2 Steer with the cursor keys to the
menu on the right "Safe & Exit"
3 Now select the command "Load
Profiles".
4 Load the second profile: "HITECH"
and confirm with the Enter key
5 Now press the "F10" button (Safe & Exit) and
confirm with the Enter key.
6 The PC restarts itself, and should start with the
right settings.BIOS-EINSTELLUNGEN LADEN [2]
MSI 970A-G43
MSI 990FXA-GD65
1 Drücke nach dem Starten mehrmals
die “Entf” Taste um in das Bios Menü
zu gelangen.
Gehe dann entweder mittels Maus
oder den Kursortasten zum Menü-
punkt „OC“.
2 Im Menüpunkt „OC“ scrolle nun
ganz nach unten und wähle den
Punkt „Overclocking Profiles“ aus.
3 Wähle nun „Profile 2“ aus.
4 Nun bitte „Load Overclocking Profile 2"
auswählen, dieses laden und dann mit
der Taste „F10“ + "Enter" neustarten.
5 Der PC startet nun wieder mit den gespeicherten
Einstellungen.3
BIOS SETTINGS FOR LOADING [2]
MSI 970A-G43
MSI 990FXA-GD65
1 Restart the PC and press repeatedly
the "Del" button to enter the BIOS.
Steer with the mouse or the cursor
key to the menu on ethe left "OC"
2 Srcroll down and choose the point
"Overclocking Profiles".
3 Here you choose "Profile 2".
4 Now choose „Load Overclocking Profile 2", load
it and then restart with "F10".
5 The PC restarts itself with right settings.BIOS-EINSTELLUNGEN LADEN [3]
MSI G45-GAMING
1 Drücke nach dem Starten mehrmals
die “Entf” Taste um in das Bios Menü
zu gelangen.
2 Wähle nun „Profile 2“ aus.
3 Nun bitte „Load Overclocking Profile
2" auswählen, dieses laden und dann
mit der Taste „F10“ + „Enter“
neustarten.
4 Der PC startet nun wieder mit den
gespeicherten Einstellungen.3
BIOS SETTINGS FOR LOADING [3]
MSI G45-GAMING
1 Restart the PC and press repeatedly
the "Del" button to enter the BIOS.
2 Here you choose "Profile 2".
3 Now choose „Load Overclocking
Profile 2", load it and then restart with
"F10" + "Enter".
4 The PC restarts itself with right settings.WASSERKÜHLUNG
KOMPLETT WASSERGEKÜHLTE PC-SYSTEME
Beachte bitte folgende Schritte beim Nachfüllen des Wassers deines Wasserkühlungssystems.:
1 Schalte den PC aus und trenne ihn Ausgleichsbehälter Verschlusskappe
vom Strom. mit Pumpe
2 Öffne das PC-Gehäuse – linke
Seitenwand.
3 Öffne die Verschlusskappe des
Ausgleichsbehälters.
4 Fülle destilliertes Wasser ein bis
90% des Ausgleichsbehälters 6 Achte darauf dass bei der Verschlusskappe kein
gefüllt sind. Wasser austritt. Sollte dies der Fall, ist die
5 Verschließe nun den Ausgleichs- Verschlusskappe nicht richtig bzw. nicht fest
behälter wieder und starte den PC. genug geschlossen.
CPU WASSERKÜHLUNG
Serienmäßig bei Low-Noise Gamer und Xtreme Gamer PC-Systemen.
Im Gegensatz zu komplett wassergekühl-
ten PC-Systemen ist bei diesen Systemen
eine Wassernachfüllung nicht notwendig.
CPU Wasserkühlung
Bildbeispiel: Coolermaster Seidon 120M4
WATERCOOLING
COMPLETELY WATER-COOLED PC SYSTEMS
Please note the following steps when refilling the water of your water cooling system.
1 Turn off your PC and disconnect it Water reservoir Cap
from the power. with pump
2 Open the PC case - left side panel.
3 Open the cap of the reservoir.
4 Fill in distilled water the reservoir is
filled up to 90%.
5 Now close the reservoir again and
start the PC. 6 Make sure that around the cap there is no water.
If this is the case, the cap is not properly closed or
not tight enough.
CPU WATER COOLING
Standard for Low-Noise and Gamer Xtreme Gamer PC systems.
In contrast to completely water-cooled PC
systems a water refilling for these systems
is not necessary.
CPU Water Cooling
Image example: Coolermaster Seidon 120MANSCHLÜSSE UND EINSTELLUNGEN
BEI UNTERSCHIEDLICHEN PC-SYSTEMEN
Bitte beachten bei folgenden Gehäusen:
PC-SYSTEM MIT GEHÄUSE
NOBLE II VON FRONTIER
HDD Einschub
Lüftersteuerung
(darf NICHT abgeschaltet werden)
PC-SYSTEM MIT GEHÄUSE
H2 VON NZXT
Taste in Pfeilrichtung schieben und dann
aufklappen, um Festplattengehäusedeckel
anzuheben.
Lüftersteuerung auf Stufe I stellen
für geringste Geräuschentwicklung
PC MIT EINGEBAUTEM CARDREADER
Es sind nur die Audio/Mikrophon Anschlüs-
se des Gehäuses verwendbar, die des Card-
readers sind nicht angeschlossen.
Cardreader
PC OHNE CARDREADER4
CONNECTIONS AND SETTINGS
OF DIFFERENT PC SYSTEMS
For the following cases take into account:
PC SYSTEM WITH CASE
NOBLE II BY FRONTIER
HDD Docking station
Fan speed control
(must not be switched off)
PC SYSTEM WITH CASE
H2 BY NZXT
Push lever in direction of the arrow and
then flap on the lever to raise the lid of the
drive housing.
Fan control on level I
for lowest noise
PC WITH BUILT-IN CARD READER
Only the audio / microphone connections
of the housing are useable, the card reader
is not connected.
Card reader
PC WITHOUT CARD READERHI-TECH - REAL OVERCLOCKED GAMING
Johann Roithner-Straße 131, 4050 Traun, Tel +43 7229 61000
Copyright© 2013 by HI-TECH. All rights reserved.
Satz- und Druckfehler vorbehalten. Verbesserungsvorschläge an marketing@hi-tech.at
Typesetting and printing errors are reserved. Suggestions for improvements: marketing@hi-tech.atSie können auch lesen