BRUUDT Kennzeichenhalter für die Yamaha BRUUDT Tail Tidy for the Yamaha MT-07 - bruudtcnc.de
←
→
Transkription von Seiteninhalten
Wenn Ihr Browser die Seite nicht korrekt rendert, bitte, lesen Sie den Inhalt der Seite unten
Montageanleitung
                                        Mounting instructions
       BRUUDT Kennzeichenhalter für die Yamaha
                       MT-07
        BRUUDT Tail Tidy for the Yamaha MT-07

           Noch einmal vielen Dank, dass Sie sich für unsere Produkte entschieden haben!
Bevor Sie mit der Montage der Teile beginnen, möchte die Firma BRUUDT darauf hinweisen, dass der
Anwender selbst für falsche Installation oder unsachgemäßen Gebrauch der Bauteile verantwortlich ist
  und haftbar gemacht werden kann. Wir empfehlen daher, die Montage des Kennzeichenhalter von
                         qualifiziertem Fachpersonal durchführen zu lassen.

Before Proceeding with the assembling of the product, Firma BRUUDT specifies that the user is liable
                  for any incorrect installation of the product or its improper use.

                     We recommend the installation of the tail tidy to qualified personnel.
       ---------------------------------------------------------------------------------------------------------------------
Schritt 1:
Entferne sie erst den Beifahrersitz, Dann der Sitzbank, und Werkzeugset.
                                     Step 1:
       Take off the duo seat first and then the seat and the toolset.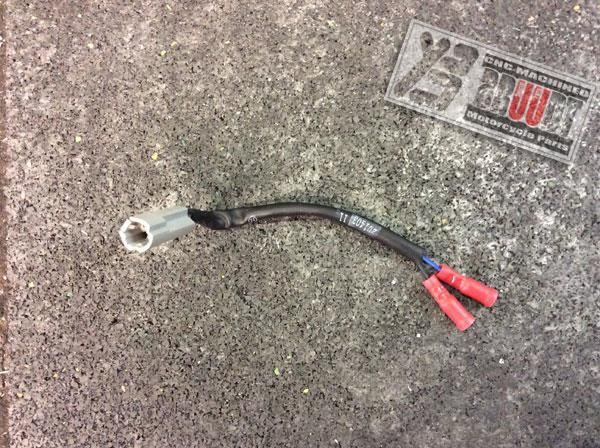
Schritt 2:
 Entferne Sie diese beide Schrauben und nehme das Verkleidungsteil weg.
                                   Step 2:
            Take out these screw and remove the plastic cover.

                                    Schritt 3:
Entferne Sie auch diese beide Schraube und nehme das Verkleidungsteil weg.
                                      Step 3:
           Also take out these screw and remove the plastic cover.
Schritt 4:
Entferne Sie diese Schrauben.
              Step 4:
   Take out these screws.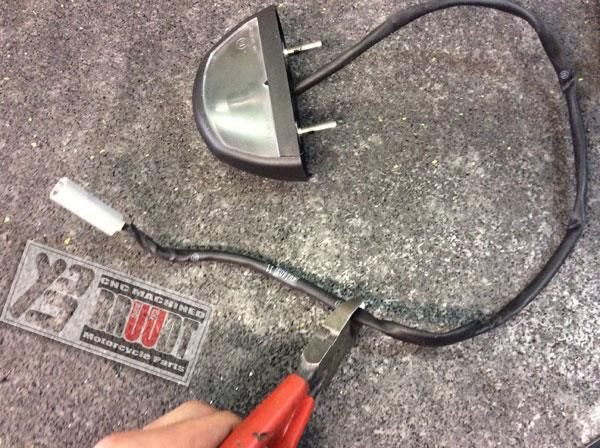
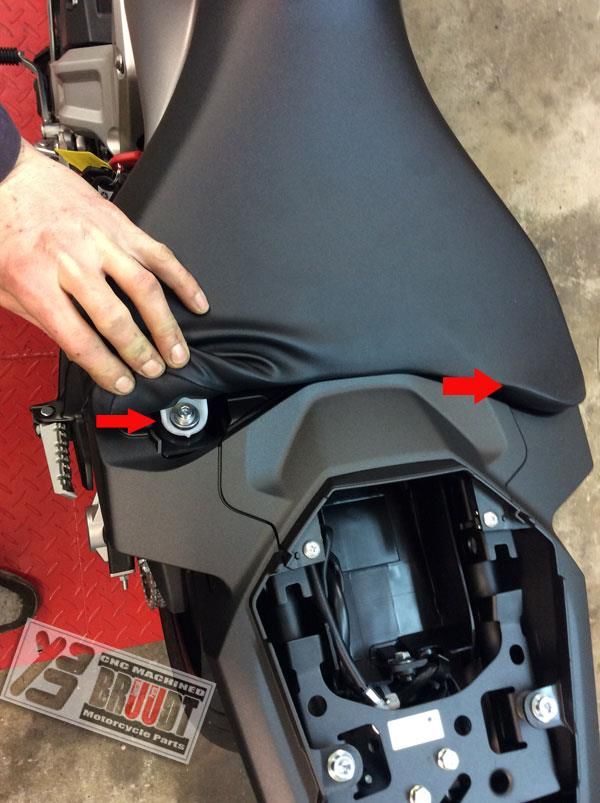
Schritt 5:
        Nehmen Sie Die Kabel aus der Kabelbinder wie auf das Folgende Bild zu sehen ist.
  Die Stecker vom Blinker und Kennzeichenbeleuchtung müssen aus einander genommen werden
                                                 Step 5:
                  Take apart the plastic clamp that is holding the wiring together.
Now you can take apart the connectors from the original indicators and plate light. The connectors are
                                  located as seen in the picture.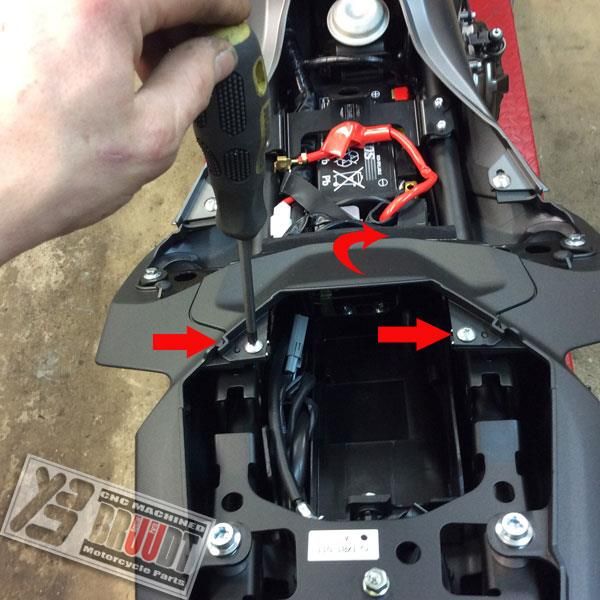
Schritt 6:
Entfernen Sie die fünf Befestigungsnieten unten an das Heck.

                             Step 6:
     Remove the 5 plastic plugs underneath the fender.
Schritt 7:
Die Seitenverkleidungen können nun vorsichtig nach außen gezogen werden. So entsteht platz genug
                                       um das Heck zu demontieren.
                                                     Step 7:
            Pull the fairing carefully outwards to create room to demount the OEM fender.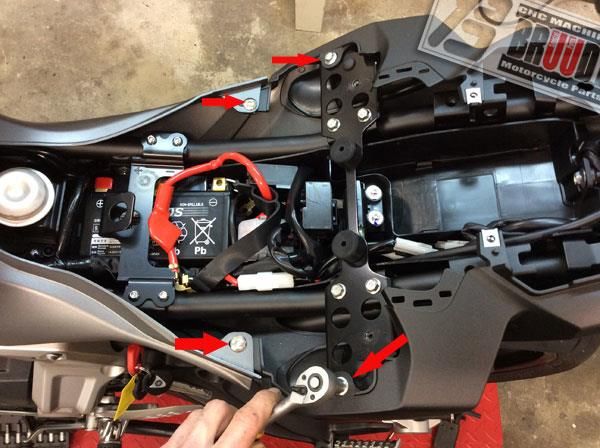
Schritt 8:
                     Die Untere Abdeckung kann nun auch entfernt werden
                                               Step 8:
                 You can also take away the bottem cover as seen in the picture.

                                               Schritt 9:
Jetzt ist es Zeit um das Original Heck zu Demontieren. Lösen sie die 4 Schrauben wie auf die Bilder
                         zu sehen ist. Und nehmen Sie das Original Teil weg.

                                             Step 9:
                    Now you can remove the four bolds to remove the fender.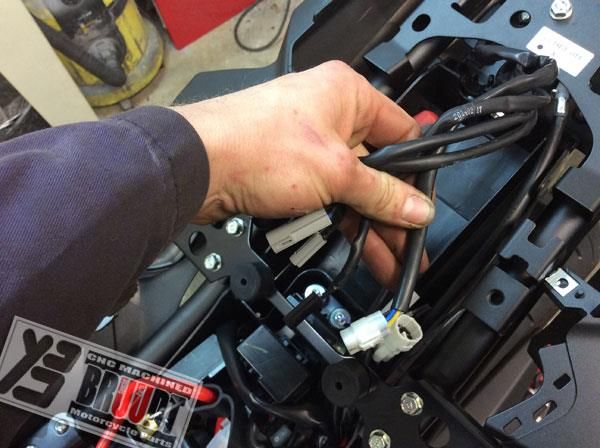
Schritt 10:
Legen Sie das Original Heck auf einen Arbeitstisch und Demontieren sie die Blinker und Katzenauge.

 Wann Sie Mini Blinker montieren möchte brauchen sie nicht den originalen Blinker zu demontieren.
 Montieren sie dann die mitgelieferten Halterbleche für die Mini Blinker am Kennzeichenhalter. Mini
                Blinker bis M10 sind einfach an diesen Halterblechen zu Montieren.

                                              Step 10:
              Now you can remove the Indicators and reflector from the stock fender.

 When you want to mount aftermarket indicators you do not have to remove the stock ones from the
  fender. Simply screw the aftermarket indicator holder on our tail tidy and mount the aftermarket
                                        indicators on them.
Schritt 11:
        Wann sie die Original Blinker behalten möchte ist es jetzt zeit um die Blinker auf der
Kennzeichenhalter zu montieren. Dafür stecken sie das Gummi vom Blinker durch das Halterblech am
         Kennzeichenhalter. Achten sie darauf dass es eine Linke und Rechte Blinker gibt.

                                                  Step 11:
  Now you can mount the original indicators to the tail tidy. First put the rubber through the indicator
 holder already mounted on the tail tidy. Make sure you put the right one on the right side and the left
                                            on the left side.

                                            Schritt 12:
 Wann die Original Blinker wieder montiert sind Wackeln die noch. Dafür sind die Distanz
Bleche mitgeliefert. Stecken sie die Distanz Bleche zwischen das Gummi und Blinkerhalter.

                                              Step 12:
After the original indicators are mounted to the tail tidy they have too much clearance so they
 will wobble. For that reason we have included 2 spacer rings as shown in the next pictures.
        Slide these rings between the indicator bracket and the rubber of the indicator.
Schritt 13: Leiten Sie die Kabel durch das Loch im Kennzeichenhalter. Der Halter muss jetzt so
aussehen.
Step 13: Put the cables through the hole in the Tail Tidy. It should look like this.Schritt 14:
Montieren sie der Kennzeichenhalter wieder am Heck. Begleiten Sie die Kabel durch das Loch im
Heck und montieren sie Der Halter mit die 4 Original Schrauben. Achtung!
Während Sie dies befestigen,
bitte darauf achten, dass der Unterseite des Rücklichts in den “T”-
geformten Ausschnitt in der Kennzeichenhalter reinpasst.
Step 14:
Mount the tail tidy on the Bike. Put the cables back through the hole and mount the tail tidy with the 4
original screws. Warning! Before you tighten the 4 bolds make sure the small boss
of the tail light is located in the “T” shaped cut-out in the tail tidy.Schritt 15:
Schneiden Sie den Kabel vom Original Kennzeichenbeleuchting (ca 10cm) und die mitgelieferte
Kabelschuhe an den offenen Kabeln anbringen. Nun können Sie die roten Stecker verbinden mir die
Stecker vom Kennzeichenbeleuchting an der Kennzeichenbeleuchting (Blau auf Blau. Grun auf
Swarz).
Step 15:
Cut off the wiring of the original licenceplate light (about 10cm) and mount the connectors that came
with the tail tidy. Now you can connect the tail tidy licenceplate light with the oem connector. ( blue on
blue, black on green.Schritt 16:
Schließen sie die Kabel wieder an. Und verlegen sie die Kabel wieder wie Original. Kontrollieren sie
bitte ob alle Beleuchtung funktioniert!
Step 16:
Plug the wires back in from the indicators and the tail light. Route the cables as original. And make
sure all your lights functions properlySchritt 17:
Montieren Sie alle Teile wieder zurück. Fangen Sie an mit das Verbindungsstück unten an das Heck.
Step 17:
Mount all parts back on. Start with the platic part underneath the tail.Schritt 18:
Zwei Befestigungsnieten unten an das Heck sind jetzt zu lang. Mitgeliefert sind Zwei Scheiben womit
man das löst.
Step 18:
Two of the plastic plugs are now to long. Two distance washers that came with the tail tidy will solve
that problem.Letzter Schritt:
Das Original Katzenauge kann jetzt an das T-Blech montiert werden und das T-Blech wieder an die
Halterplatte.(Erstmal nachmessen wo er genau Montierd werden Muss) Kontrollieren sie bitte
nochmals ob alle Beleuchtung funktioniert! Und montieren sie natürlich als letzte die
Kennzeichenplatte.
Final step:
Mount the OEM reflector on the T-Bracket. And the T-Bracket with the reflector to the tail tidy if you
need one in your country. Make sure all your lights functions properly again and mount your licence
plate.Bei fragen stehen wir immer zu Verfugung: Info@bruudt.de oder rufen sie uns einfach an.
Tel:.05944 599 406
If you have any questions don’t hesitate to contact us. Info@bruudt.de or give us a call on
00495 944 599 406Sie können auch lesen