BEDIENUNGSANLEITUNG SCHALLPEGELMESSGERÄT - USER MANUAL - Expondo
←
→
Transkription von Seiteninhalten
Wenn Ihr Browser die Seite nicht korrekt rendert, bitte, lesen Sie den Inhalt der Seite unten
BEDIENUNGSANLEITUNG
SCHALLPEGELMESSGERÄT

USER MANUAL
SOUND METER

INSTRUKCJA OBSŁUGI
MIERNIK DŹWIĘKU

NÁVOD K POUŽITÍ
SONOMETR

MANUEL D´UTILISATION
SONOMÈTRE

ISTRUZIONI PER L’USO
FONOMETRO

MANUAL DE INSTRUCCIONES
SONÓMETRO

DE | EN | PL | CZ | FR | IT | ES

SBS-SM-130C
INHALT | CONTENT | TREŚĆ | OBSAH | CONTENU | CONTENUTO | CONTENIDO
Deutsch 3
English 5
Polski 7
Česky 9
Français 11
Italiano 13
Español 15
NAZWA PRODUKTU SCHALLPEGELMESSGERÄT
PRODUKTNAME SOUND METER
PRODUCT NAME MIERNIK DŹWIĘKU
NOM DU PRODUIT SONOMETR
NOME DEL PRODOTTO SONOMÈTRE
NOMBRE DEL PRODUCTO FONOMETRO
NÁZEV VÝROBKU SONÓMETRO
MODEL PRODUKTU
MODELL
PRODUCT MODEL
MODÈLE SBS-SM-130C
MODELLO
MODELO
MODEL VÝROBKU
NAZWA PRODUCENTA
NAME DES HERSTELLERS
MANUFACTURER NAME
NOM DU FABRICANT EXPONDO POLSKA SP. Z O.O. SP. K.
NOME DEL PRODUTTORE
NOMBRE DEL FABRICANTE
NÁZEV VÝROBCE
ADRES PRODUCENTA
ANSCHRIFT DES HERSTELLERS
MANUFACTURER ADDRESS
ADRESSE DU FABRICANT UL. NOWY KISIELIN – INNOWACYJNA 7, 66-002 ZIELONA GÓRA | POLAND, EU
INDIRIZZO DEL FORNITORE
DIRECCIÓN DEL FABRICANTE
ADRESA VÝROBCE
2
Rev. 14.03.2019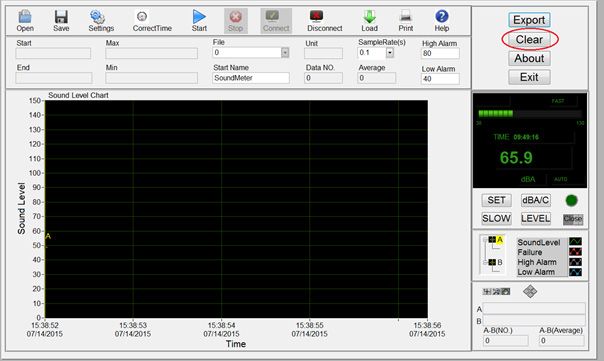
BEDIENUNGSANLEITUNG
VERWENDUNG DES GERÄTS Um die Grafik zu vergrößern, verwenden Sie die
MIT HILFE DES COMPUTERS Bildschirmlupentaste mit Pluszeichen.
1. SOFTWAREINSTALLATION
2.3.1. NAVIGATIONSBESCHRIFTUNG
Legen Sie die CD in das CD-Laufwerk ein.
Die Software startet die Installationsdatei. Befolgen Sie die 1 3
Installationsanweisungen, um die Computersoftware zu
installieren.
Wenn die Software die Installationsdatei nicht direkt
starten kann, öffnen Sie den Inhalt der CD, doppelklicken
Sie dann auf das Symbol der EXE-Datei (I.) und befolgen Sie
die Installationsanweisungen. 2 4
5 7 9 11
2. SOFTWARE-BENUTZEROBERFLÄCHE
2.1. MENÜ UND SYMBOLLEISTE
6 8 10 12
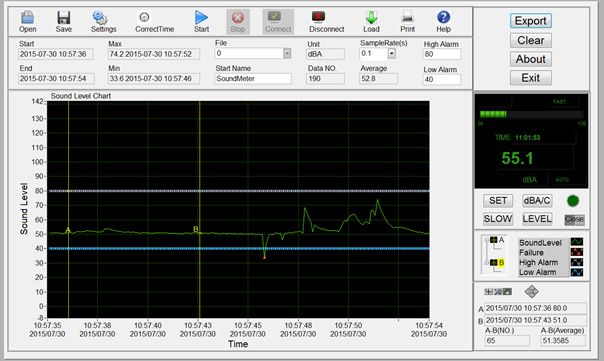
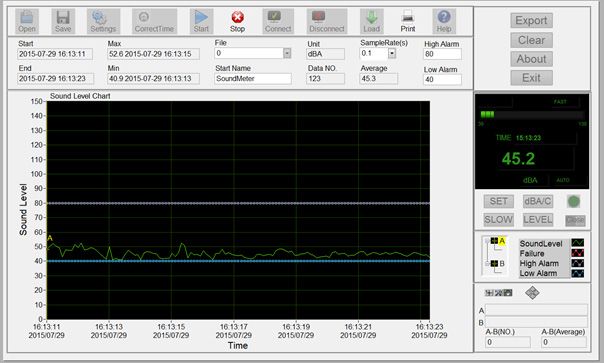
1. Startuhrzeit der Messung
2. Enduhrzeit der Messung
A B C D E F 3. Maximaler Lesewert registriert
4. Minimaler Lesewert registriert
5. Liste der Dateien
6. Datensatzname
7. Maßeinheit
G H I J K 8. Anzahl der registrierten Lesewerte
9. Abtastfrequenz
A. Dateien öffnen
10. Durchschnittswert der Daten
B. Dateien speichern
11. Obergrenze für den Alarm
C. Einstellungen
D. Zeiteinstellung
12. Untergrenze für den Alarm DE
E. Datenaufzeichnung in Echtzeit starten 2.3.2. BESCHREIBUNG DES A-B-DIAGRAMMS
F. Datenaufzeichnung in Echtzeit stoppen
G. Messgeräts mit Computer verbinden
H. Messgerät von Computer trennen
I. Daten vom Messgerät auf den Computer
herunterladen
J. Drucken
K. Hilfe
2.2. ZEITEINSTELLUNG
Mit dieser Funktion wird die Uhrzeit des Messgeräts
entsprechend der Computeruhrzeit eingestellt.
Das Datum kann in drei Formaten eingestellt werden: „YY-
MM-DD“ (Jahr-Monat-Tag), „MM-DD-YY“ (Monat-Tag-
Jahr), „DD-MM-YY“ (Tag-Monat-Jahr).
Um einen bestimmten Teilbereich der Ergebnisdiagramms
anzuzeigen, markieren Sie den ausgewählten Bereich mit
2.3. ECHTZEIT-DATENAUFZEICHNUNG:
den Markierungen A und B.
Mit dieser Funktion können Sie in Echtzeit überwachen und
Um den Marker A zu verschieben, drücken Sie das
ein lineares Diagramm der Umgebungsgeräusche erstellen,
Minuszeichen neben dem Marker, so dass „A“ gelb
nachdem Sie das Messgerät an die Software angeschlossen
markiert ist.
haben.
Mit dem Pfeil (4 Diamanten) können Sie die Markierung im
Diagramm an die gewünschte Position verschieben.
3
Rev. 14.03.2019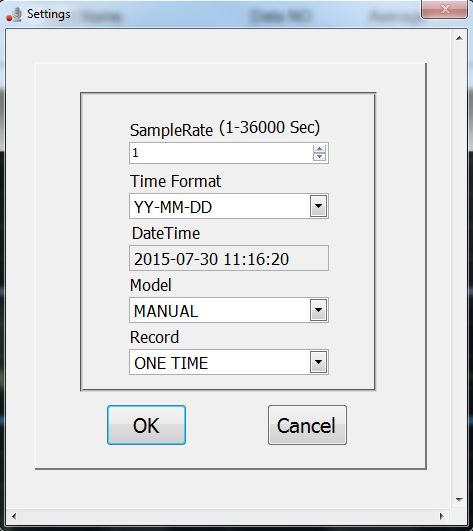
Wiederholen Sie den Vorgang für die Markierung B und
     stellen Sie sicher, dass die Markierung A nicht mehr gelb
     gekennzeichnet ist.

     Startuhrzeit und Anfangswert, Enduhrzeit und Endwert,
     Anzahl der Messungen und Durchschnittswert werden in
     der unteren linken Ecke des Fensters angezeigt.
                                                                       3. NUTZUNG
                                                                       3.1. Drücken Sie das Softwaresymbol (II.) auf dem
                                                                            Computerdesktop.

                                                                       3.2.   Schließen Sie das Messgerät mit einem USB-Kabel an
                                                                              den Computer an und schalten Sie das Messgerät mit
                                                                              der ON/OFF-Taste ein.
                                                                       3.3.   Klicken Sie nach dem Öffnen der Software auf
     2.4. FUNKTIONEN DES DATENSCHREIBERS
                                                                              Zeiteinstellung“, um Datum und Uhrzeit einzustellen.
     2.4.1. EINSTELLUNGEN
                                                                       3.4.   Einstellen: Datensatzname, Abtastfrequenz, ´Ober-
     Die      Funktion    dient    zur    Einstellung    der
                                                                              und Untergrenze für den Alarm zum Starten der
     Datenabtastfrequenz(1-36000 Sekunden), des Formats
                                                                              Messung und Überwachung in Echtzeit.
     des angezeigten Datums („YY-MM-DD“ (Jahr-Monat-Tag),
                                                                       3.5.   Um das Gerät von der Computersoftware zu trennen,
     „MM-DD-YY“ (Monat-Tag-Jahr), „DD-MM-YY“ (Tag-Monat-
                                                                              klicken Sie auf „Messgerät von Computer trennen“,
DE   Jahr)), des Aufnahmemodus, gleichzeitig wird das Datum
                                                                              trennen Sie das USB-Kabel und schalten Sie das
     und die Uhrzeit der Messung angezeigt.
                                                                              Messgerät aus.

     2.4.2. Herunterladen von Daten vom Messgerät auf den
     Computer – Damit werden Daten heruntergeladen, die im
     Gerät des Computers gespeichert sind.

     2.4.3. SPEICHERREINIGUNG
     Schließen Sie das Messgerät an den Computer an, um den
     Speicher zu reinigen. Laden Sie ggf. die Daten herunter und
     speichern Sie sie. Klicken Sie anschließend auf „CLEAR“, um
     die Daten im Speicher zu löschen.

                                                                   4
                                                                                                               Rev. 14.03.2019
USER MANUAL
USING THE DEVICE WITH A COMPUTER 2.3.1. PANEL DESCRIPTION
1. INSTALLING SOFTWARE 1 3
Insert the CD into the CD drive.
The software will launch the installation file. To install the
software, follow the installation instructions.
If the software cannot run the installation file directly, open
the CD contents, then double-click on the.exe file icon (I.).
Follow the installation instructions. 2 4
5 7 9 11
2. SOFTWARE INTERFACE
2.1. MENU AND TOOLBAR
6 8 10 12
1. Measurement start time
2. Measurement end time
A B C D E F 3. Maximum reading recorded
4. Minimum reading recorded
5. File list
6. Name of record
7. Unit of measure
G H I J K 8. Number of readings recorded
9. Sampling frequency
A. Opening files 10. Average value of data
B. Saving files 11. Alarm upper limit
C. Settings 12. Alarm lower limit
D. Setting time
E. Start real-time data logging 2.3.2. A-B GRAPH DESCRIPTION
F. Stop real-time data logging EN
G. Connecting the meter with a computer
H. Disconnecting the meter from the
computer
I. Downloading data from the meter to the
computer
J. Printing
K. Help
2.2. SETTING TIME
This function is used to set the meter’s time according to
the computer’s time.
The date can be set in three formats: „YY-MM-DD“ (year-
month-day), „MM-DD-YY“ (month-day-year), „DD-MM-YY“
(day-month – year). To look at a specific part of the graph of results, mark the
selected range using markers A and B.
2.3. REAL-TIME DATA LOGGING To move the marker A, press the minus next to the marker
This function is used to monitor and create a linear graph so that „A“ is highlighted in yellow.
of ambient sounds in real time after connecting the meter
to the software.
Use the arrow (4 diamonds) to move the marker on the
graph to the desired position.
To zoom in on the graph, use the lens plus button.
5
Rev. 14.03.2019Repeat the operation for marker B, making sure that A is no
longer highlighted in yellow.
The start time and initial value, the end time and end value,
number of measurements and the average value will be
displayed in the lower left corner of the window.
3. USING THE DEVICE
3.1. Press the software icon (II.) on the computer desktop.
3.2. Connect the meter to the computer with a USB cable
and turn on the meter with the ON/OFF button.
3.3 After the software has opened, click on „Time
settings“ to adjust the date and time.
2.4. DATALOGGER FUNCTION 3.4 To start the measurement and real-time monitoring,
2.4.1. SETTINGS set the record name, sampling frequency, alarm
This function is used to set the data sampling rate (1-36000 upper and lower limit.
seconds), the date format („YY-MM-DD“ (year-month-day), 3.5 To disconnect the device from the computer
„MM-DD-YY“ (month-day-year), „DD – MM-YY „(day- software, click on „Disconnect meter from computer“,
month-year)) and the recording mode. It also shows the disconnect the USB cable and turn off the meter.
date and time of measurement.
EN
2.4.2. Downloading data from the meter to the computer.
2.4.3. CLEANING THE MEMORY
To clean the memory, connect the meter to the computer. If
necessary, download and save the data, then click „CLEAR“
to delete the data in memory.
6
Rev. 14.03.2019INSTRUKCJA OBSŁUGI
UŻYTKOWANIE URZĄDZENIA W celu przybliżenia wykresu należy użyć przycisku lupy
ZA POŚREDNICTWEM KOMPUTERA z plusem.
1. INSTALACJA OPROGRAMOWANIA
2.3.1. OPIS PANELU
Włożyć płytę CD do napędu CD.
Oprogramowanie uruchomi plik instalacyjny. Aby 1 3
zainstalować oprogramowanie komputerowe należy
postępować zgodnie ze wskazówkami instalacji.
Jeśli oprogramowanie nie może bezpośrednio uruchomić
pliku instalacyjnego, należy otworzyć zawartość dysku CD,
a następnie kliknąć dwukrotnie w ikonę pliku.exe (I.) po
czym postępować zgodnie z instrukcjami instalacji. 2 4
5 7 9 11
2. INTERFEJS OPROGRAMOWANIA
2.1. MENU I PASEK NARZĘDZI
6 8 10 12
1. Czas rozpoczęcia pomiaru
2. Czas zakończenia pomiaru
A B C D E F 3. Zarejestrowany maksymalny odczyt
4. Zarejestrowany minimalny odczyt
5. Lista plików
6. Nazwa zapisu
7. Jednostka miary
G H I J K
8. Liczba zarejestrowanych odczytów
A. Otwieranie plików 9. Częstotliwość próbkowania
B. Zapisywanie plików 10. Wartość średnia danych
C. Ustawienia 11. Górny limit dla alarmu
D. Ustawienia czasu 12. Dolny limit dla alarmu PL
E. Rozpoczęcie rejestrowania danych
2.3.2. OPIS WYKRESU A-B
w czasie rzeczywistym
F. Zatrzymanie rejestrowania danych
w czasie rzeczywistym
G. Połączenie miernika z komputerem
H. Rozłączanie miernika z komputerem
I. Pobór danych z miernika do komputera
J. Drukowanie
K. Pomoc
2.2. USTAWIENIA CZASU
Ta funkcja służy do ustawiania czasu miernika zgodnie
z czasem komputera.
Data może być ustawiona w 3 formatach: „YY-MM-DD”
(rok-miesiąc-dzień), „MM-DD-YY” (miesiąc-dzień-rok),
„DD-MM-YY” (dzień-miesiąc-rok). Aby spojrzeć na określoną część wykresu wyników należy
ustawić wybrany zakres poprzez znaczniki A i B.
2.3. REJESTROWANIA DANYCH W CZASIE Aby przesunąć znacznik A, należy nacisnąć znak minus
RZECZYWISTYM obok znacznika tak aby "A" podświetlone zostało na żółto.
Funkcja służy do monitorowania i tworzenia wykresu
liniowego dźwięków otoczenia w czasie rzeczywistym po
podłączeniu miernika do oprogramowania.
Za pomocą strzałki (4 diamenty) można przesunąć znacznik
na wykresie do żądanej pozycji.
7
Rev. 14.03.2019Powtórzyć czynność dla znacznika B, upewniając się, że
znak A nie jest już podświetlony na żółto.
Czas rozpoczęcia oraz wartość początkowa, czas
zakończenia oraz wartość końcowa, ilość pomiarów
i wartość średnia zostaną wyświetlone w lewym dolnym
rogu okna.
3. UŻYTKOWANIE
3.1. Wcisnąć ikonę oprogramowania (II.) na pulpicie
komputera.
3.2. Podłączyć miernik za pomocą kabla USB do
komputera po czym włączyć miernik przyciskiem
ON/OFF.
3.3. Po otwarciu się oprogramowania kliknąć
2.4. FUNKCJA REJESTRATORA DANYCH w „Ustawienia czasu” w celu dostosowania daty
2.4.1. USTAWIENIA i godziny.
Funkcja służy do ustawania częstotliwości próbkowania 3.4. Ustawić: Nazwa zapisu, częstotliwość próbkowania,
danych(1-36000 sekund), formatu wyświetlanej daty („YY- górny limit dla alarmu oraz dolny limit dla alarmu
MM-DD” (rok-miesiąc-dzień), „MM-DD-YY” (miesiąc- aby rozpocząć pomiar i monitorowanie w czasie
dzień-rok), „DD-MM-YY” (dzień-miesiąc-rok)), trybu rzeczywistym.
PL nagrywania oraz pokazuje datę pomiaru i godzinę pomiaru. 3.5. Aby odłączyć urządzenie od oprogramowania
komputera, kliknąć przycisk „Rozłączanie miernika
z komputerem” odłączyć kabel USB a następnie
wyłączyć miernik.
2.4.2. Pobór danych z miernika do komputera – służy do
pobrania danych zapisanych w urządzeniu w komputerze.
2.4.3. CZYSZCZENIE PAMIĘCI
Aby wyczyścić pamięć należy podłączyć miernik do
komputera. W razie potrzeby pobrać i zapisać dane.
Następnie kliknąć przycisk „CLEAR” w celu usunięcia
danych w pamięci.
8
Rev. 14.03.2019N ÁVO D K O B S LU Z E
POUŽÍVÁNÍ ZAŘÍZENÍ 2.3.1. POPIS PANELU
PROSTŘEDNICTVÍM POČÍTAČE
1 3
1. INSTALACE PROGRAMOVÉHO VYBAVENÍ
Vložte CD disk do CD mechaniky.
Program spustí instalační soubor. Chcete-li program
nainstalovat, postupujte podle pokynů k instalaci.
Pokud program nemůže automaticky spustit instalační
soubor, otevřete obsah CD disku, pak klikněte na ikonu 2 4
souboru.exe (I.) a poté postupujte podle pokynů k instalaci.
5 7 9 11
2. UŽIVATELSKÉ ROZHRANÍ PROGRAMU 6 8 10 12
2.1. MENU A PANEL NÁSTROJŮ
1. Čas zahájení měření
2. Čas ukončení měření
3. Naměřená maximální hodnota
4. Naměřená minimální hodnota
A B C D E F
5. Seznam souborů
6. Název záznamu
7. Jednotka měření
8. Počet zaznamenaných hodnot
G H I J K 9. Frekvence vzorkování
10. Průměrná hodnota dat
A. Otevření souborů 11. Horní mez alarmu
B. Uložení souborů 12. Dolní mez alarmu
C. Nastavení
D. Nastavení času 2.3.2. POPIS GRAFU A–B
E. Spuštění záznamu dat v reálném čase CZ
F. Zastavení záznamu dat v reálném čase
G. Připojení měřiče k počítači
H. Odpojení měřiče od počítače
I. Stahování dat z měřiče do počítače
J. Tisk
K. Nápověda
2.2. NASTAVENÍ ČASU
Tato funkce slouží k nastavení času měřiče podle času
počítače.
Datum může být nastaveno ve třech formátech: „YY–MM–
DD“ (rok-měsíc-den), „MM–DD–YY“ (měsíc–den–rok), „DD–
MM–YY“ (den-měsíc-rok).
Chcete-li se podívat na určitou část grafu výsledků, nastavte
vybraný rozsah pomocí značek A a B.
2.3. NAHRÁVÁNÍ DAT V REÁLNÉM ČASE
Chcete-li posunout značku A, stiskněte znaménko mínus
Funkce slouží k monitorování a vytvoření lineárního
vedle značky tak, aby značka „A“ byla zvýrazněna žlutě.
grafu okolních zvuků v reálném čase po připojení měřiče
k programu.
Pomocí šipky (4 diamanty) můžete posunout značku na
grafu na požadovanou pozici.
Chcete-li graf přiblížit, použijte tlačítko lupy s plusem.
9
Rev. 14.03.2019Ujistěte se, že označení A již není zvýrazněno žlutě
a opakujte operaci pro značku B.
Čas zahájení měření a počáteční hodnota, čas konce měření
a koncová hodnota, počet měření a průměrná hodnota se
zobrazí v levém dolním rohu okna.
3. POUŽITÍ
3.1. Klikněte na ikonu programu (II.) na pracovní ploše
počítače.
3.2. Pomocí kabelu USB připojte měřič k počítači
a zapněte měřič pomocí tlačítka ON/OFF.
2.4. FUNKCE ZÁZNAMU DAT 3.3. Po spuštění programu klikněte na „Nastavení času“
2.4.1. NASTAVENÍ pro nastavení data a času.
Funkce se používá k nastavení vzorkovací frekvence dat 3.4. Před spuštěním měření a monitorování v reálném
(1–36000 sekund), formátu zobrazovaného data („YY-MM- čase nastavte název záznamu, vzorkovací frekvenci,
DD“ (rok-měsíc-den), „MM-DD-YY“ (měsíc-den-rok), „DD- horní mez alarmu a dolní mez alarmu.
MM-YY“ (den-měsíc-rok)), režimu záznamu a zobrazuje 3.5. Chcete-li zařízení odpojit od počítače, klepněte
datum a hodinu měření. v programu na tlačítko „Odpojit měřič od počítače“,
odpojte USB kabel a měřič vypněte.
CZ
2.4.2. Stažení dat z měřiče do počítače – slouží ke stažení
dat uložených v zařízení do počítače.
2.4.3. ČIŠTĚNÍ PAMĚTI
Chcete-li vyčistit paměť měřiče musíte připojit měřič
k počítači. Je-li to nutné, stáhněte a uložte data z měřiče.
Poté klikněte na „CLEAR“ pro vymazání dat v paměti měřiče.
10
Rev. 14.03.2019M A N U E L D‘U T I L I S AT I O N
UTILISATION DE L’APPAREIL Pour zoomer sur le graphique, utilisez la loupe avec le signe +.
AVEC UN ORDINATEUR
2.3.1. DESCRIPTION DU PANNEAU
1. INSTALLATION DU LOGICIEL
Insérez le CD dans le lecteur CD. 1 3
Le logiciel exécute le fichier d‘installation. Pour installer le
logiciel, suivez les consignes d‘installation.
Si le logiciel n’exécute pas directement le fichier
d‘installation, ouvrez le contenu du CD, puis double-
cliquez sur l‘icône du fichier. exe (I.) et suivez les consignes
d’installation. 2 4
5 7 9 11
2. INTERFACE LOGICIELLE
2.1. MENU ET BARRE D’OUTILS:
6 8 10 12
1. Heure de début de la mesure
2. Heure de fin de la mesure
A B C D E F 3. Valeur maximale enregistrée
4. Valeur minimale enregistrée
5. Liste des fichiers
6. Nom de l’enregistrement
7. Unité de mesure
G H I J K
8. Nombre de valeurs enregistrées
A. Ouverture des fichiers 9. Fréquence
B. Enregistrement des fichiers 10. Valeur moyenne des données
C. Paramètres 11. Limite supérieure pour l’alarme
D. Paramètre de l’heure 12. Limite inferieure pour l’alarme
FR
E. Démarrage l‘enregistrement des données en temps
réel 2.3.2. DESCRIPTION DU GRAPHIQUE A-B
F. Arrêt de l‘enregistrement des données en temps
réel
G. Connexion de l‘appareil de mesure à l‘ordinateur
H. Déconnexion de l‘appareil de mesure de
l‘ordinateur
I. Collecte des données du compteur vers l‘ordinateur
J. Impression
K. Aide
2.2. PARAMÈTRES DE L’HEURE
Cette fonction permet de régler l‘heure de l’appareil de
mesure en fonction de l‘heure de l‘ordinateur.
Vous pouvez régler la date suivant 3 formats: « YY-MM-DD
»(année-mois-jour), « MM-DD-YY » (mois-jour-année),«
Afin d‘examiner une partie définie du graphique des
DD-MM-YY » (jour-mois-année).
résultats, réglez la plage sélectionnée à l‘aide des
marqueurs A et B.
2.3. ENREGISTREMENT DES DONNÉES EN TEMPS RÉEL
Pour déplacer le marqueur A, cliquez sur le signe moins
Une fois l’appareil de mesure connecté au logiciel, cette
à côté du marqueur de sorte que « A » soit marqué en
fonction permet de faire un suivi et de créer un tracé
jaune.
linéaire des sons ambiants en temps réel.
Utilisez la flèche (4 losanges) pour déplacer le marqueur à la
position souhaitée sur le graphique.
11
Rev. 14.03.2019Assurez-vous que « A » n‘est plus marqué en jaune, puis
répétez la même opération pour le marqueur « B ».
L‘heure de début et la valeur initiale, l‘heure de fin et la
valeur finale, le nombre de mesures et la valeur moyenne
s’affichent dans le coin inférieur gauche de la fenêtre.
3. UTILISATION
3.1. Appuyez sur l’icône du logiciel (II.) sur le bureau.
3.2. Branchez l’appareil de mesure à l’ordinateur à l’aide
d’un câble USB et mettez-le en marche en appuyant
sur la touche ON/OFF.
2.4. FONCTION D’ENREGISTREMENT DES DONNÉES 3.3. Une fois le logiciel démarré, cliquez sur « Paramètres
2.4.1. PARAMÈTRES de l’heure » pour régler la date et l’heure.
Cette fonction permet de régler la fréquence 3.4. Pour commencer la prise de mesure et le suivi en
d‘échantillonnage des données (1-36 000 secondes), le temps réel, réglez: le nom de l’enregistrement, la
format de la date affichée (« YY-MM-DD ») (année-mois- fréquence d’échantillonnage, la limite maximale et
jour), « MM-JJJ-JJ-AAA » (mois-jour-année), « JJ-MM-MM- minimale pour l’alarme.
AAAA » (jour-mois-année), le mode d‘enregistrement et 3.5. Pour déconnecter l’appareil du logiciel cliquer sur
«Déconnecter l’appareil de l’ordinateur», débranchez
FR affiche la date et l‘heure de la prise de mesure.
le câble USB et éteignez l’appareil.
2.4.2. Transfert de données de l’appareil de mesure vers
l’ordinateur – permet d’effectuer le transfert des données
enregistrées vers un ordinateur.
2.4.3. SUPPRESSION DE MÉMOIRE
Pour vider la mémoire, branchez l’appareil de mesure
à votre ordinateur. Cliquez ensuite sur « CLEAR » pour
effacer les données de la mémoire.
12
Rev. 14.03.2019ISTRUZIONI PER L’USO
USO DEL DISPOSITIVO ATTRAVERSO IL COMPUTER 2.3.1. DESCRIZIONE DEL PANNELLO
1. INSTALLAZIONE DEL SOFTWARE 1 3
Infilare il disco CD nel lettore CD.
Il software inizierà l’installazione del file. Per installare il
software del computer, seguire le istruzioni di installazione.
Se il software non può avviare direttamente il file di
installazione, aprire il contenuto del CD, quindi fare doppio
clic sull‘icona del file CD e poi fare doppio clic sull’icona del 2 4
file.exe (I.) e seguire le istruzioni di installazione.
5 7 9 11
2. INTERFACCIA DEL SOFTWARE
2.1. MENU E BARRA DEGLI STRUMENTI 6 8 10 12
1. Momento di inizio della misurazione
2. Momento di fine della misurazione
3. Massima lettura registrata
A B C D E F 4. Minima lettura registrata
5. Elenco file
6. Nome della registrazione
7. Unità di misura
8. Numero di letture registrate
G H I J K 9. Frequeza di campionamento
10. Valore medio dei dati
A. Apertura file 11. Limite superiore per l’allarme
B. Salvataggio file 12. Limite inferiore per l’allarme
C. Impostazioni
D. Impostazioni di tempo 2.3.2. DESCRIZIONE DEL GRAFICO A-B
E. Iniziare la registrazione dati in tempo reale IT
F. Terminare la registrazione dati in tempo reale
G. Collegare il fonometro al computer
H. Disconnettere il fonometro dal computer
I. Download dei dati dal fonometro al computer
J. Stampare
K. Aiuto
2.2. IMPOSTAZIONI DELL’ORA:
Questa funzione serve per impostare l’ora del fonometro
conformemente all’ora del computer.
La data può essere impostata in 3 formati: „YY-MM-DD”
(anno-mese-giorno), „MM-DD-YY” (mese-giorno-anno),
„DD-MM-YY” (giorno-mese-anno).
Per mostrare una determinata parte dei risultati, occorre
2.3. REGISTRAZIONE DEI DATI IN TEMPO REALE impostare l’intervallo scelto usando i marcatori A e B.
Questa funzione serve per monitorare e creare il grafico Per spostare il marcatore A, premere il segno „meno”
lineare dei suoni dell’ambiente in tempo reale dopo aver accanto al marcatore in modo che „A“ sia retroillimunato
collegato il fonometro al software. in giallo.
Tramite una freccia (4 diamanti) si può spostare il marcatore
sul grafico alla posizione desiderata.
Per ingrandire il grafico occorre usare la lente
d’ingrandimento con il segno „più”.
13
Rev. 14.03.2019Ripetere l’azione per il marcatore B, assicurandosi che il
segno A sia già retroilluminato in giallo.
Tempo di inizio e valore di inizio, tempo di fine e valore
di fine, il numero di misurazioni e il valore medio saranno
visualizzati nell’angolo inferiore sinistro della finestra.
3. USO
3.1. Premere il simbolo software (II.) sul desktop del
computer.
3.2. Collegare il fonometro tramite un cavo USB al
computer dopodiché accendere il fonometro
premendo il pulsante ON/OFF.
2.4. FUNZIONE DEL REGISTRATORE DATI
3.3. Dopo l’apertura del software, cliccare su „Impostazioe
2.4.1. IMPOSTAZIONI
dell’ora” per regolare la data e l’ora.
La funzione serve per impostare le frequenze di
3.4. Impostare: Nome della registrazione, frequenza di
campionamento dei dati (1-36000 secondi), il formato della
campionamento, limite superiore e inferiore per
data visualizzata („YY-MM-DD” (anno-mese-giorno), „MM-
l’allarme per avviare la misurazione e il monitoraggio
DD-YY” (mese-giorno-anno), „DD-MM-YY” (giorno-mese-
in tempo reale.
anno)), la modalità di registrazione e contemporaneamente
3.5. Per scollegare il dispositivo dal software del computer,
IT mostra la data e l’ora della misurazione.
cliccare il pulsante „Scollegare il fonometro dal
computer”, scollegare il cavo USB e poi spegnere il
fonometro.
2.4.2. Download dei dati dal fonometro al computer – serve
per fare il download dei dati salvati nel dispositivo nel
computer.
2.4.3. PULIZIA DELLA MEMORIA
Per cancellare la memoria occorre collegare il fonometro
al computer. Se necessario, scaricare i dati e salvarli.
Poi cliccare il pulsante „CLEAR” per eliminare dati nella
memoria.
14
Rev. 14.03.2019MANUAL DE INSTRUCCIONES
USO DEL DISPOSITIVO A TRAVÉS DEL ORDENADOR 2.3.1. DESCRIPCIÓN DEL PANEL
1. INSTALACIÓN DEL PROGRAMA 1 3
Inserte el CD en la unidad de CD.
El programa arrancará automáticamente el instalador.
Para instalar el programa en el ordenador debe avanzar
siguiendo las instrucciones de la instalación
Si el programa no puede iniciar automáticamente el
instalador, abra el contenido del disco CD, a continuación 2 4
haga doble clic sobre el icono.exe (I) y siga las instrucciones
de instalación. 5 7 9 11
2. INTERFAZ DEL PROGRAMA 6 8 10 12
2.1. MENÚ Y BARRA DE HERRAMIENTAS
1. Hora de inicio de la medición
2. Hora de fin de la medición
3. Lectura máxima registrada
4. Lectura mínima registrada
A B C D E F 5. Lista de archivos
6. Nombre del registro
7. Unidad de medida
8. Número de lecturas registradas
9. Frecuencia de muestreo
G H I J K
10. Valor medio de los datos
A. Abrir archivos 11. Límite superior para la alarma
B. Guardado de archivos 12. Límite inferior para la alarma
C. Configuración
2.3.2. DESCRIPCIÓN DEL GRÁFICO A-B
D. Ajustes de fecha y hora ES
E. Iniciar el registro de datos en tiempo real
F. Detener el registro de datos en tiempo real
G. Conectar el medidor con el ordenador
H. Desconectar el medidor del ordenador
I. Descargar datos del medidor al ordenador
J. Imprimir
K. Ayuda
2.2. AJUSTES DE FECHA Y HORA
Esta función se utiliza para configurar la fecha y hora del
medidor de acuerdo con la fecha y hora del ordenador.
La fecha puede ser configurada en tres formatos: “YY-MM-
DD” (año-mes-día), “MM-DD-YY” (mes-día-año), “DD-MM-
YY” (día-mes-año). Para ver una parte específica del gráfico de resultados, se
debe configurar el rango escogido con los marcadores A y B.
2.3. REGISTRO DE DATOS EN TIEMPO REAL Para mover el marcador A, debe presionar el signo „-“
Esta función se utiliza para monitorizar y crear un gráfico situado junto al marcador, al hacerlo, „A“ aparecerá
lineal del sonido ambiental en tiempo real, tras haber resaltada en amarillo.
conectado el medidor al programa.
Utilizando la flecha (4 rombos) se puede mover el marcador
en el gráfico a la posición deseada.
Para ampliar el gráfico se debe utilizar la lupa con el „+“.
15
Rev. 14.03.2019Repita la operación con el marcador B, asegúrese de que el
marcador A no continúe resaltado en color amarillo.
La hora de inicio seguido del valor inicial, la hora de fin
seguido del valor final, el número de mediciones y el valor
medio se mostrarán en la esquina inferior izquierda de la
ventana.
3. USO
3.1. Haga clic sobre el icono del programa (II.) en el
escritorio del ordenador.
3.2. Conecte el medidor al ordenador utilizando un cable
USB y encienda el medidor con el botón ON/OFF.
3.3. Una vez que el programa se haya abierto, haga clic
2.4. FUNCIÓN DE REGISTRO DE DATOS en “Ajustes de fecha y hora” para configurar la fecha
2.4.1. CONFIGURACIÓN y la hora.
Esta función se utiliza para establecer la frecuencia de 3.4. Establezca el nombre de la grabación, la frecuencia
muestreo de datos (1-36.000 segundos), el formato de de muestreo, el límite superior para la alarma y el
la fecha mostrada (“YY-MM-DD” (año-mes-día), “MM- límite inferior para la alarma, para iniciar la medición
DD-YY” (mes-día-año), “DD-MM-YY” (día-mes-año)) y el y monitoreo en tiempo real.
modo de grabación, además de mostrar la fecha y hora 3.5. Para desconectar el dispositivo del programa,
ES haga clic en el botón “Desconectar el medidor
de grabación.
del ordenador”, desconecte el cable USB y,
a continuación, apague el medidor.
2.4.2. Descargar los datos del medidor al ordenador – se
utiliza para transferir al ordenador los datos almacenados
en el dispositivo.
2.4.3. LIMPIEZA DE MEMORIA
Para limpiar la memoria conecte el medidor al ordenador.
En caso de que sea necesario, descargue y guarde los
datos. A continuación, haga clic en el botón “CLEAR” para
borrar los datos de la memoria.
16
Rev. 14.03.2019NOTES/NOTIZEN
17
Rev. 14.03.2019NOTES/NOTIZEN
18
Rev. 14.03.2019NOTES/NOTIZEN
19
Rev. 14.03.2019Umwelt – und Entsorgungshinweise
Hersteller an Verbraucher
Sehr geehrte Damen und Herren,
gebrauchte Elektro – und Elektronikgeräte dürfen gemäß europäischer Vorgaben [1] nicht zum unsortierten Siedlungsabfall
gegeben werden, sondern müssen getrennt erfasst werden. Das Symbol der Abfalltonne auf Rädern weist auf die Notwendigkeit
der getrennten Sammlung hin. Helfen auch Sie mit beim Umweltschutz. Sorgen Sie dafür, dieses Gerät, wenn Sie es nicht mehr
weiter nutzen wollen, in die hierfür vorgesehenen Systeme der Getrenntsammlung zu geben.
In Deutschland sind Sie gesetzlich [2] verpflichtet, ein Altgerät einer vom unsortierten Siedlungsabfall getrennten Erfassung
zuzuführen. Die öffentlich – rechtlichen Entsorgungsträger (Kommunen) haben hierzu Sammelstellen eingerichtet, an denen
Altgeräte aus privaten Haushalten ihres Gebietes für Sie kostenfrei entgegengenommen werden. Möglicherweise holen die
rechtlichen Entsorgungsträger die Altgeräte auch bei den privaten Haushalten ab.
Bitte informieren Sie sich über Ihren lokalen Abfallkalender oder bei Ihrer Stadt – oder Gemeindeverwaltung über die in Ihrem
Gebiet zur Verfügung stehenden Möglichkeiten der Rückgabe oder Sammlung von Altgeräten.
[1] RICHTLINIE 2002/96/EG DES EUROPÄISCHEN PARLAMENTS UND DES RATES
ÜBER ELEKTRO – UND ELEKTRONIK – ALTGERÄTE
[2] Gesetz über das Inverkehrbringen, die Rücknahme und die umweltverträgliche Entsorgung
von Elektro – und Elektronikgeräten (Elektro – und Elektronikgerätegesetz – ElektroG).
Utylizacja produktu
Produkty elektryczne i elektroniczne po zakończeniu okresu eksploatacji wymagają segregacji i oddania ich do wyznaczo-
nego punktu odbioru. Nie wolno wyrzucać produktów elektrycznych razem z odpadami gospodarstwa domowego. Zgodnie
z dyrektywą WEEE 2012/19/UE obowiązującą w Unii Europejskiej, urządzenia elektryczne i elektroniczne wymagają segre-
gacji i utylizacji w wyznaczonych miejscach. Dbając o prawidłową utylizację, przyczyniasz się do ochrony zasobów naturalnych
i zmniejszasz negatywny wpływ oddziaływania na środowisko, człowieka i otoczenie. Zgodnie z krajowym prawodawstwem,
nieprawidłowe usuwanie odpadów elektrycznych i elektronicznych może być karane!
For the disposal of the device please consider and act according to the national and local rules and regulations.
CONTACT
expondo Polska sp. z o.o. sp. k.
ul. Nowy Kisielin-Innowacyjna 7
66-002 Zielona Góra | Poland, EU
e-mail: info@expondo.de
expondo.deSie können auch lesen