Lainbachtal Interactive Virtual Field Trip (VFT) - S. Carena, A. Friedrich
←
→
Transkription von Seiteninhalten
Wenn Ihr Browser die Seite nicht korrekt rendert, bitte, lesen Sie den Inhalt der Seite unten
S. Carena, A. Friedrich                                  15.04.2021

                             Lainbachtal
                  Interactive Virtual Field Trip (VFT)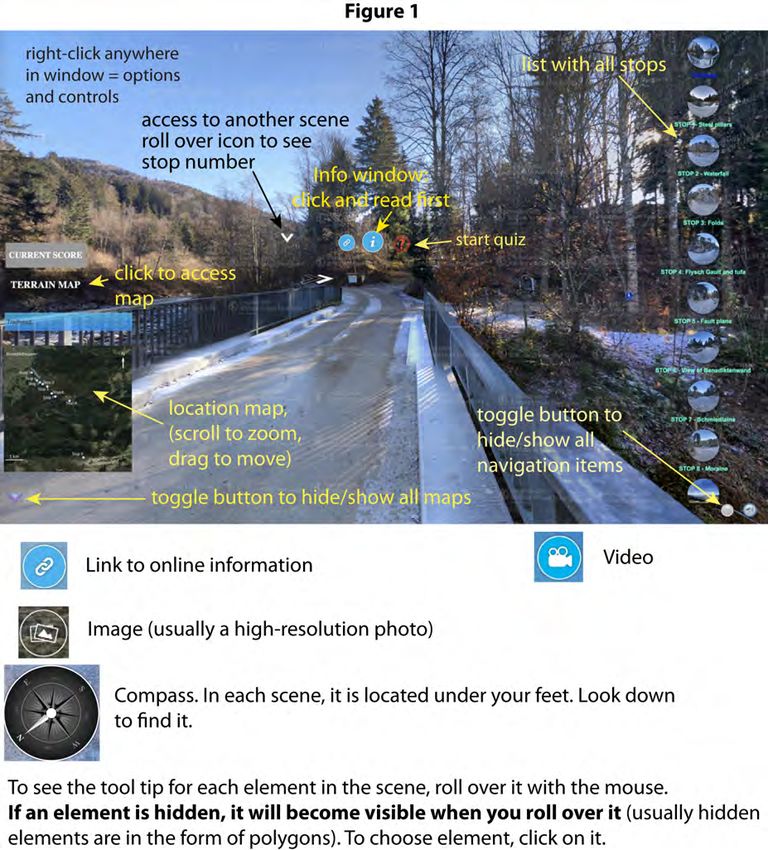
2
Einleitung

Die Geländeübung P3.4 besteht aus 5 Pflichttagen. Der in diesem Dokument beschriebene
Teil behandelt die vier ersten Tage, die sich mit der Geologie des Lainbachtals und mit
grundlegenden Geländemethoden beschäftigen. Davon finden die beiden ersten Tage (Tag
1 und Tag 2) virtuell statt. Tage 3 und 4 finden im Lainbachtal (Nähe Benediktbeuren) statt.
Alle vier Tage werden in Gruppenarbeit durchgeführt, wobei jeder Teilnehmer*in seine
eigenen Übungsblätter ausfüllt und über MOODLE abgibt. Bitte beachten Sie unbedingt,
dass Sie jede*r Teilnehmer*in einen Test zur Sicherheit im Gelände belegen muss, um am
Kurs teilzunehmen. Die jeweiligen Details werden unten beschrieben. Im Gelände dürfen
Sie aus Sicherheitsgründen nicht alleine unterwegs sein. Falls Sie aus gesundheitlichen
Gründen nicht am Kurs teilnehmen können, legen Sie bitte ihr ärztliches Attest vor. Sie
erhalten eine entsprechende Fristverlängerung bzw. eine virtuelle Ersatzveranstaltung, je
nach den Umständen.

Anrechnung des Kurses:
Um diese vier Tage angerechnet zu bekommen, müssen Sie (a) die unterschriebene
Sicherheitsbelehrung abgeben (eingescannt per MOODLE), (b) den Online-Sicherheitstest
(MOODLE) mit der erforderlichen Mindestpunktezahl digital einsenden und (b) die sechs
persönlichen Übungsblätter ausgefüllt abgeben (eingescannt per MOODLE). Die
abschließende Bewertung erfolgt mit „bestanden/nicht bestanden“. Die Übungsblätter
können auf Deutsch oder Englisch ausgefüllt werden. Die Bewertungskriterien folgen den
üblichen wissenschaftlichen Standards (Vollständigkeit, Klarheit, Präzision, Genauigkeit,
Relevanz, Sauberkeit, fachliche Tiefe, usw.).

Abgabefrist: Bis spätestens 1. Juli.

                     Wichtige Informationen zur Durchführung

MOODLE – Geländeübung P3.4. Lainbachtal
! Selbsteinschreibeschlüssel: Lainbach

Geländeausrüstung: Diese Informationen befinden sich in einer VFT-Tour, die für Sie
über die MOODLE Seite erreichbar ist. Schreiben Sie sich selbst in den MOODLE Kurs
P3.4 ein und öffnen Sie die Datei "Ausrüstung und Sicherheit im Gelände" (virtuelle Tour).
Dieses Dokument öffnet sich auf Deutsch, wenn die Sprache ihres Browsers auf Deutsch
eingestellt ist.

Sicherheitsbelehrung: Bevor Sie mit der eigentlichen Geländeübung beginnen, werden
Sie von uns über mögliche Gefahren im Lainbachtal informiert. Lesen Sie diese
Informationen aufmerksam. Bestätigen Sie, dass Sie über mögliche Gefahren informiert
wurden durch Ihre Unterschrift und laden Sie diese Datei bis spätestens 30. April auf die
MOODLE Seite des Kurses. Die Anleitung dazu befindet sich in der Datei "Ausrüstung und
Sicherheit im Gelände" (virtuelle Tour).

Die Anleitung für diese Geländeübung ist auf Englisch verfasst. Ein Glossar der wichtigsten
Fachbegriffe befindet sich am Ende dieses Dokuments.

Auf den ersten Seiten finden Sie eine Bedienungsanleitung der Tour-App (Dateiname:
"Lainbachtal VFT"), welche ihnen zum download in GOOGLE DRIVE zur Verfügung
gestellt wird. Den Link dazu finden Sie auf der MOODLE Seite. Alle Textfelder, die in der
App auftauchen, sind für Sie hier ebenfalls aufgeführt.

In diesem Dokument finden Sie außerdem eine Übersichtskarte, die Anleitung zur
Bedienung des VFT-Programmes, sowie eine genaue Auflistung und Beschreibung aller
Arbeitsschritte, die Sie entweder virtuell (VFT) oder physisch im Gelände („in the field“)

                                             3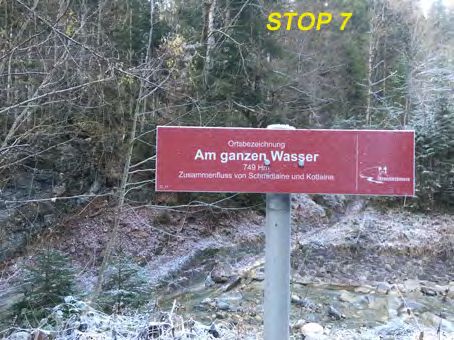
ausführen sollen. Des Weiteren finden Sie Informationen zur Verwendung von digitalen
Apps für Ihr Smartphone (anstatt eines Kompasses; wir werden die Verwendung des
Kompasses später in K&P I einüben). Am Ende des Dokuments befinden sich wichtige
Anlagen (Ihre Übungsblätter), die Sie bitte zu Beginn der Übung ausdrucken. Sie benötigen
die Übungsblätter sowohl für den VFT als auch für den Geländeteil! Nehmen Sie die
sechs Übungsblätter unbedingt mit ins Gelände.

                             Verbindliches Programm:

Dieses Programm ist „lockdown-sicher“ und findet auf jeden Fall statt. Dennoch können Sie
den Zeitplan individuell festlegen. Falls die die Hilfe unserer „Gelände-
Sicherheitsassistent*innen“ in Anspruch nehmen möchten, so sollten Sie an den dafür
vorgesehenen Tagen (siehe Semesterplan) ins Lainbachtal fahren. Diese Assisten*innen
sind Studierende aus höheren Semestern, die den Zeitplan für ihren Geländeaufenthalt
erstellen, ihnen beim Auffinden der Geländestationen helfen und im Falle von
Sicherheitsproblemen als Ansprechpartner dienen oder Hilfe holen können.

Bilden Sie nun Kleingruppen von mindestens zwei, aber maximal drei Personen, rechtzeitig
vor Anreise ins Lainbachtal. Jede Gruppe gibt sich einen Kurznamen (max. fünf
Buchstaben), den Sie an friedrich@lmu.de senden. Tragen Sie den Gruppennamen bitte
unbedingt auf ihren Übungsblättern (worksheets) ein. Dies dient uns auch als Nachweis
des Einhalts der Corona-Regeln. Ob die LMU bis dahin von uns weitere Schritte verlangt
(z.B. Schnelltest), ist derzeit noch unklar.

Tag 1 und 2 – ins virtuelle Lainbachtal (Virtual Field Trip = VFT):
Durchführung: am Computer mit der App Lainbachtal VFT, einzeln oder in Gruppenarbeit.
VFT-App: Über den MOODLE link herunterladen. Testen Sie die App bis spätestens 21.
April. Nur so können wir etwaige Probleme rechtzeitig vor der technischen Einführung am
23. April beheben.
Anleitung: Befindet sich in diesem Dokument (unten) und in der App („main info window“).
Übungsblätter: Bearbeiten Sie die in der App angegebenen Schritte und füllen Sie dabei
die Übungsblätter (worksheets) aus. Sie finden die Übungsblätter in der Anlage bzw. auf
der MOODLE Seite. Drucken Sie diese zur Bearbeitung aus. Sie benötigen dieselben
Blätter auch im Gelände.
Nachweis der Eigenleistung: Ausfüllen der Übungsblätter (worksheets) und deren
Einsendung (MOODLE).

Reihenfolge der Bearbeitung: In der VFT-Tour ist es sinnvoll und daher empfehlenswert,
die drei Stationen (=STOPs) zum Quartär (Stationen 1, 6, und 8) zuerst zu bearbeiten und
erst danach die Stationen (2, 3, 4, 5 und 7) zu den Festgesteinen.
Anzahl der Stationen im VFT: 9 Stationen (STOPs).

Tag 3 und 4 — ins reale Lainbachtal („In the field“):
Durchführung: Gruppenarbeit von mindestens zwei (Sicherheitsaspekte) und maximal
drei (akademisches Optimum) Personen.
Sicherheitsbelehrung: Sie dürfen erst ins Gelände fahren, wenn Sie den Sicherheitstest
bestanden haben. Dieser befindet sich auf der MOODLE-Seite des Kurses in Form einer
VFT. Öffnen Sie die Tour und folgen Sie den Anweisungen. Sie können den Test beliebig
oft wiederholen (um die geforderte Mindestpunktezahl zum Bestehen des Tests zu
erreichen), bevor Sie diesen absenden.
Anleitung: Benutzen Sie die Anleitung in diesem Dokument (siehe unten). Die Texte sind
fast identisch zu denen im VFT.
Übungsblätter: Jede*r Teilnehmer*in füllt die Übungsblätter eigenständig aus, die Sie
zuvor gerne in der Gruppe diskutieren dürfen.

                                           4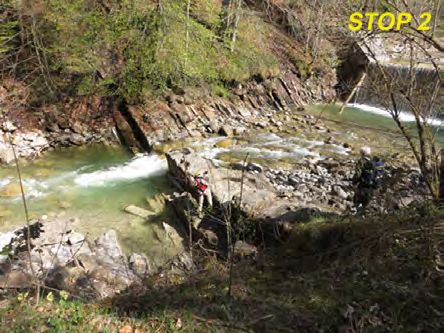
Reihenfolge der Bearbeitung im Gelände: Im Gegensatz zur VFT-Tour ist die
Reihenfolge der Durchführung Ihnen selbst überlassen. Inzwischen kennen Sie die
Stationen und können dabei einen Tag im Quartär und einen Tag in den Festgesteinen
arbeiten oder sie folgen dem Feldweg und bearbeiten die Stationen in der dabei
erscheinenden Reihenfolge. Wägen Sie selbst ab, was für ihre Gruppe am besten ist.
Anzahl der Stationen: nur 8 Stationen (Station 9 ist nur virtuell und wird im Gelände nicht
besucht).
Schlecht-Wetterklausel: Bei schlechter Witterung (Sturm, Regen, Gewitter, Hochwasser)
ist es untersagt im Gelände zu sein (Siehe: Sicherheit im Gelände, MOODLE). Auch die
Tutoren werden bei schlechter Witterung nicht im Gelände sein. Für einen solchen Fall
erhalten sie kurzfristig eine entsprechende E-Mail. Für solche Fälle haben wir Ersatztage
reserviert. Die Termine finden Sie im Stundenplan des 2. Semesters. Bitte beachten Sie
zusätzlich, dass der Weg von Station 7 zu Station 8 bei nasser Witterung einer erhöhten
Steinschlag- und Rutschungsgefahr ausgesetzt ist. Solche Zustände können mehrere Tage
nach Starkregenfällen anhalten, auch wenn das Wetter inzwischen wieder schön geworden
ist. Daher ist die Durchführung des Geländeteils von Station 8 optional und nicht zum
Bestehen des Kurses relevant.

                           Zusammenfassung (Checkliste)

   1. Auf MOODLE selbst einschreiben (Schlüssel: Lainbach).
   2. Sicherheitstest in der online Datei "Ausrüstung und Sicherheit im Gelände" starten
       und score absenden. Die beiden Formblätter (Gefährdung im Gelände und
       Sicherheitsbelehrung) zusätzlich unterschreiben, einscannen und hochladen).
   3. Sich über die Geländeausrüstung informieren, so dass sie fehlende Gegenstände
       rechtzeitig besorgen können.
   4. Eine Gruppe von mindestens 2, maximal 3 Personen bilden. Den Gruppennamen
       (max. 5 Buchstaben) einsenden (friedrich@lmu.de; Betreff: GÜ Lainbach
       Gruppenname). Die Tutoren werden sie anschließend über den genauen Zeitplan
       (zeitliche Staffelung der Gruppen) für die beiden Geländetage informieren.
   5. Die "Lainbachtal-VFT App" herunterladen.
   6. Die 9 VFT-Stationen an etwa 2 Tagen bearbeiten. Dabei die Übungsblätter
       ausfüllen und diese später ins Gelände mitnehmen (sauber halten).
   7. Mit den Stationen 1, 6 und 8 beginnen, danach ab Station # 2 aufwärts arbeiten.
   8. Sicherheitstest durchführen, falls noch nicht geschehen (Frist 30. April).
   9. Wettervorhersage beobachten und bei gutem Wetter ins Lainbachtal fahren. Bei
       schlechtem       Wetter     einen    Ersatztermin     wählen,    ggf.     mit  den
       Sicherheitsassistent*innen in Kontakt treten.
   10. Dieses Dokument (zumindest den Anhang 1, die Titelseite und die Karte)
       ausdrucken und ins Gelände mitnehmen.
   11. Tagesverpflegung, Trinkwasser und Geländeausrüstung einpacken. Corona-Regeln
       überprüfen und einhalten (ggf. Selbsttest).
   12. Rechtzeitig am Treffpunkt sein. Ab dem Parkplatz geht es nur zu Fuß weiter.
   13. In Gruppenarbeit die Stationen 1 bis 8 (trockene Witterung) oder 1-7 (feuchte
       Witterung) bearbeiten. Reihenfolge der Bearbeitung ist beliebig.
   14. Vollständig bearbeitete Übungsblätter über die MOODLE Seite hochladen (Frist 1.
       Juli).

                                            5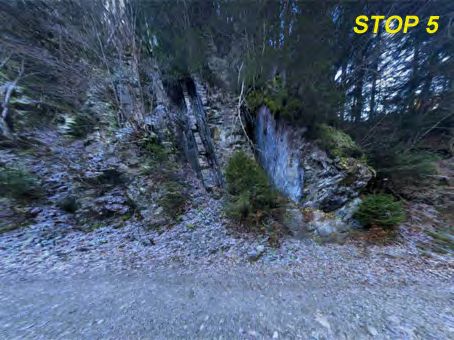
Lainbachtal VFT operating instructions

Hardware & OS

The VFT is a standalone application (distributed as a zipped file). You need a computer
with either Windows or MacOS to be able to run it. It will not work on mobile devices.

You must have a decent internet connection, because many videos, models, and images
are hosted by third-party platforms (e.g. YouTube, Sketchfab, Google Maps).

Open the tour package by double-clicking on it: it will unpack and execute on Windows. on
Macs, it will unpack, and after you double-click the app icon you need to follow the
instructions to run the trip. On Windows systems you may have to temporarily disable your
antivirus to start the app, if you encounter problems.

Moving through the Virtual Field Trip

After you click on "start the trip", the trip will automatically open at the starting point
("Trailhead"). In case the trip starts with a blank screen, click anywhere in it.

An overview of navigation controls and some basic icons is in figure 1. Hovering with the
mouse over any icon will bring up its tooltip.

Like for any subsequent stops, the first thing you need to do is to click on the blue "info"
icon and read the contents of this box. It contains a description of the stop, including which
tasks you are supposed to carry out. Occasionally it also contains images, movies, or web
links (blue text; click to open in browser).

If there are other blue icons in a scene, it means these also contain background information,
and they should be accessed before carrying out other tasks.

Sound: turn off scene sound (loudspeaker icon in the lower right corner of the screen)
before watching videos, unless you want a "double soundtrack".

If you encounter speed issues with 3D models or YouTube videos, these may improve by
playing them at full screen.

Single animated arrows allow you to go to other stops without using the list of stops, but it
is best to use these arrows only once you have gone through the entire trip in the order
suggested in this guide. Then you can hop around as you like (e.g., to revise some things).

Several stops contain hidden items (e.g., 3D models of outcrops and samples, or some
photos). The items you need to find at each stop are mentioned in the info text. For each
item that you find, points will be assigned (more points for smaller items that are harder to
find). Hidden items will show up when you roll the cursor over them, but to collect points,
you must click on the item. Many non-hidden items also carry points on click. Finally, a few
hidden items will appear on cursor rolling over them, which are either from the wrong
geological time, or a safety hazard. These will subtract points if you click on them, so watch
out.
The remaining points can be collected by answering questions (red question mark icon).
Question cards are in "stacks": you can access the next question only when you answer
the preceding one correctly. In case of a wrong answer, the question card will send you to
the relevant item (text, panorama, or embedded object) that can help you figure out the
correct answer. If you close the VFT app, all scores will be reset. To keep a record up to
that point (for example, you complete 4 stops, but want to quit and continue the next day),

                                              6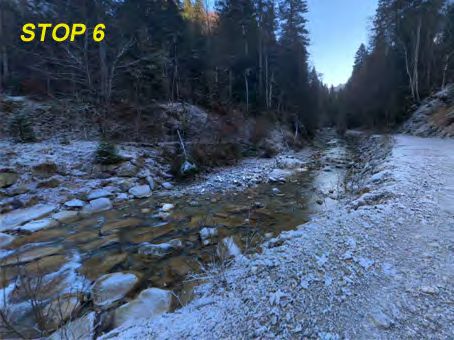
take a screenshot of your current score before quitting, so later on you can manually add
your scores.

The info text for each stop (i.e., the text that is linked to the blue info icon inside each stop)
is repeated here (appendix 1). This appendix (plus cover photos and topo map) should
be printed out and brought to the field, because it doubles as your field guide.

Please report any broken links to scarena@iaag.geo.uni-muenchen.de.

                                                7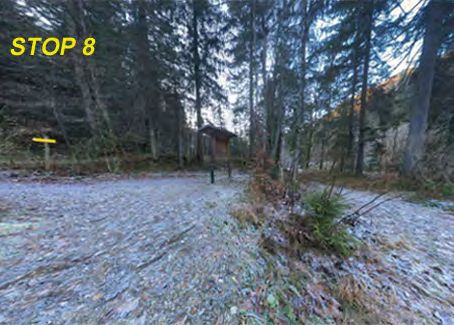
Appendix 1: Stop descriptions from the Lainbachtal VFT app
blue = tasks to do virtually; green = tasks to do in the field
" Trailhead
The Lainbachtal trail is the forest road to your left. There is an info board here (click on
animated double arrow on road to read it).
The valley is part of the Northern Calcareous Alps, and contains outcrops of Cretaceous
rocks and Quaternary sediments, both of which will be the topic of several exercises during
this field trip.
Beyond this point there are no sources of food and water along your field trip path, and few
places suitable for toilet stops.
__________________
There are two types of stops in this trip: "hard rocks" and "Quaternary", depending on
whether the main topic concerns hard rocks (and their formation and deformation) or
Quaternary sediments, geomorphology, and human activities.
Hard rock stops (2, 3, 4, 5, 7) are numbered in geological order (i.e. by geological
time, from oldest to youngest), not in the order they are encountered along the road.
Within each scene however the "previous/next" arrows will send you to the stop that is
physically right before or right after the current one, so use the stop list icons on the right
side of your screen (or the drop-down list above the location map) if you want to move in
geological order.
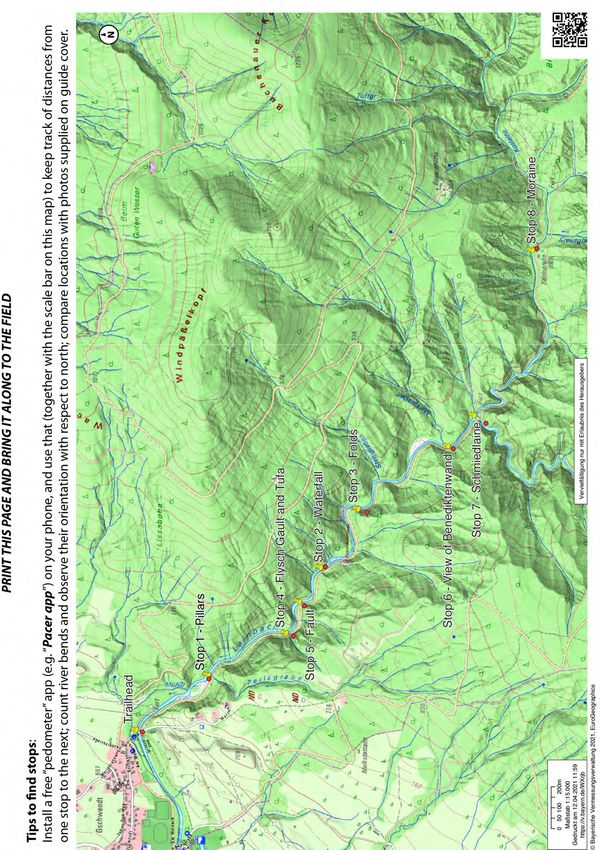
In this guide, the green numbers (in meters) right below each stop name indicate the
distance between this stop and the one that is physically before it along the road
(coming from the Trailhead). These distances can be used in the field to easily locate stops,
if you have a pedometer app installed on your smartphone.
Tasks at hard rock stops are labeled with "H" (e.g. Task H1), and at Quaternary stops with
"Q" (e.g., Task Q1). Tasks that are repeated the same way at different places keep the
same letter and number (so you may find a "Task H1" for example at more than one stop).
________________
Before you cross the bridge (virtually, or physically in the field), follow the path which from
the parking lot leads to a side stream bed[1] (find and click on animated arrow) where high
water markers (needed for tasks at Quaternary stops 1, 6 and 8) can be studied safely.
Also, you should read the link provided (blue icon next to stop description icon), which
gives you the basics of setting up and using a field notebook.
Before you move on to the next virtual stop, answer the quiz. If you answer correctly,
you will be taken to the first stop directly.
You can check your score at any stop by using the "current score" button. If you close the
VFT, however, all scores will be reset. If you want to close the file and still keep track of
scores, you can save each separate session by taking a screenshot of the scores before
closing.
[1]
Side stream: High water markers can be clumps of dead vegetation and/or trash
trapped in bushes, tree branches, or against tree trunks, or dead grass and small
plants flattened in the direction of water flow (like at this location). Look not only
near your feet, but also at eye level: floods can reach any height.
8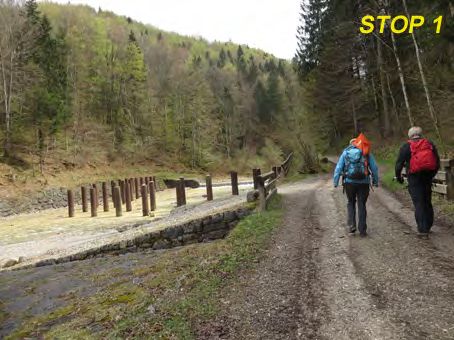
" STOP 1 – Steel Pillars (Anthropocene and Holocene)
460 m SSE of Trailhead

The Lainbach is a typical mountain stream. Torrent control measures were implemented
following a 1990 flood.

Read the information boards 1, 2, and 8 and 9 of the nature trail guide, which are
accessible as pdf files at their website (scroll down to find the list with board pdfs). Study
the different types of torrent control (Tafel 8, Tafel 9). In the field, do not forget to read the
remaining info boards (Tafeln 3-7) as you walk along the trail.

Look for the photo showing the bridge over the Perlsgraben. Click on the image to see a
second photo, which shows its upper portion (view from the bridge). Notice abundant
cobbles and boulders in this tributary. The piles of rock on either side were removed from
the stream bed after a recent flood event. At STOP 8, you will be asked to compare the
sediment in the Perlsgraben against some near STOP 8.

TASK Q1: In VFT, map the distribution of sediments within the area marked in orange on
the map provided in worksheet Q1 (you can also download a pdf file of this map if you need
a clean copy) for two time-slices (before and after March 2021). The orange area starts
from the steel pillars and extends downstream for about 30 meters (find an open photo that
gives you a view of the pillars from the downstream end of the orange area). The map
legend is already provided. Use the symbols indicated on this legend to complete the map.

The panoramic scene at this stop and all the undated photos along the main stream were
taken in winter 2020/21. All other photos were taken in early April 2021.

Find all photos along the main stream and study them to carry out the tasks below.

a) Study the sediment distribution prior to March 2021: estimate the sediment thickness in
those areas where you see sediments on the panorama and photos taken in winter
2020/21. Then on your map, use solid red color (see symbol provided in legend) where the
sediments are the thickest, and lighter red color where sediments are thinner.
b) Repeat this step for the April 2021 situation, but use brown or grey dots (see legend on
map) to indicate areas where sediments occur at this time slice.

On your worksheet Q1, mark regions where sediment has been removed (blue) and
regions where sediment has been added (red).

When you are satisfied with your mapping of the orange area, continue to complete the
task (Kartenskizze STOP 1) by mapping additional features. Use the symbols provided in
the legend. Limit your virtual mapping to those features that are obvious and easy to map,
such as the two river steps (waterfalls), river benches or other steep slopes, and the actual
courses of small creeks.

In the field, put additional features on your map (worksheet Q1), such as the steel pillars,
large blocks of rock (note whether they have smooth or sharp edges) and any other
noticeable anthropogenic or Quaternary feature you may encounter.
The steel pillars in the stream bed are laid out in a "V" shape (see Task Q2 below). Walk
along the road until you get to the location where you can look straight along the double
row of pillars, just as shown on the pair of photos of the pillars (the ones before and after
March 2021). What is the orientation of the aligned pillars, which begin directly at the road?
Indicate the horizontal direction (azimuth, Himmelsrichtung) by pointing along it with your
hand. Then measure it using your compass. Enter the value on the worksheet and
precisely add it to your map (generally, on maps, the North direction is pointing up unless
otherwise indicated).

                                                9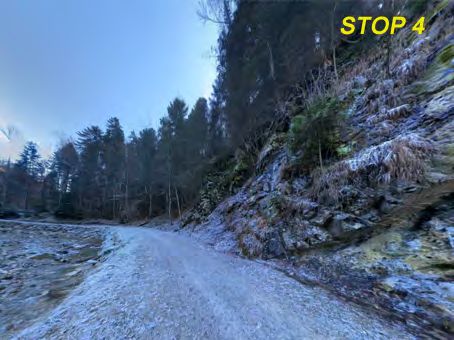
TASK Q2 (in VFT): What objects are sitting on top of the pillars? Compare the before and
after March 2021 photos (click on the icon to open photo, then click on the photo to switch
between the two versions) to see whether any of these objects have moved. How did they
get there? Think of several options and write them down in your field notebook.

TASK Q3 (in the field): Walk along the road (a few tens of meters) to the end of the
wooden fence until you get to an open area adjacent to the stream with the stone cairns
(Steinmandl, see photo in this window). Find the pile of rocks at the north end of this area.
Spend about 15-30 minutes studying the different rock types and sizes. Look for
metamorphic, magmatic, and sedimentary rocks. Which of the three classes of rock are
most common in this pile of rocks? Which class is least common? Write your answer on the
worksheet. Then take a measuring tape and a grain-size chart (a meter stick and a
protractor will also work) to characterize the size distribution at this pile. What is the size of
the largest clast you can spot in this pile? What is the size of the smallest clasts? Lastly,
mark on the worksheet whether most of the 10-15-cm-sized clasts are angular, subangular,
subrounded, or well rounded.

TASK Q4 (in VFT and in the field): Look around to find evidence for occasional high water.
Find at least two different clues. How high did the water level rise recently? In case you
missed it, more information about what to look for is at the VFT trailhead.
From this point onwards, as you walk upstream, look for such signs of flooding along
the stream’s benches, both virtually and in the field. The presence/absence of vegetation
may be another good hint.
When you find a good location, answer these questions on your worksheet: What is
the highest flood level (in meters) you found along this stream? Write down this number
and sketch two of your best clues. Add labels and a one-sentence explanation. Indicate the
location where you found the feature/s to improve your documentation by stating the two
STOP numbers between which you found the evidence.
_________________

In the virtual part of the field trip, distances are not an issue, and it is easier to tackle one
topic at a time: from here, stick with the Quaternary first (so now skip ahead to STOP 6 and
then 8), and look at the hard rocks later (stops 2, 3, 4, 5, 7).

Take the quiz: if answered correctly, it will take you directly to STOP 6.

At any moment in time of course, you can use any of the lists or arrows to move to
whatever location you would like to revise.

In the field, you can decide whether you do all the Quaternary on one day and hard rocks
the other, or whether you simply move along the road and work at each location as they
come along. By the time you go to the field, you will have already done the virtual exercises
and have a good idea of what awaits you, and so you can make your own plans.

" STOP 2 – Waterfall, Tristel Formation (Lower Cretaceous)
220 m SE of Stop 5

This is the lowermost geologic unit visible in the stratigraphy of the Lainbachtal. The Tristel
formation is Hauterivian - Barrêmian (Lower Cretaceous) in age.

It is a sequence of carbonatic turbidites deposited in a submarine environment by turbidity
currents (find and watch the video) Here, the original sedimentary layers have been tilted to
near-vertical dips (find the 3D model: can you also find a small fold in it?).

Once you have completed your virtual tasks below, move to STOP 3 in the VFT.

                                               10
TASK H1 (VFT): sketch this outcrop, including the fold (is it a syncline or an anticline?).
First open the animated "info" button and watch how a geologic sketch should be made,
then put what you have learned into practice by opening the 3D outcrop model and making
a meaningful geologic sketch of it.
Tip: you will need to estimate dimensions (look for clues like trees, the artificial waterfall,
the road); a compass (for orientation) is under your feet.
TASK H2 (VFT): in your notebook, keep track of the rock type and ages for all hard rocks
unit you encounter at each stop (beginning from this one), so that at the end you can draw
a simple stratigraphic column. An example of such a column is shown in the VFT info
window for this stop.
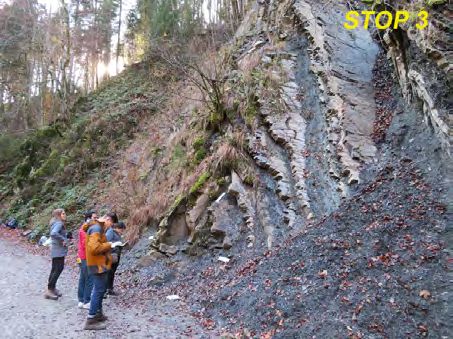
" STOP 3 – Folds in the Tristel Formation (Lower Cretaceous)
450 m SE of Stop 2
This outcrop (find its 3D model) is made of the same rocks that we saw at STOP 2:
alternating layers of marl and claystone (find the 3D models of each rock type on the
outcrop), which represent a sequence of carbonatic turbidites.
Afterwards these sediments were buried, underwent diagenesis, and later were deformed:
they are now folded into chevron folds. When rocks fold, they can break too: can you find
signs of this kind of damage (e.g., veins and cracks) in the outcrops and hand samples of
this valley?
Once you have completed your virtual tasks and answered the quiz, in the VFT move to
STOP 4.
_________________
Beginning with this outcrop, you are asked to carry out geologic compass measurements in
the field.
You can use your own smartphone for this, as long as you download, install and test a
reliable geologic compass app before you go to the field. Keep phone away from
sources of electronic interference (e.g., overhead power lines) and from metal objects,
which screw up the phone magnetometer just as they would screw up an analog compass.
The recommended apps for iPhone are Lambert (heading / dip), StereonetMobile (RHR
strike / dip), FieldMove Clino (dip / dip direction or dip / RHR strike).
For Android phones the only choice is FieldMove Clino.
In parentheses above is the measurement convention for each compass. When you write
down a measurement, the convention of your compass must be clearly
communicated (for example, you can annotate that information in a corner of your
spreadsheet, and write it in your field notebook).
More information on these compass apps is included in the VFT pdf guide (appendix 2). A
short video of how to measure an inclined layer in the field is linked to this virtual scene
(find the video).
_______________
TASK H1 (VFT): sketch this outcrop. If you forgot how to do that, the same video as at
STOP 2 is provided here. In the field, take a compass measurement on each limb (i.e.
each "side") of the fold at the road level, and write it on your sketch, marking the position
on the sketch where the measurement was taken. Your worksheet has some space for
entering the measurements too.
Tip: each of the 2 scales (elongated strips with targets on them) is 30 cm long from end to
11end; a compass (for orientation) is under your feet.
TASK H3: for both rock types present at this outcrop (marl and claystone), generate a rock
description by answering the following questions (use your worksheet to do this; it contains
a shortened version of the same questions). Most questions can be answered during
the virtual trip, but a few require going to the field.
1) What is the rock color on a fresh surface?
2) What is the rock color on a weathered surface?
3) In what grain size classification does the rock fall (e.g., "coarse sand", "fine sand", "silt",
"clay", etc.)?
4) Are there any laminations visible? If yes, at what scale (i.e., mm, cm).
5) Are any other sedimentary structures visible on hand sample or outcrop (e.g,. flute casts,
mudcracks, ripple marks, etc.)?
6) What is the typical bed thickness in outcrop?
7) How hard is the rock relative to the other type/s present at this outcrop? How can you
tell?
8) Does the rock (hand sample or outcrop scale) show any signs of brittle damage (i.e.
breaking)? If yes, what brittle features can you observe?
9) Does the rock react with HCl? What is the HCl concentration that you are using?
" STOP 4 - Flysch Gault (Aptian-Albian, Lower Cretaceous) and tufa (recent
deposit, forming today)
470 m SSE of Stop 1
This outcrop (find its 3D model) is made of alternating layers of sandstone (here a
glauconitic quartz arenite – or quartz sandstone - ; find its 3D model) and claystone. These
rocks were also deposited by marine turbidity currents, just as the rocks at Stops 2 and 3.
The difference is that the coarser-grained rocks at this outcrop are made almost entirely of
quartz grains.
A field examination of these rocks is shown as video: find it. Another video explains instead
the sedimentary structures that are visible in the 3D outcrop model (and of which you can
also find a close-up photo).
Once you have completed your virtual tasks (including answering the quiz), in the VFT
move to STOP 5.
TASK H1: sketch this outcrop in the field, and determine by careful observation whether
there are any folds visible and, if so, whether they are synclines or anticlines.
TASK H3: for both rock types present at this outcrop (quartz sandstone and claystone),
generate a rock description by answering the following questions (use your worksheet to do
this; it contains a shortened version of the same questions). Most questions can be
answered during the virtual trip, but a few require going to the field (bring your
worksheet along).
1) What is the rock color on a fresh surface?
2) What is the rock color on a weathered surface?
3) In what grain size classification does the rock fall (e.g., "coarse sand", "fine sand", "silt",
"clay", etc.)?
4) Are there any laminations visible? If yes, at what scale (i.e., mm, cm).
5) Are any other sedimentary structures visible on hand sample or outcrop (e.g., flute casts,
mudcracks, ripple marks, etc.)?
6) What is the typical bed thickness in outcrop?
7) How hard is the rock relative to the other type/s present at this outcrop? How can you
tell?
128) Does the rock (hand sample or outcrop scale) show any signs of brittle damage (i.e.
breaking)? If yes, what brittle features can you observe?
9) Does the rock react with HCl? What is the HCl concentration that you are using?
" STOP 5 - Fault plane, Flysch Gault (Lower Cretaceous)
170 m ESE of Stop 4
This is the same rock unit as you have seen at STOP 4. Find the 3D outcrop model, and
the small fault plane in the outcrop. Look at the plane closely: what are the visible
characteristics that strongly indicate this is a fault? List them in the space provided in your
worksheet. If you are not convinced by the 3D model, verify your observations in the field.
If you do not remember anything about compass measurements, read again the
information provided at STOP 3.
Once you have completed your virtual tasks described above, in the VFT move to STOP 7.
TASK H4: In the field, measure the orientation of the fault plane with your compass and
enter it in the worksheet. Then drag your hand over the fault plane: which way is smoother
(smoother = direction of motion of missing block)? Enter this information in your worksheet.
" STOP 6 – View of Benediktenwand (active stream processes, Holocene)
650 m SE of Stop 3
Study board 1 (and look again at boards 2, 8, and 9) of the nature guide provided by the
Wasserwirtschaftsamt to get an idea about what kind of events might occur in this
catchment during extreme weather events.
In the field, the behavior of active streams cannot be studied at only one location,
unlike the hard-rock outcrops. Therefore, as you walk around each bend in the trail,
especially also on the way down at the end of the day, look for additional evidence for the
stream’s transport power.
Once you have completed your virtual tasks below, answer the quiz. If answered correctly,
it will take you directly to STOP 8.
TASK Q5 (VFT). Sketch the streambed and the clasts (size, rounding, arrangement
patterns) on your worksheet. Include the transition between the natural and the
anthropogenic portion of the stream bed (= sole ramp and flume, Sohlenrampe und
Schussgerinne). Label all features. Think about a reason for this particular torrent control
measure at this location and write it on the worksheet.
TASK Q6 (VFT): First, watch the video in the info window of this scene, which shows two
geologists in action to examine and explain the aftermath of a debris flow. Then look for the
other two videos and watch them.
Do you think this kind of event is likely to occur in a catchment such as the Lainbach? In
your notebook, write down particular features, which — should you find any of them
along the trail — would support your hypothesis that debris flows would occur in this
catchment.
TASK Q7 (in the field). Sketch a longitudinal stream profile (one which follows the river’s
course) to emphasize the local changes in slope/gradient of the stream bed.
Think about these questions: Why is only a part of the stream bed reinforced? At which
locations do the reinforcements occur? Look around to find any special relationships to any
13other natural features (side streams, rock exposures, rock type, resistance to weathering,
etc.). Are spacing and type of reinforcing structures controlled by engineering aspects
unrelated to the parameters listed above? Provide a short justification for your answer on
your worksheet.
" STOP 7 - Schmiedlaine, Zementmergel Formation (Santonian - Maastrichtian,
Upper Cretaceous)
180 m SE of Stop 6
This is a new unit, though the depositional environment and process (marine, turbidity
currents) are the same as for the rocks at stops 2 through 5. Find the 3D model of the
outcrop, then answer the questions in the quiz.
Once you have completed your virtual tasks described above, in the VFT move to STOP 3.
__________________
WARNING 1: in the field, do not cross the creek to look closely at the rocks. To carry out
the rock description, stop along the main road either a few tens of meters north of the
Schmiedlaine creek (i.e., just before you reach the confluence of the three creeks at this
stop), or anywhere between stops 7 and 8. The rocks are exactly the same.
WARNING 2: in the field, if it is a rainy day, or if it rained in the 3 days before you go out,
this is your last stop (see also info at STOP 8). Do not go beyond the bridge at this location.
___________________
TASK H3 (field only): generate a rock description by answering the following questions
(use your worksheet to do this). For this task you must go to the field; there are no
models (bring your worksheet along).
1) What is the rock color on a fresh surface?
2) What is the rock color on a weathered surface?
3) In what grain size classification does the rock fall (e.g., "coarse sand", "fine sand", "silt",
"clay", etc.)?
4) Are there any laminations visible? If yes, at what scale (i.e., mm, cm).
5) Are any other sedimentary structures visible on hand sample or outcrop? Which ones
(e.g., flute casts, mudcracks, ripple marks, etc.)?
6) What is the typical bed thickness in outcrop?
7) Does the rock (hand sample or outcrop scale) show any signs of brittle damage (i.e.,
breaking)? If yes, what brittle features can you observe?
8) Does the rock react with HCl? What is the HCl concentration that you are using?
9) Based on grain size and composition, what name would you give to this rock? (Note that
the name of the geologic unit, i.e., "Zementmergel Formation", is NOT the same as the
name of the rock, which could be something like "basalt," "sandstone," "claystone," etc.).
" STOP 8 – Moraine (Pleistocene)
1000 m ESE of Stop 7
In the field, STOP 8 is your turnaround point (unless you turned around at STOP 7
because of rain – see the warning at STOP 7). There is no field exercise at STOP 9.
Study this entire scene and note any natural materials, objects, or features you can identify.
Once you are sure you have carefully observed this place, answer the quiz, which (if
answered correctly) will take you to an old photo of the hillslopes (taken by Reinhard Hesse
in about 1960 as a Munich master student) behind the trees. This photo provides a better
view of the geological setting of the valley at this stop.
14TASK Q8 (VFT): study the old photo by Hesse. On the worksheet, sketch the outline and
geological features of the moraine and describe the deposit. Answer these questions as
you take notes in your field notebook: Is the deposit consolidated and lithified or
unconsolidated/loose? Explain your choice briefly on the worksheet. Are all of the clasts of
the same size, or is there a less well-sorted distribution of particles? Estimate the size of
the largest clasts in the deposit. Write down your estimate on the worksheet.
When you are finished, click on the image to open a zoomed-out 3D view of the same area,
now showing the surroundings of the eroding smaller catchments.
TASK Q9 (VFT and Field): This broad 3D view shows the upper portion of the Lainbach
valley, called Kotlaine. The stream has incised a gorge through a glacial moraine (blue
arrows), into the underlying bedrock exposed at STOP 7. Notice that the top of the moraine
deposits is not dissected and form subhorizontal planes (red arrows, paleo-surfaces). For
comparison, also open the 3D-terrain model (button on left of screen).
Once you close the photos, look again to the N and NW and focus on the light-colored
hillslope behind the trees. These are bits of those fresh erosional cuts through the glacial
moraine.
Once you have completed your virtual tasks here, move back to STOP 2 in the VFT to start
working on hard rocks.
____________________
Prepare for task Q 10 in the field (optional): Beyond STOP 7, the road enters a
canyon. !! You are not allowed to continue beyond STOP 7 in the field if it is raining
or if it has rained within the three days preceding your trip !!
There are imminent rock-fall and rock-slide danger. The road runs between cliffs with loose
rocks and above the wild stream. It might still be snow-covered and slippery in early May (!).
IF the conditions are sufficiently dry, walk along the road from STOP 7 to STOP 8. Notice
the cliffs etched into hard rock overlain by loosely consolidated moraine deposits.
TASK Q 10 (Field - optional, weather permitting): Keep track of the last appearance of
hard rocks as you head to the Söldner Alm (STOP 8). Mark this last appearance on the
worksheet.
Study the sediments in the wild stream in the Kotlaine segment. Notice the increasing
stream gradient and the abundance of broken trees dangling on the slopes and in the
stream. Figure out the reason for the existence of this canyon and write it on your
worksheet. You may want to complete this task on your descent after having reached stop
8.
Hint: What rock unit is sitting above the hard rocks that make up the Lainbach valley at
STOP 7?
(Field/VFT): Can you now map the rest of the moraine deposit on the worksheet by
outlining its contact to the underlying bedrock? Use the different styles of hillslope erosion
between the bedrock (smoothly incised slopes) and the moraine (many sharp rills) as a
guide.
In the field, think about the function of the horizontal features in the center of the old photo
by Hesse (which you examined in the VFT). Compare this catchment to the one at
Perlsgraben near STOP 1. What differences do you notice in terms of erosional and
transport activity between these two streams? Take good notes about your observations in
your field notebook.
15"STOP 9 - Benediktenwand
This stop is virtual only.
From here, you can see the entire Lainbachtal. The rocks you are standing on are different
than the ones you have encountered in the valley.
What differences do you notice (color, relative hardness, etc.)?
Open the terrain map (find the button on left of the scene) one last time to study and enjoy
the spectacular 3D-relief and landscape to the north of the Benediktenwand.
Sometimes a different perspective can be refreshing. Find the photo in the plain beyond the
Lainbachtal. It shows the view along the Lainbachtal towards the Benediktenwand. What
do you notice that you haven't noticed before? Now sketch on your own view and take
notes in your field notebook.
Answer the quiz, and check your final scores (or add up scores from your daily
screenshots).
For a different view, don't forget to look southward and enjoy the alpine scenery.
16Appendix 2: recommended geologic compass apps
RHR = right-hand rule
Before you measure a plane, make sure you have indeed selected "planes" first, on any
app.
A geologic compass is a compass that not only gives you an orientation with respect to
north (any hiking compass can do that), but also can measure an angle from the horizontal,
preferably both at once.
Lambert (iOS only): The convention for plane measurements is given as "heading / dip"
("Azimut / Fallwinkel" in the German version), but "heading" here is really "dip direction"
(also known as "dip azimuth" sometimes). To get your measurement, position the phone
with its back flat on the plane, with the lower short edge pointing in the general direction of
dip, then click on "Get Data" when ready. Your measurement is saved in a list and you can
read it off there.
FieldMove Clino (iOS or Android): it can be set to measure in either "dip / dip direction"
or "dip / RHR strike" convention by accessing its general settings. Know what settings you
have picked!
To get your measurement, make sure you are in the "compass/clino" screen and tap on the
clino (i.e. the red "T" shaped symbol, see image below) if not already selected. Position the
phone with its back flat on the plane, with the lower short edge pointing in the general
direction of dip, then tap inside the circle when ready. This will fix your measurement
temporarily and you can read it off below the circle. To release the compass, tap inside the
circle again.
If you want to save a measurement, you must first define a rock unit (even a dummy one
will do), and then tap "save".
StereonetMobile (iOS only): It only measures as RHR strike / dip, so there is no risk of
confusion here.
To get your measurement, position the phone with its back flat on the plane (no need to
point in dip direction), and when ready tap inside the circle. This will fix your measurement
temporarily and you can read it off below the circle.
If you also want to save it, tap the "save" button. Otherwise, turn on "auto" again to release
the compass and proceed with another measurement.
17English – German geological terms
anticline = Antiklinale
bedding = Schichtung, Bankung
box folds = Kofferfalten
boulder = Block(> 20 cm), Gesteinsblock
brittle = spröde
catchment = Einzugsgebiet
chevron folds = Knickfalten
clasts = Klasten
claystone = Tonstein
cobble = Geröll (etwa 6 bis 20 cm Durchmesser)
consolidated = verfestigt
debris flow = Schuttstrom
deposit = Ablagerung
dip, dip angle = Fallen, Fallwinkel
fault plane = Störungsfläche
field = Gelände
flute casts = Strömungsmarken
fold = Falte
gravel = Kies
grain size = Korngröße
gorge = Schlucht, Klamm
joints (tension cracks) = Klüfte (Spannungsrisse)
laminations = Laminae (singular Lamina)
limbs = (Falten-)schenkel
limestone = Kalkstein
marl = Mergel
mudcracks = Trockenrisse
normal fault = Abschiebung
outcrop = Aufschluss, (Gesteinsaufschluss)
paleosurfaces = alte Landoberfläche
reverse fault = Aufschiebung
ripple marks = Rippelmarken, Welligkeitsspuren
silt = Silt, Schluff
strike = Streichen
strike-slip fault = Blattverschiebung
syncline = Synklinale
thrust fault = Überschiebung
torrent = Wildbach, reißender Bach
tributary = Nebenfluss, Zufluss
tufa = Kalktuff
veins = Mineraladern
weathered = verwittert
References
Becht, M. (1989), Neue Erkenntnisse zur Entstehung pleistozäner Talfüllungen, Eiszeitalter und
Gegenwart, v. 39, 1-9.
Hesse, R. (2011). Rhenodanubian Flyschzone, Bavarian Alps, in Carena, S., Friedrich, A.M., and
Lammerer, B., eds., Geological Field trips in Central Western Europe, Geological Society of America Field
Guide 22, 51-73, doi:10.1130/2011.0022(05).
18Sie können auch lesen