Bedienungsanleitung Operating Manual Mode d'emploi Istruzione per l'uso Gebruiksanwijzing
←
→
Transkription von Seiteninhalten
Wenn Ihr Browser die Seite nicht korrekt rendert, bitte, lesen Sie den Inhalt der Seite unten
D   DC zu DC Duales Batterieladegerät / Ladewandler
                                                                                                                                    GB DC to DC Dual battery charger / Charging converter
                                                                                                                                     F Double chargeur de batterie CC à CC / Convertisseur de charge
                                                                                                                                     I DC-DC Caricabatterie doppio / Convertitori di carica
                                                                                                                                    NL DC naar DC Dual batterijoplader / Laadstromverdelers

                                                                                                                                      Bedienungsanleitung • Operating Manual •
                                                                                                                                 Mode d’emploi • Istruzione per l’uso • Gebruiksanwijzing

D    Diese Bedienungsanleitung ist eine Publikation der axhess GmbH & Co. KG, Industriestraße 11, 56589 Rheinbrohl.
     www.axhess.de . Alle Rechte einschließlich Übersetzung vorbehalten. Reproduktionen jeder Art, auch auszugs-
     weise, z. B. Fotokopie, Mikroverfilmung, oder die Erfassung in EDV-Anlagen, bedürfen der ausdrücklichen schrift-
     lichen Genehmigung der axhess GmbH & Co. KG. Der Nachdruck, auch auszugsweise, ist verboten.
     Diese Bedienungsanleitung entspricht dem technischen Stand bei Drucklegung. Änderung in Technik,
     Ausstattung und Design vorbehalten.
     © Copyright 2018 axhess GmbH & Co. KG

     This user manual is a publication of axhess GmbH & Co. KG, Industriestraße 11, 56589 Rheinbrohl. www.axhess.de.
GB   All rights including translation reserved. Reproductions of all kinds, including extracts, e.g. photocopy, micro
     fluidization, or the saving in computer systems require the express written consent of axhess GmbH & Co. KG. The
     reprint, even in part, is prohibited. This operating manual corresponds to the technical state at the time of printing.
     Changes in technology, equipment and design reserved.
     © Copyright 2018 axhess GmbH & Co. KG

     Ce manuel d‘utilisation est une publication de axhess GmbH & Co. KG, Industriestraße 11, 56589 Rheinbrohl.
F    www.axhess.de . Tous droits réservés, y compris la traduction. Reproductions de tous types, y compris des extraits,
     par exemple. B. photocopie, microfluidisation ou le er Dans les systèmes informatiques, l’autorisation écrite ex-
     presse de axhess GmbH & Co. KG est requise. La réimpression, même partielle, est interdite. Ce manuel d‘utilisation
     correspond à l‘état technique au moment de l‘impression. Modifications de la technologie, des équipements et de
     la conception réservés.
     © Copyright 2018 axhess GmbH & Co. KG

     Questo manuale utente è una pubblicazione di axhess GmbH & Co. KG, Industriestraße 11, 56589 Rheinbrohl.
I    www.axhess.de . Tutti i diritti riservati inclusa la traduzione. Riproduzioni di ogni genere, inclusi estratti, ad es. B.
     fotocopia, microfluidizzazione o Er nei sistemi informatici richiede l‘espresso consenso scritto di axhess GmbH
     & Co. KG. La ristampa, anche parziale, è proibita. Questo manuale operativo corrisponde allo stato tecnico al
     momento della stampa. Cambiamenti di tecnologia, attrezzature e design riservati.
     © Copyright 2018 axhess GmbH & Co. KG

     Deze gebruikershandleiding is een uitgave van axhess GmbH & Co. KG, Industriestraße 11, 56589 Rheinbrohl.
NL   www.axhess.de . Alle rechten voorbehouden inclusief vertaling. Alle soorten reproducties, inclusief uittreksels,                                                               Art. Nr. 2.913.914
     bijv. B. fotokopie, microfluïdisatie of de Er in computersystemen vereisen de uitdrukkelijke schriftelijke
     toestemming van axhess GmbH & Co. KG. De herdruk, zelfs gedeeltelijk, is verboden. Deze bedieningshand-
     leiding komt overeen met de technische staat op het moment van afdrukken. Veranderingen in technologie,                                                                                   18Ah
     uitrusting en ontwerp voorbehouden.                                                                                                                                                        bis
     © Copyright 2018 axhess GmbH & Co. KG                                                                                                                                                    250Ah
D                                                                                                                                                                                                                                                                       D
    Inhaltsverzeichnis ............................................................................................................................................. 2         Inhaltsverzeichnis
    Table of contents ............................................................................................................................................. 14         Lieferumfang
    Table des matières .......................................................................................................................................... 24
                                                                                                                                                                               1. Identifikation der Bedienungsanleitung
    Contenuto ........................................................................................................................................................... 34   2. Allgemeines
    Inhoudsopgave ................................................................................................................................................ 44          3. Eindeutige Identifikation des Produktes
                                                                                                                                                                               4. Modifikation des Produktes
                                                                                                                                                                               5. Sicherheitsbezogene Informationen
      Art. Nr.                                                                                                                       2.913.914                                 6. Konformität des Produktes
      Battery Eingangsspannung – Input voltage – Tension d’entrée –                                                                  12.5 - 16.0 V                             7. Aufbewahrung der Bedienungsanleitung
      Tensione di ingresso – Ingangsspanning (Battery)                                                                                                                         8. Gebrauch des Produktes / Installation
      Solar Eingangsspannung – Input voltage –                                                                                       16.0 - 27.0 V                             9. Betrieb des Produktes
      Tension d’entrée – Tensione di ingresso – Ingangsspanning (Solar)                                                                                                        10. Instandhaltung des Produktes
                                                                                                                                                                               11. Zubehörteile, Verbrauchsmaterialien, Ersatzteile
      Ausgangsspannung – Output voltage – Tension de sortie –                                                                        13.5 – 15.4 V                             12. Informationen zu spezielle Werkzeugen, Geräten
      Tensione di uscita – Uitgangsspanning                                                                                                                                    13. Information zur Reparatur, Austausch von Teilen
      Ladestrom – Output current – Courant de charge –                                                                               20A +/- 3A                                14. Hinweise für die Entsorgung
      Corrente di carica – Laadstroom                                                                                                                                          15. Dokumentation
      Batterie – Battery – Batterie – Batteria – Batterij                                                                            GEL, AGM, VRLA,                           16. CE-Konformität
                                                                                                                                     WET, MF, LiON                             17. Erklärung Symbole, Begriffe, Besonderheiten des Produktes
                                                                                                                                                                               18. Probleme und Lösungen
      Batteriekapazität – Battery capacity – Capacité de la batterie –                                                               60 - 600 Ah
      Capacità della batteria – Capaciteit van de batterij                                                                                                                     Lieferumfang:
      Schutzklasse – Protection class – Classe de protection –                                                                       IP20
      Classe di protezione – Beschermingsklasse                                                                                                                                1x DC zu DC Duales Batterieladegerät
      Umgebungstemperatur – Working temperature - Température                                                                        -10°C - + 45°C                            1x Bedienungsanleitung
      ambiante - Temparatura ambiente – Omgevingstemperatuur
                                                                                                                                                                               1. Identifikation der Bedienungsanleitung
      Abmessungen – Dimensions –Dimensions – Dimensioni – Afmeting                                                                   208 x 136 x 38 mm
      Gewicht – Weight – Poids – Peso – Gewicht                                                                                      1100 g                                    axhess GmbH & Co. KG, Industriestraße 11, 56598 Rheinbrohl, Deutschland, www.axhess.de
      Mindestspannung – Minimum voltage – Tension minimale –                                                                         2.0 V                                     Ausgabedatum: 20191004
      Tensione minima – Minimum spanning                                                                                                                                       Artikelnummer: 2.913.914
                                                                                                                                                                               EAN 4250149704567
      Kabellänge – Cable length – longueur du cable –                                                                                0-1 m = 12 AWG
      Lunghezza del cavo – Kabellengte / TWIN CORE                                                                                   1-5 m = 8 AWG
                                                                                                                                     5 m + = 6 AWG
      Ladestufen – Load steps – Étapes de charge –                                                                                   5
      Fasi di carica – Lading stadia
      Ausgleich – Equalisation – Égalisation –                                                                                       Automatic
      Pareggiamento – Gelijkmaking

                                      axhess GmbH & Co. KG, Industriestrasse 11, 56598 Rheinbrohl, www.axhess.de

                                                                                      2                                                                                                                                    3
D                                                                                                                                                                                                           D
    2 Allgemeines                                                                                       ·   Anschluss- und / oder Montagefehler.
                                                                                                        ·   Gewaltanwendung, Beschädigungen des Gerätes und / oder der Anschlussleitungen.
    Dieses DC / DC-Ladegerät ist ein ausgereiftes, mehrstufiges Ladegerät, das eine vollautomatische,   ·   Jedwede Veränderung am Gerät und / oder den Anschlussleitungen.
    computergesteuerte Programmierung verwendet, um die meisten 12V Start- oder Versorgungs-            ·   Verwendung für andere, als in der Anleitung beschriebene Zwecke.
    batterien aufzuladen. Dieses Ladegerät bezieht seine Energie aus Gleichstromquellen wie             ·   Flüssigkeitseinwirkung und / oder unzureichende Belüftung.
    z. B. Lichtmaschine oder Solarmodule und optimiert diesen Strom, um die Ladeanforderungen           ·   Unautorisiertes Öffnen des Gerätes.
    verschiedener Batterie zu erfüllen. Es eignet sich besonders für das Laden von Batterien in Wohn-   ·   Folgeschäden die aufgrund nicht bestimmungsgemäßem Gebrauchs und / oder defekter
    wagen, Wohnmobilen, Booten und Wochenendhäusern ohne eigenen Stromanschluss.                            Batterien entstehen können.
    Der Ladevorgang startet automatisch, sobald eine Gleichstromquelle an das Ladegerät an-
                                                                                                        Betreiben Sie das Gerät ausschließlich zu seinem bestimmungsgemäßen Gebrauch.
    geschlossen ist, z. B. wenn ein Fahrzeug startet, dessen Lichtmaschine an das Ladegerät ange-
                                                                                                        Nicht in feuchter oder nasser, nur in trockener Umgebung verwenden!
    schlossen ist, oder wenn das Ladegerät mit Solarmodulen verbunden wird. Es verfügt über einen
    Temperatursensor, der über alle Temperaturbereiche optimale Ladespannungen garantiert. Es
                                                                                                        ACHTUNG!
    stellt sicher, dass Ihre Batterie sich immer in gutem Zustand befindet, schnell geladen werden
                                                                                                        Betreiben Sie das Gerät niemals in der Nähe von brennbarem Material.
    können und eine lange Lebensdauer haben.
                                                                                                        Betreiben Sie das Gerät niemals in explosionsgefährdeter Umgebung.
    Das DC-DC Duale Batterieladegerät ist ein vollautomatisches 4-Stufen-Ladegerät mit einem Lade-      Betreiben Sie das Gerät nur, wenn ausreichende Belüftungsmöglichkeit gegeben ist.
    strom von max. 20 A für 12 V-Batterien von 18-250 Ah.                                               Reparaturen und Wartungen dürfen nur durch autorisierte Fachkräfte durchgeführt werden,
    -   robustes Aluminiumgehäuse und Montagehalterungen                                                die mit den damit verbundenen Gefahren / Vorschriften vertraut sind.
    -   Mikroprozessor gesteuerte Ladung                                                                Achten Sie immer auf eine sichere Platzierung des Gerätes! Das Batterieladegerät muss so
    -   vollautomatische Hochfrequenz-Mehrstufenladung                                                  sicher aufgestellt / platziert werden, dass es nicht herabfallen oder umstürzen kann.
    -   Pulsmodus-Technologie, die die Oxidation reduziert, die Elektrolytkonsistenz verbessert         Das Gerät und Batterie so sichern und lagern, dass Kinder keinen Zugriff darauf haben können!
        und die Temperatur minimiert, was zu einer längeren Lebensdauer der Batterie führt              Kinder können entstehende Gefahren nicht erkennen und nicht einschätzen!
    -   Einfache Auswahl der Batterieart: GEL, AGM, VRLA, WET, MF, LiON                                 Dieses Batterieladegerät ist nicht dafür bestimmt, durch Personen( Kinder eingeschlossen)
    -   Interne Ladetemperaturüberwachung und Leistungssteuerung                                        mit eingeschränkten physischen, sensorischen oder geistigen Fähigkeiten oder mangels
    -   LED-Anzeigen zeigen den Ladezustand an                                                          Wissen und / oder Erfahrung benutzt zu werden; es sei denn, eine für derer Sicherheit
    -   Überladungs-, Kurzschluss- und Überhitzungsschutz                                               zuständige Person beaufsichtigt oder erteilt Anweisungen zur richtigen Benutzung des
    -   Verpolungsschutz (für Eingang und Ausgang)                                                      Gerätes. Setzen Sie das Gerät nicht direkter Sonneneinstrahlung oder anderen Wärmequellen
    -   thermischer Überlastschutz                                                                      aus, da dies die Ladeleistung verringern kann. Vermeiden Sie die zusätzliche Erwärmung des
    -   Solareingang Überlastschutz                                                                     Gerätes durch äußere Einflüsse. Decken Sie das Ladegerät nicht zu.
    -   Stromausfallspeicherfunktion: Nach der Auswahl verbleibt das Ladegerät auf dem
        gewählten Batterietyp, bis es geändert wird.                                                    ACHTUNG!
                                                                                                        Das Arbeiten in der Nähe von Blei-Säure Starterbatterien ist gefährlich!
    3. Eindeutige Identifikation des Produkts                                                           Batterien entwickeln explosive Gase während des Betriebes und beim Laden! Batteriesäure
                                                                                                        ist ätzend. Spülen Sie sofort mit reichlich Wasser, wenn Säure auf die Haut oder in die Augen
    DC zu DC Duales Batterieladegerät                                                                   gelangt. Ziehen Sie ärztliche Hilfe hinzu. Immer geeignete Schutzausrüstung, Schutzhandschu-
    Artikelnummer: 2.913.914                                                                            he und Schutzbrille tragen, wenn Sie an einer Starterbatterie arbeiten! Batteriesäure ist ätzend!
    Weitere technische Daten entnehmen Sie bitte Tabelle 1 auf Seite 1.                                 Evtl. Säurespritzer sofort mit viel Wasser gründlich abspülen, ggf. Arzt aufsuchen.
                                                                                                        Wenn Batteriesäure in die Augen gelangt, sofort wenigstens 10 Minuten unter laufendem
    4. Modifikation des Produktes                                                                       Wasser auswaschen und Arzt aufsuchen.
                                                                                                        Niemals in Batterienähe rauchen, oder offenes Feuer benutzen, Funkenbildung und Funken-
    Das Produkt darf nicht geändert oder angepasst werden. Verwenden Sie das Produkt nicht              flug vermeiden!
    für andere Zwecke als in der Anleitung beschrieben.                                                 Betreiben Sie das Gerät nur zum Laden von wieder aufladbaren Blei-Säure und Lithium Batte-
    5. Sicherheitsbezogene Informationen                                                                rien! Erklärungen zu den einzelnen Batteriearten finden Sie unter Punkt 17.
                                                                                                        Andere Batteriearten dürfen nicht angeschlossen werden!
    ACHTUNG!                                                                                            Nicht aufladbare Batterien dürfen nicht geladen werden! Gesundheitsgefahr!
    Die axhess GmbH & Co.KG, Industriestrasse 11, 56598 Rheinbrohl, übernimmt                           Stets auf ausreichende, gute Belüftung achten! Das Gerät im Betrieb niemals abdecken!
    keine Haftung für Schäden und Folgen die auftreten aufgrund:

                        axhess GmbH & Co. KG, Industriestrasse 11, 56598 Rheinbrohl, www.axhess.de

                                                   4                                                                                                  5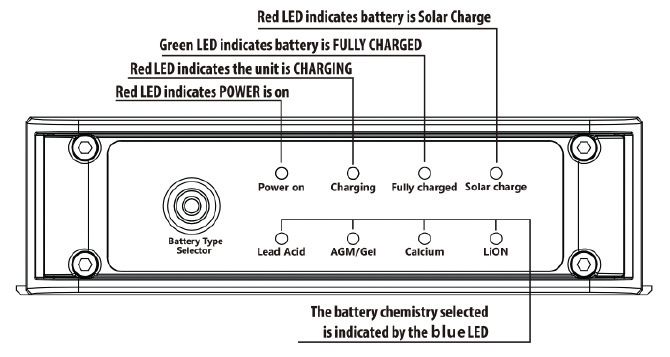
D                                                                                                                                                                                                       D
    ACHTUNG!                                                                                          6. Konformität des Produktes
    Bei stechendem Gasgeruch besteht Explosionsgefahr! Gerät nicht abschalten, Ladeanschluss
    nicht abnehmen. Sofort für gute Durchlüftung sorgen! Keine eingefrorenen Batterien laden!         Der Gewährleistungsanspruch erlischt im Fall von Schäden durch Nichtbeachtung dieser
    Keine beschädigten, korrodierten, undichte Batterien laden! Batterien niemals über Kopf hal-      Bedienungsanleitung. Des Weiteren haften wir nicht für Folgeschäden, Schäden an Gegen-
    ten! Batterien niemals stülpen! Verätzungsgefahr! Der Gebrauch von Zubehörteilen, die nicht       ständen oder Personen die durch Nichtbeachtung der Sicherheitshinweise und unsachge-
    vom Hersteller empfohlen werden, kann zu Beschädigung des Gerätes oder zu Personenver-            mäßer Bedienung/Handhabung des Geräts oder durch Verschleiß entstehen. Produktdesign
    letzungen führen! Zudem erlischt die Gewährleistung! Um Beschädigungen der Anschlüsse             und Spezifikationen können ohne vorherige Ankündigung geändert werden. Alle Logos und
    zu vermeiden, niemals am Kabel ziehen, immer mittels Stecker die Stromverbindung tren-            Markennamen sind eingetragene Warenzeichen ihrer jeweiligen Inhaber und werden hiermit
    nen. Sind Leitungen beschädigt, Gerät nicht verwenden. Gerät soweit möglich von Fachkraft
                                                                                                      als solche anerkannt.
    reparieren lassen. Keine brennbaren Gegenstände wie z.B. Kerzen auf dem Gerät abstellen.
    Keine mit Flüssigkeiten gefüllten Gegenstände wie z.B. Wasserbehälter, Getränkebehälter
    auf dem Gerät oder in der Nähe abstellen. Nur einwandfreie, unbeschädigte Batterien laden.
                                                                                                      7. Aufbewahrung der Bedienungsanleitung
    Achten Sie auf einen ausreichenden Flüssigkeitsstand in Ihrer Batterie (bei offenen Batterien).
    Beachten Sie die Hinwiese des Batterie- / Fahrzeugherstellers. Diese finden Sie in den Begleit-   Lesen Sie die Betriebsanleitung vor dem Gebrauch sorgfältig und vollständig durch.
    papieren, dem Bordbuch Ihres Fahrzeuges. Oder wenden Sie sich an den Batteriehersteller.          Die Betriebsanleitung ist Teil des Produkts. Sie enthält wichtige Hinweise zur Inbetriebnahme
    Ladeanschluss niemals während des Ladevorgangs abnehmen! Ladeanschluss nicht kurz-                und Handhabung des Gerätes. Verwahren Sie die beiliegende Bedienungsanleitung um auch
    schließen! Arbeiten Sie zu Ihrem eigenen Schutz und Sicherheit nicht alleine oder wenigs-         später in der Lage zu sein, nach Informationen suchen können. Wenn das Gerät verkauft oder
    tens so, dass eine andere Person immer in Rufnähe ist. Persönliche metallische Gegenstände        an Dritte weitergegeben wird, sind Sie verpflichtet auch die Bedienungsanleitung weiterzu-
    (z.B. Ringe, Arm- und Halsketten, Uhren) vor den Arbeiten an einer Starterbatterie abnehmen       geben da diese laut Gesetzgeber ein Teil des Produktes ist.
    um unbeabsichtigten Kurzschluss zu vermeiden. Kurzschluss-Spannungen können z. B.
    Ringe schmelzen lassen und so zu schweren Verbrennungen führen. Achten Sie darauf, dass           8. Gebrauch des Produktes / Installation
    Sie nicht mit beweglichen, rotierenden Teilen des Fahrzeugs in Berührung kommen oder
    sich Kleidungsstücke, Werkzeuge, Leitungen und Kabel darin verfangen. Bei Arbeiten an der         Dieses DC / DC-Ladegerät ist ein ausgereiftes, mehrstufiges Ladegerät, das eine vollauto-
    Batterie niemals den Fahrzeugmotor starten und / oder bei laufendem Motor arbeiten!               matische, computergesteuerte Programmierung verwendet, um die meisten 12V Batterien
    Andere als in Punkt 2 benannte Batteriearten dürfen nicht geladen oder an das Ladegerät           aufzuladen.
    angeschlossen werden! Das Gerät darf nicht als Starthilfe verwendet werden.
    Das Ladegerät würde nicht reparierbaren Schaden nehmen. Explosionsgefahr!                         Der Einbau des Gerätes muss so ausgeführt werden, dass dadurch keine Beeinträchtigungen
    Das Gerät darf nicht als Stromquelle für andere Zwecke verwendet werden!                          der Verkehrssicherheit oder der konstruktiven Stabilität des Fahrzeugs entstehen. In der Keine
                                                                                                      Kabel verlöten. Durch die Vibrationen brechen die Lötstellen nach einer gewissen Zeit. Verwen-
    WARNUNG!                                                                                          den Sie Schraubklemmen oder Kabelquetschen.
    Vor dem Einsatz eines Batterieladegerätes vergewissern Sie sich anhand der Fahrzeug- und
    Batterie-Begleitpapiere über die Polarität, den Masseanschluss und die Wartungshinweise zu        Der elektrische Anschluss sollte nur von einer Fachkraft durchgeführt werden.
    der jeweiligen Batterie oder fragen Sie im Zweifelsfall den Batteriehersteller. Dieses Ladege-    Entfernen Sie vor der Installation die Klemmen von den Batteriepolen.
    rät ist geeignet Blei-Säure und Lithium-Eisenphosphat Batterien zu laden oder die Batterie in
    einem stets startbereiten Zustand zu halten.                                                      Für die Installation dieses Geräts sind geeignete Kabel und geeignete Anschlüsse erforderlich
    ACHTUNG!                                                                                          (nicht im Lieferumfang enthalten). Einzelheiten finden Sie auf Seite 1 mit den Spezifikationen.
    Beachten Sie immer die grundsätzlichen Sicherheitsmaßnahmen beim Gebrauch von elektri-
    schen Geräten zu Ihrem eigenen und anderer Schutz vor:                                            Bereits vorhandene Kabel, die in Verbindung mit diesem Ladegerät verwendet werden sollen,
                                                                                                      müssen überprüft werden, um sicherzustellen, dass deren Größe geeignet ist. Falls erforderlich,
    • elektrischer Schlag, • Brandgefahr, • Verletzungen, • Vermögensschaden.                         ersetzen Sie die Kabel durch geeignete Kabel, wenn diese den Mindestanforderungen nicht
    Nehmen Sie das Gerät nur in Betrieb, wenn das Gehäuse und die Leitungen unbeschädigt              entsprechen.
    sind! Bei Arbeiten am Gerät z.B. Gerätepflege, vorher immer erst die Stromversorgung unter-
    brechen. Beachten Sie unbedingt alle beschriebenen Sicherheitshinweise! Nehmen Sie das
    Gerät nur in Betrieb, wenn das Gehäuse und die Leitungen unbeschädigt sind!
    Wischen Sie das Gerät immer nur mit einem trockenen Tuch ab. Benutzen Sie keine Flüssig-
    keiten oder chemische Reinigungsmittel. Tauchen Sie das Gerät niemals in Flüssigkeiten ein.
    Lassen Sie niemals Flüssigkeiten über das Gerät laufen.

                       axhess GmbH & Co. KG, Industriestrasse 11, 56598 Rheinbrohl, www.axhess.de

                                                  6                                                                                                  7
D D
Es wird empfohlen, einen 25 A-Schutzschalter (nicht im Lieferumfang enthalten) zu
Solar Panel Solar Eingang
Solar Panel Solar Input DC-DC Ladegerät
installieren. Der Schutzschalter sollte sich in der Nähe der Startbatterie befinden.
Panneau solaire Entrée Solaire
Pannello solare Ingresso Solare
DC-DC charger
Chargeur DC-DC
- Alle Verbindungen auf festen Sitz prüfen.
Zonnepaneel DC Eingang Zonne-ingang Caricabatterie DC-DC
DC Input DC-DC-oplader
Entrée CC
Ingresso DC Auto - Vehicle - Voiture - Auto - Auto
DC Ingang
Hauptbatterie
Main Vehicle Battery Ladeausgang Hauptbatterie DC-DC Ladegerät
Batterie principale
Batteria principale
Charge outpuit
Sortie de charge Main Vehicle Battery DC-DC charger
Hoofdbatterij Negativ geteilt
Shared negative
Prodotto caricando
Laaduitgang
Batterie principale Chargeur DC-DC
Partagé négativement Caricabatterie DC-DC
Negativamente condiviso Batteria principale Zusatzbatterie
Negatief gedeeld Hoofdbatterij Auxiliary battery DC-DC-oplader
Verbindung
Connection
Batterie supplémentaire
Lien Zusatzbatterie Batteria supplementare
Collegamento
Verbinding
Auxiliary battery
Batterie supplémentaire
Extra Accu
Batteria supplementare
Extra Accu
Hochleistungs-Stecker
- Entscheiden Sie, wo Sie das DC-DC-Ladegerät installieren möchten. Stellen Sie sicher, High-Performance-Plug Auto mit Caravan
dass sich das Ladegerät in einem geeigneten, trockenen Bereich im Fahrzeug oder - Vehicle with caravan - Voiture avec caravane - Auto con roulotte - Auto met caravan
Caravan/Wohnmobil befindet, ggf. in der Nähe der Zusatzbatterie
- Stellen Sie sicher, dass das Ladegerät fest montiert ist. Ladegerät kann über Kopf, vertikal
oder horizontal montiert werden 9. Betrieb des Produktes
- Messen Sie anschließend die erforderliche Kabellänge von der Hauptbatterie des
Fahrzeugs bis zum Ort des DC-DC-Ladegeräts 1 • Rote LED zeigt dass Batterie über 4 3 2 1
Sonnenenergie geladen wird.
- Stellen Sie sicher, dass ALLE Kabel den Spezifikationen entsprechen und keiner • Red LED indicates battery is
übermäßigen Hitze, beweglichen Teilen oder Abrieb ausgesetzt sind solar charged
• La LED rouge indique que la
- Befindet sich das Ladegerät in einem Wohnwagen, empfehlen wir die Verwendung einer batterie est chargée solaire
• Il LED rosso indica che la batteria
13 poligen Anhänger Steckverbindung. Die Belegung der Steckkontakte der Steckverbin- è carica solare
dung kann gegebenenfalls abweichen und ist im Einzelfall zu prüfen. • Rode LED geeft aan dat de batterij
5
is opgeladen met zonne-energie
Die standardmäßige Belegung der Kontakte ist wie folgt:
- Der Ladewandler bezieht seine Energie an Stecker Nr. 9 (+) und 13 (-). 2 • Grüne LED zeigt dass Batterie VOLL GELADEN 4 • Rote LED zeigt POWER ist an
• Green LED indicates battery is FULLY CHARGED • Red LED indicates POWER is on
- An beiden Enden der Kabel geeignete Stecker anbringen • La LED verte indique que la batterie est ENTIÈREMENT CHARGÉE • La LED rouge indique que l’alimentation est allumée
- Schließen Sie die Zusatzbatterie an den gemeinsam benutzten Minuspol (-) • Il LED verde indica che la batteria è COMPLETAMENTE CARICA • Il LED rosso indica che POWER è acceso
• Groene LED geeft aan dat de batterij VOLLEDIG IS OPGELADEN • Rode LED prikkelt POWER is ingeschakeld
und dann an den Pluspol (+) des Ladegerätausgangs an
3 • Rote LED zeigt dass Ladevorgang LÄUFT 5 • Blaue LED zeigt gewählten Batterietyp an
1 • Siehe Kabelmarkierung am Gerät • Red LED indicates the unit is CHARGING • Blue LED indicates chosen battery type
• La LED rouge indique que l‘unité est en charge • La LED bleue indique le type de batterie choisi
• See cable marking on the device • Il LED rosso indica che l‘unità è in CARICA • Il LED blu indica il tipo di batteria scelto
2 • Voir le marquage des câbles • Rode LED geeft aan dat de eenheid OPLADEN is • Blauwe LED geeft het gekozen batterijtype aan
sur l‘appareil
3 • Vedere la marcatura del cavo 1. Haupt- und Zusatzbatterie
sul dispositivo
4 - Starten Sie das Fahrzeug und lassen Sie es im Leerlauf laufen
• Zie de kabelmarkering op het
(1) Ground (2) DC Input (3) Solar (4) Output apparaat - Das Ladegerät erkennt nun, dass die Hauptstartbatterie geladen wird
- Sobald die Hauptstartbatterie 13,0 V erreicht hat, beginnt das Ladegerät die
- Verbinden Sie das rote (+) Kabel des Ladegerätes mit der (+) DC-Eingangsklemme und Zusatzbatterie zu laden
das schwarze (-) mit dem Minuspol (-) auf der Rückseite des Ladegerätes. Stellen Sie - Die anfängliche Standardeinstellung ist für AGM / Gel-Batterien
abschließend die Stromverbindungen zur Hauptstartbatterie des Fahrzeugs her.
axhess GmbH & Co. KG, Industriestrasse 11, 56598 Rheinbrohl, www.axhess.de
8 9D D
- Wenn Sie einen anderen Batterietyp laden möchten, ändern Sie einfach den Batterietyp, 15. Dokumentation
indem Sie die Batterietyp-Wahltaste an der Vorderseite des Ladegeräts drücken
- Nach der Auswahl bleibt das Ladegerät im ausgewählten Batterietyp, bis es geändert wird Das Produkt wurde in Übereinstimmung mit den relevanten Vorschriften und Richtlinien her-
- Das Ladegerät funktioniert auch nach dem Ausschalten des Fahrzeugs weiter. Sobald die gestellt und geliefert, die für Mitgliedsstaaten der Europäischen Union gültig sind. Das Produkt
Hauptstartbatterie unter 13,0 V fällt, wird das Ladegerät automatisch ausgeschaltet. entspricht den geltenden Vorschriften und Bestimmungen im Verkaufsland. Entsprechende
Unterlagen und Zertifikate sind auf Anfrage erhältlich. Die formale Dokumentation beinhaltet
2. Solareingang mindestens die Konformitätserklärung und den Prüfbericht des Produktes, ist jedoch nicht auf
- Sobald Sie die Eingangsklemme mit den positiven und negativen Kontakten eines diese beschränkt.
Solarmoduls verbinden, wechselt das Ladegerät in den Solarlademodus
- Wenn Sie einen anderen Batterietyp laden möchten, ändern Sie einfach den Batterietyp, 16. CE-Konformität
indem Sie die Batterietyp-Wahltaste an der Vorderseite des Ladegeräts drücken
- Solarladung erfordert eine Eingangsspannung von 16 V bis 25 V von den Sonnenkollek- Das Produkt stimmt mit den folgenden Normen/Direktiven überein:
toren. Wenn die verfügbare Solarmodulspannung unter 16 V fällt, wird keine Ladung an
die Zusatzbatterie geliefert.
17. Erklärung Symbole, Begriffe, Besonderheiten des Produktes
10. Instandhaltung des Produktes 1. Batteriearten
Das Produkt kann mit einem feuchten, weichen Tuch gereinigt werden. Bitte benutzen Sie 1. Blei-Säure Batterie = Ist ein Akkumulator, bei dem die Elektroden aus Blei bzw. Bleidioxid
keine chemischen oder abrasiven Reinigungsmittel (wie beispielsweise Scheuermilch, Stahl- und der Elektrolyt aus verdünnter Schwefelsäure bestehen.
wolle etc.).
VRLA = Ein VRLA-Akkumulator (engl. valve-regulated lead-acid battery „ventilgeregelte
11. Zubehörteile, Verbrauchsmaterialien, Ersatzteile Blei-Säure-Batterie“) ist ein Bleiakkumulator in einer verschlossenen Bauform. GEL, AGM und
MF gehören dazu.
Für dieses Produkt sind keine Zubehör- oder Ersatzteile im Lieferumfang enthalten.
GEL = geschlossen Die Säure ist im GEL fixiert, es entweichen bei der Ladung keine Gase, das
12. Informationen zu speziellen Werkzeugen, Geräten System ist verschlossen und ermöglicht kein Nachfüllen.
AGM = geschlossen, Die Säure ist im Glasvlies gebunden, es entweichen bei der Ladung keine
Zur Inbetriebnahme werden keine Werkzeuge benötigt. Gase, das System ist verschlossen und ermöglicht kein Nachfüllen.
Zur Montage benötigen Sie, je nach Befestigungsart Schrauben, ggf. Seitenschneider, MF = geschlossen, Die Schwefelsäure umfließt die Bleiplatten direkt, Gase werden weitestge-
Abisolierzange, Isolierband und Kreuzschlitzschraubendreher. hend rekombiniert. Flüssigkeit ist nicht nachfüllbar.
WET = offen, Die Schwefelsäure umfliest die Bleiplatten direkt, Gase entweichen durch die Ver-
13. Information zur Reparatur, Austausch von Teilen
schlussstopfen. Flüssigkeit ist nachfüllbar.
Versuchen Sie nicht das in dieser Bedienungsanleitung beschriebene Produkt zu öffnen oder CALCIUM = Ist ein Akkumulator, bei dem die Elektroden statt aus Blei bzw. Bleidioxid aus
gar zu zerlegen. Das Produkt kann nicht repariert werden. Im Falle eines Defektes außerhalb Kalzium bestehen und der Elektrolyt aus verdünnter Schwefelsäure besteht.
des Gewährleistungszeitraums ist das Gerät bei den zugelassen Sammelstellen für Sonder-
2. Lithium-Ionen-Akku = Ein Lithium-Ionen-Akkumulator (Lithium-Ionen-Akku, Li-Ionen-Akku
müll zu entsorgen.
oder (sekundäre) Li-Ionen-Batterie) ist eine elektrochemische Spannungsquelle auf der Basis
14. Hinweise für die Entsorgung von Lithium.Eine Weiterentwicklung des Li-Ionen-Akkus ist der Lithium-Polymer-Akku.
A) Verpackung: Die Verpackung ist recyclefähig. Geben Sie das Verpackungsmaterial 2. DC-DC
nur in den entsprechenden Recycle – Müll.
Ein Gleichspannungswandler- oder Ladegerät, auch DC-DC-Wandler genannt, englisch
B) Altgerät: Wenn das Gerät eines Tages endgültig außer Betrieb genommen wird,
DC-DC Converter, bezeichnet eine elektrische Schaltung, die eine am Eingang zugeführte
führen Sie es entsprechend den gültigen Gesetzen / Verordnungen den dafür vor
Gleichspannung in eine Gleichspannung mit höherem, niedrigerem oder invertiertem
gesehenen Sammelstellen zu. Im Zweifelsfall wenden Sie sich bitte an den für
Spannungsniveau umwandelt.
Sie zuständigen Entsorger oder die entsprechende kommunale Dienststelle.
Batterieladegeräte auf keinen Fall über den Hausmüll entsorgen! 3. AWG
Entsorgen Sie alte Starterbatterien ausschließlich über die zuständigen Entsorger
oder bringen Sie diese zu Ihrem Händler zurück. American Wire Gauge, abgekürzt AWG, ist eine Kodierung für Drahtdurchmesser. Sie kenn-
Batterien niemals über den Hausmüll entsorgen! zeichnet elektrische Leitungen aus Litzen und massivem Draht und wird vor allem in der
Elektrotechnik zur Bezeichnung des Querschnitts von Adern verwendet.
axhess GmbH & Co. KG, Industriestrasse 11, 56598 Rheinbrohl, www.axhess.de
10 11D D
2. Vom Gerät erzeugte, max. Ladespannungen in V nach Batterietyp 18. Probleme und Lösungen
AGM/Gel SLA/WET Calcium LiON Fehler Mögliche Ursache Abhilfe
Start 14,3 14,0 15,0 14,0 Ladegerät erkennt keine Ladung Ladegerät nicht mit Ladegerät mit Batterie
Batterie verbunden verbinden
Hauptladung 14,7 14,4 15,4 14,4
Verbindung mit Batterie- Sichere Verbindung
Erhaltungsladung 13,5 13,5 13,5 polen unzureichend herstellen
Batterie ist keine 12V Batterie verwenden
12V Batterie
3. AWG (American Wire Gauge) in metrischen Maßen Batterie wird nicht geladen Kabel entsprechen nicht Versichern sie sich, dass
(zusätzlich die nächstliegenden British SWG) den Anforderungen alle verwendeten Kabel
den Anforderungen
AWG Durchmesser in mm Querschnitt in mm* Nächstliegender British SWG entsprechen
1 7,348 42,406 1 Batterie in mangelhaftem Batteriezustand überprüfen
Zustand
2 6,544 33,634 3
Lichtmaschine lädt nicht Lichtmaschine überprüfen
3 5,827 26,667 4 Batterie lässt sich nicht Batterie lässt sich nicht Batteriezustand überprüfen
4 5,189 21,147 5 komplett laden komplett laden
5 4,621 16,771 7
6 4,115 13,299 8
7 3,665 10,550 9
8 3,264 8,367 10
9 2,906 6,632 11
10 2,588 5,260 12
11 2,305 4,173 13
12 2,053 3,310 14
13 1,828 2,624 15
14 1,628 2,087 16
15 1,450 1,651 17
16 1,291 1,309 18
17 1,150 1,039 18
18 1,024 0,823 19
axhess GmbH & Co. KG, Industriestrasse 11, 56598 Rheinbrohl, www.axhess.de
12 13GB GB
This user manual is a publication of axhess GmbH & Co. KG, Industriestraße 11, 2 General
56589 Rheinbrohl. www.axhess.de . All rights including translation reserved.
Reproductions of all kinds, including extracts, e.g. photocopy, micro fluidization, This DC / DC charger is a sophisticated, multi-stage charger that uses fully automated,
or the saving in computer systems require the express written consent of axhess computer-controlled programming to charge most 12V startup or power batteries. This charger
GmbH & Co. KG. The reprint, even in part, is prohibited. This operating manual draws its energy from DC sources such. As alternator or solar modules and optimizes this stream
corresponds to the technical state at the time of printing. Changes in technology, to meet the charging requirements of different battery. It is particularly suitable for charging
equipment and design reserved. batteries in caravans, motorhomes, boats and weekend homes without their own power supply.
© Copyright 2018 axhess GmbH & Co. KG The charging process starts automatically as soon as a DC power source is connected to the
charger , eg. B. when a vehicle starts, the alternator is connected to the loading device is
connected, or when the charger is connected to solar panels. It has a temperature sensor that
guarantees optimum charging voltages across all temperature ranges. It ensures that your
Table of contents battery is always in good condition, can be charged quickly and has a long life.
The DC-DC Dual Battery Charger is a fully automatic 4- speed charger with a charging current of
1. Identification of the operating instructions max. 20 A for 12 V batteries from 18-250 Ah.
2. General
3. Unique identification of the product - robust aluminum housing and mounting brackets
4. Modification of the product - Microprocessor controlled charge
5. Security related information - Fully automatic high frequency multi-stage charge
6. Conformity of the product - Pulse mode technology that reduces oxidation, improves electrolyte consistency
7. Storage of the operating instructions and minimizes temperature, resulting in longer battery life
8. Use of the product / installation - Easy selection of battery type: GEL, AGM, VRLA, WET, MF, LiON
9. Operation of the product - Internal charging temperature monitoring and power control
10. Maintenance of the product - LED displays indicate the charge status
11. Accessories, consumables, spare parts - Overload s , short circuit and overheating protection
12. Information about special tools, devices - Reverse polarity protection (for input and output)
13. Information about repair, replacement of parts - thermal overload protection
14. Information for disposal - Solar input Overload protection
15. documentation - Power Failure Function: Once selected, the charger will remain on the selected
16. CE conformity battery type until it is changed
17. Explanation symbols, terms, characteristics of the product
18. Problems and solutions 3. Unique identification of the product
Delivery: DC to DC dual battery charger
Article number: 2.913.914
1x DC to DC dual battery charger Further technical data can be found in Table 1 on page 1
1x user manual
4. Modification of the product
1. Identification of the operating instructions The product may not be changed or adapted. Do not use the product for purposes other
than those described in the manual.
axhess GmbH & Co. KG, Industriestraße 11, 56598 Rheinbrohl, Deutschland, www.axhess.de
Date of issue: 20191004 5. Security related information
Article number: 2.913.914
ATTENTION!
EAN 4250149704567
The axhess GmbH & Co. KG, Industriestrasse 11, 56598 Rheinbrohl, takes over no liability for
damages and consequences that occur due to:
axhess GmbH & Co. KG, Industriestrasse 11, 56598 Rheinbrohl, www.axhess.de
14 15GB GB
· Connection and / or assembly errors. ATTENTION !
· Violent use, damage to the device and / or the connecting cables. If there is a pungent smell of gas, there is a danger of explosion! Do not switch off
· Any change to the device and / or the connecting cables. the device, do not remove the charging port. Immediately ensure good ventilation!
· Use for purposes other than those described in the manual. Do not charge frozen batteries! Do not load damaged, corroded, leaking batteries!
· Liquid action and / or insufficient ventilation. Never hold batteries over your head! Never put the batteries down! Caustic burns!
· Unauthorized opening of the device.
· Consequential damages that may arise due to improper use and / or defective batteries. The use of accessories that are not recommended by the manufacturer may result in
damage to the device or personal injury! In addition, the warranty expires!
Operate the device only for its intended use. Do not use in damp or wet, only in dry To prevent damage to the connections, never pull on the cable, always disconnect the
environment! power connection with a plug.
If lines are damaged, do not use the device. First have the unit repaired by a specialist.
ATTENTION ! Do not place flammable objects such as candles on the device.
Never operate the device near flammable material. No objects filled with liquids such as water containers, beverage containers on the
Never operate the device in potentially explosive environments. Turn off the device or nearby. Only charge faultless, undamaged batteries.
Only operate the device if sufficient ventilation is available. Make sure there is enough fluid in your battery (with batteries open).
Repairs and maintenance must only be carried out by authorized specialists who are familiar Observe the instructions of the battery / vehicle manufacturer. These can be found in the
with the associated risks / regulations. accompanying documents, the logbook of your vehicle. Or contact the battery manufactu-
Always pay attention to a secure placement of the device! The battery charger must be placed rer. Never remove the charger connection while charging! Do not short-circuit the charging
connection!
safely so that it cannot fall or fall over.
For your own protection and safety, do not work alone or at least so that another person
Secure and store the device and battery so that children cannot access it!
is always within reach. Remove personal metallic objects (e.g. rings, bracelets, necklaces,
Children can not recognize the dangers and do not appreciate them!
watches) before working on a starter battery to avoid unintended short circuit. Short-
This battery charger is not intended for use by persons (children included) with a limited circuit voltages can cause rings to melt, resulting in severe burns. Be careful not to come into
physical, sensory or mental capabilities or lack of knowledge and / or experience to be used; contact with moving, rotating parts of the vehicle or get clothing, tools, wires, and cables
unless a person responsible for his safety supervises or issues instructions for the correct in it. When working on the battery, never start the vehicle engine and / or work with the
use of the device. engine running!
Do not expose the device to direct sunlight or other sources of heat, as this may cause damage Other types of batteries than mentioned in point 2 may not be charged or connected to the
and can reduce charging power. Avoid additional heating of the device by external influences. charger! The device must not be used as jump start. The charger would take irreparable da-
Do not cover the charger. mage. Risk of explosion! The device must not be used as a power source for other purposes!
ATTENTION ! WARNING!
Working near lead-acid starter batteries is dangerous! Before using a battery charger, check the polarity, ground connection and maintenance inst-
Batteries develop explosive gases during operation and when charging! ructions for the respective battery using the vehicle and battery documentation, or
Battery acid is corrosive. Rinse immediately with plenty of water if acid gets on the skin or in consult the battery manufacturer if in doubt. This charger is capable of charging lead-acid
the eyes. Seek medical help. Always wear suitable protective equipment, protective gloves and and lithium-iron phosphate batteries or keeping the battery in an always-ready state.
safety goggles when using on a starter battery work! Battery acid is corrosive! Possibly Acid
splash immediately with plenty of water thoroughly rinse off, consult a doctor if necessary. ATTENTION!
If battery acid gets into your eyes, immediately wash out with running water for at least 10 Always observe the basic safety precautions when using electric power Devices for your
minutes and see a doctor. own and other protection:
Never smoke close to batteries, or use naked flames, avoid sparks and flying sparks! • electric shock, • fire hazard, • injuries, • property damage.
Operate the device only to charge rechargeable lead-acid batteries!
Other types of batteries must not be connected! Only use the device if the housing and the cables are undamaged!
Non-rechargeable batteries must not be charged! Health hazard! When working on the device, e.g. care of the device, always first disconnect the
Always ensure adequate, good ventilation! Never cover the device during operation! power supply.
It is essential to observe all safety instructions described! Only operate the device,
if the housing and the cables are undamaged!
Always wipe the device with a dry cloth. Do not use liquids or chemical cleaning agents.
Never immerse the device in liquids. Never leave liquid to run over the device.
axhess GmbH & Co. KG, Industriestrasse 11, 56598 Rheinbrohl, www.axhess.de
16 17GB GB
6. Conformity of the product
Solar Panel Solar Eingang
Solar Panel Solar Input DC-DC Ladegerät
Panneau solaire Entrée Solaire
The warranty claim expires in case of damage due to non-observance of these operating inst- Pannello solare Ingresso Solare
DC-DC charger
Chargeur DC-DC
Zonnepaneel DC Eingang
ructions. Furthermore, we are not liable for consequential damage, damage to counter stances DC Input
Zonne-ingang Caricabatterie DC-DC
DC-DC-oplader
or persons caused by non-observance of the safety instructions and moderate Entrée CC
Ingresso DC
operation / handling of the device or wear caused. Product design and specifications are DC Ingang
subject to change without notice. All logos and brand names are registered trademarks of Hauptbatterie
Main Vehicle Battery
their respective owners and are hereby acknowledged as such. Batterie principale
Ladeausgang
Charge outpuit
Batteria principale Sortie de charge
Hoofdbatterij Negativ geteilt Prodotto caricando
7. Storage of the operating instructions Shared negative
Partagé négativement
Laaduitgang
Negativamente condiviso
Negatief gedeeld
Please read the operating instructions carefully and completely before use. The operating inst- Verbindung
ructions are part of the product. It contains important information on the commissioning and Connection
Lien Zusatzbatterie
handling of the device. Keep the enclosed operating instructions in order to be able to search Collegamento
Verbinding
Auxiliary battery
Batterie supplémentaire
for information later. If the device is sold or passed on to third parties you are obliged Batteria supplementare
Extra Accu
to pass on the operating instructions give as these are a part of the product according to
the legislature.
- Decide where to install the DC-DC charger. Make sure that the charger is in a suitable, dry
8. Use of the product / installation area in the car or caravan, possibly in the vicinity of the auxiliary battery.
- Make sure that the charger is firmly mounted with the supplied brackets and screws.
This DC / DC charger is a sophisticated, multi-stage charger that uses fully automatic, Charger can be mounted overhead, vertical or horizontal
computer-controlled programming to charge most 12V batteries. - Then measure the required cable length from the main battery of the vehicle to the
location of the DC-DC charger
The installation of the device must be carried out in such a way that it does not impair the - Ensure that ALL cables meet specifications and are not exposed to excessive heat,
traffic safety or the structural stability of the vehicle. In the No soldering wires. Due to the moving parts or abrasion
vibrations, the solder joints break a short time. Use screw terminals or cable crimping. - If the charger is in a caravan, we recommend using a 13-pin trailer connector.
The assignment of the plug contacts of the plug connection may differ if necessary and
The electrical connection should only be carried out by a specialist. Remove the terminals must be checked in individual cases. The default assignment of contacts is as follows:
from the battery poles before installation. - The charging converter draws its power to connectors Nos. 9 (+) and 13 (-).
- Attach appropriate plugs to both ends of the two-wire cables
Installation of this device requires appropriate cables and connectors (not included). - Connect the additional battery to the jointly used negative pole (-) and then
For details, see page 1 for specifications. to the positive pole (+) of the charger output
1 • Siehe Kabelmarkierung am Gerät
Existing cables to be used in conjunction with this charger must be checked to ensure their
• See cable marking on the device
size is appropriate. If necessary, replace the cables with suitable cables if they do not meet the 2 • Voir le marquage des câbles
minimum requirements. sur l‘appareil
3 • Vedere la marcatura del cavo
sul dispositivo
4
• Zie de kabelmarkering op het
(1) Ground (2) DC Input (3) Solar (4) Output apparaat
- Connect the red (+) cable of the charger with the (+) DC input terminal and the black (-)
with the negative pole (-) on the back of the charger. Finally, make the power connections
to main battery of the vehicle. It is recommended to install a 25A circuit breaker (not inclu-
ded). The circuit breaker should be near the starter battery.
- Check all connections for tightness.
axhess GmbH & Co. KG, Industriestrasse 11, 56598 Rheinbrohl, www.axhess.de
18 19GB GB
2. Solar input
Auto - Vehicle - Voiture - Auto - Auto
- Once you connect the input terminal to the positive and negative contacts of a solar
Hauptbatterie DC-DC Ladegerät module, the charger switches to solar charging mode
Main Vehicle Battery DC-DC charger - If you want to charge a different battery type, simply change the battery type by pressing
Batterie principale Chargeur DC-DC the battery type selector button on the front of the charger
Batteria principale Zusatzbatterie Caricabatterie DC-DC - Solar charging requires an input voltage of 16 V to 25 V from the solar panels. If the availa-
Hoofdbatterij Auxiliary battery DC-DC-oplader ble solar module voltage drops below 16 V, no charge is delivered to the auxiliary battery
Batterie supplémentaire
Batteria supplementare 10. Maintenance of the product
Extra Accu
The product can be cleaned with a damp, soft cloth. Please do not use any chemical or abra-
sive cleaning agents (such as scouring cream, steel wool etc.).
Hochleistungs-Stecker
High-Performance-Plug Auto mit Caravan 11. Accessories, consumables, spare parts
- Vehicle with caravan - Voiture avec caravane - Auto con roulotte - Auto met caravan
There are no accessories or replacement parts available for this product.
12. Information about special tools, devices
9. Operation oft he product
For commissioning no tools are needed. Depending on the type of fastening, you may
1 • Rote LED zeigt dass Batterie über 4 3 2 1 need screws, side shunts, wire strippers, insulating tape and cross- head screwdrivers for
Sonnenenergie geladen wird.
• Red LED indicates battery is
mounting.
solar charged
• La LED rouge indique que la 13. Information about repair, replacement of parts
batterie est chargée solaire
• Il LED rosso indica che la batteria
è carica solare Do not attempt to open or disassemble the product described in this manual. The product
• Rode LED geeft aan dat de batterij
5 cannot be repaired. In the case of a defect outside the warranty period, the device has to be
is opgeladen met zonne-energie
disposed at the approved collection points for special garbage.
2 • Grüne LED zeigt dass Batterie VOLL GELADEN 4 • Rote LED zeigt POWER ist an
• Green LED indicates battery is FULLY CHARGED • Red LED indicates POWER is on 14. Instructions for disposal
• La LED verte indique que la batterie est ENTIÈREMENT CHARGÉE • La LED rouge indique que l’alimentation est allumée
• Il LED verde indica che la batteria è COMPLETAMENTE CARICA • Il LED rosso indica che POWER è acceso
• Groene LED geeft aan dat de batterij VOLLEDIG IS OPGELADEN • Rode LED prikkelt POWER is ingeschakeld A) Packaging: The packaging is recyclable. Only put the packaging material in the
recommended recycle - garbage.
3 • Rote LED zeigt dass Ladevorgang LÄUFT 5 • Blaue LED zeigt gewählten Batterietyp an B) Old device: If the device is finally taken out of service someday, carry it out accordingly
• Red LED indicates the unit is CHARGING • Blue LED indicates chosen battery type
• La LED rouge indique que l‘unité est en charge • La LED bleue indique le type de batterie choisi in accordance with the applicable laws / regulations, they are to be assigned to the
• Il LED rosso indica che l‘unità è in CARICA • Il LED blu indica il tipo di batteria scelto
• Rode LED geeft aan dat de eenheid OPLADEN is • Blauwe LED geeft het gekozen batterijtype aan designated collection points. In doubt if necessary, please contact your local waste
disposal service or municipal office. There are no additional disposal costs for you, as
1. Main and auxiliary battery we have already paid the corresponding fees in advance to the responsible office.
Never dispose of battery chargers in the household waste! Dispose of old starter batte-
- Start the vehicle and let it idle ries exclusively via the responsible disposal companies or return them to your dealer.
- The charger now recognizes that the main battery is being charged Never dispose batteries with household waste!
- As soon as the main starting battery has reached 13.0V the charger will begin to charge
the auxiliary battery
- The initial default setting is for AGM / Gel batteries
- If you want to charge a different battery type, simply change the battery type by pressing
the battery type selector button on the front of the charger
- Once selected , the charger will remain in the selected battery type until it is changed
- The charger will continue working even after the vehicle is turned off. As soon as the
main start battery drops below 13.0 V, the charger is automatically switched off.
axhess GmbH & Co. KG, Industriestrasse 11, 56598 Rheinbrohl, www.axhess.de
20 21GB GB
15. Documentation 2. Generated by the device, max. Charging voltages in V according to battery type
The product has been manufactured and supplied in compliance with all relevant regulati- AGM/Gel SLA/WET Calcium LiON
ons and guidelines that are valid for all member states of the European Union. The product Start 14,3 14,0 15,0 14,0
complies with all applicable regulations and regulations in the country of sale. Appropriate Main Charge 14,7 14,4 15,4 14,4
documents and certificates are available on request. The formal documentation includes at Trickle Charging 13,5 13,5 13,5
least the Declaration of Conformity, the safety data sheet and the Test report of the product,
but is not limited to this.
3. AWG (American Wire Gauge) in metric measures
16. CE conformity (Plus the nearest British SWG)
The product complies with the following standards / directives: AWG Diameter in mm Cross section Nearest British SWG
in mm*
17. Explanation Symbols, terms, characteristics of the product 1 7,348 42,406 1
1. Battery types 2 6,544 33,634 3
3 5,827 26,667 4
1. lead-acid battery = is an accumulator in which the electrodes of lead or lead dioxide and 4 5,189 21,147 5
the electrolyte consist of dilute sulfuric acid.
5 4,621 16,771 7
VRLA = A VRLA accumulator (English: valve-regulated lead acid battery) is a lead-acid battery 6 4,115 13,299 8
in a sealed design. GEL, AGM and MF are among them. 7 3,665 10,550 9
GEL = closed, the acid is fixed in the gel, no gases escape during charging, the system is closed 8 3,264 8,367 10
and does not allow topping up. 9 2,906 6,632 11
AGM = closed, the acid is bound in the glass fleece, there are no gases escaping during char- 10 2,588 5,260 12
ging, the system is closed and does not allow refilling. 11 2,305 4,173 13
MF = closed, the sulfuric acid flows around the lead plates directly, gases are recombined as far
12 2,053 3,310 14
as possible. Liquid is not refillable.
WET = open, the sulfuric acid flows around the lead plates directly, gases escape through the 13 1,828 2,624 15
sealing plugs. Liquid is refillable. 14 1,628 2,087 16
CALCIUM = is an accumulator in which the electrodes consist instead of lead or lead dioxide 15 1,450 1,651 17
of calcium and the electrolyte consists of dilute sulfuric acid. 16 1,291 1,309 18
17 1,150 1,039 18
2. Lithium-ion battery = A lithium-ion battery (lithium-ion battery, Li-ion battery or (seconda-
18 1,024 0,823 19
ry) Li-ion battery) is a lithium-based electrochemical power source. A further development of
the Li Ion batteries is the lithium polymer battery.
18. Problems and solutions
2. DC-DC
Error Possible cause Remedy
A DC-DC converter or charger, also called DC-DC converter, English DC-DC converter, refers Charger does not detect a charge Charger not connected Connect charger to battery
to an electrical circuit that converts a DC voltage supplied to the input to a DC voltage with to battery
higher, lower or inverted voltage level. Insufficient connection Establish a secure connection
with battery poles
3. AWG Battery is not a 12V battery Use 12V battery
Battery is not charging Cables do not meet the Make sure that all cables used
American Wire Gauge, abbreviated AWG, is a coding for wire diameter. It identifies electrical requirements meet the requirements
cables made of strands and solid wire and is mainly used in electrical engineering to designate Battery in poor condition Check battery condition
the cross section of cores. Alternator does not charge Check alternator
Battery can not be fully charged Battery condition deficient Check battery condition
axhess GmbH & Co. KG, Industriestrasse 11, 56598 Rheinbrohl, www.axhess.de
22 23F F
Ce manuel d‘utilisation est une publication de axhess GmbH & Co. KG, 2. Général
Industriestraße 11, 56589 Rheinbrohl. www.axhess.de . Tous droits réservés, y
compris la traduction. Reproductions de tous types, y compris des extraits, par Ce chargeur CC / CC est un chargeur sophistiqué à plusieurs étages qui utilise une programmati-
exemple. B. photocopie, microfluidisation ou le er Dans les systèmes informatiques, on entièrement automatisée et contrôlée par ordinateur pour charger la plupart des batteries d’
l’autorisation écrite expresse de axhess GmbH & Co. KG est requise . alimentation ou de démarrage 12V . Ce chargeur tire son énergie de sources telles que DC . Sous
La réimpression, même partielle, est interdite. Ce manuel d‘utilisation correspond forme d‘alternateur ou de modules solaires et optimise ce flux pour répondre aux exigences de
à l‘état technique au moment de l‘impression. Modifications de la technologie, des charge des différentes batteries. Il est particulièrement adapté pour charger des batteries dans les
équipements et de la conception réservés. caravanes, les camping-cars, les bateaux et les maisons de week-end sans leur propre alimentati-
© Copyright 2018 axhess GmbH & Co. KG on électrique. Le processus de charge commence automatiquement dès qu‘une source d‘ alimen-
tation CC est connectée au chargeur , par exemple. B. lorsqu‘un véhicule démarre, l‘alternateur
est connecté au dispositif de chargement , ou lorsque le chargeur est connecté à des panneaux
solaires. Il possède un capteur de température qui garantit des tensions de charge optimales sur
Contenu
toutes les plages de température. Cela garantit que votre batterie est toujours en bon état, peut
être chargée rapidement et a une longue durée de vie.
1. Identification du mode d‘emploi
2. Général Le chargeur de batterie double DC-DC est un chargeur entièrement automatique à 4 vitesses
3. Identification unique du produit avec un courant de charge de max. 20 A pour 12 V batteries de 18-250 Ah.
4. Modification du produit - boîtier en aluminium robuste et supports de montage
5. Informations relatives à la sécurité - Charge contrôlée par microprocesseur
6. Conformité du produit - Charge multi-étages haute fréquence entièrement automatique
7. Conservation du mode d‘emploi - Technologie en mode pulsé qui réduit l‘oxydation, améliore la consistance de l‘électrolyte
8. Utilisation du produit / installation et minimise la température, prolongeant ainsi la durée de vie de la batterie
9. Fonctionnement du produit - Sélection facile du type de batterie: GEL, AGM, VRLA, WET, MF, LiON
10. Maintenance du produit - Surveillance interne de la température de charge et contrôle de la puissance
11. Accessoires, consommables, pièces détachées - Les affichages à LED indiquent l‘état de charge
12. Informations sur les outils spéciaux, les appareils - surcharge s-, court - circuit et protection contre la surchauffe
13. Informations sur la réparation, le remplacement de pièces - Protection contre l‘inversion de polarité (pour l‘entrée et la sortie)
14. Informations pour l‘élimination - protection thermique contre les surcharges
15. Documentation - Protection solaire contre les surcharges
16. Conformité CE - Fonction de coupure de courant: une fois sélectionné, le chargeur reste sur le type de
17. Symboles d‘explication, termes, caractéristiques du produit batterie sélectionné jusqu‘à ce qu‘il soit changé
18. Problèmes et solutions
3. Identification unique du produit
Portée de l‘ offre:
Chargeur de batterie double DC à DC
1x chargeur double batterie DC à DC Numéro d‘article: 2.913.914
1x manuel d‘utilisation Vous trouverez d‘autres données techniques dans le tableau 1 à la page 1.
1. Identification du mode d‘emploi 4. Modification du produit
axhess GmbH & Co. KG, Industriestraße 11, 56598 Rheinbrohl, Allemagne, www.axhess.de Le produit ne peut être ni modifié ni adapté. N‘utilisez pas le produit à des fins autres que
Date d‘édition: 20191004 celles décrites dans le manuel.
Numéro d‘article: 2.913.914 5. Informations relatives’ à la sécurité
EAN 4250149704567
ATTENTION!
La axhess GmbH & Co.KG, Industriestrasse 11, 56598 Rheinbrohl prend, aucune
responsabilité pour les dommages et les conséquences résultant de:
axhess GmbH & Co. KG, Industriestrasse 11, 56598 Rheinbrohl, www.axhess.de
24 25Sie können auch lesen