Björn Christoffer (www.bc-vanlife.com) Seite 1 von
←
→
Transkription von Seiteninhalten
Wenn Ihr Browser die Seite nicht korrekt rendert, bitte, lesen Sie den Inhalt der Seite unten
© Björn Christo er (www.bc-vanlife.com)   Seite 1 von 18
   ff
© 2021 Björn Christo er (www.bc-vanlife.com)

Version V01F – 20210708

Autor: Björn Christo er
Umschlaggestaltung: Björn Christo er

Das Werk, einschließlich seiner Teile, ist urheberrechtlich geschützt. Jede Verwertung ist ohne
Zustimmung des Autors unzulässig. Dies gilt insbesondere für die elektronische oder sonstige
Vervielfältigung, Übersetzung, Verbreitung und ö entliche Zugänglichmachung.

© Björn Christo er (www.bc-vanlife.com)                                          Seite 2 von 18
   ff
        ff
             ff
                      ff
                                    ff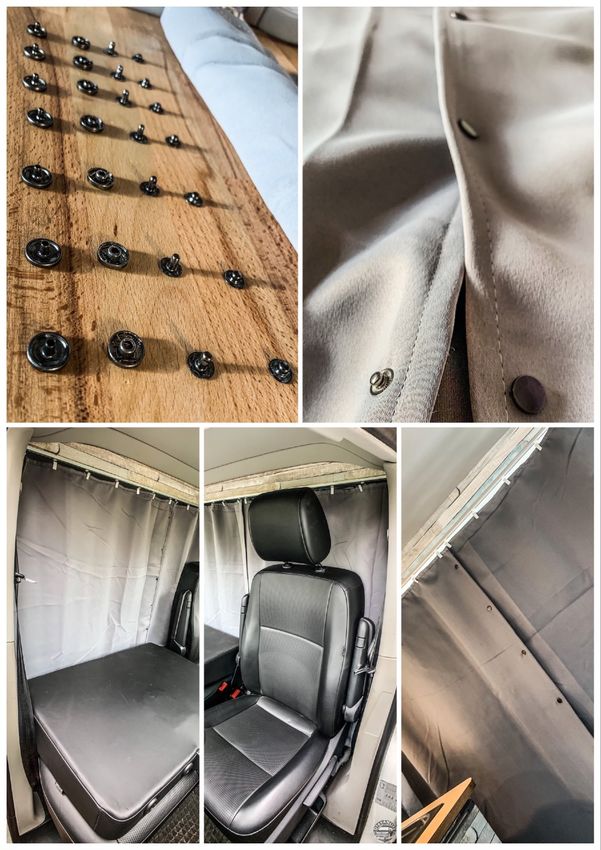
Vorwort
Diese Anleitung habe ich in Eigenarbeit nach meinen eigenen Erfahrungen erstellt und soll zum
Nachbau inspirieren, sowie als Grundlage für den eigenen Van-Ausbau dienen.
Ich bin Björn, ein Bulli Fan und Vanlife – Enthusiast. Ich fahre einen VW T6 (Caravelle) mit langen
Radstand und habe mich bei meinem Innenausbau für eine modulare Bauweise entschieden. Auf
meiner Homepage (www.bc-vanlife.com) habe ich noch weitere DIY-Anleitungen abgelegt.

In dieser Bauanleitung habe ich einen Vorhanghalter mit zwei Vorhängen beschrieben. Der
Vorhang trennt den Wohnraum von der Fahrerkabine und befindet sich direkt hinter der ersten
Sitzreihe. Die beschriebenen Maße sind angepasst auf einen T5/T6 mit dem Klima-Himmel (Bsp.
Caravelle oder Multivan). Er passt sowohl zum kurzen- (KR), als auch zum langen Radstand (LR).

Viel Spaß beim Nachbauen!

                                             Preface
I created these manuals as a result of my own experiences and should inspire you to rebuild and
serve as a basis of your own van conversion.
My Name is Björn. I'm a Bulli fan and vanlife enthusiast. I drive a VW T6 (Caravelle) long wheel base
version and decided to build a modular design for my interior conversion. I have added more DIY
instructions to my homepage (www.bc-vanlife.com).

In this DIY-manual I have described a curtain holder with two curtains. The curtain separates the
living area from the driver's cab and is located directly behind the first row of seats. The dimensions
described are adapted to a VW T5/T6 with the climatic roof (e.g. Caravelle or Multivan). It fits both,
short- (SWB) and long wheel base (LWB).

Have fun rebuilding it!

© Björn Christo er (www.bc-vanlife.com)                                                 Seite 3 von 18
    ff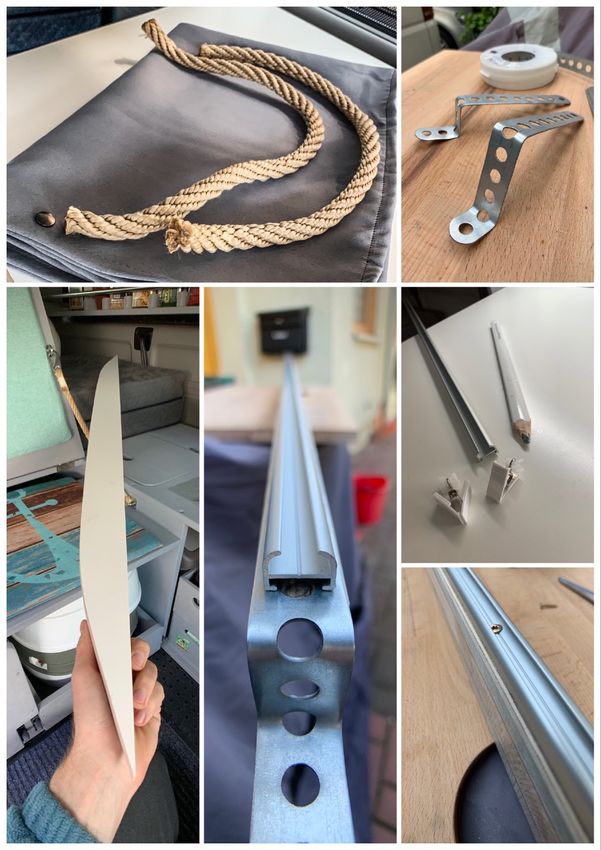
Vorhanghalter / Curtain Holder

© Björn Christo er (www.bc-vanlife.com)                Seite 4 von 18
   ff

Liste der Bauteile / list of components

                   A                    B                    C                    D
     A1        Multiplex 18 mm B1   Vorhangsto       C1   Vorhangschiene D1   DIY Metallhalter
               127,8 x 6,5 cm       Curtain fabric        Curtain rail        DIY metal braket
                                    109 x 82 cm           L = 127,8 cm
                              B2    Vorhangsto                          D2    DIY Metallhalter
                                    Curtain fabric                            DIY metal braket
                                    109 x 82 cm

© Björn Christo er (www.bc-vanlife.com)                                          Seite 5 von 18
ff
ff
          ff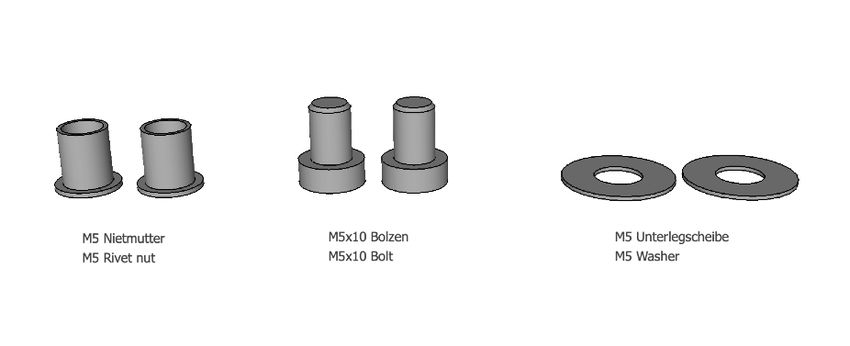
A → A1

Um die Form zu übertragen sollten die Maße wie unten beschrieben auf das Brett übertragen
werden und die Punkte verbunden werden. Diese bilden dann die Sägelinie. Die Maße sind in
Section 1 und 2 für eine Häl e dargestellt. Die andere Häl e ist dann gespiegelt.

To transfer the shape, the measurements should be transferred to the board as described below
and the points should be connected. These then form the saw line. The dimensions are shown in
Sections 1 and 2 for one half. The other half is then mirrored.

© Björn Christo er (www.bc-vanlife.com)                                        Seite 6 von 18
   ff
               ft
                                           ft
B → B1 & B2
Für die Vorhänge eignet sich licht- und blickdichter Sto . Wer selbst näht, sollte an den Rändern
etwas mehr einplanen, zum umnähen. Ich habe hier 2 cm an jeder Kante verwendet und doppelt
umgenäht.
Light and opaque fabric is suitable for the curtains. If you sew yourself, you should plan a little
more at the edges to sew around. I used 2 cm on each edge and sewed it over twice.
© Björn Christo er (www.bc-vanlife.com) Seite 7 von 18
ff
ffC → C1
Bei der Vorhangschiene habe ich mich für eine Aluminium Schiene entschieden. Diese habe ich im
Baumarkt gekau . Zum Vergleich habe ich die Maße unten einmal dargestellt. Die Vorhänge werden dann
an den Gleitern angebracht, die dann wiederum in die Vorhangschiene eingeführt werden.
For the curtain rail, I decided to use an aluminum rail. I bought this at a lokal hardware store. For
comparison, I have shown the dimensions below. The curtains are then attached to the sliders, which in turn
are inserted into the curtain rail.
© Björn Christo er (www.bc-vanlife.com) Seite 8 von 18
ft
ffD → D1
DIY Metallhalter
Zur Anfertigung der Halter habe ich Lochband verwendet und zurechtgebogen. Es eignet sich aber auch
ein Blechstreifen. Dieser muss dann wie unten im Bild dargestellt, zweimal gebogen werden.
DIY metal holder
To make the holder, I used perforated tape and bent it into shape. A sheet metal strip is also suitable. This
must then be bent twice as shown in the picture below.
© Björn Christo er (www.bc-vanlife.com) Seite 9 von 18
ffD → D2 © Björn Christo er (www.bc-vanlife.com) Seite 10 von 18 ff
Schritt-für-Schritt Zusammenbau / Step-by-step assembly

1

2

© Björn Christo er (www.bc-vanlife.com)            Seite 11 von 18
    ff
3
4
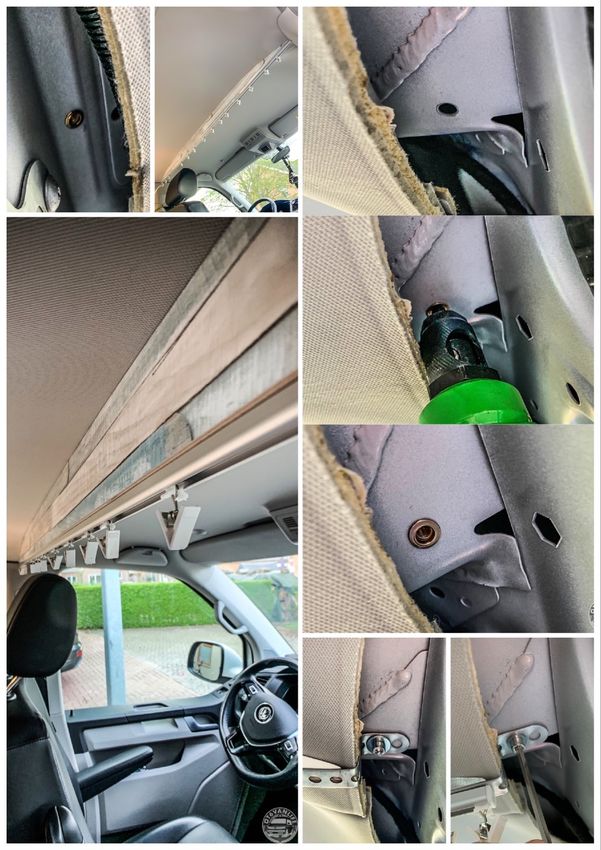
Für die Montage an der Karosserie müssen die Innenverkleidungen an den B-Säulen links und
rechts entfernt werden. Der Vorhanghalter sollte an der gewünschten Position gehalten werden
und die Bohrlöcher durch die Halter D1 und D2 mit einem Sti markiert werden. Nach dem
Bohren die Späne entfernen (Rostgefahr) und die Bohrlöcher entgraten und versiegeln. Für einen
stabilen Halt, habe ich M5 Nietmuttern verwendet und diese dann in die Bohrlöcher eingezogen.
Befestigt werden die Halter D1 und D2 dann mit M5x10 Bolzen und einer Unterlegscheibe.
For assembly on the body, the interior panels on the B-pillars on the le and right side must be
removed. The curtain holder should be held in the desired position and the drill holes through
holders D1 and D2 should be marked with a pen. A er drilling, remove the chips (risk of corrosion)
and deburr and seal the drill holes. For a stable hold, I used M5 rivet nuts for the drill holes. Holders
D1 and D2 are then attached with M5x10 bolts and a washer.
© Björn Christo er (www.bc-vanlife.com) Seite 12 von 18
ff
ft
ft
ft5
© Björn Christo er (www.bc-vanlife.com) Seite 13 von 18
ff6
Die Vorhänge habe ich an sogenannten X-Gleitern mit Klammern befestigt.
I attached the curtains to so-called X-gliders with clips.
© Björn Christo er (www.bc-vanlife.com) Seite 14 von 18
ff7
Im letzten Schritt habe ich für die vertikale Verbindung beider Vorhänge, Druckknöpfe
angebracht.
In the last step I attached snap fasteners for the vertical connection of both curtains.
© Björn Christo er (www.bc-vanlife.com) Seite 15 von 18
ffBildband / Pictures © Björn Christo er (www.bc-vanlife.com) Seite 16 von 18 ff
© Björn Christo er (www.bc-vanlife.com)   Seite 17 von 18
   ff
© Björn Christo er (www.bc-vanlife.com)   Seite 18 von 18
   ff
Sie können auch lesen