DR 70 Bedienungsanleitung
←
→
Transkription von Seiteninhalten
Wenn Ihr Browser die Seite nicht korrekt rendert, bitte, lesen Sie den Inhalt der Seite unten
DR 70
        Tragbarer digitaler DAB+- und UKW-Empfänger

             Bedienungsanleitung
      Deutsch/Englisch/Französisch/Italienisch

    Bitte sorgfältig lesen, bevor Sie dieses Gerät verwenden

1                            Deutsch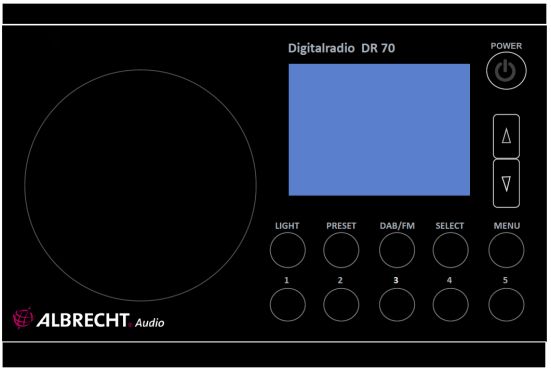
1       Inhaltsverzeichnis
1   Inhaltsverzeichnis ................................................................2
2   Sicherheitshinweise: ............................................................3
3   Technische Daten: ...............................................................3
4   Bedienelemente und Eigenschaften .....................................4
  4.1 Lautsprecher: ................................................................6
  4.2 Kopfhörer: .....................................................................6
  4.3 Radioantenne: ...............................................................6
  4.4 LED-Taschenlampe: ......................................................6
5 Erste Schritte .......................................................................6
  5.1 Das Radio einschalten:..................................................6
  5.2 Bedienung Ihres Radios: ...............................................6
  5.3 DAB+-/UKW-Band auswählen: ......................................7
6 DAB-Modus .........................................................................7
  6.1 Sender suchen und auswählen .....................................7
  6.2 Stationstaste 1-5 ...........................................................7
  6.3 Senderspeicher .............................................................8
  6.4 Service-Informationen ...................................................8
7 UKW-Modus ........................................................................9
  7.1 Sender suchen und auswählen .....................................9
  7.2 Manuelle Senderwahl ....................................................9
  7.3 Service-Informationen ...................................................9
  7.4 Stationstaste 1-5 ...........................................................9
  7.5 Senderspeicher ...........................................................10
8 Menü .................................................................................10
  8.1 Schlummermodus: ......................................................10
  8.2 Sprache wählen:.......................................................... 11
  8.3 Hintergrundbeleuchtung: ............................................. 11
  8.4 LCD-Farbauswahl: ......................................................12
  8.5 Auf Werkseinstellungen zurücksetzen: ........................12
9 Gerät ausschalten und Wartung:........................................12
10 Gewährleistungs- und Recyclinginformationen.................13

2                                       Deutsch

2    Sicherheitshinweise:
1. Benutzen Sie das Radio nicht in unmittelbarer Nähe von
   Wasser.
2. Reinigen Sie das Gerät nur mit einem trockenen Tuch.
3. Blockieren Sie keine Lüftungsöffnungen.
4. Benutzen Sie das Radio nicht in unmittelbarer Nähe von
   heißen Gegenständen.
5. Benutzen Sie nur vom Hersteller mitgeliefertes Zubehör.
6. Setzen Sie das Radio nicht Wasser, Wasserdampf, Sand
   oder sonstigen Umwelteinflüssen aus.
7. Lassen Sie Ihr Radio nicht an Orten zurück, an denen es
   durch hohe Temperaturen beschädigt werden kann, wie z. B.
   in einem geparkten Auto bei direkter Sonneneinstrahlung.

3    Technische Daten:
Modell: DR 70
Radio: DAB+ und UKW
Abmessungen: 120 x 80 x 28mm
Gewicht: ca. 274 g (einschließlich Batterien)
DAB+-Frequenzbereich: Band III (174,0-240,0MHz)
UKW-Frequenzbereich: 87,5-108 MHz mit RDS
Anzahl der voreinstellbaren Sender: 20 für DAB+ und 20 für UKW
Lautsprecherleistung: 1,5 W (RMS) 4 Ω
Ausgangsleistung: 32 Ω 0,1 W (Kopfhörer)
Spannungsversorgung: über Netzadapter (5 V, 0,5 A)
Batterien: 3 AA-Batterien
Batterielaufzeit: ca. 10 Stunden (Lautsprecher-Modus)/
20 Stunden (Kopfhörer-Modus)

3                           Deutsch
4   Bedienelemente und Eigenschaften
                        8     7    6    5

                                              1

                                              2

                                              3

                                              4

                                              13

                        9     10   11   12

                                             14

              15
4                   Deutsch
1. Ein/Aus
2. Aufwärtstaste
3. Abwärtstaste
4. Menü
5. Auswählen
16
6. DAB-/UKW-Modus
7. Senderspeicher
8. LED-Taschenlampe
9. Stationstaste 1
17 10. Stationstaste 2
11. Stationstaste 3
18 12. Stationstaste 4
13. Stationstaste 5
14. Teleskopantenne
15. Batteriefach
16. Lautstärkeregler
17. Kopfhörerbuchse
18. Buchse für 5V-Netzadapter
5 Deutsch4.1 Lautsprecher: Das DR 70 verfügt über einen hochwertigen Lautsprecher mit 4 Ω 1,5 W (RMS). 4.2 Kopfhörer: Die 3,5-mm-Buchse befindet sich auf der rechten Seite des Radios. Sie kann mit Stereo-Kopfhörern verwendet werden. Wichtig: Eine zu hohe Lautstärke über Kopfhörer kann Hörschäden verursachen. 4.3 Radioantenne: 1. Auf der Rückseite des Geräts befindet sich eine Teleskopantenne für DAB+- und UKW-Empfang. 2. Ziehen Sie die Antenne aus und stellen Sie sie so ein, dass Sie den besten Empfang haben. 3. Wenn der Empfang nicht zufriedenstellend sein sollte, ziehen Sie die Antenne so weit wie möglich aus. 4.4 LED-Taschenlampe: 1. Zur Beleuchtung wurde eine helle LED eingebaut. Um die LED-Leuchte einzuschalten, drücken Sie einmal die Taste „LIGHT“. Drücken Sie sie erneut, um das Licht wieder auszuschalten. 5 Erste Schritte 5.1 Das Radio einschalten: Das DR 70 kann entweder mit 3 AA-Batterien oder über den 5V-Netzadapter betrieben werden. 5.2 Bedienung Ihres Radios: 1. Stellen Sie sicher, dass die Batterien eingelegt oder der 5V-Netzadapter angeschlossen ist. 2. Halten Sie die Taste „ “ gedrückt, um das Radio einzuschalten. 6 Deutsch
3. In der Anzeige blinkt „Starting DAB“ und das Radio geht in
   den DAB-Modus (oder in den UKW-Modus, wenn dieser vor
   dem Ausschalten ausgewählt war).
4. Wenn das Radio das erste Mal eingeschaltet wird, führt das
   DR 70 automatisch eine Suche nach DAB-Sendern durch.
5. Stellen Sie die Lautstärke auf einen angenehmen Pegel ein.
5.3    DAB+-/UKW-Band auswählen:
1. Drücken Sie die Taste „DAB/FM“, um den DAB+- oder
   UKW-Modus auszuwählen.
2. Wenn Sie das Radio ausschalten, wird die letzte Auswahl
   gespeichert.

6     DAB-Modus
6.1    Sender suchen und auswählen
1. Stellen Sie sicher, dass das Radio im DAB+-Modus läuft.
2. Drücken Sie einmal die Taste „MENU“, um in das Menü zu
   gelangen.
3. Drücken Sie die Tasten „Aufwärts“ oder „Abwärts“, um „DAB
   Autoscan“ auszuwählen. Bestätigen Sie durch Drücken der
   Taste „SELECT“, um eine vollständige Suche nach allen
   verfügbaren DAB+-Radiosendern durchzuführen. Die
   gefundenen Sender werden in einer Senderliste gespeichert.
4. Drücken Sie die Taste „Aufwärts“ oder „Abwärts“, um die
   gewünschten Kanäle aus der Liste auszuwählen.
6.2    Stationstaste 1-5
1. Wechseln Sie mit den Tasten „Aufwärts“ oder „Abwärts“ zu
   Ihrem bevorzugten DAB+-Sender, halten Sie dann die Taste
   „1“ lange gedrückt, um den aktuellen DAB+ Sender unter
   Stationstaste 1 zu speichern. Wiederholen Sie diesen
   Vorgang für die anderen Stationstasten 1-5. Auf dem
   LCD-Bildschirm erscheint die Nachricht „Gespeichert“, wenn
   der Sender erfolgreich der Stationstaste zugeordnet wurde.
7                           Deutsch
Hinweis: Wenn unter dieser Stationstaste bereits ein Sender
   gespeichert ist, wird er überschrieben.
2. Um einen gespeicherten Sender auszuwählen und
   abzuspielen, drücken Sie einmal kurz eine der Stationstasten
   „1“ bis „5“.
3. Im DAB+-Radiomodus können 5 Sender über die
   Stationstasten voreingestellt werden.
6.3    Senderspeicher
1. Stellen Sie den gewünschten DAB+-Sender mit Hilfe der
   Tasten „Aufwärts“ oder „Abwärts“ ein und halten Sie die Taste
   „PRESET“ lange gedrückt. Auf dem Display wird die
   Nachricht „Null Memory 01“ angezeigt, wenn die Position leer
   ist. Sollte der Platz belegt sein, wird der Name des
   gespeicherten Senders angezeigt. Drücken Sie die Tasten
   „Aufwärts“ oder „Abwärts“, um die Position auszuwählen, in
   der ein Sender gespeichert werden soll. Drücken Sie dann zur
   Bestätigung die Taste „SELECT“. Auf dem LCD-Bildschirm
   wird die Nachricht „Preset Stored“ angezeigt, wenn der
   Sender erfolgreich gespeichert wurde.
2. Um die gespeicherten Sender aufzurufen, drücken Sie kurz
   die Taste „PRESET“, wählen Sie anschließend mit Hilfe der
   Tasten „Aufwärts“ oder „Abwärts“ einen gespeicherten
   Sender (der Name des Senders wird angezeigt) und drücken
   Sie zur Bestätigung die Taste „SELECT“.
3. Im DAB+-Modus können 20 Sender gespeichert werden.
6.4    Service-Informationen
Die Service-Informationen zeigen technische Informationen zum
aktuellen Status des abgespielten Senders an.
Während Sie DAB+ hören, zeigt das Display folgende
Informationen an, sofern verfügbar:
1. DLS-Informationen
2. Multiplex-Frequenz
3. Uhrzeit und Datum

8                           Deutsch
4.    Sendername
5.    Kanalnummer
6.    Signalstärke
7.    Batteriestand

7      UKW-Modus
7.1      Sender suchen und auswählen
1. Halten Sie die Taste „ “ gedrückt, um das Radio
   einzuschalten.
2. Stellen Sie sicher, dass sich das Radio im UKW-Modus
   befindet.
3. Halten Sie die Tasten „Aufwärts“ oder „Abwärts“ gedrückt, um
   automatisch den nächsten UKW-Sender zu suchen.
7.2      Manuelle Senderwahl
Drücken Sie kurz die Tasten „Aufwärts“ oder „Abwärts“, um die
Frequenz schrittweise einzustellen.
7.3      Service-Informationen
Während Sie UKW-Radio hören, zeigt das Display folgende
Informationen an, sofern verfügbar
1. Programmart
2. Senderfrequenz
3. Sendername
4. Signalstärke
5. Batteriestand
7.4      Stationstaste 1-5
1. Stellen Sie den gewünschten UKW-Sender mit Hilfe der Taste
   „Aufwärts“ oder „Abwärts“ ein und halten Sie anschließend
   die Taste „1“ lange gedrückt, um den aktuellen Sender für die
   Stationstaste 1 zu speichern. Wiederholen Sie diesen
   Vorgang für die anderen Stationstasten 1-5. Auf dem
   LCD-Bildschirm erscheint die Nachricht „Gespeichert“, wenn
   der Sender erfolgreich der Stationstaste zugeordnet wurde.
9                            Deutsch
Hinweis: Wenn unter dieser Stationstaste bereits ein Sender
   gespeichert ist, wird er überschrieben.
2. Um die für die Stationstasten gespeicherten Sender
   abzuspielen, drücken Sie einmal kurz eine der Stationstasten
   „1“ bis „5“
3. Im UKW-Modus können 5 Sender für die Stationstasten
   voreingestellt werden.
7.5    Senderspeicher
Stellen Sie den gewünschten Sender mit Hilfe der Taste
„Aufwärts“ oder „Abwärts“ ein und halten Sie anschließend die
Taste „PRESET“ lange gedrückt. Im Display wird „Null Memory
01“ angezeigt, wenn der Platz nicht belegt war. Sollte der Platz
belegt sein, wird der Name des gespeicherten Senders angezeigt.
Drücken Sie die Tasten „Aufwärts“ oder „Abwärts“, um die
Position auszuwählen, in der ein Sender gespeichert werden soll.
Drücken Sie dann zur Bestätigung die Taste „SELECT“. Auf dem
LCD-Bildschirm wird die Nachricht „Preset Stored“ angezeigt,
wenn der Sender erfolgreich gespeichert wurde.
Um die gespeicherten Sender aufzurufen, drücken Sie kurz die
Taste „PRESET“, wählen Sie danach mit Hilfe der Taste
„Aufwärts“ oder „Abwärts“ einen voreingestellten Sender (der
Name des Senders wird angezeigt) und drücken Sie dann zur
Bestätigung die Taste „SELECT“.
Im UKW-Modus können 20 Sender gespeichert werden.

8     Menü
8.1    Schlummermodus:
1. Im DAB+- oder UKW-Modus drücken Sie einmal die Taste
   „MENU“, um in das Menü zu gelangen. Drücken Sie die Taste
   „Aufwärts“ oder „Abwärts“, bis Sie „SLEEP“ erreichen, und
   bestätigten Sie durch Drücken der Taste „SELECT“, um den
   Schlummermodus zu aktivieren. Ein blinkender Timer wird im
   oberen Bereich des LCD-Displays angezeigt. Drücken Sie die
10                          Deutsch
Taste „Aufwärts“ oder „Abwärts“, um die Schlummerzeit in
   5-Minuten-Schritten (von 0 bis 90) einzustellen. Drücken Sie
   anschließend die Taste „SELECT“, um die Einstellung zu
   bestätigen, woraufhin das Blinken aufhört.
2. Das Radio schaltet sich automatisch ab, wenn der Timer Null
   erreicht hat.
3. Um die Schlummerfunktion abzubrechen, wählen Sie das
   „SLEEP“-Menü erneut aus. Stellen Sie es auf „0“ ein und
   bestätigen Sie die Einstellung, indem Sie „SELECT“ drücken.
8.2    Sprache wählen:
1. Drücken Sie die Taste „MENU“, um das Menü zu öffnen.
   Verwenden Sie „Aufwärts“ oder „Abwärts“, um zum Punkt
   „Sprache“ zu gelangen. Drücken Sie zur Auswahl die Taste
   „SELECT“. Das „Sprache“-Menü wird angezeigt. Drücken Sie
   die Tasten „Aufwärts“ oder „Abwärts“, um eine Sprache
   auszuwählen.
2. Drücken Sie die Taste „SELECT“, um die Auswahl zu
   bestätigen und zu speichern. Drücken Sie „MENU“, um das
   Menü zu verlassen.
8.3    Hintergrundbeleuchtung:
1. Stellen Sie die Dauer der LCD-Hintergrundbeleuchtung ein.
2. Drücken Sie die Taste „MENU“, um das Menü zu öffnen.
   Verwenden Sie „Aufwärts“ oder „Abwärts“, um zum Punkt
   „Beleuchtung“ zu gelangen. Drücken Sie zur Auswahl die
   Taste „SELECT“. Das „Beleuchtung“-Menü wird im Display
   angezeigt. Drücken Sie erneut die Taste „Aufwärts“ oder
   „Abwärts“, um den Timer für die LCD-Hintergrundbeleuchtung
   auf „20s“, „40s“, „60s“ oder „Immer an“ einzustellen.
3. Drücken Sie die Taste „SELECT“, um die Auswahl zu
   bestätigen und zu speichern. Drücken Sie „MENU“, um das
   Menü zu verlassen.

11                          Deutsch
8.4    LCD-Farbauswahl:
1. Stellen Sie die Hintergrundfarbe des LCD-Displays ein.
2. Drücken Sie die Taste „MENU“, um das Menü zu öffnen.
   Verwenden Sie die Tasten „Aufwärts“ oder „Abwärts“, um
   zum Punkt „Farbauswahl“ zu gelangen. Drücken Sie zur
   Auswahl die Taste „SELECT“. Das „Farbauswahl“-Menü wird
   im Display angezeigt. Verwenden Sie nun die Tasten
   „Aufwärts“ oder „Abwärts“, um die gewünschte
   Hintergrundfarbe auszuwählen.
3. Drücken Sie die Taste „SELECT“, um die Auswahl zu
   bestätigen und zu speichern. Drücken Sie „MENU“, um das
   Menü zu verlassen.
8.5    Auf Werkseinstellungen zurücksetzen:
1. Drücken Sie die Taste „MENU“, um das Menü zu öffnen.
   Verwenden Sie die Tasten „Aufwärts“ oder „Abwärts“, um
   zum Punkt „Werkseinstellung“ zu gelangen. Drücken Sie zur
   Auswahl die Taste „SELECT“. Das „Werkseinstellung“-Menü
   wird im Display angezeigt. Verwenden Sie dann die Tasten
   „Aufwärts“ oder „Abwärts“, um „Ja“ oder „Nein“ auszuwählen.
   Wenn Sie „Ja“ auswählen, löscht diese Funktion alle
   voreingestellten Sender.
2. Drücken Sie die Taste „SELECT“, um die Auswahl zu
   bestätigen und zu speichern. Drücken Sie „MENU“, um das
   Menü zu verlassen.

9     Gerät ausschalten und Wartung:
1. Schalten Sie das Radio aus, wenn es nicht verwendet wird.
   Entfernen Sie zudem die Batterien, wenn es für längere Zeit
   nicht verwendet wird.
2. Versuchen Sie nicht, das Produkt zu öffnen oder interne
   Einstellungen zu verändern.

*Die Informationen in dieser Bedienungsanleitung können sich
ohne vorherige Ankündigung ändern.
12                          Deutsch
10    Gewährleistungs- und Recyclinginformationen
Wir sind verpflichtet, jedem Gerät Informationen über die
Entsorgung,             über            die            gesetzlichen
Gewährleistungsbestimmungen              und         die         EG
Konformitätserklärungen mit Hinweisen über das Benutzen der
Geräte in den verschiedenen Ländern beizufügen. Sie finden
daher diese Informationen im folgenden Text.
Gesetzliche Gewährleistung von 2 Jahren nach Kaufdatum
Der Verkäufer dieses Geräts gewährt Ihnen eine gesetzliche
Gewährleistung von zwei Jahren nach Kaufdatum des Geräts.
Diese Gewährleistung umfasst alle Fehler, die durch defekte
Bauteile    oder    fehlerhafte     Funktionen     innerhalb     der
Gewährleistungsfrist auftreten sollten, nicht jedoch Fehler, die auf
normaler Abnutzung beruhen, wie z.B. verbrauchte Akkus,
Kratzer im Display, Gehäusedefekte, abgebrochene Antennen,
sowie Defekte durch äußere Einwirkung, wie Korrosion,
Überspannung           durch         unsachgemäße           externe
Spannungsversorgung        oder      Verwendung       ungeeigneten
Zubehörs. Ebenso sind Fehler von der Gewährleistung
ausgeschlossen, die auf nicht bestimmungsgemäßen Umgang
mit dem Gerät beruhen.
Bitte wenden Sie sich bei Gewährleistungsansprüchen zunächst
unmittelbar an den Händler, bei dem Sie das Gerät erworben
haben, oder auch gleich an unseren Servicepartner. Der Händler
wird Ihr Gerät entweder reparieren oder austauschen, oder er
wird Ihnen eine für das Gerät spezialisierte Serviceadresse
nennen.
Falls Sie Ihr Gerät einschicken, vergessen Sie Ihre Kaufquittung
als Nachweis über das Kaufdatum nicht und beschreiben Sie bitte
den aufgetretenen Fehler möglichst genau.

13                            Deutsch
Elektroschrottgesetz und Recycling
            Europäische Gesetze verbieten das Entsorgen von
            defekten oder nicht mehr brauchbaren Geräten über
            den Hausmüll. Sollten Sie eines Tages Ihr Gerät
            entsorgen wollen, dann geben Sie es bitte nur bei
            den überall eingerichteten kommunalen
            Sammelstellen zum Recycling ab. Dieses
Sammelsystem wird von der Industrie finanziert und sichert auch
die umweltgerechte Entsorgung und das Recycling wertvoller
Rohstoffe.

Serviceanschrift und technische Hotline

PST professional support technologies GmbH
Breitscheider Weg 117a
40885 Ratingen

Die Servicehotline ist unter 02102 / 1459546 (reguläre Kosten für
das deutsche Festnetz) bzw. per E-Mail unter
alan-service@ps-tech.de erreichbar.

© 2015 Alan Electronics GmbH

14                           Deutsch
DR 70
Portable Digital DAB+ and
FM Radio Receiver
User Manual
English
Please read carefully before using this product
15 English1 Table of Contents 1 Table of Contents ...............................................................16 2 Safety Instructions: ............................................................17 3 Specification: .....................................................................17 4 Controls and Attributes .......................................................18 4.1 Speaker:......................................................................19 4.2 Headphones: ...............................................................19 4.3 Radio Antenna: ............................................................20 4.4 LED Torch Light: ..........................................................20 5 First Steps .........................................................................20 5.1 Power up the radio: .....................................................20 5.2 Operating your radio: ...................................................20 5.3 DAB+/FM Band Select:................................................20 6 DAB Mode .........................................................................21 6.1 Search and select channels.........................................21 6.2 Direct Preset Button 1-5 ..............................................21 6.3 Preset..........................................................................21 6.4 Service Information .....................................................22 7 FM Mode ...........................................................................22 7.1 Search and select channels.........................................22 7.2 Manual tuning ..............................................................22 7.3 Service Information .....................................................22 7.4 Direct Preset Button 1-5 ..............................................23 7.5 Preset..........................................................................23 8 Menu .................................................................................24 8.1 Sleep mode: ................................................................24 8.2 Select Language: ........................................................24 8.3 Backlighting: ................................................................24 8.4 LCD Colour Selection: .................................................25 8.5 Factory Reset: .............................................................25 9 Power Off and Maintenance: ..............................................25 10 Warranty and Recycling Information.................................26 16 English
2     Safety Instructions:
1. Do not use this radio near water.
2. Clean with dry cloth.
3. Do not block any ventilation openings.
4. Do not use near heat objects.
5. Use accessories provided by manufacturer.
6. Do not allow this unit to be exposed to water, steam, sand or
   other environmental hazards.
7. Do not leave your radio where excessive heat could cause
   damage such as expose to direct sunlight in a parked car
   where the heat from the sun may damage the unit.

3     Specification:
Model: DR 70
Radio: Digital DAB+ & FM
Dimension: 120 x 80 x 28mm
Weight: Approx. 274g (Included battery)
DAB+ Frequency: Band III (174.0-240.0MHz)
FM Frequency: 87.5-108MHz with RDS
Number of Presets: 20 for DAB+ and 20 for FM
Speaker Output: 1.5W (RMS) 4 Ω
Output Power: 32Ω 0.1W (headphone)
Power Source: DC Adaptors (5V, 0.5A)
Battery Source: 3 x AA batteries
Usage Time: Approx 10 Hours (Speaker mode) /
             20 Hours (Headphone mode)

17                           English
4 Controls and Attributes
8 7 6 5
1
2
3
4
13
9 10 11 12
14
15
18 English1. Power ON/OFF
2. Up Button
3. Down Button
4. Menu
5. Select
6. DAB/FM Mode
16 7. Preset
8. LED Torch Light
9. Direct Preset 1
10. Direct Preset 2
11. Direct Preset 3
17 12. Direct Preset 4
13. Direct Preset 5
14. Telescopic Antenna
18 15. Battery Compartment
16. Volume Control
17. Headphone Jack
18. DC 5V Power Adaptor socket
4.1 Speaker:
The DR 70 features a high-quality 4Ω 1.5W (RMS) speaker.
4.2 Headphones:
The 3.5mm jack is located on the right-hand side of the radio. It is
designed for use with stereo headphones or earpieces.
Important:
Excessive volume from earpieces or headphone may cause
damage to your ears.
19 English4.3 Radio Antenna: 1. For DAB+ and FM reception there is a built-in telescopic antenna at the rear of the unit. 2. Extend the antenna and move it around to obtain the best reception. 3. If the reception is still unsatisfactory, pull the antenna as long as possible. 4.4 LED Torch Light: 1. A bright LED is built-in for lighting purpose. To turn ON the LED light, press once the “LIGHT” button or press again to turn it OFF. 5 First Steps 5.1 Power up the radio: The DR 70 can be operated by either 3 x AA batteries or a DC 5V power adaptor. 5.2 Operating your radio: 1. Make sure the batteries are inserted or the DC 5V power adaptor is connected. 2. Press and hold the “ ” button to turn on the radio. 3. The display will flashing with ‘Starting DAB’ and enter DAB mode (or FM mode if you selected FM before turning off). 4. If the radio is switched on for the first time, the DR 70 will perform a DAB station scan automatically. 5. Adjust the volume to a comfortable level. 5.3 DAB+/FM Band Select: 1. Press “DAB/FM” button to select DAB+ or FM mode. 2. When you turn off the radio, the last selection is saved. 20 English
6     DAB Mode
6.1     Search and select channels
1. Make sure the radio is in DAB+ mode.
2. Press the “MENU” button once to enter menu mode,
3. Press “UP or DN” button to select “DAB Autoscan” and
   confirm by pressing “SELECT” button to activate the full scan
   of all available DAB+ radio channels and all the scanned
   channels will be saved in a channel list.
4. Press the “UP” or “DN” button to select the desired channels
   from the list.
6.2     Direct Preset Button 1-5
1. Tune to your favorite DAB+ channel with the “UP” or “DN”
   button, then long press “1” button to store the current DAB+
   channel as Preset 1. Repeat the same procedure for other
   direct presets 1-5. A message of “Preset Stored” will be
   displayed on the LCD screen if the preset is stored
   successfully.
   Remark: if this preset already has stored a station this action
   will overwrite the memory.
2. To play the direct preset channels, short press the “1” to “5”
   preset button once to recall your favorite channel
3. 5 direct preset channels are available for the DAB+ radio
   mode.
6.3     Preset
1. Tune to your favorite DAB+ channel with the “UP” or “DN”
   button, long press “PRESET” button, then “Null Memory 01”
   will show on the display if the position is empty whereas it will
   show the name of the channel if it is already occupied. Press
   the “UP” or “DN” button to select the position to save, then
   press “SELECT” button to confirm. A message of “Preset
   Stored” will be displayed on LCD screen if stored successfully.
21                             English
2. To load the preset channels, short press the “PRESET” button
   and select the preset channel(the name of channel will be
   displayed) by pressing the “UP” or “DN” button, then press
   “SELECT” button to confirm.
3. 20 preset channels are available for the DAB+ radio mode.
6.4     Service Information
The Service Information display - Technical information on the
current status of the station being broadcast.
While listening to DAB+, the display will show the followings if
applicable:
1. DLS information
2. Multiplex Frequency
3. Time and Date
4. Channel Name
5. Number of Channels
6. Signal Strength
7. Battery Level

7     FM Mode
7.1     Search and select channels
1. Press and hold the “ ” button to turn the radio on.
2. Make sure the radio is in FM mode.
3. Press and hold the “UP” or “DN” button to search the nearest
   FM channel automatically.
7.2     Manual tuning
Short press the “UP” or DN” button to tune the frequency step by
step.
7.3     Service Information
While listening to FM radio, the display will show the following if
applicable

22                             English
1.    Program type
2.    Channel Frequency
3.    Channel Name
4.    Signal Strength
5.    Battery Level
7.4      Direct Preset Button 1-5
1. Tune to your favorite FM channel by “UP” or “DN” button, then
   long press “1” button to store the current FM channel as
   Preset 1. Repeat the same procedure for other direct presets
   1-5. A message of “Preset Stored” will be displayed on the
   LCD screen if the preset is stored successfully.
   Remark: if this preset already has stored a station this action
   will overwrite the memory.
2. To play the direct preset channels, short press the “1” to “5”
   preset button once to recall your favorite channel
3. 5 direct preset channels are available for the FM radio mode.
7.5      Preset
Tune to your favorite FM channel by “UP” or “DN” button, long
press “PRESET” button, then “Null Memory 01” will show on the
display if the position is empty whereas it will show the name of
the channel if it is already occupied. Press the “UP” or “DN” button
to select the position to save, then press “SELECT” button to
confirm. A message of “Preset Stored” will be displayed on LCD
screen if stored successfully.
To load the preset channels, short press the “PRESET” button
and select the preset channel(the name of channel will be
displayed) by pressing the “UP” or “DN” button, then press
“SELECT” button to confirm.
20 preset channels are available for the FM radio mode.

23                             English
8     Menu
8.1     Sleep mode:
1. In the DAB+ or FM Mode, press once the “MENU” button to
   enter menu mode, press “UP or DN” button to “SLEEP” and
   confirm by pressing “SELECT” button to activate the sleep
   function. A flashing sleep timer will be shown on the top of
   LCD, press “UP” or “DN” to select the sleep time with each
   step 5 minutes (from 0 minutes to 90), then press “SELECT”
   to confirm and the flashing will stop.
2. The radio will automatically power off when the timer reaches
   zero.
3. To cancel the sleep function select the “SLEEP” menu again
   and set it to “0” minute and confirm by pressing “SELECT”.
8.2     Select Language:
1. Press the “MENU” button to enter LCD menu, use “UP” or
   “DN” to scroll to the “Language” item, press “SELECT” button
   to confirm, then “ Language ” menu will show on the display,
   press the “UP” or “DN” button to select Language.
2. Press the “SELECT” button to confirm and save. Press
   “MENU” to exit.
8.3     Backlighting:
1. Set how long LCD backlighting remains on.
2. Press the “MENU” button to enter LCD menu, use “UP” or
   “DN” to scroll to the “Backlight” item, press “SELECT” button
   to confirm, then “ Backlight” menu will show on the display,
   press the “UP” or “DN” button again to select LCD backlight
   timer from 20s, 40s, 60s to Always On.
3. Press the “SELECT” button to confirm and save. Press
   “MENU” to exit.

24                           English
8.4     LCD Colour Selection:
1. Set the background colour of the LCD display.
2. Press the “MENU” button to enter LCD menu, use “UP” or
   “DN” to scroll to the “Color Select” item, press “SELECT”
   button to confirm, then “Color Select” menu will show on the
   display, and then use the “UP” or “DN” button to select the
   desired LCD background colour.
3. Press the “SELECT” button to confirm and save. Press
   “MENU” to exit.

8.5     Factory Reset:
1. Press the “MENU” button to enter LCD menu, use “UP” or
   “DN” to scroll to the “Factory Reset” item, press “SELECT”
   button to confirm, then “Factory Reset” menu will show on the
   display, then use the “UP” or “DN” button to select “YES” or
   “NO”. Factory reset function will clear all the preset radio
   channels if you select “YES”.
2. Press the “SELECT” button to confirm and save. Press
   “MENU” to exit.

9     Power Off and Maintenance:
1. Please shut down the radio when it is not in use and remove
   the batteries if it is not used for a longer period of time.
2. Please do not attempt to open the product or change inner
   parameter.

*Information of this user manual is subject to change without prior
notice.

25                            English
10    Warranty and Recycling Information
We are legally obliged to include disposal and warranty
information as well as EU declaration of conformity with the use
instructions in different countries for every unit. Please find this
information on the following pages.
2-Year Warranty From Date Of Purchase

The manufacturer/retailer guarantees this product for two years
from date of purchase. This warranty includes all malfunctions
caused by defective components or incorrect functions within the
warranty period excluding wear and tear, such as exhausted
batteries, scratches on the display, defective casing, broken
antenna and defects due to external effects such as corrosion,
over voltage through improper external power supply or the use of
unsuitable accessories. Defects due to unintended use are also
excluded from the warranty.
Please contact your local dealer for warranty claims. The dealer
will repair or exchange the product or forward it to an authorized
service center.
You can also contact our service partner directly. Please include
your proof of purchase with the product and describe the
malfunction as clearly as possible.

26                              English
WEEE And Recycling

            The European laws do not allow any more the
            disposal of old or defective electric or electronic
            devices with the household waste. Return your
            product to a municipal collection point for recycling to
            dispose of it. This system is financed by the industry
            and ensures environmentally responsible disposal
and the recycling of valuable raw materials.

Service Address And Technical Hotline (for units sold in
Germany)

PST professional support technologies GmbH
Breitscheider Weg 117a
D - 40885 Ratingen

Contact our service hotline by phone +49 2102 / 1459546
(regular costs for German fixed network) or e-mail at
alan-service@ps-tech.de.

© 2015 Alan Electronics GmbH

27                             English
28 English
DR 70
            Récepteur radio numérique et FM portable

                 Guide d'utilisateur
                            Français

     Veuillez lire attentivement ce guide avant d'utiliser votre
                              appareil

29                             Français
1 Sommaire 1 Sommaire ..........................................................................30 2 Instructions de sécurité : ....................................................31 3 Spécifications :...................................................................31 4 Éléments de commande et accessoires .............................32 4.1 Haut-parleur : .................................................................34 4.2 Écouteurs : .....................................................................34 4.3 Antenne radio : ...............................................................34 4.4 Éclairage à DEL :............................................................34 5 Principales opérations........................................................34 5.1 Mise en marche de la radio :...........................................34 5.2 Utilisation de votre radio : ...............................................34 5.3 Sélection de la bande numérique ou FM :.......................35 6 Mode radio numérique .......................................................35 6.1 Recherche et sélection de stations numériques ..............35 6.2 Affectation d'une station aux touches de présélection .....35 6.3 Présélection de station ...................................................36 6.4 Informations sur les services ..........................................36 7 Mode FM ...........................................................................37 7.1 Recherche et sélection de stations numériques ..............37 7.2 Recherche manuelle de station ......................................37 7.3 Informations sur les services ..........................................37 7.4 Affectation d'une station aux touches de présélection .....38 7.5 Présélection de station ...................................................38 8 Menu .................................................................................39 8.1 Mode arrêt automatique :................................................39 8.2 Sélection de la langue : ..................................................39 8.3 Éclairage de l'écran : ......................................................39 8.4 Sélection de la couleur de l'écran LCD : .........................40 8.5 Rétablissement des réglages effectués en usine : ..........40 9 Mise hors tension et entretien : ..........................................41 10 Information importante .....................................................41 30 Français
2     Instructions de sécurité :
1. N’utilisez pas cet appareil près d’une source d'eau.
2. Essuyez votre appareil avec un chiffon sec.
3. N'obstruez pas les ouvertures d'aération.
4. N'utilisez pas cet appareil à proximité d'une source de
   chaleur.
5. Utilisez les accessoires fournis par le fabricant.
6. N'exposez pas votre appareil à l'eau, à la vapeur, au sable et
   à tout autre risque dû à l'environnement.
7. N'exposez pas votre radio à une chaleur excessive risquant
   de l'endommager, par exemple dans une voiture laissée en
   plein soleil où la forte température risque alors de perturber le
   bon fonctionnement des composants.

3     Spécifications :
Modèle : DR 70
Radio : bandes numériques DAB+ et FM
Dimensions : 120 x 80 x 28mm
Poids : Environ 274 g (piles incluses)
Fréquences numériques : Bande III (174,0-240,0MHz)
Fréquences FM : 87,5-108 MHz avec RDS
Nombre de stations présélectionnées : 20 pour la bande
numérique et 20 pour la bande FM
Sortie haut-parleur : 1,5 W (RMS) 4 Ω
Puissance en sortie : 32 Ω 0,1 W (écouteurs)
Alimentation électrique : Adaptateur secteur (5 V, 0,5 A, courant
continu)
Alimentation par piles : 3 x piles AA
Autonomie des piles : Environ 10 heures en mode haut-parleur et
20 heures en mode écouteurs

31                            Français
4    Éléments de commande et accessoires
                         8      7    6    5

                                                1

                                                2

                                                3

                                                4

                                                13

                         9      10   11   12

                                               14

               15
32                   Français
1. Commutateur de
marche/arrêt
2. Touche Haut
3. Touche Bas
4. Menu
16
5. Sélectionner
6. Mode numérique/FM
7. Présélection de station
8. Éclairage à DEL
17 9. Accès direct à la
présélection 1
18 10. Accès direct à la
présélection 2
11. Accès direct à la
présélection 3
12. Accès direct à la
présélection 4
13. Accès direct à la
présélection 5
14. Antenne télescopique
15. Compartiment de piles
16. Réglage du volume
17. Sortie écouteurs
18. Entrée alimentation
secteur 5 V courant
continu
33 Français4.1 Haut-parleur : la radio DR 70 intègre un haut-parleur 4 Ω 1,5 W (RMS) de grande qualité. 4.2 Écouteurs : Le connecteur 3,5 mm se trouve sur le côté droit de la radio. Il convient au branchement d'écouteurs et casques stéréo. Important : Un volume excessif dans les écouteurs ou le casque risque d'endommager votre capacité auditive. 4.3 Antenne radio : 1. Une antenne télescopique intégrée, située à l'arrière de votre appareil, assure la réception des stations numériques et FM. 2. Pour améliorer la réception, déployez l'antenne et recherchez la meilleure orientation. 3. Si la qualité de la réception reste médiocre, tirez l'antenne aussi loin que possible. 4.4 Éclairage à DEL : 1. Nous avons prévu une DEL brillante pour servir d'éclairage. Pour allumer cette DEL, appuyez sur la touche « LIGHT » ; pour l'éteindre, réappuyez sur cette même touche. 5 Principales opérations 5.1 Mise en marche de la radio : La radio DR 70 fonctionne à partir de 3 x piles AA ou de son adaptateur 5 V courant continu. 5.2 Utilisation de votre radio : 1. Le cas échéant, insérez les piles dans leur compartiment ou branchez l'adaptateur 5 V sur une prise secteur. 2. Appuyez sur la touche « » et maintenez-la enfoncée jusqu'à ce que l'appareil s'allume. 34 Français
3. Le message « Starting DAB » clignote sur l'écran et l'appareil
   se place en mode radio numérique (ou radio FM si ce mode
   était actif au moment où vous avez éteint la radio pour la
   dernière fois).
4. Si vous allumez la radio pour la première fois, celle-ci
   démarre automatiquement une recherche des stations
   numériques.
5. Réglez le volume sonore à un niveau confortable.
5.3     Sélection de la bande numérique ou FM :
1. Appuyez sur la touche « DAB/FM » pour sélectionner le mode
   numérique DAB+ ou le mode FM.
2. Lorsque vous éteignez la radio, le mode qui est alors actif est
   enregistré en mémoire.

6     Mode radio numérique
6.1     Recherche et sélection de stations numériques
1. Vérifiez que la radio est en mode DAB+.
2. Appuyez une fois sur la touche « MENU » pour passer en
   mode menu.
3. Sélectionnez l'option « DAB Autoscan » à l'aide des touches
   « UP » et « DN », et appuyez sur la touche « SELECT » pour
   confirmer votre choix. La radio effectue une recherche
   complète de toutes les stations de radio numériques qui sont
   accessibles et copie leur fréquence dans une liste.
4. Pour écouter une station, sélectionnez-la dans la liste à l'aide
   des touches « UP » et « DN ».
6.2     Affectation d'une station aux touches de
        présélection
1. Sélectionnez une station dans la liste des stations à l'aide des
   touches « UP » et « DN ». Pour l'affecter à la touche de
   présélection 1, appuyez longuement sur la touche « 1 ».
35                            Français
Recommencez cette procédure pour les autres touches de présélection 1-5. Un message « Preset Stored » apparaît sur l'écran lorsque la présélection est effectivement enregistrée. Remarque : Si vous choisissez une touche de présélection qui a déjà été affectée à une station de radio, la fréquence est remplacée par celle de la nouvelle station. 2. Pour écouter une station qui a été affectée à l'une des touches de présélection, appuyez brièvement sur la touche de présélection « 1 » et « 5 » de cette station. 3. En mode radio numérique, vous avez accès directement à 5 touches de présélection. 6.3 Présélection de station 1. Sélectionnez une station dans la liste des stations numériques à l'aide des touches « UP » et « DN » et appuyez longuement sur la touche « PRESET ». Si la position de présélection en mémoire est vide, le message « Null Memory 01 » apparaît sur l'écran ; si elle est déjà utilisée, le nom de la station associée apparaît. Sélectionnez une position de présélection en mémoire à l'aide des touches « UP » et « DN », et appuyez sur la touche « SELECT » pour confirmer votre choix. Un message « Preset Stored » apparaît sur l'écran lorsque la présélection est effectivement enregistrée. 2. Pour écouter une station que vous avez auparavant présélectionnée, appuyez brièvement sur la touche « PRESET ». Sélectionnez sa position de présélection en mémoire à l'aide des touches « UP » et « DN », et appuyez sur la touche « SELECT » pour confirmer votre choix. 3. En mode radio numérique, vous pouvez présélectionner jusqu'à 20 stations en mémoire. 6.4 Informations sur les services La page d'information sur les services affiche des informations techniques sur la station qui est actuellement diffusée. 36 Français
Pendant que vous écoutez une station numérique, les
informations suivantes sont affichées sur l'écran (si approprié) :
1. Radiotexte
2. Fréquence du multiplexe
3. Heure et date
4. Nom de la station
5. Nombre de stations
6. Force du signal
7. Niveau de charge des piles

7     Mode FM
7.1     Recherche et sélection de stations numériques
1. Appuyez sur la touche « » et maintenez-la enfoncée
   jusqu'à ce que l'appareil s'allume.
2. Vérifiez que la radio est en mode FM.
3. Pour rechercher automatiquement la station FM la plus
   proche, appuyez sur la touche « UP » ou « DN » et
   maintenez-la enfoncée.
7.2     Recherche manuelle de station
Pour incrémenter ou décrémenter la fréquence selon le pas fixé,
appuyez brièvement sur la touche « UP » ou « DN ».
7.3     Informations sur les services
Pendant que vous écoutez une station FM, les informations
suivantes sont affichées sur l'écran (si approprié)
1. Type d'émission
2. Fréquence de la station
3. Nom de la station
4. Force du signal
5. Niveau de charge des piles

37                            Français
7.4     Affectation d'une station aux touches de
        présélection
1. Sélectionnez une station dans la liste des stations FM à l'aide
   des touches « UP » et « DN ». Pour l'affecter à la touche de
   présélection 1, appuyez longtemps sur la touche « 1 ».
   Recommencez cette procédure pour les autres touches de
   présélection 1-5. Un message « Preset Stored » apparaît sur
   l'écran lorsque la présélection est effectivement enregistrée.
   Remarque : Si vous choisissez une touche de présélection
   qui a déjà été affectée à une station de radio, la fréquence est
   remplacée par celle de la nouvelle station.
2. Pour écouter une station qui a été affectée à l'une des
   touches de présélection, appuyez brièvement sur la touche
   « 1 » à « 5 » de cette station
3. En mode radio FM, vous avez accès directement à 5 touches
   de présélection.
7.5     Présélection de station
Sélectionnez une station dans la liste des stations numériques à
l'aide des touches « UP » et « DN », et appuyez longuement sur
la touche « PRESET ». Si la position de présélection en mémoire
est vide, le message « Null Memory 01 » apparaît sur l'écran ; si
elle est déjà utilisée, le nom de la station associée apparaît.
Sélectionnez une position de présélection en mémoire à l'aide
des touches « UP » et « DN », et appuyez sur la touche
« SELECT » pour confirmer votre choix. Un message « Preset
Stored » apparaît sur l'écran lorsque la présélection est
effectivement enregistrée.
Pour écouter une station que vous avez auparavant
présélectionnée, appuyez brièvement sur la touche « PRESET ».
Sélectionnez sa position de présélection en mémoire à l'aide des
touches « UP » et « DN », et appuyez sur la touche « SELECT »
pour confirmer votre choix.
En mode radio FM, vous pouvez présélectionner jusqu'à
20 stations en mémoire.
38                            Français
8 Menu 8.1 Mode arrêt automatique : 1. En mode radio numérique ou FM, appuyez sur la touche « MENU » pour passer en mode menu. Sélectionnez l'option « SLEEP » à l'aide des touches « UP » et « DN », et appuyez sur la touche « SELECT » pour confirmer votre choix et activer la fonction arrêt automatique. Le minuteur du délai clignote en haut de l'écran. Réglez-la sur la durée que vous désirez (entre 0 et 90 minutes), par variation de 5 minutes, à l'aide des touches « UP » et « DN ». Appuyez sur la touche « SELECT » pour confirmer votre choix ; le minuteur cesse de clignoter sur l'écran. 2. La radio s'éteindra automatiquement lorsque le délai sera écoulé. 3. Pour désactiver la fonction arrêt automatique, sélectionnez l'option de menu « SLEEP » et choisissez un délai de « 0 » minute ; appuyez sur la touche « SELECT » pour confirmer votre choix. 8.2 Sélection de la langue : 1. Appuyez sur la touche « MENU » et choisissez l'option de menu « Language » à l'aide des touches « UP » et « DN ». Appuyez sur la touche « SELECT » pour confirmer votre choix. Dans le menu « Language », choisissez la langue que vous désirez l'aide des touches « UP » et « DN ». 2. Appuyez sur la touche « SELECT » pour confirmer votre choix et enregistrer la nouvelle langue. Appuyez sur « MENU » pour quitter. 8.3 Éclairage de l'écran : 1. Vous pouvez choisir la durée d'éclairage de l'écran LCD. 2. Appuyez sur la touche « MENU » et choisissez l'option de menu « Backlight » à l'aide des touches « UP » et « DN ». 39 Français
Appuyez sur la touche « SELECT » pour confirmer votre
   choix. Dans le menu « Backlight », choisissez la durée
   d'éclairage 20s, 40s, 60s ou Toujours allumé que vous
   désirez à l'aide des touches « UP » et « DN ».
3. Appuyez sur la touche « SELECT » pour confirmer votre
   choix et enregistrer la nouvelle langue. Appuyez sur
   « MENU » pour quitter.

8.4    Sélection de la couleur de l'écran LCD :
1. Vous pouvez choisir la couleur de fond de votre écran LCD.
2. Appuyez sur la touche « MENU » et choisissez l'option de
   menu « Color Select » à l'aide des touches « UP » et « DN ».
   Appuyez sur la touche « SELECT » pour confirmer votre
   choix. Dans le menu « Color Select », choisissez la couleur
   que vous désirez à l'aide des touches « UP » et « DN ».
3. Appuyez sur la touche « SELECT » pour confirmer votre
   choix et enregistrer la nouvelle langue. Appuyez sur
   « MENU » pour quitter.

8.5    Rétablissement des réglages effectués en usine :
1. Appuyez sur la touche « MENU » et choisissez l'option de
   menu « Factory Reset » à l'aide des touches « UP » et
   « DN ». Appuyez sur la touche « SELECT » pour confirmer
   votre choix. Dans le menu « Factory Reset », choisissez la
   valeur « YES » ou « NO » à l'aide des touches « UP » et
   « DN ». Si vous répondez « YES », toutes vos présélections
   sont annulées.
2. Appuyez sur la touche « SELECT » pour confirmer votre
   choix et enregistrer la nouvelle langue. Appuyez sur
   « MENU » pour quitter.

40                          Français
9     Mise hors tension et entretien :
1. Éteignez complètement votre appareil lorsque vous ne
   l'utilisez pas. Retirez les piles si vous n'envisagez pas
   d'utiliser votre appareil avant longtemps.
2. N'essayez pas d'ouvrir votre appareil ni de modifier des
   paramètres internes.

* Nous nous réservons le droit de modifier toute information
rapportée dans ce document sans notification préalable.

10    Information importante
Nous sommes légalement tenus d'inclure les dispositions et les
informations de garantie et la déclaration de conformité de l'UE
avec le mode d'emploi de chaque unité, et ce dans la langue de
chaque pays.
Veuillez trouvez ces informations dans les pages suivantes.

Deux ans de garantie à compter de la date d’achat
Le Fabricant/revendeur garantit ce produit pour deux ans à
compter de la date d’achat. Cette garantie couvre tout
dysfonctionnement dû à une défaillance des composants ou à des
fonctions incorrectes pendant la période de la garantie à
l'exception des pièces d’usure, telles que batteries, égratignures
de l'écran, défectuosité du boîtier, rupture de l'antenne et les
défaillances dues à des raisons extérieures telles que corrosion,
surtension à cause d'une source d'alimentation externe
inappropriée ou l'utilisation d'accessoires inadéquats. La garantie
ne couvre pas les défaillances dues à un usage non
prévu.Contactez votre revendeur local pour réclamation sous
garantie. Le revendeur réparera/remplacera ou envoie le produit à
un centre de service agréé.

41                            Français
Sie können auch lesen