Hotspot- Pi - Star Software
←
→
Transkription von Seiteninhalten
Wenn Ihr Browser die Seite nicht korrekt rendert, bitte, lesen Sie den Inhalt der Seite unten
Zum   01.03.2021                           hotspot-
Paßwort nötig!
Veröffentlicht am 10. Januar 2021
Hallo Leute,

aufgrund fortschreitenden Mißbrauchs des MMDVM-Protokolls für
unkoordinierte Links zu anderen Netzen haben einige Master-
Betreiber bereits begonnen, ein persönliches Hotspot-Paßwort
verpflichtend einzuführen. Dies führt dazu, daß die Master-
Server, welche nach wie vor das Standard-PW erlauben, immer
mehr diesen unerwünschten Traffic abbekommen, da natürlich die
Fremdnutzer der IDs auch nicht gänzlich blöd sind und munter
zwischen den Servern wechseln, wie es ihnen gerade gefällt.

Daher haben wir uns entschlossen, zum 01.03.2021 auf den durch
uns betreuten Servern das Standard-Paßwort für den Hotspot-
Zugang abzuschalten. Nutzer müssen ab diesem Zeitpunkt
zwingend                      im                      selfcare
(https://brandmeister.network/?page=selfcare) sowie in ihrem
Hotspot solch ein Passwort setzen, um weiterhin zu den Servern
2001, 2621 oder 2622 via Hotspot zu verbinden. Wer dies
bereits getan hat, für den ändert sich natürlich nix.

Gebt diese Information weiter, informiert auch eure
Funkfreunde, die dies vielleicht nicht mitbekommen – so macht
ihr allen die Umstellung einfacher.

Und beachtet bitte auch, natürlich bieten wir den üblichen
Support, wenn dabei Probleme auftreten – dieser beschränkt
sich aber auf Verbindungen zu den Servern 2001, 2621 und 2622,
bei anderen Master-Servern können wir keine Hilfestellung
bieten. Ferner können wir keinen Support bei Problemen
leisten, die sich auf die Software des Hotspots beziehen.
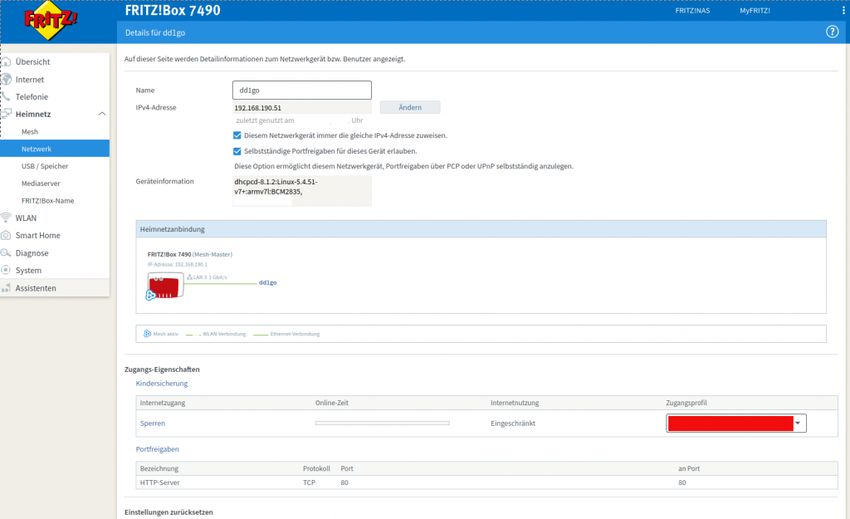
Vielen Dank für euer Verständnis, und weiter viel Spaß im BM!

 Ralph, dk5ras, fürs BM262.de-Team

Fritzbox und Hotspot
Neuere Fritz Boxen haben den Bereich Zugangsprofile geändert
und viele Ports sowie die direkte IP4 Nutzung auf die
BLACKLIST gelegt. Um mit dem Hotspot arbeiten zu können muss
dieser in die Gruppe UNBEGRENZT gefügt werden. Hier am
Beispiel 7490 gezeigt. Andere können abweichend sein.

unter Internet > Filter > Zugangsprofile werden die Profile
verwaltet oder auch hinzugefügt ( nur für Hotspot )

Die Einstellungen und Auswahl des Zugangsprofil findet Ihr
unter: Heimnetzwerk > Netzwerk > Netzwerkanbindung > [Gerät]
Die Auswahl wird im Rot markierten Feld getätigt.

Bei Standard kann „Aufrufe über IP-Adressen sind ebenfalls
gesperrt.“ eingestellt sein und alle Verbindungen zu IPs
werden vom Hotspot abgelehnt. mit der Änderung kann dies
Problem behoben werden.

In der Einstellung    Unbeschränkt   sind   auch   IP   Adressen
erreichbar.

Das Pi-Star DASHBOARD auf
EA7EE Installation ändern
(per SSH)

ZUERST ein Datenbackup ausführen!
Voraussetzung ist eine Pi-Star Installation, von Andy Taylor
(MW0MWZ). Minimum sollte es als Version 4.1.0 vorliegen. Wer
schon die RMB Version als Image von dieser Seite verwendet
muss dies nicht mehr ausführen!

Öffne das SSH Fenster ( http://pi-star.local:2222) oder
verbinde mit einer alternative zum Hotpsot . Nach dem Login im
SSH Terminal Fenster die angegebenen Befehle eingeben und mit
der Eingabe bestätigen. Bitte Zeile für Zeile !
Das Zeichen am Anfang der Zeile (*) dient nur zur Orientierung, bitte nicht eingegeben.
sudo su
rpi-rw
apt update
dpkg --configure -a
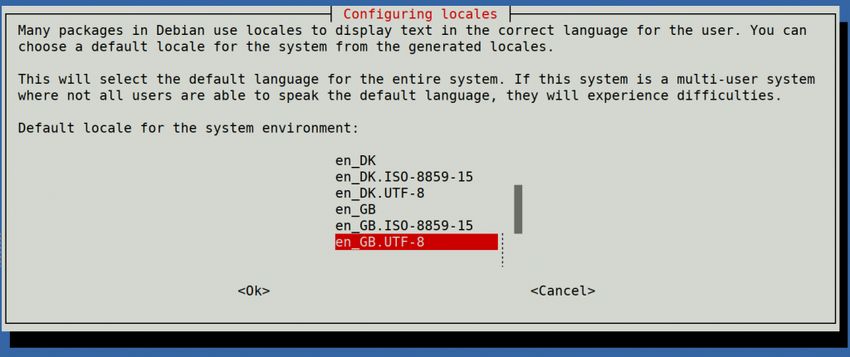
dpkg-reconfigure locales (DIES KANN AUCH SPÄTER GEMACHT
WERDEN)
Hier bitte en_GB.UTF-8 auswählen (Curser hoch/runter) und mit
der Leertaste anwählen und dann mittels der [TAB] Taste OK
anwenden und die Config abwarten.
Hier bitte en_GB.UTF-8 anwählen (Curser hoch/runter) und dann
mittels der [TAB] Taste OK anwenden und die Config abwarten.
apt upgrade -y
pistar-update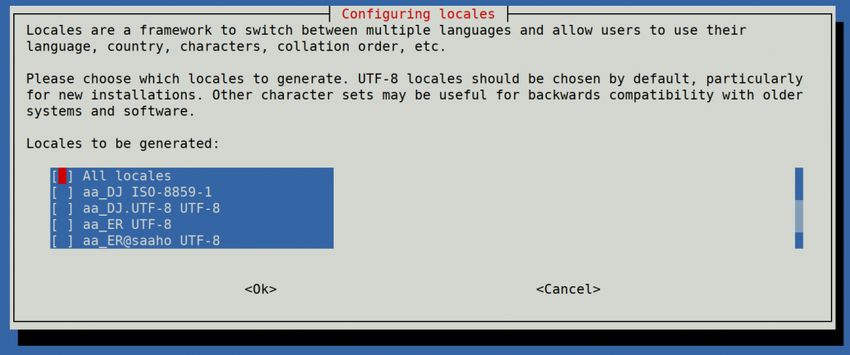
pistar-upgrade
init 6
Nun wird der Hotspot neu gestartet.
Ab hier kommt die eigentliche Neuanpassung auf RMB , jetzt
aktualisieren wir das Dashboard auf EA7EE Version.
Nun bitte erneut per SSH auf den Hotspot einloggen und die
Befehle Zeilenweise abarbeiten.
rpi-rw
wget http://fcs004.xreflector.net/ea7ee-pistar -O ea7ee-
pistar
chmod +x ea7ee-pistar
sudo ./ea7ee-pistar -ia
Das Kopieren der Dateien sollte jetzt ohne Fehler
abgeschlossen sein. Nun musst du die Konfigurationsseite des
Pi-Star Hotspot öffnen und auf die Schaltfläche „Änderungen
übernehmen“ klicken. Danach ist die Neue Pi-Star Oberfläche
schon verfügbar. Mit dieser Version ist erst mal nur das
DASHBOARD auf 2020xxxx-ea7ee betroffen , PiStar ist dann noch
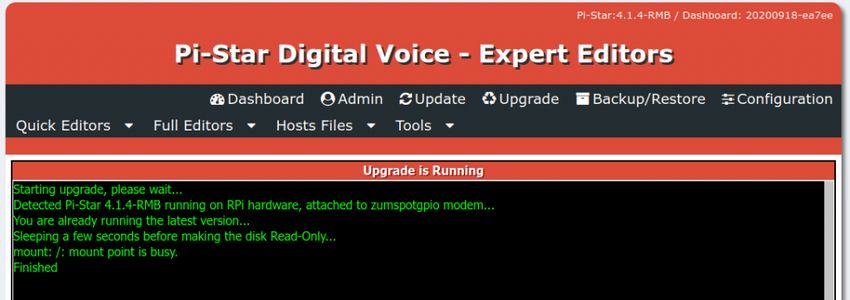
4.1.2 . Bitte dann noch solange das UPGRADE über die
Schaltflächen der Oberfläche anstoßen, bis sich daraus keine
weiteren Änderungen ergeben, bis dann die Pi* 4.1.4
abgeschlossen ist.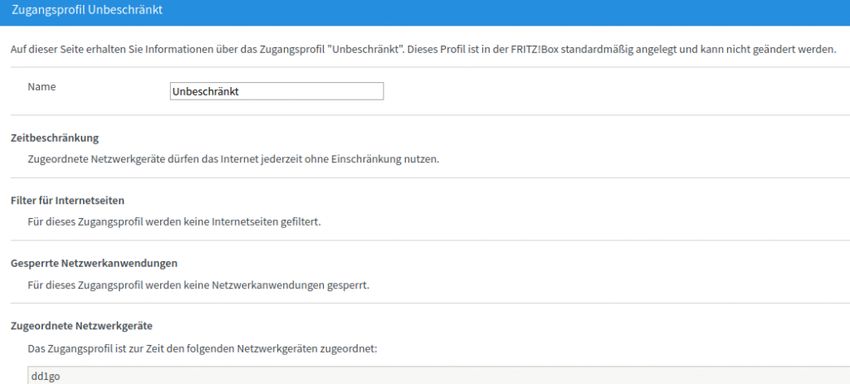
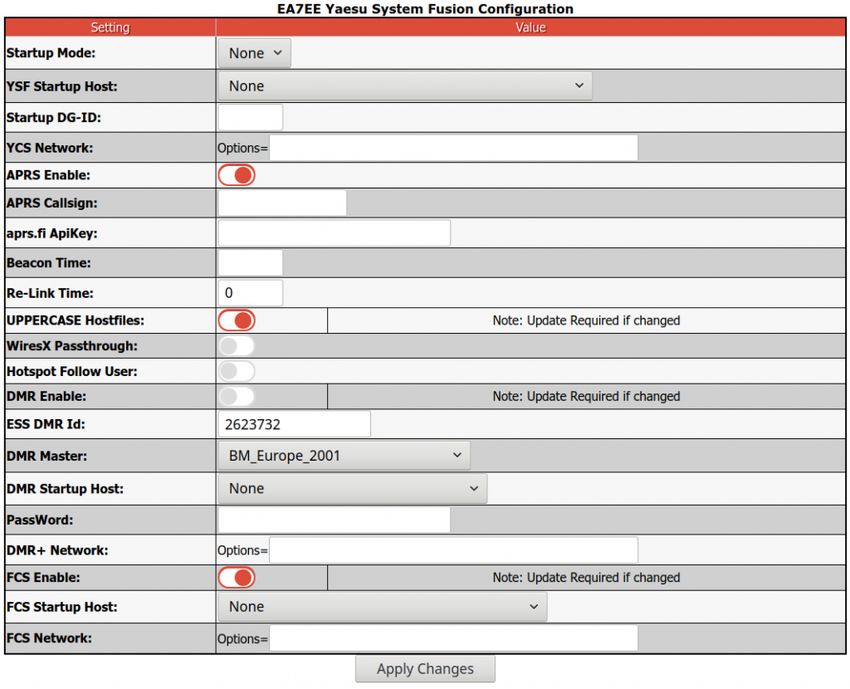
Pi-Star 4.1.4-RMB von EA7EE
Jetzt kann bei Bedarf auch die Config wieder, aus dem BACKUP
von vorhin, zurück gespielt werden. Im Anschluss die
persönlichen Daten noch kontrollieren. Konfiguration der EA7EE
Yaesu System Fusion Configuration Dienste, dann wie gewohnt
abschließen. Die Sprache für das Dashbord muss gegebenenfalls
auf Deutsch noch geändert werden.

Neutrale Konfiguration im neuen Gewand. Persönliche Wünsche
noch angeben, fertig.
Einmal den Neustart (über Power/Reboot) ausführen und fertig.

Jetzt sollte alles auf dem neusten Stand
sein.
Ein TIPP noch , BEACON TIME auf 0 setzten, da aktuell die Bake
nur Spanisch kann, dies wird aber in einer kommenden Version

mit Text2Speak geändert.

Pi-Star:4.1.2-EA7EE ISO Image
Das Image von Manuel (EA7EE) ist jetzt hier als Mirrow
gespeichert. Dies ist keine Offizielle ISO von Andy Taylor
(MW0MWZ) sondern eine Modifizierte und für C4FM verbesserte
Version. Nach dem erstellen der SD Karte ist ein UPGRADE und
UPDATE erforderlich um den Tagesaktuellen Stand zu erhalten.
D-Star DCS002
      Group           Modul DTMF   URCALL
    World-Wide         A    D2A DCS002AL
      in-use           B    D2B DCS002BL
   Deutschland         C    D2C DCS002CL
   Germany-Chat        D    D2D DCS002DL
Bosnien/Herzegowina    E    D205 DCS002EL
     Franken           F    D206 DCS002FL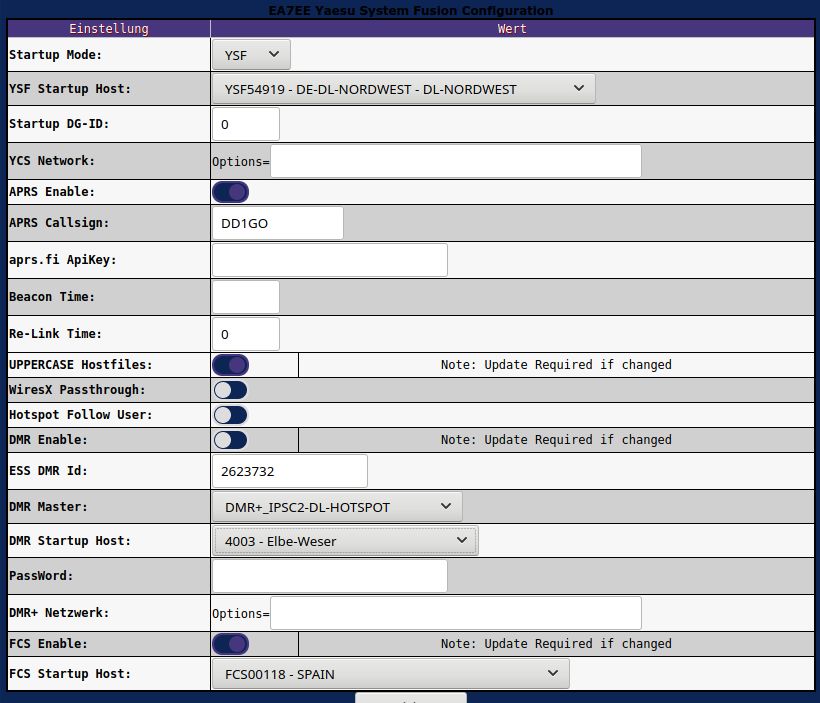
Poland          G    D207 DCS002GL
      Haiti          H    D208 DCS002HL
Schleswig-Holstein   I    D209 DCS002IL
Baden-Wuerttemberg   J    D210 DCS002JL
     Greece          K    D211 DCS002KL
     Russia          L    D212 DCS002LL
     Romania         M    D213 DCS002ML
     Hamburg         N    D214 DCS002NL
     Bayern          O    D215 DCS002OL
     Sweden          P    D216 DCS002PL
      Japan          Q    D217 DCS002QL
     Croatia         R    D218 DCS002RL
    Saarland         S    D219 DCS002SL
   Niederbayern      T    D220 DCS002TL
     Ukraine         U    D221 DCS002UL
   South-Korea       V    D222 DCS002VL
     in-use          W    D223 DCS002WL
     Israel          X    D224 DCS002XL
  Announcements      Y    D225 DCS002YL
  ECHO-Function      Z    D226 DCS002ZL

D-Star DCS001
      Group          Modul DTMF   URCALL
    World-Wide        A    D1A DCS001AL
      Europe          B    D1B DCS001BL
    Deutschland       C    D1C DCS001CL
Elbe-Weser D D1D DCS001DL
NRW E D105 DCS001EL
Berlin-Brandenb-MV F D106 DCS001FL
DL-Bayern-Ost G D107 DCS001GL
in-use H D108 DCS001HL
Ruhrgebiet I D109 DCS001IL
DL-Nord J D110 DCS001JL
Hessen K D111 DCS001KL
Rheinland-Pfalz L D112 DCS001LL
DL-Mitte M D113 DCS001ML
Niedersachsen N D114 DCS001NL
Bayern O D115 DCS001OL
Baden-Wuerttemberg P D116 DCS001PL
D-RATS-Test Q D117 DCS001QL
DL-Sued R D118 DCS001RL
DL-West S D119 DCS001SL
DL-Ost T D120 DCS001TL
Thailand U D121 DCS001UL
DMRplus-Test-Ref4012 V D122 DCS001VL
DMRplus-NR-MYK W D123 DCS001WL
working—in-use X D124 DCS001XL
Entwickler-Treff Y D125 DCS001YL
ECHO-Function Z D126 DCS001ZLConfigure a Pi-Star based multi network DMR hotspot June 3rd, 2020 | Author: Jeff VE6DV Often when people create a DMR hotspot they set them up for only one network. But if they want to use DMR+ one moment, then Brandmeister the next and then later talk with someone on the TGIF network they will need to switch back and forth depending on which network they want to use. Switching back and forth between networks works well. But this involves loading the configuration for the network that you want to use. But what if you want to be able to use multiple networks at the same time? This can easily be done by configuring the following within your Pi-Star settings. You will also need to update the code plug within your radio. But once you have everything setup you will be able to go from Brandmeister to DMR+ to TGIF all within the radio. No need to change the configuration within your hotspot. Hotspot Setup To get started, first you will want to backup your configuration. This way if something goes wrong you will be able to get back to where you started. Next, in pi-star click on configuration, then Expert, then in the Full Edit row click on DMR GW. You will want to configure the various DMR Networks. Cut and paste the following into the section showing your DMR networks in the expert configuration file. Be sure to modify the proper sections with your DMR ID etc otherwise the network will not let you connect. Your DMR network sections
should look exactly like my examples below except for the
following: DMR Network 1 – you will need to enter your
Brandmeister Hotspot Security Password between the quotes and
your DMR ID where it is called for. You may also want to
change your Brandmeister master server to the one closest to
your physical location however it probably won’t really make
much of a difference in performance. The Canadian server works
quite well and has very low latency from just about anywhere.
It also has fewer users than other servers so you may actually
find it works a little better. In DMR Network 2 you need to
enter your DMR ID where it is called for. I suggest keeping
the IPSC2 server as IPSC2-QuadNet. Full disclosure, I am an
admin and founding member with QuadNet so I am probably a
little biased. IPSC2-QuadNet is the server that we run and one
that we can make sure works and works well. If there is a
problem, we fix it. If our users have an issue we can try to
help We can’t say the same about other servers. That being
said you can use any IPSC2 server that you prefer. If you
select a different server you may find that talkgroups may not
work as expected but you can contact the server owner for
assistance. The options= line in this section is configured
with the most active DMR+ talkgroups and is how I have my
configuration setup. But you can change these as desired.

DMR Network 3 can be left as is

DMR Network 4 – Enter your DMR ID where it is called for

[DMR Network 1]
Enabled=1
Address=158.69.203.89
Port=62031
TGRewrite0=2,9,2,9,1
TypeRewrite1=1,9990,1,9990
TypeRewrite2=2,9990,2,9990
SrcRewrite0=2,4000,2,9,1001
PassAllPC1=1
PassAllPC2=2
PassAllTG1=1
PassAllTG2=2
Password=”Enter your BM Hotspot Security Password here”
Debug=0
Name=BM_Canada_3021
Id=Enter your DMR ID here

[DMR Network 2]
Enabled=1
Address=168.235.109.210
Port=55555
TGRewrite0=2,8,2,9,1
TGRewrite1=2,80505,2,505,1
TGRewrite2=2,80800,2,800,100
TGRewrite3=2,83801,2,3801,8
TGRewrite4=2,89990,2,9990,1
TGRewrite5=2,80001,1,1,9999
TGRewrite6=2,80001,2,1,9999
PCRewrite0=2,84000,2,4000,1001
Password=”PASSWORD”
Debug=0
Id=Enter your DMR ID here
Name=DMR+_IPSC2-QUADNET
Options=”TS1_1=1;TS1_2=2;TS1_3=3;TS1_4=13;TS1_5=133;TS1_6=235;
TS1_7=315;TS1_8=320″

[DMR Network 3]
Enabled=0
Name=HBLink
Address=1.2.3.4
Port=5555
TGRewrite0=2,11,2,11,1
Password=PASSWORD
Location=0
Debug=0

[DMR Network 4]
Enabled=1
Name=TGIF_Network
PCRewrite1=1,4009990,1,9990,1
PCRewrite2=2,4009990,2,9990,1
TypeRewrite1=1,4009990,1,9990
TypeRewrite2=2,4009990,2,9990
TGRewrite1=1,4000001,1,1,999999
TGRewrite2=2,4000001,2,1,999999
SrcRewrite1=1,9990,1,4009990,1
SrcRewrite2=2,9990,2,4009990,1
SrcRewrite3=1,1,1,4000001,999999
SrcRewrite4=2,1,2,4000001,999999
Address=tgif.network
Password=passw0rd
Port=62031
Location=0
Debug=0
Id=Enter your DMR ID here

Once your DMR Networks are configured as shown in the
examples, scroll to the bottom of the page and click on Apply
Changes. Next click on Admin, then power, finally click on
reboot to restart your hotspot.

Radio Setup

The next thing you will need to do is to configure your radio
to work with the new hotspot settings. Each talkgroup you add
to your code plug will need to have the proper prefix added
except for Brandmeister. BM talkgroups can be used as you
always have without a prefix. This should make updating your
code plug fairly painless. The other networks you will need to
add the prefix as follows:

DMR+ Setup

The DMR+ prefix is 8 and each talkgroup has 4 digits. So to
use access the QuadNet Array you would use talkgroup 80320. To
program the talkgroup for North America you would use 80003
and so on. The following are the most active DMR+ talkgroups
so I converted them to the proper format for you:

80001   – World Wide (All languages)
80002   – Europe
80003   – North America
80013   – World Wide English
80113   – UAE 1 (User Accessible English 1)
80123   – UAE 2 (User Accessible English 2)
80133   – USA Wide
80235   – United Kingdom
80302   – Canada Wide
80315   – QuadNet Technical (Linked to D-STAR)
80320    – QuadNet Array (linked to D-STAR, Brandmeister DMR,
Yaesu System Fusion & Wires X
80505 – Australia Wide
89990 – DMR+ Parrot. This needs to be setup as a group call.

Brandmeister Setup

Brandmeister has no prefix. Just program the talkgroup number
as you always have

TGIF Setup

TGIF is 4 and the talkgroup numbers are 6 digits. So to use
the IRN talkgroup on TGIF talkgroup 320 would be programmed as
4000320

Testing your hotspot

Now let’s test your setup to confirm everything is working
using each network’s Parrot. To test the Brandmeister
connection, do a private call to 9990. To test DMR+ send a
group call to 89990 and to test TGIF send a private call to
4009990. Each should play back what you transmit. If one of
the networks does not work check the configuration file to be
sure you entered all of the required information such as your
DMR ID or your Brandmeister hotspot security password, save
and try again.

Private Calls

To make a private call to another station, just enter their
DMR ID in your code plug and select private call. The call
will be routed over the Brandmeister network.

I hope this helps you to get your multi network hotspot up and
running. If you have any questions, feel free to give me a
call on the QuadNet Array DMR+ talkgroup 320. You can also
send an email to jeff@edmontonfireradio.com. If you have any
questions about the IPSC2-QuadNet server, send an email to
admins@openquad.net

I would like to thank Cliff VE6PLC and Andy MW0MWZ for your
help with this configuration. Without your input this solution
would not have been nearly as elegant. I would also like to
thank the many volunteers that helped make sure this worked on
their hotspot. If it weren’t for you helping to find bugs this
project would have been a lot more difficult.

73 – Jeff VE6DV

D* und HotSpot mit einem ID51
Ein Hinweis für die D-Star User mit dem ID51. Um mit dem
Hotspot raus zu kommen, ist es erforderlich eine Repeater
SHIFT mit 0 anzugeben und nicht als SIMPLEX zu arbeiten. Dann
sollte auch eine Verbindung in die Außenwelt klappen.
Pi-Star    Version                                4.1.2
veröffentlicht
Pi-Star 4.1.2 ist jetzt verfügbar. Wenn Sie bereits 4.1.x
ausführen, können Sie ein Update durchführen und anschließend
über das Dashboard aktualisieren (der Upgrade-Link befindet
sich im Expertenbereich).

Neue Sachen:
Aktualisierungen       für    das    bereits     integrierte
Basisbetriebssystem sollten verhindern, dass Pi 3A + -Benutzer
sofort Probleme haben.

Einige verbleibende Probleme aus dem Buster-Upgrade wurden
behoben. Einige Dienste wurden beim Booten unterbrochen und
blöken. Daher wurden sie jetzt entfernt.

MobileGPS wurde hinzugefügt und ist im Dashboard verfügbar.
Möglicherweise ist noch etwas Arbeit erforderlich, um es
perfekt zu machen, aber es ist endlich da.

/boot/config.txt wurde aktualisiert, um einige              der
Einstellungen an die vorgelagerten Änderungen anzupassen.

Ein unausweichliches Portal wurde hinzugefügt – wenn Sie
AutoAP verwenden, werden Sie dies bemerken

Es gibt viele andere neue Dinge in Pi-Star, die nicht nur für
diesen Build gelten, zum Beispiel Linkmanager für fast alles

Viel Spass damit!

 Eine Information von :
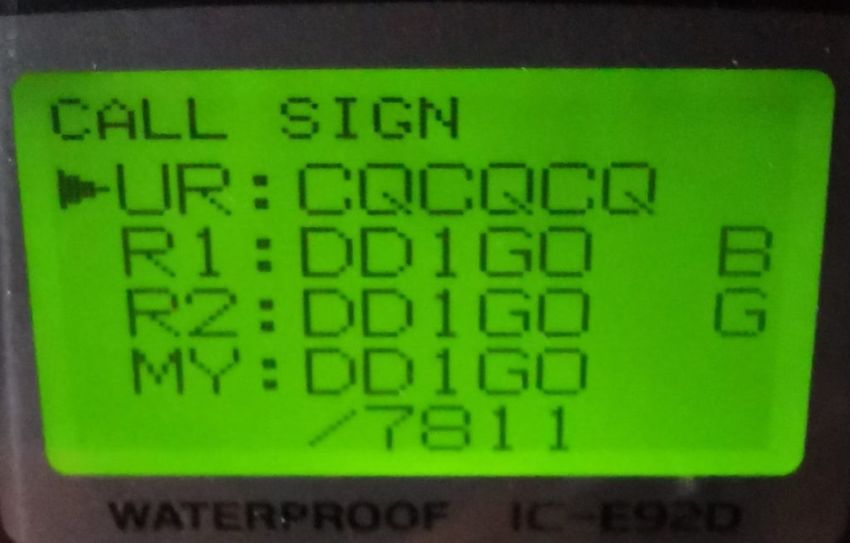
Andy, MW0MWZ

https://pi-star.de/Pi-Star_RPi_V4.1.2_20-May-2020.zip

Wichtiger Hinweis. Der erste Start kann je nach SD
Kartengröße mehrere Miuten dauern. Bitte Geduld,
bis der Vorgang abgeschlossen ist und der
AccessPoint bzw der WiFi Connect bereit steht!

D Star mit Hotspot
Wichtig ist, dass als Gateway im ICOM Funkgerät, der Hotspot
(HSCALL-G) auch eingetragen werden muss.

Beispiel für DD1GO und Hotspot
Sie können auch lesen