Montageanleitung Mounting Instruction / Notice de montage - Innovative Mobile Technology - ten Haaft
←
→
Transkription von Seiteninhalten
Wenn Ihr Browser die Seite nicht korrekt rendert, bitte, lesen Sie den Inhalt der Seite unten
Montageanleitung
                       Mounting Instruction / Notice de montage
Artn.: 3.150.2022

                                                                                   Internet

                                                     HD Receiver „Europe“

                    Innovative Mobile Technology

                    05/2013   Sprache / language / langue: deutsch / englisch / français
Bestimmungsgemäße Verwendung
Proper use and operation
Utilisation suivant votre la destination
Die bestimmungsgemäße Verwendung dieses Produktes ist die Festmontage auf Wohnmobilen oder Wohnanhängern
(Caravans) mit einer Höchstgeschwindigkeit von nicht mehr als 130 km/h. Das Produkt ist in der Lage, bei geparktem
Trägerfahrzeug die eingebaute Antenne selbsttätig auf einen der für Europa üblichen, geostationären, direkt strahlenden
Fernsehsatelliten fest auszurichten.
Die Spannungsversorgung muss durch ein normgerechtes Kraftfahrzeugbordnetz mit einer Nennspannung von 12 V oder
24 V erfolgen. Bei Einbauten, für die kein KfZ-Bordnetz zur Verfügung steht, muss ein geeigneter Wandler 230 V / 12 V
verwendet werden.

Um einen zuverlässigen und sachgerechten Betrieb Ihrer Anlage zu gewährleisten, ist ein anderer Einsatz als vorgegeben
nicht zulässig.

Bitte beachten Sie folgende Herstellervorschriften:

   l   Vermeiden Sie es, das Wohnmobil mit Sat-Anlage in einer Bürstenwaschanlage, Waschstraße oder mit Hochdruck-
       reinigern zu waschen.
   l   Fahren Sie die Anlage bei starkem Wind oder Sturm ein.
   l   Eine Veränderung des Gesamtgerätes durch Entfernen einzelner Komponenten oder Hinzufügen anderer Kompo-
       nenten ist unzulässig.
   l   Die Verwendung anderer Parabolspiegel/Flachantennen oder Empfangsköpfe (LNB) als der original montierten Teile
       ist nicht zulässig.
   l   Einschlägige, anerkannte Richtlinien des Kfz-Gewerbes sind zu beachten und zu erfüllen.
   l   Die Montage ist nur auf harten Fahrzeugdächern mit genügender Festigkeit und Eigenstabilität zulässig.
   l   Das Produkt bedarf keiner regelmäßigen Wartung. Die Gehäuse dürfen nicht geöffnet werden. Überlassen Sie Über-
       prüfungsarbeiten stets nur einem qualifizierten Fachmann.
   l   Bei Unklarheiten oder Problemen wenden Sie sich bitte an den Hersteller oder eine vom Hersteller anerkannte
       Fachwerkstatt.
   l   Durch den Einbau dieses Produktes als Zubehörteil kann sich die Gesamthöhe des KFZ vergrößern. Der Einbaubetrieb
       ist verpflichtet, den Auftraggeber über eine ggf. veränderte Fahrzeughöhe detailliert zu informieren.

This product has been designed for use in a fixed installation on mobile homes or camper trailers with maximum speeds
of 130 km/h. It is designed to automatically aim a parabolic antenna mounted on a stationary vehicle at geostationary
television satellites transmitting directly to Europe.
The power to the system is supplied by a standard vehicle electric system with a rated voltage of 12 or 24 Volt. For installa-
tions where a connection to the vehicle‘s electrical system is provided, a suitable 230-Volt to 12-Volt power converter must
be used.

Use of the equipment for any other purpose than the one specified is not permitted.

Please ensure that the following instructions are observed:

   l   Do not clean your mobile home with the mounted satellite system in a single-bay or drive-through car wash or
       with a high-pressure cleaner.
   l   Retract the antenna down, if there is a strong wind or a storm
   l   It is not permitted to change the overall device by removing or adding individual components or to use other
       parabolic/flat antennas or receiver heads (LNBs) than those originally installed at the equipment.
   l   All of the relevant and approved guidelines of the automotive industry must be observed and complied with.
   l   The equipment must only be installed on hard vehicle roofs which are sufficiently strong and inherently stable.
   l   No regular maintenance is required for the product. All housings and enclosures must not be opened. Always ask a
       qualified professional to carry out any maintenance work.
   l   In the event of any problems, or if you are unsure about anything, please contact the manufacturer directly or a
       specialist workshop which is approved by the manufacturer.
   l   By mounting this product as car accessory, the overall height of the vehicle, might be by increased. The company,
       who is mounting the system, is obliged to inform in case about a changed vehicle height in detail.
                                                              1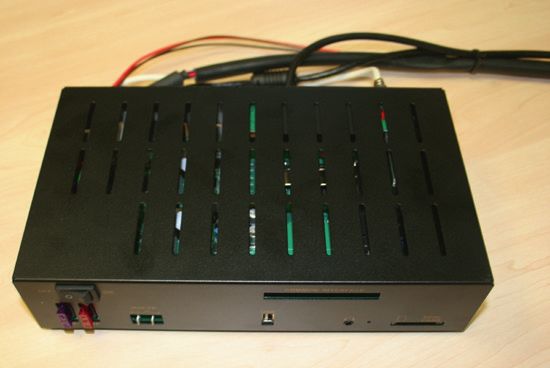
Ce système est destiné au montage fixe sur les camping-cars ou caravanes ayant une vitesse maximum ne dépassant pas
les 130 km/h.
Notre dispositif est capable de cibler automatiquement les antennes des véhicules en stationnement directement sur le
satellite européen géostationnaire habituel.

L´alimentation électrique doit être fournie par un réseau de bord automobile conforme présentant une tension nominale
de 12V ou 24 V. Si votre installation ne dispose pas du réseau de bord, il conviendra d´utiliser un convertisseur 230V/12V
approprié.

Pour garantir le fonctionnement de votre system toute autre utilisation que celle définie ci-dessous est interdite.

   l   Eviter de nettoyer le véhicule au karcher ou dans une station de lavage à brosses.
   l   En cas de tempête ou de vent très fort, rétractez l´antenne.
   l   L´appareil dans son ensemble ne doit pas être modifié ni par suppression de composants ni par ajout d´autres
       composants.
   l   L’utilisation de modules solaires, antennes paraboliques ou têtes de réception autres que les pièces d’origine n’est
       pas autorisée.
   l   Le montage sur le véhicule doit être effectué en fonction des directives afférentes et homologuées en vigueur dans
       le secteur automobile.
   l   Le montage n’est autorisé que sur des toits de véhicules rigides et présentant une résistance et une stabilité de
       forme suffisantes.
   l   Le produit ne nécessite aucun entretien régulier. Ne pas ouvrir les boîtiers. Faites toujours effectuer les opérations
       de vérification par un technicien qualifié.
   l   En cas de doute ou de problème, s´adresser au fabricant ou à un atelier spécialise agréé par le fabricant.
   l   Le montage de ce produit en tant qu´accessoire peut augmenter la hauteur totale du véhicule.L´usine qui aura
       procédé a ce montage devra en informer le clients dans les moindres details.

                                                               2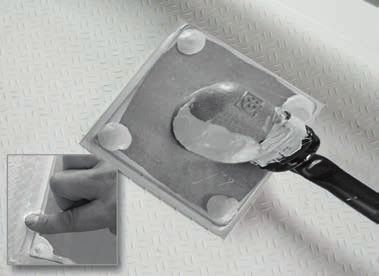
Zur besonderen Beachtung
Safety instructions
Points à observer plus particulièrement
Vor Beginn jeder Fahrt überzeugen Sie sich als Führer des Kraftfahrzeuges durch einen Blick auf die Außeneinheit bitte
persönlich davon, dass die Antenne vollständig eingefahren ist.

Das automatische Einfahren der Antenne kann nach dem Einschalten der Zündung bzw. dem Starten des Motors
bis zu 30 Sekunden dauern. Bewegen Sie Ihr Fahrzeug während dieser Zeit nicht.
Die Antenne kann nur dann eingefahren werden, wenn der Hauptschalter am Receiver EIN (bzw. auf „I“) geschaltet
ist und der Receiver mit Spannung versorgt wird. Ein technischer Defekt im Fahrzeug oder der Antennenanlage
kann das automatische Einfahren verhindern. Kontrollieren Sie deshalb immer, dass die Antenne beim Starten des
Fahrzeuges vollständig einfährt.

   l   Stellen Sie sicher, dass die Anlage entsprechend der Vorgaben in dieser Montageanleitung in Ihr Fahrzeug eingebaut
       wird und lassen Sie sich dies vom einbauenden Betrieb bestätigen.
   l   In den verschiedenen Ländern gelten unterschiedliche gesetzliche Vorgaben für den Betrieb von Satelliten-
       empfangsanlagen und elektrischen sowie elektronischen Geräten im Allgemeinen. Als Benutzer einer solchen
       Anlage sind Sie für die Einhaltung der jeweiligen Vorschriften selbst verantwortlich.
   l   Sollten Ihnen die jeweiligen nationalen Vorschriften nicht geläufig sein, empfehlen wir Ihnen zu Ihrer eigenen
       Rechtssicherheit, die Anlage vor Antritt einer jeden Fahrt mit dem Hauptschalter am Receiver auszuschalten, um die
       gesamte Satellitenempfangsanlage vollständig von der Bordspannungsversorgung abzutrennen.
   l   Beachten Sie unbedingt, dass alle Teile dieser Anlage eine Gefahr für Kinder darstellen können. So kann das
       Verschlucken von Kleinteilen wie z.B. Batterien lebensgefährlich sein! Lassen Sie Kinder niemals unbeaufsichtigt mit
       dieser Anlage oder Teilen davon spielen. Achten Sie immer darauf, dass sich während der Antennenbewegung keine
       Personen im Aktionsradius der Antenne aufhalten.
   l   Bitte beachten Sie, dass der Receiver der Sat-Anlage direkt an der Versorgungsbatterie (nicht an der Motorstart-
       Batterie) angeschlossen wird. Alternativ ist ein Anschluss der 12 Volt Spannungsversorgung auch über den Energie-
       Block des KFZ möglich, wenn sichergestellt ist, dass der Energie-Block 7 A liefert, ohne dass die Spannung einbricht.

The driver of the vehicle must inspect the antenna unit before driving off to ensure that the antenna is fully retracted.

The driver of the vehicle must inspect the antenna unit before driving off to ensure that the antenna is fully
retracted.
The automatic retraction of the antenna after switching on the ignition or starting the engine may take up to 30
seconds. Do not move the vehicle during this period!
The antenna can only be retracted when the master switch at the receiver is set to ON (or ‚I‘) and the receiver is
connected to a power source. Automatic retraction may be prevented by technical defects of the vehicle or the
antenna system. Ensure that the antenna is fully retracted before driving off!

   l   Ensure that the system is installed in your vehicle in accordance with the Installation Instructions provided or have
       the correct installation confirmed by the installer.
   l   Please note that different legal requirements may apply to the operation of electrical and electronic equipment in
       different countries. As the user of this equipment, you yourself are responsible for ensuring compliance with the
       relevant laws and regulations.
   l   In case you are not familiar with the applicable legal regulations, we recommend that you fully disconnect the
       satellite system from the power supply by turning off the master switch of the receiver in order to avoid violating
       any applicable laws.
   l   Keep in mind that all parts of this system may be dangerous to children. The swallowing of small parts such as
       batteries can be fatal! Never leave children unattended in the vicinity of the system or its components. Ensure that
       there are no persons within the operating radius of the antenna when it is operated.
   l   Please consider that the receiver should be connected to the car supply battery (not to the engine start battery).
       Alternatively, a connection to a 12 Volt power supply by the energy bloc of the vehicle is possible, if the energy bloc
       provides 7 Ampere, without breakdowns of the voltage.

                                                               3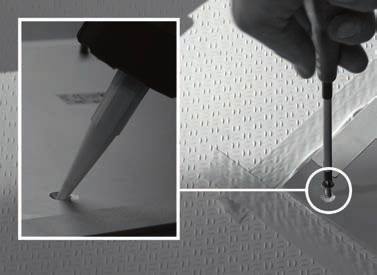
Avant chaque départ veuillez vous assurer personnellement que votre antenne pourra durer 30 secondes après de démar-
rage du moteur.

Pendant ce temps veuillez ne pas bouger votre véhicule. L’antenne ne pourra se refermer que si le démodulateur
est bien alimenté et que si son interrupteur général se trouve sur la position « I ». Une panne technique du véhicu-
le ou de l’antenne peut empêcher la fermeture automatique.
C’est pourquoi il faudra toujours vous assurez que l’antenne est bien refermée avant chaque départ.

   l    Le montage doit être effectué par un personnel possédant les qualifications adéquates, en observant précisément
        les instructions de montage fournies et qui font partie des présentes instructions d‘utilisation.
   l    La réglementation concernant l´utilisation des systèmes de réception satellite et des appareils électriques et
        électroniques en général varie selon les pays. En tant qu´utilisateur d´un tel système, vous êtes responsable du
        respect des règles en vigueur.
   l    A titre de précaution et en cas d´incertitude sur les règles nationales applicables, nous vous conseillons avant
        chaque trajet, de débrancher votre dispositif à l´aide de l´interrupteur principal, afin de couper complètement le
        système satellite du réseau de bord.
   l    Veuillez prendre en considération le fait que tous les composants du dispositif représentent un danger pour les
        enfants. L´ingestion de petites pièces, comme les piles par exemple représentent un danger mortel pour eux. Ne les
        laissez jamais jouer sans surveil-lance avec le dispositif, ni jouer avec ses composants. Veillez également à ce que
        personne ne se trouve dans le rayon de rotation d´une antenne en mouvement.
   l    Veillez à ce que le récepteur soit branché sur la batterie d´alimentation (non pas sur la batterie de démarrage du
        moteur). En alternative vous pourrez utiliser une alimentation de 12V par le bloc d´energie du véhicule, si c´ est sûr
        qu´il fournisse 7 A sans que la tension soit interrompue.

Wegen der Sicherheit von ten Haaft vorgeschrieben:
Due to the safety regulation of ten Haaft required:
En raison de la réglementation de la sécurité de ten Haaft nécessaire prescrite:

                   Zündung / Klemme 15
                 muss angeschlossen werden

!                                                         !
              Zum automatischen Einfahren der Antenne
                        bei Fahrzeugstart
                                                         ATTENTION
   ACHTUNG

             Ignition switch has to be connected
               For automatic retraction of the antenna
                          at vehicle start

                Allumage doit être connecté
              Pour rétracter automatiquement l‘antenne
                      au démarrage du véhicule                           siehe Schritt 4 / see step 4 / voir pas 4

                                                                     4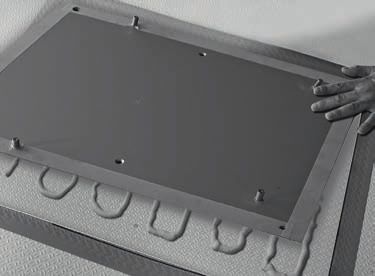
Montagevorarbeiten
Mounting preparation
Mounting preparation

1. Vorbereitung / Preparation / Preparation:

Bevor Sie die Montage beginnen, achten Sie bitte darauf, dass das Dach Ihres Fahrzeugs ausreichend stabil ist. Weiterhin
sollten Sie die bei der Montage und beim Besteigen des Daches die zulässige Dachlast Ihres Wohnmobils nicht über-
schreiten.
Bei ungenügender oder zweifelhafter Dachstabilität für die Anlage kann ein ca. 3 mm starkes Blech mit ca. 100 x 100
cm auf der Dachaußenhaut befestigt werden, um die Dachstabilität zu verbessern. Erkundigen Sie sich dazu bei Ihrem
Fahrzeughersteller.

Before starting with the mounting, take care, that the equipment must only be installed on hard vehicle roofs which are
sufficiently strong and inherently stable. Furthermore consider the maximum critical roof load before ascend on it.
If there is not sufficient or in case of doubts about the sturdiness of the roof, a sheet metal plate of the size 3 x 1000 x
1000 mm may improve the situation. Make enquiries about it at your vehicle manufacturer.

Avant de commencer le montage assurez vous que le toit de votre véhicule soit assez stable. En grimpant sur votre toit
pendant le montage, vous ne devrez pas dépasser la charge autorisée du toit de votre camping-car.
En cas d´incertitude vous avez la possibilité de fixer une tôle de 100 sur 100 cm et de 3 mm d´épaisseur sur le toit du
véhicule afin d´améliorer sa stabilité. Pour cela veuillez vous renseigner auprès du constructeur du véhicule.

2. Platzbedarf der Oyster 65- und 85-Anlage / required space for the Oyster 65- and 85 system /
   Encombrement des Oyster 65 et 85:

Achten Sie darauf, dass für die zusammengeklappte Oyster HDTV sowie für den Aktionsradius (Drehradius) ausreichend
Platz vorhanden ist.
Generell wird folgender Platz für die zusammengeklappte Oyster HDTV benötigt: Halten Sie den unmontierten Spiegel
probeweise über den Spiegelarm und planen Sie von Dach bis Spiegelunterkante 9 cm Höhe ein. Die Oyster muss später
so montiert sein, dass das LNB zum Fahrzeugheck zeigt (siehe Zeichnung).

Take care, that there is enough spare for the fold Oyster HDTV just as for the Operating range (cruising radius). In
general, this of space for a folded OYSTER HDTV is needed: Take a not mounted satellite dish for test purposes above the
satellite dish arm holder and calculate a height of 9 cm between roof and under edge of the satellite dish. The OYSTER
has to be later mounted so, that the LNB points to the rear of the vehicle. (See drawing)

Veillez à ce qu´une surface suffisante soit disponible aussi bien pour l´antenne Osyter numérique repliée que pour son
rayon d´action (rotation).
En général, voilà la place nécessaire à l´antenne repliée : Pour essayer, tenez la parabole démontée au-dessus du bras de
l´antenne et prévoyez 9 cm de hauteur entre le toit et le bord inférieur de l´antenne. Plus tard l´Oyster sera montée de
façon à ce que le LNB paraisse à l´arrière du véhicule (voir croquis)
        Oyster 85: 111,5 cm

                                            Oyster 65:   Oyster 85:
                                    37 cm
                     O
                     y

                     e
                     s

                     r

                                            72 cm        92 cm
                     t

                                                                                          Abbildung 1: Draufsicht auf eine Oyster
                                                                                                       HDTV Anlage
                                                                      Fahrtrichtung       Picture 1:   top view on an OYSTER System
                                                                      driving direction   Image 1:     vue au-dessus système Oyster
             Oyster 65: 91,5 cm                                       sens de la marche

                                                                         5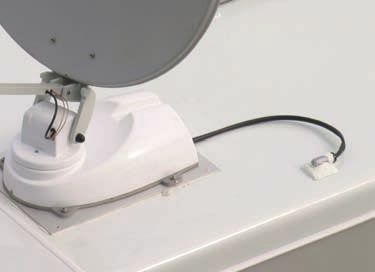
Für den Aktionsradius beim Drehen der Oyster® HDTV, muss erst ab einer Höhe von 135 mm ab Dachoberkante Platz
vorgesehen werden. Das bedeutet, Dachaufbauten wie z.B. Klimaanlagen, Dachfenster in geöffnetem Zustand, Dachkoffer
usw. müssen sich ab dieser Höhe außerhalb des unten angegebenen Aktionsradius befinden. Gegenstände, welche niedri-
ger als 135 mm ab Dachoberkante sind, wie z.B. die meisten Dachrelingarten, können sich auch innerhalb des Aktionsra-
dius befinden und schränken diesen nicht ein.

For the operating range of the Oyster® HDTV, there has to considered space only from 135 mm height, above the edge
of the roof vehicle. This means, that items of the roof system - like air condition, open roof-lights, luggage boxes etc.
- which do exceed this height of 135 mm , have to outside of the indicated operating range. Items less than 135 mm
height, like the most roof railings, can be inside this range without constricting it.

C´est à partir d´une hauteur de 135 mm à partir du bord supérieur du toit qu´il faudra prévoir une surface nécessaire
utile au rayon d´action. Cela signifie qu´à partir de cette hauteur toutes les installations montées sur le toit telles que la
climatisation, les luca rnes en position ouvertes, box, etc...devront se trouver à l´extérieur du rayon de rotation mention-
né. Les objets d´une hauteur inférieure à 135 mm du bord supérieur du toit, comme par exemple la plupart des batayoles
peuvent se trouver à l´intérieur du rayon d´action sans pour autant gêner sa rotation.

  Fahrzeugheck                                                                  Fahrtrichtung
  vehicle rear                                                                  driving direction
  vehicule arrière                                                              sens de la marche

                                                                                Radius Oyster 65: 54 cm (ab 13,5cm bis 55cm Höhe)
                                                                                radius Oyster 65: 54 cm (from 13,5cm to 55cm height)
                                                                                rayon Oyster 65: 54 cm (de 13,5cm à 55cm hauteur)
                                       O
                                       y

                                       e
                                       s

                                       r
                                       t

                                                            11cm
                                                                                Radius Oyster 85: 65 cm (ab 13,5cm bis 55cm Höhe)
                                                                                radius Oyster 85: 65 cm (from 13,5cm to 55cm height)
                                                                                rayon Oyster 85: 65 cm (de 13,5cm à 55cm hauteur)

                   Drehpunkt / center of rotation / point de rotation

Abbildung 2: Aktionsradius der Oyster HDTV 65- und 85- Anlage
Picture 2: Operating range of the Oyster 65- and 85 System
Image 2: Rayon d´action de la Oyster HDTV 65- et 85- système
                                                                  ~ 23 cm
                                                         ~ 15,9
                                                           cm

                                       ~ 7,8 cm

                                      ~ 50 cm

                      ~ 111,5 cm

Abbildung 3: Oyster HDTV 85-Anlage
Picture 3: Oyster 85 System
Image 3: Oyster HDTV 85-système

                                                                            6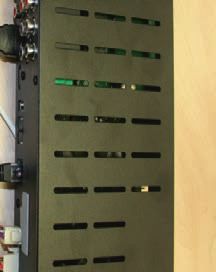
Sat - Maus / Spannungsversorgung
sat - mouse / power supply
sat souris
alimentation électrique
braun / brown / marron = Masse / ground / terre 12 / 24 Volt
rot / red / rouge = + 12 / 24 Volt
schwarz / black / noir = Klemme / clamp / serre 15
Montagevorarbeiten
Mounting preparation
Mounting preparation
TV - Kabel / cable / câble
Modem
7
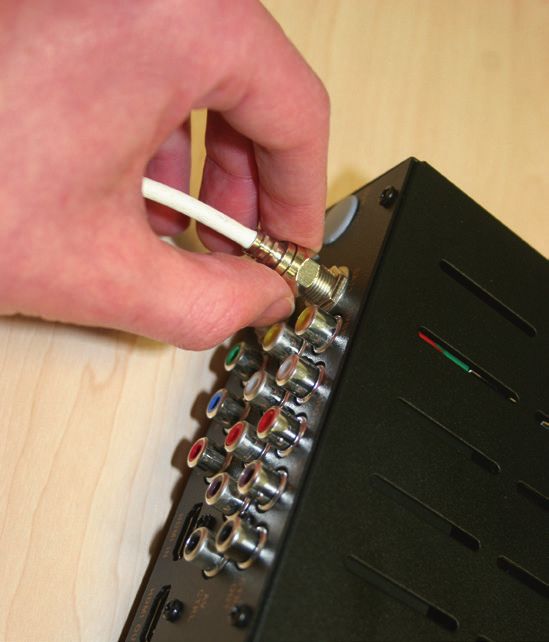
3. Übersicht System/survey system/ vue d‘ensemble du système
RX (weiß / TX (schwarz / black / noir)
white /
blanche)
RX (weiß /
ANT white /
blanche)
LOOP Switch
EXT REC Receiver SAT1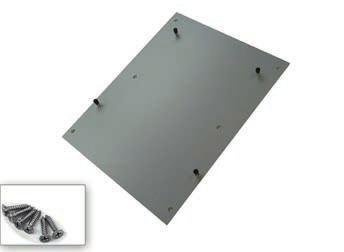
Montagevorarbeiten
Mounting preparation
Mounting preparation

Modem:

                                                                      Netzteil
                                                                      Power supply adapter
                                                        LAN           Adaptateur
                                                                      d‘alimentation
                      iLNB       iLNB
                      TX         RX     RESET

                                                                                             5
                  1          2           3              4

1   TX (schwarzes Koaxialkabel) von der Sat-Anlage                1
2   RX Koaxialkabel vom Receiver (Sat Out)                        2
3   Reset
4   LAN-Anschluss für den PC                                      4
5 Spannungsversorgung Netzteil 12 - 13,8 V DC                     5

1   TX (black coax cable) from satellite antenna unit
2   RX coax cable from receiver (Sat Out)
3   Reset
4   LAN-connection for PC
5 Power supply adapter 12 - 13,8 V DC

1   TX (câble coaxial noir) du systéme satellite
2   RX câble coaxial du récepteur (Sat Out)
3   Reset
4   Prise du réseau lcal pour l‘ordinateur
5 Adaptateur d‘alimentation 12 - 13,8 V DC

                                                              8
4. Test der mechanischen Drehgrenzen / Test mechanical limits (of the operating range) /
   test des limites de rotation:

Um zu prüfen, ob die Anlage bei starker Rückenlage nicht an Aufbauten auf dem Dach anstößt, ist es möglich eine
funktionsfähige Anlage an den mechanischen Positionsgrenzen zu betreiben. Dazu muss die Anlage betriebsbereit auf
dem Dach an der gewünschten Position aufgestellt werden. Durch die Menüfunktion „Test mechanical limits“ wird die
Prüfung gestartet. Der Funktionstest wird dabei über die Tastenfolge MENU / Oyster Digital / Konfiguration / MENU und
„Test mechanical limits“ aufgerufen.

Bitte beachten Sie: Eine Prüfung vor Beginn der Montage (Schritt 1) kann vorgenommen werden, um die Grund-
platte nicht an einer ungeeigneten Position auf dem Dach des Fahrzeugs anzubringen.

For a checking if the system doesn’t strike in a strong dorsal position items on the roof, it is possible to operate a func-
tional system onto his maximal circumferences. For this, a functional system has to be put on the designated position
onto the roof. This check is started by the menu function „Test mechanical limits“. Access to this function testing by the
following key sequence: Menu / Oyster Digital / configuration/ MENU and „Test mechanical limits“.

Please consider: Checking before beginning the mounting (Step 1) is good for avoiding mounting the base plate
onto an inappropriate place of the roof.

Pour voir si l´antenne en étant complètement sur le dos ne cogne pas sur certaines installations du toit, on a la possibilité
d´utiliser le système sur des positions limites mécaniques. Pour cela il faudra que sur le toit l´antenne prête à fonctionner
soit mise sur la position choisie. Par le biais de la fonction « Test mechanical limits » du menu, l´épreuve sera activée.On
appelle la fonction de test en passant par les touches MENU/ Oyster Digital/Confirguratgion//MENU et « test mechanical
limits »

Remarque : Le contrôle avant le montage (pas 1) sert également à ne pas poser la plaque de base au mauvais
endroit sur le toit du véhicule.

                                                             9
Schritt 1: Befestigung der Grundplatte auf dem Dach
step 1: Mounting the base plate onto the roof
pas 1: Fixation de la plaque de base sur le toit
Benötigt / needed / avoir besoin: Geliefert / delivery / livraison:
Front
1. Reinigen (Primer) /cleaning / nettoyer: 2.
Groß / large / grand
Klein / short / petit
Fah
sen rtricht
s de ung
la m / dr
arc iving
he dire
ctio
n
3. 4.
Fah
r
dri trich
v tu
sen ing di ng
sd r
e la ectio
ma n
rch
e
10Schritt 1: Befestigung der Grundplatte auf dem Dach
step 1: Mounting the base plate onto the roof
pas 1: Fixation de la plaque de base sur le toit
5. 6. +7º C Minimum
Ø 2mm
7. 8.
Front
9. 10.
11Schritt 1: Befestigung der Grundplatte auf dem Dach
step 1: Mounting the base plate onto the roof
pas 1: Fixation de la plaque de base sur le toit
11. 12.
13. 14.
15.
OK
12Schritt 2: Dachdurchführung
step 2: Lead- through roof
pas 2: Passage par le toit
Ziel / aim / but: Geliefert / delivery / livraison:
4x
1. 2.
Ø Oyster ± 20 mm
Ø CARO ± 35 mm
Ø 8 - 12 mm
3. 4. Kabellänge anpassen / cable to adapt / adapte le câble
13Schritt 2: Dachdurchführung
step 2: Lead- through roof
pas 2: Passage par le toit
5. 6.
7. 8.
9. 10.
rundum
all around
tout autour
Fa
hr
dr
tri dire arc
ivi de l
se
ch
ng a m
ns
tu ction e
ng
h
OK
Wichtig: Nach Abdichtung und Trocknung unbedingt Dichtigkeit-
sprüfung vornehmen
Important: After sealing and drying check for leaks in any case.
Important: après étanchéisation et séchage,
impérativement contrôler l‘ étanchéité
14Schritt 3: Kabelkanalverlegung auf dem Fahrzeugdach
step 3: Cabling on the roof of the vehicle
pas 3: Pose de la gaine du câble sur le toit du véhicule
Ziel (Beispiel) / aim (example) / but (exemple): Benötigt / needed / avoir besoin:
7. 8.
9. 10.
OK
15Schritt 4: Spannungsversorgung / „Klemme 15“
step 4: Power supply / „clamb 15“
pas 4: alimentation électrique / „serre 15“
Benötigt / needed / avoir besoin: 1. Verkabelung: Batterie - Energie-Block (Beispiel)
1. Cabeling batterie – energy bloc (example)
1. Câblage: batterie - bloc d´energie (exemple)
Kabel schwarz
Zündungsspannung/D+
Cable black
ignition votage/D+
4x
Câble noir
Schwarz Rot Braun
black red brown Zündungsspannung/D+
individuell:
noir rouge marron
Ø min 4,0 mm: > 5 m
oder /
or / ou
2. Verkabelung: Energie-Block - Batterie (Beispiel) 3. Verkabelung: Receivermontageort (Beispiel)
2. Cabling: energy bloc – battery (example) 3. Cabling: receiver mounting place (example)
2. Câblage: bloc d´energie - batterie (exemple) 3. Câblage: emplacement du récepteur (exemple)
+
Rot / Red / Rouge
min. 4mm²
Kabel rot +
braun / brown /
braun
marron
cable red +
- brown
câble rouge +
marron
4.1 Verbindung von „Klemme 15“/D+ am Energie-Block 4.2 Verbindung von „Klemme 15“/D+ am Energie-Block
4.1 Connection from clamp 15/d+ at the energy bloc 4.2 Connection from clamp 15/d+ at the energy bloc
4.1 connexion de „serre 15“/D+ au bloc d´energie 4.2 connexion de „serre 15“/D+ au bloc d´energie
Kabel Farbe: Kabel schwarz Kabel Farbe: Fahrzeugabhängig + schwarz
Fahrzeugabhängig Zündungsspannung/D+
cable color: vehicle specific + black
cable color: Cable black
câble couleur: spécifique vehicule + noir
vehicle specific ignition votage/D+
câble couleur: Câble noir
spécifique vehicule Zündungsspannung/D+
16Schritt 5: Spannungsversorgung an Batterie
step 5: Power supply at the battery
pas 5: Alimentation électrique au batterie
Anschluss: Kabel an Batterie 1.
Power supply at the battery
Minuspol / Masse
Alimentation électrique au batterie negative pole / ground
pôle négatif / Masse
Kabel braun
cable brown
câble marron
Kabel rot
cable red
câble rouge
2. 3.
Kabel rot
cable red
câble rouge
Kabel rot
cable red
câble rouge
10 A Sicherung / fuse / fusible
4.
+
Kabel rot
Minuspol / Masse cable red
negative pole / ground câble rouge
pôle négatif / Masse
OK
Kabel braun
cable brown
câble marron
17Schritt 6: Kabellänge anpassen am Receiverstandplatz
step 6: Adapt cable length to the place of the receiver
pas 5: Alimentation électrique au batterie
Benötigt / needed / avoir besoin: 1.
+ D+15
-
Kabel anpassen cable to adapt adapte le câble
braun, rot, schwarz brown, red, black marron, rouge, noir
(min. 4mm²) (min. 4mm²) (min. 4mm²)
2. 3.
Geliefert
delivery
livraison
+
-
D+15
OK
18Schritt 6: Kabellänge anpassen am Receiverstandplatz
step 6: Adapt cable length to the place of the receiver
pas 5: Ajuste la longueur du câble par rapport à l´emplacement du récepteur
1 2 4 6 8 10 12
5 7 9 11 13
CVBS L-Audio-R S/PDIF
SAT1 CTRL ANTENNA
OUT CONTROL
IN IN IN IN
AV
CTRL SAT
OUT OUT OUT OUT USB2 LAN MOUSE
SAT2
EXT IR
Y Pb Pr HDMI IN HDMI OUT 12V-24V
DC IN
3 14 15 16 17 18 19 20 21 22
1 SAT1, Antenneneingang zum Anschluss des ersten LNBs der 12 CTRL Out (Cinch), Schaltspannung 12V / 300mA
2 SAT-Antennenanlage 13 AV CTRL (Cinch), Schaltspannung 6V / 12V
SAT2, Antenneneingang zum Anschluss eines zweiten LNBs 14 YPbPr Komponenten Ausgang (Cinch) für Beamer/LCD-/
3 (Aufnahmefunktion) Plasma-Geräte (HD-tauglich)
Videosignal-Eingang für AV Loop Through Funktion (FBAS) 15 Digitaler HDMI Eingang (Zum Durchschleifen eines HDMI Signals
4 Analoger Videosignal Ausgang (FBAS für ältere Geräte, zum HDMI Ausgang)
5 nicht HD-tauglich) 16 Digitaler HDMI Ausgang zum Anschluss eines TV Gerätes
Audio-Eingang links 17 USB 2.0 Anschluss für eine externe USB-Festplatte
6 Audio-Ausgang links, für externe aktive Lautsprecher, HiFi- 18 LAN, IP Netzwerkanschluss
7 Anlagen etc. 19 SatMaus Anschluss zur Kanalanzeige, Direkteingabe und
Audio-Eingang rechts Infrarotempfang
8 Audio-Ausgang rechts, für externe aktive Lautsprecher, HiFi- 20 Anschluss für einen optionalen Infrarotempfänger
9 Anlagen etc. 21 Antennensteuerung für Oyster Antenne
Digitaler Audio Eingang (S/PDIF, Coaxial) 22 Spannungsversorgung
10 Digitaler Audio Ausgang (S/PDIF, Coaxial) (Braun (-) = Masse; Rot (+) = 12 - 24 V; Schwarz = Klemme 15)
1 Antenna input – for the first LNB of the SAT system 13 AV CTRL (Cinch), switching voltage 6V / 12V
2 Antenna input – for the second LNB of the SAT system 14 Y Pb Pr Video components out (Cinch) for Beamer/LCD-/
3 Input CVBS-video signal: for colour, brightness, sync Plasma-device (HD-capable)
4 Output. CVBS-video signal: for colour, brightness, sync (for older 15 Digitaler HDMI Input ( HDMI Signal LOOP to HDMI output)
5 devices, No HD) 16 Digitaler HDMI output for TV device
Input analog Audio for AV Loop Through Function (left) 17 Connector USB 2.0; for hard disk (optional)
6 Audio out left, also for external speakers, HiFi system etc 18 Connector IP LAN network 2.0; (optional)
7 Input analog Audio for AV Loop Through Function (right) 19 For satellite mouse connector (channel display and
8 Audio out right, also for external speakers,HiFi system etc. remote-control receiver)
9 Input digital Audio (S/PDIF, Coaxial) 20 Auxiliary external infrared receiver (optional)
10 Output digital Audio (S/PDIF, Coaxial) 21 Oyster plug form sat-system
11 CTRL Out (Cinch), switching voltage 12V / 300mA 22 Power supply
(brown (-) = ground; red (+) = 12 - 24 V; black = clamb 15)
1 Entrée d L’antenne – pour le prèmier LNB du SAT système 11 Sortie digital Audio (S/PDIF, Coaxial)
2 Entrée d L’antenne – pour le deuxième LNB du SAT système 12 CTRL Out (Cinch), tension de contact 12V / 300mA
3 Entrée Signal vidéo CVBS: pour la couleur, la luminosité, et le 13 AV CTRL (Cinch), tension de contact 6V / 12V
4 signal de la synchronisation 14 Y Pb Pr Video components sortie out (Cinch) pour vidéo-
Sortie Signal vidéo CVBS: pour la couleur, la luminosité, et le sig- projecteur/LCD-/ Plasma-appareil (HD-apte)
5 nal de la synchronization (pour les appareils plus âgé ; sans HD) 15 Digitaler HDMI entrée ( HDMI Signal LOOP pour HDMI sortie)
Entrée analogue Audio pour AV Loop Through Fonction (gauche) 16 Digitaler HDMI sortie pour TV appareil
6 Sortie-audio à gauche, pour haut-parleurs actifs exterieurs, 17 Connexion USB 2.0 pour disque dur externe (option)
7 chaîne hifi etc. 18 Connexion réseau IP LAN (option)
Entrée analogue Audio pour AV Loop Through Fonction (à 19 Pour la prise de la souris (affi chage canaux et récepteur
8 droite) télé-commande)
Sortie-audio à droite, pour haut-parleurs actifs extérieurs, 20 Récepteur extérieur supplémentaire à infra-rouge (option)
9 chaîne hifi etc. 21 Oyster prise de sat-système
Entrée digital Audio (S/PDIF, Coaxial) 22 Alimentation électrique
(marron = terre; rouge =12-24V; noir = serre 15)
19Schritt 7: Anschluss Receiver / Anbringung der Sat-Maus
step 7: Connecting the receiver / fixing the sat-mouse
pas 7: Connexion du récepteur / ajouter SAT – souris
1. 2.
3. Optional: Wandmontage /
mounting on wall / montage mural
OK
4. Beispiel: Anbringung der Sat-Maus / 5. Beispiel: Anbringung der Sat-Maus /
example: fixing Sat-Mouse / exemple ajouter la Sat-souris example: fixing Sat-Mouse / exemple ajouter la Sat-souris
OK
20Schritt 8: Aufbau der Anlage auf dem Fahrzeugdach OYSTER
step 8: Mounting the system onto the vehicle roof OYSTER
pas 8: Montage du système sur le toit du vehicule OYSTER
Geliefert (Oyster) / delivery (Oyster) / livraison (Oyster): 1.
2. 3.
Benötigt / needed /
avoir besoin:
4. 5.
OK
Zum Ausfahren der Anlage den Receiver starten!
Switch on the receiver for erecting the sat-system!
Pour relever le sat système mise en marche le récepteur!
2122
ten Haaft GmbH
Oberer Strietweg 8
75245 Neulingen-Göbrichen
GERMANY
Telefon + 49 (0) 72 37 /48 55–0
Telefax + 49 (0) 72 37 /48 55–50
E-Mail: info@ten-haaft.com

Öffnungszeiten / hours of opening / temps d‘ouverture :
MO – FR /          08:00 –12:00 h
LU – VE            13:00 –16:30 h

www.ten-haaft.com
Sie können auch lesen