Schnellkochtopf/-Set Pressure Cooker Autocuiseur - Gebrauchsanweisung - GSW System Classic - Westfalia Versand Österreich
←
→
Transkription von Seiteninhalten
Wenn Ihr Browser die Seite nicht korrekt rendert, bitte, lesen Sie den Inhalt der Seite unten
DKT GSW System Classic DE-GB-FR Set Seite 1 Mittwoch, 16. Mai 2018 2:45 14

                    Schnellkochtopf/-Set
                      Pressure Cooker
                        Autocuiseur
                                   Gebrauchsanweisung
                                      User Manual
                                     Mode d’emploi

GSW System Classic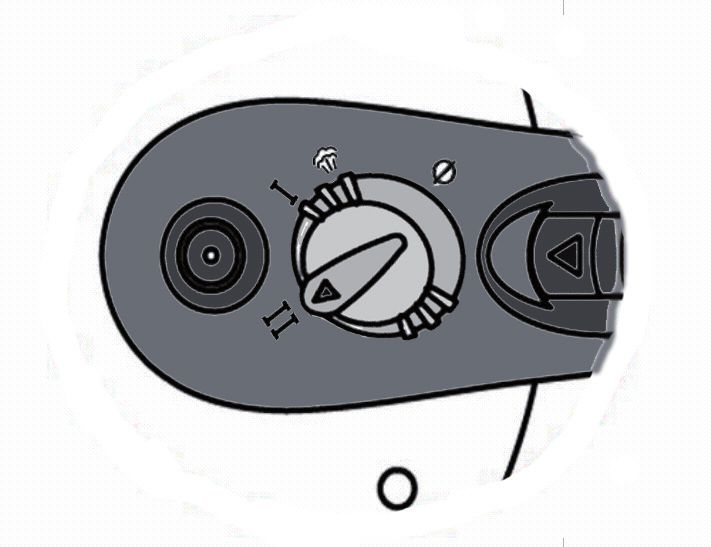
DKT GSW System Classic DE-GB-FR Set Seite 2 Mittwoch, 16. Mai 2018 2:45 14

       1                                 2     3   4       5 6     7         8   9

                                                                                     10

                                                                                     11

                                                                                     12

                             14                                      13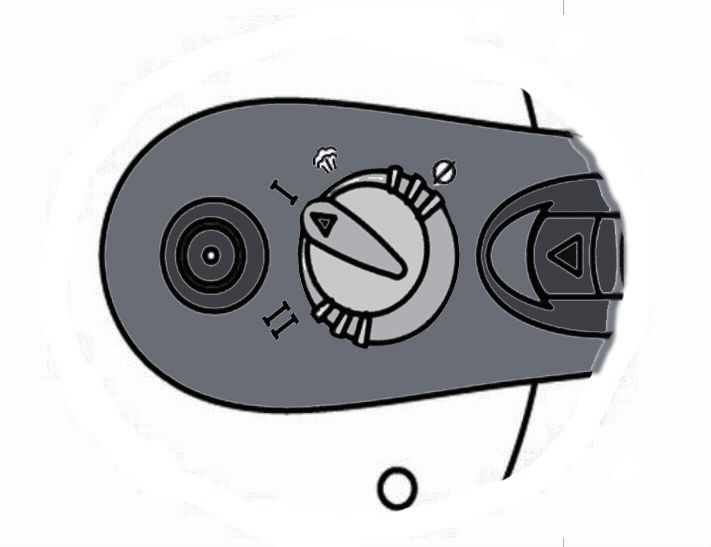
DKT GSW System Classic DE-GB-FR Set Seite 3 Mittwoch, 16. Mai 2018 2:45 14

     Deutsch . . . . . . . . . . . . . . . . . . . . . . . . . . . . . . . . . . . . . . . . . 4
     Bitte beachten Sie die Ausklappseite

     English . . . . . . . . . . . . . . . . . . . . . . . . . . . . . . . . . . . . . . . . . 19
     Please refer to fold-out page

     Français . . . . . . . . . . . . . . . . . . . . . . . . . . . . . . . . . . . . . . . . 34
     Veuillez consulter la page réversible
DKT GSW System Classic DE-GB-FR Set Seite 4 Mittwoch, 16. Mai 2018 2:45 14

                                                                    Inhalt
  1. Wichtige Hinweise vor dem ersten Gebrauch . . . . . . . . . . . . . . . . . . . . 4
  2. Gerätebeschreibung . . . . . . . . . . . . . . . . . . . . . . . . . . . . . . . . . . . . . . . . . 5
       2.1    Verwendungszweck . . . . . . . . . . . . . . . . . . . . . . . . . . . . . . . . . . . . . . . . . . . . . . . . . . . . . . . .          5
       2.2    Lieferumfang. . . . . . . . . . . . . . . . . . . . . . . . . . . . . . . . . . . . . . . . . . . . . . . . . . . . . . . . . . . . . .   5
       2.3    Funktionsbeschreibung . . . . . . . . . . . . . . . . . . . . . . . . . . . . . . . . . . . . . . . . . . . . . . . . . . . . . .         5
       2.4    Sicherheitseinrichtungen . . . . . . . . . . . . . . . . . . . . . . . . . . . . . . . . . . . . . . . . . . . . . . . . . . . . .        5
  3. Sicherheitshinweise. . . . . . . . . . . . . . . . . . . . . . . . . . . . . . . . . . . . . . . . . . 6
       3.1    Begriffserklärung . . . . . . . . . . . . . . . . . . . . . . . . . . . . . . . . . . . . . . . . . . . . . . . . . . . . . . . . . .     6
       3.2    Allgemeine Hinweise . . . . . . . . . . . . . . . . . . . . . . . . . . . . . . . . . . . . . . . . . . . . . . . . . . . . . . .         6
       3.3    Schutz vor Verbrennungen und Verbrühungen . . . . . . . . . . . . . . . . . . . . . . . . . . . . . . . . . . . .                         7
       3.4    Zur Sicherheit Ihres Kindes . . . . . . . . . . . . . . . . . . . . . . . . . . . . . . . . . . . . . . . . . . . . . . . . . . .         7
  4. Benennung der Teile (siehe Ausklappseite) . . . . . . . . . . . . . . . . . . . . . . 8
  5. Auspacken und aufstellen . . . . . . . . . . . . . . . . . . . . . . . . . . . . . . . . . . . . 8
  6. Bedienen . . . . . . . . . . . . . . . . . . . . . . . . . . . . . . . . . . . . . . . . . . . . . . . . . . 8
       6.1    Schnellkochtopf vorbereiten . . . . . . . . . . . . . . . . . . . . . . . . . . . . . . . . . . . . . . . . . . . . . . . . . . 8
       6.2    Speisen kochen. . . . . . . . . . . . . . . . . . . . . . . . . . . . . . . . . . . . . . . . . . . . . . . . . . . . . . . . . . . . 9
       6.3    Biogaren. . . . . . . . . . . . . . . . . . . . . . . . . . . . . . . . . . . . . . . . . . . . . . . . . . . . . . . . . . . . . . . . . 9
       6.4    Schnellkochtopf öffnen . . . . . . . . . . . . . . . . . . . . . . . . . . . . . . . . . . . . . . . . . . . . . . . . . . . . . 10
    7. Reinigen, pflegen, warten . . . . . . . . . . . . . . . . . . . . . . . . . . . . . . . . . . . 11
       7.1 Fristen . . . . . . . . . . . . . . . . . . . . . . . . . . . . . . . . . . . . . . . . . . . . . . . . . . . . . . . . . . . . . . . . . . 11
       7.2 Schnellkochtopf reinigen. . . . . . . . . . . . . . . . . . . . . . . . . . . . . . . . . . . . . . . . . . . . . . . . . . . . 12
       7.3 Schnellkochtopf lagern . . . . . . . . . . . . . . . . . . . . . . . . . . . . . . . . . . . . . . . . . . . . . . . . . . . . . 13
  8. Störungen und deren Beseitigung . . . . . . . . . . . . . . . . . . . . . . . . . . . . . 14
  9. Entsorgung . . . . . . . . . . . . . . . . . . . . . . . . . . . . . . . . . . . . . . . . . . . . . . . . 15
       9.1 Gerät . . . . . . . . . . . . . . . . . . . . . . . . . . . . . . . . . . . . . . . . . . . . . . . . . . . . . . . . . . . . . . . . . . 15
       9.2 Verpackung . . . . . . . . . . . . . . . . . . . . . . . . . . . . . . . . . . . . . . . . . . . . . . . . . . . . . . . . . . . . . 15
10. Garzeitentabelle . . . . . . . . . . . . . . . . . . . . . . . . . . . . . . . . . . . . . . . . . . . 15
11. Garantie . . . . . . . . . . . . . . . . . . . . . . . . . . . . . . . . . . . . . . . . . . . . . . . . . . 17

        1. Wichtige Hinweise vor dem ersten Gebrauch
Diese Gebrauchsanweisung hilft Ihnen, Ihren                                     Bewahren Sie daher diese Gebrauchsanweisung
Schnellkochtopf sicher und wirtschaftlich zu                                    gut auf, damit Sie sie jederzeit zur Verfügung
gebrauchen.                                                                     haben.
Jede Person, die diesen Schnellkochtopf bedient,                                Wenn Sie Ihren Schnellkochtopf einmal verkau-
reinigt oder entsorgt, muss den vollständigen                                   fen oder verschenken, geben Sie bitte diese
Inhalt dieser Gebrauchsanweisung zur Kenntnis                                   Gebrauchsanweisung mit, damit auch der nächs-
genommen und verstanden haben.                                                  te Besitzer das Gerät sicher benutzen kann.

4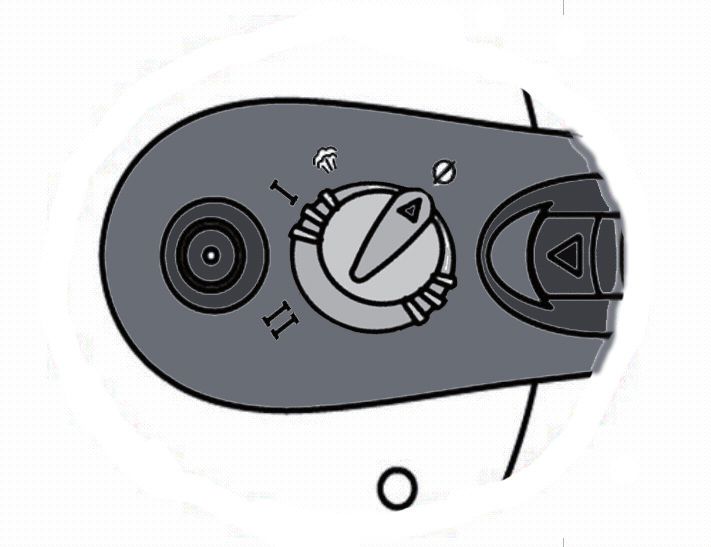
DKT GSW System Classic DE-GB-FR Set Seite 5 Mittwoch, 16. Mai 2018 2:45 14

                                    2. Gerätebeschreibung

     2.1 Verwendungszweck                                     2.3 Funktionsbeschreibung
     Mit diesem Schnellkochtopf GSW System Classic            Dadurch, dass der Schnellkochtopf luft- und
     können Sie Speisen schonend und energie-                 dampfdicht schließt, entsteht beim Kochen im
     sparend garen.                                           Inneren des Schnellkochtopfes ein Druck, der
     Ohne aufgesetzten Deckel kann das Topfunterteil          deutlich über dem normalen Luftdruck liegt.
     wie ein normaler Kochtopf verwendet werden.              Durch den erhöhten Druck steigt auch die Tempe-
     Unter Druck, also mit aufgesetztem Deckel, darf          ratur im Inneren auf deutlich über 100 °C. Durch
     der Schnellkochtopf ausschließlich mit Wasser            die erhöhte Temperatur gart Ihr Kochgut schneller
     betrieben werden. Wird der Schnellkochtopf               und schonender.
     ohne ausreichende Wassermenge erhitzt, kann              Topfunterteil und Deckel sind aus hochwertigem
     dies zu schweren Schäden führen.                         Edelstahl gefertigt.
     Keinesfalls darf das Gerät mit aufgesetztem Deckel       Der extrastarke GSW-Thermoboden sorgt für
     zum Frittieren mit Öl verwendet werden.                  eine optimale und gleichmäßige Wärmever-
     Der Schnellkochtopf ist für alle handelsüblichen         teilung und -speicherung.
     Herdarten, also Gas-, Elektro-, Ceran-, Halogen-         Der Topf verfügt im Deckel über einen Druck-
     und Induktionsherde, geeignet. Eine Verwendung           regler, der den gewählten Druck im Inneren des
     im Backofen ist ausdrücklich untersagt.                  Topfes konstant hält.
     Dieses Gerät ist für den Einsatz in Privathaushalten
     und nicht für den gewerblichen Einsatz geeignet.         2.4 Sicherheitseinrichtungen
     Das Gerät ist ebenfalls geeignet für:
                                                              Mehrere Sicherheitssysteme sorgen dafür, dass
         –den Einsatz in Küchen für Mitarbeiter in
                                                              Ihr Gerät auch im Fehlerfalle sicher arbeitet.
           Läden, Büros und anderen gewerblichen
           Bereichen,                                         Der Druckregler 6 sorgt für konstanten Druck im
         –den Einsatz in landwirtschaftlichen Anwe-           Inneren des Schnellkochtopfes. Während des Betrie-
           sen,                                               bes kann hier ständig etwas Dampf austreten.
         –Kunden in Hotels, Motels und anderen                Das Sicherheitsventil 4 sorgt dafür, dass bei
           Wohneinrichtungen,                                 einem zu großen Überdruck im Topf der Dampf
         –Frühstückspensionen.                                hier entweichen kann.
                                                              Neben dem Sicherheitsventil 4 befindet sich ein
     2.2 Lieferumfang                                         zusätzliches Überdruckventil, das den Überdruck
                                                              über die Sicherheitsöffnung 3 entlässt, falls am
     Schnellkochtopf-Set 6-teilig                             Druckregler 6 und am Sicherheitsventil 4 eine
     • bestehend aus:                                         Funktionsstörung auftritt.
       –Topfunterteil 6 Liter                                 Die Verriegelung 8 lässt sich zum Öffnen des
       –Topfunterteil 3 Liter                                 Deckels nur dann nach vorne schieben, wenn der
       –Deckel mit Dichtungsring                              Druck ausgeglichen ist und dadurch das rote
       –Glasdeckel                                            Sicherheitsventil 4 nach unten fällt.
       –Dämpfeinsatz
       –Dreibein für Dämpfeinsatz
       –Gebrauchsanweisung

     GSW System Classic                                                                                     5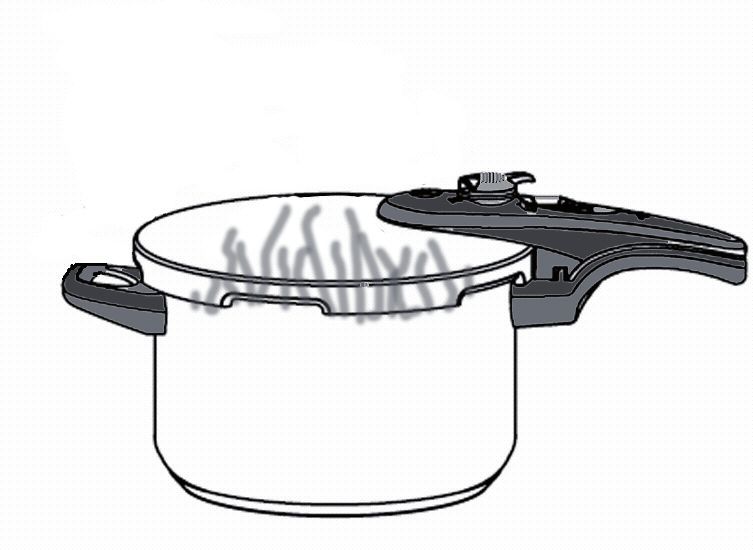
DKT GSW System Classic DE-GB-FR Set Seite 6 Mittwoch, 16. Mai 2018 2:45 14

                                3. Sicherheitshinweise
Dieses Gerät ist nach dem modernen Stand der                  Erfahrung und/oder mangelndem Wissen
Technik konstruiert und gefertigt. Alle entspre-              benutzt zu werden, es sei denn, sie werden
chenden europäischen Sicherheitsrichtlinien wer-              durch eine für ihre Sicherheit zuständige Per-
den beachtet und das Gerät wurde durch den                    son beaufsichtigt oder erhielten von ihr
TÜV geprüft. Dennoch können von derartigen                    Anweisungen, wie das Gerät zu benutzen ist.
Geräten auch Gefahren ausgehen.                               Kinder sollten beaufsichtigt werden, um
5 Minuten sollte Ihnen Ihre Sicherheit wert sein!             sicherzustellen, dass sie nicht mit dem Gerät
Länger dauert es nicht, unsere Sicherheitshin-                spielen.
weise durchzulesen. Vermutlich kennen Sie die            •    Bitte beachten Sie, dass jeglicher Anspruch
meisten Hinweise schon, lesen Sie diese bitte                 auf Garantie und Haftung erlischt, wenn
trotzdem durch, da der eine oder andere Hinweis               Zubehörteile verwendet werden, die nicht in
doch neu für Sie sein wird und Sie vor Schaden                dieser Gebrauchsanweisung empfohlen wer-
bewahren kann.                                                den oder wenn bei Reparaturen nicht aus-
                                                              schließlich Originalersatzteile verwendet
3.1 Begriffserklärung                                         werden. Dies gilt auch für Reparaturen, die
                                                              durch nichtqualifizierte Personen durchge-
Folgende Signalbegriffe finden Sie in dieser                  führt werden. Die Service-Adresse finden Sie
Gebrauchsanweisung:                                           in „11. Garantie” auf Seite 17.
           Warnung!                                      •    Bei eventuellen Funktionsstörungen inner-
           Hohes Risiko: Missachtung der War-                 halb der Garantiezeit darf die Instand-
           nung kann Schaden für Leib und Leben               setzung des Gerätes nur durch unser Service-
           verursachen.                                       Center erfolgen. Ansonsten erlischt jeglicher
Vorsicht!                                                     Garantieanspruch.
Mittleres Risiko: Missachtung der Warnung kann           •    Erhitzen Sie den Schnellkochtopf bei aufge-
einen Sachschaden verursachen.                                setztem Deckel niemals ohne vorher Wasser
Hinweis:                                                      eingefüllt zu haben. Ohne Wasser kann das
Geringes Risiko: Sachverhalte, die im Umgang                  Gerät schwer beschädigt werden.
mit dem Gerät beachtet werden sollten.                   •    Achten Sie darauf, dass nie die gesamte Flüs-
                                                              sigkeit verdampft.
3.2 Allgemeine Hinweise                                  •    Benutzen Sie den Topf nur, wenn alle Teile
                                                              sauber und leichtgängig sind. Verunreini-
• Lesen Sie vor dem Gebrauch bitte sorgfältig
                                                              gungen und Fettschmutz könnten die Sicher-
  diese Gebrauchsanweisung. Sie ist Bestand-
                                                              heitseinrichtungen beeinflussen.
  teil des Gerätes und muss jederzeit verfügbar
  sein.
• Verwenden Sie das Gerät nur für den
  beschriebenen Verwendungszweck (siehe
  „2.1 Verwendungszweck“ auf Seite 5).
• Dieses Gerät ist nicht dafür bestimmt, durch
  Personen (einschließlich Kinder) mit einge-
  schränkten physischen, sensorischen oder
  geistigen Fähigkeiten oder mit mangelnder

6
DKT GSW System Classic DE-GB-FR Set Seite 7 Mittwoch, 16. Mai 2018 2:45 14

     3.3 Schutz vor Verbrennungen und                             oder auf eine Stelle, wo jemand vorbei-
         Verbrühungen                                             kommen kann. Im Fehlerfalle würde hier ein
                                                                  starker Dampfstrahl austreten.
                Warnung! Dieser Schnellkochtopf               •   Sollte Dampf aus dem Sicherheitsventil 4
                arbeitet mit hohem Druck und hohen                oder der Sicherheitsöffnung 3 austreten,
                Temperaturen. Daher beachten Sie                  schalten Sie die Wärmezufuhr sofort ab, da
                unbedingt folgende Sicherheitshin-                der Druck im Inneren des Topfes zu hoch ist.
                weise, da sonst die Gefahr von ernst-             Nehmen Sie den Topf erst wieder in Betrieb,
                haften       Verbrennungen        oder            nachdem die Störung beseitigt wurde (siehe
                Verbrühungen besteht.                             „8. Störungen und deren Beseitigung“ auf
     •   Überprüfen Sie vor jedem Gebrauch, dass                  Seite 14).
         der      Druckregler      6     sowie      das       •   Füllen Sie den Schnellkochtopf nie über die
         Sicherheitsventil 4 nicht verstopft und leicht-          „MAX”-Markierung im Inneren des Topfes.
         gängig sind (siehe „6.1 Schnellkochtopf vor-             Bei steigendem Kochgut, wie z.B. Reis oder
         bereiten“ auf Seite 8).                                  Hülsenfrüchte, dürfen Sie das Topfunterteil
     •   Nehmen Sie an den Sicherheitssystemen                    nur bis zur Hälfte füllen. Dadurch wird verhin-
         keinerlei Eingriffe vor, sofern sie nicht in             dert, dass Kochgut an den Deckel gelangt
         „7.2 Schnellkochtopf reinigen” auf Seite 12              und eventuell das Sicherheitsventil verstopft.
         aufgeführt sind.                                     •   Fleisch mit Haut (z.B. Rinderzunge) kann
     •   Achten Sie stets darauf, dass der Topf korrekt           beim Garen unter Druck anschwellen.
         geschlossen ist, bevor Sie ihn auf den Herd              Stechen Sie nicht in die Haut, solange diese
         stellen (siehe „6.1 Schnellkochtopf vorberei-            noch angeschwollen ist. Es könnte sonst
         ten“ auf Seite 8).                                       heißes Wasser herausspritzen.
     •   Die Oberflächen des Schnellkochtopfes                •   Bei breiigen Nahrungsmitteln, rütteln Sie
         können beim Kochen sehr heiß werden.                     sanft am Schnellkochtopf, bevor Sie ihn
         Berühren Sie diese daher nicht sondern                   öffnen, um zu verhindern, dass das Essen
         fassen Sie den Schnellkochtopf ausschließl-              herausspritzt, sobald Sie den Deckel öffnen.
         ich an den Griffen an. Schützen Sie sich
         zusätzlich mit Topflappen oder Topfhand-             3.4 Zur Sicherheit Ihres Kindes
         schuhen vor der hohen Temperatur.
                                                                       Warnung! Kinder können Gefahren
     •   Der Druckregler 6 darf niemals von anderen
                                                                       oft nicht richtig einschätzen und sich
         Gegenständen abgedeckt werden.
                                                                       dadurch       Verletzungen      zuziehen.
     •   Aus der Dampföffnung 5 kann Dampf austre-
                                                                       Beachten Sie daher:
         ten. Richten Sie die Öffnung der Dampföffn-
                                                              • Dieses Produkt darf nur unter Aufsicht von
         ung 5 während des Gebrauchs niemals auf
                                                                Erwachsenen verwendet werden.
         sich oder auf eine Stelle, wo jemand vorbei-
         kommen kann. Im Fehlerfalle würde hier ein           • Achten Sie sorgfältig darauf, dass sich das
         starker Dampfstrahl austreten.                         Gerät immer außerhalb der Reichweite von
                                                                Kindern befindet.
     •   Beim Verstellen des Druckreglers 6 kann aus
         der Dampföffnung 5 ein starker Dampfstrahl           • Achten Sie darauf, dass die Verpackungs-
         austreten. Fassen Sie den Druckregler 6                folie nicht zur tödlichen Falle für Kinder wird.
         daher nur an der Riffelung 7 an.                       Verpackungsfolien sind kein Spielzeug.
     •   Richten Sie die Sicherheitsöffnung 3
         während des Gebrauchs niemals auf sich

     GSW System Classic                                                                                      7
DKT GSW System Classic DE-GB-FR Set Seite 8 Mittwoch, 16. Mai 2018 2:45 14
4. Benennung der Teile (siehe Ausklappseite)
1 Topfgriff 8 Verriegelung
2 Deckel 9 Deckelgriff
3 Sicherheitsöffnung 10 Topfstiel
4 Sicherheitsventil 11 Dichtungsring (nicht sichtbar, liegt im Deckel)
5 Dampföffnung 12 Topfunterteil
6 Druckregler 13 Dämpfeinsatz
7 Riffelung 14 Dreibein
5. Auspacken und aufstellen
1. Nehmen Sie die Einzelteile aus der Vorsicht! Vor dem ersten Gebrauch muss das
Verpackung. Gerät gründlich gereinigt werden, um eventuelle
2. Entfernen Sie alle Verpackungs- und Beipack- Produktionsrückstände zu entfernen (siehe „7.2
materialien. Schnellkochtopf reinigen“ auf Seite 12).
3. Überprüfen Sie, dass das Gerät keine 5. Reinigen Sie alle Teile mit heißem Spül-
Beschädigungen aufweist. wasser, spülen mit klarem Wasser nach und
trocknen sie dann ab
4. Entfernen Sie eventuell vorhandene Aufkleber.
6. Bedienen
6.1 Schnellkochtopf vorbereiten 4. Überprüfen Sie, dass der Dichtungsring 11
keine Beschädigungen, wie z.B. Risse auf-
Warnung! weist.
Bevor Sie mit Ihrem Schnellkochtopf Hinweis: Im Laufe der Zeit kann der Dich-
kochen, müssen Sie alle Sicherheitsein- tungsring hart werden und nicht mehr korrekt
richtungen überprüfen, um Schäden zu abdichten. Dann tritt am Deckelrand Dampf
vermeiden. aus und der Dichtungsring muss erneuert
1. Überprüfen Sie, dass die Öffnungen des werden. Einen neuen Dichtungsring erhalten
Druckreglers 6 auf der Innenseite des Sie im Fachhandel.
Deckels sauber sind. 5. Befüllen Sie das Topfunterteil mit Gargut.
2. Sollte dies nicht der Fall sein, reinigen Sie Vorsicht!
den Druckregler 6 (siehe „7.2 Schnellkoch- • Füllen Sie den Schnellkochtopf nie über die
topf reinigen“ auf Seite 12). „MAX”-Markierung im Inneren des Topfes.
3. Überprüfen Sie, dass das Sicherheitsventil 4 • Bei steigendem Kochgut, wie z.B. Reis oder
beweglich ist und nicht festsitzt. Hülsenfrüchte, dürfen Sie das Topfunterteil
nur bis zur Hälfte füllen. Dadurch wird verhin-
dert, dass Kochgut an den Deckel gelangt
und eventuell das Sicherheitsventil verstopft.
8DKT GSW System Classic DE-GB-FR Set Seite 9 Mittwoch, 16. Mai 2018 2:45 14
• Um Schäden am Gerät zu verhindern, muss Sobald der erste Dampfdruck im Topf ent-
sich immer mindestens 0,25 l Flüssigkeit im steht, geht das rote Sicherheitsventil 4 nach
Topfunterteil befinden, damit ausreichend oben und verriegelt dabei den Deckel.
Dampf erzeugt werden kann und der Topf Hinweis: zu Beginn des Kochens kann
nicht überhitzt. etwas Dampf am Sicherheitsventil austreten.
6. Füllen Sie Wasser oder Brühe ein. 4. Sobald Dampf am Druckregler 6 austritt, ver-
7. Setzen Sie den Deckel 2 so mindern Sie die Energiezufuhr auf etwa 1/3,
auf das Topfunterteil 12, sodass nur noch sehr wenig Dampf am
dass die runde Markierung Druckregler austritt.
auf dem Deckel auf den In diesem Moment beginnt die in den
Pfeil im Topfstiel 10 zeigt. Rezepten genannte Kochzeit.
8. Drehen Sie den Deckel, bis Deckelgriff 9 und Hinweis: Wenn kaum noch Dampf austritt,
Topfstiel 10 übereinanderstehen und hörbar kochen Sie optimal in Bezug auf Energie-
einrasten. einsparung und Schnelligkeit.
6.2 Speisen kochen 6.3 Biogaren
1. Wählen Sie am Druckregler 6 die ge- Die mit Abstand schonendste Zubereitungsart,
wünschte Kochstufe: speziell für Gemüse, ist das Biogaren. Beim Bio-
I: Biogaren: garen kommt das Gargut nur mit heißem Dampf,
aber kaum mit flüssigem Wasser in Berührung.
Dadurch wird verhindert, dass Mineralien,
Vitamine und andere wichtige Bestandteile aus
dem Gargut herausgelöst werden.
II: Schnellgaren:
Bio-gegartes Gemüse hat auch einen wesentlich
intensiveren Geschmack, als gekochtes.
1. Füllen Sie mindestens 0,25 l Wasser ein.
2. Lege Sie das Dreibein 14 in das
Hinweis: Biogaren arbeitet mit 0,6 bar Topfunterteil 12.
(600 hPa) und Schnellgaren arbeitet mit 1,0 bar 3. Geben Sie das Gargut in den
(1000 hPa) Überdruck. Dämpfeinsatz 13.
2. Setzen Sie den Schnellkochtopf auf eine 4. Stellen Sie den Dämpfeinsatz 13 auf das
Herdplatte, die möglichst den gleichen Dreibein 14.
Durchmesser hat, wie das Topfunterteil.
5. Gehen Sie weiter vor, wie in „6.2 Speisen
Vorsicht! Die Herdplatte kochen” auf Seite 9 beschrieben.
darf nicht größer sein, als
das Topfunterteil. Es würde
sonst zu große Hitze am
Rande des Topfes aufsteigen und könnte
dann die Kunststoffgriffe beschädigen.
3. Schalten Sie die Kochplatte auf die höchste
Stufe.
GSW System Classic 9DKT GSW System Classic DE-GB-FR Set Seite 10 Mittwoch, 16. Mai 2018 2:45 14
6.4 Schnellkochtopf öffnen 2. Drehen Sie den Druckregler 6
auf die Stellung fürs
Warnung! Abdampfen .
- Wenn das rote Sicherheitsventil 4
noch oben ist, herrscht Druck im Topf
und der Deckel kann nicht geöffnet 3. Warten Sie ab, bis der Druck ausgeglichen
werden. Unter keinen Umständen ist und dadurch das rote Sicherheitsventil 4
dürfen Sie versuchen, den Deckel mit nach unten fällt.
Gewalt zu öffnen. Sonst könnte die Hinweis: Sobald das rote
schlagartige Druckentlastung zu Ver- Sicherheitsventil 4 nach unten fällt, beträgt
brühungen führen. Erst, wenn das die Temperatur im Inneren des Schnellkoch-
rote Sicherheitsventil 4 gesunken ist, topfes noch fast 100 °C.
lässt sich der Topf öffnen.
4. Schieben Sie die Verriege-
- Aus der Dampföffnung 5 kann
lung 8 nach vorne und
Dampf austreten. Richten Sie die Öff-
drehen Sie gleichzeitig den
nung der Dampföffnung 5 während
Deckel gegen den Uhrzei-
des Gebrauchs niemals auf sich
gersinn, bis die runde Mar-
oder auf eine Stelle, wo jemand
kierung auf dem Deckel auf
vorbeikommen kann.
den Pfeil im Topfstiel 10 zeigt.
- Beim Verstellen des Druckreglers 6
kann aus der Dampföffnung 5 ein Hinweis: Sobald Sie die Verriegelung 8
starker Dampfstrahl austreten. Fas- nach vorne schieben, kann noch etwas Rest-
sen Sie den Druckregler 6 daher nur dampf austreten.
an der Riffelung 7 an. 5. Nehmen Sie den Deckel vom Topf ab.
Methode 2: Energie sparen
Vorsicht! Tauchen Sie den Topf nie ganz ins
Wasser ein. Der Druck würde sonst schlagartig Bei dieser Methode schalten Sie die Herdplatte
zusammenbrechen, was zu Schäden am Topf einige Minuten vor Garende aus und lassen den
sowie zu zerfallendem Gargut führen kann. Topf auf der Herdplatte stehen. Damit nutzen Sie
die Restwärme optimal aus und sparen Energie.
Es gibt mehrere Möglichkeiten, den Topf abküh- 1. Warten Sie ab, bis der Druck ausgeglichen
len zu lassen, um ihn öffnen zu können. ist und dadurch das rote Sicherheitsventil 4
nach unten fällt.
Methode 1: Abdampfen Hinweis: Sobald das rote
Bei dieser Methode wird solange Dampf abge- Sicherheitsventil 4 nach unten fällt, beträgt
lassen, bis der Druck im Topf weit genug abge- die Temperatur im Inneren des Schnellkoch-
sunken ist, um den Deckel öffnen zu können. topfes noch fast 100 °C.
Warnung! 2. Schieben Sie die Verriege-
Bei dieser Methode tritt heißer Dampf lung 8 nach vorne und
aus dem Druckregler aus. Achten Sie drehen Sie gleichzeitig den
daher darauf, sich daran nicht zu ver- Deckel gegen den Uhrzei-
brühen. gersinn, bis die runde Mar-
1. Nehmen Sie den Topf vom Herd.
10DKT GSW System Classic DE-GB-FR Set Seite 11 Mittwoch, 16. Mai 2018 2:45 14
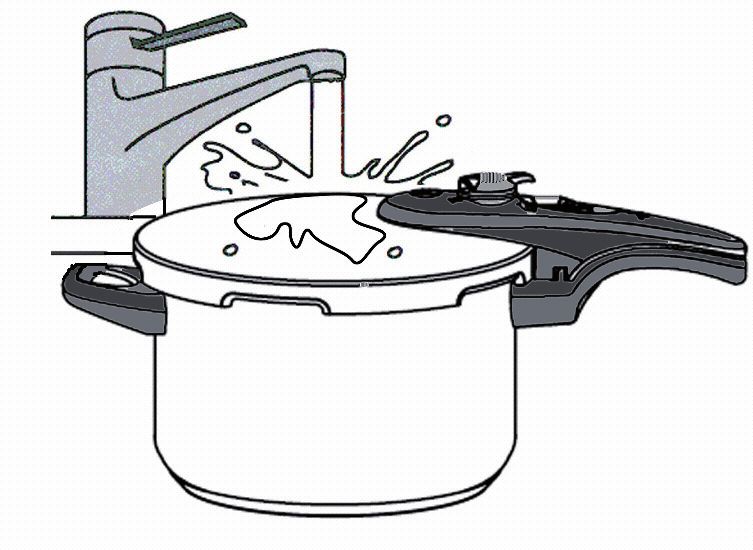
kierung auf dem Deckel auf den Pfeil im Vorsicht: Achten Sie darauf, dass der Wasser-
Topfstiel 10 zeigt. strahl nicht auf den Druckregler 6 oder das
Hinweis: Sobald Sie die Verriegelung 8 Sicherheitsventil 4 trifft. Es könnte sonst Wasser in
nach vorne schieben, kann noch etwas Rest- das Innere gelangen und die Speisen verdünnen.
dampf austreten. 2. Schieben Sie die Verriege-
3. Nehmen Sie den Deckel vom Topf ab. lung 8 nach vorne und
drehen Sie gleichzeitig den
Methode 3: Zeit sparen Deckel gegen den Uhrzei-
Bei dieser Methode nehmen Sie den Topf bei gersinn, bis die Dreiecks-
Garende von der Herdplatte. Um ihn sofort markierung auf dem Deckel
öffnen zu können, muss der Druck im Inneren des auf den Pfeil im Topfstiel 10 zeigt.
Schnellkochtopfes künstlich verringert werden, Hinweis: Sobald Sie die Verriegelung 8
bevor Sie ihn öffnen können. Diese Methode nach vorne schieben, kann noch etwas Rest-
spart vor allem Zeit. dampf austreten.
1. Halten Sie den Schnellkochtopf unter einen 3. Nehmen Sie den Deckel vom Topf ab.
nicht zu starken Wasserstrahl, bis das rote
Sicherheitsventil 4 nach unten fällt.
7. Reinigen, pflegen, warten
Ihr neuer Schnellkochtopf ist extrem wartungs- Tätigkeit Frist Kapitel
freundlich. Um lange Freude an ihm zu haben, Dichtungsring nach jedem „7.2 Schnellkoch-
sollten Sie die folgenden Reinigungsmaßnahmen 11 reinigen Gebrauch topf reinigen”
stets gründlich durchführen. Dichtungsring nach Bedarf, erhältlich im Fach-
tauschen 1x jährlich handel
7.1 Fristen
Tätigkeit Frist Kapitel
Topfunterteil nach jedem „7.2 Schnellkoch-
12 reinigen Gebrauch topf reinigen”
Druckregler 6 bei Ver- „7.2 Schnellkoch-
reinigen schmutzung topf reinigen”
Deckel 2 nach jedem „7.2 Schnellkoch-
reinigen Gebrauch topf reinigen”
GSW System Classic 11DKT GSW System Classic DE-GB-FR Set Seite 12 Mittwoch, 16. Mai 2018 2:45 14
7.2 Schnellkochtopf reinigen 5. Sollte der Druckregler sichtbar verschmutzt
sein, muss er zerlegt und gereinigt werden:
Vorsicht! Verwenden Sie niemals scharfe oder –Ziehen Sie den blauen Faltenbalg vom
scheuernde Reinigungsmittel, da Ihr Schnellkochtopf Gehäuse des Druckreglers ab.
dadurch beschädigt werden könnte. –Entnehmen Sie die transparente Druck-
Hinweis: Sie sollten den Schnellkochtopf mög- kappe.
lichst direkt nach Gebrauch reinigen, damit keine –Entnehmen Sie die Druckfeder.
Speisereste festtrocknen können. –Reinigen Sie die Teile mit heißem Wasser
und Spülmittel.
Topfunterteil (12): –Spülen Sie die Teile unter klarem, heißem
Reinigen Sie das Topfunterteil 12 nach jedem Wasser gründlich ab.
Gebrauch: –Lassen Sie die Teile trocknen.
1. Spülen Sie das Topfunterteil mit heißem 6. Setzen Sie den Druckregler wieder
Wasser und Spülmittel aus. zusammen:
2. Spülen Sie mit klarem Wasser nach. –Setzen Sie die Druckfeder in das Gehäuse
3. Trocknen Sie das Topfunterteil mit einem des Druckreglers ein.
Geschirrtuch ab, um Wasserflecken zu –Setzen Sie die transparente Druckkappe
vermeiden. auf die Feder.
Hinweis: Das Topfunterteil können Sie auch in –Setzen Sie den blauen Faltenbalg so ein,
der Geschirrspülmaschine reinigen. dass die beiden Nasen am Faltenbalg in
die entsprechenden Aufnahmen im
Druckregler (6) Gehäuse des Druckreglers eingreifen.
Der Druckregler 6 braucht nur dann zerlegt und 7. Setzen Sie den Druckregler in den Deckel
gereinigt zu werden, wenn er durch hochkochen- ein:
des Gargutes verschmutzt wurde.
–Der Druckregler muss auf
1. Drücken Sie den Druckregler 6 das Symbol „Ø” zeigen.
nach unten und drehen ihn –Drücken Sie den Druckregler
dabei auf die Stellung „Ø”. nach unten und drehen ihn
dabei entgegen dem Uhrzei-
2. Ziehen Sie den Druckregler heraus. gersinn.
3. Überprüfen Sie, ob der Druckregler sichtbare Deckel (2):
Verschmutzungen aufweist.
Vorsicht! Der Deckel ist nicht spülmaschinen-
4. Sollte der Druckregler keine sichtbaren Ver- geeignet.
schmutzungen aufweisen:
1. Waschen Sie den Deckel mit heißem Wasser
–Spülen Sie den Druckregler unter klarem und Spülmittel ab.
Wasser ab.
Sollte der Deckel stark verschmutzt sein,
–Lassen Sie den Druckregler trocknen.
weichen Sie ihn zuvor in Spülwasser ein.
–Setzen Sie den Druckregler wieder im
Deckel ein gemäß Schritt 7. 2. Spülen Sie den Deckel unter klarem, heißem
Wasser gründlich ab.
3. Trocknen Sie den Deckel mit einem Geschirr-
tuch ab, um Wasserflecken zu vermeiden.
12DKT GSW System Classic DE-GB-FR Set Seite 13 Mittwoch, 16. Mai 2018 2:45 14
Dichtungsring (11): 7.3 Schnellkochtopf lagern
Hinweis: Sie sollten den Dichtungsring bei
regelmäßiger Benutzung des Schnellkochtopfes Vorsicht! Der Schnellkochtopf darf nicht in
einmal jährlich durch einen neuen ersetzen. geschlossenem Zustand gelagert werden. Ohne
Ersatz gibt es im Fachhandel. Lüftung könnte sich Kondenswasser bilden und zu
Geruchsbildung oder Schäden führen.
1. Nehmen Sie den Dichtungsring aus dem
Deckel heraus. 1. Stellen Sie, sofern vorhanden, das Dreibein
und den Dämpfeinsatz in das Topfunterteil.
2. Spülen Sie den Dichtungs-
ring unter klarem, heißem 2. Legen Sie den Dichtungsring in den Deckel.
Wasser ab. 3. Bewahren Sie Topfunterteil und Deckel
getrennt auf.
3. Trocknen Sie den Dichtungsring mit einem
Geschirrtuch ab.
Hinweis: Der Dichtungsring darf bei der
Lagerung nicht gepresst oder verformt werden.
Legen Sie den Dichtungsring zur Aufbewahrung
daher wieder in den Deckel hinein.
GSW System Classic 13DKT GSW System Classic DE-GB-FR Set Seite 14 Mittwoch, 16. Mai 2018 2:45 14
8. Störungen und deren Beseitigung
Warnung! wieder nach Beseitigung der Störung in Betrieb
Sobald irgendwo unkontrolliert Dampf genommen werden. Lediglich ein gewisser
austritt, müssen Sie die Wärmezufuhr Dampfaustritt aus dem Druckregler 6 ist normal.
sofort stoppen. Das Gerät darf erst
Störung Ursache Beseitigung
Zwischen Deckel und Topf nicht richtig geschlossen Topf erneut korrekt schließen
Topf entweicht Dampf Dichtungsring ist verschmutzt Dichtungsring reinigen
Dichtungsring defekt/ Dichtungsring erneuern (1 x jährlich)
verschlissen
Aus dem Druckregler Dampf entweicht zwischen siehe vorhergehender Punkt
entweicht kein Dampf Deckel und Topf
Druckregler verschmutzt Druckregler reinigen (siehe „7.2 Schnell-
kochtopf reinigen“ auf Seite 12)
Zu wenig Flüssigkeit im Topf Topf langsam abkühlen lassen und mindestens
0,25 l Flüssigkeit einfüllen
Wärmezufuhr zu gering Wärmezufuhr erhöhen (Herdplatte höher
stellen)
Aus dem Druckregler Wärmezufuhr zu hoch Wärmezufuhr verringern (Herdplatte nied-
entweicht zu viel Dampf riger stellen)
Druckregler verschmutzt Druckregler reinigen (siehe „7.2 Schnell-
kochtopf reinigen“ auf Seite 12)
Seitlich vom Druckregler Druckregler nicht korrekt Druckregler korrekt montieren (siehe
entweicht Dampf montiert „Druckregler (6)“ auf Seite 12)
Aus der Sicherheits- Druckregler verschmutzt Topf vom Herd nehmen und abkühlen las-
öffnung entweicht sen. Danach Druckregler reinigen (siehe
Dampf „7.2 Schnellkochtopf reinigen“ auf
Seite 12)
Druckregler defekt Druckregler gegen neuen austauschen
Sicherheitsventil ist defekt Sicherheitsventil tauschen (siehe „Service-
Adresse“ auf Seite 17).
Deckel lässt sich nicht Es ist noch Überdruck im Topf Gehen Sie so vor, wie in
öffnen „6.4 Schnellkochtopf öffnen” auf Seite 10
beschrieben
14DKT GSW System Classic DE-GB-FR Set Seite 15 Mittwoch, 16. Mai 2018 2:45 14
9. Entsorgung
9.1 Gerät 9.2 Verpackung
Wenn Sie den Schnellkochtopf einmal entsorgen Wenn Sie die Verpackung entsorgen möchten,
möchten, achten Sie auf die entsprechenden achten Sie auf die entsprechenden Umweltvor-
Umweltvorschriften in Ihrem Land. schriften in Ihrem Land.
10. Garzeitentabelle
Die folgenden Angaben sind als Richtwerte Suppenhuhn (je nach Größe und 20 - 25 min
gedacht beim Kochen mit Stufe II. Auf Stufe I Alter)
verlängert sich die Garzeit um etwa 50 %. Die
Teigwarensuppe 3 - 5 min
genauen Zeiten sind abhängig von der Größe,
der Frische und der Qualität der verwendeten Tomatensuppe mit Reis 8 - 10 min
Lebensmittel. Zwiebelsuppe 2 - 3 min
Eintopf
Suppen Gemüseeintopf 6 - 7 min
Bohnensuppe (vorgeweicht) 15 - 20 min Irish-Stew 15 min
Erbsensuppe 20 - 25 min Linsen (vorgeweicht) mit Speck 10 min
(nicht vorgeweicht) und Kartoffeln
Erbsensuppe (vorgeweicht) 10 - 15 min Pichelsteiner 15 min
Gemüsesuppe 4 - 8 min Pikanter Reistopf 8 - 10 min
Graupensuppe 18 - 20 min Serbisches Reisfleisch mit Pilzen 8 min
Grießsuppe 3 - 5 min Fleisch
Gulaschsuppe 15 - 20 min Eisbein 30 - 40 min
Haferflockensuppe 3 - 4 min Gulasch 15 - 20 min
Kartoffelsuppe 5 - 6 min Hammelfleisch mit Bohnen 15 min
Knochenbrühe 20 - 25 min Huhn (je nach Größe und 20 - 25 min
Gewicht)
Kraftaspik 25 - 30 min
Kalbfleisch, geschnetzelt 6 min
Linsen (nicht vorgeweicht) 15 - 20 min
Kalbsbraten, Kaninchen 15 - 20 min
Linsen (vorgeweicht) 8 - 10 min
Kalbsfrikassee 10 min
Minestra 6 - 8 min
Kalbshaxe 20 - 30 min
Pot-au-Feu 20 - 25 min
Kalbsragout mit Reis 10 - 12 min
Reissuppe 8 - 10 min
Königsberger Klopse 8 min
Rindfleischbrühe (je nach Fleisch- 35 - 40 min
gewicht) Putenkeule 25 - 35 min
Rinderbraten 35 - 45 min
GSW System Classic 15DKT GSW System Classic DE-GB-FR Set Seite 16 Mittwoch, 16. Mai 2018 2:45 14
Rippchen mit Sauerkraut und Kar- 8 - 10 min Sauerkraut 8 - 10 min
toffeln Schwarzwurzeln 5 - 6 min
Roastbeef 20 - 25 min Sellerie 15 - 25 min
Rouladen 15 - 25 min Spargel 7 - 8 min
Sauerbraten 30 - 35 min Tomaten, gefüllt 2 - 3 min
Schinken, gebraten 20 - 25 min Hülsenfrüchte
Schinken, gekocht 30 - 35 min Bohnenkerne (vorgeweicht) 15 - 20 min
Schweinebraten 25 - 30 min Erbsen, ganze (nicht vorgeweicht) 20 - 25 min
Schweinshaxe 35 - 40 min Erbsen (geweicht) 10 - 15 min
Schweinscurry 10 - 15 min Erbsen, grüne (vorgeweicht) 20 - 25 min
Spickbraten 35 - 45 min Linsen (nicht vorgeweicht) 15 - 20 min
Zunge vom Kalb, Schwein, Wild 20 - 25 min Linsen (vorgeweicht) 8 - 10 min
Zunge vom Ochsen, frisch oder 50 - 60 min Nährmittel
geräuchert Graupen 18 - 20 min
Fisch, Wild Kartoffelklöße, rohe 8 - 10 min
Bouillabaisse 16 min Milchreis 10 min
Dünstfisch mit Kartoffeln 6 - 8 min Naturreis 15 - 20 min
Fisch in Weißweintunke mit Kartof- 6 - 8 min Semmelknödel 6 - 8 min
feln
Teigwaren 4 - 6 min
Rehkeule, geschmorte 25 - 30 min
Wildragout 15 - 25 min
Gemüse
Blumenkohl (je nach Sorte) 4 - 6 min
Blumenkohl, ganz (je nach Sorte) 6 - 8 min
Bohnen, grüne 5 - 7 min
Chicorée 6 - 8 min
Erbsen, grüne 3 - 4 min
Karotten 5 - 7 min
Kartoffeln in der Schale 10 - 15 min
Kartoffeln, geschält 6 - 8 min
Kohlrabi oder weiße Rüben 4 - 6 min
Möhren, geschnitten 6 min
Paprikaschoten, gefüllt 6 - 8 min
Pilze 6 - 8 min
Rosenkohl, frisch 4 - 6 min
Rote Rüben 15 - 25 min
Rotkraut, Weißkraut, Wirsing 8 - 10 min
Sahnekartoffeln 5 - 7 min
16DKT GSW System Classic DE-GB-FR Set Seite 17 Mittwoch, 16. Mai 2018 2:45 14
11. Garantie
Der Schnellkochtopf von GSW ist aus hochwerti- Service-Adresse
gem Edelstahl gefertigt. Bei sachgemäßer Pflege
und korrekter Benutzung hält er nahezu ein GSW Stahlwaren GmbH
Leben lang.
Gewerbegebiet 2
Wir garantieren, dass der Schnellkochtopf von
D-55595 Spabrücken
GSW frei von Material- oder Konstruktionsfehlern
ist. Die bei der Fertigung verarbeiteten Materia-
lien halten höchsten Qualitätsanforderungen Tel.: +49 (0) 6706-9304-14
stand. (Montag - Freitag von 09:00 bis 17:00 Uhr)
Sollte trotz unserer sorgfältigen Kontrollen inner-
halb von 2 Jahren nach Kauf eine Reparatur not- E-Mail: service@gsw-stahlwaren.de
wendig werden, die auf einen Fabrikations- oder
Materialfehler zurückzuführen ist, wird diese kos- Diese Anleitung finden Sie auch im Internet:
tenlos ausgeführt. Verschleißteile, wie zum Bei- http://www.gsw-stahlwaren.de/service/
spiel Dichtungsringe, sind von der Garantie Gebrauchsanleitungen/GSW-System-classic.pdf
ausgenommen.
Bei Verwenden von Teilen, die nicht in dieser
Anleitung empfohlen werden, normalem Ver-
schleiß, Gewaltanwendung, eigenen Reparatur-
versuchen oder unsachgemäßer Benutzung
entfällt der Garantieanspruch.
GSW System Classic 17DKT GSW System Classic DE-GB-FR Set Seite 18 Mittwoch, 16. Mai 2018 2:45 14
!"#$%&'(
#!"!"#%)
( *+ , *
- *).
-/
-
0
,1111-*
(
/ 2+ + *, , *
- *).
-/-3 4 - *,- 5%6 !
7 + #&&
-/7 ,8 .&#
+ 7+ +
(
#&!"!"#%)2
!"#$%&'
(
#!"!"#%)(
!
7 +
9 .
:+ .;+7
< )
+ = 9;+>
,> *()
7??2127 )
/+ ++
- .
@AB= +?+ - 9
02,1##"1
C ++ ( +
!
D C > .
@ABD "#">,#$$"&= 9!#
!
" # $ %
E 2
&'( %) **
+++++++++++++++++++++++++++++++
) , % -. / . 0/
:
1. 2/./(
18DKT GSW System Classic DE-GB-FR Set Seite 19 Mittwoch, 16. Mai 2018 2:45 14
Contents
1. Important information – please read before use . . . . . . . . . . . . . . . . . 19
2. Appliance description . . . . . . . . . . . . . . . . . . . . . . . . . . . . . . . . . . . . . . . 20
2.1 Intended use . . . . . . . . . . . . . . . . . . . . . . . . . . . . . . . . . . . . . . . . . . . . . . . . . . . . . . . . . . . . 20
2.2 Contents included . . . . . . . . . . . . . . . . . . . . . . . . . . . . . . . . . . . . . . . . . . . . . . . . . . . . . . . . 20
2.3 Function description . . . . . . . . . . . . . . . . . . . . . . . . . . . . . . . . . . . . . . . . . . . . . . . . . . . . . . . 20
2.4 Safety devices . . . . . . . . . . . . . . . . . . . . . . . . . . . . . . . . . . . . . . . . . . . . . . . . . . . . . . . . . . . 20
3. Safety instructions . . . . . . . . . . . . . . . . . . . . . . . . . . . . . . . . . . . . . . . . . . 21
3.1 Definitions of terminology . . . . . . . . . . . . . . . . . . . . . . . . . . . . . . . . . . . . . . . . . . . . . . . . . . 21
3.2 General advice . . . . . . . . . . . . . . . . . . . . . . . . . . . . . . . . . . . . . . . . . . . . . . . . . . . . . . . . . . 21
3.3 Preventing burns and scalds. . . . . . . . . . . . . . . . . . . . . . . . . . . . . . . . . . . . . . . . . . . . . . . . . 21
3.4 Child safety . . . . . . . . . . . . . . . . . . . . . . . . . . . . . . . . . . . . . . . . . . . . . . . . . . . . . . . . . . . . . 22
4. Names of parts (see fold-out page) . . . . . . . . . . . . . . . . . . . . . . . . . . . . 23
5. Unpacking and assembling. . . . . . . . . . . . . . . . . . . . . . . . . . . . . . . . . . . 23
6. How to use . . . . . . . . . . . . . . . . . . . . . . . . . . . . . . . . . . . . . . . . . . . . . . . . 23
6.1 Preparing the pressure cooker . . . . . . . . . . . . . . . . . . . . . . . . . . . . . . . . . . . . . . . . . . . . . . . 23
6.2 Cooking . . . . . . . . . . . . . . . . . . . . . . . . . . . . . . . . . . . . . . . . . . . . . . . . . . . . . . . . . . . . . . . . 24
6.3 Steam cooking . . . . . . . . . . . . . . . . . . . . . . . . . . . . . . . . . . . . . . . . . . . . . . . . . . . . . . . . . . . 24
6.4 Opening the pressure cooker. . . . . . . . . . . . . . . . . . . . . . . . . . . . . . . . . . . . . . . . . . . . . . . . 25
7. Cleaning, care, maintenance. . . . . . . . . . . . . . . . . . . . . . . . . . . . . . . . . . 26
7.1 How often should the various parts be cleaned?. . . . . . . . . . . . . . . . . . . . . . . . . . . . . . . . . 26
7.2 Cleaning the pressure cooker . . . . . . . . . . . . . . . . . . . . . . . . . . . . . . . . . . . . . . . . . . . . . . . 26
7.3 Storing the pressure cooker . . . . . . . . . . . . . . . . . . . . . . . . . . . . . . . . . . . . . . . . . . . . . . . . . 28
8. How to Solve Errors . . . . . . . . . . . . . . . . . . . . . . . . . . . . . . . . . . . . . . . . . 29
9. Disposal . . . . . . . . . . . . . . . . . . . . . . . . . . . . . . . . . . . . . . . . . . . . . . . . . . 30
9.1 Appliance . . . . . . . . . . . . . . . . . . . . . . . . . . . . . . . . . . . . . . . . . . . . . . . . . . . . . . . . . . . . . . 30
9.2 Packaging . . . . . . . . . . . . . . . . . . . . . . . . . . . . . . . . . . . . . . . . . . . . . . . . . . . . . . . . . . . . . . 30
10. Cooking times. . . . . . . . . . . . . . . . . . . . . . . . . . . . . . . . . . . . . . . . . . . . . . 30
11. Guarantee. . . . . . . . . . . . . . . . . . . . . . . . . . . . . . . . . . . . . . . . . . . . . . . . . 32
1. Important information – please read before use
This user manual is intended to help you to use Should you sell or give away your pressure
your pressure cooker safely and efficiently. cooker, please ensure that you enclose this user
All persons who intend to use, clean or dispose manual so that the next owner is able to use the
of this pressure cooker must have read and fully appliance safely.
understood this user manual.
Please retain this user manual for future
reference.
GSW System Classic 19DKT GSW System Classic DE-GB-FR Set Seite 20 Mittwoch, 16. Mai 2018 2:45 14
2. Appliance description
2.1 Intended use 2.3 Function description
This GSW System Classic Pressure Cooker is an In order for the pressure cooker to seal in air and
energy-saving appliance which allows you to steam, pressure is created inside the appliance
cook your food gently. whilst cooking which is considerably higher than
The base of the pressure cooker can be used as a average air pressure.
normal pan simply by removing the lid. The increased pressure inside the pressure cooker
When used under pressure, i.e. with the lid on, means that the temperature is able to exceed
the pressure cooker must be used with water in it. 100 °C. The increased temperature cooks your
The pressure cooker may become badly food quickly and gently.
damaged if it is heated without sufficient water. Both the base and the lid have been
Under no circumstances should this appliance be manufactured from high-quality stainless steel.
used with the lid on for frying with oil. The extra strong GSW thermo-base ensures
The pressure cooker is suitable for all commercial optimal and even heat distribution and retention.
types of cookers, including gas, electric, ceramic, The pan comes with a pressure regulator in the
halogen and magnetic cookers. Under no lid which keeps the desired pressure setting
circumstances should the appliance be used in constant.
the oven.
This appliance is designed for use in private 2.4 Safety devices
households and is not suitable for commercial
use. Several safety systems ensure that your
appliance will function safely, even in the event of
The appliance is likewise suitable for:
a technical fault.
• use in staff kitchens in shops, offices and
The pressure regulator 6 ensures the pressure
other commercial areas,
remains constant within the pressure cooker. It is
• use in agricultural settings,
possible that some steam may continuously
• customers in hotels, motels and other escape during use.
accommodation,
The safety valve 4 allows steam to escape if the
• bed-and-breakfast establishments. pressure in the pan becomes too great.
2.2 Contents included As well as the safety valve 4 , there is an
additional pressure control valve that releases the
excess pressure via the safety opening 3 if the
Pressure Cooker Set 6 parts pressure regulator 6 and the safety valve 4
• comprising: malfunction.
–Base 6 litres The lock 8 can only be slid forwards to open the
–Base 3 litres pan when the pressure has been equalised and
–Lid with sealing ring the red safety valve 4 drops down as a result.
–Glass lid
–Steam insert
–Stand for steam insert
–User manual
20DKT GSW System Classic DE-GB-FR Set Seite 21 Mittwoch, 16. Mai 2018 2:45 14
3. Safety instructions
This state-of-the-art appliance has been designed have little or no experience in using such an
and manufactured to high standards. It conforms appliance, unless they are supervised by a
to all appropriate European safety standards responsible person or receive clear
and is TÜV certified. However, appliances of this instructions as to how the appliance
kind can be hazardous. For your own safety, functions. This appliance should be kept out
please read these instructions! of reach of children.
It will only take 5 minutes of your time to read • Please note that the use of any additional
through them. Even if you are already aware of parts which are not recommended in this user
most of the safety advice, please read through manual or are not original spare parts will
these instructions anyway as there may be some lead to the invalidation of the guarantee and
points which are new to you and which will liability expiring. This also applies to all
prevent you from harm. repairs which are carried out by non-
qualified persons. The service address can
3.1 Definitions of terminology be found in "11. Guarantee" on page 32.
• If the appliance is found to be faulty within
The follow terminology is used in this user
the guarantee period, then it should be
manual:
returned to our service centre. Otherwise any
Warning!
claim under guarantee is void.
High risk: Disregarding this warning
• Never heat the pressure cooker with the lid
may cause serious bodily damage and
on without first putting water in it. Using the
in extreme cases could even result in
appliance without water may damage it.
death.
• Please ensure that not all of the water turns to
Caution!
steam.
Medium risk: Disregarding this warning may lead
to the appliance being damaged. • Only use the pan if all the parts are clean
and manoeuvrable. Food particles and
Note:
grease may obstruct the safety devices.
Low risk: Points to bear in mind when using the
appliance. 3.3 Preventing burns and scalds
3.2 General advice Warning! This pressure cooker works
by using high pressure and high
• Please read this user manual through
temperatures. It is therefore important
carefully before using the appliance. It
that you observe the following safety
constitutes part of the appliance and must be
instructions to avoid the danger of
available for reference at all times.
seriously burning or scalding yourself.
• This appliance must only be used for its
• Be sure to check before every use that the
intended purpose (see "2.1 Intended use" on
pressure regulator 6 and the safety valve 4
page 20).
are manoeuvrable and not blocked up (see
• This appliance is not designed for use by
"6.1 Preparing the pressure cooker" on
persons (including children) who have
page 23).
limited physical or sensory abilities, or who
have mental disabilities, or for persons who
GSW System Classic 21DKT GSW System Classic DE-GB-FR Set Seite 22 Mittwoch, 16. Mai 2018 2:45 14
• Do not interfere with the safety system, so pulses, you should only fill the base to half of
long as this not specified in "7.2 Cleaning the its capacity. This will ensure that the food
pressure cooker" on page 26. does not touch the lid, thereby avoiding the
• Always ensure that the pressure cooker is eventuality that it may block the safety valve.
closed correctly before putting it on the • Meat with skin (such as ox tongue) may
cooker (see "6.1 Preparing the pressure swell when cooked under pressure. Do not
cooker" on page 23). prick the skin if it is not yet swollen.
• The surface of the pressure cooker can Otherwise hot water may squirt out.
become extremely hot when cooking. • When cooking soft food, gently shake the
Therefore, when it is hot, you should only pressure cooker before opening it, to avoid
touch the handles. It is also advisable to the food spurting out when you open the lid.
protect yourself from the high temperatures
by using an additional oven cloth or oven 3.4 Child safety
gloves.
• The pressure regulator 6 should never be Warning! Children are often not
covered by any objects. able to correctly assess whether a
situation is dangerous or not, which
• Steam may escape from the steam vent 5.
means they are susceptible to injuring
When using your appliance, be careful never
themselves. Therefore please ensure
to direct the opening of the steam vent 5
the following:
towards yourself or towards a place where
somebody might walk past. In the event of a • This product should only be used under the
technical fault, a powerful steam jet could supervision of an adult.
escape from this vent. • This appliance should always be stored out
• When the pressure regulator 6 is adjusted, a of reach of children.
powerful steam jet could escape from the • The packaging must be disposed of safely to
steam vent 5. You should therefore only take avoid young children suffocating themselves.
hold of the pressure regulator 6 by the Packaging is not a toy.
ribbed dial 7.
• When using your appliance, be careful never
to direct the safety opening 3 towards your-
self or towards a place where somebody
might walk past. In the event of a technical
fault, a powerful steam jet could escape from
this opening.
• Should steam escape from the safety valve 4
or the safety opening 3, immediately turn off
the heat supply as the pressure inside the
appliance is too high. Only continue using
the appliance once the fault has been
corrected (see "8. How to Solve Errors" on
page 29).
• Never fill the pressure cooker above the
"MAX" mark on the inside of the pan.
Cooking food which expands, such as rice or
22DKT GSW System Classic DE-GB-FR Set Seite 23 Mittwoch, 16. Mai 2018 2:45 14
4. Names of parts (see fold-out page)
1 Helper handle 8 Lock
2 Lid 9 Lid handle
3 Safety opening 10 Base handle
4 Safety valve 11 Gasket (not visible; inside lid)
5 Steam vent 12 Base
6 Pressure regulator 13 Steamer insert
7 Ribbed dial 14 Tripod
5. Unpacking and assembling
1. Take the individual parts of the appliance out Caution! Before you use the appliance for the
of the packaging. first time it should be thoroughly cleaned to
2. Dispose of all the packaging. ensure that any residue left over from production
is removed (see "7.2 Cleaning the pressure
3. Check that the appliance is not damaged in
cooker" on page 26).
any way.
5. Clean all the individual parts with hot
4. Remove any labels which may be on the
dishwater, rinse with clean water and dry
appliance.
thoroughly.
6. How to use
6.1 Preparing the pressure cooker Note: Over time the sealing ring can
become hard and will therefore no longer
Warning! provide an air-tight seal. This will lead to
Before cooking with the pressure steam escaping from the rim of the lid and
cooker, you should check all the safety the sealing ring will therefore require
functions to avoid causing any replacing. A new sealing ring can be
damage to the appliance. purchased in a specialist shop.
1. Check that the openings for the pressure 5. Fill the base with food.
regulator 6 on the inside of the lid are clean. Caution!
2. Should this not be the case, clean the • Never fill the pressure cooker above the
pressure regulator 6 (see "7.2 Cleaning the "MAX" mark on the inside of the pan.
pressure cooker" on page 26). • When cooking food that swells, such as rice
3. Check that the safety valve 4 is loose and is or pulses, you should only fill the base
not stuck. halfway. This will prevent the food from
reaching the lid and potentially blocking the
4. Check that the sealing ring 11 is not
safety valve.
damaged in any way, i.e. that it is not split.
GSW System Classic 23DKT GSW System Classic DE-GB-FR Set Seite 24 Mittwoch, 16. Mai 2018 2:45 14
• To avoid damaging the appliance, you 3. Turn the hob onto the highest setting.
should ensure that the base always contains As soon as there is pressure in the base, the
at least 0.25 l of liquid, so that sufficient red safety valve 4 will move upwards
steam can be produced and the pan doesn't thereby locking the lid.
overheat.
Please note: At the beginning of the
6. Fill the base with water or stock. cooking time, a little steam may emerge from
7. Place the lid 2 on the the safety valve.
base 12, taking care to 4. As soon as steam starts to come out of the
position it so thatthe round pressure regulator 6, lower the temperature
mark on the lid is lined up of the hob to around 1/3 so that only a small
with the arrow on the base amount of steam comes out.
handle 10.
This is when the "cooking time" starts.
8. Turn the lid until the lid handle 9 and the
Note: When there is hardly any steam
base handle 10 are aligned and audibly
coming out, the pressure cooker is cooking
click into place.
the food quickly and saving energy.
6.2 Cooking 6.3 Steam cooking
1. Choose the desired cooking setting on the The gentlest way to prepare food, especially
pressure regulator 6: vegetables, is by using the steam cooking setting.
I: Steam cooking: When food is cooked using this method it only
comes into contact with hot steam and scarcely
with the liquid water. This prevents minerals,
vitamins and other important elements in the food
II: Fast cooking: from being lost during cooking.
Steam cooked vegetables also have a more
intensive taste than when they are cooked using
the normal method.
1. Pour in at least 0.25 l water.
Please note: Steam cooking uses 0.6 bar 2. Lay the tripod 14 inside the base 12.
(600 hPa) and fast cooking uses 1.1 bar
3. Place the food to be cooked in the steamer
(1000 hPa) pressure.
insert 13.
2. Place the pressure cooker on a hob which is
4. Stand the steamer insert 13 on the
a similar size to the base of the pressure
tripod 14.
cooker.
5. Continue with cooking as explained in
Caution! The hob should
"6.2 Cooking" on page 24.
not be bigger than the
base of the pressure
cooker. Otherwise this
could lead to too much heat rising up the
sides of the base, thereby damaging the
plastic handles.
24DKT GSW System Classic DE-GB-FR Set Seite 25 Mittwoch, 16. Mai 2018 2:45 14
6.4 Opening the pressure cooker 1. Remove the pressure cooker from the cooker.
2. Turn the pressure regulator 6
Warning! to the steam releasing setting
- If the red safety valve 4 is still raised, .
the pan is still pressurised and the lid
cannot be opened. Under no
circumstances should you attempt to 3. Wait until the pressure has equalised and the
force the lid open, as the sudden red safety valve 4 falls back down.
release of pressure could result in
scalding. The pan will only open Note: As soon as the red safety valve 4
once the red safety valve 4 has falls back down, the temperature inside the
dropped down. appliance is still almost 100 °C.
- Steam may escape from the steam 4. Slide the lock 8 forwards
vent 5. When using your appliance, and turn the lid anti-clock-
be careful never to direct the wise at the same time, until
opening of the steam vent 5 towards the round mark on the lid is
yourself or towards a place where pointing to the arrow on the
somebody might walk past. base handle 10 .
- When the pressure regulator 6 is Note: As soon as you slide the lock 8
adjusted, a powerful steam jet could forwards, some residual steam may escape.
escape from the steam vent 5. You 5. Remove the lid from the base.
should therefore only take hold of
the pressure regulator 6 by the Method 2: Saving energy
ribbed dial 7. Method 2 requires the cooker to be turned off a
Caution! Never entirely immerse the base in few minutes before the food has finished cooking,
water. Otherwise the pressure will instantly drop leaving the pan on the hob. This uses the residual
which can lead to the base as well as the food heat optimally and saves energy.
being ruined. 1. Wait until the pressure has stabilized and the
There are various methods to cool down the red safety valve 4 drops down.
pressure cooker in order to be able to open it.
Please note: When the safety valve 4
Method 1: Releasing steam drops down, the temperature inside the
This method requires releasing as much steam as pressure cooker is still around 100 °C.
possible until the pressure in the appliance has 2. Slide the lock 8 forwards
decreased enough to be able to remove the lid. and turn the lid anti-clock-
Warning! wise at the same time, until
This method means that hot steam will the round mark on the lid is
escape from the pressure regulator. pointing to the arrow on the
You should therefore be careful not to base handle 10 .
scald yourself. Note: As soon as you slide the lock 8
forwards, some residual steam may escape.
3. Remove the lid from the base.
GSW System Classic 25DKT GSW System Classic DE-GB-FR Set Seite 26 Mittwoch, 16. Mai 2018 2:45 14
Method 3: Saving time Caution: Take care to prevent the water jet from
Method 3 requires you to remove the pressure hitting the pressure regulator 6 or the safety
cooker from the hob once the food has finished valve 4, as water might otherwise get inside the
cooking. In order to be able to open the lid pan and dilute your food.
straight away, the pressure in the base has to be 2. Slide the lock 8 forwards
released manually. This method in particular and turn the lid anti-clock-
saves time. wise at the same time, until
1. Hold the pressure cooker under running the round mark on the lid is
water until the safety valve 4 drops down pointing to the arrow on the
(the pressure of the water should not be too base handle 10 .
high). Note: As soon as you slide the lock 8
forwards, some residual steam may escape.
3. Remove the lid from the base.
7. Cleaning, care, maintenance
Your new pressure cooker is easy to maintain. In 7.2 Cleaning the pressure cooker
order to enjoy your pressure cooker for a long
time, please ensure you always observe the Caution! Never use harsh or abrasive cleaning
following cleaning instructions. products, as this may damage the pressure
cooker.
7.1 How often should the various parts be Note: If possible you should clean the pressure
cleaned? cooker directly after use so that any leftovers do
not dry and stick to the base.
Activity Frequency Chapter
Clean base After each "7.2 Cleaning the Base (12):
12 use pressure cooker" Clean the base 12 after each use:
Clean When dirty "7.2 Cleaning the 1. Wash the base with hot water and washing-
pressure pressure cooker" up liquid.
regulator 6
2. Rinse with clean water.
Clean lid 2 After each "7.2 Cleaning the
use pressure cooker" 3. Dry the base with a tea towel to avoid any
water marks.
Clean sealing After each "7.2 Cleaning the
ring 11 use pressure cooker" Note: The base is dishwasher friendly.
Replace When Available in
sealing ring needed, specialist shops
1 x year
26DKT GSW System Classic DE-GB-FR Set Seite 27 Mittwoch, 16. Mai 2018 2:45 14
Pressure regulator (6) 7. Insert the pressure regulator into the lid:
The pressure regulator 6 only needs to be –The pressure regulator must
disassembled and cleaned if it has been soiled be pointing to the "Ø"
by food boiling up. symbol.
1. Press the pressure regulator 6 –Press the pressure regulator
down whilst simultaneously down whilst simultaneously
turning it to the "Ø" position. turning it anti-clockwise.
Lid (2):
2. Pull the pressure regulator out. Caution! The lid should not be washed in the
3. Check whether the pressure regulator has dishwasher.
any visible signs of soiling. 1. Wash the lid with hot water and washing-up
4. If the pressure regulator has no visible signs liquid.
of soiling: If the lid is particularly dirty, soak it for a little
–Rinse the pressure regulator with clear while in washing-up water.
water. 2. Rinse the lid under clean, hot water.
–Allow the pressure regulator to dry.
3. Dry the lid with a tea towel to avoid any
–Place the pressure regulator back in the lid
water marks.
in accordance with step 7.
5. If the pressure regulator is visibly soiled, it Sealing ring (11):
must be disassembled and cleaned: Please note: The sealing ring should be
–Pull the blue bellows out of the housing of replaced once a year if you use the pressure
the pressure regulator. cooker regularly. Replacements are available in
–Remove the transparent pressure cap. specialist shops.
–Remove the pressure spring 1. Remove the sealing ring from the lid.
–Clean the parts with hot water and 2. Rinse the sealing ring in
detergent. clean, hot water.
–Thoroughly rinse the parts with clear, hot
water.
–Allow the parts to dry.
6. Reassemble the pressure regulator: 3. Dry the sealing ring with a tea towel.
–Place the pressure spring inside the housing Please note: The sealing ring should not be
of the pressure regulator. squashed or deformed during storage. It is
–Put the transparent pressure cap on the therefore advisable to place the sealing ring
spring. back into the lid during storage.
–Insert the blue bellows, taking care to
ensure that both ends are engaged in the
corresponding receptors in the housing of
the pressure regulator.
GSW System Classic 27Sie können auch lesen